Migrating Virtual box VM to Hyper-V
I started using Virtual box around 4–5 years back and I got so comfortable that I refused to use any other Hypervisor be it VM ware or Hyper-V. Recently when I was trying to set up minikube (Kubernetes on local machine) cluster on my local machine using VirtualBox, I ran into many problems and after spending good amount of time I didn’t get any success. So, I decided to use Hyper-V for virtualization to setup minikube but I knew that once I enable Hyper-V, I won’t be able to use VirtualBox and then what about all my data on VMs in VirtualBox. So, I was wondering how can I migrate my VMs from VirtualBox to Hyper-V. After lots of search, I was able to successfully migrate my VirtualBox VM to Hyper-V. In this post, I will describe all the steps required to do so.
At high level, you need to perform 5 steps to migrate the VM from Virtual Box to Hyper-V
- Export the VM from VirtualBox into VHD format
- Convert VHD to VHDX
- Create a new VM in Hyper-V without disk
- Attach Hard Disk with Virtual machine
- Set the Boot options
1. Export the VM from VirtualBox into VHD format
Though VirtualBox has the option for this from UI but that didn’t work for me. I was using VirtualBox version 6.1.4. You may want to try with your version of VirtualBox but for me instead of VHD file it was generating a VDI file. So, I decided to use following command and it worked like charm for me
Format of command
VBoxManage clonehd <absolute-path-of-vdi-file> <vhd-destination> — format vhd
VBoxManage clonehd C:\users\myuser\VirtualBoxVMs\ubuntu.vdi D:\virtualbox-export\ubuntu.vhd — format vhd
Note 1: If your absolute path contains spaces, you will have to wrap the path in double quotes.
Note 2: VBoxManage might not be in your path, so you will to navigate to path where virtual box is installed. This happens to be following location on my machine. C:\Program Files\Oracle\VirtualBox
For those who want to try with Virtual Box UI, here are the steps:
Select the VDI you want to convert, right click and select copy
Select the location where you want to save VHD and enter a name. In Disk image file type, select VHD and click copy. This should generate the VHD
2. Convert VHD to VHDX
- Launch Hyper-V Manager and select server in left pane
- Under Actions, select Edit Disk…
- Click Next on the ‘Before You Begin’ screen
- Browse for the copied file. The file will be having a file extension of VHD. Select the file and click Next button.
- On the Choose Action window, select Convert and click Next button
6. Select VHDX format and click Next
7. Select Dynamically expanding and click Next
8. Select a name and location for the file and click Next
9. Click Finish and wait for the conversion process to complete
3. Create a new VM in Hyper-V without disk
From actions in top menu, select New → Virtual Machine and follow the wizard. Select the default values during different steps of wizard or change the values as per your convivence.
There is one screen in wizard which you need to take care of. It is Connect Virtual Hard Disk screen. On this screen, select “Attach a Virtual Hard disk later”.
4. Attach Hard Disk with Virtual machine
In Hyper V Manager, right click the VM and select settings. In left pane select IDE controller 0, select Hard Drive in right pane and click Add.
Browse to the path of vhdx file created in previous step and select that. Click Apply.
5. Set the Boot options
Select BOIS in left pane and in right pane move the IDE option to top and select ok.
After going through all the above steps, start the VM and connect to it and you will be able to use the VM through Hyper V. This VM will all the packages and data which you installed on it while working with Virtual box.
Переносим CentOS5 с VirtualBox под Hyper-V и ставим Linux Integration Services
2. Создаем новую виртуальную машину в Hyper-V, использую Legacy сетевую карту, так как синтетическая сетевая карта не заработает до установки Linux Integration Services.
3. Удаляем VirtualBoxAdditions из CentOS
в каталоге /etc/init.d/
командой
chkconfig —del «vboxadd»
chkconfig —del «vboxadd-service»
chkconfig —del «vboxadd-x11»
Затем удаляем из каталога /etc/init.d эти файлы (vboxadd, vboxadd-service, vboxadd-x11)
4. Идем в настройки Hyper-V, ставим статический mac адрес сетевой карте
Затем в линуксе идем по пути
/etc/sysconfig/network-scripts/
редактируем файл ifcfg-eth0 (либо ifcfg-seth0) и прописываем по аналогии:
DEVICE=eth0
BOOTPROTO=static
BROADCAST=10.10.10.255
HWADDR=00:01:02:03:04 (берем из настроек hyper-v)
IPADDR=10.10.10.10
NETMASK=255.255.255.0
NETWORK=10.10.10.0
ONBOOT=yes
либо поступаем еще проще, запускаем в консоли system-config-network-tui и настраиваем eth0 (физический адаптер) либо seth0 (синтетический адаптер).
Перезагружаем линукс.
5. Обновляем CentOS, набираем в консоли:
yum update
yum groupinstall «development tools»
reboot
6. Качаем Linux Integration Services v2.1 for Windows Server 2008 Hyper-V R2 , распаковываем и монтируем .iso в виртуальную машину в окне hyper-v.
Установленный Linux Integration Services дает нам:
— Driver support for synthetic devices — синтетический ethernet адаптер, более быстрый чем legacy erhernet
— Fastpath Boot Support for Hyper-V — более быструю загрузку виртуальной машины
— Timesync — синхронизация времени с хостовой машиной
— Integrated Shutdown — возможность выключать линукс из оснастки hyper-v
— Symmetric Multi-Processing (SMP) Support — поддержку до 4 процессоров
— Heartbeat — возможность мониторинга состояния гостевой ОС
— Pluggable Time Source
Из нереализованного:
— Integration Services: Data Exchange, Volume Snapshot Backup
— Networking: Jumbo Frames and TCP Offload
— Storage: Hot Add/Remove (VHD‟s and Passthrough Disks)
7. Монтируем Linux Integration Services v2.1 ISO:
mkdir -p /mnt/cdrom
mount /dev/cdrom /mnt/cdrom
Копируем файлы на жесткий диск:
mkdir /opt/linux_ic
cp -R /mnt/cdrom/* /opt/linux_ic
umount /mnt/cdrom
Устанавливаем Linux Integration Services,
cd /opt/linux_ic
make
make install
Пока не перезагружаемся. Если у вас RedHat5.5 (а у нас CentOS 5.5), то нужно зайти в
/boot/grub/grub.conf файл и поменять hda=noprobe hdb=noprobe на ide0=noprobe ide1=noprobe. Если не поправить grub, то поймаем панику ядра после перезагрузки:
Делаем reboot в консоли и радуемся корректной работе CentOS 5.5 под Hyper-V.
PS:
Подводные камни:
1. Сперва не мог понять, почему линукс при загрузке не цепляет сетевуху от hyper-v, гугление подсказало, что нужно сперва использовать legacy сетевую карту.
2. По инструкции, которая шла с Linux Integration Services v2.1 ничего не получалось, пока не нагуглил волшебную команду yum groupinstall «development tools», пакету не хватало этих вот инструментов разработчика, ну и заодно ядра посвежее.
3. Наконец-то поставил LIS, радостная перезагрузка и… kernel panic. Вдумчивое чтение документации подсказало, что нужно править grub.
VDI to VHD/VHDX – Convert VirtualBox VMs to Hyper-V
If you want to use or migrate VirtualBox virtual machines to Hyper-V on Windows 10 or Windows servers, follow this guide. We can’t discuss the direct export or import migration methods since both products run on different platforms. We have to convert the hard disk of the VM from VirtualBox, then attach to Hyper-V.
As an alternate method, we can use any P2V tools to directly convert the VirtualBox VM to Hyper-V (Considering that VirtualBox VM is running on physical hardware). But, in this guide, we will convert the VDI file to VHD to achieve this task.
Microsoft Hyper-V doesn’t support VDI (VirtualBox hard disk file) file type, therefore it should be converted to VHD (MS Virtual Disk format) or VHDX. Here, I’m going to show how to convert a working Windows VM from VirtualBox to VHD and attach to Hyper-V.
We do not need any third party software for this conversion since the built-in VirtualBox command will do the job well.
Steps to Convert VDI to VHD (VirtualBox to Hyper-V)
Note: It is recommended to uninstall the VirtualBox guest additions from the VM before starting the migration. It may cause an issue on the Hyper-V platform.
VirtualBox snapshots keep separate VDI files for each machine. So if you convert the original base VDI file, you will not get the latest state of the virtual machine. Also, you can’t convert snapshot VDI files separately. Therefore it’s recommended to delete snapshots, that will merge current machine’s state to the single original disk file.
- Using the VirtualBox Media manager
- Using the command line tool.
VDI to VHD by VirtualBox Media Manager
1) Click on File in VirtualBox and open Virtual Media Manager.
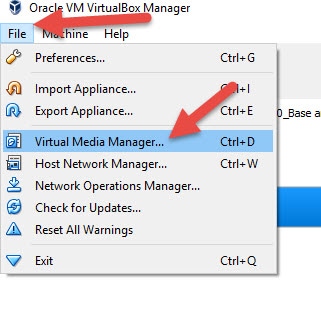
Obviously, the VM should be powered off before proceeding further.
2) Select the appropriate disk that is attached to the VM you want to migrate. Click on Copy.
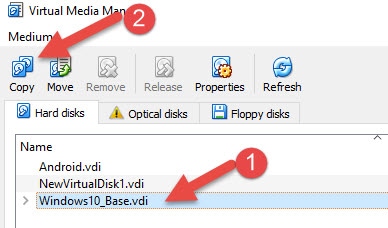
3) In the next disk copy option, select the VHD file format as output.
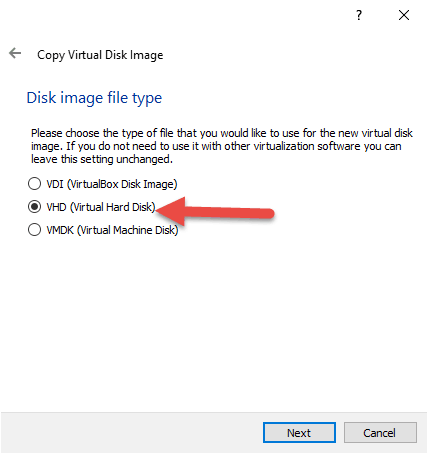
4) Next screen gives the option to make the disk dynamic or fixed size. If you are familiar with a Virtualization platform, you must be aware of them. For testing and less disk usage, you can try dynamically allocated disks. For production and high disk utilization usage, always use the fixed disk option.
5) Select the path of the VHD file and start copying. It will start copying/cloning the selected VDI file to VHD disk format.
Now you have the VHD file which converted from VDI by using GUI screens.
Convert VDI to VHD in Command Prompt (VirtualBox Tool)
1) Once the prerequisites are met (like uninstalling guest additions, deleting snapshots and powering off the VM), run the following command from the VirtualBox installation location.
WinXP.vdi – Working VM hard disk
F:\winxp.vhd – Destination and file name of VHD
The above command returned the following error.
2) This is because it is attached to one virtual machine and listed in the virtual media manager. Release and remove the disk from virtual media manager (Note – Do not remove the VDI file from physical hard disk).
Run the command again, it will return following the successful conversion message.
VDI to VHD then VHDX
If you want the latest and recommended file format of Hyper-V which the VHDX, you can convert VHD to VHDX by using Hyper-V disk utility.
The steps are simple and you can refer to this guide.
So basically you need to convert the VDI to VHD by using VirtualBox tools, then the VHD to VHDX by Hyper-V disk tool.
Attach the Disk to Hyper-V VM
Remember, as mentioned earlier this is not the export-import way. We have just converted the disk to VHD which is compatible for Microsoft Hyper-V.
a) Create a new VM in Hyper-V. Setup the hardware configuration as you wish, but instead of creating a new virtual hard disk, you must attach (browse) the converted VHD or VHDX to the VM configuration.
2) Power on the virtual machine. Since the hardware platform (VirtualBox to Hyper-V) is changed for the Operating System, it may install additional drivers and tools for its platform. Restart the VM if required. Make sure to installation Hyper-V guest additions to get better performance and features.
Here is the screenshot of working same virtual machines on both desktop virtualization software.
It hardly took 5 minutes to convert this working machine (2GB VDI) to Virtual PC. Some blogs and forums mentioned about third-party software to convert VDI to VHD, but it can be done easily by VirtualBox command as shown here. I hope this guide is helpful.
If any of the above solutions did not fix the Windows PC issues, we recommend downloading the below PC repair tool to identify and solve any PC Issues.
Dinesh
Dinesh is the founder of Sysprobs and written more than 400 articles. Enthusiast in Microsoft and cloud technologies with more than 15 years of IT experience.
You Can Read Next
Best Free Virtual Machine Software in 2023 – Start Your New Career
How to Install VM OS on iSCSI Disks in VirtualBox
Install Android on VirtualBox with VDI Pre-Installed Disk – Windows 10/11 Host
Install Windows XP on VirtualBox by Pre-Installed Image
How to Create VirtualBox Image of Existing Machine to Share Or Upload
![[Fixed] VirtualBox VMs are too Slow on Windows 11 Host](https://www.sysprobs.com/wp-content/uploads/2022/07/VirtualBox-VMs-are-too-slow-on-Windows-11-211x150.jpg)
[Fixed] VirtualBox VMs are too Slow on Windows 11 Host
16 thoughts on “VDI to VHD/VHDX – Convert VirtualBox VMs to Hyper-V”
HI ,
This is a Good tool. This works fine. Only issue i have faced when running this without uninstalling Guest Additions. (Not always but some time ). So better to uninstall that as mentioned above.
Good show Dinesh . ��
@G,
Thanks for your comment and keep reading my blog.
Yes, I never took chance without removing guest additions. Its always better to remove guest additions from any software (VMware, VB, VPC) before conversion.
Works fine, thanks for sharing!
Hi Dinesh, i had a problem regarding this. When i put in the command, it says it says invalid parameters “F:\Windows Xp”…. what to do…..
Have you added vboxmange command patch to Windows path directory? I can help you further if you give the full error message!
Is the below command applies to mac too? I have virtual box on Mac, planning to move t Virtual PC. since you all moved to virtual PC, is it better than virtual box?
This is just for the people who want to move the VirtualBox VM to Virtual PC, I don’t say virtual PC is better than VirtualBox. VirtualBox is much better than virtual pc.
I think vboxmange command will be same in Mac host also, I’m not sure.
Please check in helps and process.
Hey, great guide but how do you get the command prompt to recognize the command “vboxmanage”? Sorry, I’m a bit slow and I need help :(. Thanks you so much!!
Hi, thanks for the very nice guide, however I have this error message in cmd
‘vboxmanage.exe’ is not recognized as an internal or external command, operable program or batch file.
thanks for the help
mark,
You need to add virtualbox working folder (C:\Program Files\Oracle\VirtualBox) to PATH under Environment Variables in Advanced Settings of Windows System.
Or you run the command from where its located ( again its under VirtualBox program folder)
Thanks a lot, i was able to convert ubuntu.vdi to ubuntu.vhd with the following command in C:\Program Files\Oracle\VirtualBox>
vboxmanage clonehd “C:\Userx\username\.Virtualbox\filename.vdi” “C:\Userx\username\.Virtualbox\filename.vhd” –format VHD
However, it was not good enough to run ubuntu 10 on WVPC as mouse, keyboard, and other integration cannot be connected ^_^
Thanks a lot again for the knowledge you’ve shared to us ^_^ More Power. ^_^
I always get this error:
VBoxManage.exe: error: Cannot register the hard disk ‘C:\Program Files\Oracle\Vi
rtualBox\test.vdi’
rtualBox\test.vdi’
:\FreeBSD 7.1\FreeBSD 7.1.vdi’ with UUID
already exists
VBoxManage.exe: error: Details: code E_INVALIDARG (0x80070057), component Virtua
lBox, interface IVirtualBox, callee IUnknown
Context: “OpenMedium(Bstr(pszFilenameOrUuid).raw(), enmDevType, AccessMode_ReadW
rite, pMedium.asOutParam())” at line 209 of file VBoxManageDisk.cpp’ with UUID
already exists
VBoxManage.exe: error: Details: code E_INVALIDARG (0x80070057), component Virtua
lBox, interface IVirtualBox, callee IUnknown
Context: “OpenMedium(Bstr(pszFilenameOrUuid).raw(), enmDevType, AccessMode_ReadW
rite, pMedium.asOutParam())” at line 209 of file VBoxManageDisk.cpp
Even if I delete C:\FreeBSD 7.1\FreeBSD 7.1.vdi’ the error shows up…
i have made a Batch file and put this in it (for me the vdi file is into C:tempvirtualbox):
@echo off
cd C:program filesoraclevirtualbox
vboxmanage clonehd C:tempvirtualboxserversd02.vdi C:tempvirtualboxservervd02.vhd –format VHD
pause
exit
is it possible to use this tool for converting FROM Microsoft VPC to VirtualBox? We have couple of pc’s who are failing to run XP Mode and we need to run some software that’s not compatible with Windows 7, so I’m hoping to use an image from a machine that does run an XPMode vm file (.vhd)
when it says format to vhd, will that literally format and erase the virtual hd or just convert it to vhd?
Как перенести ОС Windows на виртуальную машину
Существует несколько способов преобразования установленной ОС Windows в образ для виртуальной машины. Созданный образ можно использовать, например, для тестирования, для проверки стабильности системы после установки какого-либо обновления, или для того, чтобы зафиксировать состояние старой машины перед внесением изменений.
Большинство программ виртуализации поддерживают функцию преобразования установленной ОС Windows в образы виртуальной машины. Некоторые решения уже поставляются со встроенными функциями, но в ряде случаев для этой же цели может понадобится использование сторонних продуктов.
В этом руководстве собраны инструкции по преобразованию установок Windows в виртуальные образы Microsoft Hyper-V, VirtualBox и VMware.
VHDX — Microsoft Hyper-V

Перенос ОС Windows в виртуальную машину Microsoft Hyper-V выполняется очень просто благодаря программе Disk2vhd от Sysinternals.
Программа является портативной, ее можно запускать из любого расположения на диске после распаковки архива. Для работы приложения требуются права администратора. Программа может применяться для создания виртуальной машины из одного или нескольких томов на компьютере.
Примечание: программу можно запустить в режиме командной строки, используя формат:
Основное окно приложения отображает путь назначения и имя файла, а чуть ниже — доступные тома. Обратите внимание, что вам нужно выбрать целевое расположение с достаточным свободным пространством для хранения, иначе процесс создания образа будет прерван.
Пользователь должен выбрать целевой путь и имя файла (с расширением vhdx), а также тома, которые следует включить в виртуальный образ.
Вы можете выбрать только раздел Windows или даже преобразовать несистемные разделы в образы VHD, не выбирая раздел Windows.
Disk2VHD поставляется с двумя дополнительными параметрами, которые указываются при запуске. Первый устанавливает выходной формат VHDX. Вы можете отключить данный параметр, чтобы использовать VHD.
VHDX имеет несколько преимуществ, такие как поддержка более крупных виртуальных дисков (64 ТБ против 2 ТБ), лучшая защита от повреждений, дистанционное онлайн изменение размера и др. VHD необходим в основном для целей совместимости, например, когда продукт не поддерживает VHDX, а также когда вы хотите преобразовать образ в Virtualbox.
Второй параметр позволяет использовать теневую копию тома.
Disk2VHD обрабатывает выбранные тома и превращает их в образы виртуальных дисков, которые сохраняются в выбранном месте.
VDI — VirtualBox

VirtualBox поставляется без встроенного инструмента конвертации установок Windows в образы виртуальной машины.
Однако, вы можете использовать альтернативное решение. Прежде всего, вам нужно создать образ VHD (как показано в разделе Microsoft Hyper-V выше).
После того, как вы получили образ VHD, можете использовать инструмент командной строки vboxmanage, который поставляется с VirtualBox, для клонирования носителя и сохранения его в другом формате.
- Нажмите на клавишу Windows , введите cmd.exe, зажмите Ctrl + Shift и нажмите клавишу Enter , чтобы запустить командную строку с правами администратора.
- Перейдите в папку VirtualBox в системе, например, C:\Program Files\Oracle\VirtualBox с помощью команды cd .
- Используйте команду vboxmanage clonemedium disk [source] [destination] , чтобы преобразовать образ диска VHD в формат VDI. Например: vboxmanage clonemedium disk o:\source.vhd o:\output.vdi
Преобразование может занять некоторое время в зависимости от размера изображения и доступных ресурсов вашего компьютера.
VMX — VMware

Вы можете создавать виртуальные образы машин Windows для VMware с помощью VMware vCenter Converter. Вы можете загрузить программу с официального сайта VMware, но для этого требуется учетная запись. На нашем сайте утилита доступна для загрузки без регистрации.
Примечание: Программа создает виртуальный образ полной машины. В графическом интерфейсе нет возможности исключить жесткие диски или разделы.
Размер установщика равен примерно 170 мегабайт. Во время установки вам будет предложено присоединиться к программе улучшения качества обслуживания клиентов.
Чтобы преобразовать запущенную систему Windows в виртуальный образ для VMware, выберите опцию “Конвертировать машину” в главном интерфейсе программы, чтобы начать работу.
После загрузки мастера, убедитесь, что для типа источника установлено значение “включено” и выбран “этот локальный компьютер”. Вы также можете создавать виртуальные образы удаленных компьютеров, но для этого необходимо указать имя или IP-адрес устройства, а также учетные данные.
Выберите виртуальную машину VMware в разделе тип цели на следующей странице и выберите целевую папку для сохранения образа.
Создание образа может занять некоторое время, в зависимости от количества томов, их размеров и ресурсов устройства.