Как устанавливать плагины в ableton live 11
Рекомендации для установок VST-плагинов на Windows

- Версия Live : ВСЕ
- Operating System: WIN
Инсталляция
VST-plugin обычно имеет два различных пути установки. Есть версия stand-alone, которая обычно устанавливается в какую-либо подпапку «Program Files». Эта подпапка по обыкновению называется именем изготовителя плагина.
Второй путь задаётся для файлов VST-плагина с расширением *.DLL.
Ableton рекомендует выбирать путь при установке и закидывать *.DLL ваших VST плагинов в следующие папки на диске C:
C:\Program Files\Steinberg\Vstplugins\
32-х битный плагин на Windows 64-bit устанавливается в:
C:\Program Files (x86)\Steinberg\Vstplugins\
Большинство плагинов будут инсталлироваться в выше упомянутые папки по умолчанию, но по некоторым причинам иногда будет необходимо вручную указать путь к этим папкам.
Внимание: версия плагина «stand-alone» (работающая как самостоятельная программа) не должна быть инсталлирована в ту же папку что и VST с DLL.
Предупреждение: VST plug-in в некоторых случаях может прекратить свою работу, если ваша одноимённая stand-alone программа будет передвинута куда-либо, переименована или деинсталлирована.
Настраиваем Ableton Live 9 для работы с VST-плагинами
- Откройте Live’s Preferences меню. Вы можете вызвать его простым нажатием CTRL + «,» (CMD + «,») на вашей клавиатуре. Не забывайте, что большинство «горячих клавиш» в Ableton работает на английской раскладке;
- Переключитесь во вкладку File/Folder;
- Под надписью «Plug-In Sources» выберите ту папку, где ваши VST плагины с DLL-файлами были инсталлированы (об этом было написано выше). Помните: выбор целого жёсткого диска, системной папки Windows или целой папки «Program Files» в качестве места расположения плагина может стать причиной вылета программы при запуске;
- Кнопка «Use VST Plug-In Custom Folder» должна быть включена.
Решение некоторых проблем и советы
- Рекомендуется всегда ставить самые последние версии плагинов и постоянно делать их апгрейды.
- Если Live вылетает во время запуска после установки какого-либо плагина, то вы можете нажать и держать Alt во время показа загрузочного экрана при запуске Ableton. Это позволит вам пропустить процесс сканирования плагинов, и временно отключает поддержку сторонних VST плагинов.
- Некоторые плагины требуют, чтобы Live был запущен с правами администратора. Например, плагин EZDrummer, который может перетаскивать миди-клипы прямо из интерфейса плагина в Ableton.
Рекомендации для установки плагинов на Mac Os

- Версия Live : ВСЕ
- Operating System: Mac
Инсталляция
Плагины для Mac OS могут поставляться как в виде *.dmg-установочных файлов, так и в виде *.component и *.vst файлов. Для начала работы с ними в Ableton Live 9, данные файлы требуется положить в определённую папку на вашем Mac.
По умолчанию Ableton может выбрать следующие папки для установки плагинов в вашей библиотеке (Library). Эти папки должны использоваться для хранения ваших плагинов, и это то самое место, куда вы их будете устанавливать:
Для AU-плагинов:
Library > Audio > Plug ins > Component
Для VST-плагинов:
Library > Audio -> Plug ins > VST
На Mac также можно указать собственную папку для установки плагинов. Делается это также как и в Windows, в Preferences > File Folder > VST Plug-In Custom Folder. Вы можете прочитать подробности вверху.
В некоторых случаях не получается получить доступ к «Библиотеке» через меню «Переход» в Finder. «Библиотека» (или «Library») может быть скрыта настройками безопасности. В этом случае вы можете нажать и удерживать кнопку «Alt». Так папка станет видна, и вы можете щёлкнуть на неё, чтобы войти внутрь.
Где увидеть плагины в Ableton

Если установка прошла правильно, и Ableton успешно просканировал при записи ваши плагины, то вы сможете их увидеть в категории «Plug-Ins» браузера программы:
Значок некоей «папки» с буквами VST с нарисованной миниатюрной клавиатурой будет означать, что это — виртуальный инструмент, способный воспроизводить звук (на скриншоте — ABL2, Absynth 5, Addictive Drums, и т.д.).
Значок «папки» без клавиатуры означает, что это — виртуальный эффект, который может применяться на каких-либо звуках для обработки (на скриншоте — A1StereoControl, Absynth 5 FX, Absynth 5 FX Surround).
Как установить плагины в Ableton Live 10?

Самым сложным вопросом при переходе с FL Studio в Ableton Live, стал вопрос: «Как установить плагины в Ableton Live 10?»
Дело в том что Anleton Live 10 работает только версиями плагинов x64. Но это далеко не все сюрпризы. Папки для сканирования можно добавить всего две:
- для плагинов VST2
- для плагинов VST3
Что делать? Я не могу установить плагины в Ableton Live 10
Устанавливать нужно по возможности новые версии плагинов x64. Устанавливать плагины можно в любое место на вашем компьютере. Не нужно специально устанавливать все плагины в одну папку. Сейчас я открою Вам один маленький секрет, который приведет вас в восторг и позволит добавить в Ableton Live уже установленные на компьютере плагины и установить без проблем новые.
Дело в том что исполнительный файл плагина для DAW, это файл с расширением .dll
Необходимо создать папку для плагинов, которую мы будем показывать Аблетону для сканирования плагинов. Затем просто ищем .dll файл нашего плагина, который обычно может находится по адресам:
- C:\Program Files\Vstplugins
- C:\Program Files\Steinberg
- C:\Program Files\Название плагина и др.
Не забудьте проверить C:\Program Files (x86)
Бывает и такое, что плагины x64 попадают именно туда
Теперь тот самый маленький секрет! Нам просто нужно создать ярлык этого .dll файла. Я обычно делаю так: жму правой кнопкой мыши по .dll файлу плагина, выбираю пункт «отправить», выбираю из списка «рабочий стол, создать ярлык».
Далее мы работаем уже с ярлыком. Для корректного отображения в Ableton Live 10, советую переименовать ярлык плагина. Достаточно убрать «- ярлык» в конце наименования файла. Затем перемещаем этот ярлык в ранее подготовленную папку для сканирования.
Правильные настройки помогут установить плагины в Ableton Live 10
Для того чтобы установить плагины в Ableton Live 10, нам нужно настроить всего несколько параметров, а именно указать пути к нашим созданным папками с ярлыками для сканирования.
Для этого мы заходим в настройки Ableton Live (Options > Preferences). Нам нужна вкладка Плагины (Plug-Ins). В этой вкладке укажите две созданные ранее папки для плагинов VST2 и VST3.
После того как мы указали наши папки в Ableton Live 10, необходимо нажать кнопку Сканировать (Rescan). После сканирования все корректно добавленные ярлыки плагинов отобразятся как плагины в браузере Ableton Live 10, в категориях в разделе Плагины (Plug-Ins)
Если у вас не получается добавить плагины, то скорее всего плагин 32-битной версии, попробуйте поискать в системе версию на x64.
Если у вас версия плагина только x32, не спешите удалять ее. Читайте далее.
Как установить старые плагины в Ableton Live 10?
Для установки 32-битных версий плагинов нам поможет замечательная программа JBridge. Эта программа — VST адаптер. Ее основная функция это снятие ограничений с одного 32-битного процесса, т.е. каждый новый VST плагин ,будет запускаться в отдельном процессе. Таким образом можно запустить практически любой старый музыкальный софт много раз, лишь бы сам софт работал корректно.
Я не буду рассказывать, где взять плагины и саму программу, для этого у вас есть поисковые системы Яндекс и Гугл. Справитесь! Я в Вас верю)
Расскажу и покажу как пользоваться программой О, на примере бесплатного плагина s(M)exoscope.
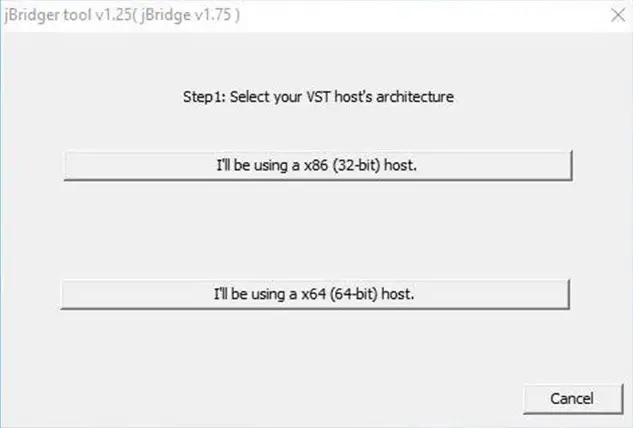
Давайте откроем программу и настроим наши старые плагины на работу в Ableton Live 10. В открывшемся окне JBridge необходимо выбрать какую версию хоста мы будем использовать.

Выбор хоста в JBridge
Далее выбираем первый пункт, остальные настройки оставляем по умолчанию.

Выбор режима создания в JBridge
Теперь нам нужно выбрать сам файл плагина, а именно s(M)exoscope.dll

Выбор .dll файла плагина s(M)exoscope в JBridge
После этого укажите директорию сохранения нового файла.

Укажите новую директорию, например Рабочий стол
Не указывайте исходную директорию, при таком выборе вы получите ошибку сохранения.

Готово!
Все, теперь выполняем операции, о которых я говорил в самом начале статьи. А именно переносим наши новые файлы плагина s(M)exoscope в папку сканирования Ableton Live 10 и нажимаем Rescan.

Таким простым способом можно установить плагины в Ableton Live 10, даже самые древние. Спросите зачем? Поверьте, среди них есть плагины с очень интересным функционалом, не встречающимся в более современных версиях.
How To Install Plugins In Ableton Live

Are you looking for a straightforward method to install your VST plugins in Ableton Live on Windows? Then you’ve come to the right place. In this article, we’ll show you how to install external VST plugins to take full advantage of free and paid synths, effects, and instruments in Ableton Live 9 and 10.
What is a VST plugin?
Virtual Studio Technology (VST) is an audio-plugin that integrates a software synthesizer or effect with, most commonly, a digital audio workstation like Ableton. External plugins can increase the functionality of your DAW by allowing you to use new or different instruments, effects, or meters than what your DAW offers.
Today, there are thousands of VST plugins out there, for all kinds of sounds and purposes, both free and paid. Many websites offer free plugins for downloads, and the most popular one to date is KVRaudio.
Paid VST plugins are also in abundance online, both as instruments and as effects. Popular options for electronic music include Serum, Massive X, Sylenth1, and the mixing/mastering plugins from Waves and iZotope.
What’s the difference between 32-bit and 64-bit?
When you purchase or download a free VST, you will see mentions of 32-bit and 64-bit.
Simply put, the difference between the two is how much computer memory the plugin can utilize. While a 32-bit version of a plugin (and a DAW) can only access 4GB of computer memory, a 64-bit version can access 1 exabyte – or in other words, 1 000 000 000 gigabytes of computer memory.
What does this mean for you?
Well, 4GB of memory isn’t much when working on CPU and memory hungry projects and live sets. And once you reach that limit, Ableton crashes.
64-bit, on the other hand, can load an almost unlimited number of tracks, plugins, and effects (within the limits of your computer, of course.) As a result, you get fewer crashes and more stable experience.
The good news is that Ableton has discontinued its older 32-bit version, leaving only the new, improved 64-bit version: Live 10 (and above.)
Ableton and bits:
- Live 9.7.7 and below are 32-bit and can only run 32-bit VST plugins.
- Live 10 and above are 64-bit and can only run 64-bit VST plugins.
So if you’re running an older version of Live, your VST-plugins must be in 32-bits to run. And if you’re running Live 10 and above – you need 64-bit plugins.
— Can you run 32-bit plugins in Ableton Live 10 and above? No.
— Can you run 64-bit plugins in Ableton 9.7.7 and below? Nope, sorry.
So make sure your VST plugins are in the right bit format and match your current DAW.
How To Install Plugins In Ableton Live 10
Installing VST plugins in Ableton for the first time might not be as straightforward as you would think. When you’re starting fresh and enter the world of music production, even the term «VST» is foreign, let alone the mentions of bits and dedicated plugin folders.
But don’t worry, just follow the guide below, and you’ll know how to install your VST plugins in no time.
1. Start The Plugin Installer
Whether it’s a free or paid VST plugin, it will usually come with an installer in an executable format. Follow the instructions and click through the installer until you reach the step where you choose the install destination path. Then move on to the next step.
Note: If your plugin doesn’t have an installer and comes as a zip-folder with a «.dll» file, unzip, or place that .dll file inside your 64-bit plugin folder (as seen in step two.)
2. Choose Your Install Folder
When you’ve reached the install destination path stage in the plugin installer, it’s time to select your install folders. These folders can be anywhere, but Ableton generally looks for these in set folder paths. For simplicity, we will go with the folders they recommend.
Ableton recommends using these folders for VST plugin installation:
- C:\Program Files\VSTPlugins — 64-bit VST2 plug-ins.
- C:\Program Files\Common Files\VST3 — 64-bit VST3 plug-ins. (Live 10.1 and later).
- C:\Program Files (x86)\VSTPlugins — 32-bit plug-ins.
3. Launch Live

When you’ve installed and placed the correct version of your VST plugin in the right folder, launch your version of Live.
Then, on the top of the Live window, click Options and then Preferences.
4. Set Your Live Plugin Folders
Inside Preferences, the next step is to find your VST plugin folder selection. It’s here you tell Ableton Live where it finds your plugins.
In Live 10:
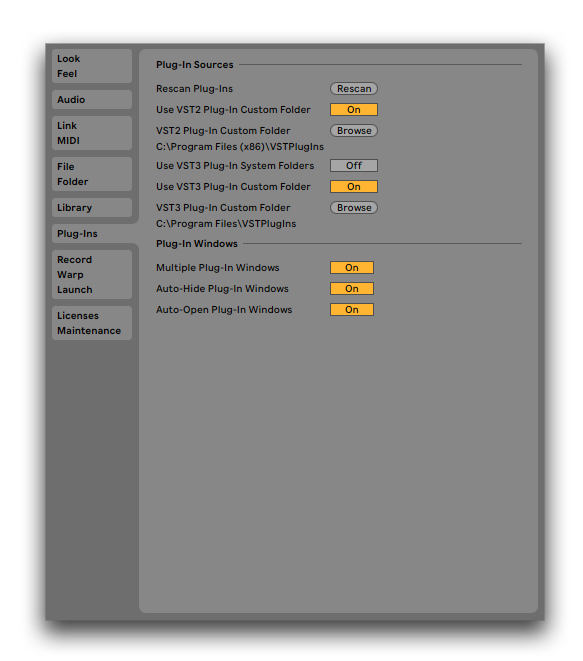
- Click Plug-Ins on the left side of the preferences window.
- Make sure both «Use VST2 Plug-In Custom Folder» and «Use VST3 Plug-In Custom Folder» is set to «On.»
- Click the Browse button to the right of «VST2 Plug-In Custom Folder» and «VST3 Plug-In Custom Folder.»
- Choose your folder for both VST2 and VST3.
- Click «Rescan» if necessary, to scan your folder and find your VST plugins.
In Live 9:
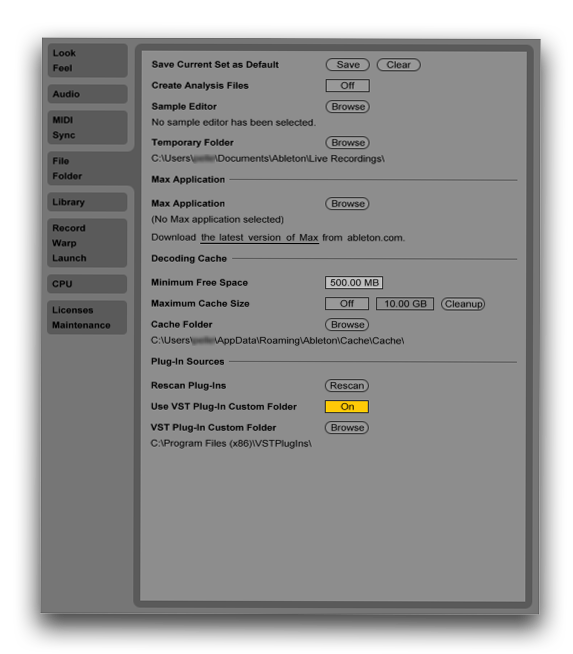
- Click File Folder on the left side of the preferences window.
- Make sure «Use VST Plug-In Custom Folder» is set to «On.»
- Click the Browse button to the right of «VST Plug-In Custom Folder.»
- Choose your 32-bit VST Plugin folder.
- Click «Rescan» if necessary, to scan your folder and find your VST plugins.
What To Do If A Plugin Doesn’t Appear In Live
Suppose you’ve installed a VST plugin and followed the step-by-step instructions above, but don’t see the VST plugin in Live.
In that case, the error is probably down to an incompatibility between your Live version and your VST version.
Remember:
- Live 10 and above can only access 64-bit VST versions.
- Live 9 and below can only access 32-bit VST versions.
Double-check the compatibility and get the correct version for your version of Live.
If that doesn’t work, make sure you’ve installed the VST in the correct folder. You can do this by going to your selected folder and double-check. If it isn’t there – try to re-install it. Also check your chosen folders in the Live preferences.
Where To Find Your VST Plugins
Now when you’ve followed the steps outlined in the article, and your VST plugins are successfully installed, you can close your Preferences window in Live.
On the left side of your Live screen, you will now find your VST plugins under «Plug-Ins».
Live 10:

Live 9:

To use your plugin, insert a MIDI track into Live, and double-click your chosen VST plugin with your MIDI track selected.
Your Next Step In Music Production
With your new VST plugins installed and functioning, you can now begin to craft your signature sound.
When starting out, creating sounds in a VST synth from scratch is very confusing.
To get the sound you desire, you have to use or combine oscillators waveforms, shape your sound with ADSR, specific filters, and LFO’s.
The whole ordeal is very overwhelming without a foundation of knowledge.
I’m here to tell you — creating your sounds isn’t difficult once you know how.
The real challenge in music production is taking your great sounds and putting them together to form a professional track.
But to get there, you must know how to create your sounds.
And for that, our sound design courses teach you everything you need to know.
Did you buy the Serum synth yet?
In that case, you might be interested to learn precisely how to craft your dream sounds — from scratch — in Serum.
Furthermore, the course will also teach you the foundation of sound design, which is true for almost all synths out there.
This means that you can craft your signature sound in all popular synths after your Serum course completion.
You’re only a click away from learning everything about making sounds in Serum.
Course: Xfer SERUM + Sound Design
How To Install VST Plugins In Ableton Live
Plugins are used to broaden sound libraries, edit audio in unique ways and expand what is possible in music production. Enhance your Ableton experience and achieve any sound imaginable with an endless and accessible catalogue of downloadable plugins.
Hi, I’m Ben from Live Aspects and I’ll be showing you the two best ways to install VST plugins in Ableton.
- | How To Install VST Plugins
– Installation File Method
– Custom Install Method - | How To Run 32 Bit Plugins In Live 10
Without further ado, let’s get started!
| How To Install VST Plugins
Start by downloading the plugin you wish the use in Ableton. If you are not sure which plugin/s to download, browse the internet to discover an endless amount of free and paid options. If you’re looking for a selection of FREE VST plug-ins for your DAW, visit here.
Please enable JavaScript
Below are the two best ways to install the different formats that plugins come in:
| Installation File Method (.pkg/.dmg/.exe)
This method is the quickest and most simple way to install VST plugins for use in Ableton. Plugin installation files typically have the extension .dmg or .pkg file on Mac or an .exe file on Windows. Follow these steps if the plugin you wish to install looks similar to the examples below:
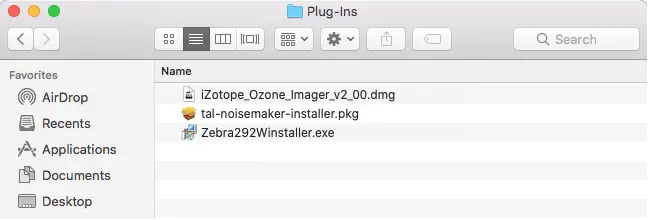
Step 1: Install Plugin
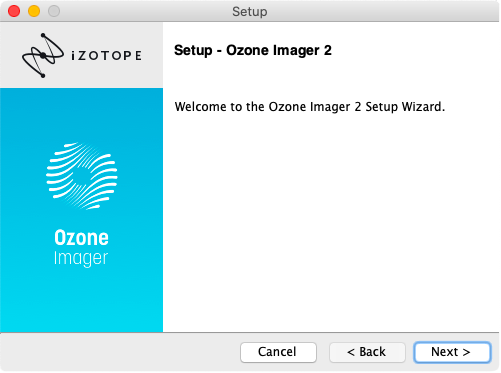
Double-click on your plugin installation file to begin the installation process. A new window will open up and take you through the steps to install the plugin. Exit this window once installation is complete. In this example, we are installing iZotope’s Ozone Imager, a free stereo imaging plugin.
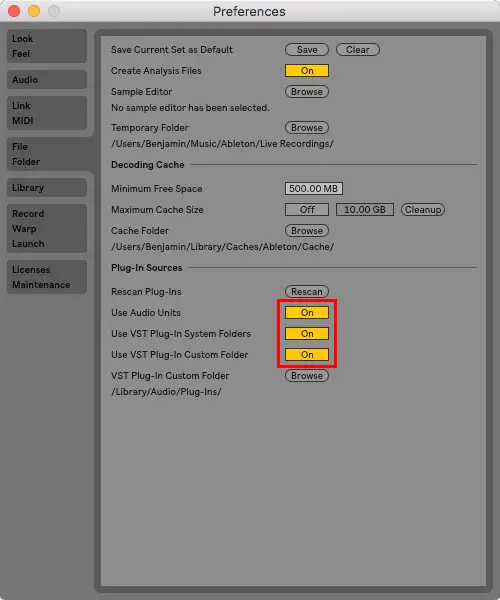
Step 2: Access Live’s Preferences
Open Ableton and navigate to Live’s Preferences. Next, select the ‘File Folder’ tab. Ensure that ‘Use Audio Units’, ‘Use VST Plug-In System Folders’ and ‘Use VST Plug-In Custom Folder’ are all turned on.
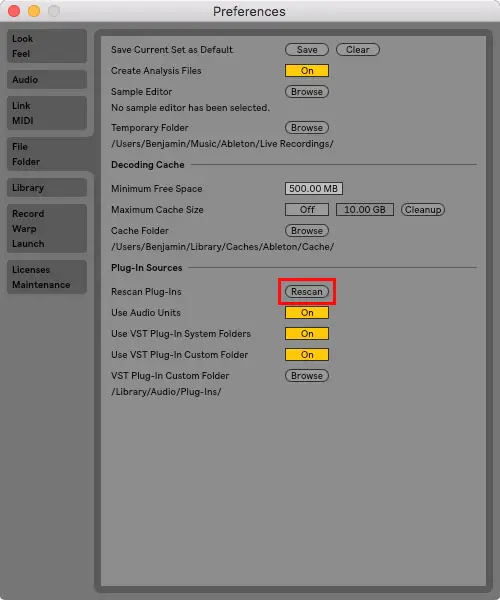
Step 3: Re-Scan Plugins
Firstly, ensure the VST Plug-In Custom Folder matches the location of your installed plugin. Below are the locations where plugins are installed by default on Mac and Windows devices:
Mac
/Library/Audio/Plug-Ins
Windows
C:/Program Files/VSTPlugins
If ‘Not Set’ is displayed under ‘VST Plug-In Custom Folder’, select ‘Browse’ and navigate to the default plugin folder for your device.
Finally, Select ‘Rescan Plug-Ins’.
Step 4: Search Browser
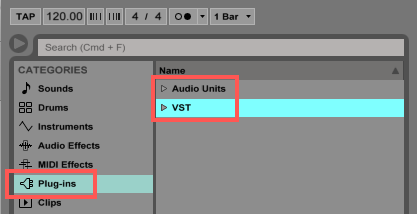
Navigate to Live’s Browser, select the ‘Plug-ins’ tab, then expand the ‘Audio Units’ and ‘VST’ drop-down menus to access a list of plugins you have installed. Alternatively, use the Search Bar to search for the name of your plugin and be sure to select ‘All Results.’
| Custom Install Method (VST & AU)
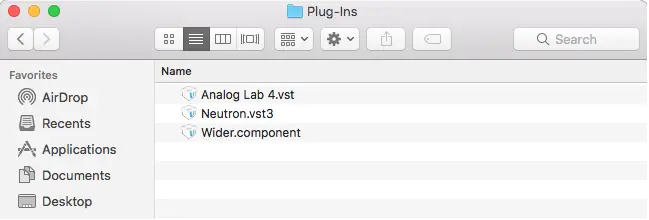
This method is the best way to install standalone VST and AU plugin files for use in Ableton. Plugins of this format typically have the extension .vst, .vst3 or .component and require manual installation. Follow these steps if the plugin you wish to install looks similar to the examples below:
Step 1: Access Live’s Preferences
Open Ableton and navigate to Live’s Preferences. Next, select the ‘File Folder’ tab. Ensure that ‘Use Audio Units’, ‘Use VST Plug-In System Folders’ and ‘Use VST Plug-In Custom Folder’ are all turned on.
Step 2: Open VST Plug-In Custom Folder
If ‘Not Set’ is displayed under ‘VST Plug-In Custom Folder’, select ‘Browse’ and navigate to the default plugin folder for your device. Below are the locations where plugins are installed by default on Mac and Windows devices:
Mac
/Library/Audio/Plug-Ins
Windows
C:/Program Files/VSTPlugins
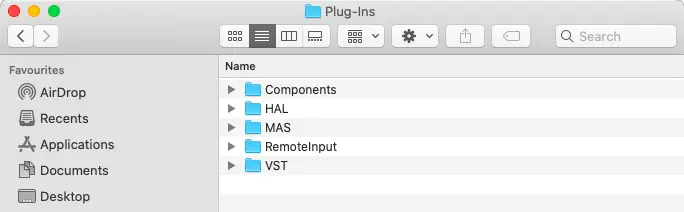
Next, open a new window in Finder (Mac) or Explorer (Windows) and navigate to the location of your VST Plug-In Custom Folder.
Step 3: Copy & Paste Plugin
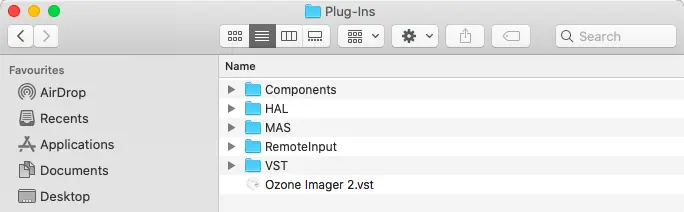
Navigate to the location of your plugin and copy it by selecting it and pressing [COMMAND + C] on Mac or [CNTRL + C] on Windows. Next, head back to the location of your VST Plug-In Custom Folder and paste it by pressing [COMMAND + V] on Mac or [CNTRL + V] on Windows.
Step 4: Re-Scan Plugins
Head back into Ableton and open Live’s Preferences. Select the ‘File Folder’ tab and press ‘Rescan Plug-Ins’.
Step 5: Search Browser
Navigate to Live’s Browser, select the ‘Plug-ins’ tab, then expand the ‘Audio Units’ and ‘VST’ drop-down menus to access a list of plugins you have installed. Alternatively, use the Search Bar to search for the name of your plugin and be sure to select ‘All Results.’
| How To Run 32-bit Plugins In Live 10
Ableton Live no longer supports 32-bit plug-ins and as a result, many older plug-ins have become incompatible with Live 10. While plug-in creators often provide a 64-bit solution, there is a way to use 32-bit plug-ins in the latest versions of Live.
jBridge is an application designed for bridging VST plug-ins on Mac and Windows. It makes it possible to use outdated plug-ins in any DAW. You can download this amazing software for under $20 or try out the demo version for free.
Want To Know More?
Here at Live Aspects, we have dozens of useful lessons and tutorials created to enhance your music production skills and help speed up the learning process. You can access our huge range of music theory lessons and production tips and tricks here.
Benjamin Jones
Hi, my name is Ben. I live in Melbourne, Australia and I’m the founder of Live Aspects. I’m a DJ and producer with a bachelor’s degree in Audio Production. I’ve spent the last eleven or so years addicted to music production and discovering the extraordinary ways producers around the world create their music. My goal is to provide eager producers with the tools and information they need to make amazing music and experience the thrill of music production.