Как я делал из физического сервера виртуальный
Был у бухгалтеров bit2000 и всё их устраивало, ну, почти всё. Не устроило то, что нужно было бы привязать ещё склады в программу, но сделать такое не вышло. И переехали мы на 1с, и закуплен был сервер и было это хорошо, а старый сервер оказался не сильно нужен, но железо нужно.
И задумался я, а как бы мне физическую машину сделать виртуальной. Начал рыть интернет и даже на хабре в поиске — p2v, ничего стоящего нет, что могло бы помочь.
Как сделать слепок системы так, чтобы он запустился без проблем?
Интернет подсказывал несколько решений, вот только у меня исходная система windows server 2003, и даже с кряком не всё работает, нужен кряк под сервер. Скажу сразу, Акронис не подойдёт, Парагон диск менеджер серверный может сделать слепок системы, но выгружает его не на локальные диски, а только на физические диски. Имейте это ввиду, когда решите их использовать.
Интернет подсказал. В блоге Андрея Бешкова была ссылка на бесплатную утилиту disk2vhd. Маленькая, да удаленькая, позволяет сделать снимок работающей системы и выгрузить его на локальный диск.
Описание, как первоначальный раздел на 300 гигабайт был поделён на 3 раздела, можно пропустить.
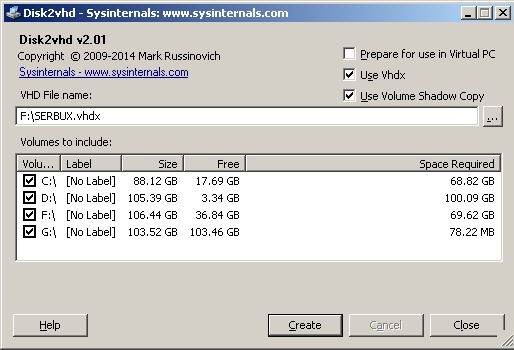
Утилита очень простая, выбираете диски на которых стоит нужная вам система, и выбираете путь — его придётся прописать вручную. Я не пробовал, но, вероятно, программа может и на сетевые диски и папки перекидывать снапшот системы. Отметил также галочку «Prepare for use in Virtual PC», хоть и вместо Virtual PC, у меня Hyper-V. Help не работает.
После создания виртуального диска, создаём виртуальную машину.

Выбираем 1 поколение.
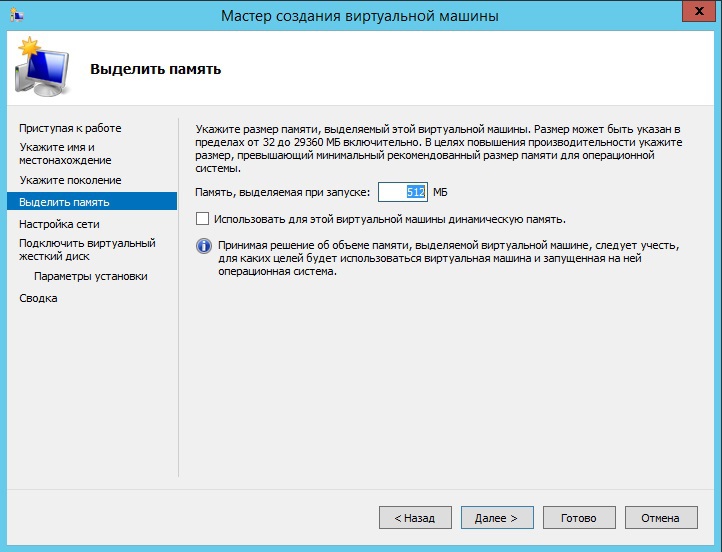
Устанавливаем нужный объём оперативной памяти — она будет выделятся из физической, в моём случае виртуальная машина крутится на 1 гигабайте оперативки, если выставить больше она просто не запускается — не хватает памяти, не только она одна работает на сервере.
Учитывайте этот момент.
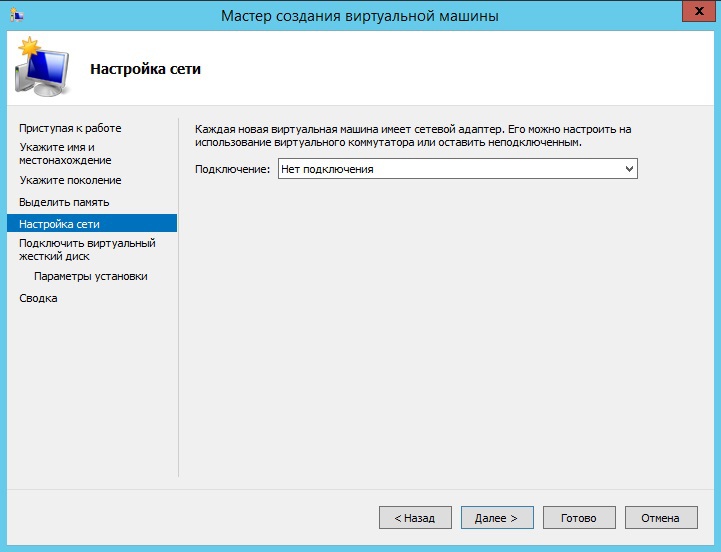
Сетевой адаптер пока не выбираем.
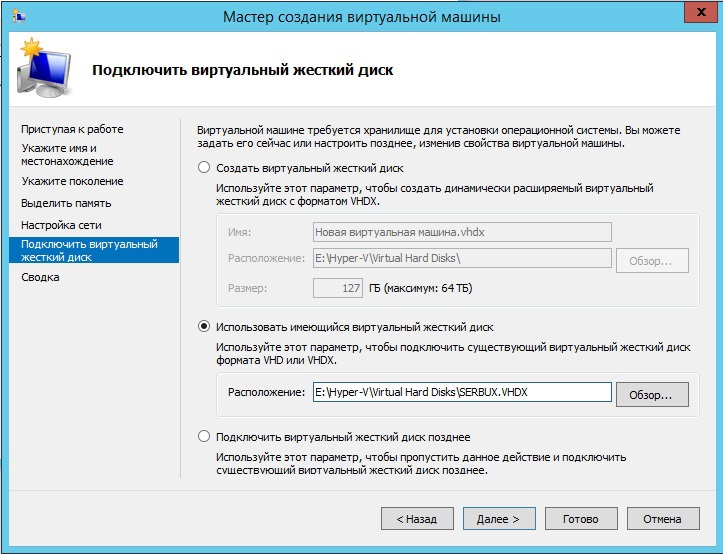
Указываем виртуальной машине использовать нами созданный виртуальный диск.
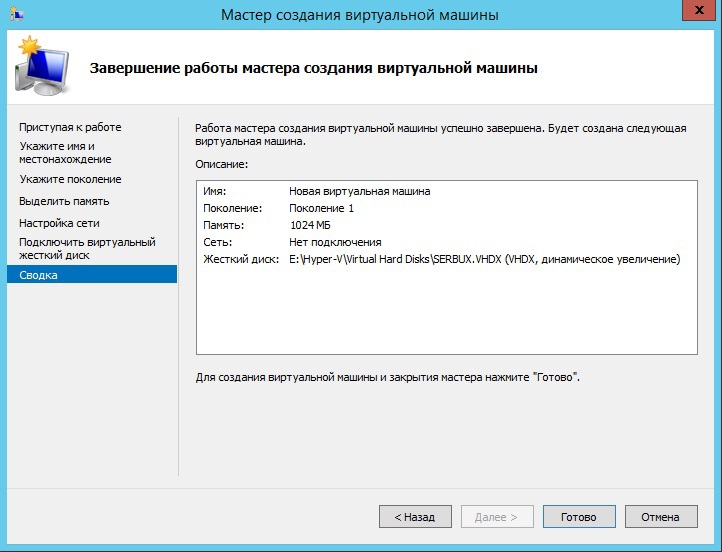
В такой конфигурации работает моя виртуальная машина.
Переходим к настройке виртуальной машины.
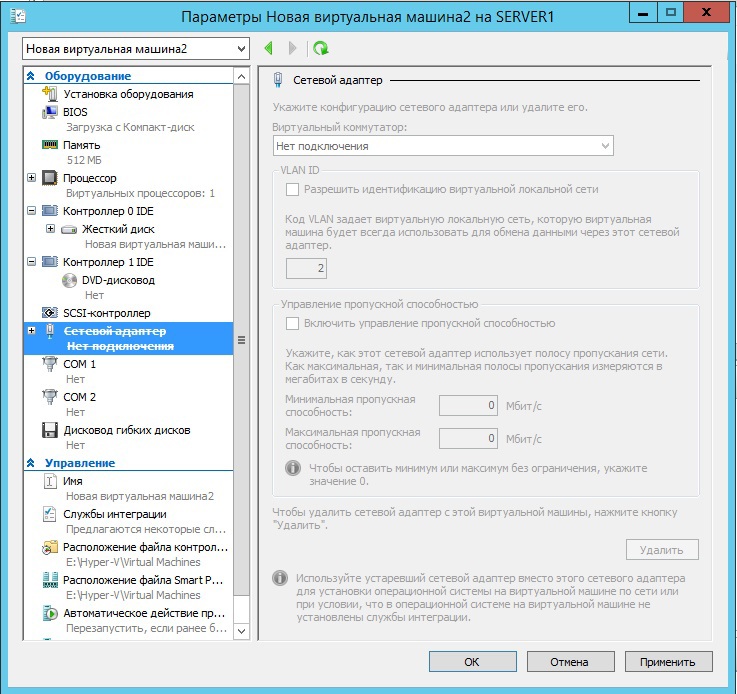
Удаляем имеющийся сетевой адаптер — он не будет работать на сервере, сервер который был завиртуален просто не увидит его.
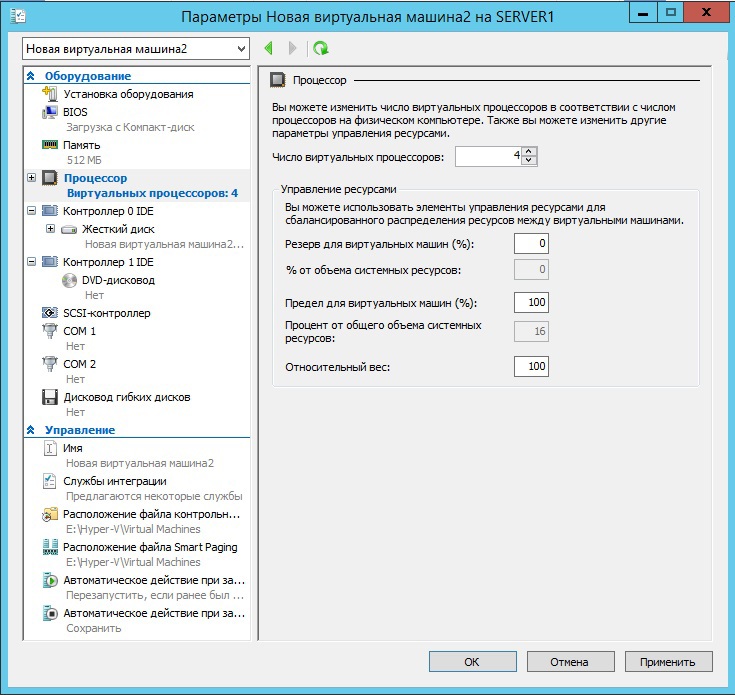
Выставляем количество ядер процессора которые выделяем под данную виртуальную машину.
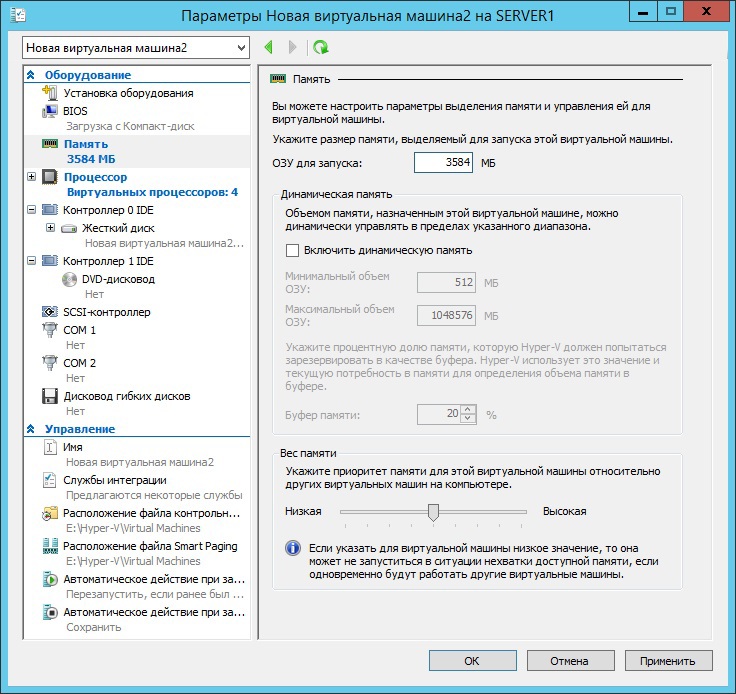
Можно установить желаемый объём оперативной памяти.
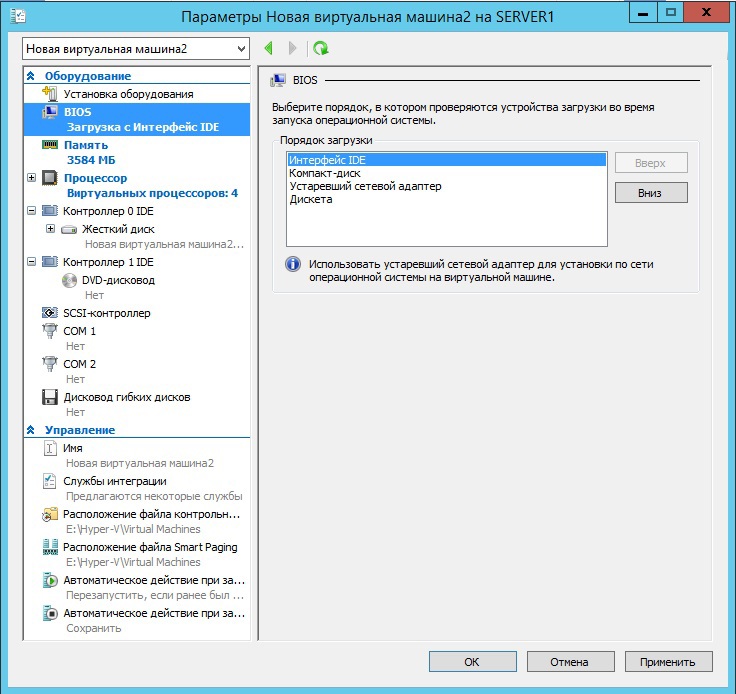
Загружаемся с диска, установка новой системы не требуется.
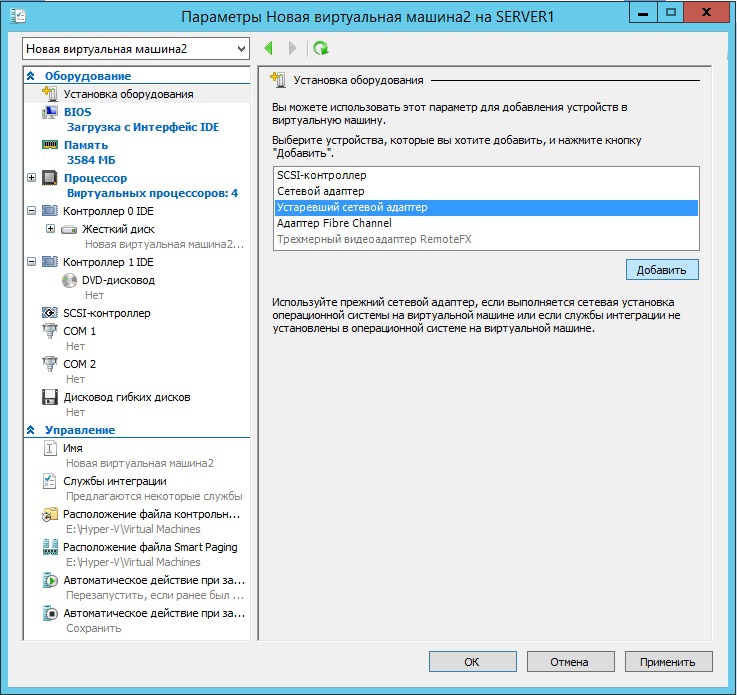
Устанавливаем новое оборудование — «Устаревший сетевой адаптер», его наш windows server 2003 увидит.
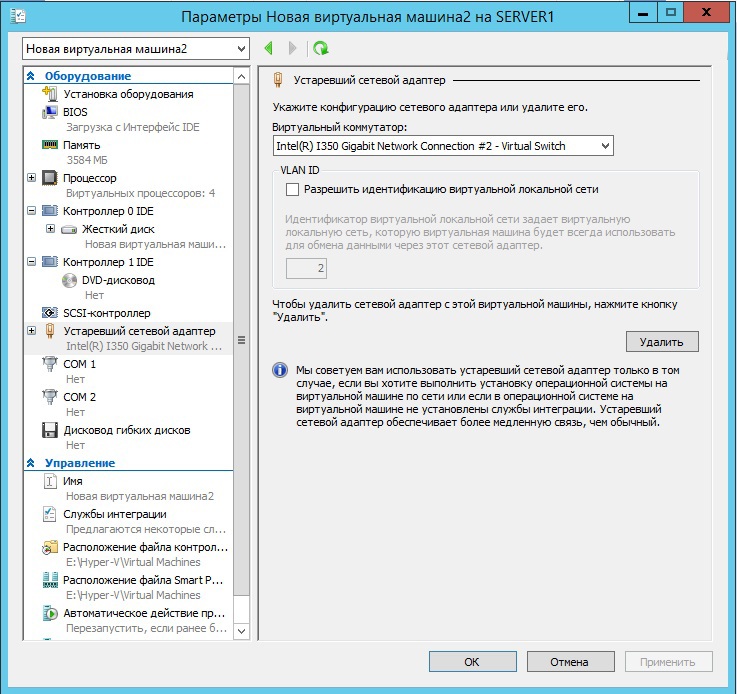
Выбираем нужный виртуальный адаптер. В моём случае, так как ещё одной виртуальной машиной выступает прокси сервер и под интернет выделена отдельная сетевая карта и своя сеть недоступная из обычной локальной сети, я выбрал виртуальный адаптер созданный для второй сетевой карты использующей нашу локальную сеть.
Всё готово, можно запускать.
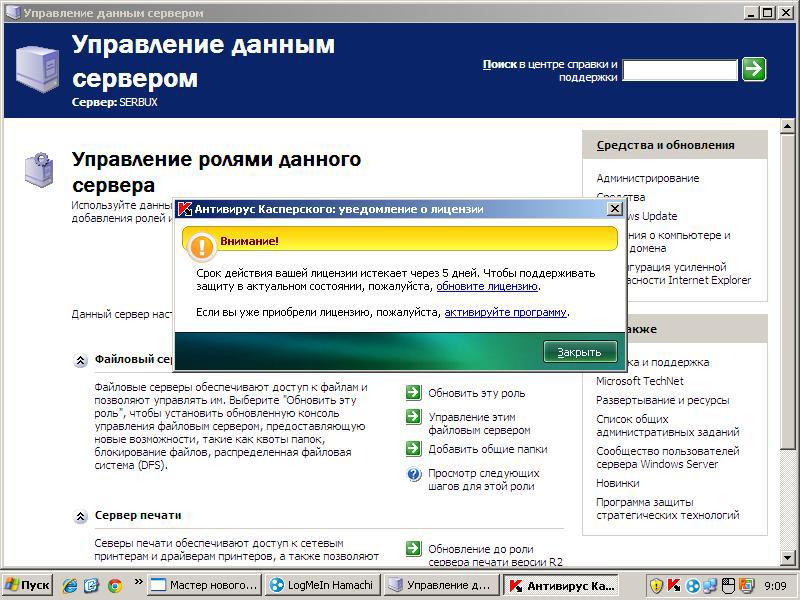
После запуска скорее всего вас будет ждать несколько сюрпризов — мышка может не работать. Настраивать сетевую карту придётся с помощью клавиатуры. После настройки сетевой карты — удалось подключиться с помощью Radmin, напрямую к нашей новой виртуальной машине.
Кстати, при попытке увеличить разрешение экрана с 800х600 система выдала синий экран смерти, скорее всего, это связано с небольшим количеством оперативной памяти, которой я выделил под виртуальную машину.
Конвертация Windows XP в виртуальную машину для запуска в Windows 7 при помощи Disk2vhd
Я решил запустить Disk2vhd прямо с сайта Live.Sysinternals.com . Как только я нажал ссылку, открылось диалоговое окно Internet Explorer «Загрузка файла — предупреждение системы безопасности» (File Download – Security Warning).
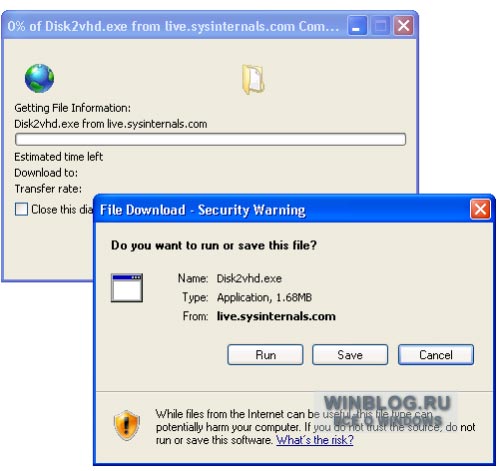
Предупреждение системы безопасности
Поле нажатия кнопки «Запустить» (Run) сразу же начинается загрузка.
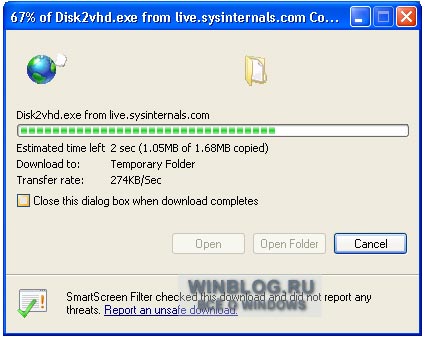
Быстрая загрузка
После завершения загрузки запускается исполняемый файл, в связи с чем появляется новое предупреждение системы безопасности.
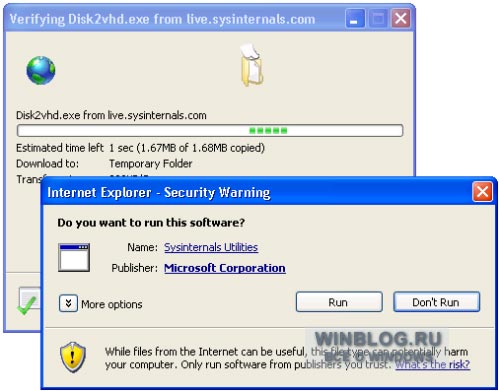
Еще одно предупреждение системы безопасности
Затем нужно принять лицензионное соглашение Sysinternals.
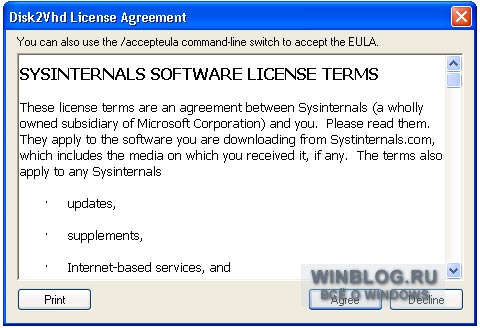
Лицензионное соглашение
Откроется окно программы. Disk2vhd автоматически выбирает все доступные тома/диски и присваивает имя VHD-файлу. Имя и размещение виртуального диска можно изменить при необходимости. Более того, желательно сохранять файл на отдельный жесткий диск, а не на тот, что конвертируется, — это значительно ускорит процесс. И не забудьте поставить флажок «Подготовить к использованию в Virtual PC» (Prepare for use in Virtual PC). Как видите, я выбрал только основной жесткий диск, а сохранять его буду на внешний HDD. Закончив с настройками, нажмите кнопку «Создать» (Create).
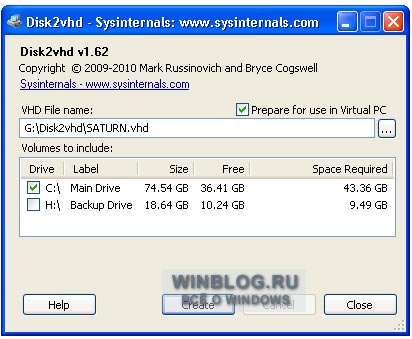
Выберите диски для конвертации
После этого остается только ждать. В зависимости от объемов жесткого диска и выбранного целевого каталога для сохранения, процесс может занять довольно много времени. Наблюдать за работой программы можно по индикатору прогресса.
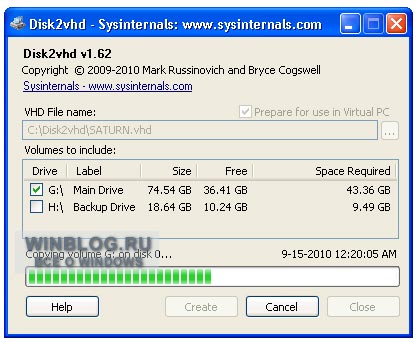
Индикатор прогресса
Например, конвертация и сохранение на внешний жесткий диск моей системы с 80-гигабайтным жестким диском, заполненным наполовину, заняла чуть больше двух часов. После завершения операции появится сообщение, показанное на рисунке.
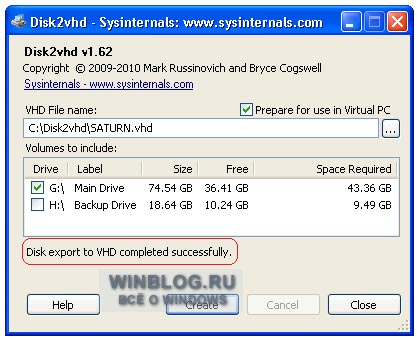
Конвертация завершена
Скопировав VDH-файл Windows XP в Windows 7, откройте Windows Virtual PC и запустите мастер создания виртуальной машины.
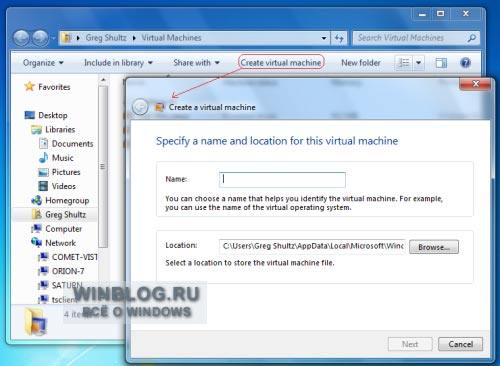
Мастер создания виртуальной машины
Чтобы не тратить лишнего времени на настройку, я назначил своей виртуальной машине тот же объем оперативной памяти, что и у физической системы.
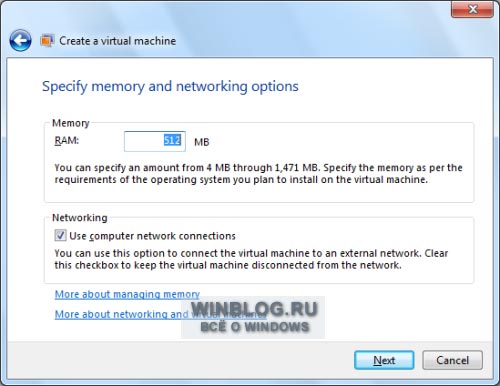
Укажите объем виртуальной памяти
В диалоговом окне подключения жесткого диска выберите опцию «Использовать существующий виртуальный жесткий диск» (Use an existing virtual hard disk), нажмите кнопку «Обзор» (Browse) и укажите размещение своего VHD-файла. После этого нажмите кнопку «Создать» (Create).
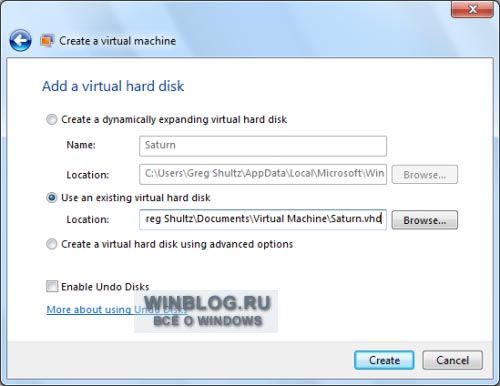
Выбор существующего жесткого диска
После завершения работы мастера перезапустите Windows Virtual PC, выберите новую виртуальную машину и включите ее. Конечно, мне пришлось немного повозиться, чтобы наладить нормальную работу системы на новом компьютере, и даже ее заново активировать. Но все это прошло относительно безболезненно, и уже вскоре я смог использовать Windows XP в Windows 7.
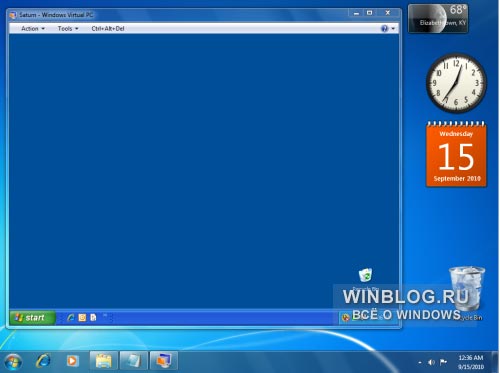
Виртуальная Windows XP
Перенос компьютера с Windows в виртуальную среду VirtualBox
В данном материале мы рассмотрим тот случай, когда нужно перенести компьютер с операционной системой Windows в виртуальную среду VirtualBox. Поскольку сам производитель VirtualBox в виде Oracle не предлагает никаких инструментов для подобной манипуляции, мы будем использовать специально созданную для этого программу от Microsoft.
Использование утилиты Disk2vhd
Утилита Disk2vhd предназначена для переноса физических компьютеров с операционными системами Windows, на виртуальный жесткий диск формата VHD или VHDX, с целью дальнейшего использования в Microsoft Virtual PC или Hyper-V. Однако, за счет того, что VirtualBox умеет работать с форматом VHD, с помощью данной утилиты можно практически без проблем «виртуализировать» компьютер с Windows.
- Включаем компьютер и загружаемся в Windows. Скачиваем программу Disk2vhd с официального сайта Microsoft — ссылка.
- Распаковываем данную программу в любое удобное место, и запускаем её с правами администратора.
- В программе Disk2vhd, в поле «VHD File name» выбираем место сохранения для виртуального жесткого диска. Ниже галочками выбираем необходимые для сохранения разделы жесткого диска.
VirtualBox
По завершению создания виртуального жесткого диска, копируем его на компьютер, где у Вас развернут VirtualBox. После завершения копирования, запускаем VirtualBox и делаем там следующие манипуляции:
- В главном окне VirtualBox нажимаем кнопку «Создать».
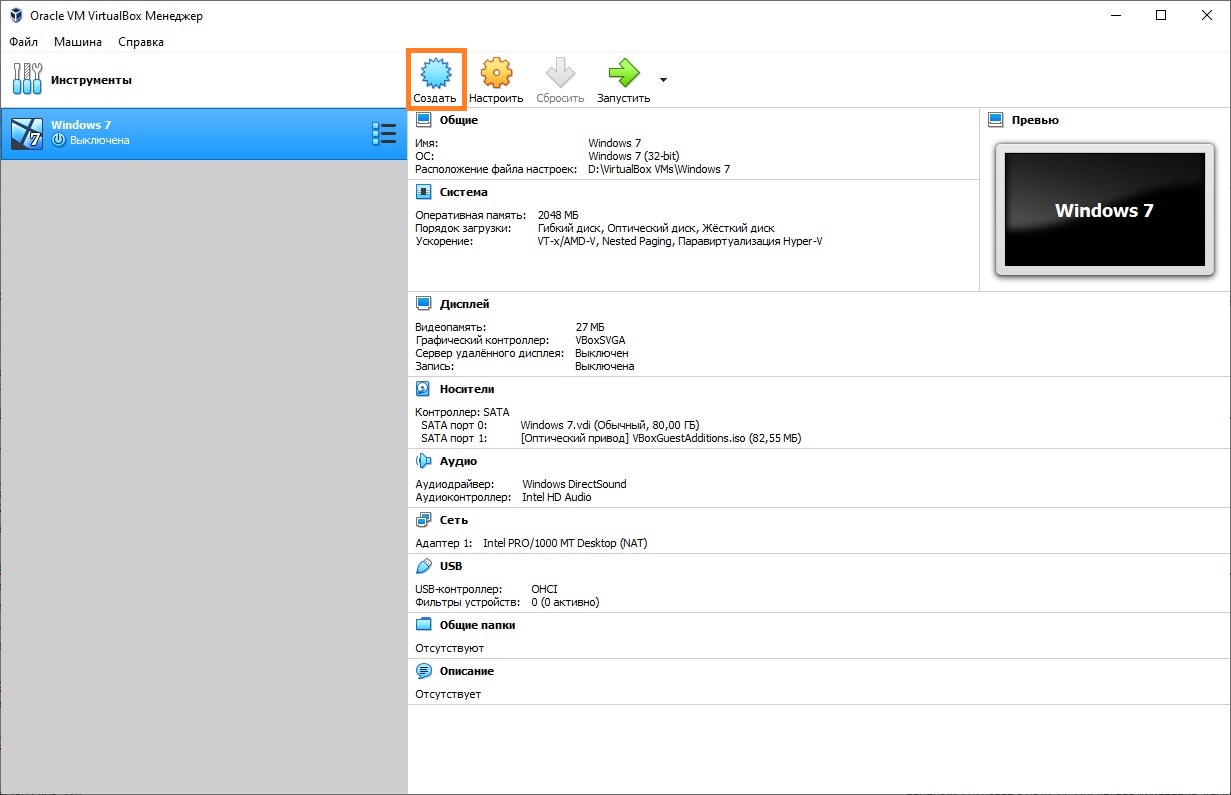
- Заполняем поле «Имя», выбираем «Тип» и «Версия» операционной системы, в соответствии той, которая была на компьютере. Затем выбираем объем оперативной памяти — в общем, все как при создании обычной виртуальной машины VirtualBox.
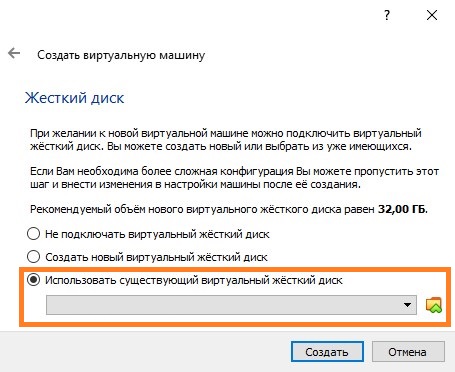
- Единственное отличие от создания обычной виртуальной машины — это выбор жесткого диска. Вместо «Создать новый виртуальный жесткий диск» следует выбрать «Использовать существующий виртуальный жесткий диск», и выбрать ранее скопированный VHD файл. По завершению выбора жесткого диска, нужно нажать на кнопку «Создать».
- После этого, можно запустить данную виртуальную машину, и загрузится в уже рабочую систему.
Решение возможных проблем
Windows XP при загрузке «зависает» на черном экране
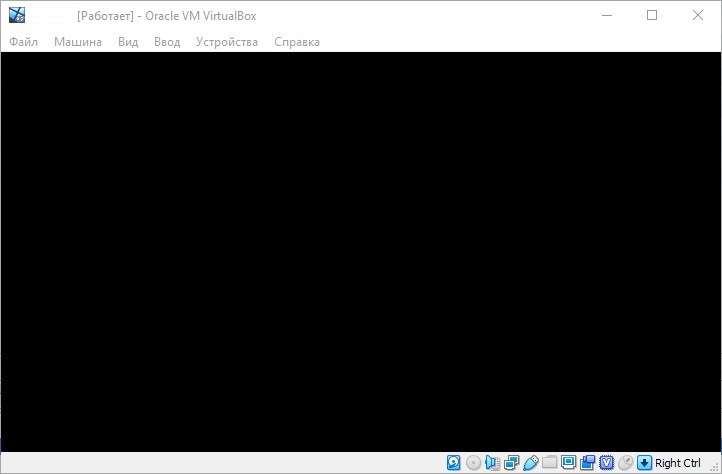
Если при попытке запустить Windows XP вы получаете черный экран с мигающим курсором, попробуйте поменять следующие настройки виртуальной машины: раздел «Система», вкладка «Материнская плата», и там включить или выключить параметр «Включить I/O APIC». 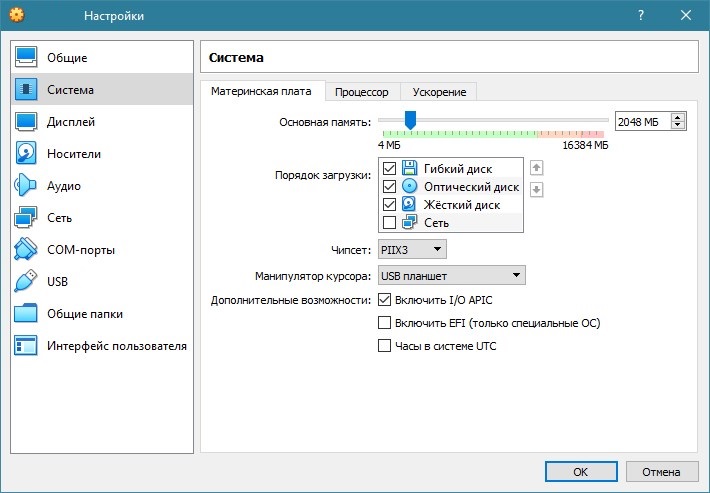
Disk2Vhd: Learn to convert Physical Machines to Virtual Disks
Download a free trial of Veeam Backup for Microsoft 365 and eliminate the risk of losing access and control over your data!
Table of Contents
Do you have some physical Windows devices that you dream about virtualizing and getting rid of the clunk, but you have no idea how to best approach that? Wonder no more, dear reader. In this article, you will learn more about Disk2vhd by Sysinternals: a tried, tested, and free way to convert physical machines or disks to their virtual equivalents.
In this article, you will convert a physical Windows system by creating a virtualized copy of the disk. Eager to go virtual? Dive in!
Prerequisites
This tutorial will be a hands-on demonstration. To follow along, be sure you have the following:
- A Physical Windows device. The examples will run on a Windows 10 device.
Disk2vhd has been recorded to work on Windows 11. If your physical disk contains a working Windows 11 installation, this tutorial will still serve you well.
- Enough free disk space to save the disk you are going to convert. Disk2vhd will help you identify exactly how much space is needed. At a minimum, you will need as much space as is in use on the physical disk
- Any Running Hypervisor. Oracle VirtualBox v6.1.22 is used in the examples. Other hypervisors, like Hyper-V, or KVM, will also serve you fine.
A user account with administrative access.
Installing and Running Disk2vhd
Your first step is to install Disk2vhd if you haven’t already. For the tasks to come you will need a user with administrative access and physical access to the Windows device. The disk you want to convert needs to be connected and online.
Head over to Microsoft’s Sysinternals page and download a copy of Disk2vhd. At the time of writing this article, the latest version available, and the one the examples will be based on, was version 2.02. The download will be a zip archive containing various versions of the program.
Right-click on the most appropriate version for your device and select Run as administrator as seen below.
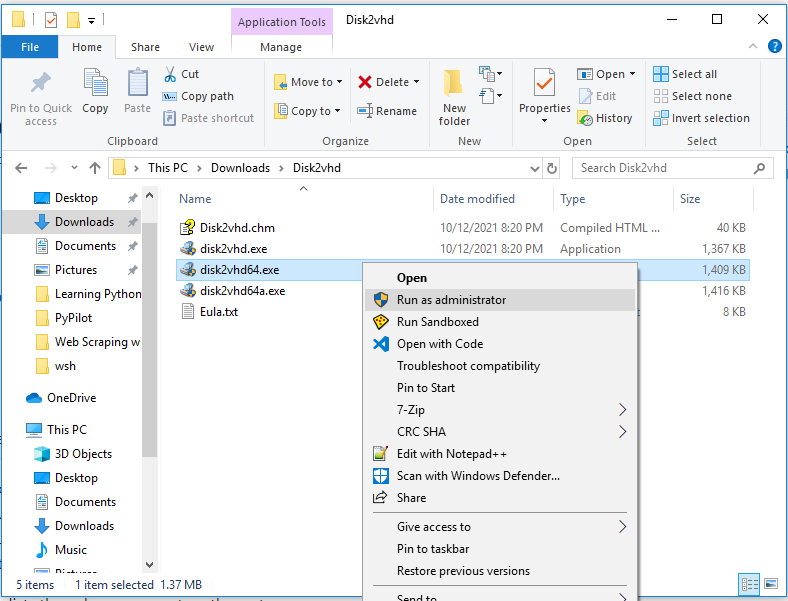
Starting Disk2vhd as administrator
Converting a Physical Disk to a Virtual Disk
Now that you have a working and running copy of Disk2vhd, is time to virtualize your Windows 10 boot disk. The selected disk will be the C:\ drive on the machine used as an example.
For the sake of brevity, this article will be limited to converting a boot disk (a disk that has a working copy of Windows) to a virtual hard disk. But Disk2vhd is not limited to converting boot disks.
Your first task is to select the right flags for the disk you are about to create:
- Check the Prepare for use in Virtual PC flag if you intend to make the disk compatible with the deprecatedMicrosoft Virtual PC.
- Check Use Vhdx if you prefer the resulting virtual disk to be of the vhdx format instead of a regular vhd file.
VHDX is an improved version of the VHD format, but it is limited in vendor support when compared to VHD. VHDX boasts better performance and a much higher maximum disk size when compared to VHD (64TB as opposed to 2TB). Since both formats are ultimately from Microsoft, it makes sense to defer to VHDX in cases where Hyper-V will be used as the hypervisor. VHD can be used where cross-compatibility with other hypervisors is important.
- Check Use Volume Shadow Copy if you are working on a running system and do not want to interfere with the state of the system. This option aims to enable you to have a smoother conversion process. You will not need to be concerned about file-in-use popups or inconsistencies in the system state. If you do not check this option, you will directly copy the files from the live volume, instead of copying files from the shadow copy.
Shadow copies are essentially point-in-time read-only snapshots of volumes that can be used for consistent disk copy operations. Programs that rely on the technology can make safe copies of the files even while applications are in use.
If you are following along, your options should look like the screenshot below.

Selecting the appropriate options
You are not selecting the VHDX because VirtualBox cannot fully handle VHDX disks. To avoid over-extending the tutorial by trying to convert from one disk format to the other, the output format is set to VHD.
2. Now it is time to select the output file. Pick the name of the output VHD file, including its full path and extension. The output file in the example will have the same name as the device name, as you can see below.

Providing the file name
3. You will now select the volumes you want to virtualize. The disk in this tutorial is Master Boot Record (MBR) based, so you select the only volume needed, as shown below. Be sure to reserve at least as much space free on the destination drive as the Space Required column specifies.
For a GUID Partition Table(GPT) partitioned disk, you have to copy the EFI System Partition (ESP) volume in addition to the Operating System (OS) volume. The ESP volume contains bootloader files that the system needs to locate and boot an OS properly.
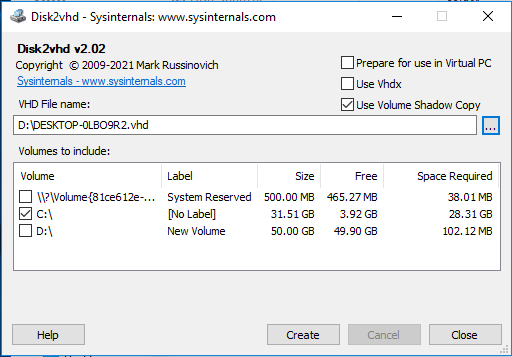
Selecting input volumes, pay attention to the Space Required information
4. With everything in place, you are ready to start the conversion process! Beware that due to the load Disk2vhd puts on a running system, it is not advisable to run it on systems already known for high loads. Click Create to start the conversion and wait until the process is complete.
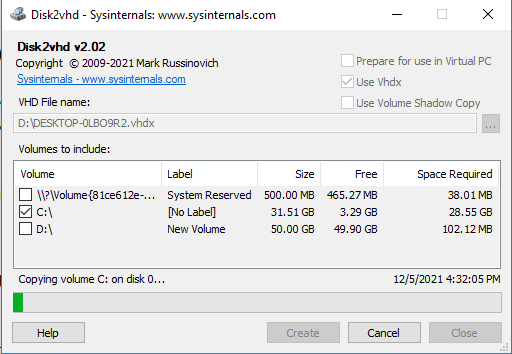
Conversion in progress
5. Voila! After waiting for the completion of the process, you should now have a VHD file in the folder you specified, as seen in the screenshot below.
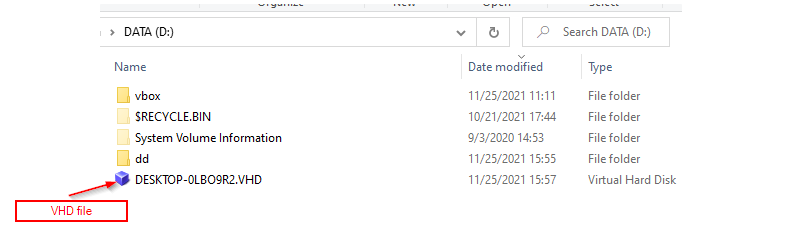
The resulting output VHD file
Be sure not to mount the resulting VHD directly on the physical machine. Windows uses a signature to identify each connected disk. To avoid a disk signature collision, Windows will change the signature of the virtual disk when you mount it on the same machine as the physical disk. If you create a new VM with the disk, as is in this tutorial, the new VM may be rendered unbootable.
Converting Disks Via The Command-Line
For those who need it for automation or remote usage, Disk2vhd has also a command-line option. The syntax follows:
- The -h flag is the same as selecting “Prepare for use in Virtual PC” on the graphical user interface(GUI).
- The -c flag will make a direct copy and not a shadow copy
- Volumes are included by specifying their drive letters or using for all.
The example below creates a backup copy of the C:\ drive C on a 64bit machine via a PowerShell session. The output filename will incorporate the backup creation date in the file name with the Get-Date PowerShell cmdlet. Give the file a specific name, to run this code in a non-PowerShell session.
The command will create a file akin to the one in the screenshot below upon successful conversion.
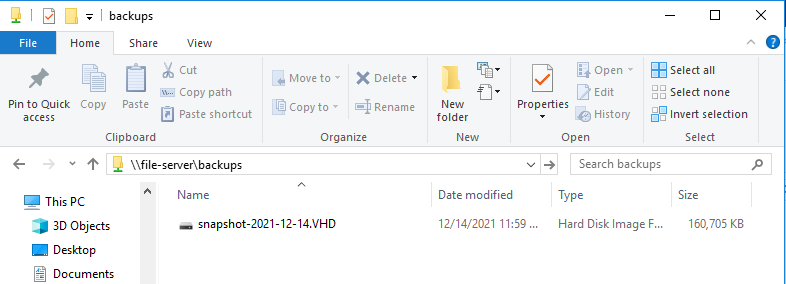
VHD file created via Disk2vhd command-line
You can couple the command line with a scheduling solution, such as a scheduled task in PowerShell to create a barebones automated backup system.
Creating a Virtual Machine with the Converted Disk
Now that you have a virtual replica of the physical, you will attach the resulting virtual hard disk to check your action results. After booting up the virtual system, you will find it virtually replicates your previous system (pun intended).
1. Open VirtualBox to follow along and then select New under the Machine menu
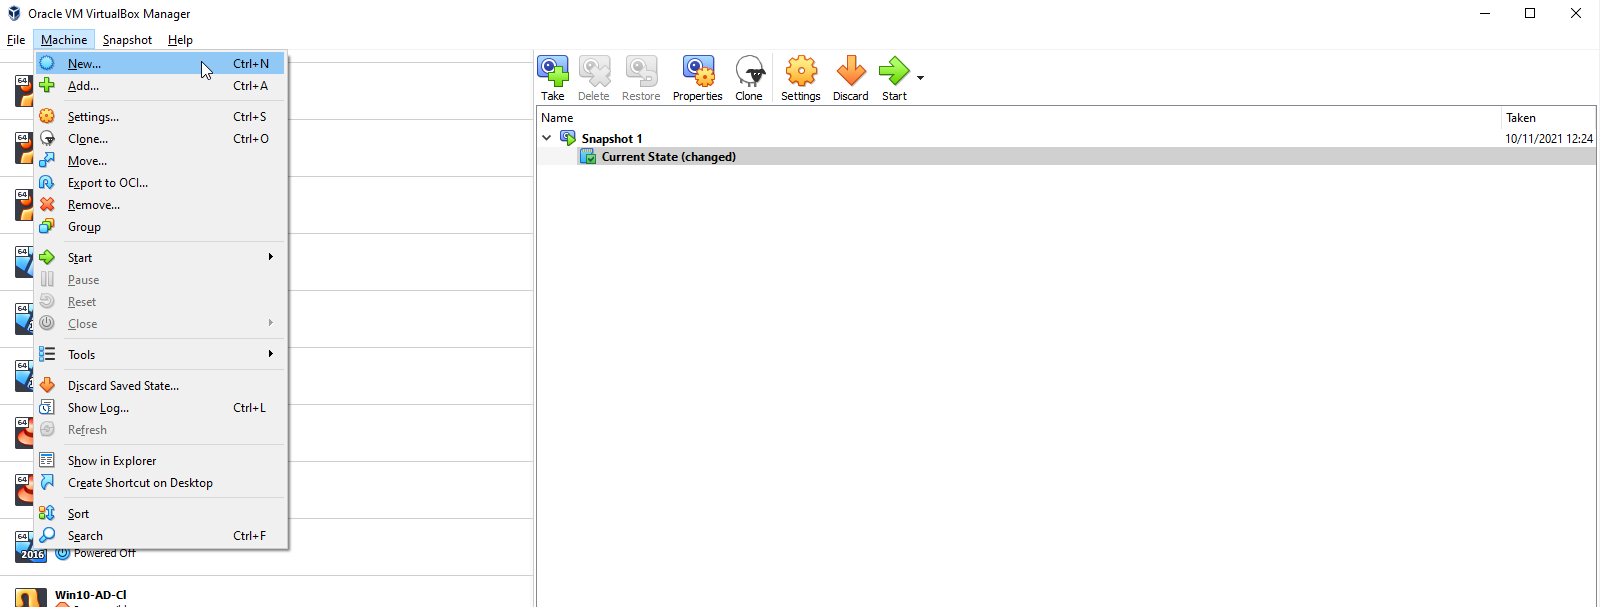
Create a new VM in VirtualBox Manager
2. Give the machine a name, select a folder to store the files, select the OS Type and Version accordingly, and click Next.
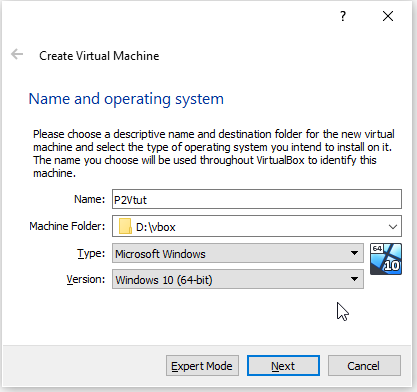
VM creation window: Identification details
3. Select the memory the system will consume. For your testing purposes, 2 GB of RAM should be enough.
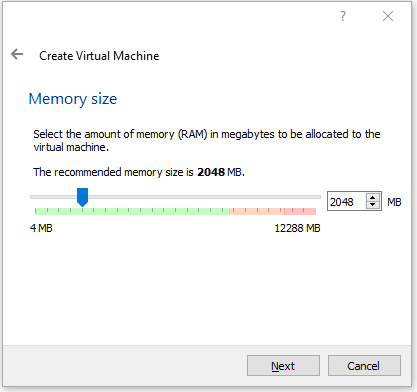
VM Creation Window: RAM settings
4. Now comes the most crucial part, the Hard disk selection. Select “Use an existing virtual hard disk file” and click the browse icon provided to find the VHD created earlier.
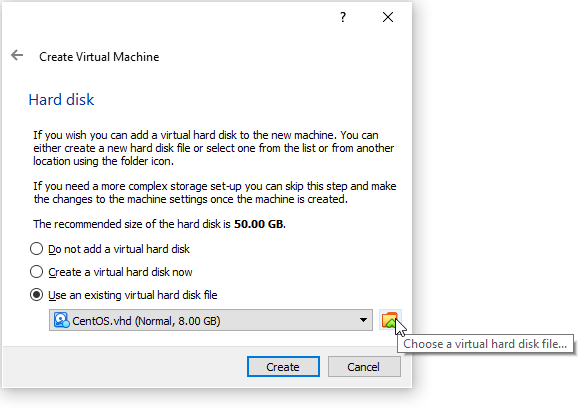
VM Creation Window: Hard Disk creation
5. The next screen lists know Virtual Box VHDs. Choose Add to include the new VHD in the list of disks known by VirtualBox. This step is necessary before attaching the disk to any VM.
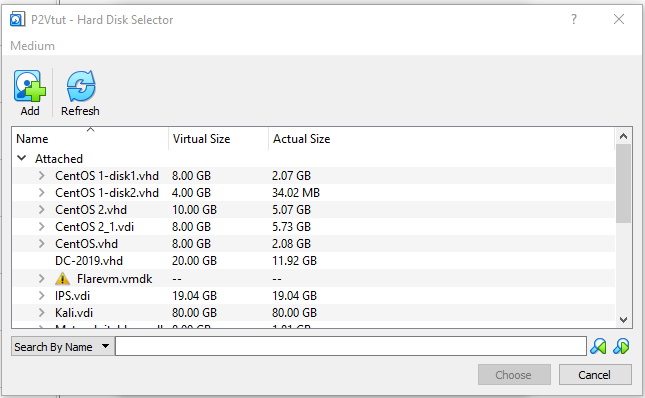
VM Creation Window: Hard disk Selection
Navigate to the VHD file created in the previous section and select Open.
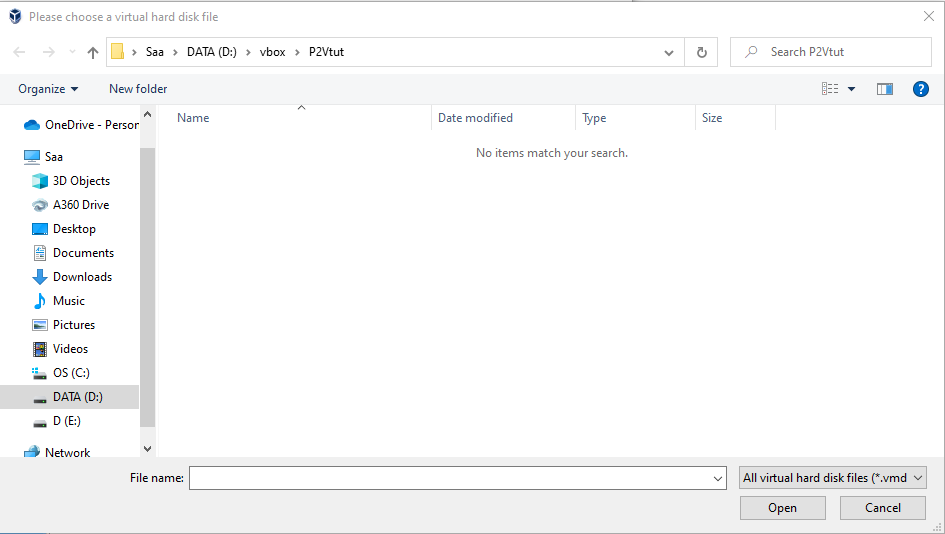
Selecting the converted hard disk file
7. VirtualBox lists the VHD as Not Attached. Select the file and click Choose to attach the VHD to the new VM.
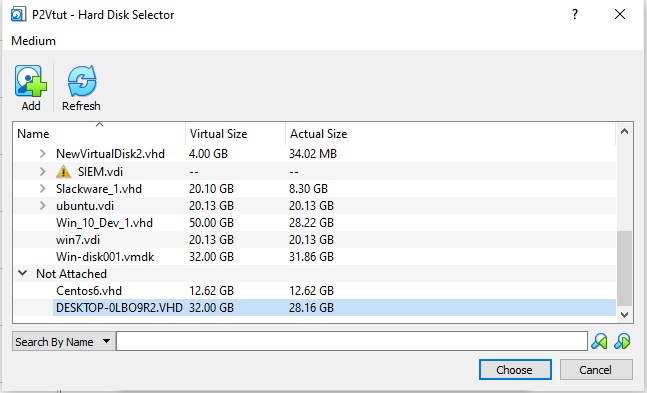
VM Creation Window: Hard disk selection
8. Click Create .
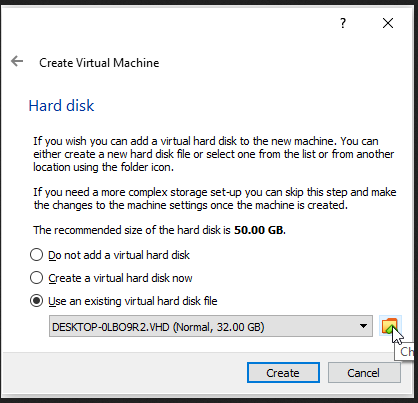
VM Creation Window: Create VM
9. You can now start the VM. Select Normal Start as seen below.
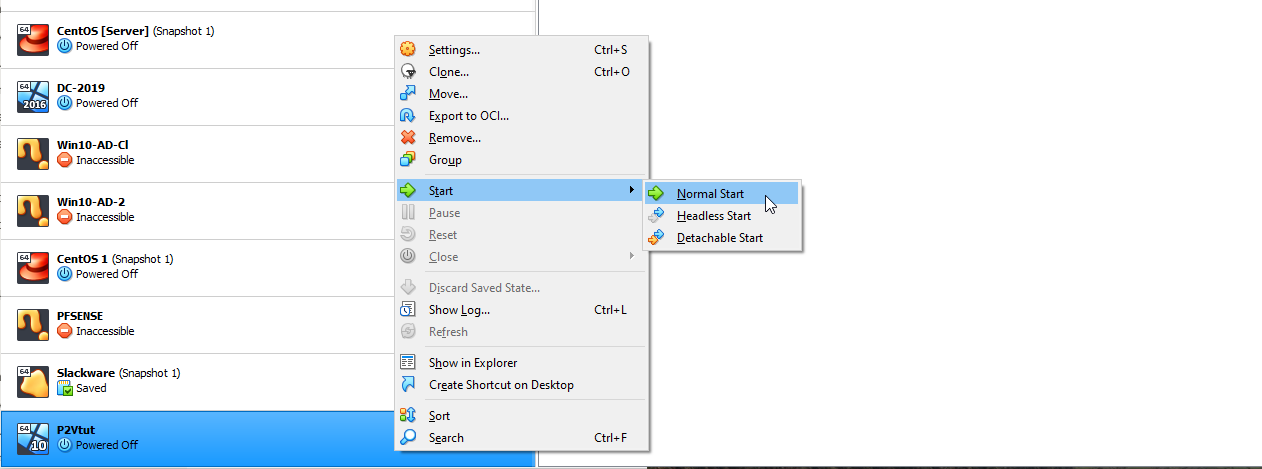
Starting the VM: Turning on the VM
10. You should see the same sign-in screen as the physical device.
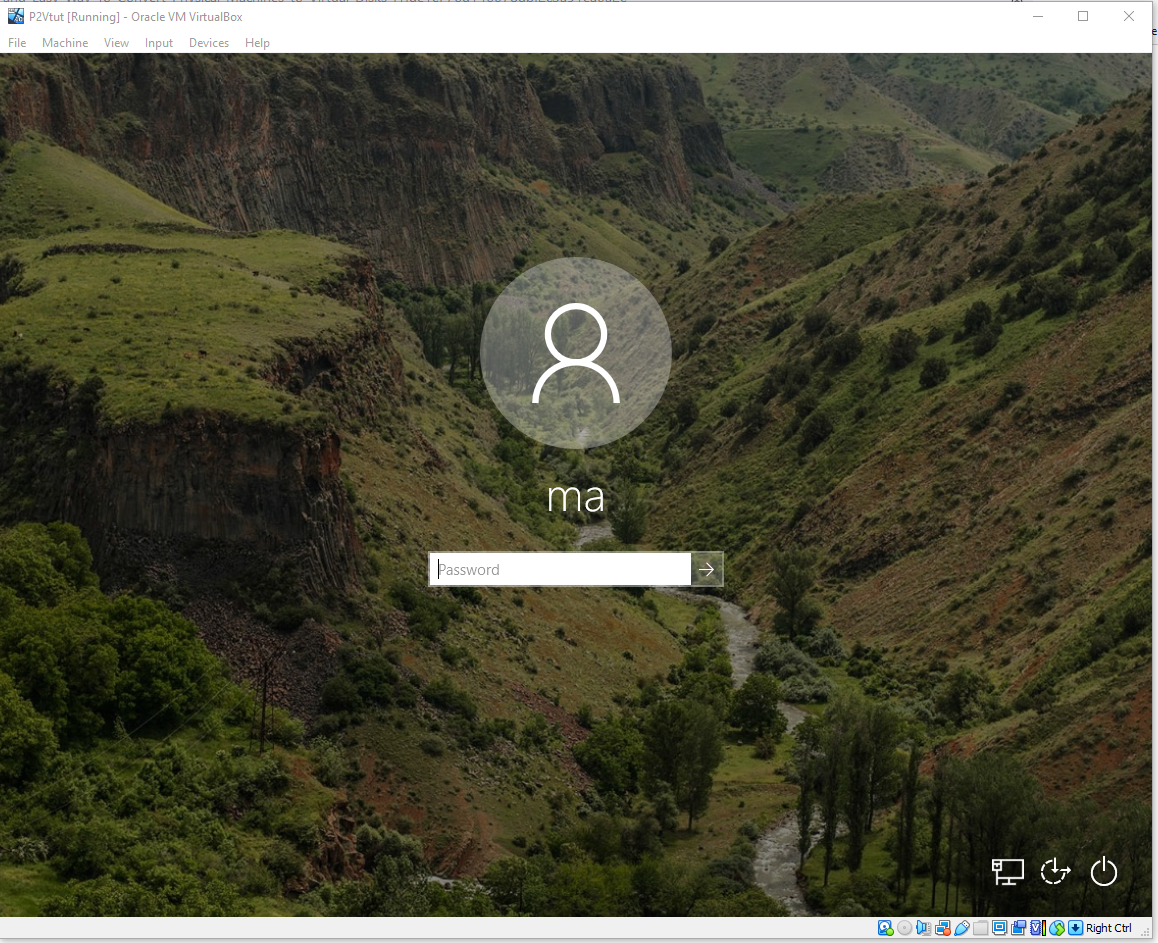
Starting the VM: Sign-in Screen
11. After logging in, you will notice that the virtual machine is an exact copy of the physical device, down to the user accounts and installed applications. The virtual machine is the same as the physical one.
Conclusion
Disk2vhd can save you a lot of time whenever you need to virtualize a physical disk, whether it is a live OS or not. By coming this far, you are now ready to virtualize your physical devices and reap the benefits of virtualization.
What are the machines that you are planning to virtualize?
Hate ads? Want to support the writer? Get many of our tutorials packaged as an ATA Guidebook.
More from ATA Learning & Partners
Recommended Resources!
Recommended Resources for Training, Information Security, Automation, and more!
Get Paid to Write!
ATA Learning is always seeking instructors of all experience levels. Regardless if you’re a junior admin or system architect, you have something to share. Why not write on a platform with an existing audience and share your knowledge with the world?
ATA Learning Guidebooks
ATA Learning is known for its high-quality written tutorials in the form of blog posts. Support ATA Learning with ATA Guidebook PDF eBooks available offline and with no ads!