docker compose pull
Refer to the options section for an overview of available OPTIONS for this command.
Description
Pulls an image associated with a service defined in a compose.yaml file, but does not start containers based on those images.
For example uses of this command, refer to the examples section below.
Options
| Name, shorthand | Default | Description |
| —ignore-buildable | Ignore images that can be built. | |
| —ignore-pull-failures | Pull what it can and ignores images with pull failures. | |
| —include-deps | Also pull services declared as dependencies. | |
| —quiet , -q | Pull without printing progress information. |
Examples
suppose you have this compose.yaml :
If you run docker compose pull ServiceName in the same directory as the compose.yaml file that defines the service, Docker pulls the associated image. For example, to call the postgres image configured as the db service in our example, you would run docker compose pull db .
docker compose pull will try to pull image for services with a build section. If pull fails, it will let user know this service image MUST be built. You can skip this by setting —ignore-buildable flag
Docker (Докер) для чайников
Вступление от автора руководства — Dmytro Yakovenko 2022/04/23: Дорогие мои читатели, я сам чайник в докерах, но куда деваться нужно изучить предметную область. Начнем помолясь:) Как всегда я стараюсь осветить терминологию, второй шаг установку, а дальше какой-нибудь интересную задачу решим с использованием доккера и какую-нибудь распространённую.
Docker (Докер) — программное обеспечение для автоматизации развёртывания и управления приложениями в средах с поддержкой контейнеризации, контейнеризатор приложений. Docker — это инструмент, позволяющий запустить почти любое приложение со всеми его зависимостями в изолированной среде.
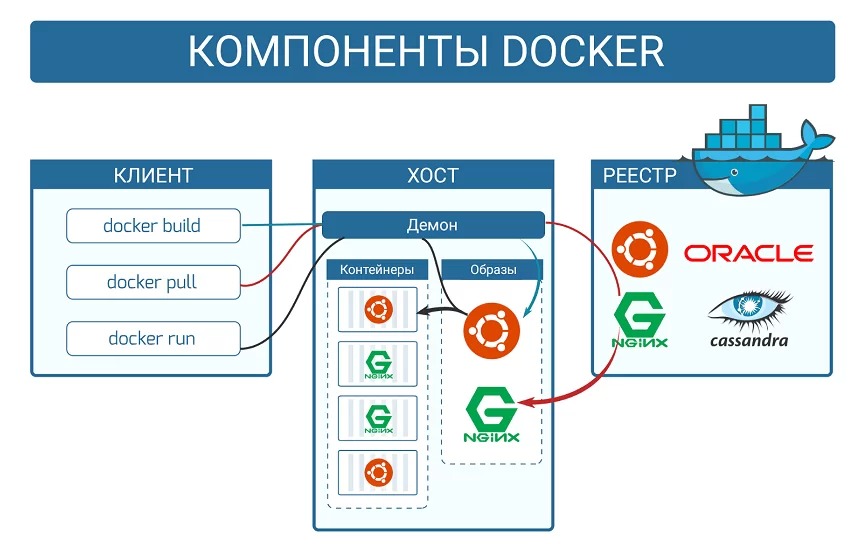
Отличия Docker от виртуальной машины
Есть два способа упаковки и переноса приложений со всеми его библиотеками между различными системами: использовать виртуальную машину или Docker-контейнер. Если выбрать виртуальную машину:
Из плюсов — у виртуальной машины удобные способы управления.
Если выбрать Docker-контейнер:
Из минусов — у Docker сложная система управления контейнерами, которой можно управлять как локально на сервере, так и по протоколу HTTP.
Главное отличие технологий в том, что виртуальная машина виртуализирует аппаратные ресурсы, такие как процессор, память, системы input и output, а docker контейнеры виртуализируют только ОС.
Шаг 1: Установка Docker
Почитал мануалов и сказано в них, что не по-пацански (не по админски) устанавливать Docker из репозиториев, ибо грех это! И так какие VPS у меня есть на текущий момент в работе? Это Debian и CentOS 7. Значит устанавливаем Docker и там и там и сравниваем отличия в установке.
Шаг 1.1 : Установка в Debian, Ubuntu
Пакет Docker можно найти в официальном репозитории Debian и Ubuntu. Но чтобы получить наиболее актуальную версию программы, нужно обратиться к официальному репозиторию Docker. В этом разделе показано, как загрузить и установить пакет из официального репозитория Docker.
Для Ubuntu (версии 18.04 LTS и выше):
Теперь в системе работает системная служба Docker. Давайте что-нибудь запустить, чтобы увидеть что докер работает, например:
Шаг 1.2 : Установка в CentOS 7, 8
Теперь попробуем установить Docker в всё еще не умирающем CentOS версии 7. Кстати Доккер официально поддерживается только в 7 и 8 версии CentOS, а 6 забыли, хотя она до сих пор распространена.
В CentOS сначала придется удалить все намеки на старую версию Docker.
Рекомендуемый подход: настроить репозитории Docker и устанавливать из них него простоты установки и обновления. Для этого установим пакет yum-utils, который содержит утилиту yum-config-manager и настроим стабильный (stable) репозиторий. Есть еще nightly репозиторий, но думаю стабильного нам хватит:)
Теперь установка самого Docker:
Запускаем Докер и тестовую программу, чтобы убедиться что он работает:
Последний штрих, проверяем загружается ли при перезагрузке Linux наш Докер автоматически, используем для этого systemctl:
Конечно же нет, добавим в автозагрузку Docker:
Шаг 1.3 : Установка Docker в Windows
Все что нужно знать об установки Docker в Windows 10 Pro это то, что у вас перестанут работать программы, такие как VirtualBox, эмуляторы Android.
А там уже смотрите сами, нужно ли вам такое счастье или нет.
Шаг 2: Как пользоваться командами, ключами Docker
С помощью команды docker можно пользоваться различными опциями, а также командами с аргументами. Ниже показан ее синтаксис. Запуск команды docker без ключей выведет весь список возможных ключей запуска.
Шаг 2.1: Управление контейнерами
Для просмотра запущенных контейнеров применяется команда docker ps, ключ а также показывает все контейнеры в системе. Разберем поля вывода команды
Шаг 2.2: Как зайти в контейнер и выполнить команду внутри
Для того, чтобы выполнять команды внутри контейнера, надо для начала в него попасть. Для этого необходимо получить ID необходимого контейнера. Делается это командой:
После получения списка всех запущенных контейнеров, мы выбираем (в первом столбце) ID нужного нам контейнера и подставляем в следующую команду вместо <container_id>:
Данная команда в контейнере <container_id> запустит bash прямо в вашей консоли. После чего, можно выполнять внутри контейнера все правки, которые нам необходимы. Не забывайте, что после перезапуска контейнера — все правки пропадут, для сохранения правок изучите Шаг 4: Как сохранить локально изменения в новый образ Docker.
Шаг 2.3: Удаление образов, контейнеров и томов Docker
Чтобы удалить все остановленные контейнеры и неиспользуемые образы (а не только образы, не связанные с контейнерами), добавьте в эту команду флаг -a.
Используйте команду docker ps с флагом -a для поиска имен или идентификаторов контейнеров, которые вы хотите удалить:
Если вы создаете контейнер, который вам не будет нужен после завершения его использования, вы можете использовать команду docker run –rm для его автоматического удаления при выходе.
Вы можете найти контейнеры с помощью команды docker ps -a и отфильтровать их по статусу: created (создан), restarting (перезапускается), running (работает), paused (пауза) или exited (выполнен выход). Чтобы просмотреть список контейнеров, из которых выполнен выход, используйте флаг -f для фильтрации по статусу. Убедитесь, что вы хотите удалить эти контейнеры, и используйте флаг -q для передачи идентификаторов в команду docker rm.
Более простой вариант
Используйте команду docker images с флагом -a, чтобы найти идентификатор удаляемых образов. Эта команда покажет вам все образы, включая промежуточные слои образов. Когда вы определитесь с составом удаляемых образов, вы можете передать их идентификаторы или теги в docker rmi:
Образы Docker состоят из нескольких слоев. Несвязанные образы — это слои, не имеющие связей с каким-либо образами с тегами. У них нет никакого назначения, и они просто занимают место на диске. Их можно найти, добавив флаг фильтра -f со значением dangling=true в команду docker images. Если вы уверены, что хотите удалить их, вы можете использовать команду docker images purge:
Вы можете найти все образы, соответствующие определенному шаблону, используя комбинацию команд docker images и grep. Когда вы будете довольны, вы можете удалить их, используя awk для передачи идентификаторов в docker rmi. Эти утилиты не предоставляются Docker и могут быть доступны не во всех системах:
Шаг 3: Где скачать и как работать с образами Docker
Изначально Docker берет образы в хабах Docker Hub (докер хаб). Docker Hub является реестром образов, поддерживаемых разработчиком. Любой имеет возможность создавать и загружать собственные образы. Для большей части дистрибутивов и программ уже имеются необходимые образы в Docker Hub.
Докер хранит файлы (контейнеры) в виде папок и файлов в директории /var/lib/docker/containers.
Строчка OK в столбце OFFICIAL говорит о том, что образ создан и его поддержка осуществляется компанией, ответственной за этот проект.
Добавление опций -i (видеть, что происходит в контейнере) и -t (взаимодействовать, то есть пересылать в контейнер наши команды) предоставляет доступ в интерактивном режиме к командному процессору.
Шаг 4: Как сохранить локально изменения в новый образ Docker
Во время запуска контейнера из существующего образа у пользователя есть возможность создавать или удалять файлы, аналогично работе на виртуальной машине. При этом изменения будут распространяться только в определенном контейнере. Доступна и возможность запуска с последующей остановкой контейнера, но после его удаления с помощью docker rm будут утеряны внесенные изменения.
Соответственно, следует ознакомиться со способом сохранения текущего контейнера как нового образа.
Сохраните результаты в текущем образе командой:
Добавление опции -m дает возможность указать сообщение подтверждения. Это позволит будущим пользователям образа понять, что именно было изменено. Что касается параметра -a — с его помощью можно указать, кто его создатель. container_id является тем же идентификатором, который был использован ранее, во время запуска интерактивной сессии в Docker.
Если вы не занимались до этого созданием новых репозиториев в Docker Hub, имя создаваемого репозитория по умолчанию будет названо именем вашего пользователя в Docker Hub.
Шаг 5: Автозагрузка контейнеров в ОС
Ваш сервера перезагрузился и все запущенные контейнеры остановились. Чтобы избавиться от необходимости вручную запускать их, можно настроить автозапуск контейнеров. Для этого следует создать текстовые файлы со специальным форматом для сервиса systemd. Рассмотрим пример автозапуска контейнера my-db, для этого создадим файл
После этого остается перезапустить демон systemcmd и включить автозагрузку контейнера mydb, набрав в терминале поочередно команды:
Шаг 6: Что такое Docker Compose
По сути дела это «пакетный менеджер» для Docker, как, к примеру, composer для PHP. Пользоваться им несложно:
Убеждаемся, что нужные нам контейнеры созданы и запущены!
Пример 1: Docker MySQL / MariaDB установка и настройка
Рассмотрим как правильно установить и настроить СУБД MySQL MariaDB в виде приложения Docker, при этом все постоянные данные будут храниться в файловой системе хоста.
Читайте также
Зачем использовать Docker для установки MariaDB? Использование Docker-контейнера позволяет не только обеспечивает чистое развертывание, не зависящее от программного обеспечения сервера, но и позволяет поддерживать несколько СУБД MySQL разных версий и различного назначения в рамках одной операционной системы.
При установке MariaDB будет использован внешний конфигурационный файл и внешний каталог хранения данных для того, чтобы при перезапуске контейнера вся информация оставалась в сохранности. Сначала создадим необходимые каталоги, в которых будут храниться настройки, журналы и базы данных MySQL:
Создадим конфигурационный файл /opt/mariadb/etc/config.cnf, который будет уточнять настройки, применяемые контейнером по умолчанию. В этом файле вы можете переопределять переменные MySQL для задания нужного поведения. Мы определим 3 переменных для демонстрации возможностей:
Теперь можно запустить сам сервер MySQL:
Для проверки работоспособности сервера используйте консольный клиент MySQL:
Выгрузка данных БД для резервных копий в самом простом случае может выполняться стандартным
Всё, сервер MariaDB развернут, при этом файлы располагаются в каталогах хоста, что позволяет изменять настройки сервера, получать доступ к записям журналов и сами данным баз данных.
Ramp Up your Skills with this Docker Compose Tutorial
Download a free trial of Veeam Backup for Microsoft 365 and eliminate the risk of losing access and control over your data!
Table of Contents
If you’re wondering how to create reproducible Docker containers with Docker Compose, you’ve come to the right place. In this step-by-step Docker Compose tutorial, you’re going to learn how to create simple containers, map ports with Docker Compose all the way to complex multi-container scenarios.
Not a reader? Watch this related video tutorial!
Are you ready? Let’s dig in!
Prerequisites
If you’d like to follow along step-by-step, in this tutorial, ensure you have the following:
- A fresh install of Ubuntu Server LTS with SSH Enabled. This guide will use Ubuntu Server LTS 20.04.1 as the Docker host machine.
- A computer with VS Code installed (optional). This guide will use Visual Studio Code 1.52.1 to SSH to the Docker host and run commands.
- The VS Code official SSH extension installed and connected to the Docker host. (optional)
What is Docker Compose?
Single commands can get long, really long in Docker. Take the below as an example. This example creates a container for a software application called bookstack.
As the complexity of a docker environment increases, so does the amount of flags and conditions required for a working container setup. The Docker command line starts to become cumbersome and difficult to troubleshoot; especially once multi-container setups start entering the mix.
Docker Compose is a way to create reproducible Docker containers using a config file instead of extremely long Docker commands. By using a structured config file, mistakes are easier to pick up and container interactions are easier to define.
Docker Compose quickly becomes invaluable when dealing with container dependencies or multi-container environments.
Docker Compose is a fantastic way to step into Infrastructure as Code without the complexity of distributed systems like Kubernetes.
Docker Compose uses a config file structure called YAML. YAML is similar to JSON or HTML in that YAML is a structured, machine-readable language. YAML specifically focuses on being as human-readable as possible while keeping that structured power.
YAML does have a downside where tabs and other whitespace are significant and must be formatted properly. VS Code does a lot of this hard work for you and is also why you will see many of the examples being done in VS Code.
Installing Docker Compose
Let’s now get started getting your hands dirty. Assuming you’re connected to your Docker host, it’s time to install Docker Compose.
Docker Compose is a separate package from the Docker runtime. But installing Docker Compose will also install the Docker runtime so you’ll kill two birds with one stone!
To install Docker Compose and the Docker runtime, run the following two commands.
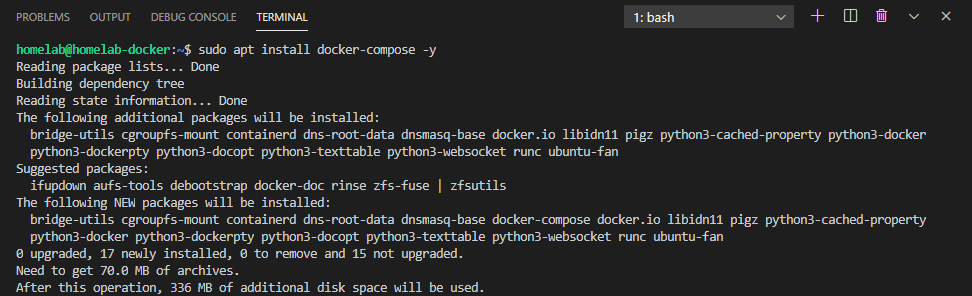
The installation command for Docker Compose
Once installed, you should now create a folder structure to store containers.
Creating a Folder Structure for Docker Compose
Before you can create a container with Docker Compose, you should first create a folder to store containers. You should not only create a folder structure to store containers but you’ll find that various Docker commands are sensitive to the location of various configuration files; Docker Compose is no different.
The most important component of Docker Compose is it’s configuration file called docker-compose.yaml. This configuration file, as explained above, dictates how the Docker runtime should build a container.
When you run Docker Compose, the command will look for its configuration file in the same folder as the command is run. Due to this requirement, it’s always best to create a separate folder when running Docker Compose.
There may only be one Docker Compose configuration file per folder.
To demonstrate creating a Docker container with Docker Compose, first create a folder structure to store the future container and its configuration file using a small fileserver called Caddy.
Caddy is a fileserver, similar to apache httpd or nginx, but written in the Go language. Caddy is specifically designed for ease of use (and will automatically generate or serve an index.html file) without configuration. This combination makes caddy a good choice for beginners.
Assuming you’re logged onto your Docker host, create the folder structure as follows:
- In your home directory, create a folder called containers. This folder will be a good placeholder for this and other containers.
- Inside the containers folder, create a subfolder called caddy. This folder will contain the Docker Compose configuration file and the Caddy container itself.
- Finally, inside of the container folder, caddy, create a blank text file called docker-compose.yaml that will become the Docker Compose configuration file.
With the folder structure and Docker Compose configuration file created, you can now start begin filling out that configuration file with a Docker Compose configuration.
Creating a Docker Compose Configuration File
At its most basic form, a docker-compose.yaml file for the caddy container looks like the following. In your favorite Linux text editor or with VS Code, copy and paste the code below into the Docker Compose configuration file created earlier.
Let’s step through each of the options shown:
- version specifies the version of the docker-compose file. Each new definition of Docker Compose includes breaking changes to the specification. Therefore the version is important so Docker Compose can tell what features it needs to use. Version 3.7 is the latest version that Ubuntu 20.04.1 LTS supports.
The full specification for Docker Compose 3.x can be found here. The linked documentation mentions every single option you can use within Docker Compose
- services contain the specifications for the actual containers. You can define multiple containers in this section.
- caddy is the name of the first container (this is purely for reference).
- container_name defines the actual name given to the container by Docker and must be unique.
- image is the name of the image. In this case, caddy from the Docker Hub is defined. The name or number after the tag separated by a colon is the version.
Port Mapping
That last option in particular requires a special mention:
In Docker Compose, the ports directive allows you to set one or more mappings from the host to the container. For example, above you have mapped port 80 on the host to port 80 on the container. However, you do not need to match the port number. The example below maps port 8800 on the host to port 80 in the container.
You could also define multiple ports like below.
Doing so would map both port 80 and 443 to the host (a common configuration for web servers, to serve both HTTP and HTTPS).
The Docker image creator defines available ports at the time of creation. Be sure to check the documentation of the image you’re working with on Docker Hub or the maintainer’s website for mappable ports. There is no point mapping a port if the port isn’t in use!
With that in mind, lets look at actually running the container.
Running the Container
By now you should have the docker-compose.yaml file inside of your
\containers\caddy folder. Now’s the time to create and start the Caddy container.
On your terminal run the following command which will bring up the Docker containers defined in the docker-compose.yaml file.
You may notice that you did not have to specify the location of the docker-compose.yaml file when running sudo docker-compose up -d . Docker Compose expects you to run all commands inside the folder that contains the docker-compose.yaml file, as many commands are relative to that folder.
Now verify that the container is up and running by navigating to http://<your ip>. This guide is using http://homelab-docker for reference.
You can see this processing happening in VS Code while SSHed into the Docker host in the below animation:
Success! You have now successfully used Docker Compose to start a container from a config file. With that first important step taken, let’s look at how you manage the state of your container.
Commands to Manage Detached Containers
In the previous section, you started the caddy container using the -d flag. Doing so ran a container in a detached state. When a container is in a detached state, that the container will continue to run in the background. But, this poses a problem: how do you manage that container if you no longer have direct control?
To solve this problem, Docker Compose has a series of commands that will manage containers started with a docker-compose.yaml file:
- docker-compose restart is used to restart a container that is currently running. Doing so is different from actually rerunning docker-compose up -d . The restart command will simply restart an existing container, re-run the docker-compose up -d command, and recreate the container from scratch (if the config file has been changed).
- docker-compose stop will stop a running container without destroying the container. Similarly, docker-compose start will start the container up again.
- docker-compose down will stop the running containers and also destroy them. This is where having bind mounts of volumes come into play (read more below).
- docker-compose pull will pull the current version of the docker image (or images) off the repository. If using the latest tag, you can follow with docker-compose down && sudo docker-compose up -d to replace the container with the latest version. Using docker-compose pull is a convenient way to update containers quickly with minimal downtime.
- docker-compose logs will show the logs of the running (or stopped) container. You can also address individual containers (if there are multiple containers defined in the compose file) with docker-compose logs <container name> .
A full list of docker-compose commands can be seen by running docker-compose with no additional arguments or referenced here in the documentation.
Now that you have a running container, let’s look at using content saved locally on your machine.
Creating Bind Mounts in Docker Compose
Bind Mounts are how Docker maps important user data to local storage on your server. To start, generate some content for the container to host:
-
On the Docker host, Inside of the
2. Create a new file called index.html inside of the
/containers/caddy folder that looks like below. This will be the main page the Caddy webserver will serve up.
3. Modify your Docker Compose configuration file to look like below. The example file below is adding the volumes section and pointing a bind mount to the files folder just created to make it available to the container.
4. Run docker-compose up -d again. Docker Compose will now recognize the file has been changed and recreate your container.
5. Navigate to the container’s page with a browser and you should now see it is serving the “Hello World!” page.
You can see the following in the below animation:
You are now hosting content stored locally on your machine! However, what if your content is on an external source like a network share?
Using Docker Compose with Docker Volumes
Once you create a simple container with Docker Compose, you’ll probably need that container to access files somewhere else perhaps on a network share. If so, you can configure the container to use Docker volumes right in your Docker Compose configuration file.
For demonstration purposes, this guide will be creating a Network File Share (NFS) server on the Docker host. Serving local content as an NFS mount holds no practical purpose outside of demonstration. If you were to mount an NFS volume, it will generally be from an external source like a NAS or remote server.
Set up an NFS Share
If you don’t already have an NFS share set up, build one now on the Docker host for this tutorial. To do so:
- Install the NFS server package by running apt install nfs-kernel-server -y .
2. Add the container as an NFS export (similar to a Windows CIFS share) by running the following.
3. Now verify that the host exposes the NFS share by running showmount -e localhost . This command will show any currently exposed NFS shares and who has access.
In the below screenshot, you can see /home/homelab/containers is exposed, but only to the localhost computer (which is the same server running the Docker host).
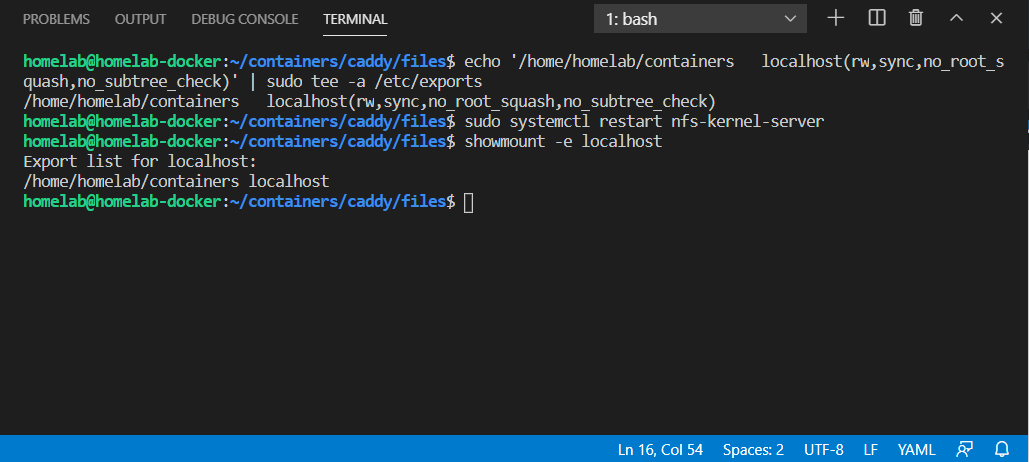
Creating a NFS share in Ubuntu 20.04
If you see the folder /home/<username>/containers in the output, the NFS share is set up.
Defining a Docker Named Volume
Once you’ve created the NFS share, you now need to tell Docker how to access that share. Using Docker Compose, you can do that by defining a named volume in the Docker Compose configuration file.
A named volume is a way for Docker to abstract network-based file shares. Network file sharing comes in all sorts of shapes and sizes these days: CIFS (windows) shares, NFS (Linux) shares, AWS S3 Buckets, and more. By creating a Named Volume, Docker does the hard part of figuring out how to talk to the network share and lets the container just treat the share as if it is local storage.
To create a named volume:
-
Open the Docker Compose configuration file (docker-compose.yaml). If you’re following along, the file should be located in the
2. Inside of the Docker Compose configuration file, add a volumes section after the services section. Your configuration file should like below. The volumes section creates a named volume called MyWebsite. Within that named volume, the parameters needed (such as IP, NFS settings, and path) are specified. The volumes parameter within the services section is also modified, to point to the name volume as opposed to a local folder.
3. Once you’ve defined the named volume pointing to the NFS share in the Docker Compose configuration file, run docker-compose up -d to create and start the container. If all goes well, the container and website should come back up.
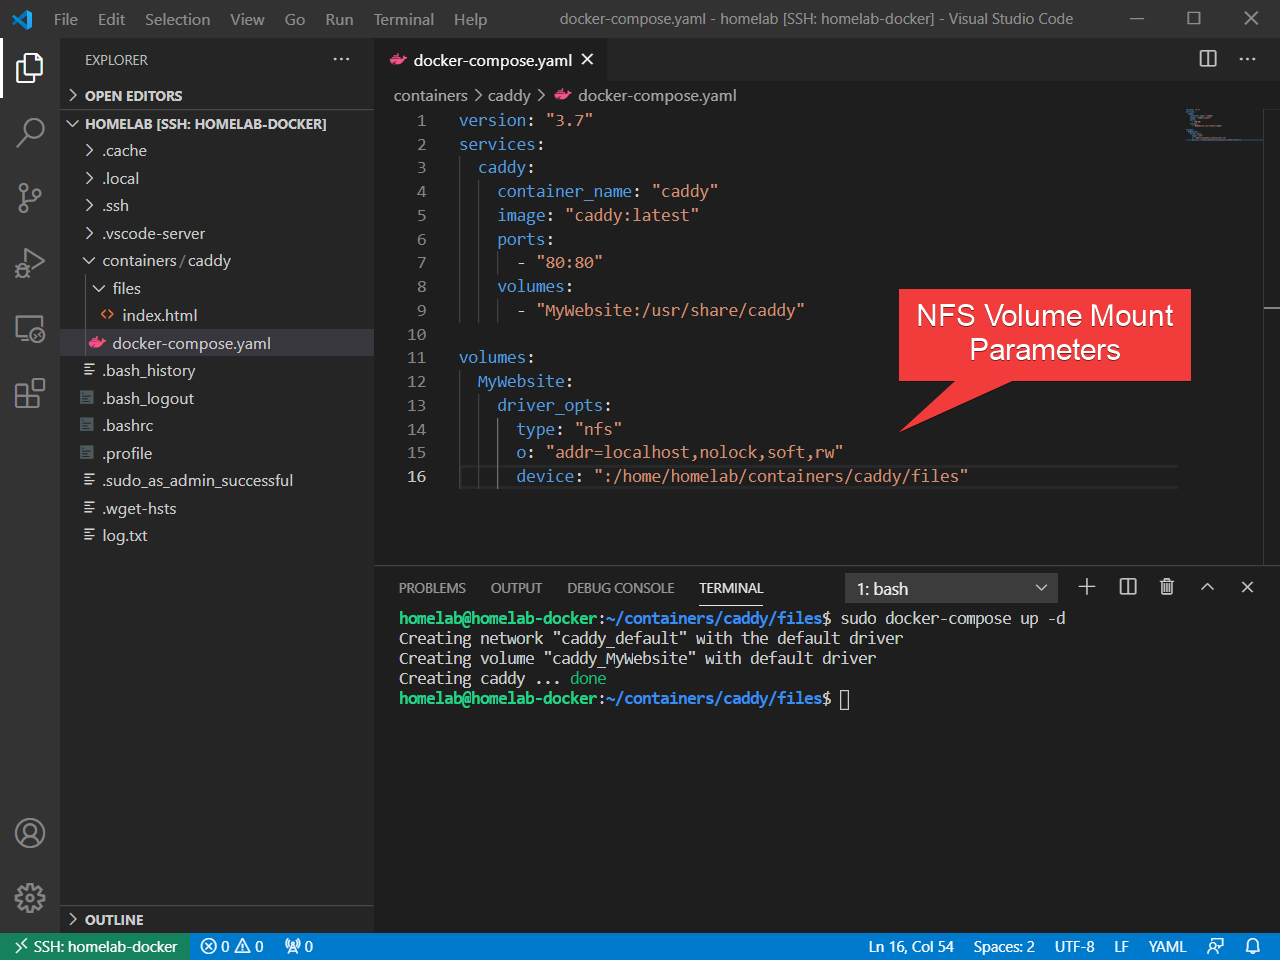
Setting NFS client settings within Docker Compose in VS Code
4. Navigate to the container’s page again. The index.html content should appear just as if the file was being mounted locally. However, that file is being mounted through the NFS server set up on the network.
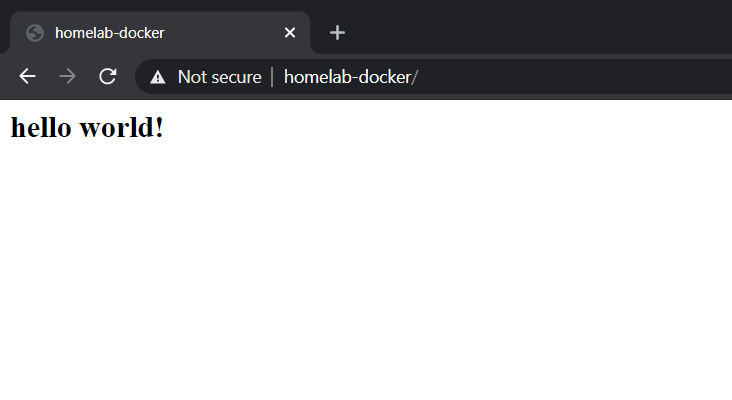
Demonstrating access to the index.html file through an NFS share in Docker
Since you can now mount external Docker volumes in Docker Compose, you can now bring all sorts of network storage into your containers. However, Docker Compose can do more than just define single containers or volumes. Let’s dive into more complex, multi-container scenarios.
This tutorial will no longer be using the caddy container, so you can remove the container using docker-compose down .
Defining Multiple Containers in Docker Compose
Most Docker containers do not work inside a vacuum. Docker containers usually have service dependencies like databases or separate web services that speak over an API.
Using Docker Compose, you can group containers together defined within a single file. By defining multiple containers in a single file, containers can communicate between dependent services and simplify the organization of complex container layouts.
To demonstrate such a scenario, let’s set up a popular wiki application called BookStack.
BookStack is a popular wiki software known for its ease of use and hierarchal layout (as opposed to a flat layout, such as mediawiki).
BookStack, like many web applications, requires a separate database to function properly, as well as the information required to communicate to the database. Setting up such a situation is where Docker Compose excels.
Create the Docker Compose Configuration File
BookStack does not have an internally maintained Docker image, however, linuxserver.io maintains a reputable Docker Hub image on BookStack’s behalf. While the documentation on the docker hub site has a recommended Docker Compose configuration file, this tutorial will build a new configuration file while explaining the concepts.
On the Docker host:
-
First, create a folder for BookStack. If you followed the previous section’s tutorials, you should have a
2. Then create a blank Docker Compose configuration file called docker-compose.yaml inside of the bookstack folder.
3. Now open up the Docker Compose configuration file and define two containers: the bookstack container and the bookstack_db (mariadb) container.
So far, this docker-compose.yaml file is mostly using concepts already introduced: You have two services ( bookstack , and bookstack_db ), both with images and bind mounts. The bookstack container has a port mapping from host port 8080 to internal port 80.
Given the extremely low overhead of Docker containers, it is common practice to define a separate database container for every web application. Doing so allows for a greater separation of duties. This is distinctly different from traditional database setups, where a single database installation may serve hundreds of web applications.
One new option you can see in the above file is the depends_on command. This command tells Docker the order in which the containers should start. Defining the depends_on command tells Docker that the bookstack_db container must start first.
Setting up Container Communication with Environment Variables
This configuration file built in the last section isn’t complete yet. While you have defined two services (containers), they aren’t speaking to each other! The bookstack container has no idea how to communicate with the bookstack_db container. Lets resolve that using environment variables.
Environment variables are the most common way of providing variables to Docker containers. These are variables given at runtime (or defined in the docker-compose.yaml configuration file) to provide information about what the container needs to do.
Environment Variables are defined by the person who creates the Docker image. They will be different depending on the Docker image you are using, and you must refer to the documentation from the creator regarding what environment variables to use.
There are two methods of defining environment variables; directly in the docker-compose.yaml file itself or as a separate file.
A separate file is, typically, the recommended method, especially if variables contain sensitive data such as passwords. A docker-compose.yaml file is designed to be shared or even uploaded to a public-facing GitHub repo. Having a separate file for sensitive data reduces the chance of an accidental security breach.
On the Docker host, now create two environment variables; one for the bookstack container and one for the bookstack_db container.
-
Create a new file in the
2. Create a new file in the
/containers/bookstack folder called bookstack_db.env and include the following content:
3. As a best practice, now ensure both env files are not readable by other users.
You should change read access because both the bookstack.env and bookstack_db.env files have sensitive data in them.
/containers/bookstack/docker-compose.yaml Docker Compose file to reference these two environment files shown below.
5. Now start the bookstack and bookstack_db containers using Docker Compose.
You can see each of the aforementioned steps in this section performed in VS Code below.
Monitoring Docker Compose Logs
The Docker engine works with Docker Compose to perform many different tasks in the background. Being able to monitor what’s going on especially when working with multiple containers at once is helpful.
To monitor the bookstack container, for example, use the logs command. In this tutorial, once you see the logs show [services.d] done , you can go to the bookstack URL.
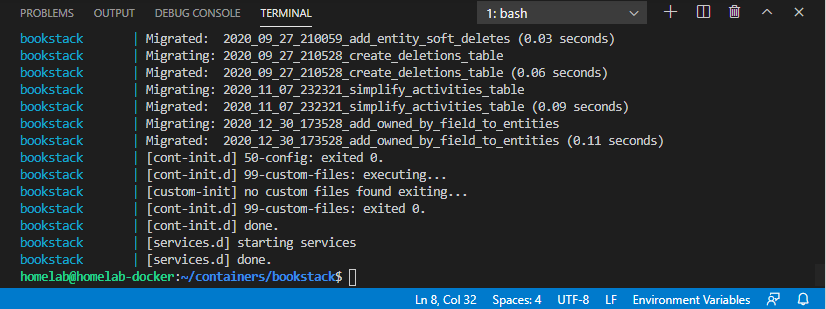
Using the docker-compose logs command
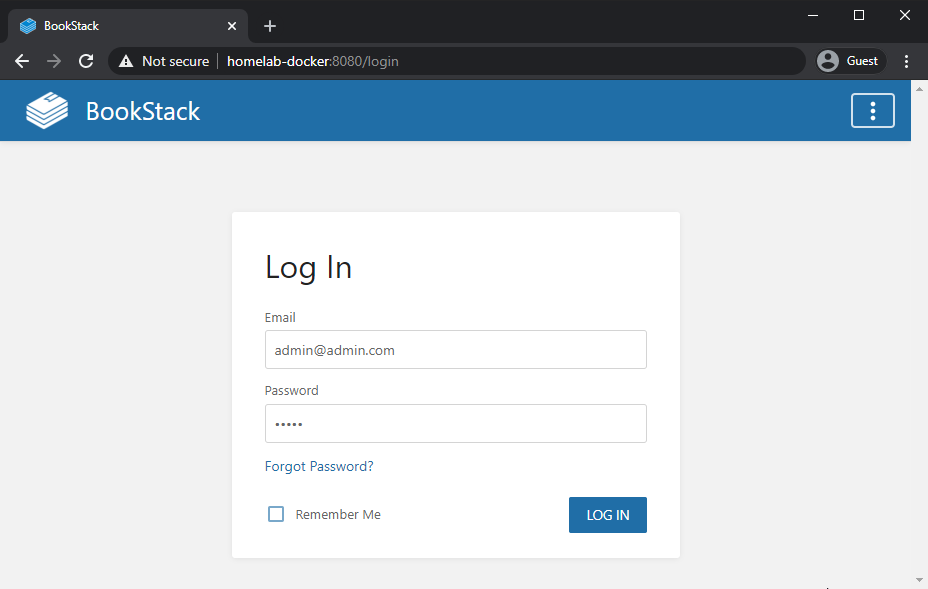
The bookstack welcome screen. Default login is [email protected]/password
At this stage, you should have a fully functional wiki running within its own container, with its own database, entirely within Docker!
As long as you have the bookstack and bookstack_db folders, you can recreate your bookstack environment from scratch.
Docker Compose and Networking
Up to this point, you haven’t learned too much about the communication and networking aspect of how containers work together. Let’s change that.
When you create multiple containers within a single docker-compose.yaml file as you’ve done in the previous sections, they are all assigned to the same network (usually called name-of-parent-folder_default).
You can see the network created for the containers when you run docker-compose up -d as shown below.
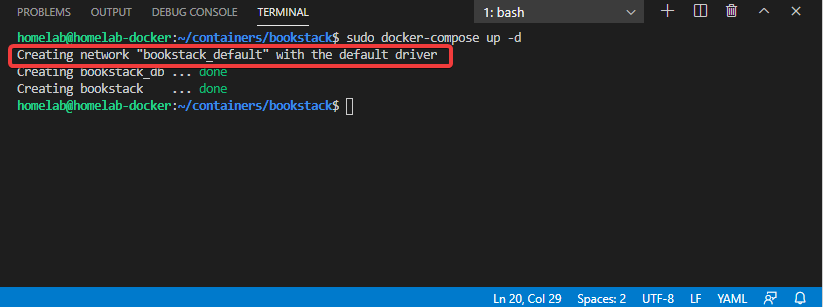
The default network created with docker-compose comes up
When all containers get assigned within the same network, Docker creates DNS entries for them internally. That is why in the previous example, you referred to your database as bookstack_db in the environment variables. That bookstack_db name is actually a DNS entry that points to the database container’s IP address.
You also do not have to rely on Docker Compose to autogenerate networks for you. You can manually define internal or external networks. Manually defining networks is great when you have a container that needs to speak to another container in a separate docker-compose.yaml file. You could expose the ports, or you can create a network they can both join!
Note that when you start explicitly defining networks, you also have to explicitly define the default network. Docker Compose will stop creating that network automatically once you start defining the networks
Now modify the bookstack docker-compose.yaml to include an externally created network.
- Create the external network with docker network create my_external_network .
2. Define the external network in docker-compose.yaml:
3. Run docker-compose up -d to recreate the containers. Your two containers are now joined to two networks as shown below.
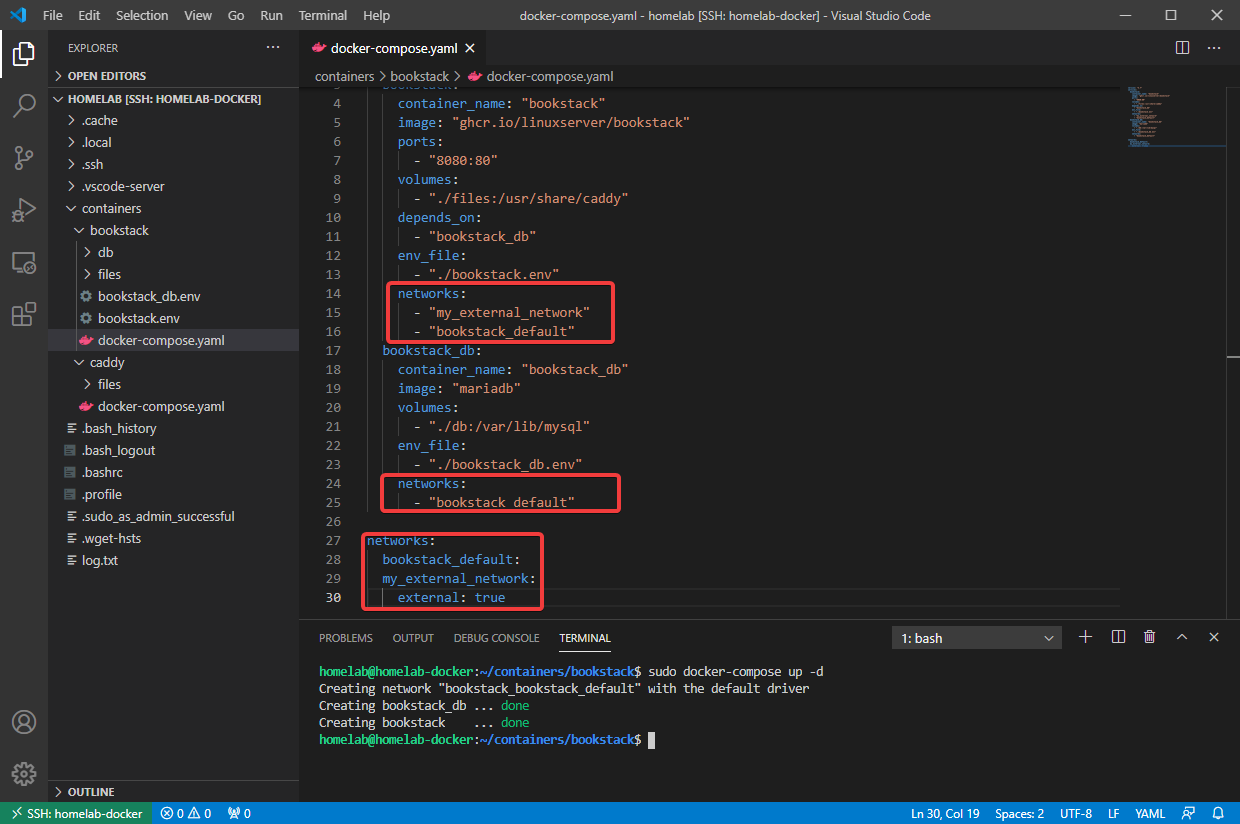
A highlight of the networks defined within a docker-compose file
The bookstack container is now also joined to an externally defined network. This allows you to create another container that turns the bookstack HTTP traffic into HTTPS before it leaves Docker (referred to as a reverse-proxy).
Setting a Specific User to Run a Container
By default, all Docker containers run as a sandboxed root user. This is equivalent to running a virtual machine logged in as the default Administrator user. While this generally isn’t a problem, there are security concerns if the sandbox is compromised.
The other issue with running as root is file permissions. You may notice that if you try to delete the db folder within the bookstack folder, you actually can’t; the contents are owned by root.
While most images do not appreciate running as a non-root user, linuxserver.io images in particular offer an environment variable to set the user that runs inside the container. You can do so by adding UID=1000 and GID=1000 inside the bookstack.env configuration.
1000:1000 is the default user ID and group for the first user in ubuntu (which you may not be). You can read more about User IDs and Group IDs at Related: A Windows Guy in a Linux World: Users and File Permissions)
You can also force a UID and GID using the user parameter in docker-compose, but this is not recommended as most containers do not behave well when forced to a different user
Setting the Restart Policy
If you’d like containers built with Docker Compose to restart on failure, use the restart policy by adding a restart: <option> parameter under the container settings in docker-compose.yaml.
Adding this parameter will cause containers to automatically restart on failure to help maintain uptime in the event of unexpected power issues.
Manually setting DNS entries for Containers
Just like with Windows and Linux, Docker also has a “hosts file”. By using the extra_hosts parameter in a config file, you can force a host to resolve to a specific IP. This can be useful when you have DNS constraints, such as split DNS or a test server you want to interact with temporarily.
Running Commands
Once the container is started, you can run commands inside of the container using the docker-compose run . For example, maybe you’d like to start up a Bash terminal inside of your bookstack container. To do that, you’d run the command below.
Conclusion
At this stage, you should have enough information to follow along with the majority of docker-compose tutorials out on the web. Having this knowledge can vastly expand your ability to move into the world of Docker, and the building of web apps in Infrastructure as Code.
Hate ads? Want to support the writer? Get many of our tutorials packaged as an ATA Guidebook.
More from ATA Learning & Partners
Recommended Resources!
Recommended Resources for Training, Information Security, Automation, and more!
Get Paid to Write!
ATA Learning is always seeking instructors of all experience levels. Regardless if you’re a junior admin or system architect, you have something to share. Why not write on a platform with an existing audience and share your knowledge with the world?
ATA Learning Guidebooks
ATA Learning is known for its high-quality written tutorials in the form of blog posts. Support ATA Learning with ATA Guidebook PDF eBooks available offline and with no ads!
15 Basic Docker Compose Commands for Beginners

After writing the 25 Basic Docker Commands for Beginners article, it was only natural that I start exploring the functions of Docker Compose Commands. While running container using a docker run command is an easy way to get your containers up and running, using a docker-compose.yml file will ensure that your environmental variables and other parameters are saved making it easy to redeploy your containers across Docker host machines.
You can have multiple containers within a single Docker Compose file which will create a service that runs multiple containers. For example a container that runs a wiki, and a container that runs an SQL database for that wiki.
The docker compose commands in this article will be able to get you started with working with docker compose. This guide assumes that you already have Docker and Docker Compose installed on your system. If not, you can read the Quick and Easy Steps to Install Docker. Scroll to the bottom of the article and you will see the instructions to install Docker Compose.
Working with Docker Compose Services
Docker compose commands are available in the CLI that will allow you to start, stop and restart services, pause and resume services and pull images. Below are examples of those commands.
Create and Start all Containers, Volumes, Images, and Networks in a Docker Compose File
When you are ready to run your service, cd to the directory in which your docker-compose.yml file is located. Once you are in the directory with the compose file you can use the following command to run your service.
When the above command is ran, docker-compose will search for a file named docker-compose.yml or docker-compose.yaml . Once it finds the file, it will read it and create the containers, volumes, images, and networks listed in the file and then run the containers.
Stop and Remove all Containers, Volumes, Images, and Networks in a Docker Compose File
In order to shut down your service, make sure you are in the directory of your docker-compose.yml file and run the following command.
When this command is ran, docker-compose will search for a file named docker-compose.yml or docker-compose.yaml . Once the file is located, it will stop all of the containers in the service and remove the containers from your system.
If you want to remove internal volumes that were created, you can add the -v flag to the command. Below is an example of the command to remove internal volumes.
Start Services in a Docker Compose File
In order to start services that are outlined in a Docker Compose File you can run the following command within the directory of your docker-compose file.
This command will search for services listed in a docker-compose.yaml or docker-compose.yml file and start the containers listed in the service.
Stop Services in a Docker Compose File
If you need to stop the services that are outlined in your Docker Compose File you can run the below command within the directory of your docker-compose file.
This command will stop all services located in your docker-compose.yml file.
Pause Services in a Docker Compose File
In order to pause the containers in a service that is listed in a docker-compose file you can run the following command from within the directory of your docker-compose file.
Resume Services in a Docker Compose File
In order to resume paused containers in a service that is listed in a docker-compose file you can run the following command from within the directory of your docker-compose file.
Restart Services in a Docker Compose File
To restart all of the containers in a service that is outlined in your docker-compose file, you can run the following command from inside the directory of your docker-compose file.
After this command is ran, all of your containers will restart.
Remove Stopped Containers in a Docker Compose File
This command will remove all containers that are listed in a docker-compose file that are stopped. You can run the following command from within the directory of our docker-compose.yml or docker-compose.yaml file.
Pull Images in a Docker Compose File
If you would like to pre-pull your container images prior to running your service or if you would like to pull updated images for your containers, you can run the following command.
This command will pull all of the container images that are outlined in your docker-compose file.
Monitoring Docker Compose Services
Docker Compose has commands that will allow you to view logs, resource usage and monitor events within the service outlined in your docker-compose.yml file.
List Containers Deployed from a Docker Compose File
If you need to view a list of containers that are deployed from your docker compose file, you can run the following command within the directory of your docker-compose file.
List images from a Docker Compose File
The below command will list all of the images that are on your system as part of your docker-compose file.
View Logs from Running Containers
In order to view the logs from the containers you have running in a service you can run the following command within the directory of your docker-compose file.
This command will combine and output all of the logs from service containers that you have running.
View Resource Usage of Running Containers
This command is equivalent to running the top command. It will display resource usage of the containers that are deployed from a docker-compose file.
Validate and View a docker-compose.yml File
In order to view and validate your docker-compose.yml file, you can run the below command from inside the directory in which your docker-compose file is stored.
Additional Information
If you need additional information with any of these docker compose commands you can type append —help to the end of any of the above docker commands and type enter. If you need more information you can visit the Docker Documentation page.
If there are any other Docker Compose commands you would like to see added to this post, leave a comment below.