GitLab CI: Часть 3, введение в .gitlab-ci.yml
May 15, 2017 16:24 · 454 words · 3 minute read gitlab gitlab ci
В одной из предыдущих статей мы полностью подготовили фундамент для использования GitLab CI, во второй успешно зарегистрировали раннер (runner), который будет заниматься выполнением инструкций из специального файла .gitlab-ci.yml .
В третьей статье цикла мы подробнее рассмотрим процесс continuous integration в GitLab и разберемся с простым примером конфигурационного файла .gitlab-ci.yml !
Итак, просесс continuous integration (CI) в GitLab работает следующим образом:
- выполняется push изменений в репозиторий проекта;
- если в корне проекта есть файл .gitlab-ci.yml , то GitLab понимает, что для этого проекта нужно использовать continuous integration;
- GitLab ищет запущенный runner, подключенный для этого проекта (или общедоступный, shared runner);
- GitLab передает файл .gitlab-ci.yml раннеру, который обновляет исходники в своем каталоге для билда ( —builds-dir ) и выполняет команды, описанные в этом файле;
- после выполнения команд раннер возвращает в GitLab результаты, которые можно посмотреть рядом с соответствующим коммитом, на вкладке pipelines или вкладке jobs.
Простейший файл .gitlab-ci.yml (не выполняет полезных действий, но важен для понимания) может выглядеть так:
Если ваши глаза владеют английским, то в официальной документации можно найти куда больше полезных примеров данного конфигурационного файла, а также обязательно стоит ознакомиться с переменными, которые используются в процессе continuous integration.
Подготовим «скелет» для нашего файла .gitlab-ci.yml — для начала опишем этапы и задачи, которые мы хотим реализовать с его помощью:
Итак, в данном примере мы включаем в .gitlab-ci.yml специальные образы, которые подготовили в предыдущей статье и описываем шесть этапов (stages), а именно:
- запуск контейнеров, которые будут использоваться для сборки проекта;
- выполнение действий по сборке проекта;
- тестирование собранного проекта;
- «упаковку» собранного и протестированного проекта в docker-образ;
- деплой docker-образа с проектом на ревью (автоматический режим) и продакшн (ручной режим);
- остановка и удаление контейнеров, которые использовались для сборки проекта.
Также следуется отметить, что данные этапы выполняются последовательно и зависят друг от друга — если, например, этап сборки проекта завершится с ошибкой, то этап тестирования (и следующие за ним) просто не запустится.
На этом все, а в следующих статьях мы подробно рассмотрим каждый из описанных этапов отдельно.
Основы CI/CD на gitlab
Gitlab предоставляет уникальную возможность получить одновременно бесплатный приватный репозиторий и бесплатный CI/CD из коробки в том же месте. Для сохранения баланса он конфигурируется не менее уникальным способом через конфиг-файл, который не так-то просто для понимания(я в первый раз вникала чересчур долго). В конце концов разобралась, и хочу поделиться.
Как это работает вообще все?
Есть файл .gitlab-ci.yml , который лежит в корне проекта, в нем конфигурируется вся магия сборки. Если гитлаб видит, что в ветке есть такой файл, он запускает сборку по алгоритму, описанному в этом файле.
По дефолту билды запускаются на каждый пуш в ветку.
То есть если у вас в одной ветке нет конфига, а в двух других он принципиально разный, если запушить что-то новое в три ветки сразу, запустится два билда с разными алгоритмами.
Настроить билды без этого файла, как, например, в тимсити или дженкинсе нельзя.
Ура, я хочу захостить свой фронтенд-проект на gitlab!
В отличие от простого gh-pages, где ты собираешь, что хочешь, и просто пушишь в репозиторий файл index.html, тут так поступить нельзя. Ну, то есть, в теории, можно, но автоматически ничего все равно работать не будет.
Как будет выглядеть в gitlab конфиг “типа как на gh-pages” (я предполагаю, что мы, как и с gh-pages уже собрали все в папку dist и запушили ее).
Главный секрет деплоя статики — положить все необходимое в папку public и отметить ее как артефакт.
И тут задумываемся — зачем собирать все локально, если можно делать это на машинах гитлаба, все равно же конфиг пишем. Это займет чуть больше времени, зато будет надежнее.
Все, мы разобрались с тем, как сделать, чтобы сайт собирался и деплоился, достаточно просто вносить изменения, пушить и он автоматически будет пересобираться и обновляться!
Теперь можно разобраться поподробнее в конфиге и придумать, какие еще возможности можно использовать
Этапы сборки
Конфиг “stage” — этап билда, по дефолту их три: build, test, deploy. Этапы всегда идут в четком порядке. Можно не указывать ничего, тогда запустится на этапе test.
Разберемся, что это такое и как использовать это во благо. Если подумать, этапов работы с кодом у нас и правда в целом три: собрать, протестировать(убедиться, что это можно деплоить), задеплоить. И если один из них упал, остальные запускать нет необходимости.
По этому принципу делает и гитлаб:
- jobs. Их может быть много разных. Каждая делает свое маленькое дело — собирает фронтенд с одним параметром, собирает с другим параметром, прогоняет тесты интерфейса, прогоняет линтер бекенда.
- stages: это этапы сборки. Внутри одного этапа все jobs выполняются без определенного порядка. Однако по умолчанию джобы следующего этапа не стартуют, пока все из предыдущего не завершились успешно
- pipelines — pipeline создается каждый раз при пуше или если запустить его руками. Один пайплайн — одна сборка с конкретной кофнигурацией stages и jobs.
Особенность конфига гитлаба в том, что мы не идем вроде как логично, объявляя этапы и наполняя их задачами, а, наоборот, каждой задаче указываем, на каком она этапе. Этапы, конечно же, можно создать любые, не ограничиваясь стандартными.
Например кусочек конфига для скриншота выше:
Стоит поменять порядок этапов в конфиге, и они начнут выполняться в другом порядке.
cache
Билды обычно идут дольше, чем хотелось бы. Первое, что приходит в голову — это что же, каждый раз скачивать зависимости? Это можно улучшить!
В конфиг задачи достаточно добавить вот такое:
$
Это будет работать следующим образом: каждый раз при запуске задачи гитлаб будет искать у себя сохраненный кеш с названием, совпадающим с cache-for-my-task-хеш_ветки . Если найдет — скачает его и добавит к кодовой базе, на которой будут совершаться дальнейшие действия.
В данном случае скачает все node_modules, которые сохранились с предыдущего запуска и после выполнения стандартного шага npm i установка зависимостей произойдет гораздо быстрее.
Гитлаб предоставляет много разных переменных, которые можно использовать здесь. Кешировать node_modules наиболее эффективно по веткам, хотя можно шерить кеш на весь репозиторий. Или вообще написать хитрое условие.
Артефакты
В конфиге выше написано:
Артефакты работают так: файлы, лежащие по указанным путям, в конце каждой джобы загружаются на сервер гитлаба и скачиваются в начале каждой джобы следующего этапа.
Погодите, звучит как кеш! В чем разница?
Кеш, исходя из названия, нужен для того, чтобы что-то временно хранить для ускорения сборки. Кстати, исходя из его предназначния, гитлаб не гарантирует то, что кеш найдется, он вполне себе может потеряться.
- У кеша мы можем указать ключ, а у артефактов — не можем. Это происходит потому, что кеш шарится между несколькими пайплайнами, можно запустить сборку ветки два раза, и они будут использовать один и тот же кеш (потому что название ветки, на которое мы ссылаемся в ключе — одинаковое).
А артефакт живет только внутри одного пайплайна и все, причем передается только из этапа в этап, не между джобами одного этапа. - Артефакт можно скачать из интерфейса гитлаба — все пакуется в zip и доступно для скачивания и анализа (удобно дебажить проблемы с node_modules). У кеша такой опции нет. Если смотреть чуть глубже, то кеш хранится на там, где установлен раннер, а артефакт — у самого гитлаба. Это как раз и обеспечивает гарантию наличия/отсутствия кеша и артефактов. Кстати, можно настроить и хранить артефакты до 30 дней.
Я описала два глобальных отличия, есть еще несколько, их можно найти здесь.
Но в итоге непонятно: как тут добавление артефактов позволяет деплоить pages, и когда вообще нужно их использовать?
- Деплой pages происходит просто потому, что гитлаб придумал такой алгоритм — если в артефактах папка public — она используется для раздачи статики. Вот и вся хитрость
- Артефакты же нужно использовать когда нужно передать какие-то данные между этапами сборки. Например, в одном этапе собрали бандл фронтовый, и в качестве артефакта передали его на этап деплоя.
Все, базовые основы CD на gitlab вы знаете, теперь можно хостить и деплоить код втайне от подписчиков на гитхабе (а если не хотите и гитлаб светить, то приватные репозитории + heroku в помощь!).
Введение в GitLab CI
Публикую перевод моей статьи из блога ГитЛаба про то как начать использовать CI. Остальные переводы гитлабовских постов можно найти в блоге компании Softmart.
Представим на секунду, что вы не знаете ничего о концепции непрерывной интеграции (Continuous Integration — CI) и для чего она нужна. Или вы всё это забыли. В любом случае, начнем с основ.
Представьте, что вы работаете над проектом, в котором вся кодовая база состоит из двух текстовых файлов. Более того, очень важно, чтобы при конкатенации этих файлов в результате всегда получалась фраза «Hello world.» Если это условие не выполняется, вся команда лишается месячной зарплаты. Да, все настолько серьезно.

Один ответственный разработчик написал небольшой скрипт, который нужно запускать перед каждой отправкой кода заказчикам. Скрипт нетривиален:
Проблема в том, что в команде десять разработчиков, а человеческий фактор еще никто не отменял.
Неделю назад один новичок забыл запустить скрипт перед отправкой кода, в результате чего трое заказчиков получили поломанные сборки. Хотелось бы в дальнейшем избежать подобного, так что вы решаете положить конец этой проблеме раз и навсегда. К счастью, ваш код уже находится на GitLab, а вы помните про встроенную CI-систему. К тому же, на конференции вы слышали, что CI используется для тестирования.
Запуск первого теста в CI
После пары минут, потраченных на поиск и чтение документации, оказывается, что все что нужно сделать — это добавить две строчки кода в файл .gitlab-ci.yml :
Добавляем, коммитим — и ура! Сборка успешна! 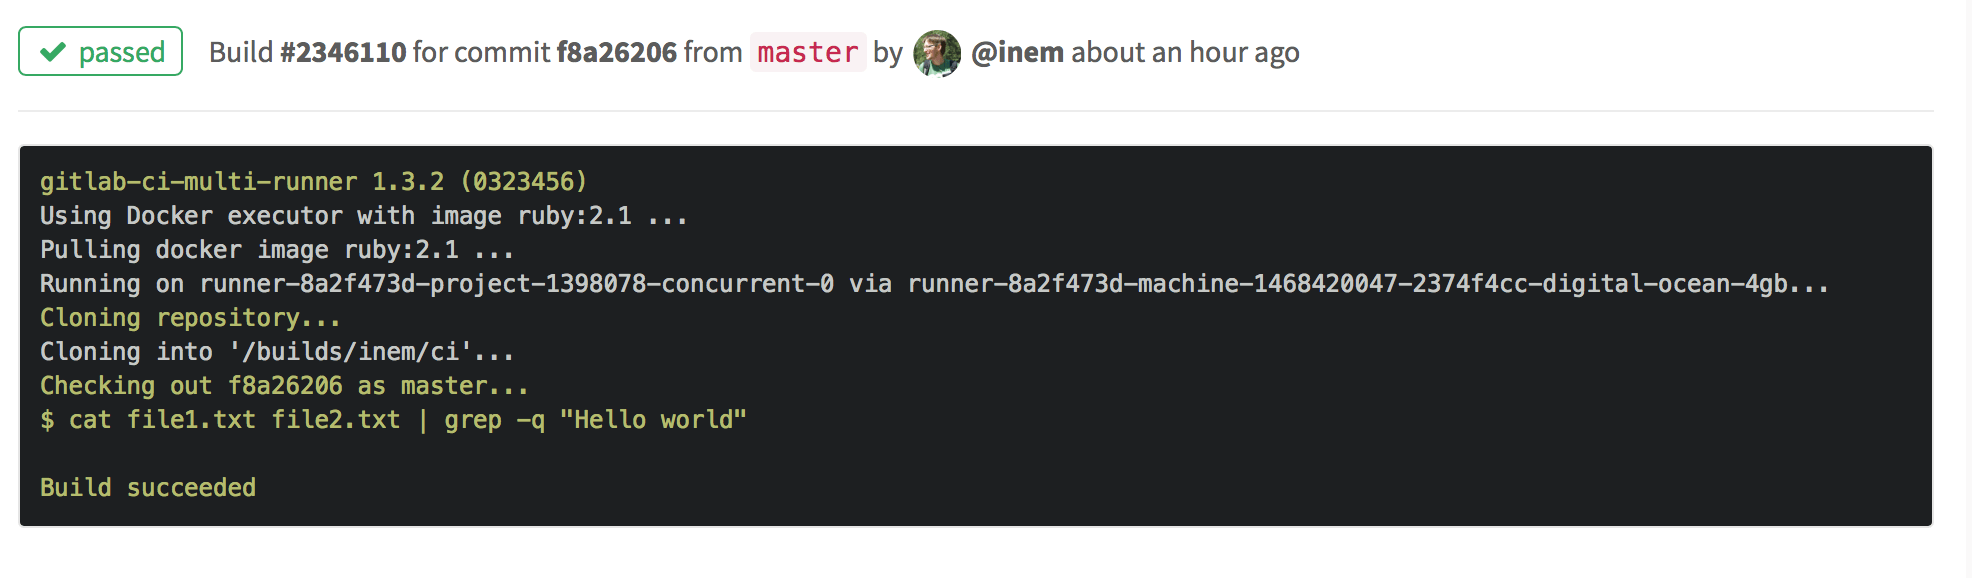
Поменяем во втором файле «world» на «Africa» и посмотрим, что получится: 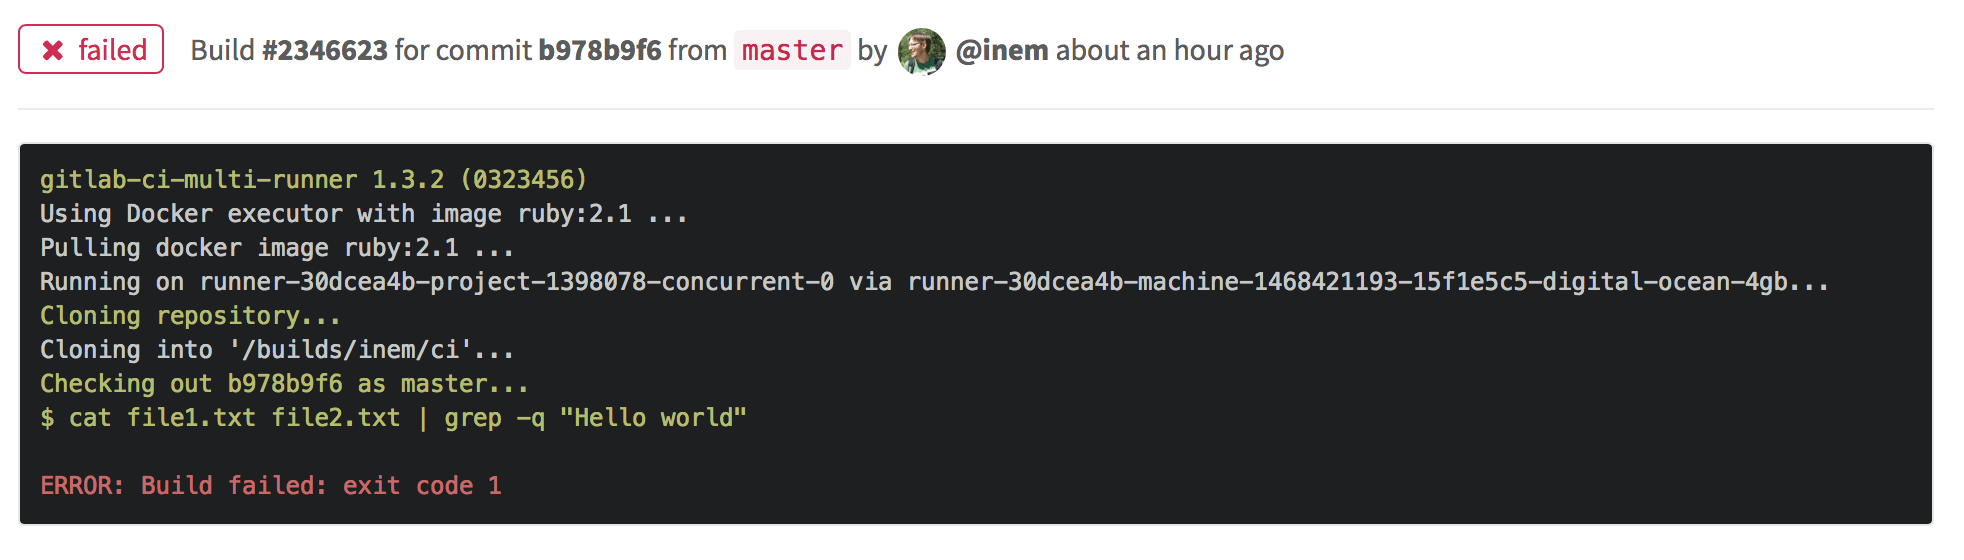
Сборка неудачна, как и ожидалось.
Итак, у нас теперь есть автоматизированные тесты. GitLab CI будет запускать наш тестовый скрипт при каждом пуше нового кода в репозиторий.
Возможность загрузки результатов сборки
Следующим бизнес-требованием является архивация кода перед отправкой заказчикам. Почему бы не автоматизировать и его?
Все, что для этого нужно сделать — определить еще одну задачу для CI. Назовем ее «package»:
В результате появляется вторая вкладка 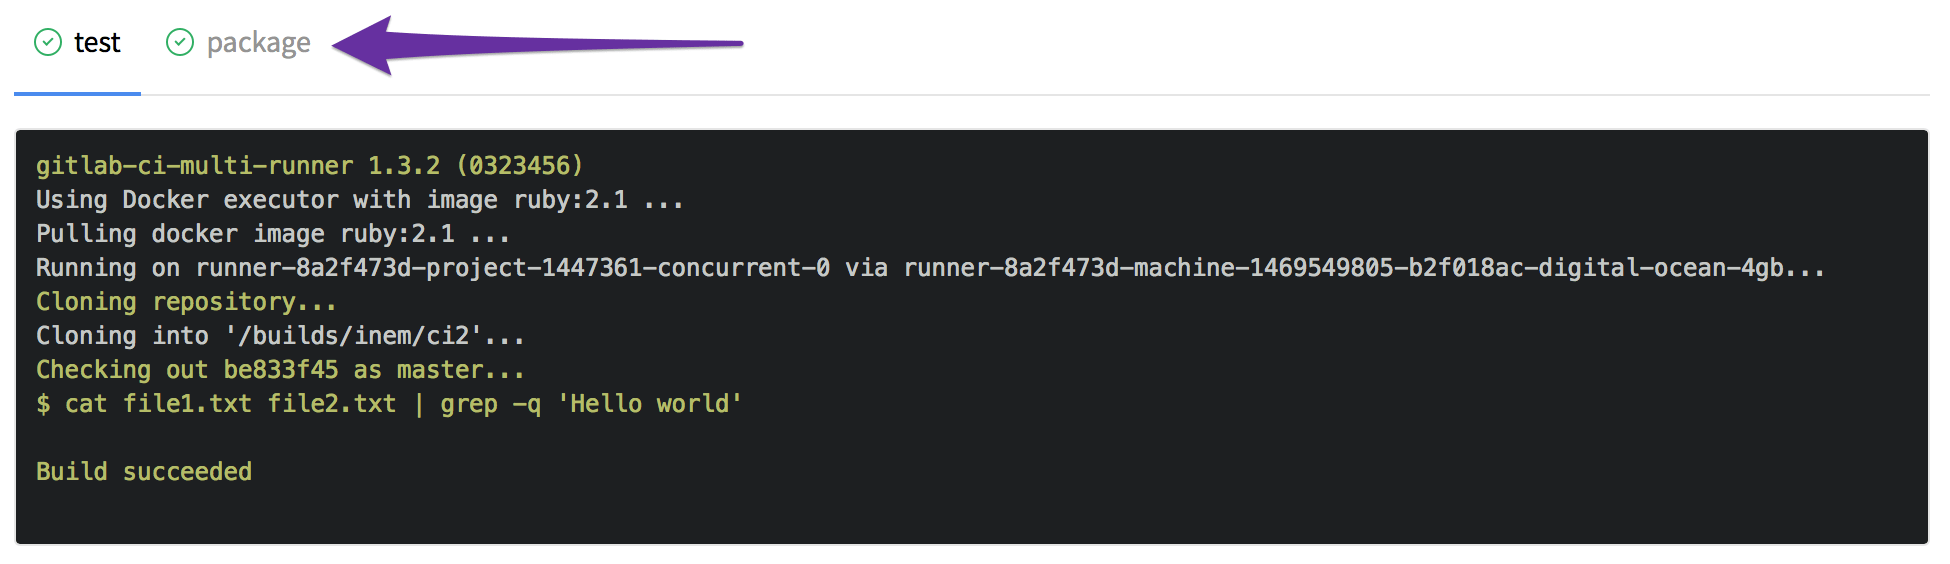
Однако мы забыли уточнить, что новый файл является артефактом сборки, что позволит его скачивать. Это легко поправить, добавив раздел artifacts :
Проверяем… Все на месте: 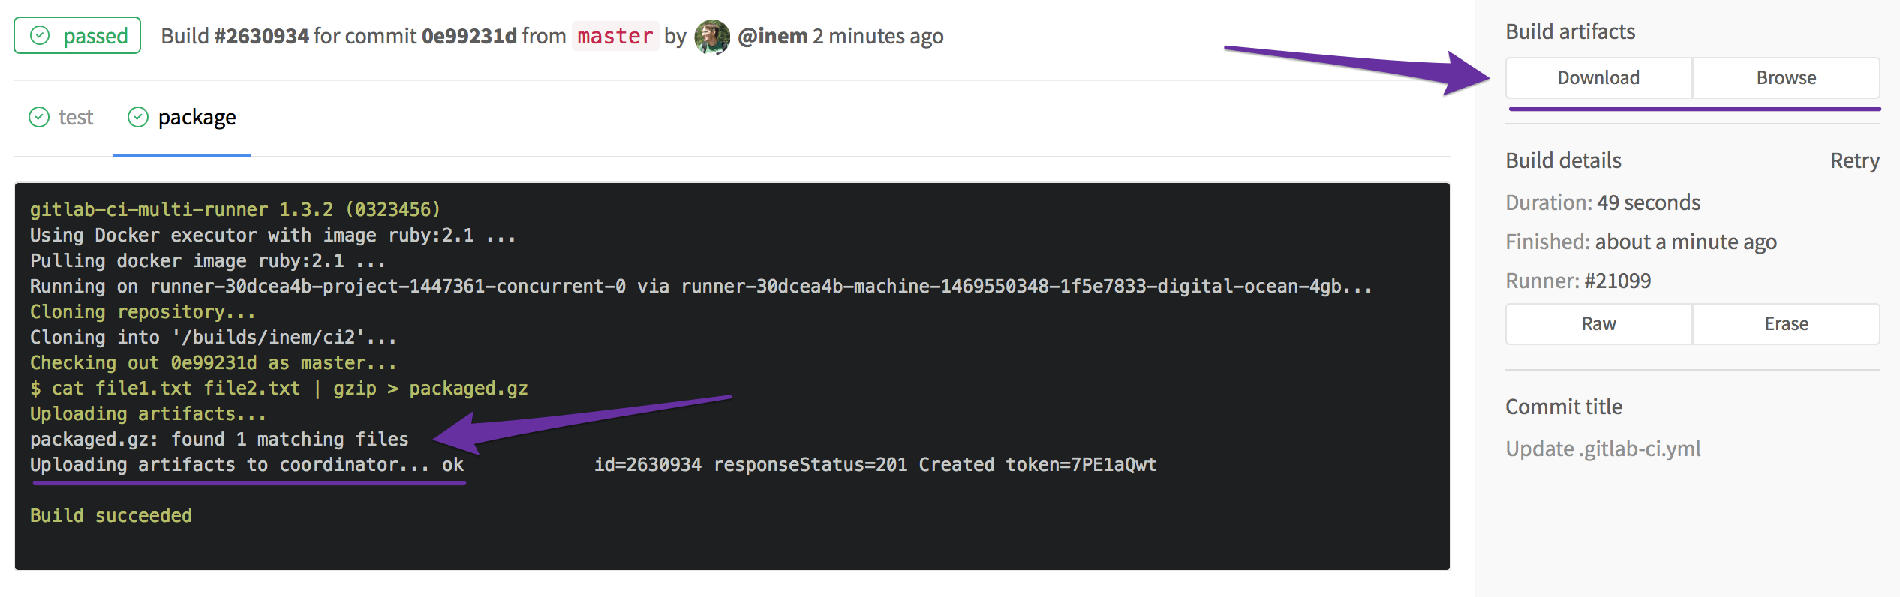
Отлично! Однако, осталась одна проблема: задачи выполняются параллельно, а нам не нужно архивировать наше приложение в случаях, когда тест не пройден.
Последовательное выполнение задач
Задача ‘package’ должна выполняться только при успешном прохождении тестов. Определим порядок выполнения задач путем введения стадий ( stages ):
Также не стоит забывать о том, что компиляция (которой в нашем случае является конкатенация файлов) занимает время, поэтому не стоит проводить ее дважды. Введем отдельную стадию для компиляции:
Посмотрим на получившиеся артефакты:

Скачивание файла «compile» нам ни к чему, поэтому ограничим длительность жизни временных артефактов 20 минутами:
Итоговая функциональность конфига впечатляет:
- Есть три последовательных стадии: компиляция, тестирование и архивация приложения.
- Результат стадии компиляции передается на последующие стадии, то есть приложение компилируется только однажды (что ускоряет рабочий процесс).
- Архивированная версия приложения хранится в артефактах сборки для дальнейшего использования.
Какие образы Docker лучше использовать
Прогресс налицо. Однако, несмотря на наши усилия, сборка до сих пор проходит медленно. Взглянем на логи:
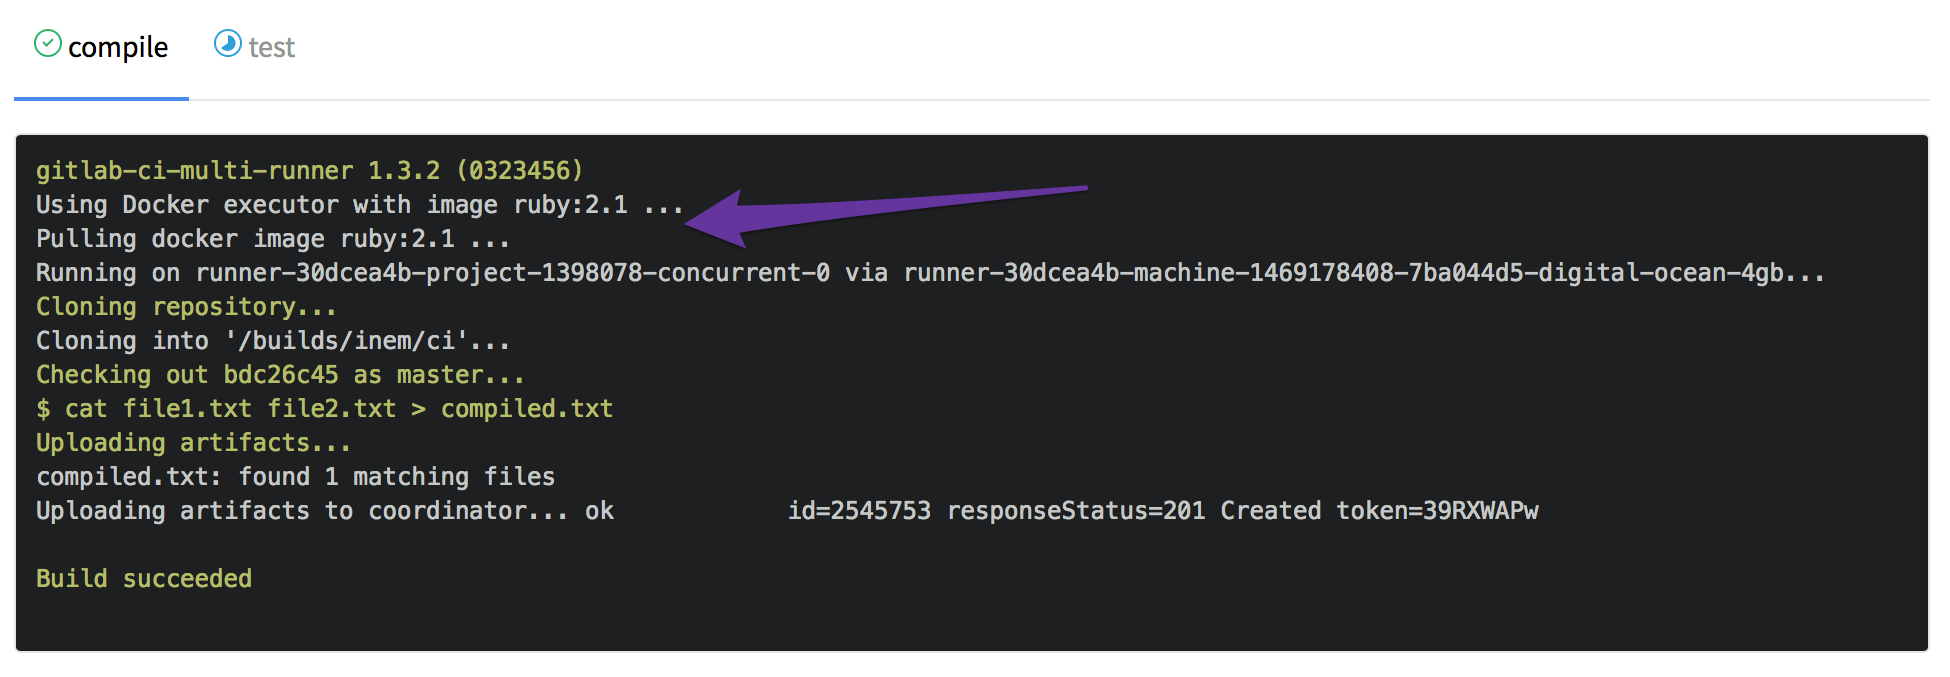
Что, простите? Ruby 2.1?
Зачем тут вообще Ruby? А затем, что GitLab.com использует образы Docker для запуска сборок, а по умолчанию для этого используется образ ruby:2.1 . Само собой, в этом образе содержится множество пакетов, которые нам ни к чему. Спросив помощи у гугла, узнаем, что существует образ alpine , который представляет собой практически «голый» образ Linux.
Для того, чтобы использовать этот образ, добавим image: alpine в .gitlab-ci.yml .
Благодаря этому время сборки сокращается почти на три минуты:

А вообще, в свободном доступе находится довольно много разных образов, так что можно без проблем подобрать один для нашего стека. Главное — помнить о том, что лучше подходят образы, не содержащие дополнительной функциональности — такой подход минимизирует время скачивания.
Работа со сложными сценариями
Теперь представим, что у нас появился новый заказчик, который хочет, чтобы вместо .gz архива наше приложение поставлялось в виде образа .iso . Поскольку весь процесс сборки реализован через CI, все, что нам нужно сделать — добавить еще одну задачу. Образы ISO создаются с помощью команды mkisofs. В итоге конфигурационный файл должен выглядеть следующим образом:
Обратите внимание на то, что названия задач не обязательно должны быть одинаковыми. Более того, в таком случае параллельное выполнение задач на одной стадии было бы невозможным. Так что относитесь к одинаковым названиям задач и стадий как к совпадению.
А тем временем сборка не удалась: 
Проблема в том, что конманда mkisofs не входит в состав образа alpine , так что нужно установить ее отдельно.
Установка дполнительного ПО
На сайте Alpine Linux указано, что mkisofs входит в состав пакетов xorriso и cdrkit . Для установки пакета нужно выполнить следующие команды:
Все это — тоже валидные команды CI. Полный список команд в разделе script должен выглядеть следующим образом:
С другой стороны, семантически более корректно выполнять команды, ответственные за установку пакетов до раздела script , а именно в разделе before_script . При размещении этого раздела в верхнем уровне файла конфигурации, его команды будут выполнены раньше всех задач. Однако в нашем случае достаточно выполнить before_script раньше одной определенной задачи.
Итоговая версия .gitlab-ci.yml :
А ведь мы только что создали конвейер! У нас есть три последовательные стадии, при этом задачи pack-gz и pack-iso стадии package выполняются параллельно:

Подводя итоги
В этой статье приведены далеко не все возможности GitLab CI, однако пока что остановимся на этом. Надеемся вам понравился этот небольшой рассказ. Приведенные в нем примеры были намеренно тривиальными — это было сделано для того, чтобы наглядно показать принципы работы CI не отвлекаясь на незнакомые технологии. Давайте подытожим изученное:
- Для того, чтобы передать выполнение определенной работы в GitLab CI, нужно определить одну или более задач в .gitlab-ci.yml .
- Задачам должны быть присвоены названия, советуем делать их осмысленными, чтобы потом самим не запутаться.
- В каждой задаче содержится набор правил и инструкций для GitLab CI, определяющийся ключевыми словами.
- Задачи могут выполняться последовательно, параллельно, либо вы можете задать свой собственный порядок выполнения, создав конвейер.
- Существует возможность передавать файлы между заданиями и сохранять их как артефакты сборки для последующего скачивания через интерфейс.
В последнем разделе этой статьи приведен более формализованный список терминов и ключевых слов, использованных в данном примере, а также ссылки на подробные описания функциональности GitLab CI.
Configuration of your jobs with .gitlab-ci.yml
This document describes the usage of .gitlab-ci.yml , the file that is used by GitLab Runner to manage your project’s jobs.
If you want a quick introduction to GitLab CI, follow our quick start guide.
.gitlab-ci.yml
From version 7.12, GitLab CI uses a YAML file ( .gitlab-ci.yml ) for the project configuration. It is placed in the root of your repository and contains definitions of how your project should be built.
The YAML file defines a set of jobs with constraints stating when they should be run. The jobs are defined as top-level elements with a name and always have to contain at least the script clause:
The above example is the simplest possible CI configuration with two separate jobs, where each of the jobs executes a different command.
Of course a command can execute code directly ( ./configure;make;make install ) or run a script ( test.sh ) in the repository.
Jobs are picked up by Runners and executed within the environment of the Runner. What is important, is that each job is run independently from each other.
The YAML syntax allows for using more complex job specifications than in the above example:
There are a few reserved keywords that cannot be used as job names:
| Keyword | Required | Description |
|---|---|---|
| image | no | Use docker image, covered in Use Docker |
| services | no | Use docker services, covered in Use Docker |
| stages | no | Define build stages |
| types | no | Alias for stages (deprecated) |
| before_script | no | Define commands that run before each job’s script |
| after_script | no | Define commands that run after each job’s script |
| variables | no | Define build variables |
| cache | no | Define list of files that should be cached between subsequent runs |
image and services
This allows to specify a custom Docker image and a list of services that can be used for time of the job. The configuration of this feature is covered in a separate document.
before_script
before_script is used to define the command that should be run before all jobs, including deploy jobs, but after the restoration of artifacts. This can be an array or a multi-line string.
after_script
Introduced in GitLab 8.7 and requires Gitlab Runner v1.2
after_script is used to define the command that will be run after for all jobs. This has to be an array or a multi-line string.
stages
stages is used to define stages that can be used by jobs. The specification of stages allows for having flexible multi stage pipelines.
The ordering of elements in stages defines the ordering of jobs’ execution:
- Jobs of the same stage are run in parallel.
- Jobs of the next stage are run after the jobs from the previous stage complete successfully.
Let’s consider the following example, which defines 3 stages:
- First, all jobs of build are executed in parallel.
- If all jobs of build succeed, the test jobs are executed in parallel.
- If all jobs of test succeed, the deploy jobs are executed in parallel.
- If all jobs of deploy succeed, the commit is marked as success .
- If any of the previous jobs fails, the commit is marked as failed and no jobs of further stage are executed.
There are also two edge cases worth mentioning:
- If no stages are defined in .gitlab-ci.yml , then the build , test and deploy are allowed to be used as job’s stage by default.
- If a job doesn’t specify a stage , the job is assigned the test stage.
types
Deprecated, and could be removed in one of the future releases. Use stages instead.
variables
GitLab CI allows you to add variables to .gitlab-ci.yml that are set in the job environment. The variables are stored in the Git repository and are meant to store non-sensitive project configuration, for example:
Note: Integers (as well as strings) are legal both for variable’s name and value. Floats are not legal and cannot be used.
These variables can be later used in all executed commands and scripts. The YAML-defined variables are also set to all created service containers, thus allowing to fine tune them. Variables can be also defined on a job level.
Except for the user defined variables, there are also the ones set up by the Runner itself. One example would be CI_COMMIT_REF_NAME which has the value of the branch or tag name for which project is built. Apart from the variables you can set in .gitlab-ci.yml , there are also the so called secret variables which can be set in GitLab’s UI.
cache
- Introduced in GitLab Runner v0.7.0.
- Prior to GitLab 9.2, caches were restored after artifacts.
- From GitLab 9.2, caches are restored before artifacts.
cache is used to specify a list of files and directories which should be cached between jobs. You can only use paths that are within the project workspace.
By default caching is enabled and shared between pipelines and jobs, starting from GitLab 9.0
If cache is defined outside the scope of jobs, it means it is set globally and all jobs will use that definition.
Cache all files in binaries and .config :
Cache all Git untracked files:
Cache all Git untracked files and files in binaries :
Locally defined cache overrides globally defined options. The following rspec job will cache only binaries/ :
Note that since cache is shared between jobs, if you’re using different paths for different jobs, you should also set a different cache:key otherwise cache content can be overwritten.
The cache is provided on a best-effort basis, so don’t expect that the cache will be always present. For implementation details, please check GitLab Runner.
cache:key
The key directive allows you to define the affinity of caching between jobs, allowing to have a single cache for all jobs, cache per-job, cache per-branch or any other way you deem proper.
This allows you to fine tune caching, allowing you to cache data between different jobs or even different branches.
The cache:key variable can use any of the predefined variables.
The default key is default across the project, therefore everything is shared between each pipelines and jobs by default, starting from GitLab 9.0.
Note: The cache:key variable cannot contain the / character.
Example configurations
To enable per-job caching:
To enable per-branch caching:
To enable per-job and per-branch caching:
To enable per-branch and per-stage caching:
If you use Windows Batch to run your shell scripts you need to replace $ with % :
If you use Windows PowerShell to run your shell scripts you need to replace $ with $env: :
cache:policy
The default behaviour of a caching job is to download the files at the start of execution, and to re-upload them at the end. This allows any changes made by the job to be persisted for future runs, and is known as the pull-push cache policy.
If you know the job doesn’t alter the cached files, you can skip the upload step by setting policy: pull in the job specification. Typically, this would be twinned with an ordinary cache job at an earlier stage to ensure the cache is updated from time to time:
This helps to speed up job execution and reduce load on the cache server, especially when you have a large number of cache-using jobs executing in parallel.
Additionally, if you have a job that unconditionally recreates the cache without reference to its previous contents, you can use policy: push in that job to skip the download step.
.gitlab-ci.yml allows you to specify an unlimited number of jobs. Each job must have a unique name, which is not one of the keywords mentioned above. A job is defined by a list of parameters that define the job behavior.
| Keyword | Required | Description |
|---|---|---|
| script | yes | Defines a shell script which is executed by Runner |
| image | no | Use docker image, covered in Using Docker Images |
| services | no | Use docker services, covered in Using Docker Images |
| stage | no | Defines a job stage (default: test ) |
| type | no | Alias for stage |
| variables | no | Define job variables on a job level |
| only | no | Defines a list of git refs for which job is created |
| except | no | Defines a list of git refs for which job is not created |
| tags | no | Defines a list of tags which are used to select Runner |
| allow_failure | no | Allow job to fail. Failed job doesn’t contribute to commit status |
| when | no | Define when to run job. Can be on_success , on_failure , always or manual |
| dependencies | no | Define other jobs that a job depends on so that you can pass artifacts between them |
| artifacts | no | Define list of job artifacts |
| cache | no | Define list of files that should be cached between subsequent runs |
| before_script | no | Override a set of commands that are executed before job |
| after_script | no | Override a set of commands that are executed after job |
| environment | no | Defines a name of environment to which deployment is done by this job |
| coverage | no | Define code coverage settings for a given job |
| retry | no | Define how many times a job can be auto-retried in case of a failure |
script
script is a shell script which is executed by the Runner. For example:
This parameter can also contain several commands using an array:
Sometimes, script commands will need to be wrapped in single or double quotes. For example, commands that contain a colon ( : ) need to be wrapped in quotes so that the YAML parser knows to interpret the whole thing as a string rather than a «key: value» pair. Be careful when using special characters: : , < , >, [ , ] , , , & , * , # , ? , | , — , < , > , = , ! , % , @ , ` .
stage
stage allows to group jobs into different stages. Jobs of the same stage are executed in parallel . For more info about the use of stage please check stages.
only and except (simplified)
only and except are two parameters that set a job policy to limit when jobs are created:
- only defines the names of branches and tags for which the job will run.
- except defines the names of branches and tags for which the job will not run.
There are a few rules that apply to the usage of job policy:
- only and except are inclusive. If both only and except are defined in a job specification, the ref is filtered by only and except .
- only and except allow the use of regular expressions.
- only and except allow to specify a repository path to filter jobs for forks.
In addition, only and except allow the use of special keywords:
| Value | Description |
|---|---|
| branches | When a branch is pushed. |
| tags | When a tag is pushed. |
| api | When pipeline has been triggered by a second pipelines API (not triggers API). |
| external | When using CI services other than GitLab. |
| pipelines | For multi-project triggers, created using the API with CI_JOB_TOKEN . |
| pushes | Pipeline is triggered by a git push by the user. |
| schedules | For scheduled pipelines. |
| triggers | For pipelines created using a trigger token. |
| web | For pipelines created using Run pipeline button in GitLab UI (under your project’s Pipelines). |
In the example below, job will run only for refs that start with issue- , whereas all branches will be skipped:
In this example, job will run only for refs that are tagged, or if a build is explicitly requested via an API trigger or a Pipeline Schedule:
The repository path can be used to have jobs executed only for the parent repository and not forks:
The above example will run job for all branches on gitlab-org/gitlab-ce , except master.
only and except (complex)
Introduced in GitLab 10.0
This an alpha feature, and it it subject to change at any time without prior notice!
Since GitLab 10.0 it is possible to define a more elaborate only/except job policy configuration.
GitLab now supports both, simple and complex strategies, so it is possible to use an array and a hash configuration scheme.
Two keys are now available: refs and kubernetes . Refs strategy equals to simplified only/except configuration, whereas kubernetes strategy accepts only active keyword.
See the example below. Job is going to be created only when pipeline has been scheduled or runs for a master branch, and only if kubernetes service is active in the project.
Job variables
It is possible to define job variables using a variables keyword on a job level. It works basically the same way as its global-level equivalent, but allows you to define job-specific variables.
When the variables keyword is used on a job level, it overrides the global YAML job variables and predefined ones. To turn off global defined variables in your job, define an empty hash:
Job variables priority is defined in the variables documentation.
tags is used to select specific Runners from the list of all Runners that are allowed to run this project.
During the registration of a Runner, you can specify the Runner’s tags, for example ruby , postgres , development .
tags allow you to run jobs with Runners that have the specified tags assigned to them:
The specification above, will make sure that job is built by a Runner that has both ruby AND postgres tags defined.
allow_failure
allow_failure is used when you want to allow a job to fail without impacting the rest of the CI suite. Failed jobs don’t contribute to the commit status.
When enabled and the job fails, the pipeline will be successful/green for all intents and purposes, but a «CI build passed with warnings» message will be displayed on the merge request or commit or job page. This is to be used by jobs that are allowed to fail, but where failure indicates some other (manual) steps should be taken elsewhere.
In the example below, job1 and job2 will run in parallel, but if job1 fails, it will not stop the next stage from running, since it’s marked with allow_failure: true :
when is used to implement jobs that are run in case of failure or despite the failure.
when can be set to one of the following values:
- on_success — execute job only when all jobs from prior stages succeed. This is the default.
- on_failure — execute job only when at least one job from prior stages fails.
- always — execute job regardless of the status of jobs from prior stages.
- manual — execute job manually (added in GitLab 8.10). Read about manual actions below.
The above script will:
- Execute cleanup_build_job only when build_job fails.
- Always execute cleanup_job as the last step in pipeline regardless of success or failure.
- Allow you to manually execute deploy_job from GitLab’s UI.
Manual actions
Introduced in GitLab 8.10. Blocking manual actions were introduced in GitLab 9.0 Protected actions were introduced in GitLab 9.2
Manual actions are a special type of job that are not executed automatically; they need to be explicitly started by a user. Manual actions can be started from pipeline, build, environment, and deployment views.
An example usage of manual actions is deployment to production.
Manual actions can be either optional or blocking. Blocking manual action will block execution of the pipeline at stage this action is defined in. It is possible to resume execution of the pipeline when someone executes a blocking manual actions by clicking a play button.
When pipeline is blocked it will not be merged if Merge When Pipeline Succeeds is set. Blocked pipelines also do have a special status, called manual.
Manual actions are non-blocking by default. If you want to make manual action blocking, it is necessary to add allow_failure: false to the job’s definition in .gitlab-ci.yml .
Optional manual actions have allow_failure: true set by default.
Statuses of optional actions do not contribute to overall pipeline status.
Manual actions are considered to be write actions, so permissions for protected branches are used when user wants to trigger an action. In other words, in order to trigger a manual action assigned to a branch that the pipeline is running for, user needs to have ability to merge to this branch.
environment
- Introduced in GitLab 8.9.
- You can read more about environments and find more examples in the documentation about environments.
environment is used to define that a job deploys to a specific environment. If environment is specified and no environment under that name exists, a new one will be created automatically.
In its simplest form, the environment keyword can be defined like:
In the above example, the deploy to production job will be marked as doing a deployment to the production environment.
environment:name
- Introduced in GitLab 8.11.
- Before GitLab 8.11, the name of an environment could be defined as a string like environment: production . The recommended way now is to define it under the name keyword.
- The name parameter can use any of the defined CI variables, including predefined, secure variables and .gitlab-ci.yml variables . You however cannot use variables defined under script .
The environment name can contain:
- letters
- digits
- spaces
- —
- _
- /
- $
- <
- >
Common names are qa , staging , and production , but you can use whatever name works with your workflow.
Instead of defining the name of the environment right after the environment keyword, it is also possible to define it as a separate value. For that, use the name keyword under environment :
environment:url
- Introduced in GitLab 8.11.
- Before GitLab 8.11, the URL could be added only in GitLab’s UI. The recommended way now is to define it in .gitlab-ci.yml .
- The url parameter can use any of the defined CI variables, including predefined, secure variables and .gitlab-ci.yml variables . You however cannot use variables defined under script .
This is an optional value that when set, it exposes buttons in various places in GitLab which when clicked take you to the defined URL.
In the example below, if the job finishes successfully, it will create buttons in the merge requests and in the environments/deployments pages which will point to https://prod.example.com .
environment:on_stop
- Introduced in GitLab 8.13.
- Starting with GitLab 8.14, when you have an environment that has a stop action defined, GitLab will automatically trigger a stop action when the associated branch is deleted.
Closing (stoping) environments can be achieved with the on_stop keyword defined under environment . It declares a different job that runs in order to close the environment.
Read the environment:action section for an example.
environment:action
The action keyword is to be used in conjunction with on_stop and is defined in the job that is called to close the environment.
Take for instance:
In the above example we set up the review_app job to deploy to the review environment, and we also defined a new stop_review_app job under on_stop . Once the review_app job is successfully finished, it will trigger the stop_review_app job based on what is defined under when . In this case we set it up to manual so it will need a manual action via GitLab’s web interface in order to run.
The stop_review_app job is required to have the following keywords defined:
- when — reference
- environment:name
- environment:action
- stage should be the same as the review_app in order for the environment to stop automatically when the branch is deleted
dynamic environments
- Introduced in GitLab 8.12 and GitLab Runner 1.6.
- The $CI_ENVIRONMENT_SLUG was introduced in GitLab 8.15.
- The name and url parameters can use any of the defined CI variables, including predefined, secure variables and .gitlab-ci.yml variables . You however cannot use variables defined under script .
The deploy as review app job will be marked as deployment to dynamically create the review/$CI_COMMIT_REF_NAME environment, where $CI_COMMIT_REF_NAME is an environment variable set by the Runner. The $CI_ENVIRONMENT_SLUG variable is based on the environment name, but suitable for inclusion in URLs. In this case, if the deploy as review app job was run in a branch named pow , this environment would be accessible with an URL like https://review-pow.example.com/ .
This of course implies that the underlying server which hosts the application is properly configured.
The common use case is to create dynamic environments for branches and use them as Review Apps. You can see a simple example using Review Apps at https://gitlab.com/gitlab-examples/review-apps-nginx/.
artifacts
- Introduced in GitLab Runner v0.7.0 for non-Windows platforms.
- Windows support was added in GitLab Runner v.1.0.0.
- Prior to GitLab 9.2, caches were restored after artifacts.
- From GitLab 9.2, caches are restored before artifacts.
- Currently not all executors are supported.
- Job artifacts are only collected for successful jobs by default.
artifacts is used to specify a list of files and directories which should be attached to the job after success. You can only use paths that are within the project workspace. To pass artifacts between different jobs, see dependencies. Below are some examples.
Send all files in binaries and .config :
Send all Git untracked files:
Send all Git untracked files and files in binaries :
To disable artifact passing, define the job with empty dependencies:
You may want to create artifacts only for tagged releases to avoid filling the build server storage with temporary build artifacts.
Create artifacts only for tags ( default-job will not create artifacts):
The artifacts will be sent to GitLab after the job finishes successfully and will be available for download in the GitLab UI.
artifacts:name
Introduced in GitLab 8.6 and GitLab Runner v1.1.0.
The name directive allows you to define the name of the created artifacts archive. That way, you can have a unique name for every archive which could be useful when you’d like to download the archive from GitLab. The artifacts:name variable can make use of any of the predefined variables. The default name is artifacts , which becomes artifacts.zip when downloaded.
Example configurations
To create an archive with a name of the current job:
To create an archive with a name of the current branch or tag including only the files that are untracked by Git:
To create an archive with a name of the current job and the current branch or tag including only the files that are untracked by Git:
To create an archive with a name of the current stage and branch name:
If you use Windows Batch to run your shell scripts you need to replace $ with % :
If you use Windows PowerShell to run your shell scripts you need to replace $ with $env: :
artifacts:when
Introduced in GitLab 8.9 and GitLab Runner v1.3.0.
artifacts:when is used to upload artifacts on job failure or despite the failure.
artifacts:when can be set to one of the following values:
- on_success — upload artifacts only when the job succeeds. This is the default.
- on_failure — upload artifacts only when the job fails.
- always — upload artifacts regardless of the job status.
Example configurations
To upload artifacts only when job fails.
artifacts:expire_in
Introduced in GitLab 8.9 and GitLab Runner v1.3.0.
artifacts:expire_in is used to delete uploaded artifacts after the specified time. By default, artifacts are stored on GitLab forever. expire_in allows you to specify how long artifacts should live before they expire, counting from the time they are uploaded and stored on GitLab.
You can use the Keep button on the job page to override expiration and keep artifacts forever.
After expiry, artifacts are actually deleted hourly by default (via a cron job), but they are not accessible after expiry.
The value of expire_in is an elapsed time. Examples of parseable values:
- ‘3 mins 4 sec’
- ‘2 hrs 20 min’
- ‘2h20min’
- ‘6 mos 1 day’
- ’47 yrs 6 mos and 4d’
- ‘3 weeks and 2 days’
Example configurations
To expire artifacts 1 week after being uploaded:
dependencies
Introduced in GitLab 8.6 and GitLab Runner v1.1.1.
This feature should be used in conjunction with artifacts and allows you to define the artifacts to pass between different jobs.
Note that artifacts from all previous stages are passed by default.
To use this feature, define dependencies in context of the job and pass a list of all previous jobs from which the artifacts should be downloaded. You can only define jobs from stages that are executed before the current one. An error will be shown if you define jobs from the current stage or next ones. Defining an empty array will skip downloading any artifacts for that job. The status of the previous job is not considered when using dependencies , so if it failed or it is a manual job that was not run, no error occurs.
In the following example, we define two jobs with artifacts, build:osx and build:linux . When the test:osx is executed, the artifacts from build:osx will be downloaded and extracted in the context of the build. The same happens for test:linux and artifacts from build:linux .
The job deploy will download artifacts from all previous jobs because of the stage precedence:
before_script and after_script
It’s possible to overwrite the globally defined before_script and after_script :
coverage
Notes:
- Introduced in GitLab 8.17.
coverage allows you to configure how code coverage will be extracted from the job output.
Regular expressions are the only valid kind of value expected here. So, using surrounding / is mandatory in order to consistently and explicitly represent a regular expression string. You must escape special characters if you want to match them literally.
A simple example:
retry
Notes:
- Introduced in GitLab 9.5.
retry allows you to configure how many times a job is going to be retried in case of a failure.
When a job fails, and has retry configured it is going to be processed again up to the amount of times specified by the retry keyword.
If retry is set to 2, and a job succeeds in a second run (first retry), it won’t be retried again. retry value has to be a positive integer, equal or larger than 0, but lower or equal to 2 (two retries maximum, three runs in total).
A simple example:
Git Strategy
Introduced in GitLab 8.9 as an experimental feature. May change or be removed completely in future releases. GIT_STRATEGY=none requires GitLab Runner v1.7+.
You can set the GIT_STRATEGY used for getting recent application code, either in the global variables section or the variables section for individual jobs. If left unspecified, the default from project settings will be used.
There are three possible values: clone , fetch , and none .
clone is the slowest option. It clones the repository from scratch for every job, ensuring that the project workspace is always pristine.
fetch is faster as it re-uses the project workspace (falling back to clone if it doesn’t exist). git clean is used to undo any changes made by the last job, and git fetch is used to retrieve commits made since the last job ran.
none also re-uses the project workspace, but skips all Git operations (including GitLab Runner’s pre-clone script, if present). It is mostly useful for jobs that operate exclusively on artifacts (e.g., deploy ). Git repository data may be present, but it is certain to be out of date, so you should only rely on files brought into the project workspace from cache or artifacts.
Git Checkout
The GIT_CHECKOUT variable can be used when the GIT_STRATEGY is set to either clone or fetch to specify whether a git checkout should be run. If not specified, it defaults to true. Like GIT_STRATEGY , it can be set in either the global variables section or the variables section for individual jobs.
If set to false , the Runner will:
- when doing fetch — update the repository and leave working copy on the current revision,
- when doing clone — clone the repository and leave working copy on the default branch.
Having this setting set to true will mean that for both clone and fetch strategies the Runner will checkout the working copy to a revision related to the CI pipeline:
Git Submodule Strategy
The GIT_SUBMODULE_STRATEGY variable is used to control if / how Git submodules are included when fetching the code before a build. Like GIT_STRATEGY , it can be set in either the global variables section or the variables section for individual jobs.
There are three possible values: none , normal , and recursive :
none means that submodules will not be included when fetching the project code. This is the default, which matches the pre-v1.10 behavior.
normal means that only the top-level submodules will be included. It is equivalent to:
recursive means that all submodules (including submodules of submodules) will be included. It is equivalent to:
Note that for this feature to work correctly, the submodules must be configured (in .gitmodules ) with either:
- the HTTP(S) URL of a publicly-accessible repository, or
- a relative path to another repository on the same GitLab server. See the Git submodules documentation.
Job stages attempts
Introduced in GitLab, it requires GitLab Runner v1.9+.
You can set the number for attempts the running job will try to execute each of the following stages:
| Variable | Description |
|---|---|
| GET_SOURCES_ATTEMPTS | Number of attempts to fetch sources running a job |
| ARTIFACT_DOWNLOAD_ATTEMPTS | Number of attempts to download artifacts running a job |
| RESTORE_CACHE_ATTEMPTS | Number of attempts to restore the cache running a job |
The default is one single attempt.
You can set them in the global variables section or the variables section for individual jobs.
Shallow cloning
Introduced in GitLab 8.9 as an experimental feature. May change in future releases or be removed completely.
You can specify the depth of fetching and cloning using GIT_DEPTH . This allows shallow cloning of the repository which can significantly speed up cloning for repositories with a large number of commits or old, large binaries. The value is passed to git fetch and git clone .
Note: If you use a depth of 1 and have a queue of jobs or retry jobs, jobs may fail.
Since Git fetching and cloning is based on a ref, such as a branch name, Runners can’t clone a specific commit SHA. If there are multiple jobs in the queue, or you are retrying an old job, the commit to be tested needs to be within the Git history that is cloned. Setting too small a value for GIT_DEPTH can make it impossible to run these old commits. You will see unresolved reference in job logs. You should then reconsider changing GIT_DEPTH to a higher value.
Jobs that rely on git describe may not work correctly when GIT_DEPTH is set since only part of the Git history is present.
To fetch or clone only the last 3 commits:
Hidden keys (jobs)
Introduced in GitLab 8.6 and GitLab Runner v1.1.1.
If you want to temporarily ‘disable’ a job, rather than commenting out all the lines where the job is defined:
you can instead start its name with a dot ( . ) and it will not be processed by GitLab CI. In the following example, .hidden_job will be ignored:
Use this feature to ignore jobs, or use the special YAML features and transform the hidden keys into templates.
Special YAML features
It’s possible to use special YAML features like anchors ( & ), aliases ( * ) and map merging ( << ), which will allow you to greatly reduce the complexity of .gitlab-ci.yml .
Read more about the various YAML features.
Anchors
Introduced in GitLab 8.6 and GitLab Runner v1.1.1.
YAML has a handy feature called ‘anchors’, which lets you easily duplicate content across your document. Anchors can be used to duplicate/inherit properties, and is a perfect example to be used with hidden keys to provide templates for your jobs.
The following example uses anchors and map merging. It will create two jobs, test1 and test2 , that will inherit the parameters of .job_template , each having their own custom script defined:
& sets up the name of the anchor ( job_definition ), << means «merge the given hash into the current one», and * includes the named anchor ( job_definition again). The expanded version looks like this:
Let’s see another one example. This time we will use anchors to define two sets of services. This will create two jobs, test:postgres and test:mysql , that will share the script directive defined in .job_template , and the services directive defined in .postgres_services and .mysql_services respectively:
The expanded version looks like this:
You can see that the hidden keys are conveniently used as templates.
Triggers
Triggers can be used to force a rebuild of a specific branch, tag or commit, with an API call.
pages
pages is a special job that is used to upload static content to GitLab that can be used to serve your website. It has a special syntax, so the two requirements below must be met:
- Any static content must be placed under a public/ directory
- artifacts with a path to the public/ directory must be defined
The example below simply moves all files from the root of the project to the public/ directory. The .public workaround is so cp doesn’t also copy public/ to itself in an infinite loop:
Validate the .gitlab-ci.yml
Each instance of GitLab CI has an embedded debug tool called Lint. You can find the link under /ci/lint of your gitlab instance.
Using reserved keywords
If you get validation error when using specific values (e.g., true or false ), try to quote them, or change them to a different form (e.g., /bin/true ).
Skipping jobs
If your commit message contains [ci skip] or [skip ci] , using any capitalization, the commit will be created but the jobs will be skipped.
Examples
Visit the examples README to see a list of examples using GitLab CI with various languages.