Install SSH-Agent and SSH-Add to Powershell
Starting the SSH-Agent and adding a key pair to Powershell.
Purpose
To create a quick how-to on installing OpenSSH client and how to start the SSH-Agent on Powershell in order to add a key pair to log in to a VM.
For the TLDR click here.
Prerequisites
First, verify you have Open SSH, and run this command, if you get an “Installed” for both the client and server then skip to Starting SSH-Services section.
INSTALLING OPENSSH
I started by completely removing OpenSSH from my system so I would be starting bare bones.
To install OpenSSH Client, a restart and update are required of the PC.
Install the OpenSSH Server.
Here you may get an error in red letters. Run the following if you do
Restart and Update PC, if you had to restart again rerun the install OpenSSH server command above. Then verify our services are installed, if both are installed follow the next steps.
Starting SSH Services
Now that the OpenSSH client and server are both installed we need to start our ssh services. Also, this will make it start up automatically every time we have to start Powershell.
Next, we will confirm firewall is configured. You will have to hit enter at the end. Input all the following text as one command.
Installing SSH-Agent
Next, start the ssh-agent. To see if the service is running run.
If this gives you red letters and an error then we need to start the service in the GUI. I don’t know how to do it in Powershell. Type services in your search bar. Find OpenSSH Authentication and set the Startup type to automatic. Click Apply.
Then start the ssh-agent.
Adding Key Pair
Run ssh-add to add our key pair and you are golden. Replace keypair with your actual path to the file.
SSH keys on Windows 10
You need to add the optional feature ‘OpenSSH Server’ in Windows 10 first by going to Settings -> search for Add an optional feature -> search again for OpenSSH Client and choose to install.

Configure SSH service to automatically start
By default Windows won’t start the ssh-agent . You can tell Windows to start the service automatically in the future by running the following command in PowerShell (as Administrator).
But right now, manually start the service by running
Generate the key
Open PowerShell and follow these commands to generate SSH key on your machine.
Keep the default location for where to save the key. This should be C:\Users\<username>/.ssh/id_rsa.
Generate a complex password and store in safe place, ideally a password manager. Enter this password when prompted. When complete you’ll be shown the key fingerprint and the key's randomart image .
Add key to the SSH Agent
We need to add the key to our ssh-agent so we don’t have to type the key each time we use it.
The agent will recognise that a new key is present and will ask for the passphrase.

Once entered you’ll see the confirmation message Identity added .
I still needed to manually add the key to the ssh-agent. To do so navigate to the .ssh folder where we stored our keys earlier C:\Users\<username>/.ssh/ and run the following with the correct key name.
This will prompt you to enter the passphrase in and once again you should see the Identity added confirmation.

Access your public key
Now we have our key we can add it to systems such as GitHub or Bitbucket. To do so follow the instructions for that particular service. We’ll need to retrieve the public key from our machine to do so.
Navigate to the .ssh folder and find the file <private-key>.pub . Open this in a text editor. The contents of this file is what you need to copy and paste into the relevant service you’re wanted to add the key to.
Testing the keys
In this example lets assume we’ve added our key to Bitbucket. We can test that the key is correctly set up by running the following command.
If all is well then we should see the logged in as message without needing to enter the passphrase
Using with Git
By now we have our key correctly stored in the SSH agent and we’re allowed to connect to the Bitbucket servers using SSH. However we might still be prompted to enter our passphrase whenever we try to perform a git command that talks to the remote.
The ssh -T command uses the Windows 10 agent so all appears to be correct, but it won’t behave the same in Git. This is due to the fact Git is using it’s own ssh agent, not the Windows 10 agent that we’ve added our keys to.
We need to tell Git to use the Windows SSH agent instead of it’s own. We do this by updating the git config .
Now when we use Git, we won’t be prompted for our passphrase, even after a restart.
Использование встроенного SSH клиента в Windows 10
 24.11.2020
 itpro
itpro
 Windows 10, Windows Server 2019
 комментарий 21
В Windows 10 и Windows Server 2019 появился встроенный SSH клиент, который вы можете использовать для подключения к *Nix серверам, ESXi хостам и другим устройствам по защищенному протоколу, вместо Putty, MTPuTTY или других сторонних SSH клиентов. Встроенный SSH клиент Windows основан на порте OpenSSH и предустановлен в ОС, начиная с Windows 10 1809.
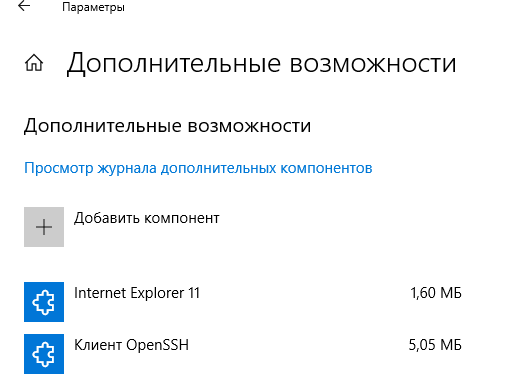
Установка клиента OpenSSH в Windows 10
Клиент OpenSSH входит в состав Features on Demand Windows 10 (как и RSAT). Клиент SSH установлен по умолчанию в Windows Server 2019 и Windows 10 1809 и более новых билдах.
Проверьте, что SSH клиент установлен:
Get-WindowsCapability -Online | ? Name -like ‘OpenSSH.Client*’

В нашем примере клиент OpenSSH установлен (статус: State: Installed).
Если SSH клиент отсутствует (State: Not Present), его можно установить:
- С помощью команды PowerShell: Add-WindowsCapability -Online -Name OpenSSH.Client*
- С помощью DISM: dism /Online /Add-Capability /CapabilityName:OpenSSH.Client
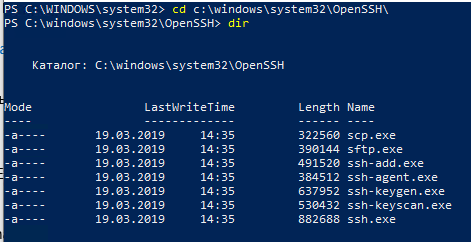
]Бинарные файлы OpenSSH находятся в каталоге c:\windows\system32\OpenSSH\.
- ssh.exe – это исполняемый файл клиента SSH;
- scp.exe – утилита для копирования файлов в SSH сессии;
- ssh-keygen.exe – утилита для генерации ключей аутентификации;
- ssh-agent.exe – используется для управления ключами;
- ssh-add.exe – добавление ключа в базу ssh-агента.
Как использовать SSH клиенте в Windows 10?
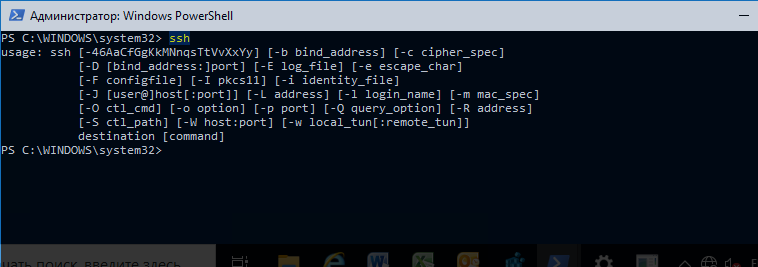
Чтобы запустить SSH клиент, запустите командную строку PowerShell или cmd.exe . Выведите доступные параметры и синтаксис утилиты ssh.exe, набрав команду:
ssh
usage: ssh [-46AaCfGgKkMNnqsTtVvXxYy] [-b bind_address] [-c cipher_spec]
[-D [bind_address:]port] [-E log_file] [-e escape_char]
[-F configfile] [-I pkcs11] [-i identity_file]
[-J [[email protected]]host[:port]] [-L address] [-l login_name] [-m mac_spec]
[-O ctl_cmd] [-o option] [-p port] [-Q query_option] [-R address]
[-S ctl_path] [-W host:port] [-w local_tun[:remote_tun]]
destination [command]
Для подключения к удаленному серверу по SSH используется команда:
Если SSH сервер запущен на нестандартном порту, отличном от TCP/22, можно указать номер порта:
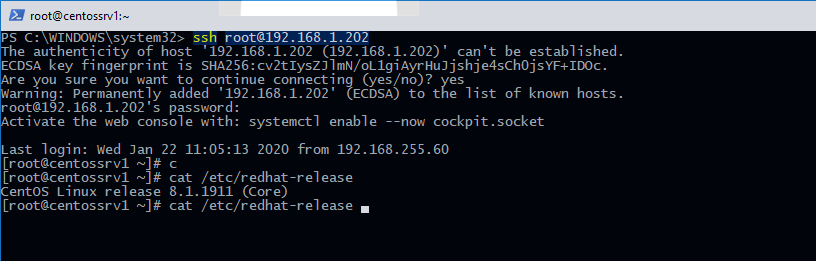
Например, чтобы подключиться к Linux хосту с IP адресом 192.168.1.202 под root, выполните:
При первом подключении появится запрос на добавление ключа хоста в доверенные, наберите yes -> Enter (при этом отпечаток ключа хоста добавляется в файл C:\Users\username\.ssh\known_hosts).
Затем появится запрос пароля указанной учетной записи, укажите пароль root, после чего должна открытся консоль удаленного Linux сервера (в моем примере на удаленном сервере установлен CentOS 8).
Если вы используете SSH аутентификацию по RSA ключам (см. пример с настройкой SSH аутентификации по ключам в Windows), вы можете указать путь к файлу с закрытым ключом в клиенте SSH так:
Также вы можете добавить ваш закрытый ключ в SSH-Agent. Сначала нужно включить службу ssh-agent и настроить ее автозапуск:
set-service ssh-agent StartupType ‘Automatic’
Start-Service ssh-agent
Добавим ваш закрытый ключ в базу ssh-agent:
Теперь вы можете подключиться к серверу по SSH без указания пути к RSA ключу, он будет использоваться автоматически. Пароль для подключения не запрашивается (если только вы не защитили ваш RSA ключ отдельным паролем):
Еще несколько полезных аргументов SSH:
SCP: копирование файлов из/в Windows через SSH
С помощью утилиты scp.exe, которая входит в состав пакета клиента SSH, вы можете скопировать файл с вашего компьютера на SSH сервер:

scp.exe «E:\ISO\CentOS-8.1.1911-x86_64.iso» [email protected]:/home
Можно рекурсивно скопировать все содержимое каталога:
И наоборот, вы можете скопировать файл с удаленного сервера на ваш компьютер:
Итак, теперь вы можете прямо из Windows 10 подключаться к SSH серверам, копировать файлы с помощью scp без установки сторонних приложений и утилит.
 Предыдущая статья Следующая статья
Setting up SSH-Agent in Windows for Passwordless Git Authentication
SSH-Agent and OpenSSH are tools in Windows that can be used to authenticate to remote Git repositories, such as GitLab, GitHub, Azure DevOps, etc. Once set up as a service that stores your various SSH keys, this can facilitate authentication without entering a password each time, removing the irritation of entering a password every time you wish to push/pull/etc. from a Git repository.
Prerequisites
- The OpenSSH Client optional service must be enabled on your machine, and OpenSSH must be added to your PATH environment variable. You can read how to do that here.
- A remote Git repository that you wish to access. We will use a GitLab repository for this article; however, the process will be similar for other Git management providers. must be installed on your machine.
How to Install the SSH-Agent Service in Windows
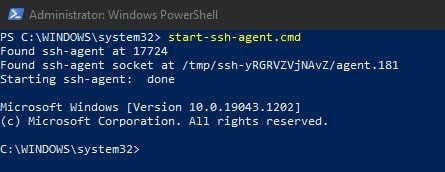
Using an elevated PowerShell window (run as admin), execute the following command to install the SSH-Agent service and configure it to start automatically when you log into your machine:

To avoid needing to restart your system to get the service running for the first time, execute this command:
Setting up an SSH Key Pair to Access a Git Remote Provider
Using a command line tool such as Bash or PowerShell, you should be able to follow these steps to create a local SSH key pair. For our example, we will create an ED25519 key, but you can create other keys such as an RSA.
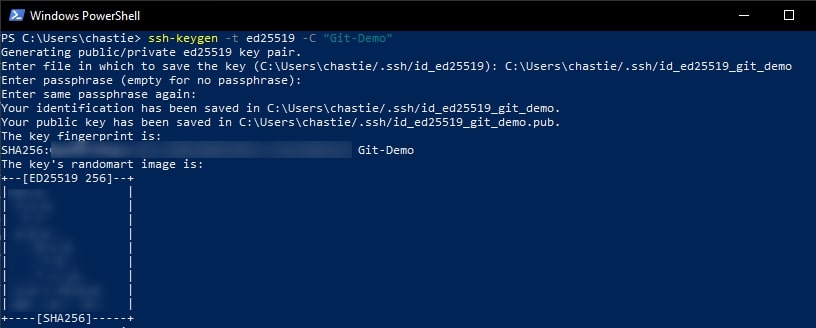
Create a new SSH ED25519 key, giving it a useful comment:
By default, the file will be stored in your local user’s SSH repository in Windows. You can choose another storage location if you wish or rename the file by entering a new file path to save the key. Leave it blank to stick with the default.
In our example, we rename the file from the default id_ed25519 to id_ed25519_git_demo:

You can also add a password if you like or leave this blank:

You will then be shown the key’s randomart image to confirm creation:
Copy the contents of the public key to your clipboard. You can read this key with the following command:
For example, our code is likely:
Note: We access the public key with the .pub suffix.
A sample is shown here. You can then select this and copy it with a right-click of your mouse:

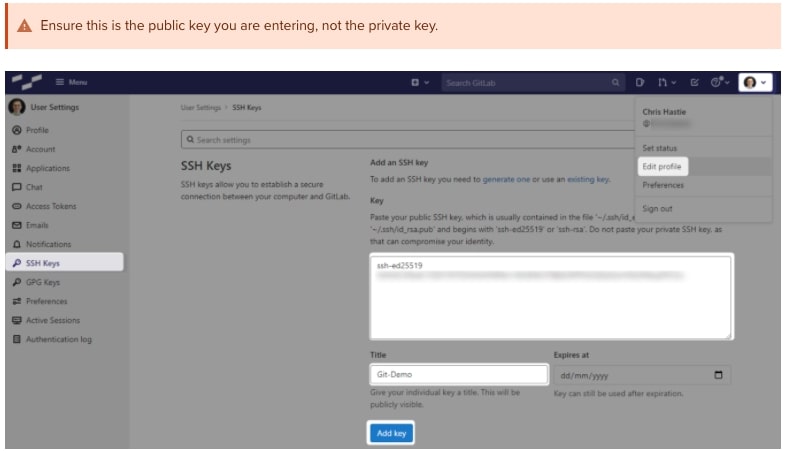
In GitLab (or the appropriate location of your Git remote repository), you can now add this public key to your user profile. In GitLab, you can do this by adding it under the SSH Keys section of your user settings:
Test that you can connect to the repository when using the SSH private key directly with this command:
For example, our command could be:

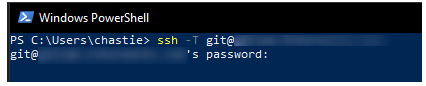
We have now established an SSH key pair that can authenticate to our Git remote provider. It remains to set this up in the SSH-Agent service to automatically provide access. We can demonstrate the issue by attempting the same connection, but without specifically naming the SSH key, with the command below:
As we can see, if we execute this command without specifying an SSH key, we are prompted for a password:
Adding the SSH Key to the SSH-Agent Service
Our goal is to be able to connect to a Git repository without entering a password. At this stage, we have a working SSH key pair and the SSH-Agent service installed and running.
Execute the following command to add your SSH key to your SSH-Agent service:
For our example, our command could be:

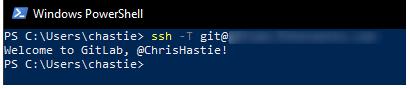
We can now test our connection to our Git remote provider without specifying a key and connect successfully:
Configuring Git to Leverage the Windows SSH-Agent

In an elevated console (run as admin), execute the following command to modify your existing Git configuration to leverage the windows OpenSSH service as the core SSH command:

Congratulations! You have now set up your environment to automatically authenticate to your Git remote provider through an SSH key pair, without using passwords. If you wish to facilitate access to any other Git remote providers, simply follow the same steps to generate a key pair ( as outlined above) and add it to your existing SSH-Agent service.