How to set DNS Nameserver on Ubuntu 20.04
The Domain Name System (DNS) translates text-based domain names to numeric IP addresses. By default, most networks are configured to work with DNS servers supplied by the internet service provider. However, users are free to change the DNS nameservers.
This tutorial will show you how to change DNS nameservers on your Ubuntu machine using GUI or the command line.
- Ubuntu 20.04 (both methods also work on Ubuntu 18.04 and later)
- Access to the terminal
- Sudo privileges
Change DNS Nameserver via GUI
Use Ubuntu Settings to complete all the steps to change DNS addresses via the graphical user interface.
1. Launch Settings and click the Network tab in the menu on the left.
2. Click the cogwheel next to the connection you wish to set up.
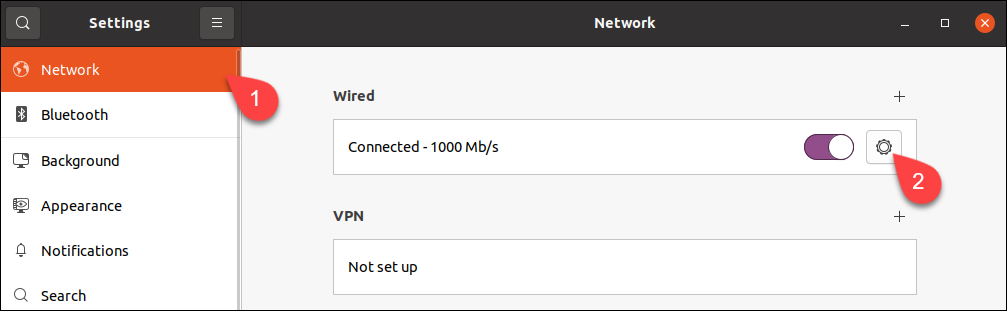
Note: To change the settings for a wireless connection, select the Wi-Fi tab, choose a wireless network and proceed with the steps below.
3. Go to the IPv4 tab.
4. Disable automatic DNS configuration by turning off the switch next to the DNS field.
5. Type new DNS addresses in the field. The example shows Google’s public DNS nameservers.
6. Click Apply.
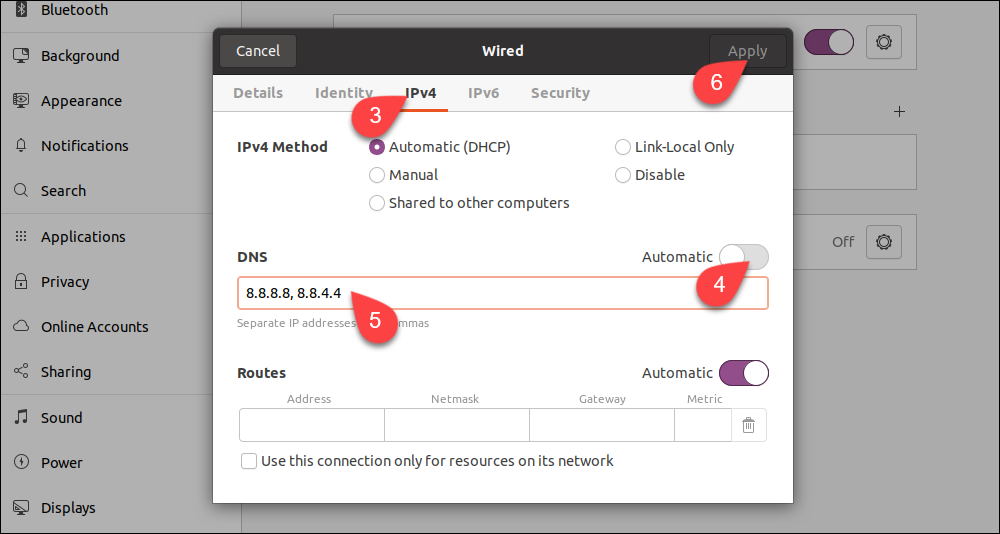
The system is now configured to work with the new DNS servers.
Note: If you wish to set up IPv6 nameservers, go to the IPv6 tab and enter them there. The IPv6 address format is different from IPv4. For example, Google’s IPv6 DNS servers are: 2001:4860:4860::8888 and 2001:4860:4860::8844 .
Change DNS Nameserver via Config File
If you do not use a GUI, change DNS settings with the command line Netplan tool.
1. Go to the Netplan directory:
2. List the directory contents with ls to see the name of the yaml file containing network configuration.

Open the file in a text editor. Your file may have a different name.
Ethernet connections are listed in the ethernets section of the file. If there are any wireless connections, you can find them in the wifis section. Netplan stores the current DNS configuration parameters in nameservers subsections of each section.
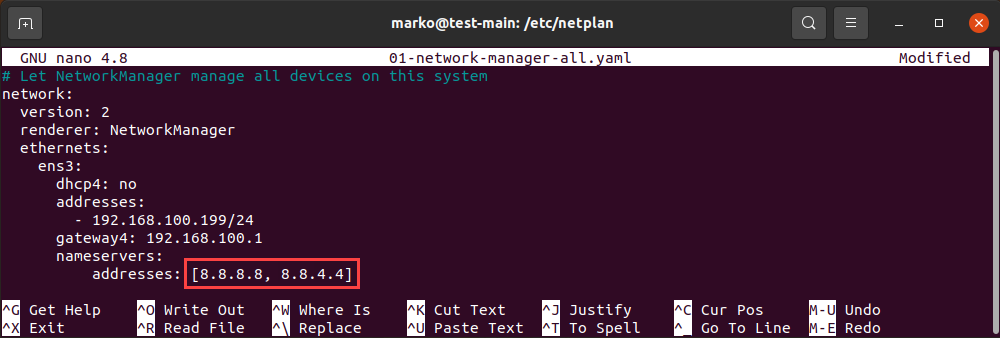
Replace the addresses located in the file with the DNS addresses you want to use. You can enter more than two addresses. Save the changes and exit.
Note: The file on your system may lack the entire ethernets or wifis section. In that case, add the lines that are missing, making sure you respect the indentation provided in the example.
3. Apply the changes you made in the config file:
If the operation is successful, there is no output. To check if the system successfully applied the changes, type:
The output lists your current DNS servers:

Why Change DNS Nameserver on Ubuntu?
In most cases, your default DNS settings offer optimal performance. However, there are scenarios in which you should consider switching to a third-party DNS provider:
- Large companies with better infrastructure are usually more capable of providing uninterrupted DNS service. If your ISP is unreliable and you experience frequent downtimes, switching the DNS provider may be the solution.
- Third-party DNS servers can be faster than those provided to you by your ISP.
Note: Since latency is the primary consideration for DNS, a fast third-party server located far away may provide inferior service to a slower one that is closer to you.
- Some DNS providers offer filters that prevent phishing sites from reaching your computer. The same mechanism is also used to block sensitive content on the internet. Businesses often employ this DNS feature.
- Internet Service Providers sometimes block content on the DNS level, so switching to another DNS nameserver may help you access some geo-restricted websites.
Note: Learn how to install PowerDNS on Ubuntu, a flexible and robust DNS solution.
This tutorial showed you how to set your DNS nameservers on Ubuntu, either using a graphical user interface or the command line.
Как изменить dns linux
Authored by: Jered Heeschen
If you find that your server’s Domain Name Server (DNS) settings are misconfigured or you prefer to use your own, this article describes how to change your Linux® server’s DNS settings.
If you want to test your site without the test link prior to going live with SSL or verify that an alias site works prior to DNS changes, you can Modify your hosts file to override the DNS for a domain on a specific machine.
Add name servers to the configuration file
On most Linux operating systems, the DNS servers that the system uses for name resolution are defined in the /etc/resolv.conf file. That file should contain at least one nameserver line. Each nameserver line defines a DNS server. The name servers are prioritized in the order the system finds them in the file. Use the Internet Protocol (IP) addresses of the name servers when you enter them into the configuration file because the system doesn’t know what to do with domain names until after it knows how to get to the DNS servers.
In some cases, /etc/resolv.conf could be a directly managed file, populated by the network service ( network by using initscripts or NetworkManager ). To directly edit the configuration file, use the following steps to add the DNS servers:
Open the resolv.conf file with an editor, such as nano , to make the necessary changes. If the file doesn’t already exist, this command creates it:
sudo nano /etc/resolv.conf
Add lines for the name servers that you want to use. The following table displays which name server IP addresses to use depending on which datacenter houses your cloud servers. The “Name server IP address” column shows the lines to add to the configuration file:
To ensure that your new settings are working, ping the domain name by using the following command:
ping -c 3 rackspace.com
You should see a result similar to the following one:
If you receive an unknown host message, double-check the IP addresses that you set as your DNS servers.
Add the same name servers with IPv6 addresses
If you’re using IPv6 on your server, you might need to add the IPv6 addresses of your name servers to the resolv.conf file. You can see if a DNS server has an IPv6 address by performing the following steps:
Use the following host command to get the domain name of the server (substitute your DNS server IP address):
Use the domain name you got back in another host lookup:
If an IPv6 address is returned, you can add that as another nameserver line in the resolv.conf file, as follows:
Then test as previously shown, by using the ping6 command instead of the regular ping command to force the system to use IPv6.
Share this information:
©2020 Rackspace US, Inc.
Except where otherwise noted, content on this site is licensed under a Creative Commons Attribution-NonCommercial-NoDerivs 3.0 Unported License
Настройка DNS в Ubuntu
Сервера DNS используются системой для преобразования сложных для запоминания IP адресов в простые доменные имена. Это делается потому что людям сложно запоминать несколько никак не связанных цифр, но очень просто запомнить слово.
Когда компьютеру нужно узнать IP адрес какого-либо домена, он отправляет запрос известному ему DNS серверу. Эти сервера могут быть получены автоматически от роутера по DHCP или же заданы в ручную. В этой статье мы рассмотрим как выполняется настройка DNS Ubuntu 16.04 и более старых версиях.
Настройка DNS в Ubuntu через GUI
Раньше, для настройки DNS серверов, которые будут использоваться системой было достаточно внести адреса нужных серверов в файл /etc/resolv.conf. Но сейчас всей конфигурацией сети в Ubuntu управляет NetworkManager, а этот файл теперь представляет собой только ссылку на файл NetworkManager.
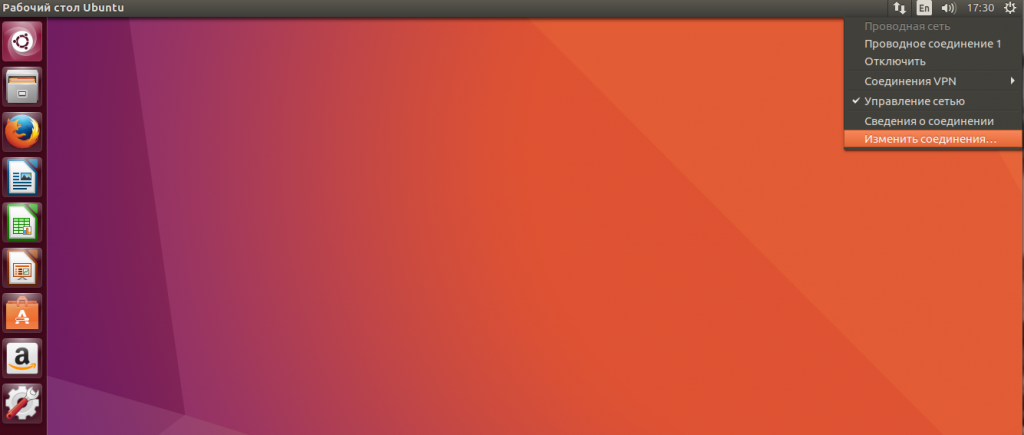
Этот способ до сих пор работает, но в нем вы можете настроить DNS на LiveCD, или до перезагрузки. После перезагрузки все настройки собьются и придется все делать заново. Поэтому, чтобы все сохранилось нужно выполнять все действия через интерфейс NetworkManager. Сначала откройте контекстное меню для значка сети на панели и выберите «Изменить подключения»:
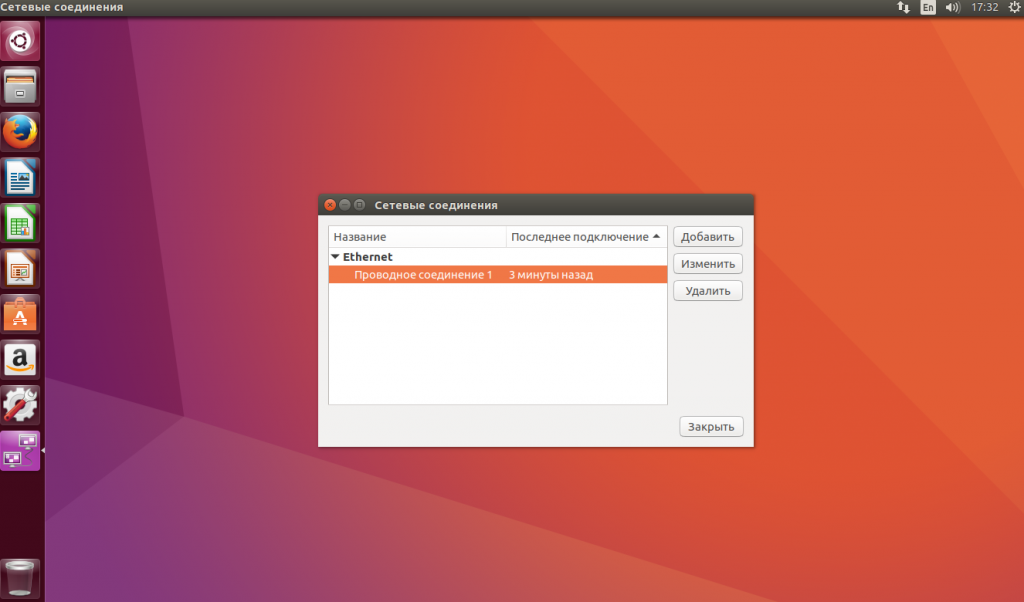
Выберите ваше подключение и нажмите «Изменить»:
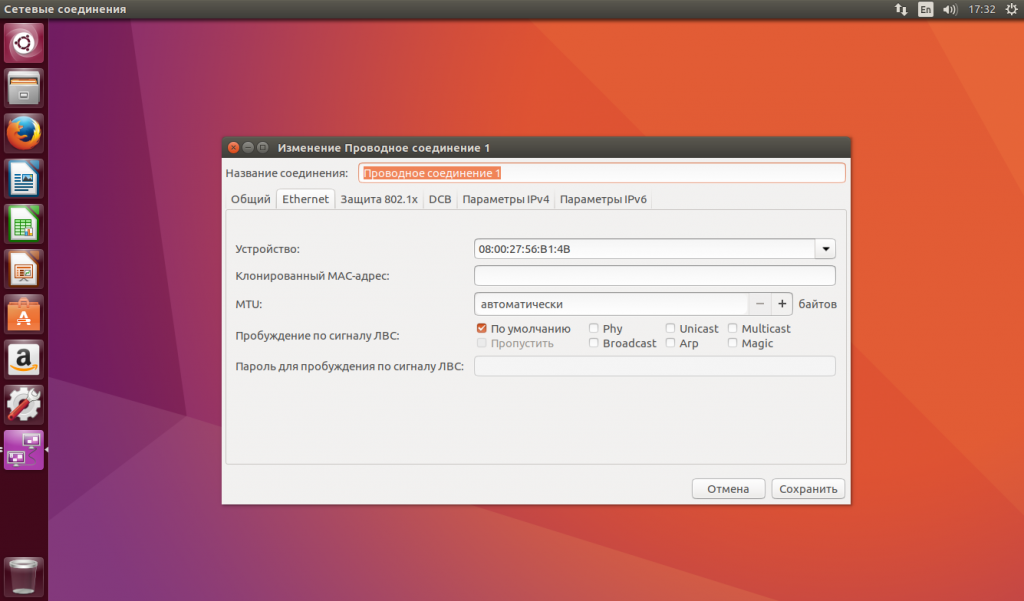
В открывшемся окне перейдите на вкладку «Параметры IPv4»:
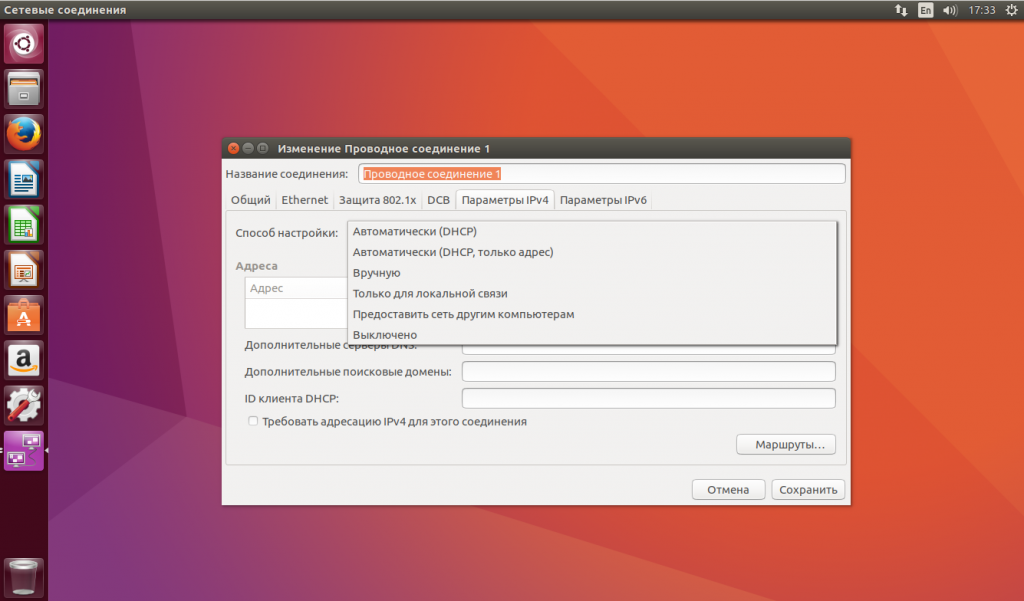
Затем, в поле «Способ настройки» выберите «Автоматически (DHCP, только адрес)»:
Теперь немного ниже появиться поле «Серверы DNS», где вам нужно прописать нужные серверы, можно несколько адресов через запятую. Например, можно указать сервера от Google:
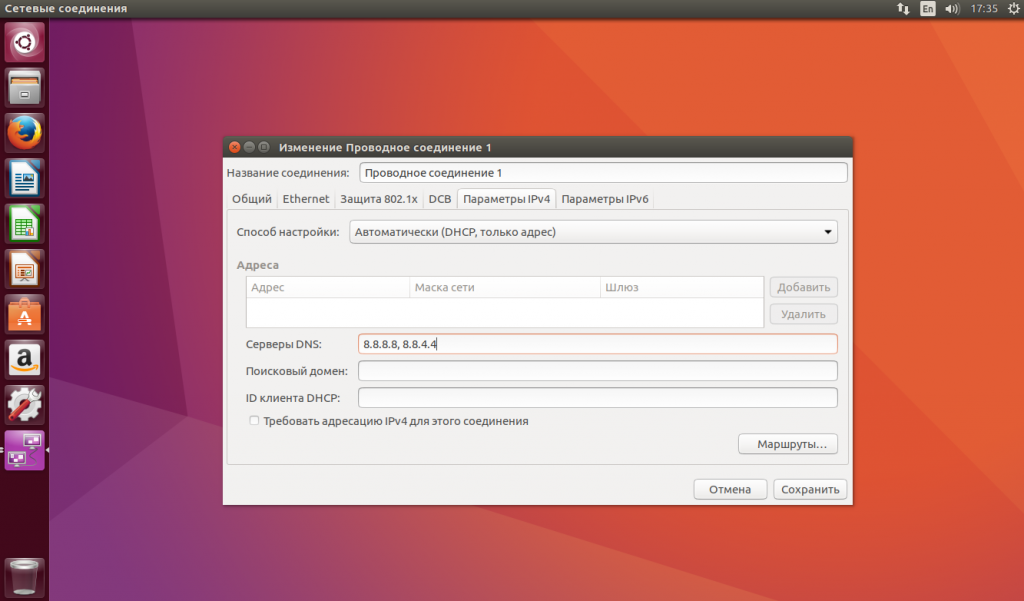
Поле этого нажмите «Сохранить» и «Закрыть». Теперь можете переподключитесь к этому соединению и можете проверять текущий DNS сервер:
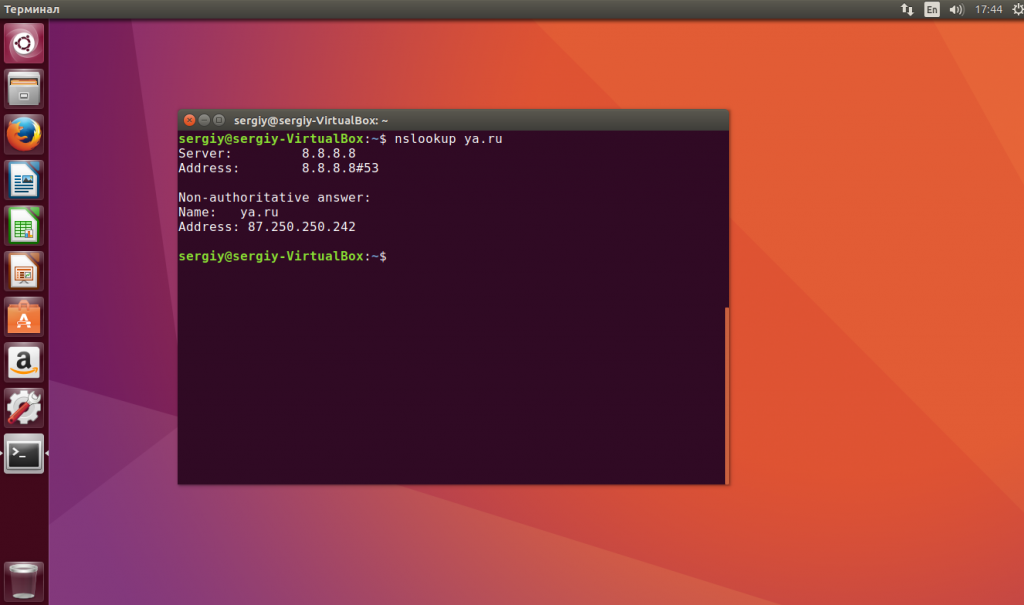
Собственно, это все, но есть еще один способ настройки через консоль, если этот не сработал или вы предпочитаете работать из консоли.
Настройка DNS через терминал Ubuntu
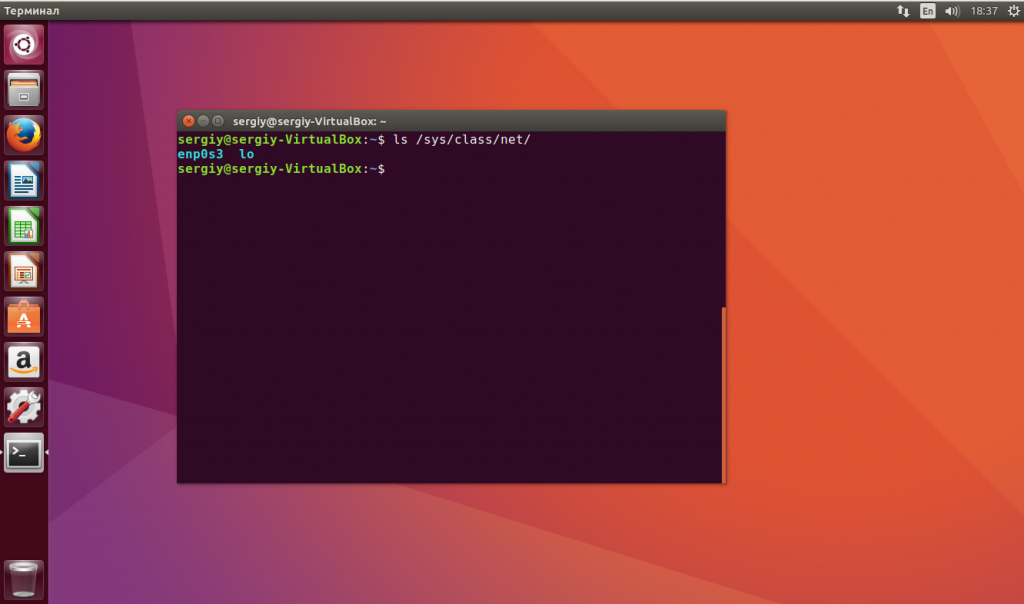
В Ubuntu есть унифицированный интерфейс настройки сети, который настраивается через конфигурационный файл /etc/network/interfaces. Сначала смотрим список сетевых интерфейсов:
Откройте файл для редактирования и найдите в нем имя своего сетевого интерфейса, например, auto enp0s3, если такой секции нет, ее нужно добавить:
sudo vi /etc/network/interfaces
auto enp0s3 iface enp0s3 inet dhcp
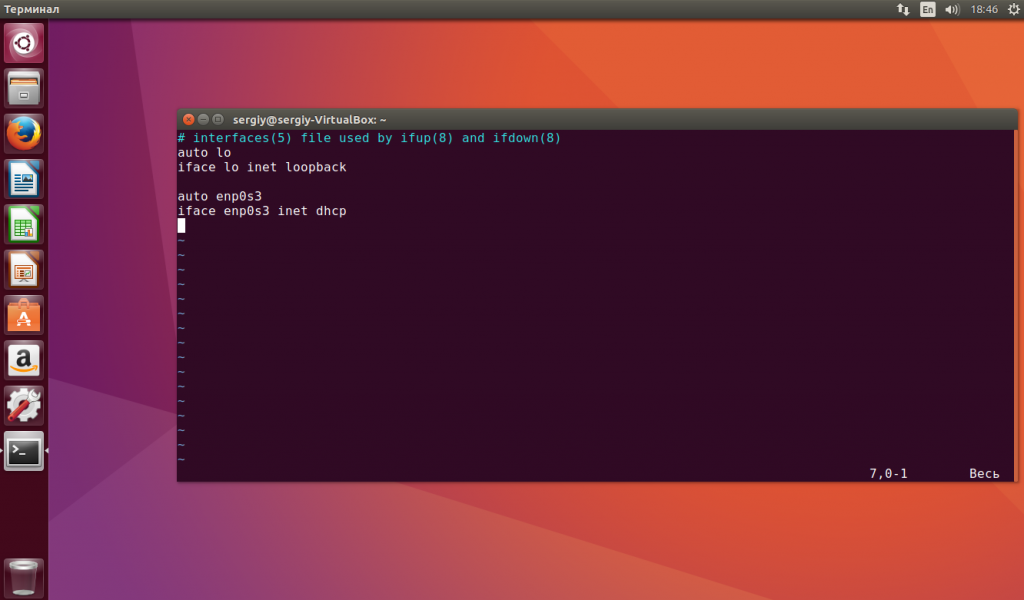
Затем, добавьте в эту секцию строчку:
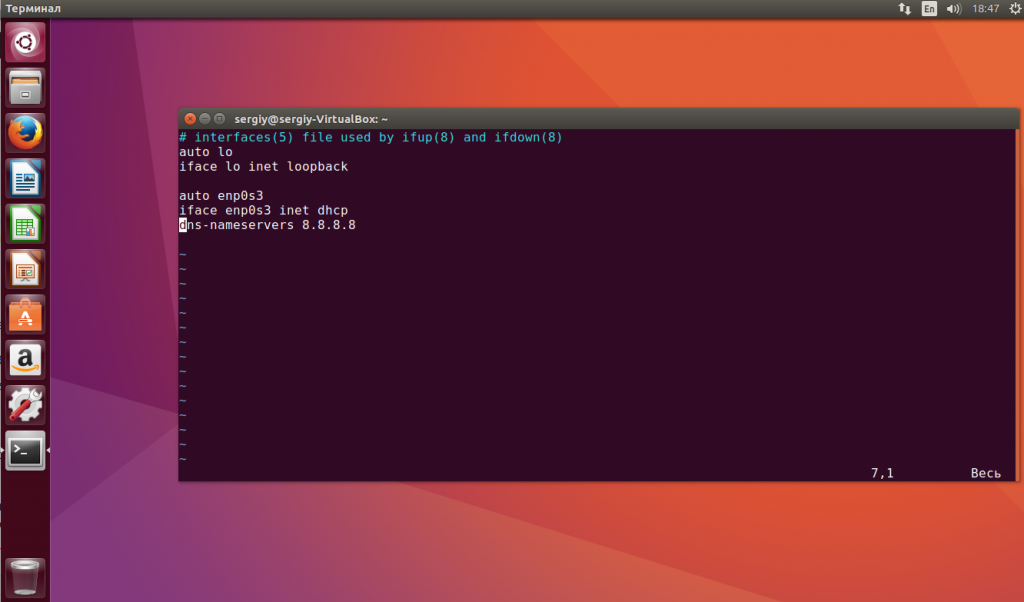
Здесь адрес 8.8.8.8 — это адрес вашего DNS сервера. Но эта настройка сработает, только если ваш DHCP клиент не пытается назначить адрес самостоятельно. Чтобы указать DNS адрес на уровне DHCP сервера нужно добавить такую строчку в конфигурационный файл /etc/dhcp/dhclient.conf:
sudo vi /etc/dhcp/dhclient.conf
supersede domain-name-servers 8.8.8.8
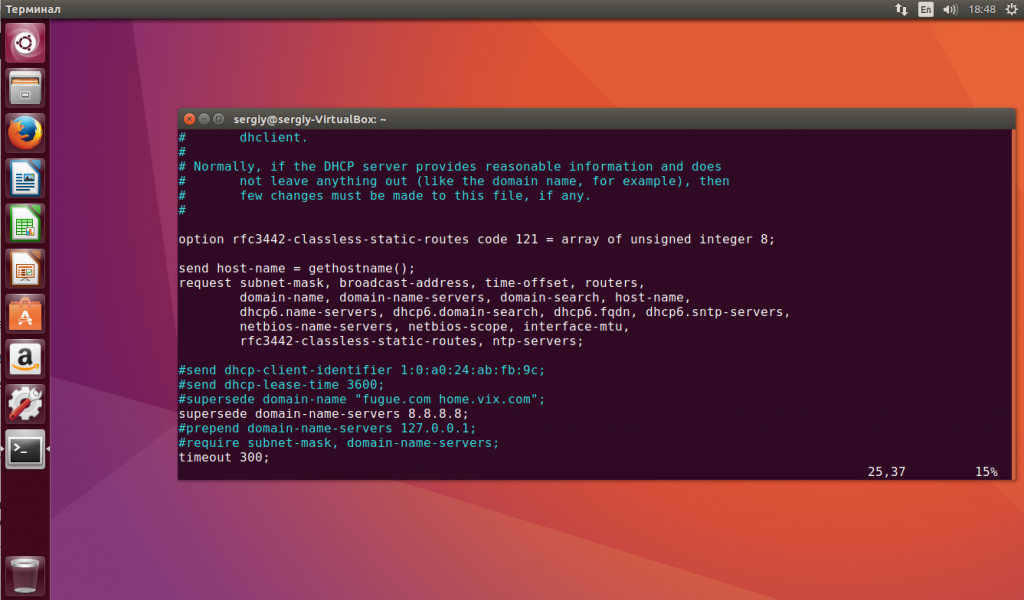
Здесь тоже адрес 8.8.8.8 означает адрес DNS сервера. Для верности, вы можете добавить свои адреса DNS серверов в файл /etc/resolvconf/resolv.conf.d/base:
sudo vi /etc/resolvconf/resolv.conf.d/base
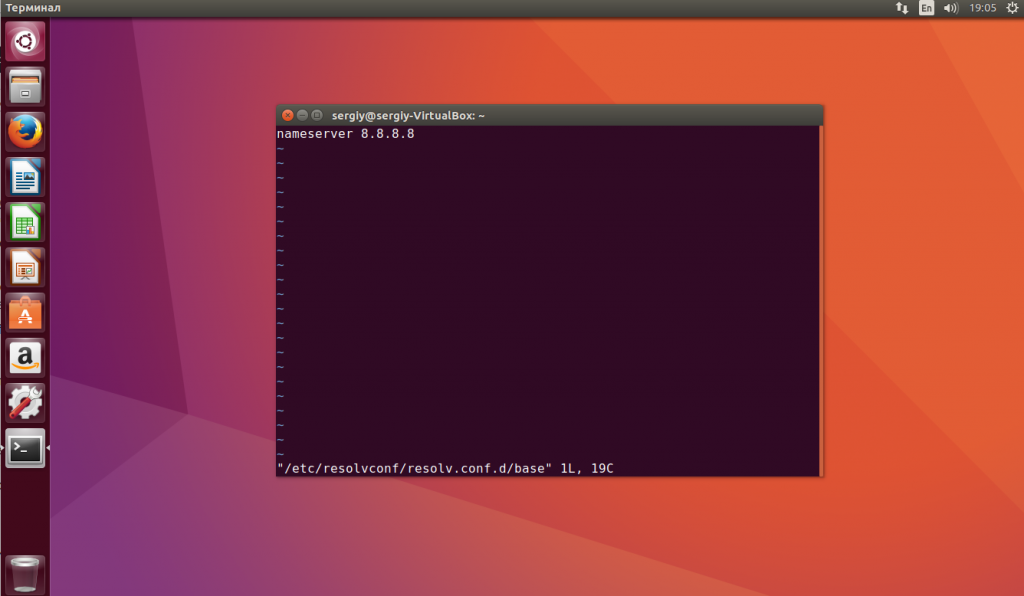
Чтобы настройки вступили в силу необходимо перезапустить сеть:
sudo systemctl restart networking
Возможно, даже лучше будет если вы полностью перезагрузите компьютер. Теперь вы можете открыть /etc/resolv.conf и посмотреть применялся ли новый адрес DNS:
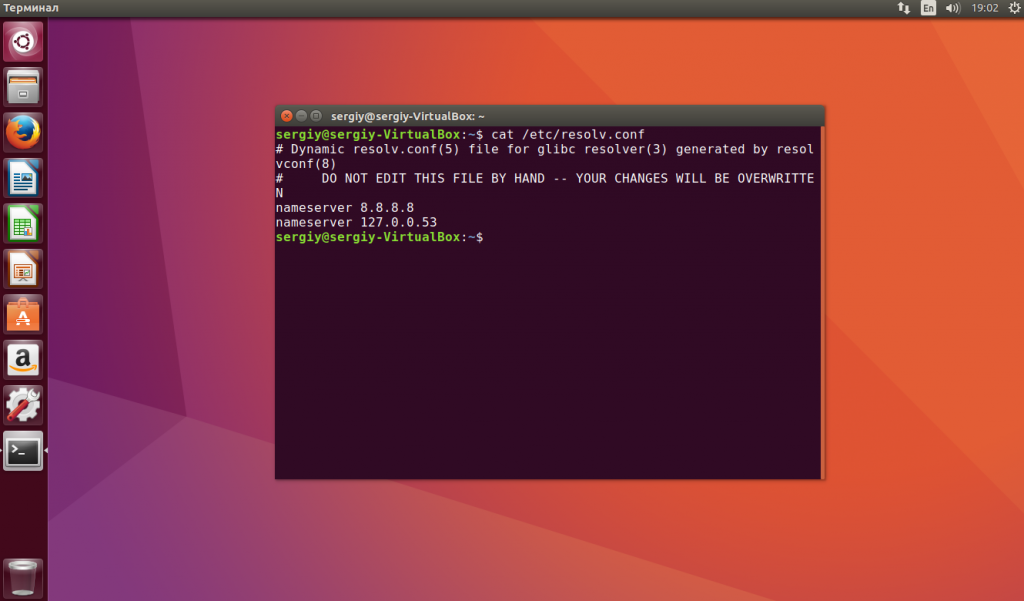
Как видите, в моем примере все заработало. Подобно этому выполняется настройка dns linux для любого дистрибутива.
Выводы
В этой небольшой статье мы рассмотрели как выполняется настройка DNS Ubuntu 16.04 через графический интерфейс или терминал. В Ubuntu автоматической настройкой DNS могут заниматься множество утилит и это создает некоторые проблемы при настройке, но со всем можно разобраться. Надеюсь, эта информация была полезной для вас.
Domain Name Service (DNS)
Domain Name Service (DNS) is an Internet service that maps IP addresses and fully qualified domain names (FQDN) to one another. In this way, DNS alleviates the need to remember IP addresses. Computers that run DNS are called name servers. Ubuntu ships with BIND (Berkley Internet Naming Daemon), the most common program used for maintaining a name server on Linux.
Installation
At a terminal prompt, enter the following command to install dns:
A very useful package for testing and troubleshooting DNS issues is the dnsutils package. Very often these tools will be installed already, but to check and/or install dnsutils enter the following:
Configuration
There are many ways to configure BIND9. Some of the most common configurations are a caching nameserver, primary server, and secondary server.
When configured as a caching nameserver BIND9 will find the answer to name queries and remember the answer when the domain is queried again.
As a primary server, BIND9 reads the data for a zone from a file on its host and is authoritative for that zone.
As a secondary server, BIND9 gets the zone data from another nameserver that is authoritative for the zone.
Overview
The DNS configuration files are stored in the /etc/bind directory. The primary configuration file is /etc/bind/named.conf , which in the layout provided by the package just includes these files.
- /etc/bind/named.conf.options : global DNS options
- /etc/bind/named.conf.local : for your zones
- /etc/bind/named.conf.default-zones : default zones such as localhost, its reverse, and the root hints
The root nameservers used to be described in the file /etc/bind/db.root . This is now provided instead by the /usr/share/dns/root.hints file shipped with the dns-root-data package, and is referenced in the named.conf.default-zones configuration file above.
It is possible to configure the same server to be a caching name server, primary, and secondary: it all depends on the zones it is serving. A server can be the Start of Authority (SOA) for one zone, while providing secondary service for another zone. All the while providing caching services for hosts on the local LAN.
Caching Nameserver
The default configuration acts as a caching server. Simply uncomment and edit /etc/bind/named.conf.options to set the IP addresses of your ISP’s DNS servers:
Note
Replace 1.2.3.4 and 5.6.7.8 with the IP Addresses of actual nameservers.
To enable the new configuration, restart the DNS server. From a terminal prompt:
See dig for information on testing a caching DNS server.
Primary Server
In this section BIND9 will be configured as the Primary server for the domain example.com . Simply replace example.com with your FQDN (Fully Qualified Domain Name).
Forward Zone File
To add a DNS zone to BIND9, turning BIND9 into a Primary server, first edit /etc/bind/named.conf.local :
Note
If bind will be receiving automatic updates to the file as with DDNS, then use /var/lib/bind/db.example.com rather than /etc/bind/db.example.com both here and in the copy command below.
Now use an existing zone file as a template to create the /etc/bind/db.example.com file:
Edit the new zone file /etc/bind/db.example.com and change localhost. to the FQDN of your server, leaving the additional . at the end. Change 127.0.0.1 to the nameserver’s IP Address and root.localhost to a valid email address, but with a . instead of the usual @ symbol, again leaving the . at the end. Change the comment to indicate the domain that this file is for.
Create an A record for the base domain, example.com . Also, create an A record for ns.example.com , the name server in this example:
You must increment the Serial Number every time you make changes to the zone file. If you make multiple changes before restarting BIND9, simply increment the Serial once.
Now, you can add DNS records to the bottom of the zone file. See Common Record Types for details.
Note
Many admins like to use the last date edited as the serial of a zone, such as 2020012100 which is yyyymmddss (where ss is the Serial Number)
Once you have made changes to the zone file BIND9 needs to be restarted for the changes to take effect:
Reverse Zone File
Now that the zone is setup and resolving names to IP Addresses, a Reverse zone needs to be added to allows DNS to resolve an address to a name.
Edit /etc/bind/named.conf.local and add the following:
Note
Replace 1.168.192 with the first three octets of whatever network you are using. Also, name the zone file /etc/bind/db.192 appropriately. It should match the first octet of your network.
Now create the /etc/bind/db.192 file:
Next edit /etc/bind/db.192 changing the same options as /etc/bind/db.example.com :
The Serial Number in the Reverse zone needs to be incremented on each change as well. For each A record you configure in /etc/bind/db.example.com , that is for a different address, you need to create a PTR record in /etc/bind/db.192 .
After creating the reverse zone file restart BIND9:
Secondary Server
Once a Primary Server has been configured a Secondary Server is highly recommended in order to maintain the availability of the domain should the Primary become unavailable.
First, on the Primary server, the zone transfer needs to be allowed. Add the allow-transfer option to the example Forward and Reverse zone definitions in /etc/bind/named.conf.local :
Note
Replace 192.168.1.11 with the IP Address of your Secondary nameserver.
Restart BIND9 on the Primary server:
Next, on the Secondary server, install the bind9 package the same way as on the Primary. Then edit the /etc/bind/named.conf.local and add the following declarations for the Forward and Reverse zones:
Note
Replace 192.168.1.10 with the IP Address of your Primary nameserver.
Restart BIND9 on the Secondary server:
In /var/log/syslog you should see something similar to the following (some lines have been split to fit the format of this document):
Note
Note: A zone is only transferred if the Serial Number on the Primary is larger than the one on the Secondary. If you want to have your Primary DNS notifying other Secondary DNS Servers of zone changes, you can add also-notify < ipaddress; >; to /etc/bind/named.conf.local as shown in the example below:
Note
The default directory for non-authoritative zone files is /var/cache/bind/ . This directory is also configured in AppArmor to allow the named daemon to write to it. For more information on AppArmor see Security — AppArmor.
Troubleshooting
This section covers diagnosing problems with DNS and BIND9 configurations.
Testing
resolv.conf
The first step in testing BIND9 is to add the nameserver’s IP Address to a hosts resolver. The Primary nameserver should be configured as well as another host to double check things. Refer to DNS client configuration for details on adding nameserver addresses to your network clients. In the end your nameserver line in /etc/resolv.conf should be pointing at 127.0.0.53 and you should have a search parameter for your domain. Something like this:
To check which DNS server your local resolver is using, run:
Note
You should also add the IP Address of the Secondary nameserver to your client configuration in case the Primary becomes unavailable.
If you installed the dnsutils package you can test your setup using the DNS lookup utility dig:
After installing BIND9 use dig against the loopback interface to make sure it is listening on port 53. From a terminal prompt:
You should see lines similar to the following in the command output:
If you have configured BIND9 as a Caching nameserver “dig” an outside domain to check the query time:
Note the query time toward the end of the command output:
After a second dig there should be improvement:
Now to demonstrate how applications make use of DNS to resolve a host name use the ping utility to send an ICMP echo request:
This tests if the nameserver can resolve the name ns.example.com to an IP Address. The command output should resemble:
named-checkzone
A great way to test your zone files is by using the named-checkzone utility installed with the bind9 package. This utility allows you to make sure the configuration is correct before restarting BIND9 and making the changes live.
To test our example Forward zone file enter the following from a command prompt:
If everything is configured correctly you should see output similar to:
Similarly, to test the Reverse zone file enter the following:
The output should be similar to:
Note
The Serial Number of your zone file will probably be different.
Quick temporary query logging
With the rndc tool, you can quickly turn query logging on and off, without restarting the service or changing the configuration file.
To turn query logging on, run:
Likewise, to turn it off, run:
The logs will be sent to syslog and will show up in /var/log/syslog by default:
Note
The amount of logs generated by enabling querylog could be huge!
Logging
BIND9 has a wide variety of logging configuration options available, but the two main ones are channel and category, which configure where logs go, and what information gets logged, respectively.
If no logging options are configured the default configuration is:
Let’s instead configure BIND9 to send debug messages related to DNS queries to a separate file.
We need to configure a channel to specify which file to send the messages to, and a category. In this example, the category will log all queries. Edit /etc/bind/named.conf.local and add the following:
Note
The debug option can be set from 1 to 3. If a level isn’t specified, level 1 is the default.
Since the named daemon runs as the bind user the /var/log/named directory must be created and the ownership changed:
Now restart BIND9 for the changes to take effect:
You should see the file /var/log/named/query.log fill with query information. This is a simple example of the BIND9 logging options. For coverage of advanced options see More Information.
References
Common Record Types
This section covers some of the most common DNS record types.
A record: This record maps an IP Address to a hostname.
CNAME record: Used to create an alias to an existing A record. You cannot create a CNAME record pointing to another CNAME record.
MX record: Used to define where email should be sent to. Must point to an A record, not a CNAME .
NS record: Used to define which servers serve copies of a zone. It must point to an A record, not a CNAME . This is where Primary and Secondary servers are defined.
More Information
DNS and BIND is a popular book now in it’s fifth edition. There is now also a DNS and BIND on IPv6 book.
A great place to ask for BIND9 assistance, and get involved with the Ubuntu Server community, is the #ubuntu-server IRC channel on freenode.