How to Sign PowerShell Script (And Effectively Run It)
Download a free trial of Veeam Backup for Microsoft 365 and eliminate the risk of losing access and control over your data!
Table of Contents
Do you need to ensure that nobody makes modifications to your scripts and pass them as the original? If so, then you need to learn how to sign PowerShell script. Signing adds the publisher’s identity to the script so that users can decide whether to trust the script’s source.
Not a reader? Watch this related video tutorial!
In this article, learn how to ensure that only trusted scripts are run in your environment by learning how to sign PowerShell scripts.
Prerequisites
If you’re going to follow the examples in this article, you need the following.
- A computer running on a recent version of the Windows operating system. This article uses Windows 10 version 20H2.
- Windows PowerShell 5.1 or PowerShell 6+. The examples in this article will use PowerShell v7.1.3.
- A sample PowerShell script for signing. Feel free to create a script with any name and in any folder you want. This article will use a sample script called C:\ATA\myscript.ps1 that contains the code below.
Obtaining a Code Signing Certificate
Before learning how to sign PowerShell script, you need to obtain a code signing certificate first. In the Microsoft world, code signing certificates are also known as Authenticode certificates.
A code signing certificate is one type of digital certificate whose purpose for signing files. Signing a file or code with a code signing certificate adds proof that the file came from the publisher who signed it.
Where you get a code signing certificate depends on where you intend to deploy or distribute your signed scripts. And as always, the cost is a big factor, too.
- Global / Public – You’ll need a certificate whose issuer is a globally trusted Certificate Authority (CA). Examples of such CAs are GeoTrust and DigiCert. These certificates are not free. For example, a DigiCert Authenticode certificate will set you back $474/year as of this writing.
- Internal / Local Intranet – If you have an internal certificate authority (CA) server, you can request and download a signing certificate from your internal CA server.
- Personal / Development – For personal testing or development use, a self-signed certificate should be fine. This type of signing certificate is what you’ll use in this article.
Creating a Self-Signed Certificate for Code Signing
You’ve read in the previous section that in learning how to sign PowerShell script, you first need a code signing certificate. Since you’ll only be doing personal testing in this tutorial, a self-signed certificate would suffice. But where do you get it?
As the name implies, self-signed means that your local computer will issue a code signing certificate to itself. To generate a self-signed certificate, follow these steps.
2. Copy the command below and run it in PowerShell. This command uses the New-SelfSignedCertificate cmdlet to create a new code signing certificate. The certificate’s name is ATA Authenticode inside the local computer’s Personal certificate store.
The New-SelfSignedCertificate cmdlet only supports creating certificates in the current user’s personal certificate store (cert:\CurrentUser\My) or the local machine’s personal certificate store (cert:\LocalMachine\My). Certificates in cert:\LocalMachine\My are available computer-wide.
The command also stores the certificate object to the $authenticode variable for use in the next step.
3. Next, to make your computer trust the new certificate you’ve created, add the self-signed certificate to the computer’s Trusted Root Certification Authority and Trusted Publishers certificate store. To do so, copy the code below and run it in PowerShell.
There are three primary reasons to install the self-signed certificates in three different certificate stores.
- The certificate you created in the Personal certificate store is what you’ll use as the code signing certificate.
- Copying the same certificate to the Trusted Publishers store ensures that your local computer will trust the publisher who signed the script. PowerShell checks for the certificate in this store to validate a script’s signature.
- Finally, adding the self-signed certificate to the Trusted Root Certification Authorities ensures that your local computer trusts the certificates in the Personal and Trusted Publishers stores.
4. To confirm that the certificate with the subject ATA Authenticode is in the Personal, Root, and Trusted Publisher certificate stores, run the commands below in PowerShell.
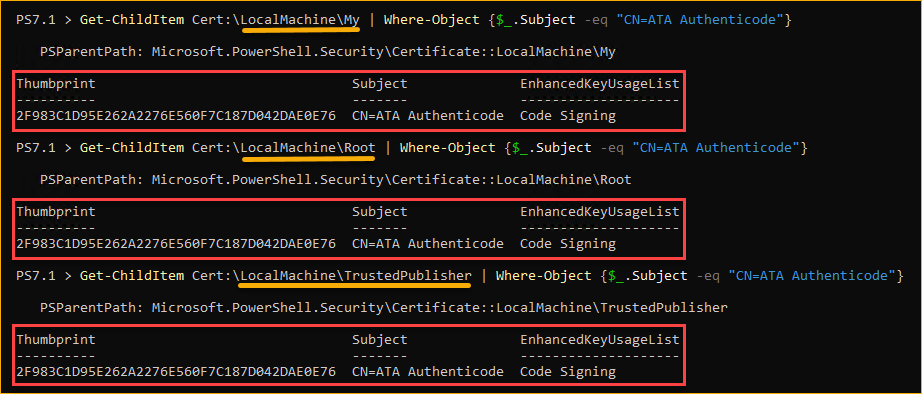
Confirming the creation of the new self-signed certificate
5. To view the certificate in a GUI instead, open the Certificates Snap-in and look for the certificate you’ve created under the Certificates folder inside the Personal, Trusted Root Certification Authorities, and Trusted Publishers certificate stores.
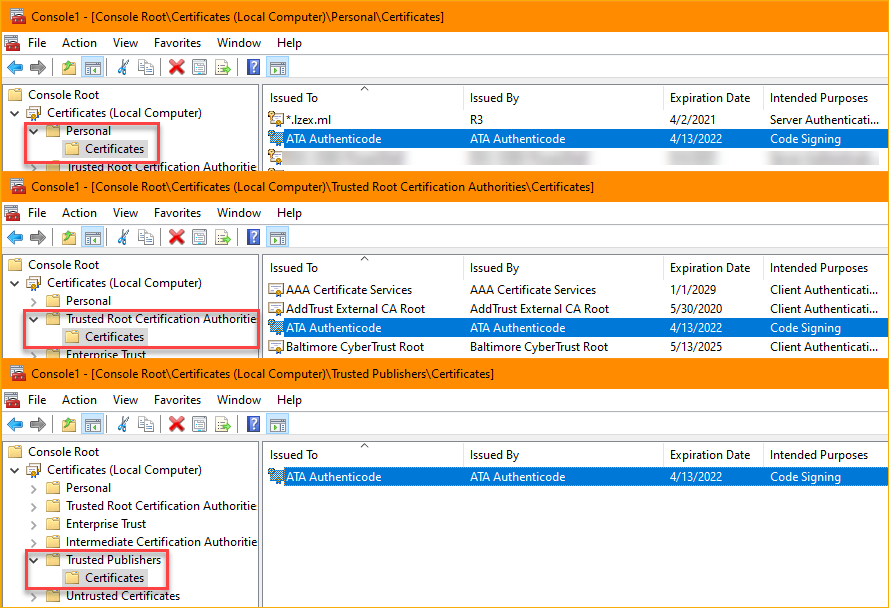
Viewing certificates in the Microsoft Management Console (MMC)
How to Sign PowerShell Scripts
Now that you have created and installed your code signing certificate into the three certificate stores, you’re ready to use it to sign your sample PowerShell script. When you need to sign scripts, the Set-AuthenticodeSignature cmdlet is the main star.
To sign the PowerShell script, run the code below in PowerShell. The first command gets the code-signing certificate from the local machine’s personal certificate store. The second command adds a digital signature to the PowerShell script file.
Most trusted certificate providers have a timestamp server and you can find them from the providers’ websites. For example, DigiCert‘s timestamp server is http://timestamp.digicert.com and Comodo has http://timestamp.comodoca.com.
After signing the script, you should see a similar output to the screenshot below.

How to Sign PowerShell Scripts
Checking a PowerShell Script’s Digital Signature
So far, you’ve signed a PowerShell script using the self-signed certificate that you created. But how do you know if the script does have a digital signature?
Opening the Code
One way to confirm a script’s digital signature is to open the script and view the code in a text editor. Like the example below, the signed script has a signature block at the end of the code. The signature block begins with # SIG # Begin signature block and ends with # SIG # End signature block .
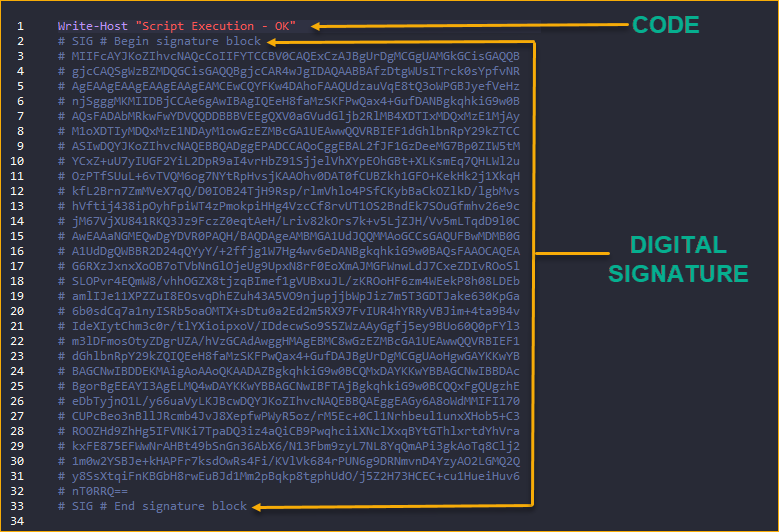
Viewing the digital signature in the script’s content
Deleting the digital signature block from the script’s code will revert the script to being non-signed.
Opening the Script’s File Properties
Another way to check the script’s digital signature is to open the script’s file properties in Windows Explorer. To do so:
- In Windows Explorer, navigate to the PowerShell script’s location. In this example, the script is in C:\ATA\myscript.ps1.
- Right-click the script and click on Properties.
- On the file’s Properties window, click the Digital Signatures tab, and you should see a digital signature under the Signature list.
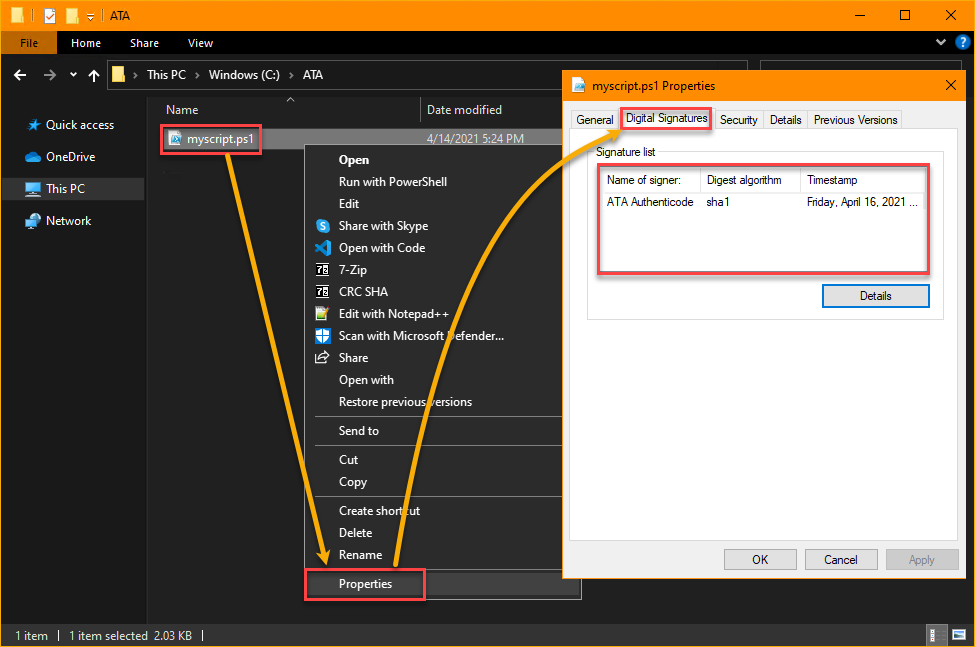
Viewing the digital signature in the script’s file properties
Using Get-AuthenticodeSignature
Would you be surprised that you can also check a script’s signature inside PowerShell? Probably not. The cmdlet that you can invoke to retrieve the signature of a file is Get-AuthenticodeSignature .
To get the digital signature of the script, run the command below. This command gets the signature of the C:\ATA\myscript.ps1 file. The Select-Object -Property * cmdlet displays all the details of the signature.
After running the command, you should see a similar result as the screenshot below. As you can see, the SignerCertificate property shows the details of the signing certificate. While the TimerStamperCertificate property shows the certificate of timestamp server.
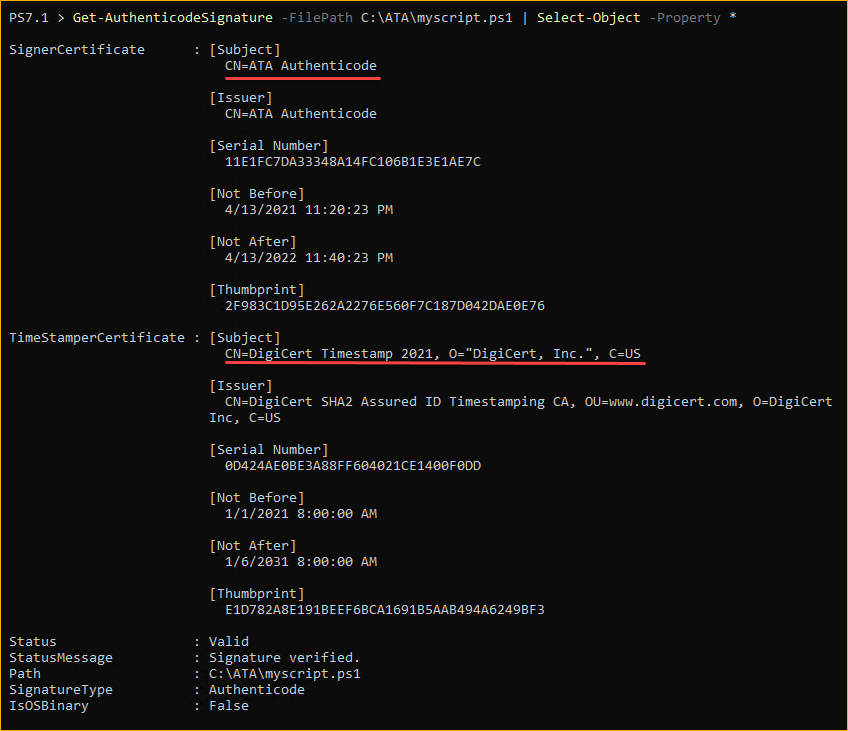
Viewing the digital signature in PowerShell
Running a Signed PowerShell Script
At this point, you’ve signed a PowerShell script and confirmed that the digital signature is present. But, the ultimate test of whether you’ve done all the steps correctly is to execute the script and confirm that it runs.
PowerShell has a safety feature that protects users from unintentionally running scripts. This safety feature is called Execution Policies. Depending on the execution policy, PowerShell may prevent or allow scripts to run.
To learn about the different execution policies and how they affect script execution, refer to PowerShell Execution Policies: Understanding and Managing.
To run a signed PowerShell script, follow these steps.
First, change the execution policy to AllSigned to ensure only signed scripts can run. Without doing this step, you cannot accurately test whether your signed script works. To do so, invoke the Set-ExecutionPolicy cmdlet by running the command below in PowerShell as admin.
Next, execute the signed PowerShell script.
The script should run and without errors or warning, as you can see in the result below.

Running the signed script without errors
But, if somehow the script was not correctly signed or not signed at all, you’ll get an error similar to the image below. In which case, revisit your steps and try signing the script again.

Running a script with errors regarding the digital signature
What if you eventually updated your script? Will the digital signature still be valid? The answer is no. Any modification to the signed script will invalidate the script’s digital signature. Running the modified script will fail and result in an error.
Follow these steps to test a modified signed script.
1. Open the signed myscript.ps1 script in a code or text editor.
2. Modify the code to add a character, such as an underscore in this example. Do not change anything else.
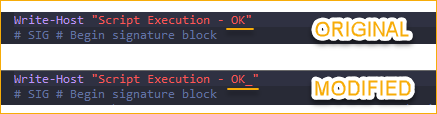
Editing the signed script
3. Save the script after modifying the code.
4. Finally, execute the modified script in PowerShell by running the command below.
Since you’ve modified the signed script, executing the script will result in the error shown below. You’ll need to sign the script again to update and fix its digital signature.

Running a signed script with a broken digital signature
A digital signature does not guarantee that nobody modified the script from its original version. Any PowerShell script with malicious code may be digitally signed, too. Always practice caution when running scripts from sources you do not fully trust.
Conclusion
In this article, you learned why signing PowerShell scripts may be necessary depending on the execution policies. You also learned how to distinguish between a signed and non-signed script. Finally, you’ve learned how to sign PowerShell scripts digitally and how to test and run them.
Now that you know how to sign PowerShell scripts, will you start signing scripts before you distribute or deploy them?
Hate ads? Want to support the writer? Get many of our tutorials packaged as an ATA Guidebook.
More from ATA Learning & Partners
Recommended Resources!
Recommended Resources for Training, Information Security, Automation, and more!
Get Paid to Write!
ATA Learning is always seeking instructors of all experience levels. Regardless if you’re a junior admin or system architect, you have something to share. Why not write on a platform with an existing audience and share your knowledge with the world?
ATA Learning Guidebooks
ATA Learning is known for its high-quality written tutorials in the form of blog posts. Support ATA Learning with ATA Guidebook PDF eBooks available offline and with no ads!
Как подписать скрипт powershell
Все можно сделать встроенными средствами PowerShell, первым делом необходимо создать сертификат используя командлет New-SelfSignedCertificate:
Далее открываем mmc оснастку (certmgr.msc), добавляем оснастку Certificates — My user account:

Экспортируем сертификат в любое удобное место:


Импортируем его в Trusted Root Certificates Authorities:

После каждого изменения скрипта, нужно его подписывать (когда уже он готов в прод, перед публикацией собственно скрипта куда-либо).
Как проверить какие политики выполнения используются в данный момент времени:
Как подписать скрипт powershell
Как известно практически всем пользователям PowerShell, в целях безопасности была введена политика запуска скриптов. Которая имеет 4 режима:
- Restricted – запрещено исполнять любые скрипты, возможна работа только в интерактивной консоли
- AllSigned – все скрипты должны быть криптографически подписаны
- RemoteSigned – только полученные из недоверенных источников (например, интернет) скрипты должны быть подписаны
- Unrestricted – наименее безопасный уровень, допускается исполнение любых скриптов
В версии V2 (пока ещё CTP3) скрипты PowerShell приравняли к исполняемым файлам и эти файлы стали неотключаемо мониториться политикой Software Restriction Policies. Я об этом уже писал ранее: PowerShell V2 и Software Restriction Policies. Поначалу меня это сильно напрягало, но после пришёл к мнению, что это правильно. Неправильно только то, что мы этого не видим (ps1 расширение нигде не фигурирует). С этим бороться можно двумя методами – явно указывать пути, откуда разрешён запуск .ps1 файлов или подписать их все.
Если компьютеров в сети больше одного, то самое идеальное для решения задачи будет наличие домена Active Directory и, по возможности, Enterprise Certification Authity (CA). Наличие домена решит массу задач, как распространение политики SRP в пределах домена, распространение сертификата в пределах домена, контроль версии сертификата, которым подписаны скрипты.
Итак, для начала нам нужно получить сертификат, которым будут подписываться скрипты. В целях безопасности следует создать ограниченную учётную запись пользователя из под которой администратор (в большинстве случаев) будет подписывать скрипты. В книге PowerShell In Action для генерации сертификата предлагается использовать makecert.exe, который входит в состав Visual Studio SDK, но как мне кажется более правильным будет использование CA. В Windows Server CA для этих целей есть уже готовый шаблон, который называется Code Signing. Но принципиальной разницы нету, каким инструментом вы будете генерировать сертификат и я опишу процесс получения сертификата с использованием доменного CA.
Если CA у нас уже установлен, то открываем оснастку Certification Authority и переходим в раздел Certificate Templates. Нажимаем правой кнопкой и выбираем Manage. Откроется редактор шаблонов. Если у вас Enterprise или Datacenter редакции Windows Server, то вы можете создать свой настроенный шаблон. Но я не вижу в этом необходимости. На данном этапе нам необходимо разрешить ограниченному пользователю запрашивать сертификаты этого шаблона. Для этого в закладке Security шаблона Code Signing нужно разрешить чтение и запрос сертификата ограниченному пользователю. Когда эта процедура проделана, редактор шаблонов можно закрыть. После чего в оснастке Certification Authority снова нажать правой кнопкой на разделе Certificate Templates –> New –> Certificate Template to Issue и в списке выбрать шаблон Code Signing.
После чего нужно залогиниться этим пользователем, запустить оснастку Certificate Manager ( Start –> Run… –> certmgr.msc ) и выполнить запрос сертификата. В списке шаблонов должен быть и добавленный нами Code Signing. Когда сертификат будет запрошен не надо закрывать оснастку сертификатов. Далее нам потребуется экспортировать открытую часть сертификата в x509 файл (с расширением .cer). Экспорт открытой части нам потребуется для проверки подписи и организации доверия подписи в пределах домена. Экспортированный сертификат необходимо теперь доставить администратору(-ам), который отвечает за групповую политику.
В групповых политиках (чаще всего в доменной политике) необходимо создать новую политику Software Restriction Policies и в Additiona Rules добавить правило сертификата (Certificate Rule) и указать экспортированный сертификат. Это необходимо затем, что PowerShell для проверки доверия сертификата ищет его в контейнере Trusted Publishers и только Software Restriction Policies позволяет централизовано распространять сертификаты в этот контейнер.
Теперь можно приступать к подписыванию скриптов. Для этих целей используется командлет Set-AuthenticodeSignature и синтаксис его такой:
Где $file – путь к скрипту и $cert – объект сертификата, который получается следующим образом:
здесь мы явно указываем, что нам нужен сертификат, у которого в EKU (Enchanced Key Usage) указан Code Sgining. В нашем случае он будет всего 1. Но если их окажется несколько, то мы выберем самый первый. Вот как это будет выглядеть на практике:
Я наглядно показал, как это работает. Мы сначала перевели политику исполнения скриптов в AllSigned и убедились, что неподписанный скрипт не исполняется. После чего я подписал этот скрипт и попробовал снова. Как видите, скрипт теперь исполнился.
Если не будет выполнено условие распространения сертификата посредством политики SRP в контейнер Trusted Publishers, то вы получите вот такое сообщение:
Вот таким образом мы решаем задачу исполнения только проверенного набора скриптов. В этом смысле PowerShell 1.0 менее безопасный и удобный, поскольку мы не можем политикой SRP блокировать исполнение PS1 файлов как класс и имеем только один выход – принудительное подписывание скриптов. В версии V2 политика исполнения скриптов удобно интегрируется с SRP. Удобство интегрирования в том, что SRP помимо распространения сертификата в пределах домена так же на основе этого правила разрешает исполнять эти скрипты в обход общего ограничения на PS1 файлы.
В следующем посте я расскажу, как можно упростить процесс подписывания скриптов. Так что не отключаемся 🙂
Как подписать файл PowerShell скрипта (ps1) с помощью сертификата?
 24.02.2021
 itpro
itpro
 PowerShell, Windows 10, Windows Server 2016
 комментариев 16
Наличие цифровой подписи у скрипта или исполняемого файла позволяет пользователю удостовериться, что файл является оригинальным и его код не был изменен третьими лицами. В современных версиях PowerShell есть встроенные средства для подписывания кода файла скриптов *.ps1 с помощью цифровых сертификатов.
Для подписывания скриптов PowerShell нужно использовать специальный сертификат типа Code Signing. Этот сертификат может быть получен от внешнего коммерческого центра сертификации, внутреннего корпоративного Certificate Authority (CA) или можно даже самоподписанный сертификат.
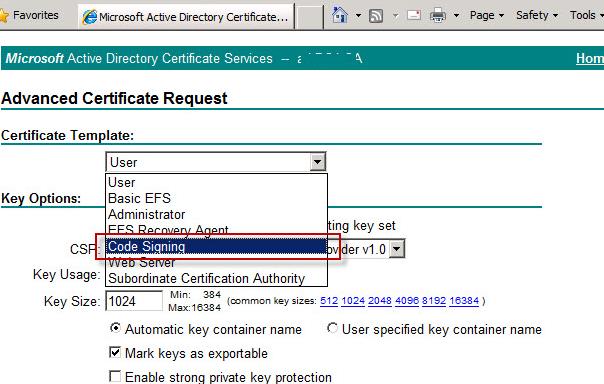
Предположим, у нас в домене развернуты службы PKI — Active Directory Certificate Services. Запросите новый сертификат, перейдя на страницу https://CA-server-name/certsrv . Нужно запросить новый сертификат с шаблоном Code Signing (данный шаблон должен быть предварительно разрешен в консоли Certification Authority).
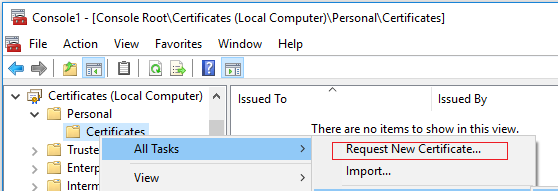
Также пользователь может самостоятельно запросить сертификат для подписи PowerShell скриптов из mmc оснастки Certificates -> My user account -> Personal -> All task -> Request New Certificate.
Если вы запросили сертификат вручную, у вас должен получится файл сертификат x509 в виде файла с расширением .cer. Данный сертификат нужно установить в локальное хранилище сертификатов вашего компьютера.
Для добавления сертификата в доверенные корневые сертификаты компьютера можно использовать следующие команды PowerShell:
$certFile = Export-Certificate -Cert $cert -FilePath C:\ps\certname.cer
Import-Certificate -CertStoreLocation Cert:\LocalMachine\AuthRoot -FilePath $certFile.FullName
Если вы хотите использовать самоподписанный сертификат, то вы можете использовать командлета New-SelfSignedCertificate чтобы создать сертификат типа CodeSigning c DNS именем test1:
New-SelfSignedCertificate -DnsName test1 -Type CodeSigning
$cert = New-SelfSignedCertificate -Subject «Cert for Code Signing” -Type CodeSigningCert -DnsName test1 -CertStoreLocation cert:\LocalMachine\My
После генерации сертификата, его нужно будет в консоли управления хранилищем сертификатов ( certmgr.msc ) перенести из контейнера Intermediate в Trusted Root.
После того, как сертификат получен, можно настроить политику исполнения скриптов PowerShell, разрешив запуск только подписанных скриптов. По умолчанию PowerShell Execution политика в Windows 10/Windows Server 2016 установлена в значение Restricted. Это режим блокирует запуск любых PowerShell скриптов:
Чтобы разрешить запуск только подписанных PS1 скриптов, можно изменить настройку политики исполнения скриптов на AllSigned или RemoteSigned (разница между ними в том, что RemoteSigned требует наличие подписи только для скриптов, полученных из интернета):
Set-ExecutionPolicy AllSigned –Force
В этом режиме при запуске неподписанных PowerShell скриптов появляется ошибка:
Теперь перейдем к подписыванию файла со скриптом PowerShell. В первую очередь вам нужно получить сертификат типа CodeSign из локального хранилища сертификатов текущего пользователя. Сначала выведем список всех сертификатов, которые можно использовать для подписывания кода:
Get-ChildItem cert:\CurrentUser\my –CodeSigningCert
В нашем случае мы возьмем первый сертификат и сохраним его в переменную $cert.
$cert = (Get-ChildItem cert:\CurrentUser\my –CodeSigningCert)[0]
Затем можно использовать данный сертификат, чтобы подписать файл PS1 с вашим скриптом PowerShell:
Set-AuthenticodeSignature -Certificate $cert -FilePath C:\PS\test_script.ps1
Также можно использовать такую команду (в данном случае мы вибираем самоподписанный сертификат созданный ранее по DnsName):
Set-AuthenticodeSignature C:\PS\test_script.ps1 @(gci Cert:\LocalMachine\My -DnsName test1 -codesigning)[0]
Если вы попытаетесь использовать обычный сертификат для подписывания скрипта, появится ошибка:
Get-ChildItem c:\ps\*.ps1| Set-AuthenticodeSignature -Certificate $Cert
Теперь можно проверить, что скрипт подписан. Можно использовать командлет Get-AuthenticodeSignature или открыть свойства PS1 файла и перейдти на вкладку Digital Signatures.
Get-AuthenticodeSignature c:\ps\test_script.ps1 | ft -AutoSize
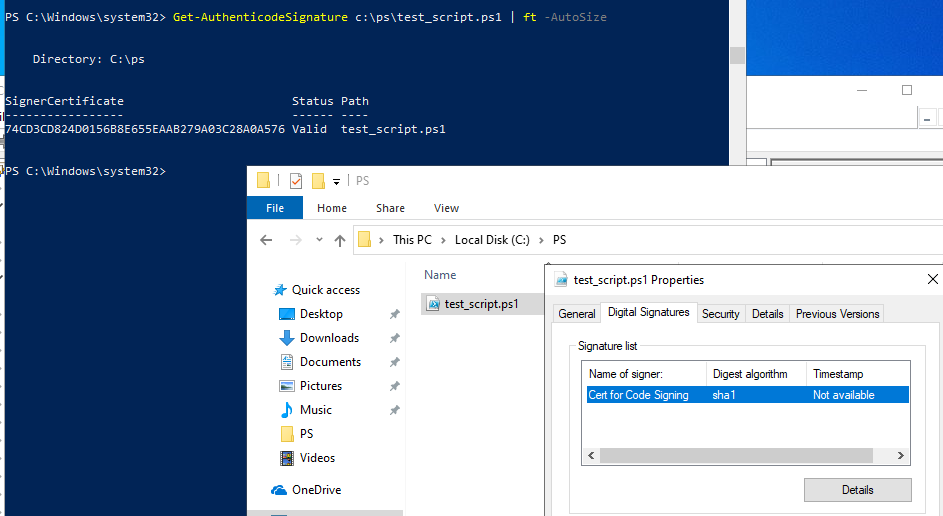
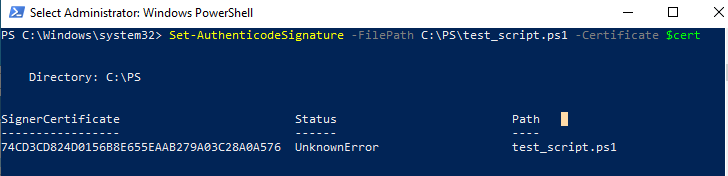
Если при выполнении команды Set-AuthenticodeSignature появится предупреждение UnknownError, значит этот сертификат недоверенный, т.к. находится в персональном хранилище сертификатов пользователя.
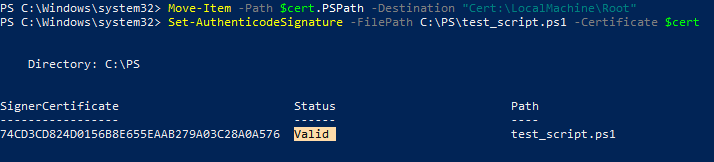
Теперь при проверке подписи PS1 файла должен возвращаться статус Valid.
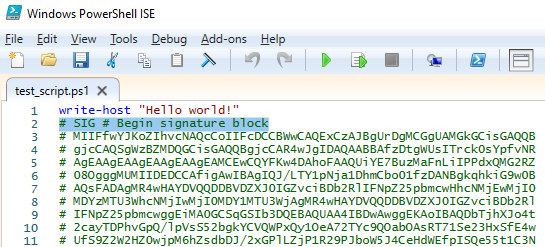
При подписывании файла PowerShell скрипта, командлет Set-AuthenticodeSignature добавляет в конец текстового файла PS1 блок сигнатуры цифровой подписи, обрамленный специальными метками:
Блок сигнатуры содержит хэш скрипта, который зашифрован с помощью закрытого ключа.
При первой попытке запустить скрипт появится предупреждение:
Если выбрать [A] Always run, то при запуске любых PowerShell скриптов, подписанных этим сертификатом, предупреждение появляться больше не будет.

Чтобы это предупреждения не появлялось нужно скопировать сертификат также в раздел Trusted Publishers. С помощью обычной операции Copy-Paste в консоли Certificates скопируйте сертификат в раздел Trusted Publishers -> Certificates.
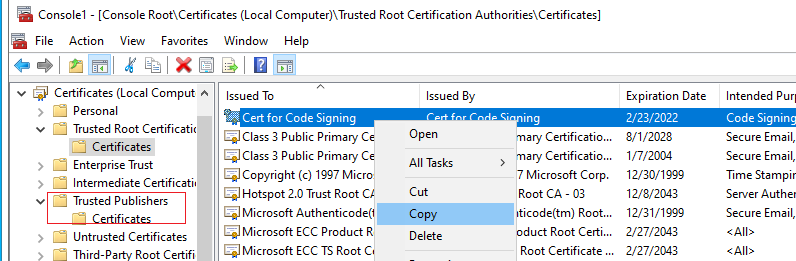
Теперь подписанный PowerShell скрипт будет запускаться без уведомления об untrusted publisher.
Computer Configuration -> Policies -> Windows Settings -> Security Settings -> Public Key Policies -> Trusted Root Certification Authorities и Trusted Publishers.
Если корневой сертификат недоверенный, то при запуске скрипта PowerShell будет появляться ошибка:
Что произойдет, если изменить код подписанного файла со скриптом PowerShell? Его запуск будет заблокирован, с ошибкой, что содержимое скрипта было изменено:
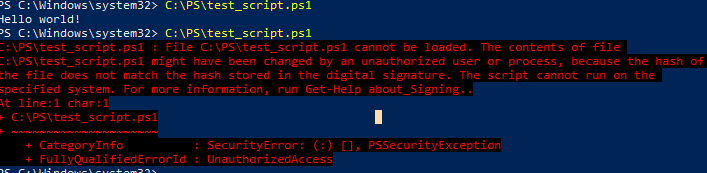
Попробуйте проверить цифровую подпись скрипта с помощью командлета Get-AuthenticodeSignature . Если хэш не совпадает с хэшем в подписи, появится сообщение HashMismatch.
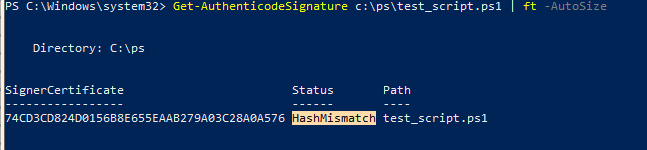
Таким образом, после любой модификации кода подписанного PS1 скрипта его нужно заново переподписать.
 Предыдущая статья Следующая статья