Шаблон базовой настройки маршрутизатора Cisco
В последнее время приходится часто настраивать с нуля маршрутизаторы Cisco (в основном 800-1800 серии) для филиалов моей компании и дабы не набирать одни и теже команды третий десяток раз составил для себя небольшой шаблон настроек на разные случаи жизни. Сразу скажу что сертификаты от Cisco не получал, книжек по данным роутерам особо не читал, весь свой опыт приобрел методом научного тыка, курением мануалов на cisco.com и кое каким вдумчивым заимствованием кусков чужих конфигов…
Итак распаковываем роутер, заливаем последнюю прошивку (для SSH необходим минимум Advanced Security), делаем
#erase startup-config
дабы избавится от преднастроеного мусора и перегружаемся.
Настройка авторизации и доступа по SSH
! включаем шифрование паролей
service password-encryption
! используем новую модель ААА и локальную базу пользователей
aaa new-model
aaa authentication login default local
! заводим пользователя с максимальными правами
username admin privilege 15 secret PASSWORD
! даем имя роутеру
hostname <. >
ip domain-name router.domain
! генерируем ключик для SSH
crypto key generate rsa modulus 1024
! тюнингуем SSH
ip ssh time-out 60
ip ssh authentication-retries 2
ip ssh version 2
! и разрешаем его на удаленной консоли
line vty 0 4
transport input telnet ssh
privilege level 15
Настройка роутинга
! включаем ускоренную коммутацию пакетов
ip cef
Настройка времени
! временная зона GMT+2
clock timezone Ukraine 2
clock summer-time Ukraine recurring last Sun Mar 2:00 last Sun Oct 2:00
! обновление системных часов по NTP
ntp update-calendar
! ntp сервера лучше задавать по айпи, ибо если при перегрузке DNS-сервера не доступны то настройки по именам слетают…
ntp server NTP.SERVER.1.IP
ntp server NTP.SERVER.2.IP
Архивирование конфигов
! включаем архивирование всех изменений конфига, скрывая пароли в логах
archive
log config
logging enable
hidekeys
! историю изменения конфига можно посмотреть командой
show archive log config all
Настройка DNS
! включить разрешение имен
ip domain-lookup
! включаем внутренний DNS сервер
ip dns server
! прописываем DNS провайдера
ip name-server XXX.XXX.XXX.XXX
! на всякий случай добавляем несколько публичных DNS серверов
ip name-server 4.2.2.2
ip name-server 208.67.222.222
ip name-server 208.67.220.220
Настройка локальной сети
! обычно порты внутреннего свитча на роутере объединены в Vlan1
interface Vlan1
description === LAN ===
ip address 192.168. 1
! включаем на интерфейсе подсчет пакетов передаваемых клиентам — удобно просматривать кто съедает трафик
ip accounting output-packets
! посмотреть статистику можно командой
show ip accounting
! очистить
clear ip accounting
Настройка DHCP сервера
! исключаем некоторые адреса из пула
ip dhcp excluded-address 192.168. 1 192.168. 99
! и настраиваем пул адресов
ip dhcp pool LAN
network 192.168. 0 255.255.255.0
default-router 192.168. 1
dns-server 192.168. 1
Настройка Internet и Firewall
! настраиваем фильтр входящего трафика (по умолчанию все запрещено)
ip access-list extended FIREWALL
permit tcp any any eq 22
! включаем инспектирование трафика между локальной сетью и Интернетом
ip inspect name INSPECT_OUT dns
ip inspect name INSPECT_OUT icmp
ip inspect name INSPECT_OUT ntp
ip inspect name INSPECT_OUT tcp router-traffic
ip inspect name INSPECT_OUT udp router-traffic
ip inspect name INSPECT_OUT icmp router-traffic
! настраиваем порт в Интернет и вешаем на него некоторую защиту
interface FastEthernet0/0
description === Internet ===
ip address . 255.255.255.
ip virtual-reassembly
ip verify unicast reverse-path
no ip redirects
no ip directed-broadcast
no ip proxy-arp
no cdp enable
ip inspect INSPECT_OUT out
ip access-group FIREWALL in
! ну и напоследок шлюз по умолчанию
ip route 0.0.0.0 0.0.0.0 .
Настройка NAT
! на Интернет интерфейсе
interface FastEthernet0/0
ip nat outside
! на локальном интерфейсе
interface Vlan1
ip nat inside
! создаем список IP имеющих доступ к NAT
ip access-list extended NAT
permit ip host 192.168. any
! включаем NAT на внешнем интерфейсе
ip nat inside source list NAT interface FastEthernet0/0 overload
! добавляем инспекцию популярных протоколов
ip inspect name INSPECT_OUT http
ip inspect name INSPECT_OUT https
ip inspect name INSPECT_OUT ftp
Отключение ненужных сервисов
no service tcp-small-servers
no service udp-small-servers
no service finger
no service config
no service pad
no ip finger
no ip source-route
no ip http server
no ip http secure-server
no ip bootp server
UPD. Убрал лишнее по советам хаброюзеров
UPD2. Добавил отключение ненужных сервисов
UPD3. Изменил настройка файрвола (спасибо Fedia)
Configure a Gateway of Last Resort that Uses IP Commands
The documentation set for this product strives to use bias-free language. For the purposes of this documentation set, bias-free is defined as language that does not imply discrimination based on age, disability, gender, racial identity, ethnic identity, sexual orientation, socioeconomic status, and intersectionality. Exceptions may be present in the documentation due to language that is hardcoded in the user interfaces of the product software, language used based on RFP documentation, or language that is used by a referenced third-party product. Learn more about how Cisco is using Inclusive Language.
Contents
Introduction
This document describes how to configure a default route or gateway of last resort.
Prerequisites
Requirements
There are no specific requirements for this document.
Components Used
This document is not restricted to specific software and hardware versions. The command outputs shown were taken from a Cisco 3900 Series router with Cisco IOS ® Software Release 15M.
The information in this document was created from the devices in a specific lab environment. All of the devices used in this document started with a cleared (default) configuration. If your network is live, ensure that you understand the potential impact of any command.
Conventions
For more information on document conventions, see theCisco Technical Tips Conventions.
Background Information
Default routes are used to direct packets addressed to networks not explicitly listed in the routing table. Default routes are invaluable in topologies where it is not desirable to learn all the more specific networks, as in case of stub networks, or not feasible due to limited system resources such as memory and limited resources.
The next IP commands are used and described in more detail:
ip default-gateway
ip default-network
ip route 0.0.0.0 0.0.0.0
Use Command ip default-gateway
Theip default-gatewaycommand differs from the other two commands as it must be used only be used whenip routingis disabled on the Cisco router. For instance, if the router is a host in the IP world, you can use this command to define a default gateway for it. You can also use this command when your low end Cisco router is in boot mode in order to TFTP a Cisco IOS® Software image to the router. In boot mode, the router does not haveip routingenabled. This example defines the router on IP address 172.16.15.4 as the default route:
Use Command ip default-network
Unlike theip default-gatewaycommand, you can useip default-network whenip routingis enabled on the Cisco router. When you configureip default-networkthe router considers routes to that network for installation as the gateway of last resort on the router. For every network configured withip default-network, if a router has a route to that network, that route is flagged as a candidate default route. This network diagram displays the routing table taken from router R1:
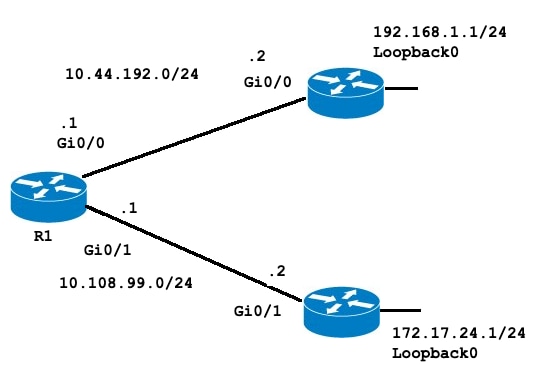
Notice that the static route to 192.168.1.0 via 10.44.192.2 and that the gateway of last resort is not set. If you configureip default-network 192.168.1.0, the routing table changes as follows:
The gateway of last resort is now set as 10.44.192.2. This result is independent of any routing protocol, as shown by theshow ip protocolscommand output no routing protocol is configured. You can add another candidate default route with the configuration of another instance ofip default-network:
Note: After theip default-networkcommand was entered you can observe that the network was not flagged as a default network. TheFlag a Default Networksection explains the reason.
Flag a Default Network
Theip default-networkcommand is classful, this means that if the router has a route to the subnet indicated by this command, it installs the route to the major network. At this point neither network has been flagged as the default route. Theip default-networkcommand must be run again, this time with the use of the major network in order to flag the candidate as a default route.
If the original static route had been configured to the major network, the previous step would not have been necessary.
There are still no IP Protocols configured in the router, without any dynamic protocols you can configure your router to choose from a number of candidate default routes based on whether the routing table has routes to networks other than 0.0.0.0/0. Theip default-networkcommand allows you to configure robustness into the selection of a gateway of last resort. Rather than the use of static routes to specific next-hops, you can have the router choose a default route to a particular network based in the routing table information.
If you lose the route to a particular network, the router selects the other candidate default. In that scenario, you can then remove the lost route from the configuration as shown in the next output:
After you remove the static route to the network, the routing table looks like this:
Use Different Routing Protocols
Gateways of last resort selected via theip default-networkcommand are propagated differently based on which routing protocol is used. For EIGRP there are different methods to Configure a Default Route in EIGRP which are preferred. The default route announced with theip default-networkcommand is not propagated by Open Shortest Path First (OSPF) or by Intermediate System-to-Intermediate System (IS-IS). For more detailed information on behavior of default routes with OSPF, refer toHow Does OSPF Generate Default Routes?.
Use Command ip route 0.0.0.0 0.0.0.0
A static route configured with the command ip route 0.0.0.0 0.0.0.0 is another way to set the gateway of last resort on a router. As with theip default-networkcommand, the use of the static route to 0.0.0.0 is not dependent on any routing protocols. However,ip routingmust be enabled on the router.
Note: EIGRP propagates a route to network 0.0.0.0, but the static route must be redistributed into the routing protocol.
In earlier versions of RIP, the default route created through theip route 0.0.0.0 0.0.0.0was automatically advertised by RIP routers. In Cisco IOS Software Release 12 and later, RIP does not advertise the default route if the route is not learned via RIP. It can be necessary to redistribute the route into RIP.
The default routes configured with theip route 0.0.0.0 0.0.0.0command are not propagated by OSPF and IS-IS. Additionally, this default route cannot be redistributed into OSPF or IS-IS through theredistributecommand. Use the default-information originate command to generate a default route into an IS-IS or OSPF routing domain. For more detailed information about the behavior of default routes with OSPF, please refer toHow Does OSPF Generate Default Routes?. The next output is an example on how to configure a gateway of last resort with the use of theip route 0.0.0.0 0.0.0.0command:
Note:If you configure multiple networks as candidate default routes via theip default-networkcommand, the network that has the lowest administrative distance is chosen as the network for the gateway of last resort. If all the networks have the same administrative distance then the network listed first in the routing table is chosen as the network for the gateway of last resort. If you use both theip default-networkandip route 0.0.0.0 0.0.0.0commands to configure candidate default networks theip route 0.0.0.0 0.0.0.0command, takes precedence and is chosen for the gateway of last resort. If you use multipleip route 0.0.0.0 0.0.0.0commands to configure a default route, traffic is load-balanced over the multiple routes.
Summary
Use theip default-gatewaycommand whenip routingis disabled on a Cisco router. Use theip default-networkorip route 0.0.0.0 0.0.0.0commands to set the gateway of last resort on Cisco routers that haveip routingenabled. The way in which routing protocols propagate the default route information varies for each protocol.
Начальная конфигурация коммутатора Cisco
После оператора secret можно задать представление пароля:
- 0 : незашифрованный текстовый пароль; используется по умолчанию, поэтому не обязателен;
- 4 : используется хеш SHA-256; считается устаревшим;
- 5 : используется хеш MD5;
- 8 : используется хеш SHA-256;
- 9 : используется алгоритм scrypt .
2.6 Настройка нового режима аутентификации
Настроим режим aaa (authentication, authorization, accounting):
Настроим подключение по консоли:
- Консоль настроена на использование локальной базы данных имён пользователей и паролей.
- no password : удалить старую модель паролей.
2.7 Административный пользователь
Зададим пользователя admin и пароль для него:
- privelege : уровень привилегий для данного пользователя от 0 до 15 (15 самый высокий);
- secret : пароль будет храниться в зашифрованном виде.
2.8 Удалённый доступ
Не во всех поставках IOS есть поддержка ssh. Поэтому приходится использовать telnet.
Настроим порядок аутентификации по telnet.
Настроим подключение по терминальным линиям.
- Терминальные линии, включая telnet, настроены на использование одной и той же локальной базы данных имён пользователей и паролей.
- no password : удалить старую модель паролей.
2.9 Зададим имя устройства
- Имя устройства имеет вид: sw-<помещение>-<номер устройства>, например sw-103-1 .
- Зададим имя устройства:
2.10 Настройка ssh
- Если устройство поддерживает ssh, то стоит его настроить.
- Создадим ключ (необходимо, чтобы было настроено имя домена):
- Задаёт версию протокола для ssh:
- Указываем время таймаута до автоматического закрытия SSH сессии в 60 минут:
- Сбрасываем подключение после 3 неверных паролей:
- Задаём протокол для подключения:
- Можно также оставить и telnet:
2.11 Поднимем интерфейсы
- Сделаем последний порт транковым:
2.12 Сетевые настройки
- Зададим адрес 192.168.0.1/24, шлюз 192.168.0.254:
- Настроим клиента DNS:
- Настроим NTP:
- Проверим статус синхронизации:
2.13 Настройка vtp
- Настройте vtp:
- Проверьте статус vtp:
2.14 Безопасность
- Отключим сервер http:
2.15 Сохранение конфигурации
- Сохраните конфигурацию:
3 Подключение к Observium
Настройте доступ к SMTP.
Пусть сервер мониторинга имеет адрес: 192.168.0.5.
Имя коммьюнити для чтения: rocom.
Добавьте коммутатор в свой DNS.
Подключитесь к Observium.
Добавьте коммутатор в список наблюдения в Observium:
Установка пароля может быть выполнена двумя командами password и secret . В первом случае пароль хранится в конфигурационном файле в открытом виде, а во втором в зашифрованном. Если использовалась команда password , необходимо зашифровать пароли, хранящиеся в устройстве в открытом виде с помощью команды service password-encryption в режиме глобальной конфигурации. ↩︎
Куда вводить шлюз в cisco
25.11.2010 | Автор: mahatm
Шпаргалка для себя и для студентов
Установка пароля для консоли
R1(config)#line console 0
R1(config-line)#password cisco
R1(config-line)#login
Установка пароля для telnet
R1(config)#line vty 0 4
R1(config-line)#password cisco
R1(config-line)#login
Удаление консольного пароля
router(config)#line console 0
router(config-line)#no login
router(config-line)#no password
Удаление пароля Secret
router(config)#no enable secret
Проверка параметра Register
router>enable
router#show version
Задание адреса-маски и административное включение интерфейса
R1(config)#interface Serial0/0/0
R1(config-if)#ip address 192.168.2.1 255.255.255.0
Административное выключение интерфейса маршрутизатора
router(config)#int s0/0
router(config-if)#shutdown
Включение интерфейса Serial
router#configure terminal
router(config)#interface s0/0
router(config-if)#no shutdown
Установка тактовой частоты для интерфейса Serial
router(config-if)#clock rate 64000
Проверка интерфейса Serial
router(config)#show interfaces s0/0
Добавить статическую запись в таблицу маршрутизации
Router(config)#ip route 10.10.10.0 255.255.255.0
Посмотреть таблицу маршрутизации
R1#show ip route
Посмотреть интерфейсы
R1#show interfaces
Посмотреть интерфейсы и их статистику в табличном виде
R1#show ip interface brief
Посмотреть соседей устройства:
Router#show cdp neighbors
Router#show cdp neighbors detail
Глобальное выключение CDP (cisco discovery protocol):
Router(config)#no cdp run
Выключение CDP (cisco discovery protocol) на интерфейсе:
Router(config-if)#no cdp enable
Статус DTE/DCE
router#show controllers s0/0
Сохранение конфигурации
router#copy running-config startup-config
Загрузка файла (например IOS) с TFTP сервера
R#copy tftp flash:
Резервное копирование Startup конфига на TFTP
router#copy startup-config tftp
Сохранение Running конфига
router#write memory
router#copy run st
Удаление конфигурации NVRAM
router#write erase
Проверка конфигурации NVRAM
router#show startup-config
Посмотреть таблицу MAC адресов свитча
show mac-address-table
Статически прописать MAC адрес в таблицу адресов свитча
#mac-address-table static MAC address vlan interface interface-id command
Создать VLAN
S1(config)#vlan 20
S1(config-vlan)#name students
Создаем интерфейс для управления VLAN
S1(config)#interface vlan 20
S1(config-if)#ip address 10.2.2.1 255.255.255.0
S1(config-if)#no shutdown
Назначить порт для доступа к VLAN
S1(config)#interface fa0/18
S1(config-if)#switchport mode access
S1(config-if)#switchport access vlan 20
Назначить порт для транка Cisco Dynamic Trunking protocol
S1(config)#interface fa0/18
или S1(config-if)#switchport mode trunk
ли S1(config-if)#switchport mode dynamic auto
или S1(config-if)#switchport mode dynamic desirable
или S1(config-if)#switchport mode nonegotiate
какие vlan пропускать через trunk
S1(config-if)#switchport trunk allowed vlan 18 (можно указывать диапазоны или all)
Переключиться обратно из trunk в режим доступа
S1(config-if)#no switchport trunk allowed vlan
S1(config-if)#no switchport trunk native vlan
S1(config-if)#switchport mode access
Разрешить трафик местного (native) VLAN через порт транка
S1(config)#interface fa0/18
S1(config-if)#switchport mode trunk
S1(config-if)#switchport trunk native vlan 18
S1#show interfaces fa0/18 switchport
Посмотреть статистику VLAN
или show vlan brief
или show vlan id 20
или show vlan name students
или show vlan summary
Посмотреть статистику портов свитча
show interfaces vlan 20
show interfaces fa0/18 switchport
Назначить шлюз по умолчанию
S1(config)#ip default gateway 1.2.3.4
Включить протокол динамической маршрутизации
R1(config)#router протокол (rip, eigrp и т.д.)
R1(config-router)#network network_number [wildcard_mask]
R1(config-if)#bandwidth 64
R1(config-router)#passive-interface s 0/0/0 Выключить динамическую маршрутизацию на интерфейсе
или
R1(config-router)#passive-interface default Выключить динамическую маршрутизацию на всех интерфейсах
а потом на некоторых включить:
R1(config-router)#no passive-interface s 0/0/0