16 JRE Installation for Microsoft Windows
This page describes how to install and uninstall JRE 8 for Windows.
The page has these topics:
See «JDK 8 and JRE 8 Installation Start Here» for general information about installing JDK 8 and JRE 8.
System Requirements
See http://www.oracle.com/technetwork/java/javase/certconfig-2095354.html for information about supported platforms, operating systems, and browsers.
See «Windows System Requirements for JDK and JRE» for minimum processor, disk space, and memory requirements.
Proxy Settings and Authentication
To use the Windows Online Installer, you must be connected to the Internet. If you are running behind a proxy server, you must have your proxy settings correctly configured. If they are not configured, or are incorrectly configured, the installer will terminate with the following message:
If you see this message, check your proxy settings: From the Start menu select Settings, click Control Panel, double-click Internet Options, select the Connections tab, and click the LAN Settings button.
If you do not know what the correct settings should be, check with your Internet provider or system administrator.
Installation Instructions Notation
For any text in this document that contains the following notation, you must substitute the appropriate update version number:
For example, if you were downloading the JRE installer for 32-bit systems for update 1.8.0_01, the file name: jre-8 version -windows-i586.exe would become jre-8u1-windows-i586.exe .
Similarly, if you were downloading the JRE installer for 64-bit systems for update 1.8.0_01, the file name jre-8 version -windows-x64.exe would become jre-8u1-windows-x64.exe .
Installation Instructions
Installing the JRE consists of two main steps:
Downloading the Installer
You have a choice of the following kinds of JRE installers that you can download:
Windows x86 Online: jre-8 version -windows-i586-iftw.exe (The letters iftw mean «install from the web.»)
Windows x86 Offline: jre-8 version -windows-i586.exe
Windows x64: jre-8 version -windows-x64.exe
The Windows x86 Online Installer is a small program that will download more installer files based on your system configuration. Using this installer can help you avoid downloading large amounts of unnecessary files. For more information, see «Windows Online Installation and Java Update FAQ».
The Windows x86 Offline Installer, as well as the installers for 64-bit systems, contain everything needed to install the JRE.
Click the JRE Download link for the installer you want to use. A dialog box opens. Depending on your browser, click Save or Save File to save the JRE installer without installing it. Verify that you have downloaded the entire file by comparing the size of the file you downloaded with the expected size shown on the download page. Alternatively, (depending on your browser) click Run or Open to run the JRE installer from your browser.
Running the Installer
If you saved the JRE installer to your computer, run the installer by double-clicking it. Follow the instructions the installer provides. The installer notifies you if Java content is disabled in web browsers, and provides instructions for enabling it. If you previously chose to hide some of the security prompts for applets and Java Web Start applications, the installer provides an option for restoring the prompts. When you are finished with the installation, you can delete the downloaded file to recover disk space.
Note the following:
The public JRE installed with the JDK is not registered. (This also applies to the 64-bit version of the JDK.) You must set the PATH environment variable to point to JAVA_HOME \bin (where JAVA_HOME is the location where you installed the public JRE) to register the JRE. See «Private Versus Public JRE» for more information about the public JRE.
After installation, use the Java item in the Windows Start menu to get access to essential Java information and functions, including help, the Java Control Panel, and checking for updates.
Java Executables Installation Locations
The Java executable java.exe is installed in the bin directory of the JRE. In addition, a symlink to the java.exe executable is created in the %ProgramData%/Oracle/Java/javapath directory, and this path is prepended to the system RegKey value HKLM\SYSTEM+\CurrentControlSet\Control\Session Manager\Environment\Path . Consequently, the java.exe executable is added to the user’s system path and can be launched from any directory location without giving the full path to it.
The java.exe symlink always points to the newest JRE on the system. The symlink is updated during install and uninstall using the JavaHome RegValue in the HKEY_LOCAL_MACHINE\Software\JavaSoft\Java Runtime Environment\<JRE Version> key. The java.exe symlink points to the bin directory of the latest <JRE Version> key. This ensures that the user can always launch the newest JRE from the command line.
For example, if you have JRE 8u20 and JRE 7u60 installed on your system, and you run java -version from your Windows command prompt, then you will see the the version and build details for JRE 8u20.
The JRE installer installs the Java executables javaw.exe and javaws.exe in a similar manner. The following table lists the Java executables and symlinks that are installed:
| Java Executable | Symlink |
|---|---|
| %Program Files%\Java\jre<version>\bin\java.exe | %ProgramData%\Oracle\Java\Javapath\java.exe |
| %Program Files%\Java\jre<version>\bin\javaw.exe | %ProgramData%\Oracle\Java\Javapath\javaw.exe |
| %Program Files%\Java\jre<version>\bin\javaws.exe | %ProgramData%\Oracle\Java\Javapath\javaws.exe |
Uninstalling the JRE
To uninstall the JRE, use the Java Uninstall tool, which you can access in the following ways:
If the JRE is version 8u20 or later, uninstall it with the «Add/Remove Programs» utility in the Microsoft Windows Control Panel. The Java Removal Tool is integrated with the uninstallation process, and it will guide you through the removal of older JREs.
Use the online Java Uninstall tool:
The Java Uninstall tool helps you improve your computer security by simplifying the process of finding and uninstalling older versions of Java. The Uninstall tool shows you a list of the Java versions on your computer and then removes those that are out-of-date.
The Java Uninstall tool will not run if your system administrator specified a deployment rule set in your organization.
A deployment rule set enables enterprises to manage their Java desktop environment directly and continue using legacy business applications in an environment of ever-tightening Java applet and Java Web Start application security policies. A deployment rule set enables administrators to specify rules for applets and Java Web Start applications; these rules may specify that a specific JRE version must be used. Consequently, the Java Uninstall tool will not run if it detects a deployment rule set to ensure that no required JREs are uninstalled.
Java Start Menu
Starting with JDK 7u40 release, Java menu items are added to the Windows Start Menu to provide easy access to Java resources.
During JRE install, a Java folder is created in the Windows Start Menu, which contains the following items:
About Java: Opens an About Java window that shows the latest JRE version installed on the system.
Check for Updates: Opens the Java Control Panel with focus on the Update tab.
Configure Java: Opens the Java Control Panel with focus on the General tab.
Visit Java.com: Opens the URL http://java.com/en/ .
During JRE install and uninstall processes, the appropriate start menu items are updated to be associated with the latest JRE version on the system.
Java Plug-in
Java Plug-in technology, included as part of the JRE, establishes a connection between popular browsers and the Java platform. This connection enables applets on web sites to be run within a browser on the desktop. Java Plug-in is automatically enabled for supported web browsers during installation of the JRE. No user intervention is necessary. See http://docs.oracle.com/javase/8/docs/technotes/guides/deploy/applet_dev_guide.html for more information about Java Plug-in technology.
Java Web Start
Java Web Start is an application-deployment technology that gives you the power to run full-featured applications with a single click from your Web browser. You can now download and run applications, such as a complete spreadsheet program or an Internet chat client, without going through complicated installation procedures. With Java Web Start, you run applications simply by clicking a web page link. If the application is not present on your computer, Java Web Start automatically downloads all necessary files. It then caches the files on your computer so the application is always ready to be run anytime you want — either from an icon on your desktop or from the browser link. No matter which method you use to run the application, the most current, available version of the application is always presented to you. See Java Web Start for more information.
This topic covers the following topics:
Upgrading from Previous Versions
If you have a previous version of Java Web Start, do not uninstall it. Uninstalling it will cause the download cache to be cleared, and all previously installed Java Web Start application data will have to be downloaded again. This new version will write over previous installations and automatically update browsers to use this new version. The configuration files and the program files folder used by Java Web Start have changed, but all your settings will remain intact after the upgrade because Java Web Start will translate your settings to the new form.
Uninstallation
The only way to uninstall Java Web Start is to uninstall the JDK/JRE. Uninstalling the JDK/JRE will not, however, remove the cache for previous versions of Java Web Start. Previous releases have separate uninstall instructions for Java Web Start.
You may see a misleading message if you do the following:
Download and cache a Java Web Start application with the JDK or JRE.
Remove the JDK or JRE using «Add or Remove Programs» from the Windows Control Panel.
Remove the Java Web Start application using «Add or Remove Programs.»
When you remove the application, you see an «Uninstaller Error» dialog box saying «An error occurred while trying to remove Java-Application: name App. It may have already been uninstalled. Would you like to remove Java-Application: name App from the Add or Remove program list?» If you say yes to this, then you will see another «Uninstaller Error» dialog box saying «You do not have sufficient access to remove Java-Application: name App from the Add or Remove Program list. Please contact your system administrator.» This is the misleading message. It implies that the problem is due to privileges. It is not. The problem is that you have already removed the Java Web Start application when you removed JDK or JRE, but this is not reflected in the «Add or Remove Programs» dialog box until it is refreshed by pressing F5 or it is closed and reopened.
To avoid seeing this misleading message, either press F5 or close and reopen the dialog box. Any Java Web Start application that was downloaded and cached with the JDK or JRE will no longer appear in the list of currently installed programs.
Java Update Feature
Option to Disable the «JRE out of date» Warning
When the installed JRE (7u10 or later), falls below the security baseline or passes it’s built-in expiration date, an additional warning is shown to users to update their installed JRE to the latest version. For businesses that manage the update process centrally, users attempting to update their JRE individually, may cause problems.
Starting from 7u40, a new deployment property, deployment.expiration.check.enabled is available. This property can be used to disable the JRE out of date warning.
To suppress this specific warning message, add the following entry in the deployment properties file:
To disable automatic updates, un-check the Check for Updates Automatically check box in the Update tab of the Java Control Panel.
Silent Installation
To install the JRE silently or non-interactively, which is useful for installing on multiple computers, see «Command-Line Installation».
Installation of JRE on 64-Bit Windows Computers
64-bit Windows operating systems (which may be Vista, Windows 7, or Windows 8) come with a 32-bit Internet Explorer (IE) browser as the standard (default) for viewing web pages. These operating systems also include a 64-bit Internet Explorer browser. However, using it is optional, and it must be explicitly selected to view web pages. Note that because some web content may not work properly in a 64-bit browser, it is recommended that you use the default 32-bit browser and install the 32-bit JRE.
Установка и настройка Java
JDK — это комплект разработки,который позволяет писать программу на языке программирования Java. Вы можете установить несколько версий данной утилиты, однако рекомендуется установить последнюю версию этой программы.
Как установить Java для Windows?
Ниже описано как бесплатно загрузить JDK 8 для 32 бит или JDK 8 64 бит и установить:
- Перейдите на официальный сайт Oracle.com, найдите раздел JDK и нажмите кнопку скачать.
- Далее, вам необходимо принять соглашение для скачивания JDK. Не забудьте выбрать версию именно для вашей системы 32bit или 64bit. Узнать сколько битная у вас система можно перейдя в параметры системы и найти вкладку о компьютере.
- Когда вы нажмете на ссылку установки, откроется всплывающее окно. Нажмите на кнопку Я рассмотрел и принимаю Лицензионное соглашение OracleTechnologyNetwork для OracleJava SE, и вы будете перенаправлены на страницу входа. Если у вас нет учетной записи oracle, вы можете легко зарегистрироваться, добавив свои основные данные. ПРИМЕЧАНИЕ: Вам потребуется создать учетную запись Oracle, чтобы начать загрузку файла.
- После завершения загрузки Java JDK 8 запустите exe-файл для установки JDK. Нажмите кнопку Далее.
- Выберите ПУТЬ для установки Java в Windows… Вы можете оставить его по умолчанию. Нажмите кнопку далее. ПРИМЕЧАНИЕ: Следуйте инструкциям на экране в последующих шагах установки.
- После установки Java в Windows нажмите кнопку «Закрыть».
Настройка переменных окружения
Во время установки Java вам не предлагают настроить переменные среды PATH и ClassPath, а также Java_Home( она должна показывать путь установки среды Java). Последняя переменная необходима для того, чтобы программы могли определять где находится директория Java.
Переменная PATH указывает операционной системе папки, в которых необходимо искать исполняемые файлы, чтобы можно было запускать Java из консоли.Очень важно чтобы она была правильно настроена.
Для того чтобы настроить все переменные следуйте шагам ниже:
- Откройте свойства компьютера, сделать это можно комбинацией клавиш Win-Pause.
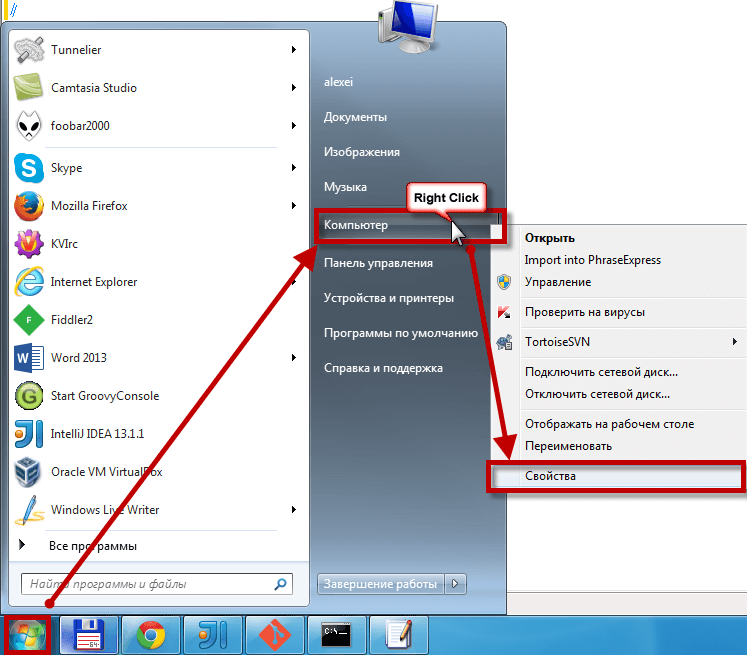
- Выберите вкладку «Дополнительные параметры системы», затем «Дополнительно» и «Переменные среды». У вас должно появиться окошка настройки переменных.
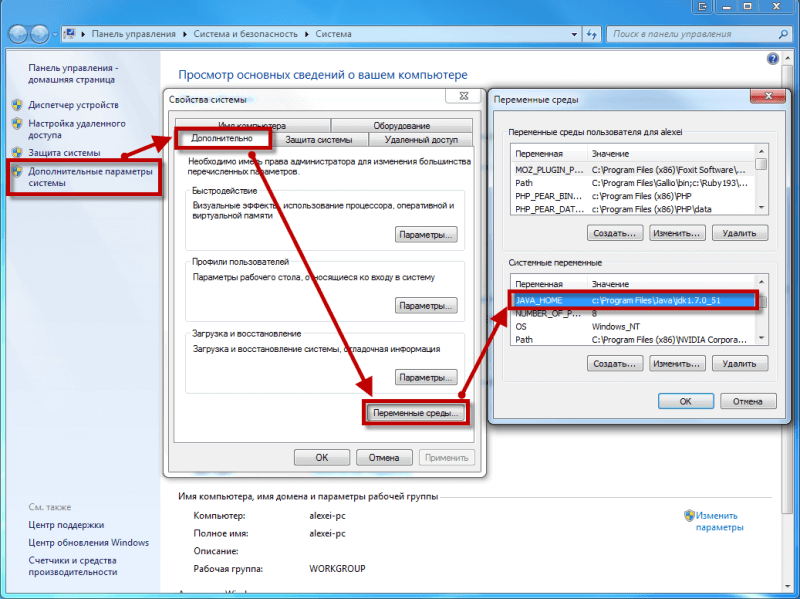
- Вместо значения Java_HOME нужно скопировать и вставить путь до папки,где установлена Java(если у вас уже есть путь, необходимо стереть и вставить актуальный).
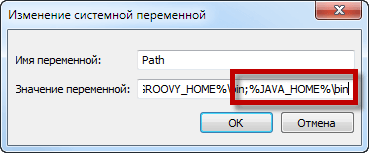
После того, как вы установили значение переменной JAVA_HOME, можете закрыть все диалоговые окно нажав кнопку ОК.
Настройка программного окружения

У тех, кто только начинает изучать программирование, всегда очень много вопросов. Поверьте — шаг за шагом Вы начнёте всё больше и больше разбираться в программировании. А пока просто наберитесь терпения и идите напролом к своей цели.
Чтобы начать писать программы на Java, Вам н еобходимо настроить программное окружение. И тогда мы с Вами напишем Вашу первую программу на Java.
Для этого необходимо скачать и установить на своём компьютере:
- JDK
- IDE
JDK (Java Development Kit) — это комплект разработчика приложений на языке Java. Чтобы лучше понять из чего состоит JDK, давайте посмотрим на картинку ниже.

Как видно из картинки, JDK состоит из:
- компилятора javac
- полного набора библиотек Java
- документации
- примеров
- утилит
- JRE (Java Runtime Environment)
В свою очередь JRE состоит из:
- JVM (Java Virtual Machine)
- минимального набора библиотек Java
Компилятор javac — именно с помощью компилятора программы переводятся из человекочитаемого вида кода в вид кода, который читается JVM (Java Virtual Machine). Принцип работы компилятора мы показывали в статье «Почему язык Java так популярен?»
Полный набор библиотек Java — это протестированный код, который программисты используют в своих программах. Больше о библиотеках Java Вы можете узнать, прочитав статью «Что такое библиотеки классов Java?»
JRE (Java Runtime Environment, на русском «среда выполнения для Java») — это минимальная реализация виртуальной машины, необходимая для исполнения Java-приложений без компилятора и других средств разработки. То есть JRE достаточно для выполнения Java программ. А вот для разработки Java программ JRE недостаточно.
IDE (Integrated Development Environment) — это интегрированная среда разработки. Одним словом — это инструмент, предназначенный для разработки ПО (программного обеспечения).
3 самые популярные IDE:
- Eclipse
- JetBrains IntelliJ IDEA
- NetBeans
Причём первые две — Eclipse и JetBrains IntelliJ IDEA — пользуются самой большой популярностью среди программистов. И тут сразу стоит сказать, что Java-программисты обычно делятся на 2 «лагеря»:
- Ярые сторонники Eclipse
- Ярые сторонники JetBrains IntelliJ IDEA
Одни доказывают, что Eclipse — лучшая интегрированная среда разработки, другие — что JetBrains IntelliJ IDEA. Это одна из любимых тем для жарких дискуссий. А уж сколько статей по этому поводу написано с множеством аргументов, что же лучше. Со временем Вы тоже сделаете для себя выбор к какому «лагерю» Вы примкнёте.
А пока Вам просто необходимо установить:
- либо Eclipse
- либо JetBrains IntelliJ IDEA
Eclipse — это бесплатная IDE. Разработана фирмой IBM (International Business Machines Corporation). Написана на Java.
JetBrains IntelliJ IDEA — есть бесплатная и платные версии. Разработана в январе 2001 года компанией JetBrains.
Ну что ж, самое время приступить к настройке программного окружения . Ниже Вы найдёте ссылочки с детальными инструкциями по настройке программного окружения. Просто выбирайте ОС (операционную систему), которая стоит у Вас на компьютере, и вперёд!