Браузер в Fl Studio изучение всех настроек

РАБОТА В FL STUDIO
Здравствуйте читатели блога BigSong.ru. Сегодня мы будем изучать браузер в Fl Studio.Он служит для навигации между семплами, пресетами, проектами, а также для быстрого выбора необходимых vst плагинов.
Перед тем как вам мы продолжим изучать этот раздел хочу отметить что в браузере предусмотрена функция запоминания проделанных действий, что дает вам просмотреть всю свою историю произведенных действий, которая помогает нам вернуть предыдущие действия, если по какой-либо причине вы забыли как расставляли свои ноты в piano roll (т.е. редактор клавиш). Чтобы просмотреть историю проделанных действий кликните по Current project => History.

Местоположение браузера можно менять, нажав левой кнопкой мышки в верхней части браузера и удерживая кнопку перетащить, куда вам удобнее. Остальные части тоже можно так же перетаскивать. В случае если ваш браузер закрылся его можно вызвать, нажав на кнопку Alt+F8 или в верхней части меню, как показано на рисунке ниже.

С остальными разделами fl studio как видите можно также включать и выключать.
Теперь давайте рассмотрим браузер по составным частям.
 Browser Menu (Меню Браузера). Здесь его можно настраивать как вам угодно меняя вид и размер браузера. Также можно производить поиск нужных вам семплов и т.д. Ниже представлено меню браузера.

 Collapse Structure (Свернуть структуру) — это стрелочка, которая скрывает все открытые вкладки.
 Reread Structure (Обновить структуру) – обновляет список файлов в браузере. Если, например вы добавили новые семплы и у вас они не отображаются то можете нажать на эту кнопку и тогда ваш браузер обновит список файлов.
 Поиск — поиск необходимого вам файла.
 Browser Snapshot (Снимок браузера (посмотрите на 1-ом скрине правее слова All))– сохранение состояние бразера для быстрого восстановления.
- All, Current project, Plugin database — запоминает всё, текущий проект, база данных плагинов.
- Snap 4 to 9 на выбранный слот динамически будет сохраняться браузер и все ее последние изменения.
- Auto — автоматически сохраняется браузер и при включении Fl Studio также откроет вкладки которые были использованы. Такие как пресеты плагина, пресеты микшера,вкладка сэмплов, паттерны, а также отображает и другие действия в программе.
- Rename – переминовывает название слотов (Snap 4 to 9).
- Frozen – замораживает состояние выбранного слота и защищает его от изминений.
 Close (Закрыть) – крестик для закрытия браузера (F8)
 Свернуть — сворачивает окно браузера для быстрого доступа.
Resize (разделитель) – стенка (разделитель). Эту стенку можно увеличить в ширину нажав левой кнопкой и удерживая увеличивать ее размеры.
Scroll bar (Полоса прокрутки) – ползунок прокрутки.
 В этой вкладке отображаются все элементы браузера.
 Здесь отображаются данные связанные только с текущим проектом.
 База данных vst плагинов. Здесь вы можете щёлкнуть правой кнопкой мыши для сканирования, добавления в избранное и удаления плагинов.
Добавление сэмплов в пошаговый сэквенсор.
Для того чтобы развернуть и свернуть папку нужно щелкнуть по ней левой кнопкой мыши.

Для загрузки содержимого из браузера достаточно перетащить в нужное вам место нажав левой кнопкой и удерживая перетаскивать.
Для предпрослушки звука необходимо нажать на нее и звук будет воспроизведен. После выбора необходимой папки для предпрослушки звуков (если их там много) можно воспользоваться кнопками на клавиатуре «стрелка вверх» и «стрелка вниз» для пошаговой предпрослушки.
Каждый формат звука как вы заметили, имеет свои иконки.
Что находится в папках браузера?

Вся необходимая коллекция пресетов, партитур, сэмплов, др. находится в папке под названием Impulses, Misc, Packs.
Папка Projects — содержит коллекцию проектов сэмплов от разработчиков программы (.flp файлы).
Для того чтобы открыть проект в папке Projects вам необходимо щелкнуть по проекту правой кнопкой мыши и выбрать OPEN.
Как загрузкить свои сэмплы?
Если вы желаете загрузить свои семплы, то нажмите правой кнопкой на папку User она находится в конце списка и выберите открыть папку. После этого откроется эта папка, и туда смело можете скопировать семплы и т.д.

Еще один вариант, если не хотите копировать. Просто зайдите в верхнею часть меню Опции (Options) => Настройка файлов (Configuration Faile), как показано на рисунке ниже. И после того как вышло окно нажимаете на папку и находите местоположение своей папки с семплами и выбираете эту папку и нажимаете Ок. Затем в браузере появится ваша папка и вы смело можете начинать пользоваться вашими семплами. Советую использовать этот вариант.

На этом мы завершаем разбор по браузеру в программе Fl Studio. Если есть вопросы задавайте в комментариях и мы их обсудим или же на нашем форуме.
Browser
The File Browser provides access to projects, samples, local and online content libraries plus VST/AU plugins. There are several (user editable) tabs along the top. By default these include All, Current Project, Plugin Database, Online Content and Starred (Favorites).
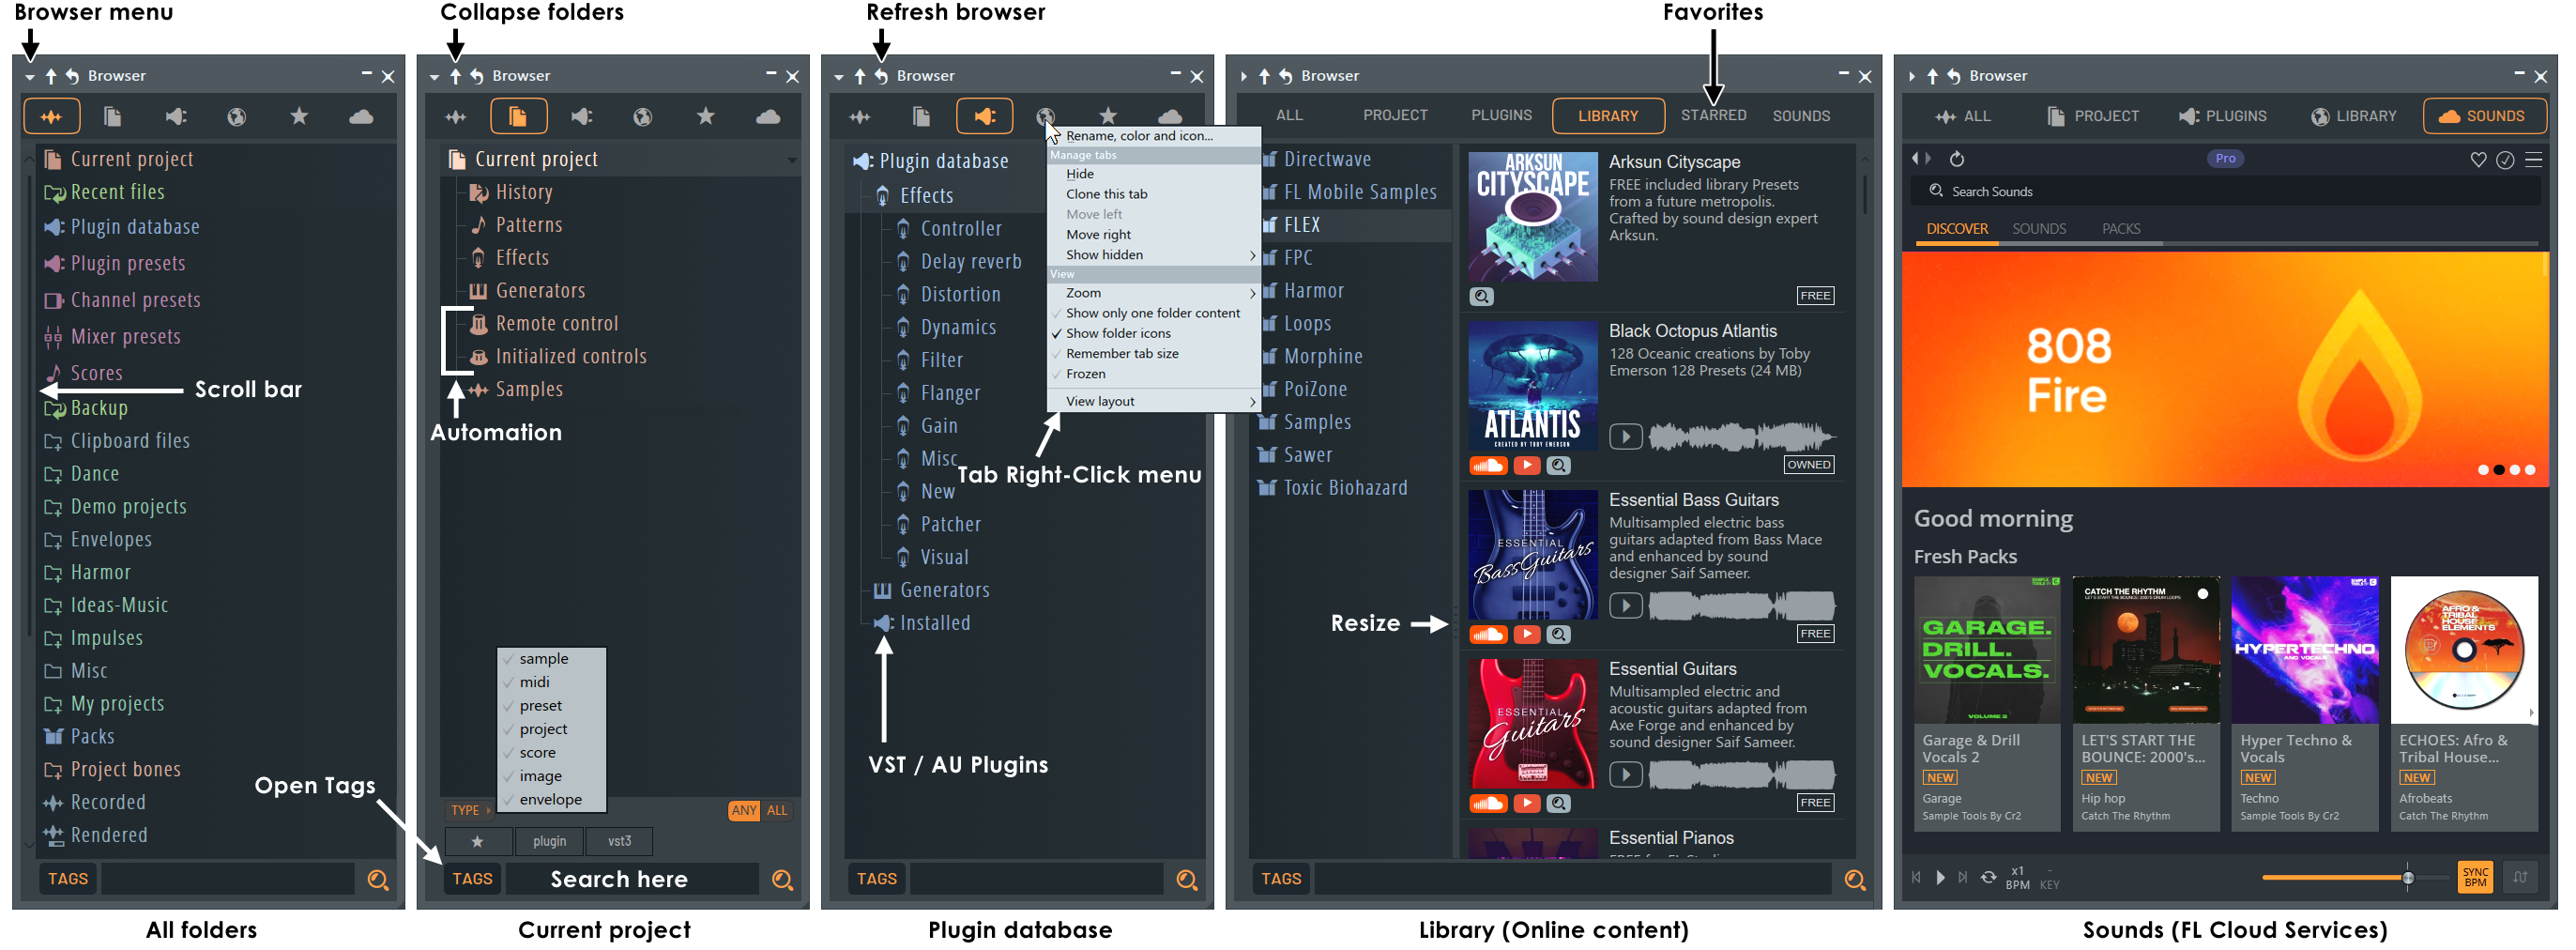
Can’t see the Browser? — Show it using the Shortcut panel or press ( Alt+F8 ).
NOTE: FL Studio will only search for files in folders you have added to the Browser. By default FL Studio does not include any of your personal folders. The simplest way to add folders is drag and drop folders from your Operating System browser to the FL Studio Browser. Searches include sub-folders so you only need to add parent folders you want to use.
Tutorial Video
- The browser can be detached to a separate window or docked on the right side of the FL Studio desktop.
- The Tab menu option ‘View > Show only one folder’ should be deselected if you want to keep several folders open at the same time.
Browser Controls
NOTES: The Divider — Left-click to drag the divider to change the width of the Browser. The divider can snap to a second position, move the divider to the desired location then Right-Click to swap between the new and/original location. Pop-out file-name view — File names obscured by the right edge of the Browser can be read by placing the mouse cursor over the item. Scroll bar — Click & drag or click to focus and scroll mouse-wheel. Quick Zoom — Hold Shift + Scroll -wheel.
Browser, Tab, Folder & File Menus
NOTE: Options shown in these menus will vary depending on the location from where they are accessed, preceding actions, current settings or content type.
Browser Options Menu
- Search:
- Find previous / next — Jump forward and backward in search results.
- Show parent folders in search results — When selected the parent folder for content is shown.
- Search for folders — Includes/excludes folders from search results.
- Search box on top — Moves the content search toolbar to the top of the Browser.
- Type to filter — Starts filtering as you type.
- Enable indexing — Indexing builds a file to improve the speed and depth of searches. NOTE: When this is disabled, only the selected folder will be searched.
- Previous ( Backspace ) — Return to the previous folder/item.
- Next ( Shift+Backspace ) — Jump to the next folder/item.
- Send previous / next to selected channel — ( Shift+Up-Arrow ) / ( Shift+Down-Arrow ). You can also ( Right-Click ) content to:
- Right-Click menu — Right-Click the item and select ‘Send to selected Channel or focussed plugin‘ to load samples or instruments in the selected Channel.
- Middle mouse button (often the mouse scroll-wheel is clickable) — Loads compatible content on the selected Channel.
- Auto hide — The Browser will auto hide and pop out when you move your mouse to the Browser location (usually left of the screen). To stop the FL Studio workspace moving you can click on the Browser header area and drag it to the right side of the screen. You can also use this method to undock the Browser and drop it anywhere on the screen.
- Auto contrast text — Visual aid controls. Makes Browser text higher contrast and provides additional folder open/close controls.
- Show icons and text on tabs:
- Auto — Will automatically swap between icons and text depending on the width of the tabs.
- Icons — Always show Icons (Tab Icon). ( Right-Click ) Tabs to set Icons.
- Text — Always show Text (Tab name). ( Right-Click ) Tabs to Rename.
- Collapse structure ( Ctrl+Up ) — Collapses all expanded folders in the Browser window.
- Reread structure ( Ctrl+R ) — Rereads the contents of all folders in the Browser. Click this button to see any new files and folders that were created after FL Studio was started.
- Configure extra folders — Opens the ‘File Settings’ Options (F10). Use this to specify folders outside the FL Studio Installation path that hold your plugins, samples, projects, etc. You can also drop any folder from an external File Browser onto the FL Studio Browser and it will be added to the list.
- Refresh plugin list (fast scan) — Scans for newly installed plugins, see here for more details on installing 3rd party VST & AU plugins.
Tabs & Tab Menu ( Right-Click / Control-Click ) on Tabs
- Rename, color and icon . — Edit these Tab properties.
- Manage tabs:
- Hide (for user Tabs) — Hides the Tab. To show again use ‘Other tabs > Show hidden‘ (see below).
- Show hidden — Will show a menu of all hidden Tabs.
- Delete (for user Tabs) — Deletes the selected Tab.
- Clone this tab — Make a copy of the selected Tab. Useful to edit the contents for your own workflow while preserving the default one.
- Move right / left — Move the Tabs location.
- Zoom — Changes the size of the font and spacing according to Compact, Normal, Large, Huge & Massive options.
- Show only one folder content — Only one folder will be open at a time. Deselect this if you want to have several folders open at the same time.
- Show folder icons — Displays an icon for each folder in the Browser tree.
- Show images — Shows the Plugin database plugin icons.
- Show preview — Show the preview panel at the bottom of the Browser. Becomes visible when previewable content is selected.
- Show file extensions — Shows file extensions such as .wav, .mp3, etc.
- Show unknown file types — Displays files not natively supported by FL Studio. You may be able to drag and drop these on VST/AU plugins for example.
- Frozen — Freezes the currently selected slot and protects it from change. The slot will display a tick mark when frozen.
- Sort by:
- Name — Alpha-numerical name sorting.
- Type — File extension type e.g. .mp3 or .fst
- Date — Files creation date.
- Group — Files Group. This option sorts folders or files according to the order specified by XYZ.nfo files in the ..[FL Studio installation folder]\FL Studio\Data\Patches\ folder, where XYZ = any folder or file name. Inside the .nfo file put the command SortGroup=1 to N. 1 will appear at the top while N is the last file to be sorted toward the top of the Browser. Unsorted files will appear below these as usual.
- Standard — Shows the folder structure and content in a single column.
- Tree — Opens a second column to show the content in folders when selected.
- Samples — Same as ‘Tree’ but shows audio files as playable and visualized content.
- Plugins (Plugin Database) — Same as ‘Tree’ but shows plugins in a separate grid.
Folder Menus ( Right-Click / Control-Click ) on Folders
- Expand all / Collapse all — Show or hide all sub folders.
- Open in new tab — Open the selected folder as its own tab.
- Add folder to tab — When you have added your own Tabs, these will show as options here. NOTE: This does not duplicate files on your hard drive, it’s just a shortcut to the original data.
- Change color — Change the color of the selected folder.
- Change icon — Change or set an icon for the selected folder.
- Windows shell menu (Windows only) — Opens the Operating System ( Right-Click ) folder options associated with the folder.
- Open — Opens the folder in the Operating System Browser.
Browser Folders
- Left-click a folder to expand/collapse it.
- Right-Click and select Open to open a standard file browser.
- Hover the mouse over the name of a folder for a short description in the hint-bar. The folders seen by default in the Browser window include:
- Channel presets — Contains a collection of instrument/effects presets, scores, etc.
- Projects — Contains a collection of sample projects (.flp files).
Adding your own folders
- Drag and drop. — Open an external File Browser and then drag-and-drop the folder you want to add from the File Explorer onto the FL Studio Browser.
- File options — Use the File options ‘Browser extra search folders‘ list to add up to 30 custom folders. Custom folders appear in the Browser in green font.
NOTE: Custom ‘Extra search folders’ and their sub-folders are scanned for samples and content when loading projects. So, it’s not advisable to set the root of any drive as a search folder since it can make load-times for projects very long (while the whole drive is searched). On the other hand, this is a good trick for locating missing files you have moved somewhere and forgotten about.
File Menu ( Right-Click / Control-Click )
- Send to selected channel or focused plugins — Content will be sent to the selected Channel or Plugin as noted.
- Open in new channel — Opens the content in a new Channel.
- Add to plugin database (flag as favorite) — Where the content is a Plugin Preset.
- Edit in audio editor — Where the content is audio, open in Edison.
- Edit in pitch corrector — Where the content is audio, open in Pitcher.
- Edit in tine warper — Where the content is audio, open in NewTime.
- Open in new sampler channel — Where the content is audio, open in a Sampler Channel.
- Open in new Fruity Granulizer channel — Where the content is audio, open in Granulizer.
- Open in new Fruity Slicer channel — Where the content is audio, open in Slicer.
- Open in new Slicex channel — Where the content is audio, open in Slicex.
- System:
- Windows shell menu (Windows only) — Opens the Operating System ( Right-Click ) folder options.
- Open parent folder — Opens the content’s containing folder in the Operating System Browser.
- Locate file — Opens the content’s parent folder in the Operating System Browser.
- Delete file — Don’t come complaining to support when you delete your important files there is a pop-up warning!
- Favorite — Adds the content to the Starred / Favorite Tab.
- Tags — Show existing tags to select one for the content.
- Add a tag — Type in a Tag to add to the file. You can add multiple Tags by separating them with a comma, e.g. typing — Kick,808,C# will give the content 3 tags.
- Edit tags — Edit any existing Tags.
Working with files (content)
- Load files — Most items can be dragged from the Browser onto a compatible location in FL Studio (FL desktop, Plugin, Channel, Mixer, Edison, etc). Alternatively, Right-Click an item to ‘send’ it to a particular location. See below for details:
- Drag and drop — Most items may be dragged from the Browser (Left-click, hold & drag) to the desired target in FL Studio and they will be loaded automatically. For example;
- Instrument presets from folders or Instruments from the Plugin Picker can be dragged to Channels OR better, Mixer tracks to automatically set a routing to that track.
- Effects to Mixer tracks or FX slots.
- 1. Select the Channel, plugin or click on the window.
- 2. Click on the first item in the Browser list, then start stepping using the ( Shift + Up / Down Arrow ) keys.
FL Studio project files
FL Studio project files can be saved to one of two formats:
FL Studio project file (*.flp) — To open Right-Click and select ‘Open’, middle-click the mouse-wheel or drag-n-drop on the FL Studio desk top. Project files contain the data that belongs to your project, including notes and sequencer data, patches and settings for all instruments, FX and Channels, but does NOT include sample data (use .zip project files for that). Sample data locations are saved, and these will be scanned when the project is opened for the correct sample data. If the samples can’t be found there FL Studio will search all custom folders added to the Browser. If you want to skip this extended search, press and hold ESC when you see the loading icon in the Hint bar. Zipped project file (*.zip) — To open Right-Click and select ‘Open’, middle-click the mouse-wheel or drag-n-drop on the FL Studio desktop. Zipped project files include all the data of the .flp file (see above), plus samples used by Audio Clips, Channel Samplers etc. It does not save VST/AU plugins OR samples used by VST/AU plugins in the .zip. The .zip format is the same compression standard as used by 3rd party applications. The file contains the .flp project plus sample data. When opening a .zip file, FL Studio will automatically decompress it, load the .flp project and any samples. Zipped files are a great way to archive an important projects or to share them with collaborators, even if the project uses non-FL Studio samples. NOTE: To export your project as an audio file (.wav, .mp3 or .ogg) use the File menu > Export option.
Preview Player
When you select audio content, the Preview Player will appear in the Browser. On mouse over there is a volume control as shown below:
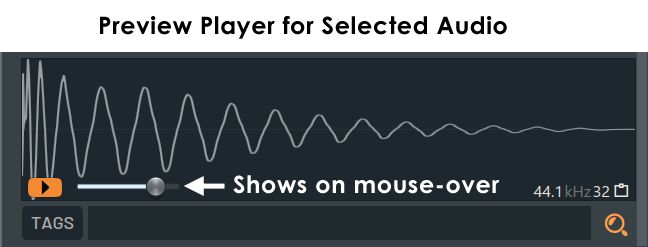
- Preview samples — Left-click items (.mp3, .m4a, .ogg, .wav files) to play. By default the preview will be up to 5 seconds unless Browser Menu > ‘Full sample preview’ is selected.
- Play to end — Press the play button on the Preview Player. Alternatively, ( Alt+Click ) samples in the Browser or select the Browser Menu > ‘Full sample preview’. Click Stop on the transport panel to end early.
- Play from mouse position ( Shift+Click ) — On release playback will start from the mouse position.
- Sync to tempo & pitch — Wav files may contain tempo and tempo-sync meta-data. This will be read by FL Studio if the General settings > ‘Read sample tempo information’ option is selected. If this information is used the preview will be time-stretched to match the tempo of the project and the sample may be similarly stretched when loaded into the Playlist. This can cause unexpected behavior if the tempo data saved in the sample is wrong. You can load any samples into Edison and open the File properties dialog to change the value of any incorrectly tagged samples.
Search
The search tools are located at the bottom of the Browser by default. You can use the Search Options in the Browser menu to move them to the top. The controls are as follows:
- Search bar options — See here.
- Type (filter) — Search results will show only content of the type selected. The filter button will show the selected type icons.
- Any / All (Tag search logic) — Will show content with ‘Any‘ of the selected tags, or only that with ‘All‘ the selected tags.
- Tags — Shows / hides the available content Tags. The following ( Right+Click ) options are available for content (files):
- Star (icon) — Adds the content to the Starred / Favorite Tab.
- Tags — Show existing tags to select one or more to filter content to the tagged categories.
- Add a tag — Type in a Tag to add to the file. You can add multiple Tags by separating them with a comma, e.g. typing — Kick,808,C# will give the content 3 tags. NOTE: To remove existing tags select files and ( Right+Click ) > ‘Delete’ Tags.
- Edit tags — Edit any existing Tags.
- Find ( Alt+F ) — Type in a search string after selecting this option. The exact phrase will be searched.
- Browser find ( Ctrl+F ) — Allows the use of advanced search functions. Wildcards: ‘sytr*’ will find ‘sytrus’, ‘s*us’ will find ‘sytrus’ or ‘stylus’ and Boolean search (AND, OR, NOT) also work. TIPS: Don’t forget to use the content ‘Type’ filter to find only samples (audio) or projects for example.
- Browser find in the selected folder. ( Shift+F ) — As above but for the selected folder.
- Find previous ( F2 ) — Jumps to the previous item of the same search type.
- Find next ( F3 ) — Jumps to the next item of the same search type.
Current project
- Jump to an undo point — Left-click the item in the list.
- Sequentially browse — Use the Undo and Redo commands in the Edit menu. Undo/Redo (Win: Ctrl+Alt+Z macOS: fn+option+command+Z / Win: Ctrl+Z macOS: fn+comand+Z ) — These keyboard shortcuts allow you to step back and forward through the edit history.
- Set maximum undo steps — Use the General Settings > Maximum undo levels.
- Include knob tweaks in the undo list — Use the General Settings > Undo knob tweaks.
- Clicking on Patterns — Opens folders to show any Piano roll or Event Automation data. Clicking on sub-level items will open the target Piano roll or Event editor.
- Right-Clicking — Displays a menu to expand, collapse or search for items/data. ‘Delete item’ ‘will show where available.
- Tweak parameter — Left-click and hold to open a quick-access parameter control.
- Automate a parameter — Right-Click the target parameter and select Create automation clip or Edit events to draw automation.
- Link to controller — Right-Click and select Link to controller or Override generic link. See here for more detail on these two methods.
- Make plugin thumbnail — To create a thumbnail image of the plugins used in your project use the Wrapper > Plugin menu to select ‘Make editor thumbnail‘ for each plugin. The thumbnail will appear in the Current Project sub-folder. NOTE: The Browser view must be larger than ‘Compact’ for the thumbnail image to display.
- Tweak parameter — Left-click and hold to open a quick-access parameter control.
- Automate a parameter — Right-Click the target parameter and select Create automation clip or Edit events to draw automation.
- Link to controller — Right-Click and select Link to controller or Override generic link. See here for more detail on these two methods.
- Make plugin thumbnail — To create a thumbnail image of the plugins used in your project use the Wrapper > Plugin menu to select ‘Make editor thumbnail‘ for each plugin. The thumbnail will appear in the Current Project sub-folder. NOTE: The Browser view must be larger than ‘Compact’ for the thumbnail image to display.
- Edit the link assignment — Left-click the item to open the Remote control settings dialog.
- To initialize a control — Right-Click and select ‘Init song with this position‘. Creating an Automation Clip will automatically initialize the target control, so the control can return to its original value, if the Clip is deleted. Initialization associated with Automation Clips can cause issues where you don’t want the song to start with the initialized value. In this case you can manually delete the value for the control here OR disable auto-initialization under General Settings > Advanced > Don’t initialize controls automatically
- To remove an initialization — (Right-Click) the control on the UI and select ‘Delete initial value‘ OR from the Browser entry and select Delete event.
Plugin Database
The Plugin database > Effects / Generators folders are your ‘favorites‘ list. This is the data used to generate the Plugin Picker ( F8 ) pop-up and various ‘add plugins’ menus in FL Studio.
The Plugin database > Installed > Effects / Generators folders show ALL VST/AU plugins you have installed.
Managing the Plugin Database
- Open the plugin from the ‘Installed’ sub-folder that you want to add to the database.
- Right-Click the plugin — Select ‘Add to plugin database (flag as favorite)‘.
- Click OK to the popup and a thumbnail screenshot will be saved to the database at the currently opened location.
NOTE: You can also ‘favorite‘ plugins from a list using the FL Studio Plugin Manager tool if you are not interested in creating plugin thumbnails.
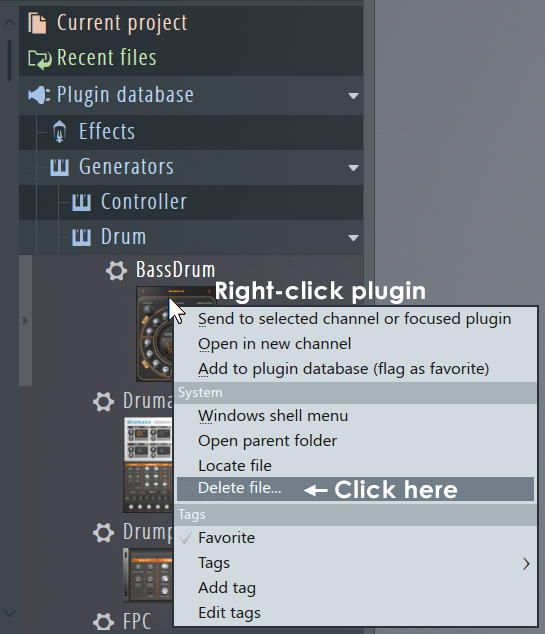
- Right-Click on the Plugin Database category — to see the context menu.
- Select ‘Open’ — This will open a standard external file browser.
- Edit stuff — Notice the file structure matches what you can see in the Browser, amaze at that for a while. Then notice that there are three files for each item (or two if you didn’t save a thumbnail). Plugin name.bmp (the thumbnail image, 8 bit RGB color bitmaps), Plugin name.fst (the default preset plugins open with) and Plugin name.nfo (information for FL Studio, you can open this in any text editor).
- Backing up your database — If you have extensively customized the list you may want to make an external backup copy of this folder as a precaution against loss of data during future FL Studio installations.
- +1 up your file management skills — Check this page.
Plugin Picker
The Plugin Picker ( F8 ) displays the plugins in the database as an array (generators left, effects right, as shown below). To use the Plugin Picker, click, hold & drag the icon of the plugin you want to use. The picker interface will close leaving you holding the plugin ready to drop on the desired location inside FL Studio. Alternatively double-clicking a plugin will load it into a new channel or double-clicking an effect will load it into the currently selected mixer track.
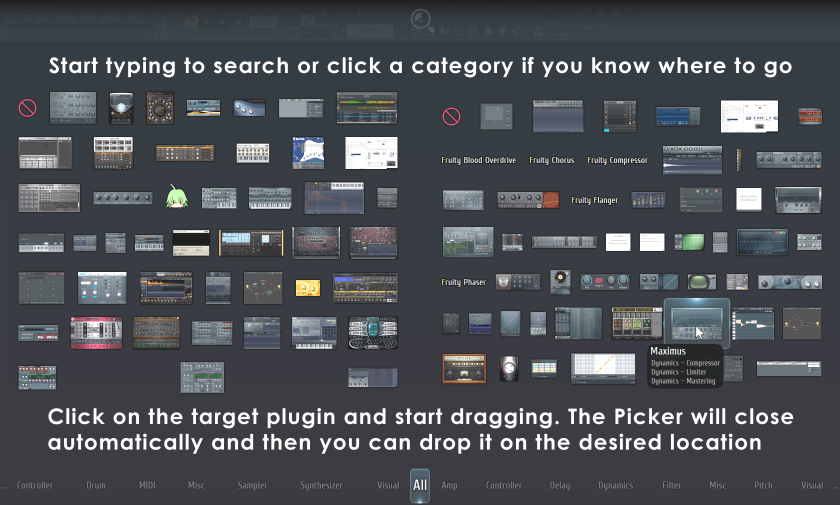
-
To open the Plugin picker:
Library
The library shows online content. Some will be free and some is available to purchase as indicated. Where content is associated with a plugin, it will be automatically downloaded to the correct location and does not need to be manually installed (see ‘Locating Downloaded Library Content‘ below).
- Purchase content — Click the cart icon and the integrated FL Studio Shop will open.
- Show in browser — Click the magnifying glass icon and the Browser will open to the installed location. NOTE: Content will install to a location where associated plugins can find it.
- Preview content — Click the demo icons below the product image.
- Owned / Free — Badges show when content is Free or Owned (installed).
Locating Downloaded Library Content
NOTE: Content downloaded from the library will always be visible to plugins and tools that can use it. For example, FLEX or FPC content will be immediately available in the respective plugin browsers. Regular ‘Sample‘ content will appear under the ‘Packs‘ folder in the main Browser. All downloaded content (samples, presets, themes etc.) is saved to your User data folder under . Documents > Image-Line > Downloads.
Starred (Favorites)
The Starred Tab shows your selected ‘Favorite’ files. ‘Favoriting’ is achieved by selecting the star that appears after files on mouse-over or from the file ( Right-Click ) file menu.
-
To add to favorites — On file mouse-over, a favoriting star will appear at the end of the content. Click it to add to the Starred tab. Use standard multi-selection shortcuts to favorite a group of files inc. ( Shift ), ( Shift+Ctrl ) when using ‘Favorite‘ from the ( Right-Click ) file menu.
Уроки FL Studio. Browser
В прошлых статьях мы рассматривали окна программы FL Studio, которые непосредственно участвуют в создании музыкальной композиции (Step Sequencer, Playlist, Mixer). В этом уроке FL Studio будем говорить о браузере.
Браузер (browser) – это своеобразный проводник (дерево папок), обеспечивающий быстрый и удобный доступ ко всем необходимым файлам (пресеты, сэмплы, параметры автоматизации и др.).

Открыть / закрыть браузер можно с помощью клавиши View browser / plugin picker на панели быстрого доступа или, нажав на клавишу F8.
Browser FL Studio поддерживает возможность перетаскивания.
Давайте в этом уроке FL Studio рассмотрим основные возможности браузера.

Browser options – меню браузера:
— Find – поиск по введённой фразе;
— Smart find – использование сокращений при поиске и других дополнительных параметров;
— Find previous – переход к следующей строке поиска того же типа;
— Find next – переход к следующей поисковой строке.
— Send previous to selected channel – помещает объект, выше выбранного, на выделенный канал пошагового секвенсора;
— Send next to selected channel – помещает объект, ниже выбранного, на выделенный канал пошагового секвенсора.
— Size – изменение размера браузера и шрифта;
— Show folder icons – отображение значков папок в каталоге;
— Show only one folder content – возможность одновременно открыть лишь одну директорию;
— Show file extensions – отображать расширения файлов;
— Show unknown file types – отображение файлов, не поддерживаемых программой;
— Sort by – сортировка (имя, тип, дата, группа)
— Collapse structure – свернуть все папки;
— Reread structure – обновление всех папок браузера;
— Configure extra folders – открывает окно Browser extra search folders;
— Current snapshot – слоты для сохранения настроек размеров окна браузера.
С помощью браузера можно перетаскивать пресеты на каналы пошагового секвенсора, сэмплы в Playlist и на каналы секвенсора, эффекты на FX каналы микшера, проекты для того, чтобы их открыть. Также браузер позволяет прослушивать музыкальные файлы.
Для добавления собственных папок в браузер выберите пункт OPTIONS / File settings.

В папке Current project сохраняются и динамически обновляются все файлы проекта.
History – история изменений;
Automation – параметры автоматизации;
Effects – параметры эффектов;
Generators – параметры используемых инструментов;
Remote control – список инструментов связанных с Internal или MIDI контроллерами.
В этом уроке FL Studio мы с вами рассмотрели основные параметры браузера.
Всё остальное придет с практикой.
Читайте также:
Если понравилась статья, поделись с друзьями!
Добавьте свой комментарий. Отменить ответ
Комментарии: 2
Раньше использовал FL для создании партий барабанов и бас — гитары, а сам при этом играл на электрогитаре и сводил все с помощью cool edit pro. Твитнул.
И сайт хороший и статья познавательная! Пробовал делать музыку в FL Studio 10, что то получалось но забросил даже сам не знаю почему.
Рубрики
Подписывайся на новые статьи
Онлайн курс
Электронная музыка
с нуля до PRO
ПодробнееНашли ошибку?
Выделите текст и нажмите Ctrl+Enter.© Создание электронной музыки, 2011 — 2022. Все права защищены.
Мы используем файлы cookie, чтобы вам было удобнее пользоваться нашим сайтом.
Вы можете узнать больше о том, какие файлы cookie мы используем, или отключить их в настройках .
- Конфиденциальность
- Строго необходимые файлы cookie
- Политика конфиденциальности
Этот веб-сайт использует файлы cookie, чтобы мы могли предоставить вам лучшие результаты вашего запроса. Информация о файлах cookie хранится в вашем браузере и выполняет такие функции, как распознавание вас, когда вы возвращаетесь на наш веб-сайт, и помогает нашей команде понять, какие разделы веб-сайта вы находите наиболее интересными и полезными.
Мы используем файлы cookie, чтобы анализировать трафик, подбирать для вас подходящий контент и рекламу, а также дать вам возможность делиться информацией в социальных сетях. Мы передаем информацию о ваших действиях на сайте партнерам Google: социальным сетям и компаниям, занимающимся рекламой и веб-аналитикой. Наши партнеры могут комбинировать эти сведения с предоставленной вами информацией, а также данными, которые они получили при использовании вами их сервисов.
Строго необходимые файлы cookie должны быть включены постоянно, чтобы мы могли сохранить ваши предпочтения в настройках файлов cookie.
Если вы отключите эти файлы cookie, мы не сможем сохранить ваши настройки. Это означает, что каждый раз, когда вы посещаете этот веб-сайт, вам нужно будет снова включать или отключать файлы cookie.
FL Studio — Горячие клавиши
Для чего нужны горячие клавиши? Казалось бы, выбрать необходимую команду в меню с помощью мышки гораздо проще. Но это только на первый взгляд. во-первых эту самую команду нужно еще найти и знать, где она находится. Во-вторых нужно пройти через несколько выпадающих меню, чтобы открыть нужную. Ну и наконец — все профи используют хоткеи:)
Ниже представлен полный список горячих клавиш, не обязательно запоминать все — можно выбрать 5-10 наиболее используемых и со временем зададите себе вопрос: «Почему раньше я ими не пользовался?»
- Drag and drop — Most items may be dragged from the Browser (Left-click, hold & drag) to the desired target in FL Studio and they will be loaded automatically. For example;