How to configure Kali Linux to use a static IP address
What are advantages of a static IP address usage?
On a local network, a static IP address allows you to use the Web server, SSH, FTP and other network services without having to get to know IP of a system on which these services are running each time. If you do not use these services, then there is no need to configure a static IP.
A static address for a particular computer or other device can be set in several ways:
- in the settings of your router, bind the MAC address to the IP address: in different routers the configuration process may be slightly different, but usually these functions are located in the Local network (LAN settings) -> DHCP server -> The list of manually assigned IP addresses bypassing DHCP.
- setting up a static IP address in Network Manager
- setting up a static IP address in the command line
Manually assigning IP addresses bypassing DHCP in the router
A static IP address can be configured on the router. The router uses a MAC address to identify devices, so you can save pairs of MAC and IP addresses in the router settings (see also “How to find the MAC address and How to find the manufacturer by MAC address”).
The specific steps for binding the MAC address to the IP address in the router depend on the device model. Therefore, if you have any questions or you can not find the desired setting in your router, then refer to its manuals. In this case, the actions do not depend on the device to which you want to assign a permanent IP address, since all the configuration is performed in the router. Also, after resetting the settings on the device to which the permanent IP address was assigned (for example, when reinstalling the OS on the computer or Factory Reset of the phone), then the binding of the IP address to the device is preserved, since the MAC address is always unchanged.
This method is not suitable for virtual machines, even if a network connection of the Bridge type is used.
What are Address, Netmask, Gateway and DNS server when setting up a static address
Whichever method of setting a static IP address you choose, and in whatever graphical environment you set a static IP address, you will need to enter values for the following fields:
- Address
- Net mask
- Gateway
- DNS
Address is a static IP address that you want to assign to this computer. Typically, home routers have addresses like 192.168.0.* or 192.168.1.*, where instead of an asterisk there is a number from 2 to 254. An IP address ending in one is usually the router itself, and an IP address ending in 255 is broadcast.
Netmask – If you are setting up a home router, then usually the netmask is 255.255.255.0, this same value in another notation is written as “/24”.
Gateway is the IP address of the router. This is usually 192.168.0.1 or 192.168.1.1
DNS is a DNS server, if you do not know what to specify, you can use the following IP addresses as DNS servers: 8.8.8.8 and 8.8.4.4.
When done, click the Apply button.
By the way, if you are already connected to the local network, to find out the gateway (IP address of the router), run the command:
The following will be displayed:
After the ‘default via’ line, the IP router will follow, in my case it is 192.168.0.1.
To apply made changes enter:
Check your current local IP with the command:

Setting up a static IP address in Kali Linux (in Xfce)
Xfce is the default graphical desktop environment in Kali Linux.
Since the computer is already connected to the network and it received network settings (IP address, gateway address, etc.), then to see the current values, run the command:

Pay attention to the line
It means that the IP address 192.168.1.51 is assigned to the eth0 network interface, the subnet mask is /24. To find out the gateway address, replace the last digit in the IP address with “1”, that is, in this case, the gateway address is 192.168.1.1.
Suppose I want the computer to be configured to have a static IP address of 192.168.1.101.
Next to the clock, right-click on the network connections icon.

In the context menu that opens, click on “Edit Connections…”.
Select the network for which you want to configure a static IP address and click the gear icon.

In the window that opens, go to the “IPv4 Settings” tab. Select “Manual” for the “Method”. Then click the Add button and enter the values you want.

When everything is ready, click the “Save” button.

Changes will take effect after reconnecting to the network.
Using the command
make sure that the IP address that was assigned to the computer is actually used:

Configuring a Static IP Address in Network Manager in Kali Linux (GNOME)
GNOME is the default graphical desktop environment in previous versions of Kali Linux. Currently, you can still select GNOME (or any other graphical desktop environment) when installing the OS.
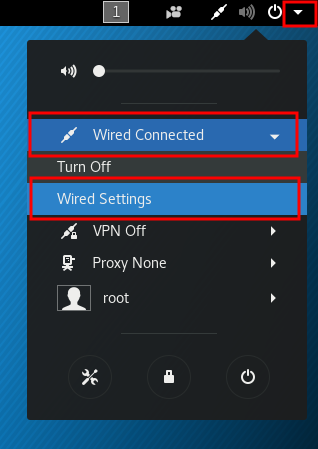
In Linux, a static address in a graphical environment can be set in the Network Manager settings. To do this, click on the arrow in the upper right corner of the screen, in the menu that appears, click on ‘Wired Connected’, and then on ‘Wired Settings’:
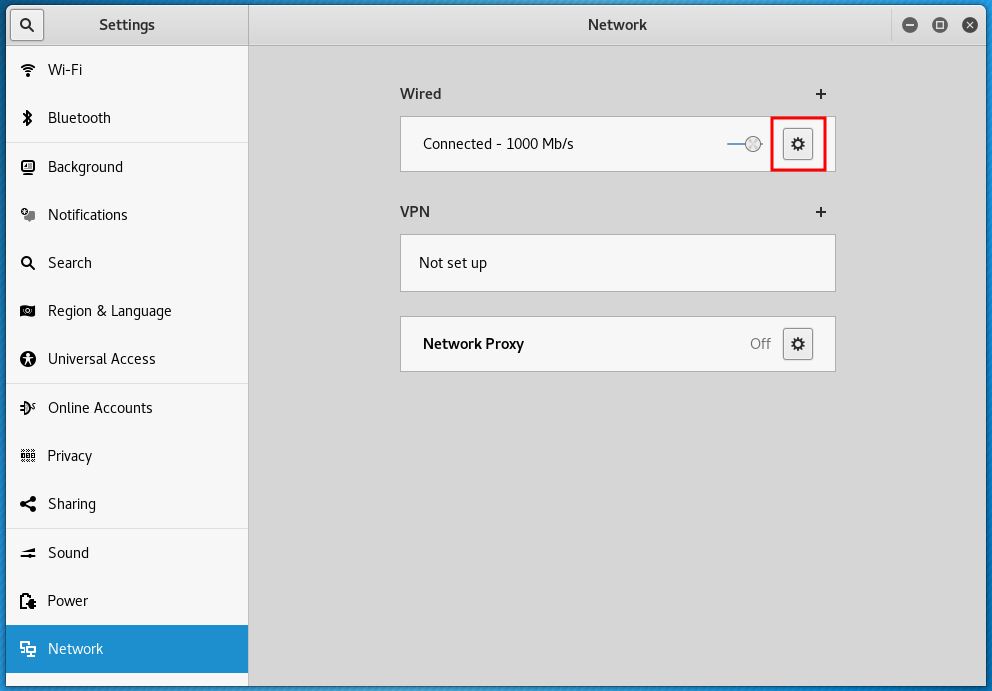
A new window will open, in it click on the gear icon:
Another window will open, in which go to the IPv4 tab:

select ‘Manual’:
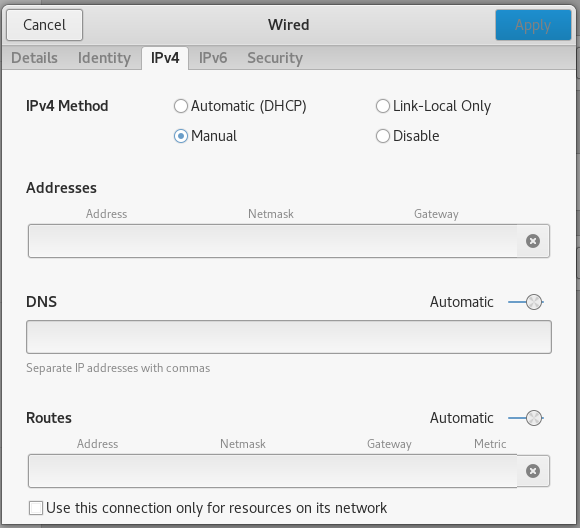
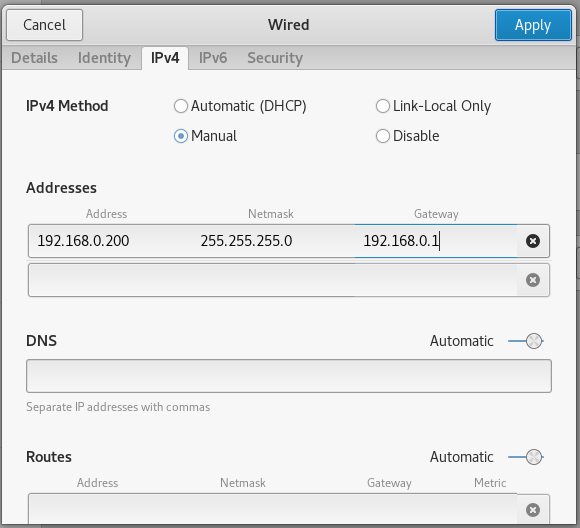
then enter the desired static IP in the ‘Addresses’ field, it should match your network, for example, if the router (default gateway) has the address 192.168.0.1, then the selected address should be 192.168.0.*, if the router has the address 192.168.1.1, then the selected IP should be of the form 192.168.1.* etc. Next, write down the ‘Netmask’, for most tasks 255.255.255.0 is suitable, also write the ‘Gateway’, which is the IP router, an example:
If you wish, you can also set the DNS server settings, but this is not mandatory.
Setting up a static IP address in Kali Linux (in Cinnamon)
Cinnamon is a graphical desktop environment that, although not included by default in Kali Linux, is quite popular among users. Optionally, Cinnamon can be installed on Kali Linux.
To configure a static IP address in Cinnamon, click on the network connection icon and select “Network Settings”.

Select the network adapter for which you want to configure, then select the network and click the gear icon next to it.

Select the “IPv4” tab, switch “Addresses” to “Manual”, enter the information you need and click the “Apply” button.

Changes will take effect after reconnecting to the network.
Configuring a Static IP Address in the Kali Linux Command Line
If for some reason you do not use Network Manager (for example, if you use Linux without a desktop graphical environment), you can configure a static IP address on the command line.
To do this, open the /etc/network/interfaces file with any text editor:
Only four lines should be added to this file. Example strings:
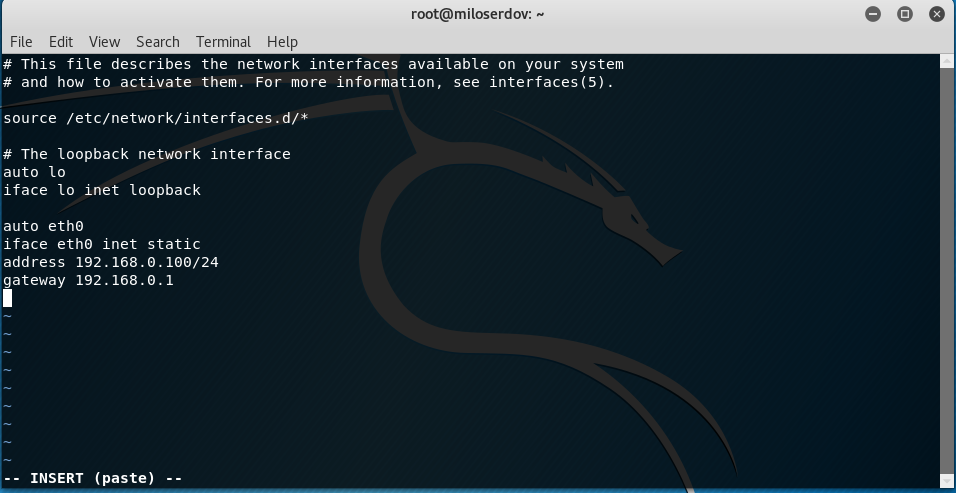
Let us examine them in more detail. eth0 is the name of the network interface. If there is only one network card, then in Debian (i.e., in Kali Linux too), this interface is called eth0. The second network interface is named eth1, etc.
If you are not sure, you can find the name of the wired network interface with the command:
In the second line, you need to use the same interface name (eth0).
Further in the third line, 192.168.0.100 is the IP that we want our system to always have. And /24 is an alternative way to set netmask. These characters correspond to 255.255.255.0.
As you might guess, in the last, fourth line, 192.168.0.1 means a gateway.
All these data need to be changed to fit your needs.
For the changes to take effect, issue the command:
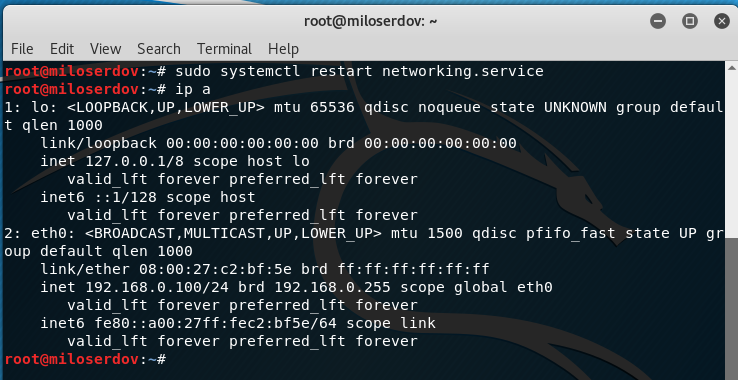
As you can see, the interface is really assigned the required IP and now it will be saved after each reboot.
Как задать ip адрес в Linux
По умолчанию в большинстве дистрибутивов Linux, ip адрес устанавливается автоматически, по протоколу DHCP, независимо от того какой тип соединения используется, будь то проводной интернет или беспроводное подключение к точке доступа Wifi или даже USB модем. Но если необходимо вы можете задать ip адрес Linux вручную. Это может понадобиться если вы хотите использовать статический ip адрес чтобы сеть запускалась быстрее при старте системы.
Есть несколько способов ручной настройки ip адреса в системе Linux, все можно сделать с помощью терминала или в графическом интерфейсе. Мы будем рассматривать только ipv4 адреса, и поговорим о том, как настроить статический ip, который будет присваиваться сетевому интерфейсу автоматически, а также как установить ip для сетевого интерфейса с помощью утилиты ip.
Как узнать IP, шлюз и маску?
Вы не можете установить любой IP для своего компьютера. Есть определенный диапазон значений, которые можно использовать. Ваш новый ip адрес должен быть в той же сети, что IP адрес роутера, который представляет из себя шлюз в сеть. Также, если вы задаете IP вручную, то нужно указать и другие параметры, которые система раньше получала по DHCP. И перед тем как переходить к настройке давайте рассмотрим откуда взять эти данные.
Обычно, в локальных сетях адрес находится в одном из следующих диапазонов:
- 10.0.0.0 – 10.255.255.255
- 172.16.0.0 – 172.31.255.255
- 192.168.0.0 – 192.168.255.255
Они все зарезервированы для локальных сетей и их использование не должно вызвать конфликтов с общим интернетом, таким образом сначала надо узнать адрес шлюза. Но со шлюзом все немного сложнее. Это ваш маршрутизатор. Очень важно указать шлюз правильно, иначе компьютер не сможет получить доступ к сети. Посмотреть текущий адрес шлюза можно командой:
ip route show match 0/0
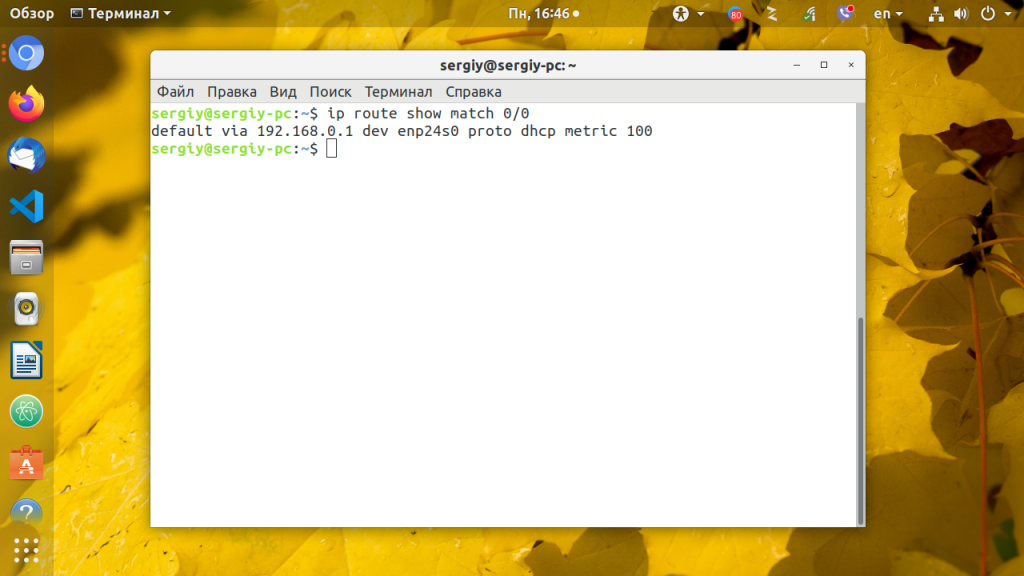
Здесь мы видим, что наш адрес шлюза — 192.168.0.1. Отсюда выплывает, что нам нужно выбирать наш ip именно из этого диапазона, можно менять только последнюю цифру и надо, чтобы в этой сети компьютеров с такими адресами больше не было, например, 192.168.0.64.
Маска подсети используется чтобы отделить локальную часть ip адреса, которая меняется, от статической. Сейчас в большинстве случаев применяется значение 255.255.255.0, которое означает изменение только последней цифры. Теперь, когда вы знаете откуда брать все значения, рассмотрим как установить ip адрес Linux.
Настройка ip адреса в Ubuntu
Настройкой сети в Ubuntu по умолчанию занимается специальная служба networking, конфигурация которой находятся в файле /etc/network/interfaces. Стандартные настройки с использованием динамического получения ip адреса по DHCP выглядят следующим образом:
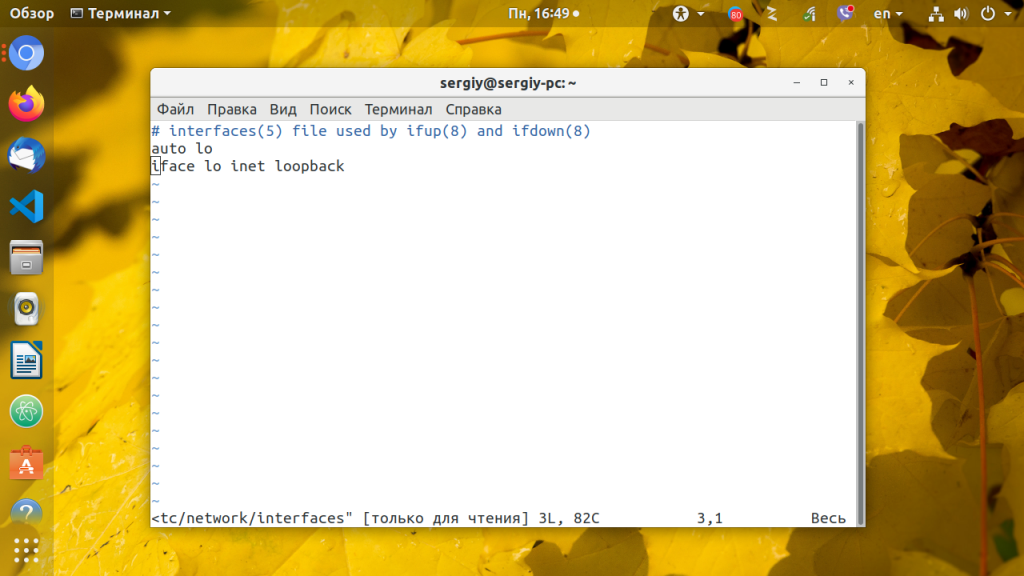
В этом примере настраиваются два интерфейса, lo и eth0. Нас будет интересовать только строчка, касающаяся проводного соединения eth0, она тут одна:
iface eth0 inet dhcp
Отредактируйте конфигурацию как показано ниже, нужно закомментировать строчку получения ip по DHCP и добавить вместо нее настройку статического ip адреса, подсети, и шлюза:
sudo vi /etc/network/interfaces
auto lo iface lo inet loopback # iface enp24s0 inet dhcp auto enp24s0 iface enp24s0 inet static address 192.168.0.65 netmask 255.255.255.0 gateway 192.168.0.1 dns-nameservers 8.8.8.8,8.8.4.4
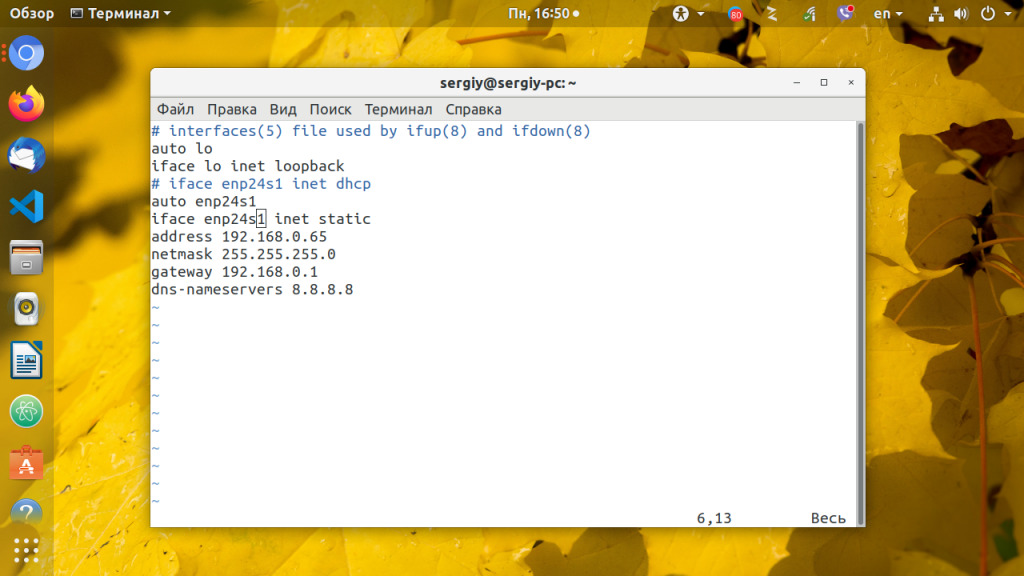
Более подробно настройка сети Ubuntu через терминал описана в отдельной статье. Настройте параметры в соответствии с вашими параметрами сети. Затем перезапустите сетевые службы чтобы изменения вступили в силу без перезагрузки компьютера:
sudo systemctl restart networking
Чтобы убедиться что все установлено правильно используйте утилиту ip.
ip addr list | grep enp24s0
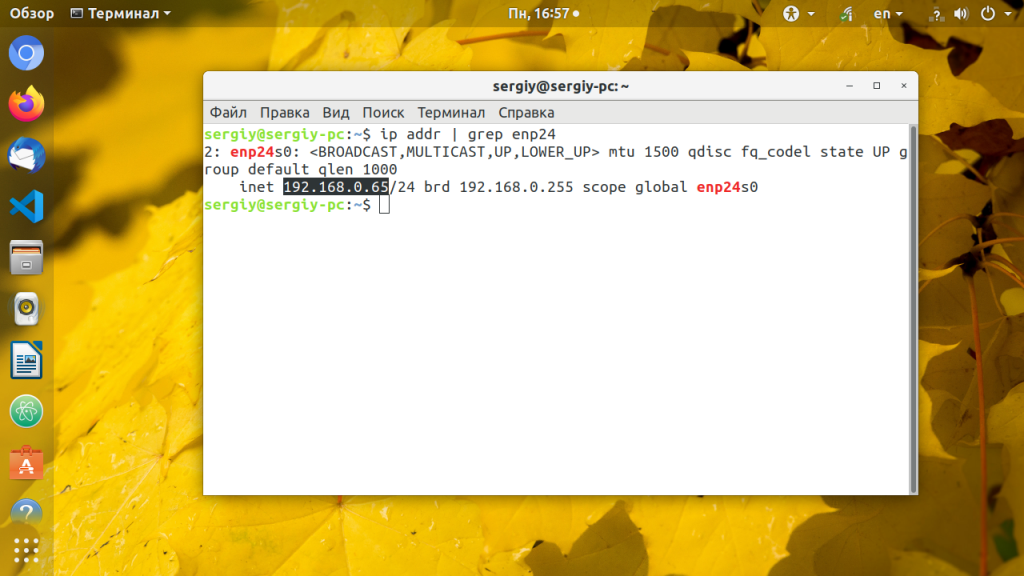
Настройка IP адреса в CentOS
В системах, основанных на дистрибутиве RedHat, файлы настройки сети немного отличаются. Тут за начальную настройку сети отвечает фреймворк Wiched. Настройки получения IP адреса хранятся отдельно для каждого сетевого интерфейса в файлах /etc/sysconfig/network-scripts/ifcfg-имя_интерфейса, например, enp2s0. Настройки статического ip для сетевого адаптера с адресом enp2s0 будут выглядеть следующим образом:
sudo vi /etc/sysconfig/network-scripts/ifcfg-enp2s0
DEVICE=»enp2s0″ BOOTPROTO=»static» NM_CONTROLLED=»yes» ONBOOT=»yes» TYPE=»Ethernet» IPADDR=192.168.0.65 NETMASK=255.255.255.0 GATEWAY=192.168.0.1 DNS1=»8.8.8.8″
Чтобы изменения вступили в силу перезапускаем сеть:
sudo systemctl restart networking
Готово, настройка ip адреса linux с помощью стандартных средств системы завершена и вы можете дальше использовать свой компьютер.
Настройка статического IP адреса в nmcli
Сетевой конфигуратор NetworkManager сейчас используется практически повсеместно. Если нужно настроить IP в терминале вы можете использовать утилиту nmcli. Сначала смотрим доступные подключения. Для этого выполните:
Допустим, что необходимое вам подключение называется Проводное соединение 2. Тогда осталось установить IP адрес, шлюз и DNS сервер:
nmcli con mod «Проводное соединение 2» ipv4.addresses 192.168.1.64/24 nmcli con mod «Проводное соединение 2» ipv4.gateway 192.168.1.1 nmcli con mod «Проводное соединение 2» ipv4.dns «8.8.8.8»
Затем надо сообщить утилите, что IP адрес будет настраиваться вручную:
nmcli con mod «Проводное соединение 2» ipv4.method manual
В этом примере IP адрес задается немного по другому. Сначала идёт выбранный ip адрес, а затем маска в формате /24. Это аналог записи 255.255.255.0, только короче.
Настройка IP в графическом интерфейсе
Разберемся ещё как изменить IP адрес через графический интерфейс. Для этого кликните по значку сети в правом верхнем углу экрана, затем выберите любое сетевое подключение и кликните по пункту Параметры соединения:
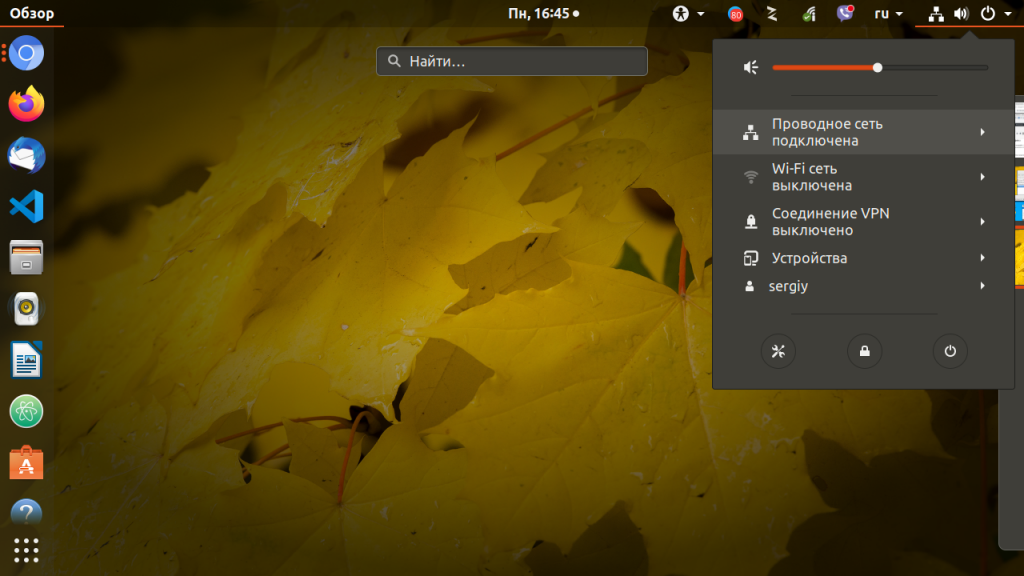
В открывшемся окне параметров нажмите значок шестеренки напротив нужного соединения, например, Проводное:
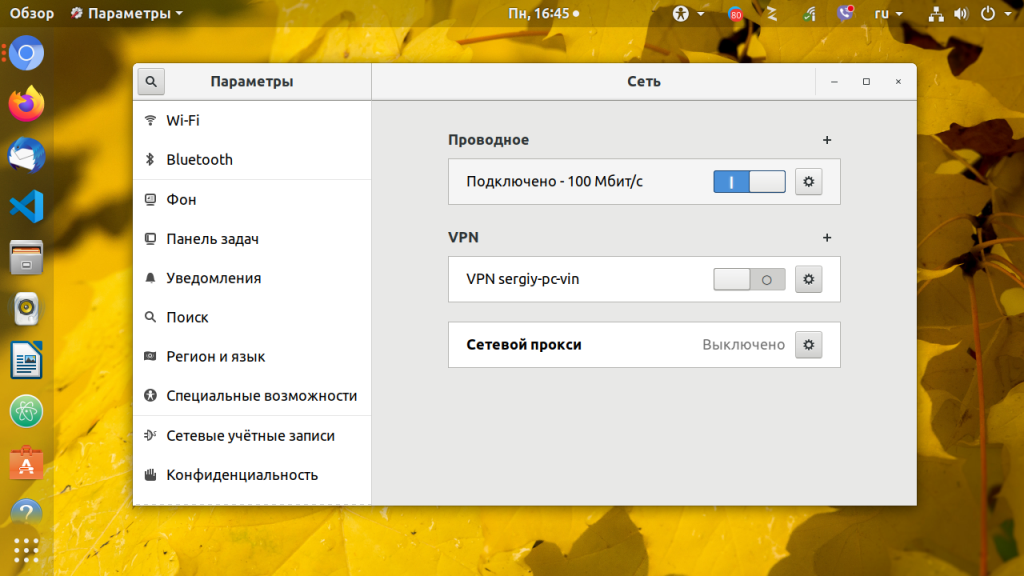
Перейдите на вкладку IPv4 и напротив пункта Метод IPv4 выберите Вручную. Появится несколько полей, которые надо заполнить. Заполните IP адрес, маску и шлюз:
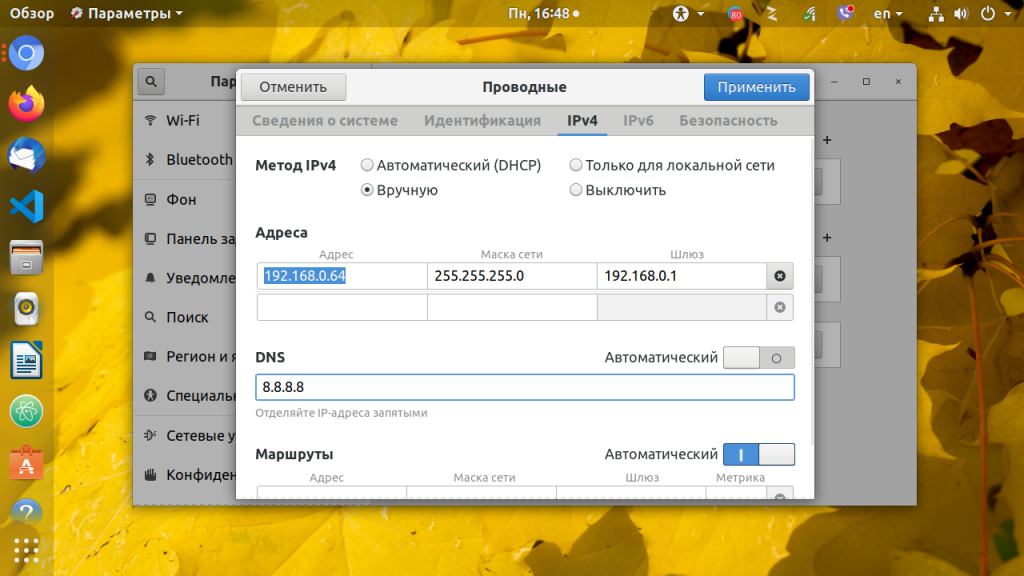
Затем чуть ниже пропишите DNS. Когда всё будет готово нажмите кнопку Применить.
Настройка IP адреса с помощью утилиты ip
Если вам не нужно настраивать статический ip при загрузке, а необходимо только один раз задать ip адрес linux через терминал, то можно использовать утилиту ip. Включите интерфейс, если он выключен:
sudo ip link set eth0 up
Сначала нужно изменить IP и маску сети:
sudo ip addr add 192.168.0.65/255.255.255.0 dev eth0
Затем добавить шлюз:
sudo ip route add default via 192.168.0.1
Готово, теперь ваша сеть должна работать. Только эти настройки будут работать до первой перезагрузки.
Выводы
Вот и все. В этой статье мы рассмотрели как выполняется настройка ip адреса linux. Все это может показаться сложным, но если хорошо разобраться, то смена ip linux уже не будет вызывать таких проблем. Если у вас остались вопросы, спрашивайте в комментариях!
How to Configure Static IP address in Kali Linux
There are mainly two types of IP address local IP address and External IP address. Local IP address in our system is assigned by the router. The assigned IP address is not static means, the router may change the IP address for our system. In many networking jobs like port forwarding, web server, FTP, SSH we need the IP address of our system. A static IP is much more beneficial than a dynamic one. An IoT based project must need a static IP.
Kali Linux users need to do penetration testing jobs and networking always took a big space in penetration testing syllabus. A static IP address will always help us. We don’t need to check for our IP address again and again, and our networking structure will be stable.
- Configure static IP in router settings.
- Configure static IP in the Network Manager in our Kali Linux.
- Configure static IP in command line.
- Configure an External static IP.
Configure static IP in router settings
We can bind a fixed/static IP address with our mac address (unique & fixed hardware address for every device) in our router’s setting.
The process may vary in different models of the router, but the technique will be the same. Usually these function is located
LAN Settings (Local Network) > DHCP Server > List of assigned IP addresses bypassing DHCP.

The specific steps for binding the MAC address to the IP address in the router settings depend on the router model. Therefore, if we have any trouble or we can not find the desired setting in our router, then we should check its manuals.
If we configured static IP router settings, then the actions do not depend on the device to which we want to assign a static IP address, since all the configuration is performed in the router. Also, if we reset all the settings on our device the IP address remains static.
For example if we reinstall our Operating System on our computer or hard reset our phone , then our router will assign the same static IP to our that device, because we have binded the IP address with the MAC address (which is always static).
Note: This method is not applicable for virtual machines, even if a network connection of the Bridge type is used. (But why ? Guess the simple reason and answer us in the comment section).
Configuring Static IP Address in Network Manager
In Linux with Graphical User Interface (GUI) we can configure a static IP in the Wired Settings.
Here we can configure a static IP for our wired connection and also for wireless connection. For example we set a static IP address for one of our wireless networks. Process for configuring the wired will be the same.
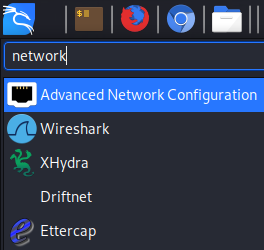
First we open the network manager from the application menu Settings -> Advanced Network Manager or we can search for it. Shown in the screenshot:
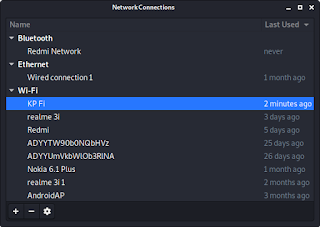
Here we need to choose our WiFi router which one we want to fix our IP address. So we choose our home network by double clicking over it.
Now we got a new window like following:

Here we need to navigate to the IPV4 Settings tab and we got this:

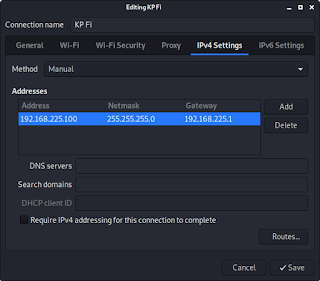
Here we need to change the method to manual. Then on «Additional static addresses» field we click on Add to add a static IP address.
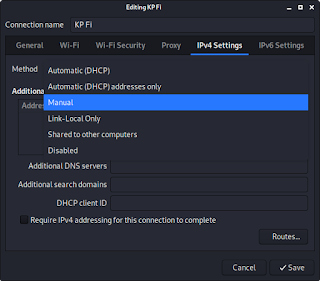
Here we need to enter the desired static IP in the ‘Addresses’ field. Note that it should match our network, for example, if the router (default gateway) has the address 192.168.0.1, then the selected address should be 192.168.0.*. So we need to check our router’s IP address; this is also called default gateway. To check this we need to run following command in our terminal :
In the above screenshot we can see that our router’s IP address is 192.168.225.1 so we choose 192.168.225.100. We think it is easy to remember for us.
Note: We can’t choose 192.168.225.001 because 192.168.225.1 and 192.168.225.001 will be the same in the case of IPV4.
After choosing the address we need to choose the netmask. We should type here 255.255.255.0 because this netmask will be suitable for most of the tasks.
In the Default gateway field we need to enter our router’s IP address in our case this is 192.168.225.1.

Configuring Static IP in command line
We also can configure a static IP address in the command line interface from our terminal. First we need to configure a file “/etc/network/interfaces”. Let we open this file in our favorite text editor by using following command:
Then we add the following lines at the end of the file:
Here wlan0 is our wireless interface. We can check our interfaces using ip addr command.
The address is our desired static IP address and netmask is 255.255.255.0 will be suitable for most of the tasks, gateway is the IP address of our router. Router’s IP address may vary by its manufacturer.
Then we save and close it by CTRL+X then Y then ‘Enter’ as we save our changes in nano editor.
For the changes to take effect, reboot our system by using following command:
After reboot we check for the IP address using ip addr command, the screenshot of the command is following:

As we can see in the above screenshot, the network interface is really assigned to required IP and now it will be saved after each reboot.
This is how we can set a local static IP in Kali Linux or any other Debian based Linux distro.
Configure an External static IP
Those things are for static IP address in our local network. But what if we want to fix our dynamic external IP, What if we need a static external IP ?
Well, this isn’t controlled from our side. It totally depends on our Internet Service Provider (ISP). We can ask them for a static external IP address (May they took some extra charge for this).
There is another way to convert our dynamic IP to a static IP, the service called NO-IP. This service provides a hostname for us and we also need to install a client software in our system. The client will check for external IP provided by ISP. Whenever the IP changes it updates it with the hostname and we can use the hostname as our static IP address. We can follow this tutorial to install No-IP.
Liked our genuine and tested tutorials ? Then make sure to visit our website regularly. For any help comment down we always replay. Don’t forget to follow us on Twitter and Medium, we update small news and our new articles there.
Как изменить свой IP-адрес из командной строки в Linux

Легко изменить свой IP-адрес с помощью графического интерфейса, но знаете ли вы, что Linux также позволяет изменять IP-адрес вашей сетевой карты с помощью простой команды из командной строки?
Этот прием должен работать на всех дистрибутивах Linux на основе Debian, включая Ubuntu. Чтобы начать, введите ifconfig в командной строке терминала и нажмите Enter. Эта команда выводит список всех сетевых интерфейсов в системе, поэтому обратите внимание на имя интерфейса, для которого вы хотите изменить IP-адрес.

Чтобы изменить настройки, вы также используете команду ifconfig, на этот раз с несколькими дополнительными параметрами. Следующая команда изменяет сетевой интерфейс с именем «eth0» для использования IP-адреса 102.168.0.1 и назначает маску подсети 255.255.255.0:

Вы можете, конечно, заменить на любые значения, которые вы хотите. Если вы снова запустите ifconfig, вы увидите, что ваш интерфейс теперь принял новые настройки, которые вы ему присвоили.

Если вам также необходимо изменить шлюз по умолчанию, используемый сетевым интерфейсом, вы можете использовать команду route. Следующая команда, например, устанавливает шлюз по умолчанию для интерфейса «eth0» в 192.168.0.253:

Чтобы увидеть ваши новые настройки, вам нужно будет отобразить таблицу маршрутизации. Введите в командной строке следующую команду и нажмите клавишу ВВОД:

Это все, что нужно для изменения вашего IP-адреса с терминала. Если вас интересуют другие замечательные сетевые инструменты, которые вы можете использовать на терминале, обязательно ознакомьтесь с нашим руководством по этому вопросу.