Миграция DHCP сервера на Windows Server 2012
 23.07.2021
 itpro
itpro
 Windows Server 2012
 комментариев 16
Сегодня поговорим о таком актуальном вопросе, вызванной переходом на новую версию серверной ОС от Microsoft, как миграция старого dhcp сервера на новую платформу Windows Server 2012.
Обычно в продуктивной службе DHCP настроено множество параметров, в том числе огромные списки dhcp резерваций для клиентов (это всевозможные принтера, сендеры, компьютеры), поэтому о ручном переносе DHCP на новый Windows Server 2012 думать даже не хочется. К счастью существует возможность экспорта/импорта конфигурации DHCP сервера.
Нас интересуют два сценария переноса DHCP со старого сервера на Windows Server 2012:
1) Миграция DHCP сервера с Windows 2008/2008 R2
2) Миграция DHCP сервера с Windows 2003/ 2003 R2
Разберем оба эти сценария более подробно.
Миграция DHCP сервера с Windows 2008 на Windows Server 2012
Предположим, у нас имеется старый сервер с развернутой ролью DHCP, работающий под управлением Windows Server 2008 / 2008 R2 (пусть его имя srv-dhcp2008) и новый сервер с Windows 2012 (srv-dhcp2012), на который планируется осуществить перенос службы DHCP со всеми настройками.
На новом сервере с Windows Server 2012 установим роль DHCP с помощью команд Powershell:
Обратите внимание на параметр «IncludeManagementTools«, без которого роль DHCP будет установлена, но без соответствующей консоли управления.
Следующий шаг – авторизация нового DHCP сервера в Active Directory. Эту операцию также выполним с помощью Powershell :
В Windows Server 2012 появились специальные PowerShell командлеты, позволяющие осуществить импорт/экспорт любых параметров DHCP сервера. Отметим, что Microsoft максимально упростило всю процедуру, и нам необходимо будет выполнить всего две команды PowerShell: Export-DhcpServer и Import-Dhcpserver, которые могут работать и в удаленном режиме.
Итак, для экспорта настроек DHCP сервера, всех зон и резерваций с сервера под управление Windows Server 2008/R2, в консоли powershell на новом сервере (srv-dhcp2012) выполните следующую команду:
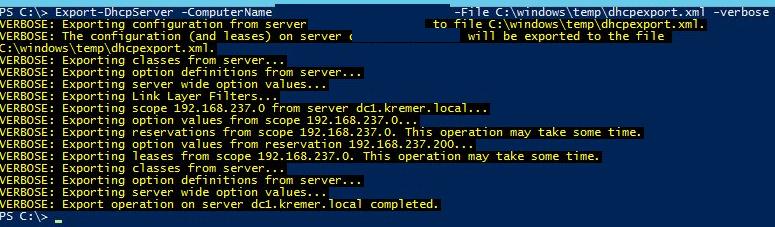
Конфигурация старого сервера экспортируется в XML формате в файл w2008dhcpconfig.xml. Отключите службу DHCP на сервере srv-dhcp2008:
Затем запускаем команду импорта:
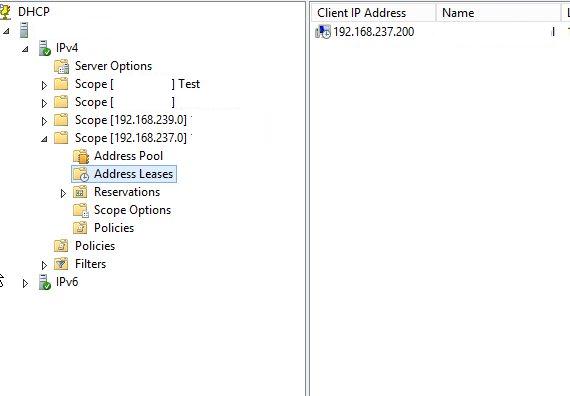
Удостоверимся, что все dhcp зоны, резервации и мигрированы на новый сервер.
Если нужно импортировать только часть dhcp-зон, команда импорта будет выглядеть так:
Перенос DHCP с Windows Server 2003 на Windows 2012
К сожалению, прямой перенос настроек базы DHCP из Windows 2003 в Windows Server 2012 невозможен, т.к. Powershell-модуль экспорта не совместим со старыми версиями Windows Server, а команда netsh dhcp не поддерживается в Windows 2012 (функционал netsh dhcp был перенесен в PoSh ), так что в этом случае придется сначала перенести базу DHCP на Windows 2008, а затем уже с помощью Powershell мигрировать ее в Windows Server 2012. Как мигрировать базу из Windows 2003 в Windows 2008 R2 описано ниже.
Перенос базы DHCP из Windows Server 2003 в Windows 2008
Допустим, у нас есть DHCP сервер, работающая под управлением ОС Microsoft Windows Server 2003. Экспортируем базу данных DHCP в бинарный файл командой:
В результате, в корне диска C:\ появится бинарный файл dhcp_conf2003.dat, содержащий все настройки старого DHCP сервера. Для предотвращения dhcp конфликтов в сети, остановим службу DHCP на старом сервере:
Затем зайдем на сервер с Windows Server 2008 (на котором предварительно развернутся роль DHCP сервера, авторизованная в домене) и импортируем конфигурацию со старого сервера:
После этого нужно перезапустить службу DHCP на новом сервере с Windows 2008:
 Предыдущая статья Следующая статья
Миграция DHCP-сервера 2003-2012
Миграция службы DHCP с старого 2003 сервера на новый 2012R2 в целом не вызывает сложностей. Всего то нужно:
- установить роль DHCP на новом сервере
- создать нужную область (Scope), настроить ее параметры по образу и подобию старого сервера.
- перенести на новый сервер зарезервированные IP-адреса с их уникальными параметрами (если они есть)
- выключить службу на старом сервера
- авторизовать и включить службу на новом сервере.
Основная проблема, с которой придется столкнуться, это перенос резервированных IP адресов.
Особенно это коснется тех, кто предпочитает резервировать ВСЕ адреса в области DHCP (встречаются и такие), или тех, у кого достаточно большое хозяйство и накопилось много зарезервированных адресов, которые руками перетаскивать долго.
Было найдено два рабочих варианта:
Первый: полу-автоматический
- На старом сервере запускаем netsh —Dhcp —server\\имя_сервера_2003–exportc:\win2003DbAll
- На новом ставим роль DHCP, останавливаем DHCP-службу, удаляем базу C:\Windows\System32\DHCP\*.mdb, снова запускаем DHCP-сервер, импортируем настройки, командой Netsh – Dhcp – server\\имя_сервера_2012– import c:\win2003db
- Удаляем роль DHCP на старом сервере.
- Перезапускаем и авторизуем новый DHCP сервер, проверяем что все работает корректно.
Второй: полу-ручной (кому-то этот вариант понравится больше, т.к. есть возможность не только причесать свою службу DHCP в процессе миграции, но и не ловить в дальнейшем «хвосты старых проблем». Мы же параноики… Кто его знает что там мигрирует и как, правда? Никакая мигрированная настройка (тем более через 4 поколения серверных ОС) не сравнится с вручную созданной с нуля :). Ну и грех в данном случае не использовать мощь PowerShell.
- На новом сервере ставим DHCP, настраиваем параметры области, параметры сервера (если нужно).
- На старом сервере в консоли DHCP выбираем вкладку «Address Leases» и экспортируем все что видим в CSV-файл
- Редактируем при необходимости CSV-файл (убираем ненужные резервации, переименовываем комментарии к второпях сделанным адресам и т.д.). Перед сохранением выбираем только те записи, которые имеют в столбце ТИП упоминание Reservation и приводим таблицу к виду ScopeID;IPAddress;Name;ClientID;Description, где ScopeID — имя области(Scope) на новом сервере (в моем случае это 192.168.0.0.
- Сохраняем с разделителями «;»
- На новом сервере импортируем резервированные адреса из CSV-файла с помощью PowerShell
Import-Csv c:\Users\user\Desktop\RezervDHCP.txt -delimiter «;» -Encoding Default | Add-DhcpServerv4Reservation -ComputerName NewServ2012
Многие админы не просто резервируют адреса, но и назначают им параметры, отличающиеся от стандартных. Например меняют адрес шлюза, или ставят DNS другие чем у всех. Здесь логично объединить эти «отличающиеся адреса» каким нибудь общим признаком, чтобы потом было удобнее ими управлять. В моем случае это была группировка по начальным цифрам адреса. т.е. Scope была с раширенной маской 255.255.248.0 и компьютеры были группированы так:
- имевшие адрес начинающийся с 192.168.0.0 — имели другой адрес шлюза
- имевшие адрес начинающийся с 192.168.1.0 — имели другой адрес шлюза и другой DNS
Для автоматической правки получившихся чистых резерваций достаточно сделать следующее:
Как перенести dhcp на другой сервер
Авторизуясь в LiveJournal с помощью стороннего сервиса вы принимаете условия Пользовательского соглашения LiveJournal
- February 2022
| 1 | 2 | 3 | 4 | 5 | ||
| 6 | 7 | 8 | 9 | 10 | 11 | 12 |
| 13 | 14 | 15 | 16 | 17 | 18 | 19 |
| 20 | 21 | 22 | 23 | 24 | 25 | 26 |
| 27 | 28 |
Задача: перенести роль и базу данных (lease’ы и reservation’ы) DHCP с одного сервера на другой.
На сервере-доноре
1) Запускаем PowerShell, вводим:
netsh dhcp server export C:\dhcp.txt all
2) Останавливаем DHCP-сервер или деактивируем scope.
На сервере-поциенте
3) Добавляем роль DHCP-сервера. Scope НЕ СОЗДАЁМ.
4) Копируем файл экспорта dhcp.txt из сервера-донора.
5) Запускаем PowerShell, вводим:
netsh dhcp server import c:\dhcp.txt all
6) Авторизуем DHCP-сервер.
7) .
8) Profit.
UPD:
Есть вероятность, что если в описаниях scope-ов есть кириллица, то получишь отлуп и придется по одному скопу так импортировать.
Покури отказоустойчивость DHCP в 2012. Там как раз парой (не более) работают и при отключении одного ровно ничего не происходит.
Вот статья технета: http://technet.microsoft.com/ru-ru/library/hh831385.aspx
Добавлю еще: в отличие от импорт-экспорта тут 100% доступность сервиса. Но это вряд ли критично для 99% организаций)))
Edited at 2014-08-05 02:22 pm (UTC)
Ну конечно же я знаю, что в «двенашке» появился failover для DHCP!
Но речь-то идёт про Windows Server 2008 (не! R2), откуда я базу-то экспортировал!
How to Migrate DHCP Server to Windows Server 2016/2019/2022?
Migrating the DHCP service from the old server to the new Windows Server 2016/2019/2022 host with the saving of all the DHCP scope settings of the old server is quite easy. If the old DHCP server is running Windows Server 2008/R2 or Windows Server 2012/R2, you can directly transfer DHCP settings, zones, and DHCP reservations.
Deploying DHCP Server Role on Windows Server 2022/2019/2016
First of all, you need to install the DHCP Server role on a new server that is running Windows Server 2016/2019/2022. You can install the DHCP Server role using the Server Manager console, where you need to run the Add Roles Wizard in the Manage > Add Roles and Features menu and select the DHCP Server.
But it’s much easier to install the DHCP role and role management tools (the DHCP MMC console and PowerShell module to interact with DHCP server) using PowerShell. Run the PowerShell console as an Administrator and run the following command:
The -IncludeManagementTools parameter must be specified to install the DHCP server management console. By default, the Add-WindowsFeature cmdlet installs only the DHCP server role without the appropriate console.
Next, you need to create local DHCP security groups (DHCP Administrators and DHCP Users):
Note. These security groups are used to manage the local DHCP server:
- DHCP Administrators — these are users with full permissions on the DHCP server (they can change any settings), but without local admin permissions on Windows Server;
- DHCP Users — users with the rights to view DHCP server settings and statistics (including the DHCP Leases info).
To enable DHCP security settings associated with the local security groups created, restart the DHCP Server service:
Authorize DHCP Server in Active Directory
Next, you need to authorize the new DHCP server in the Active Directory domain. Authorization in Active Directory is performed under an account with Enterprise Admins permissions and is needed to prevent rogue DHCP servers from working on the network.
The list of authorized DHCP servers in the AD domain can be displayed as follows:
To authorize the new DHCP server in the Active Directory domain:

If you want to start a DHCP server without authorization in AD, you need to change the DisableRogueDetection registry parameter with the following PowerShell command:
However, after the DHCP role is installed and the post-installation settings with PowerShell are performed, you can’t connect to the DHCP Server. You can see an alert message in the Server Manager console: a post-installation configuration is required, even though it has already been performed. In this case, even the server reboot won’t help to make this alert disappear.

To remove this warning message and notify Server Manager that post-install DHCP configuration is completed, you need to modify the ConfigurationState registry parameter. Use the following PowerShell command to indicate that the actual DHCP server role has already been configured:
After that, you need to restart the DHCP service:
Moving DHCP Server from Windows Server 2008/R2/2012 to 2016/2019/2022
In Windows Server 2012 special PowerShell cmdlets have been added, allowing you to import/export any DHCP server settings. Note that Microsoft simplified the procedure as much as possible, and we will need to execute only two PowerShell commands: Export-DhcpServer and Import-Dhcpserver, which can work remotely. All commands can be executed on one machine (the one to which the DHCP service migrates).
Create the folder C:\DHCP (New-Item C:\DHCP -type directory) and run the command to export the configuration of the old DHCP server to the XML file named OldDHCPConf.xml.

Now you can perform a full import of the DHCP configuration on the new server:
Everything is ready. Run the DHCP console and check that all the DHCP scopes, reservations, and IP leases are in place.

After the migration of the DHCP server is completed, do not forget to reconfigure the DHCP Relay (IP Helper) agents on the routing network devices. Reconfigure them to use the IP address of the new DHCP server.
When you run the command Import-DhcpServer -Leases –File…. you may get an errorGet-DhcpServerVersion : Failed to get version of the DHCP server DC3.
In this case, make sure you run PowerShell console as Administrator. Also, check if your account is a member of the local DHCP Administrators group.
Migrating the DHCP Role on Windows Server Using the Backup/Restore Feature
In Windows Server 2016+, you can backup and restore your DHCP server configuration via the graphical MMC snap-in DHCP Management (dhcpmgmt.msc). You can use these features to migrate your DHCP server.

- Open the RSAT DHCP console;
- Right-click on the DHCP server and select Backup;
- Specify the directory where you want to save the backup copy of the DHCP server settings.
You can use this backup copy to restore the DHCP server settings on the current or another Windows Server host. However, if you simply copy the DHCP backup files to a new server and try to restore the configuration using the Restore option in dhcpmgmt.msc, an error will appear when importing the DHCP database:
The database was not restored correctly. No changes were made. For more information, please see Event Viewer on the specified server.

To successfully migrate your DHCP server config to a new device, you need to copy your DHCP1 backup to the %SystemRoot%\System32\DHCP\backup directory on the DHCP2 server. Then select the Restore option in the DHCP console and select to restore the configuration from this folder.

If everything was successful, the following message should appear:
The database was restored successfully.

As you can see, we successfully migrated DHCP from one server to another using a DHCP backup.
Note that by default, Windows backs up the DHCP configuration and leases every 60 minutes to the %SystemRoot%\System32\DHCP\backup directory.
The backup directory is configured in the DHCP server settings.

You can also list the current DHCP backup settings using the PowerShell command:
FileName : C:\Windows\system32\dhcp\dhcp.mdb
BackupPath : C:\Windows\system32\dhcp\backup
BackupInterval(m) : 60
CleanupInterval(m) : 60
LoggingEnabled : True
RestoreFromBackup : False

This means that if your Windows Server DHCP server fails, you can manually copy the DHCP database files from the backup directory on the failed server’s disk and restore its configuration to the new server.
DHCP Server Migration from Windows Server 2003 to 2016/2019
If you are using a legacy DHCP server on Windows Server 2003/R2, you need to use a different migration method. This is because Windows Server 2003 does not support the PowerShell cmdlets for exporting DHCP settings that are available in newer versions of Windows Server.
Log in to the Windows Server 2003 and open the command prompt. Run the following command to export DHCP server configuration to a binary file:
Now copy the dhcp2003_config.dat file to the new DHCP server running Windows Server 2016/2019 and import the configurations from a local file or over the network (using a UNC path):
Migrating DHCP Failover Configuration
If you are using a DHCP failover or DHCP load balancing configuration, after importing the DHCP settings on the first server, you only need to import only the server configuration on the second Windows Server:
After that, you need to perform the standard DHCP Failover configuration.
Remove the Old DHCP Server
Now you need to disable the DHCP service on the old server:
And unauthorize the old DHCP server from Active Directory using the DHCP console (right-click on the DHCP server name > Unauthorize)

Or unauthorize your old DHCP Server in AD using the following PowerShell command: