F5 Vpn Client Save
This software allows you to connect to an F5 VPN server without using their browser plugin. It also has the advantage of setting up DNS properly on OSX systems, which the official client doesn’t do. (but maybe they will in the future, now that they can copy the method I use).
It is not supported or affiliated with F5 in any way. I actually find it rather sad the client they provide is so terribly poor that I had to write this in order to get reliable access to my company’s VPN.
This software does not require any software from F5 to be installed on the client. The only requirement is Python 2.3.5 or later. It works on at least Linux and OSX systems, but porting to any similar OS should be trivial. Porting to Windows, on the other hand, is probably not reasonably possible.
To install: «make install» as root.
([email protected] is saved for future invocations, so doesn’t need to be specified on future invocations)
ChangeLog
- Added ability to choose the VPN connection when multiple are returned
- Added SOCKS proxy support, if you have the «SocksiPy» python module installed; use the —socks5-proxy argument.
- Fixed compatibility issues with some newer version of the VPN server. (thanks James Trammell and Dave Cadwallader)
- Oops I broke resolvconf again. 🙁 Forgot an os.close().
- Support non-split-tunneling VPN configuration. (thanks Mark Kamichoff)
- Use «UseDefaultGateway0» param to tell pppd to set the machine’s default route, and to override the DNS servers, rather than supplementing them.
- Allow LAN0 to be empty.
- Added ability to connect via a HTTPS proxy with a —proxy=hostname:port argument.
- Basic functionality on iPhone v2.0. Requires python and pyobjc, both of which you can install easily via Cydia. For now, at least, you’ll have to run it in the terminal, and, since the iphone drops the net connection every time the phone sleeps, it’s not really very usable.
- Fixed bug in DNS on linux. (too clever by far)
- Retry connecting a few times if the VPN fails to answer properly.
- Added support for the resolvconf DNS-manager on linux systems which have it installed.
- Made the netmask parser more forgiving, since apparently some people have their vpn servers set up oddly.
- If no DNS0 parameter is supplied by the VPN server, don’t attempt to set up DNS overrides.
- Added a SIGUSR1 handler which prints some stuff.
- Fixed a bug that caused it to not work on OSX 10.4.
- Make the keepalive feature actually work.
2007-12-07: New features:
- Now sends a little traffic over the connection at least every 5 minutes, to keep crappy home NAT devices from tearing down the TCP connection. (NetGear, with your 10 minute inactivity timeout. I’m looking at you, with disgust.)
- On OSX 10.5, make reverse DNS of VPN-remote IPs work right (this is only an issue on OSX to begin with, as linux doesn’t support split-DNS anyhow.)
- Fixed bug with the way I called SSL_write causing «bad write retry» errors occasionally.
- On OSX 10.5, use the SystemConfiguration python module instead of execing scutil (revdns change runs afoul of scutil’s 256char line limit).
- Don’t assume the VPN ID is 0,4: actually read the page to find the right number.
2007-09-08: Rewrote the f5vpn-login script to no longer require the «svpn» binary from F5. It now just requires python and a little platform-specific knowledge about setting up routes and dns (implemented for linux and osx, currently, feel free to contribute others).
Remote connection via F5 Client VPN on Windows 10

You may gain access to the Institute network for remote work via the F5 Client VPN service.
Instructions for Use
Remote Connection via F5 Client VPN on Windows 10
To connect from afar via F5 Client VPN, perform the following:
- Use your browser to access https://evpn.weizmann.ac.il.

- Enter your User ID and password on the page that loads.

Select the desired method to receive an OTP (One Time Password) – via SMS or RSA token, and click Logon.

Enter the one time password received via the selected method, and click Logon.

Click Download in the window that appears.

When the download finishes, double-click the f5vpn_setup.exe file with your mouse.

When requested to provide administrator permission for the installation, click Continue.

Click Yes in the next window that appears to continue the installation.

On completion and termination of the installation application, click Click here to connect.

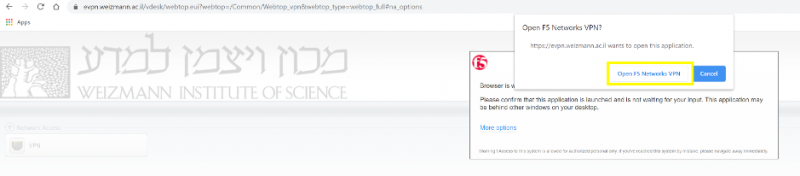
In the window that pops up (with Open F5 Networks VPN in its title bar), click Open F5 Networks VPN.
Click the Add this site to your Trusted Sites list… option to confirm that you trust the target site.

Click Yes in the next window.

On conclusion of the installation, click Yes again in the next window to initiate the connection.

When your work is finished, double-click the VPN F5 icon in the Windows task bar’s notification area.

To disconnect from the network, click Disconnect in the window that appears.
VPN F5 Desktop Client
IMPORTANT: Windows 10 users who upgraded from a previous version of Windows must uninstall earlier versions of the VPN client before installing this version, otherwise, you risk rendering your computer unusable.
- Download the BIG-Edge IP Client installer using the link provided.
- Follow the on-screen prompts, accepting the default installation options.
- Restart your computer.
- On first launch, you will be prompted for a server name. Enter vpn.brown.edu
Follow the instructions below to install the current VPN Desktop Client.
- Using the link provided, download the Brown VPN client for macOS.
- Open the BIGIPMacEdgeClient.zip file from your downloads folder.
- Control + Click on the mac_edgesvpn.pkg file and select «Open With —> Installer (default).»
- Follow the on-screen installation instructions, selecting the default options.
- When you are notified the installation was successful, click Close.
- Restart your computer.
- Launch the f5 vpn client from your Applications folder.
- On first launch, you may be prompted to add a server. Enter vpn.brown.edu for the server address, and BrownVPN for the server name.
While the VPN is not officially supported for Linux users, it does work in many distributions. You will need the ‘network-manager’ and ‘ppp’ packages for your distribution installed, then use the web-based login (vpn.brown.edu) — note that this currently doesn’t work in all browsers (definitely not Chrome). You will also need superuser access to install the plugin.
Installing VPN Plugin (Pale Moon)
Sign in with your Brown credentials and your two-step authorization, if applicable.
Follow through on-screen prompts to install plugin; you may be asked to restart the browser.
Once plugin is installed, you will be able to connect through Brown VPN by going to this page.
F5 vpn client что это
F5 vpn client что это
-
Как видно из описания темы, речь пойдёт о настройке брандмауэра Windows для предотвращения несанкционированных соединений, в том числе телеметрии, вся «борьба» с которой сводится к отключению/перенастройке почти всех правил Microsoft.
Сначала возвращаем ПРАВИЛА БРАНДМАУЭРА ПО УМОЛЧАНИЮ , если система только что установлена, то можно пропустить.kayrus/gof5
If nothing happens, download GitHub Desktop and try again.
Launching GitHub Desktop
If nothing happens, download GitHub Desktop and try again.
Launching Xcode
If nothing happens, download Xcode and try again.
Launching Visual Studio Code
Your codespace will open once ready.
There was a problem preparing your codespace, please try again.
Latest commit
Git stats
Files
Failed to load latest commit information.
README.md
- an application must be executed under a privileged user
If your Linux distribution uses systemd-resolved or NetworkManager you can run gof5 without sudo privileges. You need to adjust the binary capabilities:
For systemd-resolved you need to adjust PolicyKit Local Authority config, e.g. in Ubuntu:
Per user capabilities
If you want to have more granular restrictions to run gof5, you can allow only particular users to run it.
First of all add an entry before the none * in a /etc/security/capability.conf file:
where a %username% is a name of the user, which should get inherited CAP_NET_ADMIN and CAP_NET_BIND_SERVICE capabilities.
Adjust the binary flags to have inherited capabilities only:
Check user’s capabilities:
gof5 should be executed using sudo even if you already logged in as this user:
On MacOS run the command below to avoid a cannot be opened because the developer cannot be verified warning:
Windows version doesn’t support pppd driver.
Developer mode should be enabled, since gof5 requires root privileges. The binary should be placed inside the /usr/share/oem directory. Home directory in ChromeOS doesn’t allow to have executables. You need to restart shill with an option in order to allow tun interface creation: sudo restart shill BLOCKED_DEVICES=tun0 . Use the the driver: pppd config option if you don’t want to restart shill.
Build from source
Alternatively you can use a session ID, obtained during the web browser authentication (in case, when you have MFA). You can find the session ID by going to the VPN host in a web browser, logging in, and running this JavaScript in Developer Tools:
Then specify it as an argument:
When username and password are not provided, they will be asked if
/.gof5/cookies.yaml file doesn’t contain previously saved HTTPS session cookies or when the saved session is expired or explicitly terminated ( —close-session ).
Use —close-session flag to terminate an HTTPS VPN session on exit. Next startup will require a valid username/password.
Use —select to choose a VPN server from the list, known to a current server.