Рекомендуется дисплей Full HD или выше. Поддерживаются настройки с несколькими мониторами, а рабочие пространства можно настроить для охвата нескольких мониторов.
Пример поддержки нескольких мониторов в Blender. 
Устройства ввода
Blender поддерживает различные типы устройств ввода:
Клавиатуры (рекомендуется использовать клавиатуры с дополнительной цифровой панелью и английской раскладкой).
Мыши (рекомендуется использовать трёхкнопочную мышь с колёсиком прокрутки).
NDOF устройства (также называемые 3D-мышь).
If you are missing an input device such as a mouse or numpad you can change Blender’s keymap to emulate these devices. Settings to enable this can be found in the Input Preferences .
Эмуляция кнопок мыши
Если у вас не трёхкнопочная мышь, вы можете эмулировать её, включив соответствующий параметр в Настройки .
Следующая таблица показывает используемые при эмуляции комбинации:
Keyboard
Эмуляция цифровой клавиатуры
If you do not have a numeric Numpad on the side of your keyboard, you may want to emulate one (uses the numbers at the top of the keyboard instead, however, removes quick access to layer visibility).
Подробнее об эмуляции цифровой клавиатуры см. Настройки .
Клавиатуры с отсутствующей англоязычной раскладкой
If you use a keyboard with a non-English keyboard layout, you still may benefit from switching your computer to the UK or US layout as long as you work with Blender.
You can also change the default keymap and default hotkeys from the Preferences , however, this manual assumes you are using the default keymap.
Графический планшет
Графические планшеты можно использовать для обеспечения более традиционного метода управления курсором мыши с помощью пера. Это может помочь предоставить более знакомый опыт художникам, которые привыкли рисовать с помощью аналогичных инструментов, а также предоставить дополнительные элементы управления, такие как чувствительность к нажатию.
Если вы используете графический планшет вместо мыши, а чувствительность к давлению не работает должным образом, попробуйте разместить указатель мыши над окном Blender и отключите, а затем снова подключите планшет. Это может помочь.
NDOF (3D мышь)
3D mice or NDOF devices are hardware that you can use to navigate a scene in Blender. Currently only devices made by 3Dconnexion are supported. These devices allow you to explore a scene, as well as making Fly/Walk Navigation easier to control. The NDOF device can be configured in the Preference . These settings can also be accessed using the NDOFMenu button on the NDOF device to open a pop-up menu to adjust the settings directly from the viewport.
Дополнительную информацию о настройке периферийных устройств смотрите в разделе Настройки ввода .
Очки/шлемы виртуальной реальности
Поддерживаемые платформы
Поддержка виртуальной реальности в Blender реализована через мультиплатформенный стандарт OpenXR. Этот стандарт является новым, поэтому его поддержка всё еще ограничена.
Поддерживаемые платформы OpenXR. 
Пока не рекомендуется для общего использования.
Prototype Release, Oculus Link required for Quest.
Поддерживается Windows 10, май 2019 (1903).
Начало работы
В следующих подразделах описывается, как можно настроить HMD для использования с поддерживаемыми платформами. Если этого не сделать, Blender сообщит об ошибке при попытке начать сеанс виртуальной реальности.
Oculus
Oculus provides prototype OpenXR support. To use it, Blender has to be started in a special way, as described below.
Download and install the Oculus Rift software.
Start Blender by double clicking the blender_oculus script inside the installation directory. It will open a command-line window with further information.
SteamVR
OpenXR support in SteamVR is a developer preview. It requires SteamVR beta features.
Launch SteamVR. It should show a prompt for making SteamVR the default OpenXR runtime. Click Set as default .
Windows Mixed Reality
To check if a PC meets the requirements to run Windows Mixed Reality, Microsoft offers the Windows Mixed Reality PC Check application.
Убедитесь, что установлено майское обновление Windows 10 2019 (1903).
Если система соответствует всем требованиям, Портал смешанной реальности уже должен быть установлен. Он также доступен в магазине Microsoft.
Запустите портал смешанной реальности (Mixed Reality Portal). Нажмите кнопку меню . в левом нижнем углу. В открывшемся меню выберите Set up OpenXR.
For more information, refer to Windows“ Getting Started Guide for OpenXR.
Monado
Monado is a free and open source XR platform for Linux. It is not yet ready for production usage and should only be used for testing purposes.
Пакеты доступны для следующих дистрибутивов:
Для других систем это придёться компилировать из исходников, что в данном случае не рекомендуется людям с небольшим опытом компиляции ПО. Тем не менее, следуйте руководствам по началу работы от Monado.
Sorry for being so simple but i’m finding it really difficult to work out how to split screens and then rejoin them.
so i grab the corner of a screen and drag it creates a new screen then i grab the corner again and sometimes it creates a new one and sometimes it merges them.
I’m a bit confused about the controls.
I looked on the 2.8 manual and I think its a bit out of date as it looks the same as 2.79.
Any help is greatly appreciated
1 Answer 1
It is the same as in 2.79 only the corners now look different — if you click on a corner of one area and then start dragging it in the direction of itself then it splits, if you start dragging it in the direction of another area it joins them. I believe the design for these functions might still be worked on and I would not be surprised if it was made a bit more intuitive in the end.
Организация окон и границ
Блендер использует новый подход к разбиению экрана на оконные рамы (области). Окно приложения — это всегда прямоугольник (прямоугольная область) на рабочем столе. Он делит его на некоторое количество окон (рамок, областей), у которых можно изменять размер. Оконные рамы (области) содержат рабочее пространство для определенного типа окна, например, окно для просмотра 3D изображений, или окно структуры проекта. Идея заключается в том, что вы можете разбить большое окно приложения на любое число меньших (но все равно прямоугольные) непересекающихся оконные рамы. Таким образом, каждое окно всегда полностью видно. Это облегчает работу, когда работаешь в одном окне и затем переключаешься на работу в другом окне. .
Максимизация окон
Вы можете максимизировать окно так, чтобы оно заполнило все окно приложения в меню Вид –> Переключить полноэкранность области. Чтобы вернуться к нормальному размеру, и использовать снова Вид –> Переключить полноэкранность области. Более быстрый способ достичь этого — использовать : Shift-Spacebar , Ctrl-Down или Ctrl-Up , чтобы переключаться между максимизированным видом и видом окна. Примечание: окна будут максимизироваться при помощи сочетаний клавиш, но переключение будет только у того окна, над которым находится мышь.
Разбиваем окно
В верхнем правом и нижнем левом углах окна, есть виджеты сплиттера, они выглядят как маленький треугольник. Он и разбивает и объединяет оконные области. При наведении на него, курсор изменится на крестик. Нажмите LMB и перетащите его влево, чтобы разбить область окна вертикально или вниз, чтобы разделить его по горизонтали.
Как разделить блендер на 2 монитора
Работа с Окнами Видов в Blender
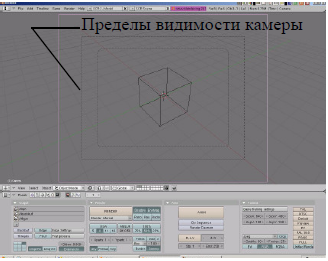
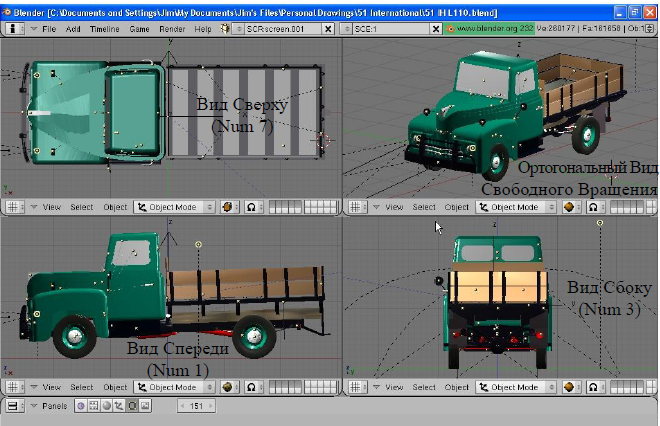
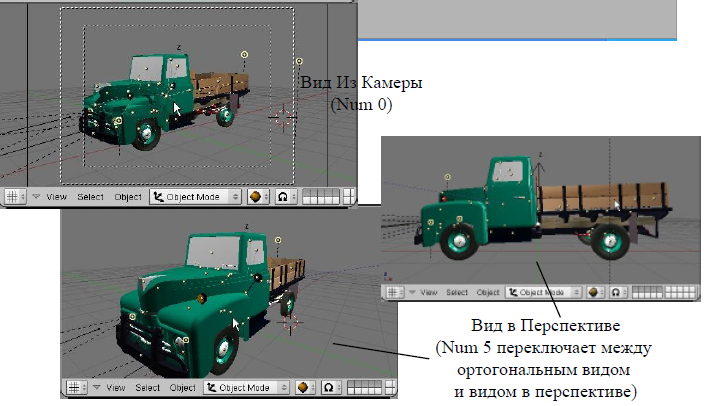
В большинстве случаев для работы вам необходимо более одного 3D окна для правильного расположения объекта в трех измерениях. Большинство программ рендеринга и анимации позволяют работать с разными направлениями просмотра. Blender также предоставляет такую возможность. Как вы знаете, при запуске Blender отображает 3 окна: «Окно Пользовательских Настроек» (сверху), «3D Окно» (в центре) и «Окно Кнопок» (снизу). Вы можете изменить размер каждого из этих окон, просто потянув Левой Кнопкой Мышки за линию разделяющую окна. Как вы можете заметить, указатель мышки при наведении на эту линию изменился, он стал похож на стрелку с двумя указателями. Если вы хотите разделить окно на две части — наведите указатель на эту линию и кликните Правой Кнопкой Мышки, в появившемся меню выберите «Split Area». Двигайте появившуюся разделительную линию до нужного положения и размера окна. Перемещая мышь на другую границу окна вы выбираете направление разделения. Объединение окон производится тем же способом (в меню, вызываемом правой кнопкой мыши, вместо «Split Area» нужно выбрать «Join Areas»). Вы можете разделять окно без ограничений сколько угодно раз.
Теперь, когда Вы добавили несколько дополнительных Окон, помните, что типы окон можно менять (см. на рис слева). Когда вы станете ближе знакомы с Blender, вам потребуются такие типы Окон как «Редактор Ipo», «Редактор Действий» и другие.
Blender — настройки интерфейса, горячие клавиши.
Горячие клавиши Blender 2.8 наиболее востребованные мной.
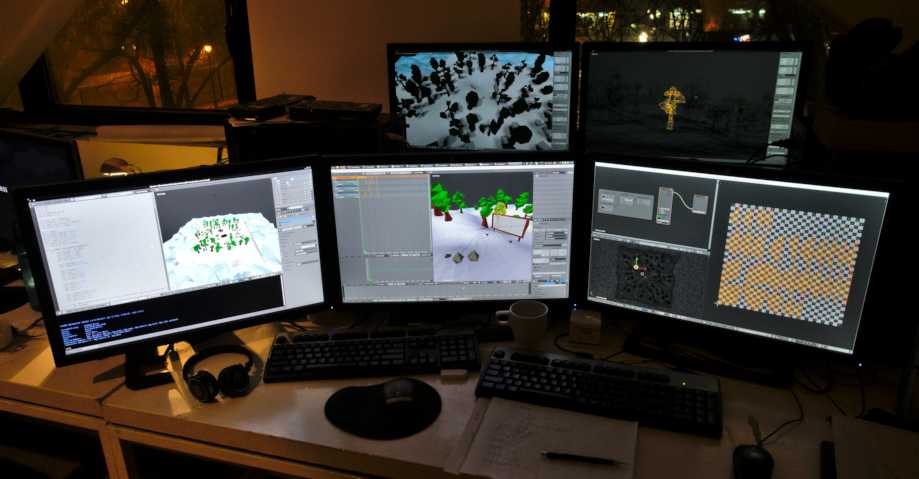
Настраиваем интерфейс blender 2.8 для двух мониторов.
Горячие клавиши Blender 2.8 которые используются в режиме редактирования.
Различные меню Blender 2.8
How to use multiple monitors with Blender?
What is the best way to boost the productivity of a digital artist? Some people might say that getting better hardware, like a more powerful GPU or more memory. Those will bring a lot of benefits, are on the wish list of most digital artists.
But, there is something that could equally improve your productivity, not only in Blender but with everything related to digital art.
For people that still mainly works with a single monitor, making a move to a dual monitor setup will bring that feeling; how could I live without a second monitor?
Now, here comes an important question. How to use Blender with multiple monitors?
By holding down the SHIFT and click and drag with the left mouse button, at the right location will do the trick. If you use that in the top right or lower left corner of a window, it will detach the window from the Blender UI. You can set any view at the cloned window independently from all other windows.
After that, you can move the new window to a different workspace in your second or third monitor.
Do you want to go even further? Use the CTRL+ALT+W keys to duplicate all windows in Blender. It will work like a cloned UI.
You can view an architectural model from any angle in one window, and have a completely different view in any other field.
For instance, you could see a project in the top view in one monitor and have a birdseye on another. Better yet, you can have a dedicated monitor only to view complex node materials for Cycles or Eevee.
In architectural visualization, you could use that to keep reference images at hand all the time, and craft better materials and work on lights. The list of benefits is endless.
Detaching windows in Blender is something that even experienced artists are unaware of Blender. Last week I showed that to an artist with five years of experience using Blender. And he didn’t know about that. Don’t have to say that shortcut blew his mind.
Comments
Shane
While you can open multiple windows, you will find that they get out of sync, each window uses different scene and screen properties, you want to add an info editor to the top of the extra windows to be able to change scenes. Most systems also require a click in each window to give it focus before it will respond to shortcuts. I prefer to keep one window spanning both monitors, changing scenes or screen layouts then effects the entire desktop. https://blender.stackexchange.com/a/21564/935
Paul C Sorensen
Currently, I don’t use multiple 3D-views, however; I did maximize the 3D-view on one monitor by tearing off the right side areas to another monitor.
To do this, hover the mouse in the upper left corner of the area until you get the cross-hair cursor. Use shift LMB drag to tear off the right side areas to separate windows on the second monitor. Then drag the lower right areas to minimize the upper areas.
Join all right areas into one: RMB click the border between area and select join from the dropdown menu. Repeat until you have only one right side area. I found it useful to change this one area to be the text editor.
Finally, RMB click the border between 3D-view and single (has to be only one) right areas. Select join from the dropdown menu. You should have the 3D-view full width
Once torn off, you can’t add areas to those windows or tear off additional windows. To do that, you have to tear off from the original window.
While it is possible to override the default layout using workspaces, I just save the project as normal. Then use that as a base template for future projects. I can then uniquely customize other things for each type of project.
As of the 2.8-1 (July 2019) release, it looks like this works without sync issues.
As Shane said above, it’s annoying if you need to click in a separate window to activate it before you can interact with it. You can change Windows’ behaviour by a registry tweak, which sets what is known as XMouse options (or ‘active window tracking’), and which then activates a window when you hover over it. However, this has 2 drawbacks: 1. You don’t want the ‘activate on hover’ behaviour during most of your interactions with Windows (believe me, it’s infuriating!) 2. You don’t want to have to edit the registry every time you want to change the XMouse settings.
One solution is to install a utility like WinAero Tweaker, which has a button to enable/disable the XMouse (otherwise known as ‘windows tracking’ ) behaviour.
Another, which I personally find more useful is to install AutoHotKeys, with a script to toggle XMouse status at press of a key combination. The script can be compiled to exe and set to run at startup, and just waits for the relevant keypress.
#NoEnv ; Recommended for performance and compatibility with future AutoHotkey releases. ; #Warn ; Enable warnings to assist with detecting common errors. SendMode Input ; Recommended for new scripts due to its superior speed and reliability. SetWorkingDir %A_ScriptDir% ; Ensures a consistent starting directory.
; Function: Toggles Active Window Tracking on or off
; Return Value: None
#z::ToggleActiveWindowTracking() ; set WinKey+Z to toggle the ActiveWindowTrackingStatus
; This function simply examines the state of the of the system variable which determines whether the ; window under the mouse pointer is automatically activated, and reverses the state.
ToggleActiveWindowTracking() ; http://msdn.microsoft.com/en-us/library/ms724947%28VS.85%29.aspx ; SPI_GETACTIVEWINDOWTRACKING = 0x1000 ; SPI_GETACTIVEWNDTRKZORDER = 0x100C ; SPI_GETACTIVEWNDTRKTIMEOUT = 0x2002 ; SPI_SETACTIVEWINDOWTRACKING = 0x1001 ; SPI_SETACTIVEWNDTRKZORDER = 0x100D ; SPI_SETACTIVEWNDTRKTIMEOUT = 0x2003 Static SPITrack := 0 Static SPI := “User32.dll\SystemParametersInfo” ; store the name of the API function we need to call DllCall(SPI, “UInt”, 0x1000, “UInt”, 0, “UIntP”, SPITrack, “UInt”, False) ; get the current state of the system SPITrack := !SPITrack DllCall(SPI, “UInt”, 0x1001, “UInt”, 0, “Ptr”, SPITrack, “UInt”, False) return >
This site uses Akismet to reduce spam. Learn how your comment data is processed.

 Если вы хотите разделить окно на две части — наведите указатель на эту линию и кликните Правой Кнопкой Мышки, в появившемся меню выберите «Split Area».
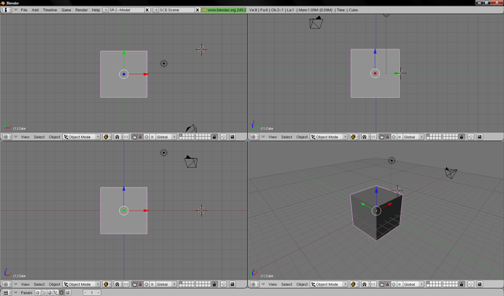
 Теперь, когда Вы добавили несколько дополнительных Окон, помните, что типы окон можно менять (см. на рис слева). Когда вы станете ближе знакомы с Blender, вам потребуются такие типы Окон как «Редактор Ipo», «Редактор Действий» и другие.