building a lexer in python — a tutorial
knowing how to build a lexer allows you to extend your applications and opens up a whole new world. You can write your own DSLs or your own language or just better separate symbols: in other words, it allows you to have more control over a string
what is a lexer?
from user input to code execution there are three main steps either for interpreters or compilers:
- lexical analysis (1)
- parsing (2)
- code generation (example: to machine code or bytecode)
- execution (3)
a lexer is a tool that performs lexical analysis
difference between lexical analysis and scanning
in the beginning, scanning and lexical analysis were two different steps but due to the increased speed of processors, they now refer to one and the same process and are used interchangeably.
what is scanning?
scanning means to pass over / scan a string character by character (char by char).
what is lexical analysis?
it is the process whereby the scanned characters are turned into lexemes
what is a lexeme?
a lexeme is a recognised piece of string
we might build a parser that outputs the following lexemes :
- lexeme 1: the
- lexeme 2: quick
- lexeme 3: brown
- lexeme 4: fox
now let us take a simili code:
- lexeme 1: for
- lexeme 2: (
- lexeme 3: i
- lexeme 4: ;
- lexeme 5: i
- lexeme 6: <
- lexeme 7: arr
- lexeme 8: .
- lexeme 9: length
- lexeme 10: ;
- lexeme 11: i
- lexeme 12: ++
- lexeme 13: )
- lexeme 14: <
- lexeme 15: >
so our task for this post will be to build a program that can separate those pieces
what does a lexer needs as input?
a lexer needs two things : the source code and keywords
what is a keyword?
a keyword is a lexeme that has a special meaning to the lexer
normally words like print, from, to are known as keywords, however, symbols such as ( , < can also be considered as keywords
types of keywords
there are single character keywords e.g. whitespace
there are multi-char keywords such as print
ignoring keywords
there are cases where we might want to ignore keywords as in the case where they appear between ” ” or in comments
what are ids?
ids are user-defined names, like the names of namespaces, variables, classes and functions. functions in the standard library are only predefined ids. normally keyword names are banned from being used as ids
some observations
the quick brown fox
for(i; i<arr.length; i++)
for both of the strings, lexing could be carried out. the first case is simple
but for the next case we observe a general rule. we break if the next character is a keyword be it a special word or symbol
in reality we also add the condition of if the element itself is a keyword
special cases
now let us take the case of ++, + is a keyword and ++ too but how do we differenciate between them or ==?
that’s when we use flags to determine which context are we in
flags are just variables that act like switches e.g.
or use some checks !
writing the scanner
basically we just need a program that outputs a char at one time. in python it is easy :
just some fancy modifications :
writing the basic lexer
now that we can read a string char by char, we can now check if next char is a keyword
let us do it for the phrase:
where white space is a keyword, referring to above :
we implement something similar to it i.e checking if next char is a white space:
moon is missing as there is no white space after it, we fix this edge case by printing the lexeme after the loop :
fixing whitespace addition
now white space got added to our lexeme, to fix we just add a character if the current char is not a whitespace :
running on a real piece of code
let us take this piece of java code taken from tutorialspoint:
our first task is to identify single-char and multi-char keywords
public, class, static, void, main, string, int, for
we did not consider System as a keyword as in the language, System is the name of an id (user-defined name)
now we can feed those keywords to our lexer
preassumption on whitespace
since whitespace still separates between like public and class:
we’ll keep the if next == whitespace rule
source codes are just pieces of strings
we could have ignored newline was it not for single line comments
a first attempt:
the added conditions test if the next char is a single-char keyword or if what we already have at hand after adding a char is a keyword, if so, we then check if our variable is not empty else we’ll print an empty lexeme. we also replaced newline by <newline> to better distinguish it
the above code outputs in:
see how it magically separates 10 and , System and . , String and name … all perfect but : we have a glitch
a glitch and the introduction the next step!
see at /* and */, it considered them as / then * and not as a single entity. that is because we defined * as a keyword, though we did not use it here but we use it in multiplication like : 12 * 12
so, our basic lexer has a confusion at this junction, we can for the time being tackle it like :
we modify only the loop :
we just added some checks to make things clear with the result that now the comments are recognised as such :
conclusion
we built a lexer by voluntarily leaving out regex given that some lookaheads is a breeze in py. we’ll move on next time to the tokeniser.
in this post, brevity was voluntarily left out, favouring a more complete approach, more programming than jargon usage!
Простой интерпретатор с нуля на Python (перевод) #1

Вещь, которая привлекла меня изучать компьютерную науку была компилятором. Я думал, что это все магия, как они могут читать даже мой плохо написанный код и компилировать его. Когда я прошел курс компиляторов, я стал находить этот процесс очень простым и понятным.
Сущность языка IMP
Прежде всего, давайте обсудим, для чего мы будем писать интерпретатор. IMP есть нереально простой язык со следующими конструкциями:
Присвоения (все переменные являются глобальные и принимают только integer):
Составные операторы (разделенные ;):
Это всего-лишь игрушечный язык. Но вы можете расширить его до уровня полезности как у Python или Lua. Я лишь хотел сохранить его настолько простым, насколько смогу.
А вот тут пример программы, которая вычисляет факториал:
Язык IMP не умеет читать входные данные (input), т.е. в начале программы нужно создать все нужные переменные и присвоить им значения. Также, язык не умеет выводить что-либо: интерпретатор выведет результат в конце.
Структура интерпретатора
Ядро интерпретатора является ничем иным, как промежуточным представлением (intermediate representation, IR). Оно будет представлять наши IMP-программы в памяти. Так как IMP простой как 3 рубля, IR будет напрямую соответствовать синтаксису языка; мы создадим по классу для каждой единицы синтаксиса. Конечно, в более сложном языке вы хотели бы использовать еще и семантическую представление, которое намного легче для анализа или исполнения.
- Разобрать символы исходного кода на токены.
- Собрать все токены в абстрактное синтаксическое дерево (abstract syntax tree, AST). AST и есть наша IR.
- Исполнить AST и вывести результат в конце.
Процессом разделения символов на токены называется лексинг (lexing), а занимается этим лексер (lexer). Токены являют собой короткие, удобоваримые строки, содержащие самые основные части программы, такие как числа, идентификаторы, ключевые слова и операторы. Лексер будет пропускать пробелы и комментарии, так как они игнорируются интерпретатором.
Процесс сборки токенов в AST называется парсингом. Парсер извлекает структуру нашей программы в форму, которую мы можем исполнить. 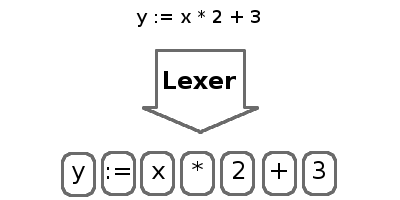
Эта статься будет сосредоточена исключительно на лексере. Сначала мы напишем общую лекс-библиотеку а затем уже лексер для IMP. Следующие части будут сфокусированы на парсере и исполнителе.
Лексер
По правде говоря, лексические операции очень просты и основываются на регулярных выражениях. Если вы с ними не знакомы, то можете прочитать официальную документацию.
Входными данными для лексера будет простой поток символов. Для простоты мы прочитаем инпут в память. А вот выходящими данными будет список токенов. Каждый токен включает в себя значение и метку (тег, для идентификации вида токена). Парсер будет использовать это для построения дерева (AST).
Итак, давайте сделаем обычнейший лексер, который будет брать список регэкспов и разбирать на теги код. Для каждого выражения он будет проверять, соответствует ли инпут текущей позиции. Если совпадение найдено, то соответствующий текст извлекается в токен, наряду с тегом регулярного выражения. Если регулярное выражение ни к чему не подходит, то текст отбрасывается. Это позволяет нам избавиться от таких вещей как комментарии и пробелы. Если вообще ничего не совпало, то мы рапортуем об ошибке и скрипт становится героем. Этот процесс повторяется, пока мы не разберем весь поток кода.
Вот код из библиотеки лексера:
Отметим, что порядок передачи в регулярные выражения является значительным. Функция lex будет перебирать все выражения и примет только первое найденное совпадение. Это значит, что при использовании этой функции, первым делом нам следует передавать специфичные выражения (соответствующие операторам и ключевым словам), а затем уже обычные выражения (идентификаторы и числа).
Лексер IMP
С учетом кода выше, создание лексера для нашего языка становится очень простым. Для начала определим серию тегов для токенов. Для языка нужно всего лишь 3 тега. RESERVED для зарезервированных слов или операторов, INT для чисел, ID для идентификаторов.
Теперь мы определим выражения для токенов, которые будут использованы в лексере. Первые два выражения соответствуют пробелам и комментариям. Так как у них нету тегов, лексер их пропустит.
После этого следуют все наши операторы и зарезервированные слова.
Наконец, нам нужны выражения для чисел и идентификаторов. Обратите внимание, что регулярным выражениям для идентификаторов будут соответствовать все зарезервированные слова выше, поэтому очень важно, чтобы эти две строчки шли последними.
Когда наши регэкспы определены, мы можем создать обертку над функцией lex:
Если вы дочитали до этих слов, то вам, скорее всего, будет интересно как работает наше чудо. Вот код для теста:
Скачать полный исходный код: imp-interpreter.tar.gz
Автор оригинальной статьи — Jay Conrod.
UPD: Спасибо пользователю zeLark за исправление бага, связанного с порядком определения шаблонов.
Write your own lexer
If a lexer for your favorite language is missing in the Pygments package, you can easily write your own and extend Pygments.
All you need can be found inside the pygments.lexer module. As you can read in the API documentation , a lexer is a class that is initialized with some keyword arguments (the lexer options) and that provides a get_tokens_unprocessed() method which is given a string or unicode object with the data to lex.
The get_tokens_unprocessed() method must return an iterator or iterable containing tuples in the form (index, token, value) . Normally you don’t need to do this since there are base lexers that do most of the work and that you can subclass.
RegexLexer
The lexer base class used by almost all of Pygments’ lexers is the RegexLexer . This class allows you to define lexing rules in terms of regular expressions for different states.
States are groups of regular expressions that are matched against the input string at the current position. If one of these expressions matches, a corresponding action is performed (such as yielding a token with a specific type, or changing state), the current position is set to where the last match ended and the matching process continues with the first regex of the current state.
Lexer states are kept on a stack: each time a new state is entered, the new state is pushed onto the stack. The most basic lexers (like the DiffLexer ) just need one state.
Each state is defined as a list of tuples in the form ( regex , action , new_state ) where the last item is optional. In the most basic form, action is a token type (like Name.Builtin ). That means: When regex matches, emit a token with the match text and type tokentype and push new_state on the state stack. If the new state is ‘#pop’ , the topmost state is popped from the stack instead. To pop more than one state, use ‘#pop:2’ and so on. ‘#push’ is a synonym for pushing a second time the current state on top of the stack.
The following example shows the DiffLexer from the builtin lexers. Note that it contains some additional attributes name , aliases and filenames which aren’t required for a lexer. They are used by the builtin lexer lookup functions.
As you can see this lexer only uses one state. When the lexer starts scanning the text, it first checks if the current character is a space. If this is true it scans everything until newline and returns the data as a Text token (which is the “no special highlighting” token).
If this rule doesn’t match, it checks if the current char is a plus sign. And so on.
If no rule matches at the current position, the current char is emitted as an Error token that indicates a lexing error, and the position is increased by one.
Using a lexer
The easiest way to use a new lexer is to use Pygments’ support for loading the lexer from a file relative to your current directory.
First, change the name of your lexer class to CustomLexer:
Then you can load and test the lexer from the command line with the additional flag -x :
To specify a class name other than CustomLexer, append it with a colon:
Or, using the Python API:
When loading custom lexers and formatters, be extremely careful to use only trusted files; Pygments will perform the equivalent of eval on them.
If you only want to use your lexer with the Pygments API, you can import and instantiate the lexer yourself, then pass it to pygments.highlight() .
Use the -f flag to select a different output format than terminal escape sequences. The HtmlFormatter helps you with debugging your lexer. You can use the debug_token_types option to display the token types assigned to each part of your input file:
Hover over each token to see the token type displayed as a tooltip.
If your lexer would be useful to other people, we would love if you contributed it to Pygments. See Contributing to Pygments for advice.
Regex Flags
You can either define regex flags locally in the regex ( r'(?x)foo bar’ ) or globally by adding a flags attribute to your lexer class. If no attribute is defined, it defaults to re.MULTILINE . For more information about regular expression flags see the page about regular expressions in the Python documentation.
Scanning multiple tokens at once
So far, the action element in the rule tuple of regex, action and state has been a single token type. Now we look at the first of several other possible values.
Here is a more complex lexer that highlights INI files. INI files consist of sections, comments and key = value pairs:
The lexer first looks for whitespace, comments and section names. Later it looks for a line that looks like a key, value pair, separated by an ‘=’ sign, and optional whitespace.
The bygroups helper yields each capturing group in the regex with a different token type. First the Name.Attribute token, then a Text token for the optional whitespace, after that a Operator token for the equals sign. Then a Text token for the whitespace again. The rest of the line is returned as String .
Note that for this to work, every part of the match must be inside a capturing group (a (. ) ), and there must not be any nested capturing groups. If you nevertheless need a group, use a non-capturing group defined using this syntax: (?:some|words|here) (note the ?: after the beginning parenthesis).
If you find yourself needing a capturing group inside the regex which shouldn’t be part of the output but is used in the regular expressions for backreferencing (eg: r'(<(foo|bar)>)(.*?)(</\2>)’ ), you can pass None to the bygroups function and that group will be skipped in the output.
Changing states
Many lexers need multiple states to work as expected. For example, some languages allow multiline comments to be nested. Since this is a recursive pattern it’s impossible to lex just using regular expressions.
Here is a lexer that recognizes C++ style comments (multi-line with /* */ and single-line with // until end of line):
This lexer starts lexing in the ‘root’ state. It tries to match as much as possible until it finds a slash ( ‘/’ ). If the next character after the slash is an asterisk ( ‘*’ ) the RegexLexer sends those two characters to the output stream marked as Comment.Multiline and continues lexing with the rules defined in the ‘comment’ state.
If there wasn’t an asterisk after the slash, the RegexLexer checks if it’s a Singleline comment (i.e. followed by a second slash). If this also wasn’t the case it must be a single slash, which is not a comment starter (the separate regex for a single slash must also be given, else the slash would be marked as an error token).
Inside the ‘comment’ state, we do the same thing again. Scan until the lexer finds a star or slash. If it’s the opening of a multiline comment, push the ‘comment’ state on the stack and continue scanning, again in the ‘comment’ state. Else, check if it’s the end of the multiline comment. If yes, pop one state from the stack.
Note: If you pop from an empty stack you’ll get an IndexError . (There is an easy way to prevent this from happening: don’t ‘#pop’ in the root state).
If the RegexLexer encounters a newline that is flagged as an error token, the stack is emptied and the lexer continues scanning in the ‘root’ state. This can help producing error-tolerant highlighting for erroneous input, e.g. when a single-line string is not closed.
Advanced state tricks
There are a few more things you can do with states:
You can push multiple states onto the stack if you give a tuple instead of a simple string as the third item in a rule tuple. For example, if you want to match a comment containing a directive, something like:
you can use this rule:
When this encounters the above sample, first ‘comment’ and ‘directive’ are pushed onto the stack, then the lexer continues in the directive state until it finds the closing > , then it continues in the comment state until the closing */ . Then, both states are popped from the stack again and lexing continues in the root state.
New in version 0.9: The tuple can contain the special ‘#push’ and ‘#pop’ (but not ‘#pop:n’ ) directives.
You can include the rules of a state in the definition of another. This is done by using include from pygments.lexer :
This is a hypothetical lexer for a language that consist of functions and comments. Because comments can occur at toplevel and in functions, we need rules for comments in both states. As you can see, the include helper saves repeating rules that occur more than once (in this example, the state ‘comment’ will never be entered by the lexer, as it’s only there to be included in ‘root’ and ‘function’ ).
Sometimes, you may want to “combine” a state from existing ones. This is possible with the combined helper from pygments.lexer .
If you, instead of a new state, write combined(‘state1’, ‘state2’) as the third item of a rule tuple, a new anonymous state will be formed from state1 and state2 and if the rule matches, the lexer will enter this state.
This is not used very often, but can be helpful in some cases, such as the PythonLexer ’s string literal processing.
If you want your lexer to start lexing in a different state you can modify the stack by overriding the get_tokens_unprocessed() method:
Some lexers like the PhpLexer use this to make the leading <?php preprocessor comments optional. Note that you can crash the lexer easily by putting values into the stack that don’t exist in the token map. Also removing ‘root’ from the stack can result in strange errors!
In some lexers, a state should be popped if anything is encountered that isn’t matched by a rule in the state. You could use an empty regex at the end of the state list, but Pygments provides a more obvious way of spelling that: default(‘#pop’) is equivalent to (», Text, ‘#pop’) .
New in version 2.0.
Subclassing lexers derived from RegexLexer
New in version 1.6.
Sometimes multiple languages are very similar, but should still be lexed by different lexer classes.
When subclassing a lexer derived from RegexLexer, the tokens dictionaries defined in the parent and child class are merged. For example:
The BaseLexer defines two states, lexing names and strings. The DerivedLexer defines its own tokens dictionary, which extends the definitions of the base lexer:
The “root” state has an additional rule and then the special object inherit , which tells Pygments to insert the token definitions of the parent class at that point.
The “string” state is replaced entirely, since there is not inherit rule.
The “comment” state is inherited entirely.
Using multiple lexers
Using multiple lexers for the same input can be tricky. One of the easiest combination techniques is shown here: You can replace the action entry in a rule tuple with a lexer class. The matched text will then be lexed with that lexer, and the resulting tokens will be yielded.
For example, look at this stripped-down HTML lexer:
Here the content of a <script> tag is passed to a newly created instance of a JavascriptLexer and not processed by the HtmlLexer . This is done using the using helper that takes the other lexer class as its parameter.
Note the combination of bygroups and using . This makes sure that the content up to the </script> end tag is processed by the JavascriptLexer , while the end tag is yielded as a normal token with the Name.Tag type.
Also note the (r'<\s*script\s*’, Name.Tag, (‘script-content’, ‘tag’)) rule. Here, two states are pushed onto the state stack, ‘script-content’ and ‘tag’ . That means that first ‘tag’ is processed, which will lex attributes and the closing > , then the ‘tag’ state is popped and the next state on top of the stack will be ‘script-content’ .
Since you cannot refer to the class currently being defined, use this (imported from pygments.lexer ) to refer to the current lexer class, i.e. using(this) . This construct may seem unnecessary, but this is often the most obvious way of lexing arbitrary syntax between fixed delimiters without introducing deeply nested states.
The using() helper has a special keyword argument, state , which works as follows: if given, the lexer to use initially is not in the "root" state, but in the state given by this argument. This does not work with advanced RegexLexer subclasses such as ExtendedRegexLexer (see below).
Any other keywords arguments passed to using() are added to the keyword arguments used to create the lexer.
Delegating Lexer
Another approach for nested lexers is the DelegatingLexer which is for example used for the template engine lexers. It takes two lexers as arguments on initialisation: a root_lexer and a language_lexer .
The input is processed as follows: First, the whole text is lexed with the language_lexer . All tokens yielded with the special type of Other are then concatenated and given to the root_lexer . The language tokens of the language_lexer are then inserted into the root_lexer ’s token stream at the appropriate positions.
This procedure ensures that e.g. HTML with template tags in it is highlighted correctly even if the template tags are put into HTML tags or attributes.
If you want to change the needle token Other to something else, you can give the lexer another token type as the third parameter:
Callbacks
Sometimes the grammar of a language is so complex that a lexer would be unable to process it just by using regular expressions and stacks.
For this, the RegexLexer allows callbacks to be given in rule tuples, instead of token types ( bygroups and using are nothing else but preimplemented callbacks). The callback must be a function taking two arguments:
the lexer itself
the match object for the last matched rule
The callback must then return an iterable of (or simply yield) (index, tokentype, value) tuples, which are then just passed through by get_tokens_unprocessed() . The index here is the position of the token in the input string, tokentype is the normal token type (like Name.Builtin ), and value the associated part of the input string.
You can see an example here:
If the regex for the headline_callback matches, the function is called with the match object. Note that after the callback is done, processing continues normally, that is, after the end of the previous match. The callback has no possibility to influence the position.
There are not really any simple examples for lexer callbacks, but you can see them in action e.g. in the SMLLexer class in ml.py.
The ExtendedRegexLexer class
The RegexLexer , even with callbacks, unfortunately isn’t powerful enough for the funky syntax rules of languages such as Ruby.
But fear not; even then you don’t have to abandon the regular expression approach: Pygments has a subclass of RegexLexer , the ExtendedRegexLexer . All features known from RegexLexers are available here too, and the tokens are specified in exactly the same way, except for one detail:
The get_tokens_unprocessed() method holds its internal state data not as local variables, but in an instance of the pygments.lexer.LexerContext class, and that instance is passed to callbacks as a third argument. This means that you can modify the lexer state in callbacks.
The LexerContext class has the following members:
text – the input text
pos – the current starting position that is used for matching regexes
stack – a list containing the state stack
end – the maximum position to which regexes are matched, this defaults to the length of text
Additionally, the get_tokens_unprocessed() method can be given a LexerContext instead of a string and will then process this context instead of creating a new one for the string argument.
Note that because you can set the current position to anything in the callback, it won’t be automatically be set by the caller after the callback is finished. For example, this is how the hypothetical lexer above would be written with the ExtendedRegexLexer :
This might sound confusing (and it can really be). But it is needed, and for an example look at the Ruby lexer in ruby.py.
Handling Lists of Keywords
For a relatively short list (hundreds) you can construct an optimized regular expression directly using words() (longer lists, see next section). This function handles a few things for you automatically, including escaping metacharacters and Python’s first-match rather than longest-match in alternations. Feel free to put the lists themselves in pygments/lexers/_$lang_builtins.py (see examples there), and generated by code if possible.
An example of using words() is something like:
As you can see, you can add prefix and suffix parts to the constructed regex.
Modifying Token Streams
Some languages ship a lot of builtin functions (for example PHP). The total amount of those functions differs from system to system because not everybody has every extension installed. In the case of PHP there are over 3000 builtin functions. That’s an incredibly huge amount of functions, much more than you want to put into a regular expression.
But because only Name tokens can be function names this is solvable by overriding the get_tokens_unprocessed() method. The following lexer subclasses the PythonLexer so that it highlights some additional names as pseudo keywords:
The PhpLexer and LuaLexer use this method to resolve builtin functions.
Common pitfalls and best practices
Regular expressions are ubiquitous in Pygments lexers. We have written this section to warn about a few common mistakes you might do when using them. There are also some tips on making your lexers easier to read and review. You are asked to read this section if you want to contribute a new lexer, but you might find it useful in any case.
When writing rules, try to merge simple rules. For instance, combine:
Be careful with .* . This matches greedily as much as it can. For instance, a rule like @.*@ will match the whole string @first@ second @third@ , instead of matching @first@ and @second@ . You can use @.*?@ in this case to stop early. The ? tries to match as few times as possible.
Beware of so-called “catastrophic backtracking”. As a first example, consider the regular expression (A+)*B . This is equivalent to A*B regarding what it matches, but non-matches will take very long. This is because of the way the regular expression engine works. Suppose you feed it 50 ‘A’s, and a ‘C’ at the end. It first matches the ‘A’s greedily in A+ , but finds that it cannot match the end since ‘B’ is not the same as ‘C’. Then it backtracks, removing one ‘A’ from the first A+ and trying to match the rest as another (A+)* . This fails again, so it backtracks further left in the input string, etc. In effect, it tries all combinations
Thus, the matching has exponential complexity. In a lexer, the effect is that Pygments will seemingly hang when parsing invalid input.
As a more subtle and real-life example, here is a badly written regular expression to match strings:
If the ending quote is missing, the regular expression engine will find that it cannot match at the end, and try to backtrack with less matches in the *? . When it finds a backslash, as it has already tried the possibility \\. , it tries . (recognizing it as a simple character without meaning), which leads to the same exponential backtracking problem if there are lots of backslashes in the (invalid) input string. A good way to write this would be r’"([^\\]|\\.)*?"’ , where the inner group can only match in one way. Better yet is to use a dedicated state, which not only sidesteps the issue without headaches, but allows you to highlight string escapes.
When writing rules for patterns such as comments or strings, match as many characters as possible in each token. This is an example of what not to do:
This generates one token per character in the comment, which slows down the lexing process, and also makes the raw token output (and in particular the test output) hard to read. Do this instead:
Writing a lexer for a new programming language in python
I have no idea how/where to start. I’m supposed to be using python, and more specifically, the ply library. So far, all I’ve done in create a list of tokens that will be part of the language. That list is given below:
I’ve obviously got a long way to go, seeing as I also need to write a parser and an interpreter.
I’ve got a few questions:
- How do I use the ply library?
- Is this a good start, and if so, what do I go from this?
- Are there any resources I can use to help me with this.
I’ve tried googling stuff on writing new programming languages, but I haven’t yet found anything satisfactory
![]()
1 Answer 1
How do I use the ply library?
Assuming that you already have Ply installed, you should start with exploring the tutorials on the official Ply website. They are well written and easy to follow.
Is this a good start, and if so, what do I go from this?
Ply requires token definitions to begin with. You have already done that. However, the complexities increase when your lexer has to differentiate between say a string like «forget» and a reserved keyword like for . The library provides good support for variable precedence to resolve grammar ambiguity. This can be as easy as defining the precedence as tuples:
However, I recommend you should read more about lexers and yacc before deep diving into the more advanced features like expressions and precedence in Ply. For a start, you should build a simple numerical lexer that successfully parses integers, operators and bracket symbols. I’ve reduced the token definition to suit this purpose. The following example has been modified from the official tutorials.
Library import & Token definition:
Define regular expression rules for simple tokens: Ply uses the re Python library to find regex matches for tokenization. Each token requires a regex definition. We first define regex definitions for simple tokens. Each rule declaration begins with the special prefix t_ to indicate that it defines a token.
Define regular expression rules for more complex tokens like data types such as int, float and newline characters to track line numbers. You will notice that these definitions are quite similar to the above.
Add some error handling for invalid characters:
Build the lexer:
Test the lexer with some input data, tokenize and print tokens:
You can add this example code to a Python script file like new_lexer.py and run it like python new_lexer.py . You should get the following output. Note that the input data consisted of newline( ‘\n’ ) characters that were successfully ignored in the output.
There are many other features you can make use of. For instance, debugging can be enabled with lex.lex(debug=True) . The official tutorials provide more detailed information around these features.
I hope this helps to get you started. You can extend the code further to include reserved keywords like if , while and string identification with STRING , character identification with CHAR . The tutorials cover the implementation of reserved words by defining a key-value dictionary mapping like this:
extending the tokens list further by defining the reserved token type as ‘ID’ and including the reserved dict values: tokens.append(‘ID’) and tokens = tokens + list(reserved.values()) . Then, add a definition for t_ID as above.
Are there any resources I can use to help me with this.
There are many resources available to learn about lexers, parsers and compilers. You should start with a good book that covers the theory and implementation. There are many books available that cover these topics. I liked this one. Here’s another resource that may help. If you’d like to explore similar Python libraries or resources, this SO answer may help.