Приступая к работе
Если у тебя ещё нет Python’а, ты можешь найти последние официальные установочные файлы здесь:
Будучи последним, Python 3 предпочтительнее!
На Windows можно добавить Python в переменную “path”, чтобы её было легче найти. Для этого нужно перейти в каталог с установленным Python’ом (например, C:\Python33\ ), открыть директорию Tools , потом — Scripts и запустить двойным кликом файл win_add2path.py .
И редактор кода
Хороший редактор кода помогает читать и писать программы. Их много, а каждый программист выбирает подходящий для себя так же, как теннисист выбирает ракетку, а шеф-повар — нож. Начинающим больше подойдут несложные, незапутанные, но помогающие в работе, редакторы, например:
Sublime Text: простой, но проприетарный редактор, поддерживающий Windows, Mac и GNU/Linux. Сочетание клавиш Ctl+B запускает открытый файл.
Geany: простой в обращении и не перегруженный функциями редактор, работающий на Windows и GNU/Linux.
TextMate: один из самых известных редакторов кода для Mac’ов, изначально бывший коммерческим продуктом, но позже ставший свободным и бесплатным.
Gedit и Kate: если ты используешь GNU/Linux с Gnome или KDE соответственно, то один из них должен быть предустановлен!
Komodo Edit: неплохой свободный редактор под Mac, Windows и GNU/Linux, основанный на более мощной Komodo IDE.
Если ты хочешь последовать нашим рекомендациям, для начала попробуй Sublime Text.
Wordpad, TextEdit, Notepad и Word – неподходящие текстовые редакторы.
Всё же, что такое Python?
Python — это вещь, называемая языком программирования. Она принимает текст (обычно называемый кодом), который ты написал, переводит его в инструкции для компьютера, которые затем исполняет. Мы будем учиться писать код, чтобы делать клёвые и полезные вещи. Отныне вы не обязаны использовать чужие программы, чтобы выполнять работу на компьютере!
В действительности, Python – всего лишь ещё одна программа на твоём компьютере. Для начала нужно узнать, как использовать и взаимодействовать с ним. Существует много способов научиться этому, первый из которых – работать и интерпретатором Python, используя консоль операционной системы (ОС).
Консоль (“терминал”, “командная строка”) – это текстовый (в отличие от так называемых “окружений рабочего стола” (Desktop Environment, DE), работающих в связке с мышью) интерфейс для работы с ОС.
Открываем консоль в Mac OS X
Стандартная консоль OS X зовётся Терминалом, который можно найти с помощью поиска (правый верхний угол) по системе или в разделе Приложения -> Утилиты .
Командная строка Terminal — это инструмент для “общения” с компьютером. Открывшееся окно должно содержать сообщение-подсказку, что-то вроде этого:
Открываем консоль в GNU/Linux
В дистрибутивах GNU/Linux (Ubuntu, Fedora, Mint и т.д.) обычно уже установлены разные программы-консоли, обычно называемые терминалами. То, какой терминал установлен, зависит от используемого дистрибутива. Например, в Ubuntu это Gnome Terminal. После запуска появляется приглашение вроде этого:
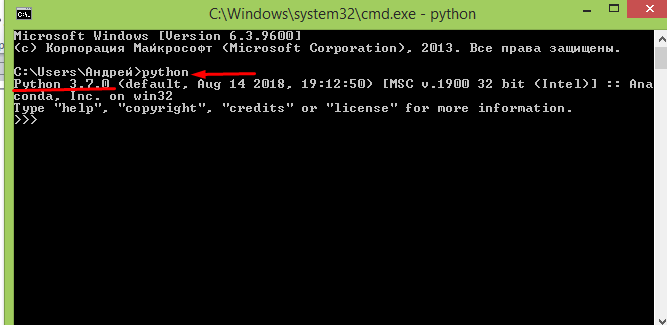
Открываем консоль в Windows
В WIndows консоль называется командной строкой (cmd). Самый простой способ запустить её — нажать Windows+R ( Windows — это клавиша с соответствующим логотипом), в открывшемся окне ввести cmd и нажать Enter (или кликнуть по кнопке Ok ); также можно найти её в меню Пуск . Выглядеть командная строка должна примерно так:
Командная строка Windows намного менее функциональна, чем её аналоги из GNU/Linux и OS X, потому лучше запускать интерпретатор Python’а (см. ниже) напрямую или с помощью программы IDLE, которая поставляется с Python’ом (найти её можно в меню “Пуск”).
Использование Python
Python-программа, установленная по умолчанию, называется интерпретатором. Интепретатор принимает команды и выполняет их после ввода. Очень удобно для тестирования чего-либо.
Чтобы запустить интерпретатор, просто введи python и нажми Enter.
Чтобы узнать, какая версия Python запущена, используй python -V
Взаимодействие с Python’ом
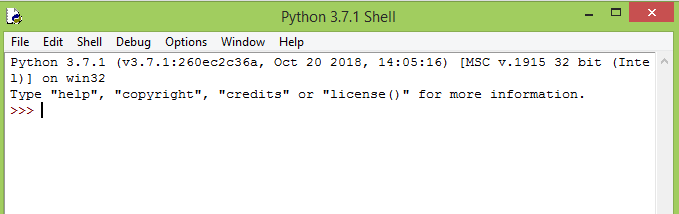
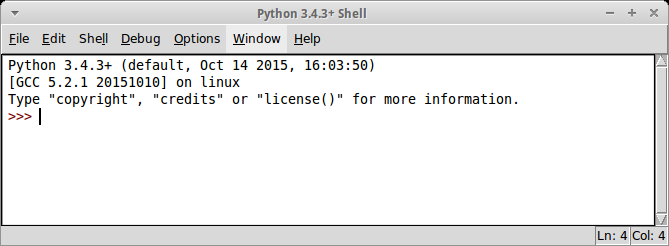
Когда Python запустится, ты увидишь что-то вроде этого:
>>> в последней строке означает, что сейчас мы находимся в интерактивном интерпретаторе Python, также называемом “Оболочкой Python (Python shell)”. Это не то же самое, и что обычная командная строка!
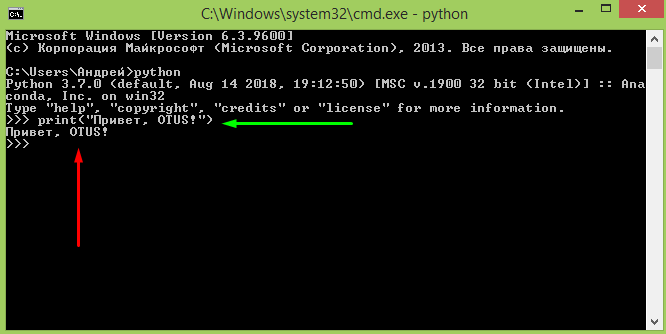
Теперь ты можешь ввести немного Python-кода. Попробуй:
Нажми <Enter> и посмотри, что произошло. После вывода результата Python вернёт тебя обратно в интерактивную оболочку, в которой мы можем ввести какую-нибудь другую команду:
Очень полезна команда help() , которая поможет тебе изучить досконально изучить Python, не выходя из интерпретатора. Нажми q , чтобы закрыть окно со справкой и вернуться в командную строку Python.
Чтобы выйти из интерактивной оболочки, нажми Ctrl-Z и затем Enter , если используешь Windows, и Ctrl-D , если используешь GNU/Linux или OS X. Этого же можно добиться вводом Python-команды exit() .
Запуск файлов с Python-кодом
Когда Python-кода становится слишком много, лучше записывать его в файлы. Это, например, позволит тебе редактировать отдельные части кода (исправлять ошибки) и тут же запускать их без необходимости перепечатывать текст. Просто сохрани код в файл, и передай его имя python‘у. Записанный в файл исходный код будет выполнен без запуска интерактивного интерпретатора.
Давай попробуем сделать это. С помощью своего любимого текстового редактора создай файл hello.py в текущей директории и запиши в него программу команду, выводящую фразу “Hello world”, из примера выше. На GNU/Linux или OS X также можно выполнить команду touch hello.py , чтобы создать пустой файл для последующего редактирования. Выполнить сохранённую в файле программу проще простого:
Для начала убедись, что ты находишься в командной строке (на конце строк должны находиться символы $ или > , а не >>> , как в интерактивной оболочке Python).
В Windows нужно два раза кликнуть на пиктограмму файла, чтобы запустить его.
Когда ты нажмешь <Enter> в консоли, наш файл выполнится и результат его работы будет выведен на экран. В этот момент интерпретатор Python выполнит все инструкции, находящиеся в скрипте и вернет управление командной строке, а не интерактивной оболчке Python.
Теперь всё готово, и мы можем приступить к черепашке!
Вместо ожидаемого “Hello world” ты получил какие-то странные ошибки “can’t open file” или “No such file or directory”? Скорее всего, что ты работаешь не в той директории где сохранен твой Pyhton-скрипт. С помощью командной строки легко сменить текущий активный каталог, используя команду cd, что означает “change directory” (сменить каталог). В Windows эта команда может выглядеть так:
В Linux или OS X:
С помощью этой команды мы перейдем в папку Python_Exercises, которая находиться в папке Desktop (конечно же, на твоем компьютере названия папок будут отличаться). Если ты не знаешь путь к каталогу, где ты сохранил свой файл, попробуй просто перетащить папку в окно консоли. А если ты не знаешь в какой папке ты сейчас находишься в консоли — воспользуйся командой pwd, которая означает “print working directory” (показать активную директорию).
Эксперементируя с черепашкой, не называй рабочий файл turtle.py — лучше выбрать более подходящие имена, такие как square.py или rectangle.py , иначе при обращении к turtle Python будет использовать твой файл вместо turtle из стандартной библиотеки.
- Edit on Github
- Report a problem
© Авторские права 2012–2014, OpenTechSchool and contributors.
Создано с помощью Sphinx 1.3.1.
1. Command line and environment
The CPython interpreter scans the command line and the environment for various settings.
CPython implementation detail: Other implementations’ command line schemes may differ. See Alternate Implementations for further resources.
1.1. Command line
When invoking Python, you may specify any of these options:
The most common use case is, of course, a simple invocation of a script:
1.1.1. Interface options
The interpreter interface resembles that of the UNIX shell, but provides some additional methods of invocation:
When called with standard input connected to a tty device, it prompts for commands and executes them until an EOF (an end-of-file character, you can produce that with Ctrl — D on UNIX or Ctrl — Z, Enter on Windows) is read.
When called with a file name argument or with a file as standard input, it reads and executes a script from that file.
When called with a directory name argument, it reads and executes an appropriately named script from that directory.
When called with -c command , it executes the Python statement(s) given as command. Here command may contain multiple statements separated by newlines. Leading whitespace is significant in Python statements!
When called with -m module-name , the given module is located on the Python module path and executed as a script.
In non-interactive mode, the entire input is parsed before it is executed.
An interface option terminates the list of options consumed by the interpreter, all consecutive arguments will end up in sys.argv – note that the first element, subscript zero ( sys.argv[0] ), is a string reflecting the program’s source.
Execute the Python code in command. command can be one or more statements separated by newlines, with significant leading whitespace as in normal module code.
If this option is given, the first element of sys.argv will be "-c" and the current directory will be added to the start of sys.path (allowing modules in that directory to be imported as top level modules).
Raises an auditing event cpython.run_command with argument command .
Search sys.path for the named module and execute its contents as the __main__ module.
Since the argument is a module name, you must not give a file extension ( .py ). The module name should be a valid absolute Python module name, but the implementation may not always enforce this (e.g. it may allow you to use a name that includes a hyphen).
Package names (including namespace packages) are also permitted. When a package name is supplied instead of a normal module, the interpreter will execute <pkg>.__main__ as the main module. This behaviour is deliberately similar to the handling of directories and zipfiles that are passed to the interpreter as the script argument.
This option cannot be used with built-in modules and extension modules written in C, since they do not have Python module files. However, it can still be used for precompiled modules, even if the original source file is not available.
If this option is given, the first element of sys.argv will be the full path to the module file (while the module file is being located, the first element will be set to "-m" ). As with the -c option, the current directory will be added to the start of sys.path .
-I option can be used to run the script in isolated mode where sys.path contains neither the current directory nor the user’s site-packages directory. All PYTHON* environment variables are ignored, too.
Many standard library modules contain code that is invoked on their execution as a script. An example is the timeit module:
Raises an auditing event cpython.run_module with argument module-name .
Equivalent functionality directly available to Python code
PEP 338 – Executing modules as scripts
Changed in version 3.1: Supply the package name to run a __main__ submodule.
Changed in version 3.4: namespace packages are also supported
Read commands from standard input ( sys.stdin ). If standard input is a terminal, -i is implied.
If this option is given, the first element of sys.argv will be "-" and the current directory will be added to the start of sys.path .
Raises an auditing event cpython.run_stdin with no arguments.
Execute the Python code contained in script, which must be a filesystem path (absolute or relative) referring to either a Python file, a directory containing a __main__.py file, or a zipfile containing a __main__.py file.
If this option is given, the first element of sys.argv will be the script name as given on the command line.
If the script name refers directly to a Python file, the directory containing that file is added to the start of sys.path , and the file is executed as the __main__ module.
If the script name refers to a directory or zipfile, the script name is added to the start of sys.path and the __main__.py file in that location is executed as the __main__ module.
-I option can be used to run the script in isolated mode where sys.path contains neither the script’s directory nor the user’s site-packages directory. All PYTHON* environment variables are ignored, too.
Raises an auditing event cpython.run_file with argument filename .
Equivalent functionality directly available to Python code
If no interface option is given, -i is implied, sys.argv[0] is an empty string ( "" ) and the current directory will be added to the start of sys.path . Also, tab-completion and history editing is automatically enabled, if available on your platform (see Readline configuration ).
Changed in version 3.4: Automatic enabling of tab-completion and history editing.
1.1.2. Generic options
Print a short description of all command line options and corresponding environment variables and exit.
Print a short description of Python-specific environment variables and exit.
New in version 3.11.
Print a description of implementation-specific -X options and exit.
New in version 3.11.
Print complete usage information and exit.
New in version 3.11.
Print the Python version number and exit. Example output could be:
When given twice, print more information about the build, like:
New in version 3.6: The -VV option.
1.1.3. Miscellaneous options
Issue a warning when comparing bytes or bytearray with str or bytes with int . Issue an error when the option is given twice ( -bb ).
Changed in version 3.5: Affects comparisons of bytes with int .
If given, Python won’t try to write .pyc files on the import of source modules. See also PYTHONDONTWRITEBYTECODE .
Control the validation behavior of hash-based .pyc files. See Cached bytecode invalidation . When set to default , checked and unchecked hash-based bytecode cache files are validated according to their default semantics. When set to always , all hash-based .pyc files, whether checked or unchecked, are validated against their corresponding source file. When set to never , hash-based .pyc files are not validated against their corresponding source files.
The semantics of timestamp-based .pyc files are unaffected by this option.
Turn on parser debugging output (for expert only, depending on compilation options). See also PYTHONDEBUG .
Ignore all PYTHON* environment variables, e.g. PYTHONPATH and PYTHONHOME , that might be set.
See also the -P and -I (isolated) options.
When a script is passed as first argument or the -c option is used, enter interactive mode after executing the script or the command, even when sys.stdin does not appear to be a terminal. The PYTHONSTARTUP file is not read.
This can be useful to inspect global variables or a stack trace when a script raises an exception. See also PYTHONINSPECT .
Run Python in isolated mode. This also implies -E , -P and -s options.
In isolated mode sys.path contains neither the script’s directory nor the user’s site-packages directory. All PYTHON* environment variables are ignored, too. Further restrictions may be imposed to prevent the user from injecting malicious code.
New in version 3.4.
Remove assert statements and any code conditional on the value of __debug__ . Augment the filename for compiled ( bytecode ) files by adding .opt-1 before the .pyc extension (see PEP 488). See also PYTHONOPTIMIZE .
Changed in version 3.5: Modify .pyc filenames according to PEP 488.
Do -O and also discard docstrings. Augment the filename for compiled ( bytecode ) files by adding .opt-2 before the .pyc extension (see PEP 488).
Changed in version 3.5: Modify .pyc filenames according to PEP 488.
Don’t prepend a potentially unsafe path to sys.path :
python -m module command line: Don’t prepend the current working directory.
python script.py command line: Don’t prepend the script’s directory. If it’s a symbolic link, resolve symbolic links.
python -c code and python (REPL) command lines: Don’t prepend an empty string, which means the current working directory.
See also the PYTHONSAFEPATH environment variable, and -E and -I (isolated) options.
New in version 3.11.
Don’t display the copyright and version messages even in interactive mode.
New in version 3.2.
Turn on hash randomization. This option only has an effect if the PYTHONHASHSEED environment variable is set to 0 , since hash randomization is enabled by default.
On previous versions of Python, this option turns on hash randomization, so that the __hash__() values of str and bytes objects are “salted” with an unpredictable random value. Although they remain constant within an individual Python process, they are not predictable between repeated invocations of Python.
Hash randomization is intended to provide protection against a denial-of-service caused by carefully chosen inputs that exploit the worst case performance of a dict construction, O(n 2 ) complexity. See http://www.ocert.org/advisories/ocert-2011-003.html for details.
PYTHONHASHSEED allows you to set a fixed value for the hash seed secret.
Changed in version 3.7: The option is no longer ignored.
New in version 3.2.3.
PEP 370 – Per user site-packages directory
Disable the import of the module site and the site-dependent manipulations of sys.path that it entails. Also disable these manipulations if site is explicitly imported later (call site.main() if you want them to be triggered).
Force the stdout and stderr streams to be unbuffered. This option has no effect on the stdin stream.
Changed in version 3.7: The text layer of the stdout and stderr streams now is unbuffered.
Print a message each time a module is initialized, showing the place (filename or built-in module) from which it is loaded. When given twice ( -vv ), print a message for each file that is checked for when searching for a module. Also provides information on module cleanup at exit.
Changed in version 3.10: The site module reports the site-specific paths and .pth files being processed.
Warning control. Python’s warning machinery by default prints warning messages to sys.stderr .
The simplest settings apply a particular action unconditionally to all warnings emitted by a process (even those that are otherwise ignored by default):
The action names can be abbreviated as desired and the interpreter will resolve them to the appropriate action name. For example, -Wi is the same as -Wignore .
The full form of argument is:
Empty fields match all values; trailing empty fields may be omitted. For example -W ignore::DeprecationWarning ignores all DeprecationWarning warnings.
The action field is as explained above but only applies to warnings that match the remaining fields.
The message field must match the whole warning message; this match is case-insensitive.
The category field matches the warning category (ex: DeprecationWarning ). This must be a class name; the match test whether the actual warning category of the message is a subclass of the specified warning category.
The module field matches the (fully qualified) module name; this match is case-sensitive.
The lineno field matches the line number, where zero matches all line numbers and is thus equivalent to an omitted line number.
Multiple -W options can be given; when a warning matches more than one option, the action for the last matching option is performed. Invalid -W options are ignored (though, a warning message is printed about invalid options when the first warning is issued).
Warnings can also be controlled using the PYTHONWARNINGS environment variable and from within a Python program using the warnings module. For example, the warnings.filterwarnings() function can be used to use a regular expression on the warning message.
Skip the first line of the source, allowing use of non-Unix forms of #!cmd . This is intended for a DOS specific hack only.
Reserved for various implementation-specific options. CPython currently defines the following possible values:
-X faulthandler to enable faulthandler ;
-X showrefcount to output the total reference count and number of used memory blocks when the program finishes or after each statement in the interactive interpreter. This only works on debug builds .
-X tracemalloc to start tracing Python memory allocations using the tracemalloc module. By default, only the most recent frame is stored in a traceback of a trace. Use -X tracemalloc=NFRAME to start tracing with a traceback limit of NFRAME frames. See the tracemalloc.start() for more information.
-X importtime to show how long each import takes. It shows module name, cumulative time (including nested imports) and self time (excluding nested imports). Note that its output may be broken in multi-threaded application. Typical usage is python3 -X importtime -c ‘import asyncio’ . See also PYTHONPROFILEIMPORTTIME .
-X dev : enable Python Development Mode , introducing additional runtime checks that are too expensive to be enabled by default.
-X utf8 enables the Python UTF-8 Mode . -X utf8=0 explicitly disables Python UTF-8 Mode (even when it would otherwise activate automatically).
-X pycache_prefix=PATH enables writing .pyc files to a parallel tree rooted at the given directory instead of to the code tree. See also PYTHONPYCACHEPREFIX .
-X warn_default_encoding issues a EncodingWarning when the locale-specific default encoding is used for opening files. See also PYTHONWARNDEFAULTENCODING .
-X no_debug_ranges disables the inclusion of the tables mapping extra location information (end line, start column offset and end column offset) to every instruction in code objects. This is useful when smaller code objects and pyc files are desired as well as suppressing the extra visual location indicators when the interpreter displays tracebacks. See also PYTHONNODEBUGRANGES .
-X frozen_modules determines whether or not frozen modules are ignored by the import machinery. A value of “on” means they get imported and “off” means they are ignored. The default is “on” if this is an installed Python (the normal case). If it’s under development (running from the source tree) then the default is “off”. Note that the “importlib_bootstrap” and “importlib_bootstrap_external” frozen modules are always used, even if this flag is set to “off”.
It also allows passing arbitrary values and retrieving them through the sys._xoptions dictionary.
Changed in version 3.2: The -X option was added.
New in version 3.3: The -X faulthandler option.
New in version 3.4: The -X showrefcount and -X tracemalloc options.
New in version 3.6: The -X showalloccount option.
New in version 3.7: The -X importtime , -X dev and -X utf8 options.
New in version 3.8: The -X pycache_prefix option. The -X dev option now logs close() exceptions in io.IOBase destructor.
Changed in version 3.9: Using -X dev option, check encoding and errors arguments on string encoding and decoding operations.
The -X showalloccount option has been removed.
New in version 3.10: The -X warn_default_encoding option.
Deprecated since version 3.9, removed in version 3.10: The -X oldparser option.
New in version 3.11: The -X no_debug_ranges option.
New in version 3.11: The -X frozen_modules option.
New in version 3.11: The -X int_max_str_digits option.
1.1.4. Options you shouldn’t use
Reserved for use by Jython.
1.2. Environment variables
These environment variables influence Python’s behavior, they are processed before the command-line switches other than -E or -I. It is customary that command-line switches override environmental variables where there is a conflict.
Change the location of the standard Python libraries. By default, the libraries are searched in prefix /lib/python version and exec_prefix /lib/python version , where prefix and exec_prefix are installation-dependent directories, both defaulting to /usr/local .
When PYTHONHOME is set to a single directory, its value replaces both prefix and exec_prefix . To specify different values for these, set PYTHONHOME to prefix : exec_prefix .
Augment the default search path for module files. The format is the same as the shell’s PATH : one or more directory pathnames separated by os.pathsep (e.g. colons on Unix or semicolons on Windows). Non-existent directories are silently ignored.
In addition to normal directories, individual PYTHONPATH entries may refer to zipfiles containing pure Python modules (in either source or compiled form). Extension modules cannot be imported from zipfiles.
The default search path is installation dependent, but generally begins with prefix /lib/python version (see PYTHONHOME above). It is always appended to PYTHONPATH .
An additional directory will be inserted in the search path in front of PYTHONPATH as described above under Interface options . The search path can be manipulated from within a Python program as the variable sys.path .
If this is set to a non-empty string, don’t prepend a potentially unsafe path to sys.path : see the -P option for details.
New in version 3.11.
If this is set to a non-empty string, it overrides the sys.platlibdir value.
New in version 3.9.
If this is the name of a readable file, the Python commands in that file are executed before the first prompt is displayed in interactive mode. The file is executed in the same namespace where interactive commands are executed so that objects defined or imported in it can be used without qualification in the interactive session. You can also change the prompts sys.ps1 and sys.ps2 and the hook sys.__interactivehook__ in this file.
Raises an auditing event cpython.run_startup with the filename as the argument when called on startup.
If this is set to a non-empty string it is equivalent to specifying the -O option. If set to an integer, it is equivalent to specifying -O multiple times.
If this is set, it names a callable using dotted-path notation. The module containing the callable will be imported and then the callable will be run by the default implementation of sys.breakpointhook() which itself is called by built-in breakpoint() . If not set, or set to the empty string, it is equivalent to the value “pdb.set_trace”. Setting this to the string “0” causes the default implementation of sys.breakpointhook() to do nothing but return immediately.
New in version 3.7.
If this is set to a non-empty string it is equivalent to specifying the -d option. If set to an integer, it is equivalent to specifying -d multiple times.
If this is set to a non-empty string it is equivalent to specifying the -i option.
This variable can also be modified by Python code using os.environ to force inspect mode on program termination.
If this is set to a non-empty string it is equivalent to specifying the -u option.
If this is set to a non-empty string it is equivalent to specifying the -v option. If set to an integer, it is equivalent to specifying -v multiple times.
If this is set, Python ignores case in import statements. This only works on Windows and macOS.
If this is set to a non-empty string, Python won’t try to write .pyc files on the import of source modules. This is equivalent to specifying the -B option.
If this is set, Python will write .pyc files in a mirror directory tree at this path, instead of in __pycache__ directories within the source tree. This is equivalent to specifying the -X pycache_prefix=PATH option.
New in version 3.8.
If this variable is not set or set to random , a random value is used to seed the hashes of str and bytes objects.
If PYTHONHASHSEED is set to an integer value, it is used as a fixed seed for generating the hash() of the types covered by the hash randomization.
Its purpose is to allow repeatable hashing, such as for selftests for the interpreter itself, or to allow a cluster of python processes to share hash values.
The integer must be a decimal number in the range [0,4294967295]. Specifying the value 0 will disable hash randomization.
New in version 3.2.3.
If this variable is set to an integer, it is used to configure the interpreter’s global integer string conversion length limitation .
New in version 3.11.
If this is set before running the interpreter, it overrides the encoding used for stdin/stdout/stderr, in the syntax encodingname:errorhandler . Both the encodingname and the :errorhandler parts are optional and have the same meaning as in str.encode() .
For stderr, the :errorhandler part is ignored; the handler will always be ‘backslashreplace’ .
Changed in version 3.4: The encodingname part is now optional.
Changed in version 3.6: On Windows, the encoding specified by this variable is ignored for interactive console buffers unless PYTHONLEGACYWINDOWSSTDIO is also specified. Files and pipes redirected through the standard streams are not affected.
If this is set, Python won’t add the user site-packages directory to sys.path .
PEP 370 – Per user site-packages directory
Defines the user base directory , which is used to compute the path of the user site-packages directory and Distutils installation paths for python setup.py install —user .
PEP 370 – Per user site-packages directory
If this environment variable is set, sys.argv[0] will be set to its value instead of the value got through the C runtime. Only works on macOS.
This is equivalent to the -W option. If set to a comma separated string, it is equivalent to specifying -W multiple times, with filters later in the list taking precedence over those earlier in the list.
The simplest settings apply a particular action unconditionally to all warnings emitted by a process (even those that are otherwise ignored by default):
If this environment variable is set to a non-empty string, faulthandler.enable() is called at startup: install a handler for SIGSEGV , SIGFPE , SIGABRT , SIGBUS and SIGILL signals to dump the Python traceback. This is equivalent to -X faulthandler option.
New in version 3.3.
If this environment variable is set to a non-empty string, start tracing Python memory allocations using the tracemalloc module. The value of the variable is the maximum number of frames stored in a traceback of a trace. For example, PYTHONTRACEMALLOC=1 stores only the most recent frame. See the tracemalloc.start() for more information.
New in version 3.4.
If this environment variable is set to a non-empty string, Python will show how long each import takes. This is exactly equivalent to setting -X importtime on the command line.
New in version 3.7.
If this environment variable is set to a non-empty string, enable the debug mode of the asyncio module.
New in version 3.4.
Set the Python memory allocators and/or install debug hooks.
Set the family of memory allocators used by Python:
malloc : use the malloc() function of the C library for all domains ( PYMEM_DOMAIN_RAW , PYMEM_DOMAIN_MEM , PYMEM_DOMAIN_OBJ ).
pymalloc : use the pymalloc allocator for PYMEM_DOMAIN_MEM and PYMEM_DOMAIN_OBJ domains and use the malloc() function for the PYMEM_DOMAIN_RAW domain.
debug : install debug hooks on top of the default memory allocators .
malloc_debug : same as malloc but also install debug hooks.
pymalloc_debug : same as pymalloc but also install debug hooks.
Changed in version 3.7: Added the "default" allocator.
New in version 3.6.
If set to a non-empty string, Python will print statistics of the pymalloc memory allocator every time a new pymalloc object arena is created, and on shutdown.
This variable is ignored if the PYTHONMALLOC environment variable is used to force the malloc() allocator of the C library, or if Python is configured without pymalloc support.
Changed in version 3.6: This variable can now also be used on Python compiled in release mode. It now has no effect if set to an empty string.
If set to a non-empty string, the default filesystem encoding and error handler mode will revert to their pre-3.6 values of ‘mbcs’ and ‘replace’, respectively. Otherwise, the new defaults ‘utf-8’ and ‘surrogatepass’ are used.
This may also be enabled at runtime with sys._enablelegacywindowsfsencoding() .
New in version 3.6: See PEP 529 for more details.
If set to a non-empty string, does not use the new console reader and writer. This means that Unicode characters will be encoded according to the active console code page, rather than using utf-8.
This variable is ignored if the standard streams are redirected (to files or pipes) rather than referring to console buffers.
New in version 3.6.
If set to the value 0 , causes the main Python command line application to skip coercing the legacy ASCII-based C and POSIX locales to a more capable UTF-8 based alternative.
If this variable is not set (or is set to a value other than 0 ), the LC_ALL locale override environment variable is also not set, and the current locale reported for the LC_CTYPE category is either the default C locale, or else the explicitly ASCII-based POSIX locale, then the Python CLI will attempt to configure the following locales for the LC_CTYPE category in the order listed before loading the interpreter runtime:
If setting one of these locale categories succeeds, then the LC_CTYPE environment variable will also be set accordingly in the current process environment before the Python runtime is initialized. This ensures that in addition to being seen by both the interpreter itself and other locale-aware components running in the same process (such as the GNU readline library), the updated setting is also seen in subprocesses (regardless of whether or not those processes are running a Python interpreter), as well as in operations that query the environment rather than the current C locale (such as Python’s own locale.getdefaultlocale() ).
Configuring one of these locales (either explicitly or via the above implicit locale coercion) automatically enables the surrogateescape error handler for sys.stdin and sys.stdout ( sys.stderr continues to use backslashreplace as it does in any other locale). This stream handling behavior can be overridden using PYTHONIOENCODING as usual.
For debugging purposes, setting PYTHONCOERCECLOCALE=warn will cause Python to emit warning messages on stderr if either the locale coercion activates, or else if a locale that would have triggered coercion is still active when the Python runtime is initialized.
Also note that even when locale coercion is disabled, or when it fails to find a suitable target locale, PYTHONUTF8 will still activate by default in legacy ASCII-based locales. Both features must be disabled in order to force the interpreter to use ASCII instead of UTF-8 for system interfaces.
New in version 3.7: See PEP 538 for more details.
If this environment variable is set to a non-empty string, enable Python Development Mode , introducing additional runtime checks that are too expensive to be enabled by default.
New in version 3.7.
If set to 1 , enable the Python UTF-8 Mode .
If set to 0 , disable the Python UTF-8 Mode .
Setting any other non-empty string causes an error during interpreter initialisation.
New in version 3.7.
If this environment variable is set to a non-empty string, issue a EncodingWarning when the locale-specific default encoding is used.
New in version 3.10.
If this variable is set, it disables the inclusion of the tables mapping extra location information (end line, start column offset and end column offset) to every instruction in code objects. This is useful when smaller code objects and pyc files are desired as well as suppressing the extra visual location indicators when the interpreter displays tracebacks.
New in version 3.11.
1.2.1. Debug-mode variables
If set, Python will print threading debug info into stdout.
Deprecated since version 3.10, will be removed in version 3.12.
If set, Python will dump objects and reference counts still alive after shutting down the interpreter.
Need Python configured with the —with-trace-refs build option.
If set, Python will dump objects and reference counts still alive after shutting down the interpreter into a file called FILENAME.
Как запустить код на Python?
В одной из предыдущих статей рассказывалось, как установить Python на операционные системы Windows и Linux. Этот материал посвящён запуску и первоначальной работе с «Пайтоном». Будут рассмотрены два основных способа запустить его: интерпретация строк исходного кода, вводимого с помощью клавиатуры (интерактивный режим), а также исполнение файлов с кодом (пакетный режим). Отдельный разговор пойдёт про особенности запуска программы и кода Python в Windows и Linux. Материал предназначен для начинающих.
Язык программирования «Пайтон» является интерпретируемым. В этом контексте можно сказать, что кроме самой программы, пользователю ещё нужен и специальный инструмент, обеспечивающий её запуск.
Вернувшись на несколько шагов назад, следует напомнить, что языки программирования бывают: — компилируемыми. С высокоуровневого языка код переводится в машинный с учётом конкретной платформы. Далее распространение происходит в качестве бинарного файла (чаще всего). Запускаться такая программа может без дополнительных программных средств (необходимые библиотеки следует оставить за рамками данного обсуждения). Наиболее распространёнными компилируемыми языками программирования являются C++ и C; — интерпретируемыми. В этом случае выполнение программы осуществляется интерпретатором с последующим распространением в виде исходного кода. Самый популярный язык из этой категории — общеизвестный «Питон» или «Пайтон» (Python).
Запуск кода Python: интерактивный режим в CMD
Python способен функционировать в 2-х режимах: — пакетный; — интерактивный.
Пользователям Windows можно проверить интерактивный режим работы с кодом с помощью командной строки (CMD, command line interpreter — интерпретатор командной строки). Открыв командную строку, следует набрать следующую команду:
Итогом станет запуск «Пайтона» в интерактивном режиме. Далее программа станет ждать ввод последующих команд (commands) от пользователя. Вот, как это может выглядеть:
Программа готова к запуску кода. Прекрасный пример — использование классического приветствия, в которое можно внести минимальные изменения: print(«Привет, OTUS!») . В таком коде внутри скобок пользователь может написать и другие фразы.
Зелёная стрелка — это команда, красная — результат. По коду видно, что программа отработала без затруднений.
Но возможности «Пайтона» выходят далеко за пределы стандартного «хэллоуворлда». Его без проблем можно использовать и в качестве калькулятора, выполняя вычисления.
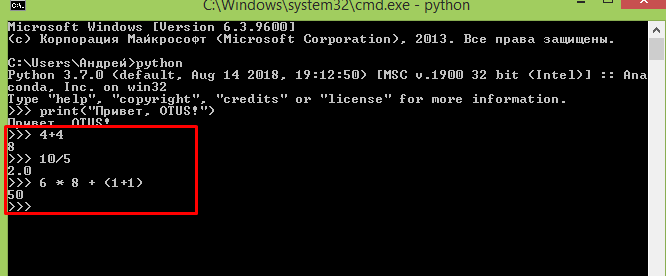
А при подключении соответствующих библиотек, эти вычисления могут быть весьма сложны и мало уступят специализированным пакетам Matlab.
Далее следует выйти из интерактивного режима, набрав простую команду exit() .
Запуск Python: интерактивный режим в IDLE
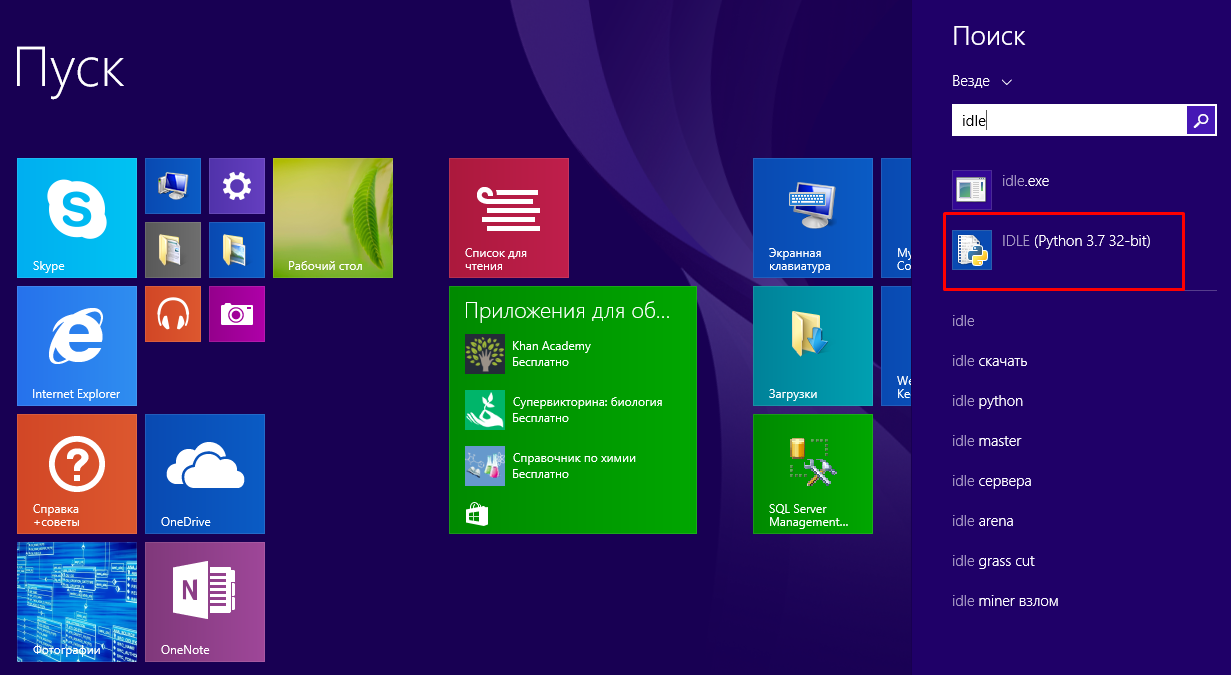
При установке языка программирования Python в комплекте с ним идёт IDLE. Это интегрированная среда разработки, подобная по своей сути интерпретатору, который запущен интерактивно. Отличие — расширенный набор возможностей. Среди таких возможностей: — отладка; — просмотр объектов; — подсветка синтаксиса и прочие.
Чтобы запустить IDLE в Windows, следует перейти в меню «Пуск», где можно без проблем найти нужный инструмент:
После запуска пользователь увидит следующую среду:
В ней можно тоже полноценно работать с кодом.
Если же разговор идёт про Linux, то в этой операционной системе IDLE-оболочка по дефолту отсутствует, поэтому придётся её инсталлировать. Для Python 3.4 это будет выглядеть так:

Итогом станет загрузка IDLE на персональный компьютер пользователя. Запустить оболочку тоже несложно:

Выглядеть среда будет следующим образом:
Как запустить приложение Python в пакетном режиме?
Бывает, у пользователя уже есть Python-файлы с расширением .py. Их тоже можно запустить через командную строку. Для этого вызывается интерпретатор Python, а в качестве аргумента передаётся соответствующий файл.
Давайте продемонстрируем это на практике. Откройте блокнот и поместите туда уже знакомые строки кода:
Сохраните файл под именем example.py. Пусть он будет сохранен на диске C (можно выбрать и другую директорию на усмотрение пользователя).
Теперь откройте командную строку, перейдите в соответствующую директорию и можете запускать файл:
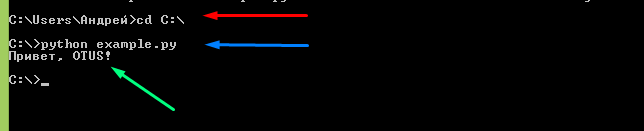
Красная стрелка — переход в нужную директорию, синяя — команда для запуска «Питона» в пакетном режиме, зелёная — итоговый результат. Всё просто.
Делаем выводы:
- Чтобы запустить «Пайтон» в интерактивном режиме, надо набрать в командной строке (cmd) имя интерпретатора — python (иногда это python3) либо запустить интегрированную среду разработки IDLE.
- Чтобы выполнить запуск в пакетном режиме, надо ввести в командной строке имя интерпретатора, плюс имя файла. В нашем случае это python.example.py .
Для закрепления материала настоятельно рекомендуется повторить всё вышеописанное самостоятельно.
Осваиваем Python. Унция ноль. Введение.
Присоединяюсь к MaxElc, DarwinTenk и Devgru 🙂 Начинаю цикл статей посвященных Python. Сам я имею некоторый опыт обращения с PHP и Java. Но каждый раз, при относительном освоении какого-то инструмента — оставалось определённое неудовлетворение им, связанное с чем-то конкретным, и поиски продолжались. На сегодняшний день наиболее близко к идеалу в моих глазах стоит Python. Идеал недостижим — это понятно, посему и у Python есть недостатки. Прежде всего — это скорость выполнения, однако, эта проблема решаема несколькими путями и об этом мы обязательно поговорим чуть позднее.
Сам я начал осваивать Python буквально недавно. Начиная этот цикл статей — я преследую несколько целей. Во-первых, это дополнительная само мотивация + интерактивность, во-вторых, опыт. В-третьих, блуждая по просторам рунета — вижу, что Python куда менее популярен, чем в мире. Ситуацию надо исправлять 🙂
В соответствии с идеологией Python, а именно с тем, что одни из главных его козырей — это быстрота в освоении и скорость разработки, мы достаточно быстро, практически тезисно пронесёмся по основам синтаксиса и построения программ и перейдём к основной цели данного цикла — освоение django.
Итак, мы начинаем.
Архитектура
-
— стандартная реализация Python — альтернативная реализация Python. Основная цель которой — бесшовная интеграция с платформой Java. Состоит из java-классов, которые транслируют программный код на языке Python в java байт-код, который затем запускается на виртуальной машине Java (JVM). — реализация Python предназначенная для интеграции с .NET платформой.
- Shedskin C++ — нетрадиционный подход к выполнению программ на языке Python. Цель — оптимизация скорости выполнения. Преобразует исходный код Python в исходный код C++, который затем может быть скомпилирован в машинный код. — реализация PVM на самом языке Python + JIT компилятор.
Варианты запуска программ
На хабре уже была написана хорошая инструкция для новичков, как быстро организовать рабочую среду для разработки на Python и django. Если вы уже проделали описанную в ней последовательность действий, то это означает, что на вашей машине уже установлен интерпретатор python. В большинстве Linux дистрибутивов он установлен по-умолчанию.
Вариант 1. Интерактивный режим
Для попадания в интерактивный режим необходимо ввести в командной строке команду python.
$ python
Python 2.5.2 (r252:60911, Oct 5 2008, 19:24:49)
[GCC 4.3.2] on linux2
Type «help», «copyright», «credits» or «license» for more information.
>>> print ‘Hello World!’
Hello World!
В интерактивном режиме инструкции выполняются построчно. Для того, чтобы выполнить блок кода, можно, к примеру, набрать в пустом текстовом файле следующие две команды:
str1 = ‘Hello World!’
str2 = » It’s my second script»
print ‘import has been done successfully’
И сохранить их в файле hi.py. Далее в командной строчке используя команду cd перейти в тот каталог, в котором вы сохранили файл и набрать команду python.
Для импорта инструкций можно использовать инструкцию import <имя файла без расширения .py>. Файлы в языке Python являются модулями, которые внутри себя содержат пространство имён. Импортируя модуль мы получаем доступ к пространству имён верхнего уровня.
$ python
Python 2.5.2 (r252:60911, Oct 5 2008, 19:24:49)
[GCC 4.3.2] on linux2
Type «help», «copyright», «credits» or «license» for more information.
>>> import hi
import has been done successfully
>>> print hi.str1+hi.str2
Hello World! It’s my second script
Используя в инструкции конструкцию вида: hi.str1, мы обращаемся к имени str1, определённом внутри модуля hi.
Строки, числа в языке Python — это тоже объекты. Здесь прослеживается наследование парадигмы берущей начало от языка SmallTalk «Всё — объекты». Однако, если мне не изменяет память там речь шла и о том, что операторы — тоже были объектами. В python оператор «+» — это перегруженный оператор для строк выполняющий конкатенацию.
Для импортирования конкретных имён можно использовать инструкцию from:
>>> from hi import str1
>>> print str1
Hello World!
После чего мы сможем обращаться к импортируемому имени непосредственно.
После внесения каких-то изменений в файл, для того чтобы изменения вступили в силу — необходимо перезагрузить модуль с помощью функции reload().
>>> reload(hi)
<module ‘hi’ from ‘hi.pyc’>
Для получения списка всех доступных имён модуля можно использовать функцию dir():
>>> dir(hi)
[‘__builtins__’, ‘__doc__’, ‘__file__’, ‘__name__’, ‘str1’, ‘str2’]
Вариант 2. Запуск из командной строки.
Запустить сценарий из командной строки можно следующим образом:
Так же сценарию можно передавать параметры командной строки. Доступ к ним из сценария можно получить, импортировав встроенный модуль sys. Изменим файл hi.py следующим образом:
import sys
print sys.argv
После чего вызовем его из команжной строки, передав несколько произвольных параметров:
$ python hi.py 1 2 3 ‘param-pam-pam’
[‘hi.py’, ‘1’, ‘2’, ‘3’, ‘param-pam-pam’]
В результате получим список, содержащий в себе переданные параметры. Список — это тоже конструкция языка Python. О списках речь пойдёт в следующих статьях.
Потоки ввода и вывода сценария можно перенаправлять с помощью средств командной оболочки, например так:
$ python hi.py 1 2 3 ‘param-pam-pam’ > text.txt
Вариант 3. IDE.
Интерактивный режим удобен в некоторых случаях, например, когда нужно поэкспериментировать с какой-то определённой инструкцией. Однако, постоянно работать в нём неудобно т.к. Нужно постоянно вспоминать про перезагрузку модулей.
Поэтому гораздо удобнее воспользоваться описанной выше процедурой настройки IDE и запускать программы из неё. Так же при разработке программ на Python вполне приемлем вариант написания кода в блокноте с подсветкой синтаксиса и запуском программы из консоли.
На сегодня всё. В следующих статьях мы перейдём непосредственно к изучению конструкций языка. Не сомневаюсь, отклики будут и я буду на них ориентироваться.
Спасибо за внимание!