Docker Volumes: How to Create & Get Started
Docker volumes are widely used and useful tools for ensuring data persistence while working in containers. They are a better alternative than compiling additional writable layers, which increase Docker image size.
In this tutorial, learn how to use Docker Volumes with practical examples.
What are Docker Volumes?
Docker volumes are file systems mounted on Docker containers to preserve data generated by the running container.
The volumes are stored on the host, independent of the container life cycle. This allows users to back up data and share file systems between containers easily.
Getting Started With Docker Volumes
There are different ways to mount a Docker volume while launching a container. Users can decide between the -v and the —mount flags, which are added to the docker run command.
This article shows examples of both flags in use.
How to Create a Docker Volume
To create a Docker Volume use the command:
Docker automatically creates a directory for the volume on the host under the /var/lib/docker/volume/ path. You can now mount this volume on a container, ensuring data persistence and data sharing among multiple containers.
For example, to create a volume under the name data, you would run the command:
List Docker Volumes
To verify you have successfully created a Docker volume, prompt Docker to list all available volumes with:
The output displays a list of volumes, specifying their location (DRIVER) and their VOLUME NAME. In the image below, you can see the volume data created in the previous section.

Inspecting Docker Volumes
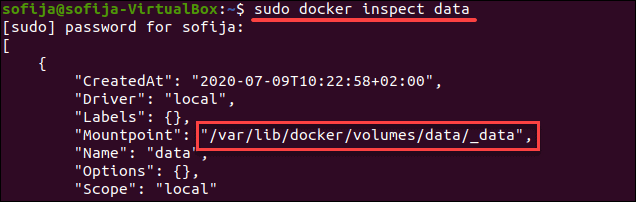
To see more information about a Docker volume, use the inspect command:
It lists details of a volume, including its location on the host file (Mountpoint). Everything stored within the data volume can also be found in the directory listed under the mountpoint path.
Mounting a Data Volume
To mount a data volume to a container add the —mount flag to the docker run command. It adds the volume to the specified container, where it stores the data produced inside the virtual environment.
To run a container and mount a data volume to it, follow the basic syntax:
Replace [path_in_container] with the path where you want to place the data volume in the container. Everything stored in that directory automatically gets saved on the data volume on the host as well.
For example, to launch an Ubuntu container and mount the data volume to it, run:
The command instructs Docker to run a container in interactive mode ( -it ) from the Ubuntu image, under the name example1 , while mounting the volume data in the /data directory inside the container.
Then, check to verify the volume was successfully mounted by listing the content of the container:
Find the Docker volume under the name defined while launching the container. In this example, it is data.

Copying Files Between Containers From a Shared Volume
Let’s see how Docker volumes allow you to share files between containers.
To do so, we use the volume and container created in the previous section. This included running the commands:
- docker volume create data
- docker run -it —name=example1 —mount source=data,destination=/data ubuntu
1. Once you have switched to the container command prompt, move to the data volume directory:
2. Create an empty sample file using the touch command:
3. Now, exit the container:
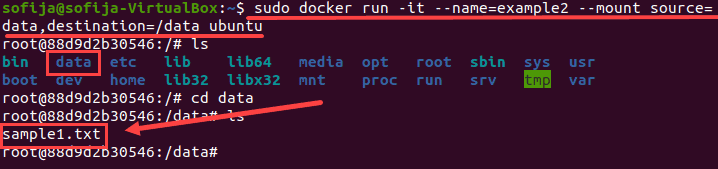
4. Then, launch a new container example2 with the same data volume:
5. List the content of the container. You should find the data directory, as in example1:
6. Move to the data directory and list the content of it:
The output should list the sample1.txt file you created in the previous container (example1).
Note: You might be interested in finding out how Kubernetes persistent volumes work.
Mounting a Host Directory as a Data volume
You can also mount an existing directory from the host machine to a container. This type of volume is called Host Volumes.
You can mount host volumes by using the -v flag and specifying the name of the host directory.
Everything within the host directory is then available in the container. What’s more, all the data generated inside the container and placed in the data volume is safely stored on the host directory.
The basic syntax for mounting a host directory is:
The "$(pwd)" attribute instructs Docker to mount the directory the user is currently in.
The following example outlines how this is done.
1. First, create a sample directory on the host under the name tmp and move into it:
2. Once inside the directory, create a test file to see whether it will be available from the container:
2. Then, use the docker run command to launch an Ubuntu container with the host directory attached to it:
This launches the container in interactive mode and mounts a volume under the name data1.
3. List the content of the container and verify there is a data1 directory:

4. Open the mounted directory and list the content. The output should display the file you created on the host:

Volume Permission and Ownership
Volume permissions van be changed by configuring the ownership within the Dockerfile.
Use the RUN instruction and the chown command to set the Docker volume permission. Make sure this instruction precedes the line defining the VOLUME .
Alternatively, you can change the ownership of the directory used as the host volume.
For instructions on how to use the chown command, refer to Linux File Permission Tutorial: How To Check And Change Permissions.
How to Delete Docker Volumes
To delete a Docker volume, you need to specify its name.
The basic syntax for removing a Docker volume in the command line is:
Docker removes volumes only if they are not in use at the moment. If there is a container with the specified volume, it responds with an error. To proceed, stop and remove the container and then rerun the docker volume rm command.
Note: If you don’t know the name of the volume, use the docker volume ls command.
How to Delete All Volumes at Once
To delete all unused Docker volumes with a single command:
The output warns you it will remove all local volumes not used by at least one container. Press y to continue.
After reading this article, you should have a better understanding of how Docker volumes work, as well as how to mount volumes to containers.
Docker Mount Volume – How To Mount a Local Directory

Sebastian Sigl
Containers make software engineering easier and more efficient, and Docker containers are popular and easy to use.
Containers are essential for local development. They let you test-run your applications in local environments and start building out the required infrastructure.
Docker containers are immutable by nature. This means that restarting a container erases all your stored data in the container. But Docker provides volumes and bind mounts, which are two mechanisms for persisting data in your Docker container.
This tutorial will teach you how to bind local directories to your Docker container and use docker-managed volumes alternatively. Knowing both enables you to use Docker containers for many more use cases that can boost your productivity.
How to Mount Local Directories using docker run -v
Using the parameter -v allows you to bind a local directory.
-v or —volume allows you to mount local directories and files to your container. For example, you can start a MySQL database and mount the data directory to store the actual data in your mounted directory.
Binding a directory is a 2-way sync. Every file you change on the host is changed in the container, and every file that is changed in the container is changed on the host. So if you stop and start the database, you can mount the same directory, and your configuration and stored data will be available.
The advantages of this method are that it’s straightforward to use and easy to access. You should use binding local directories for files you want to change or observe on the host, like configuration files and log files.
How to Use Docker Volumes to Persist Changes
Instead of binding your local directory, you can use Docker volumes. A Docker volume is a directory somewhere in your Docker storage directory and can be mounted to one or many containers. They are fully managed and do not depend on certain operating system specifics.
Let’s create a Docker volume and mount it to persist MySQL data:
Before removing the Docker volume, you can open your Docker GUI and inspect the volume by clicking on the data tab.

You see the files, but they’re isolated in a Docker volume. It’s recommended to use them for persisting files that you don’t need to observe or change from your host system. This method is known to have better performance than local directory bindings.
Summary
Docker containers get more powerful when you know how to persist your data and not to lose them when stopping a container.
You bind local directories and volumes to a container by providing the Docker run -v parameter. You need to give the absolute local path or a volume name and map it to a directory within the container -v <source>:<target> .
I hope you enjoyed the article.
If you liked it and felt the need to give me a round of applause or just want to get in touch, follow me on Twitter.
I work at eBay Kleinanzeigen, one of the world’s biggest classified companies. By the way, we are hiring!
Docker Volumes — Persisting Data using Data Volumes in Docker

Volumes store the data generated by Docker. Using Docker Volume, we can achieve data persistence within Docker Containers. We can share directories between container and container versions using Docker Volumes. Also, we can upgrade containers, restart machines or share data without losing it. So let us discuss more of the Data persistence and Docker Volumes in this article. We will cover the following topics as part of this tutorial.
- How to manage data in Docker?
- Volume vs. Bind Mount in Docker
- How to use Mounts in Docker?
- How to use data volumes?
- Initial set-up — docker plugin install command
- Create a data volume using a volume driver — docker volume create command
- Start a container that creates a volume using a volume driver
- Backup a container
- Restore container from backup
- Remove docker volume
How to manage data in Docker?
We know that Docker has a layered storage implementation that aids in portability, efficiency, and faster performance. This storage implementation is also optimal for retrieving, storing, and transferring images across various environments. When we delete a Docker container, all the data associated or written to the container is deleted with it. So there is a need to persist the container data somehow even when the container gets deleted so that we need not worry about data and persist this data after the container ceases to exist.
Hence there is a need to persist data in containers. One of the best-recommended practices is the isolation of data from the container to retain the benefits of containerization. Here we keep data management distinctly separate from container lifecycle. We can implement multiple strategies to persist data or add persistence to containers that we will discuss next. These strategies are as shown in the diagram below.
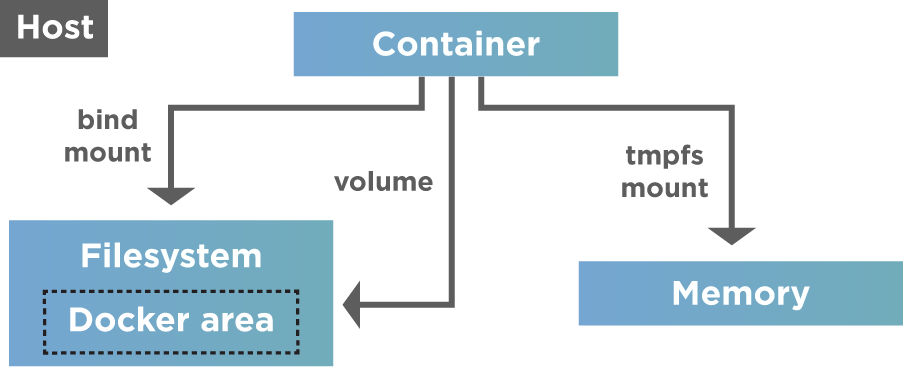
As shown above, Docker provides two options for data persistence so that files are persisted even after the container stops.
- Volumes
- Mounts
Let’s understand the difference between these two:
Volume vs. Bind Mount in Docker
- Volumes: Volumes are directories or files that are outside the Union file system(the combination of read-only layers with a read-write layer on top of the container). Volumes exist/ store as normal files and directories on the host filesystem. Hence to persist and share data between containers, Docker uses Volumes. Volumes are the best option to persist data in Docker containers. Docker manages volumes and is stored in a part of the host filesystem (/var/lib/docker/volumes/ on Linux).
Note: Processes not part of Docker (non-docker processes) should not modify this portion of the filesystem.
- Mounts: In Docker, we can use the following mounts.
- Bind mounts: A file or folder stored anywhere on the container host filesystem and mounted into a running container is called a bind mount. They can be anything from essential system files to directories. Interestingly, Docker container or Non-Docker processes present on the Docker host can modify these mounts at any time.
- tmpfs mounts are used mainly by Docker running on Linux systems. Their storage is in the host system’s memory only. Additionally, we never write the tmpfs mounts to the host system’s filesystem. Contrary to volumes and bind mounts, the "tmpfs" mount is temporary and only persisted in the host memory. When the container stops, the "tmpfs" mount removes, and files written there won’t persist.
Note: If the Docker is running on Windows, we can use the named pipe.
The Docker volumes are widely used and useful tools for data persistence when working with Docker containers. Compilation of additional writable layers adds to the image size, and hence volumes are the better alternative. Secondly, the volumes are independent of the container life cycle and stored on the host. Because of this, we can back up data and share file systems between one or more containers easily.
For now, just keep in mind these methods, as the details will be shared later in the post.
How to use Mounts in Docker?
When we use bind mounts, we can control the exact mount point, a directory (typically an empty one) in the currently accessible filesystem on which additional filesystem mounts (i.e., logically attached) we want the host system. Apart from using bind mounts to persist data, it often provides additional data to containers. Using bind mounts to mount source code into the container lets us see code changes right away and respond.
The question now arises as to which mount should we use and when?
Although we should generally use volumes as far as possible, bind mounts are appropriate in the following use cases:
- When we need to share configuration files to containers from the host machine. For instance, to provide DNS resolution to containers, Docker mounts "/etc/resolv.conf" into each container from the host.
- When we want to share the build artifacts or source code between the development environment and container on the host machine. For example, we may mount, say, the Maven ‘target/’ directory into a container. Thus each time we build the Maven project on the host, the container will access the updated artifacts.
- We can also use bind mounts when the directory or file structure of the Docker host is consistent with the bind mounts required by containers.
So discussed above are some of the cases or situations where we find bind mounts useful.
On the other hand, we can use tmpfs mounts when we do not want to persist data on the host machine and the container. It is mainly for security reasons and protects the container performance, especially when the application has to write large non-persistent data volumes.
As evident from the above discussion, we use tmpfs mounts seldomly. Nonetheless, we should keep in mind a few tips when working with bind mounts and volumes.
- When we mount an empty volume into a directory inside the container, the files and/or directories inside the container propagate into the volume.
- When we start the container and specify a volume that does not exist, Docker creates an empty volume.
- Similarly, when we mount non-empty volumes or bind mounts into a directory inside the container which already has some files and/or directories, then these files and/or directories are obscured by the mount and are not accessible while the volume or bind mount is mounted.
In the remainder of this article, we will discuss volumes in detail.
How to use data volumes?
Volumes are popular and preferred mechanisms for data persistence in Docker containers. As against bind mounts dependent on the OS and directory structure of the host machine, volumes are managed entirely by the Docker. Some of the advantages of volumes over bind mounts are as follows:
- We manage volumes using Docker API commands.
- Volumes are supported both by Linux and Windows.
- It is easier to back up or migrate volumes as compared to bind mounts.
- We can quickly and safely share volumes among multiple containers.
- Using volume drivers, we can also store volumes on remote hosts or cloud providers. We can also encrypt the contents of volumes or add any other functionality.
- The container can pre-populate the new volumes.
- Volumes on Docker Desktop perform more efficiently than bind mounts from Windows or Mac hosts.
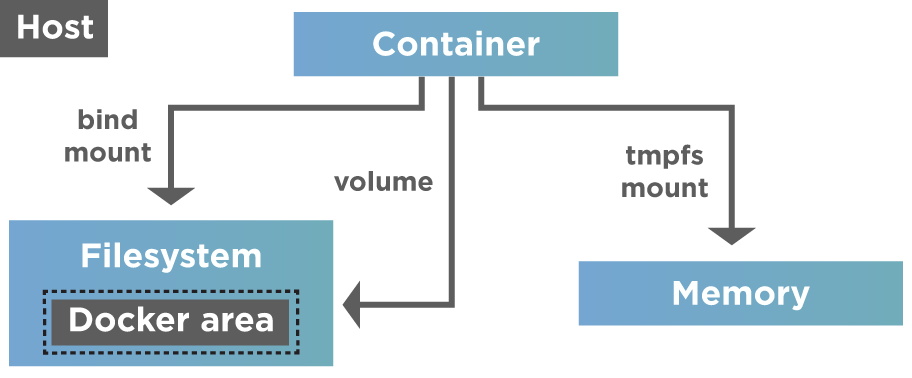
Volumes do not increase the size of the containers that are using them, and also, contents of the volume exist outside the lifecycle of that container. Hence volumes are a popular choice for persisting data. The following diagram shows volumes and mounts in action.
So if the container has to store non-persistent data that is temporary, we should ideally consider using tmpfs mount. For other things like storing data permanently or writing it into the container’s writable layer, we go for volumes or bind mounts.
The -v or -mount flag?
As far as volumes are concerned, they use private bind propagation, and we cannot configure bind propagation for volumes.
As to the options —mount or —v, —mount is more verbose and explicit. The main difference between —v and —mount is that the —v syntax combines all options in one field, whereas the —mount syntax separates them.
For specifying volume driver options, we should use —mount.
- -v or —volume: This option consists of three fields separated by a colon (:). We must ensure that the fields are in the correct order. Field descriptions are as below.
- For anonymous volumes, the first field omits. In the case of named volumes, the first field contains the name of the volume. The name is unique for a given host machine.
- The second field contains the path of the location of the file or directory mounted in the container.
- The third field is optional. It contains a comma-separated list of options, such as ro.
- —mount: This option contains multiple key-value pairs, separated by commas (,) with each consisting of (<key>=<value>) tuple. Note that the syntax for ‘—mount‘ is more verbose than ‘—v‘ or ‘—volume‘.
- The type (type) of the mount: This can be bind, volume, or tmpfs.
- The source of the mount(source/src): For named volumes, this field contains the volume’s name. We omit this field for anonymous volumes.
- The destination(destination/dst/target): This field has the value of the path where the directory or file is mounted.
- The readonly option: When present, this field makes the bind mount to mount as read-only.
- The volume-opt option: This field consists of key-value pairs with option name and value. It can be specified more than once.
Now let us tabularise the main differences between —v and —mount options.
Property Named Volumes Bind Mounts Host Location Chosen by Docker User-controlled Mount Example (using — v) my-volume:/usr/local/data /path/to/data:/usr/local/data Prepopulate new volume with container contents Yes No Volume Drivers support Yes No Note: Contrary to bind mounts, all the options for volumes are present for —mount as well -v flags. When we use volumes with services, only —mount is supported.
In the next section, let us go through Docker commands related to volumes.
Create and manage Docker data volume
Volumes can be created and managed outside the scope of any container. To create a docker volume, use the ‘docker volume create‘ command on the console. The command to is given below.
We can list the existing volumes using the following command.
Given a volume, we can retrieve its details by using the "docker volume inspect command".
The following screenshot shows the working of the above commands.
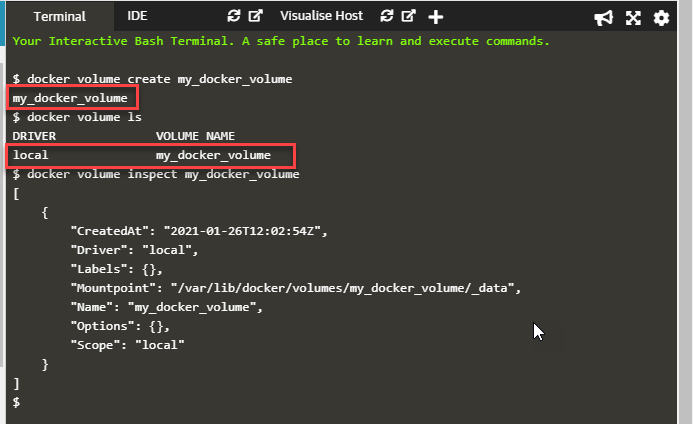
As shown in the above screenshot, we have created a new volume, "my_docker_volume" with the docker volume create command:
The next command, "docker volume ls", lists the volume just created. Next, we specify the command:
This command gives the details of the volume, as shown in the above screenshot.
Similarly, we can use the following command to remove the volume.
Hence to remove the volume created above, we can specify the command,
The result of the command is as shown below.
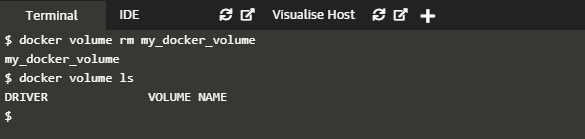
To verify that we indeed removed the volume, we can give the command "docker volume ls".
How to use data volume with docker-compose?
We can also create a volume with Docker compose service or also specify existing volumes. For example, the following screenshot shows a ‘docker-compose‘ file that creates a docker-compose service with a volume.
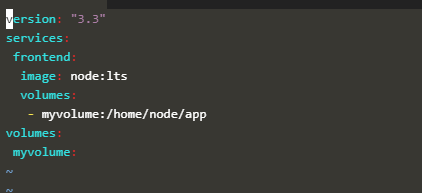
The command is as follows:
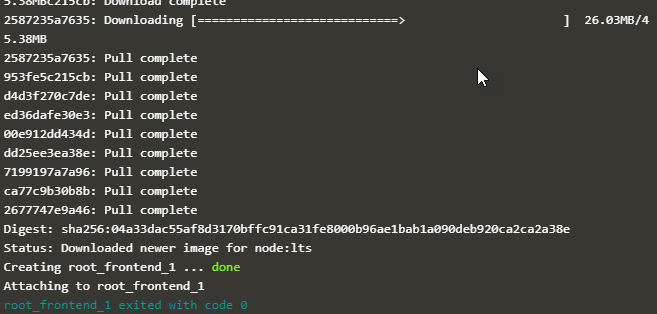
Output generated:
As a result of the above command, a volume with the name ‘myvolume‘ gets created. Subsequent invocations of ‘docker-compose up‘ will reuse this volume.
Alternatively, we can also create a volume outside of Docker Compose and then reference it inside the ‘docker-compose.yaml‘ file, as shown in an example below.
In the above docker-compose file, we have used the volume with the name ‘myvolume‘. Note that a flag ‘external‘ is specified and is set to true that indicates the volume already created outside the docker-compose.
What are read-only data volumes?
In most cases, the container only needs access to the data for reading purposes. Also, some folders may change a lot, and it might be difficult and costly to create images for each execution. In this situation, we go for read-only volumes.
To specify the volume as read-only, we append ‘ro‘ to the -v switch as shown below:
We can also use the "mount" switch with the ‘readonly‘ option, as shown below.
We use read-only volumes in the case of dynamic data used in the application.
Start a container/service with Docker data volume
When we start a container with the non-existing volume, Docker creates a new volume with the specified name. The following example shows this.
Here we give the following command.
As shown in the above command, a new container, "volumetest", is started with the specified volume name as "my_docker_volume". This volume is non-existing. On execution of the above command, we get the ID of the container volumetest. To verify that we actually created the volume, we can give the inspect container command as follows:
When this command executes, we can directly jump to the "Mounts" section of the inspect output, as shown in the below screenshot.
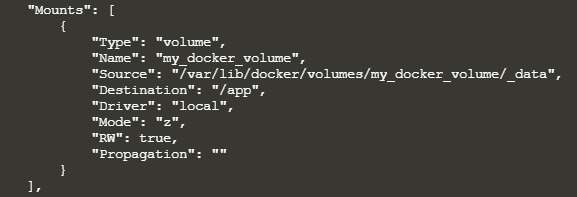
As seen in the above screenshot, we have the details of the volume created. volume’ and the read-write option is true for this mount. We can then stop the container and remove the volume with the following sequence of commands.
When a service starts and we define a volume, each service container will use its local volume. So if we use a local volume driver, no container will share the data. But there are exceptions wherein some volume drivers support shared storage. For example, Docker for AWS and Azure uses the Cloutstor plugin to support shared persistent storage.
Starting the service with the local volume is similar to that of starting a container. The difference is that in the ‘docker service create‘ command, the ‘-v‘ or ‘—volume‘ flag is not supported. Instead, we must use the ‘—mount‘ flag for mounting the volume.
How to populate a Docker data volume using a container?
When we start a container that creates a new volume, and if the container has files and directories inside it, then the contents of this directory are copied into the volume. Thus, the container that mounts this volume and other containers that use this volume will have access to pre-populated contents.
As an example, we give the following command to start the ubuntu container and populate the new volume "ubuntu_vol" with the contents of the "/usr/share/ubuntu/html" directory.
After this, we can clean up the containers and volumes by executing the following sequence of commands.
Apart from this command, we can also prepopulate the volume with the command used in the previous section to start the container.
What is a Volume driver?
We can use volume drivers when we need to store volumes on remote hosts or cloud providers to encrypt the contents of volumes or add more functionality. For example, when we use the "docker volume create" command, or we start a container with a non-existing volume, we can specify the volume driver. One of the examples of the volume driver is "Vieux/sshfs". In this section, we will just touch base with the basics of volume drivers.
Initial set-up — docker plugin install command
The first step in using the volume driver is to install the appropriate plugin. For example, we can install the plugin vieux/sshfs with the following command.
It will install the volume driver plugin on the docker host.
Create a data volume using a volume driver — docker volume create command
The next step is to use the just installed plugin to create a volume.
We have specified an SSH password in the above command, but we can omit it if two hosts configure with shared keys. The flag ‘-o‘ specifies zero or more configurable options (like username and password in the above command).
Start a container that creates a volume using a volume driver
After installing the plugin, we can also start a container by specifying the volume driver’s non-existing volume. Docker will create a new volume while starting the container. The following example shows creating an Nginx container with the "vieux/sshfs" volume driver.
Again we can omit the password if there are shared keys, and there can be zero or more configurable options specified with ‘volume-opt‘. Remember to use ‘—mount‘ flag to mount the volume when the volume driver needs to pass options.
Backup, restore, migrate, or remove a data volume in Docker
We can use volumes for migrations, backups, and restores. Let us discuss these with volumes.
Backup a container
We follow the following steps to back up a container.
- Create a new container
- Launch a new container and mount the volume from the container created in step 1.
- Mount localhost directory as /backup
- Tar the contents of the volume to backup.tar file inside the /backup directory.
Thus we have a backup of the volume in /backup local directory. Let us take an example to illustrate these commands.
First, we create a new container with the following command:
Next, we can create a backup directory or backup the volume in the present directory itself. Once this happens, we execute the following command to tar the volume contents.
The following screenshot shows the result of the execution of the above commands.
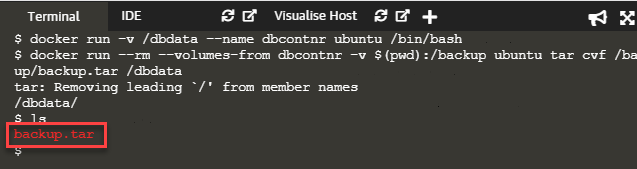
When we list the contents of the current directory, we can see the backup.tar file of dbdata volume created on the host machine.
Restore container from backup
Now that we have created a backup, how do we restore it to the container? We can either restore the backup to the exact container or another container. First, let us restore the backup we created in the previous section to a new container. For this first, we create a new container as follows.
Now we restore the backup (backup.tar) to this container as follows:
Once the command is successful, the container ‘dbcontainer2’s‘ data volume will have the contents of untar file into it.
We can use these techniques of backup, migration, and restore to automate the entire process.
Remove docker volume
The data volume of a Docker container persists even after the container deletes. A Docker data volume persists after a container deletes. We have two types of data volumes:
- Named volumes: Named volumes have a specific source that is outside the container, for example awesome : /hello.
- Anonymous volumes: These volumes do not have a specific source when the container deletes. We should instruct the Docker Engine Daemon in case we need to remove them.
To remove anonymous volumes automatically, we use the "— rm" option. For example, if we have an anonymous /bkup volume. Then, when the container deletes, the Docker Engine will automatically remove the /bkup volume with the following command.
The above command creates an anonymous /bkup volume. So when we remove the container, the Docker Engine removes the /bkup volume but not the awesome volume.
Как примонтировать папку в docker
jpetazzo/Attach a volume to a container while it is running
It has been asked on #docker-dev recently if it was possible to attach a volume to a container after it was started. At first, I thought it would be difficult, because of how the mnt namespace works. Then I thought better 🙂
To attach a volume into a running container, we are going to:
- use nsenter to mount the whole filesystem containing this volume on a temporary mountpoint;
- create a bind mount from the specific directory that we want to use as the volume, to the right location of this volume;
- umount the temporary mountpoint.
It’s that simple, really.
Preliminary warning
In the examples below, I deliberately included the $ sign to indicate the shell prompt and help to make the difference between what you’re supposed to type, and what the machine is supposed to answer. There are some multi-line commands, with > continuation characters. I am aware that it makes the examples really painful to copy-paste. If you want to copy-paste code, look at the sample script at the end of this post!
Step by step
In the following example, I assume that I started a simple container named charlie , with the following command:
I also assume that I want to mount the host directory /home/jpetazzo/Work/DOCKER/docker to /src in my container.
nsenter
First, you will need nsenter, with the docker-enter helper script. Why? Because we are going to mount filesystems from within our container, and for security reasons, our container is not allowed to do that. Using nsenter , we will be able to run an arbitrary command within the context (technically: the namespaces) of our container, but without the associated security restrictions. Needless to say, this can be done only with root access on the Docker host.
The simplest way to install nsenter and its associated docker-enter script is to run:
For more details, check the nsenter project page.
Find our filesystem
We want to mount the filesystem containing our host directory ( /home/jpetazzo/Work/DOCKER/docker ) in the container.
We have to find on which filesystem this directory is located.
First, we will canonicalize (or dereference) the file, just in case it is a symbolic link — or its path contains any symbolic link:
A-ha, it is indeed a symlink! Let’s put that in an environment variable to make our life easier:
Then, we need to find which filesystem contains that path. We will use an unexpected tool for that, df :
Let’s use the -P flag (to force POSIX format, just in case you have an exotic df , or someone runs that on Solaris or BSD when those systems will get Docker too) and put the result into a variable as well:
Find the device (and sub-root) of our filesystem
Now, in a world without bind mounts or BTRFS subvolumes, we would just have to look into /proc/mounts to find out the device corresponding to the /home/jpetazzo filesystem, and we would be golden. But on my system, /home/jpetazzo is a subvolume on a BTRFS pool. To get subvolume information (or bind mount information), we will check /proc/self/mountinfo .
If you had never heard about mountinfo, check proc.txt in the kernel docs, and be enlightened 🙂
So, first, let’s retrieve the device of our filesystem:
Next, retrieve the sub-root (i.e. the path of the mounted filesystem, within the global filesystem living in this device):
Perfect. Now we know that we will need to mount /dev/sda2 , and inside that filesystem, go to /jpetazzo , and from there, to the remaining path to our file (in our example, /go/src/github.com/docker/docker ).
Let’s compute this remaining path, by the way:
Note: this works as long as there are no , in the path. If you have an idea to make that work regardless of the funky characters that might be in the path, let me know! (I shall invoke the Shell Triad to the rescue: jessie, soulshake, tianon?)
The last thing that we need to do before diving into the container, is to resolve the major and minor device numbers for this block device. stat will do it for us:
Note that those numbers are in hexadecimal, and later, we will need them in decimal. Here is a hackish way to convert them easily:
Putting it all together
There is one last subtle hack. For reasons that are beyond my understanding, some filesystems (including BTRFS) will update the device field in /proc/mounts when you mount them multiple times. In other words, if we create a temporary block device named /tmpblkdev in our container, and use that to mount our filesystem, then now our filesystem (in the host!) will appear as /tmpblkdev instead of e.g. /dev/sda2 . This sounds like a little detail, but in fact, it will screw up all future attempts to resolve the filesystem block device.
Long story short: we have to make sure that the block device node in the container is located at the same path than its counterpart on the host.
Create a temporary mount point, and mount the filesystem:
Make sure that the volume mount point exists, and bind mount the volume on it:
Cleanup after ourselves:
(We don’t clean up the device node. We could be extra fancy and detect whether the device existed in the first place, but this is already pretty complex as it is right now!)
Automating the hell out of it
This little snippet is almost copy-paste ready.
Status and limitations
This will not work on filesystems which are not based on block devices.
It will only work if /proc/mounts correctly lists the block device node (which, as we saw above, is not necessarily true).
Also, I only tested this on my local environment; I didn’t even try on a cloud instance or anything like that, but I would love to know if it works there or not!