Writing Shell Scripts — The Beginner’s Guide
Shell scripts are just set of commands that you write in a file and run them together. For anyone who has worked with DOS’s bat files, it’s almost the same concept. You just put a series of commands into a text file and run them together. The difference comes from the fact that bash scripts can do a lot more than batch files.
“A shell script is a computer program designed to be run by the Unix shell, a command-line interpreter. The various dialects of shell scripts are considered to be scripting languages. Typical operations performed by shell scripts include file manipulation, program execution, and printing text.”
Unix has more than one possible shell, and scripting any of them is a topic that can easily pack a complete book. In this post, I am going to cover the basic elements of a bash script.
Should I learn?
Agreed that anything you can do with a shell script, you can do that using some programming language such as Ruby, Python or Go but mostly for the small tasks, you will find yourself using Shell Scripts in one way or another.
Shell scripts are used to automate administrative tasks, encapsulate complex configuration details and get at the full power of the operating system. The ability to combine commands allows you to create new commands, thereby adding value to your operating system. Furthermore, combining a shell with graphical desktop environment allows you to get the best of both worlds
- Automate your daily tasks
- Create your own commands with optionally accepting input from the user
- Portability, executing the same script in your mac and your Linux based systems.
Writing Shell Scripts
Let’s start by a Hello World example. Open your favorite editor and write a shell script file named as my_script.sh containing following lines
The first line called a hashbang or shebang. It tells Unix that this script should be run through the /bin/bash shell. Second line is just the echo statement, which prints the words after it to the terminal.
After saving the above file, we need to give it execute permission to make it runnable. You can set the execute permission as follows
Execute script as anyone of the following commands
Sample Output
Now we are done with the very basic shell script that prints `Hello world` to the screen.
Before we go any deeper into few language constructs of shell scripting, you should have some basic knowledge of Linux commands. You can find several articles on the internet for that. Here is a sample article showing some of the commonly used ones.
Going Deep
Now that we have seen how to write a basic Hello World example, let’s look at some of the language constructs that you will find yourself using most of the time when writing shell scripts.
Variables
To process data, data must be kept in the computer’s memory. Memory is divided into small locations, and each location had a unique number called memory address, which is used to hold data.
Programmers can give a unique name to this memory address called variables. Variables are a named storage location that may take different values, but only one at a time.
In Linux Shell Scripting, there are two types of variable:
- System variables — Created and maintained by Linux itself. This type of variable defined in CAPITAL LETTERS.
- User-defined variables — Created and maintained by the user. This type of variable defined in lower letters.
System variables can be used in the script to show any information these variables are holding. Like few important System variables are:
- BASH —Holds our shell name
- BASH_VERSION — Holds our shell version name
- HOME — Holds home directory path
- OSTYPE — Holds OS type
- USERNAME – Holds username who is currently logged in to the machine
NOTE — Some of the above system variables may have a different value in a different environment.
User-defined variables are as simple as we have in any other programming language but variables can store any type of data, as in the following example:
To access user-defined variables use the following syntax:
Print to screen:
Use the above variable in a string:
Quotes
Following are the three types of quotes available in Shell scripting.
Double Quotes (“) : Anything inside double quotes will be string except \ and $. See example
Single quotes (‘) : Anything inside single quotes will be a string. See example:
Left Quotes (`): Anything enclosed in left quotes will be treated as an executable command. See examples
Conditions [if/else]
Shell scripts use fairly standard syntax for if statements. The conditional statement is executed using either the test command or the [ command.
In its most basic form an if statement is:
Have you noticed that fi is just if spelled backward? See below example that includes an else statement
Adding an else-if statement structure is used with the elif command.
There are many different ways in which conditional statements can be used in Shell scripting. Following tables elaborates on how to add some important comparison:
So this is the basic use of conditions in shell scripting is explained.
Looping
Almost all languages have the concept of loops, If we want to repeat a task ten times, we don’t want to have to type in the code ten times, with maybe a slight change each time.
As a result, we have for and while loops in the shell scripting. This is somewhat fewer features than other languages.
For Loop:
The above for loop first creates variable i and assign a number to it from the list of number from 1 to 5, The shell executes echo statement for each assignment of i and on every iteration, it will echo the statement as shown in the output. This process will continue until the last item.
While Loop
While loop will execute until the condition is true. See below example:
The above script first creates a variable i with the value 1. And then the loop will iterate until the value of i is less than equals to 5. The statement
i=`expr $i + 1` is responsible for the increment of value of i.
If this statement is removed the above said loop will be an infinite loop.
Functions
Function is a type of procedure or routine. Functions encapsulate a task (they combine many instructions into a single line of code). Most programming languages provide many built-in functions, that would otherwise require many steps to accomplish, for example calculating the square of a number.
In shell scripting, we can define functions in two manners.
- Creating a function inside the same script file to use.
- Create a separate file i.e. library.shwith all useful functions.
See below example to define and use a function in shell scripting:
Exit Status
The exit command terminates a script, just as in a C program. It can also return a value, which is available to the script’s parent process.
Every command returns an exit status (sometimes referred to as a return status or exit code). A successful command returns a 0, while an unsuccessful one returns a non-zero value that usually can be interpreted as an error code. Well-behaved UNIX commands, programs, and utilities return a 0 exit code upon successful completion, though there are some exceptions.
When a script ends with an exit that has no parameter, the exit status of the script is the exit status of the last command executed in the script (previous to the exit).
The equivalent of a exit is exit $? or even just omitting the exit.
$? is a special variable in shell that reads the exit status of the last command executed. After a function returns, $? gives the exit status of the last command executed in the function.
And with that, this article comes to an end. I hope you have got the basic idea by now. If you have any questions or feedback, leave them in the comments section below. For more information, check out Awesome Shell and GNU’s official bash reference.
Основы Bash-скриптинга для непрограммистов. Часть 2
В первой части статьи мы рассмотрели командные оболочки, профили, синонимы и первые команды. Под спойлером я также рассказал, как развернуть тестовую виртуальную машину.
В этой части речь пойдет о файлах скриптов, их параметрах и правах доступа. Также я расскажу про операторы условного выполнения, выбора и циклы.
Скрипты
Для выполнения нескольких команд одним вызовом удобно использовать скрипты. Скрипт – это текстовый файл, содержащий команды для shell. Это могут быть как внутренние команды shell, так и вызовы внешних исполняемых файлов.
Как правило, имя файла скрипта имеет окончание .sh, но это не является обязательным требованием и используется лишь для того, чтобы пользователю было удобнее ориентироваться по имени файла. Для интерпретатора более важным является содержимое файла, а также права доступа к нему.
Перейдем в домашнюю директорию командой cd
и создадим в ней с помощью редактора nano ( nano script.sh )файл, содержащий 2 строки:
Чтобы выйти из редактора nano после набора текста скрипта, нужно нажать Ctrl+X, далее на вопрос «Save modified buffer?» нажать Y, далее на запрос «File Name to Write:» нажать Enter. При желании можно использовать любой другой текстовый редактор.
Скрипт запускается командой ./<имя_файла> , т.е. ./ перед именем файла указывает на то, что нужно выполнить скрипт или исполняемый файл, находящийся в текущей директории. Если выполнить команду script.sh , то будет выдана ошибка, т.к. оболочка будет искать файл в директориях, указанных в переменной среды PATH, а также среди встроенных команд (таких, как, например, pwd):
Ошибки не будет, если выполнять скрипт с указанием абсолютного пути, но данный подход является менее универсальным: /home/user/script.sh . Однако на данном этапе при попытке выполнить созданный файл будет выдана ошибка:
Проверим права доступа к файлу:
Из вывода команды ls видно, что отсутствуют права на выполнение. Рассмотрим подробнее на картинке:

Права доступа задаются тремя наборами: для пользователя, которому принадлежит файл; для группы, в которую входит пользователь; и для всех остальных. Здесь r, w и x означают соответственно доступ на чтение, запись и выполнение.
В нашем примере пользователь (test) имеет доступ на чтение и запись, группа также имеет доступ на чтение и запись, все остальные – только на чтение. Эти права выданы в соответствии с правами, заданными по умолчанию, которые можно проверить командой umask -S . Изменить права по умолчанию можно, добавив вызов команды umask с нужными параметрами в файл профиля пользователя (файл
/.profile), либо для всех пользователей в общесистемный профиль (файл /etc/profile).
Для того, чтобы установить права, используется команда chmod <параметры> <имя_файла> . Например, чтобы выдать права на выполнение файла всем пользователям, нужно выполнить команду:
Чтобы выдать права на чтение и выполнение пользователю и группе:
Чтобы запретить доступ на запись (изменение содержимого) файла всем:
Также для указания прав можно использовать маску. Например, чтобы разрешить права на чтение, запись, выполнение пользователю, чтение и выполнение группе, и чтение – для остальных, нужно выполнить:
Будут выданы права -rwxr-xr— :
Указывая 3 цифры, мы задаем соответствующие маски для каждой из трех групп. Переведя цифру в двоичную систему, можно понять, каким правам она соответствует. Иллюстрация для нашего примера:
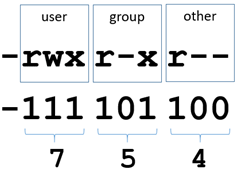
Символ – перед наборами прав доступа указывает на тип файла ( – означает обычный файл, d – директория, l – ссылка, c – символьное устройство, b – блочное устройство, и т. д.). Соответствие числа, его двоичного представления и прав доступ можно представить в виде таблицы:
Beginners / BashScripting
Bash scripting is one of the easiest types of scripting to learn, and is best compared to Windows Batch scripting. Bash is very flexible, and has many advanced features that you won’t see in batch scripts.
However if you are a ‘non-computer-savvy’ person that won’t mean a thing to you. Bash is the language that you will learn to love as much of everyday Ubuntu life is done/can be done using the Terminal. You will soon learn that most things can be done through both GUI (Graphical User Interface) and CLI (Command Line Interface), however some things are more easily achieved from one or the other. For example, changing file permissions of a folder and all its sub folders is more easily achieved using cli instead gui.
NOTE: Text that is inside the box are to be entered into a terminal as follows:
You can also just copy and paste if needed.
Intro
In this document we will discuss useful everyday commands, as well as going a bit more in depth into scripting and semi-advanced features of Bash. Bash is not only used to run programs and applications, but it can also be used to write programs or scripts.
Bash — Everyday Ubuntu life
- Creating folders
- Deleting files
- Deleting folders and their sub-folders
- Opening applications as root
- Backing up your files
- Backing up your folders
- Checking system performance
- Check Devices
- Checking wireless connection
Along with many other things, the list above will be the commands we will discuss.
Commands
Creating folders
Creating folders can be done simply in the file manager nautilus by right clicking and selecting ‘Create Folder’, but if you want to do this from a cli environment you would type the following in the terminal:
the mkdir (make directory) command creates the folder then the file path tells it where to create the folder.
Deleting files
Deleting files are done with the rm command as follows:
the rm (remove) command is used to remove anything through a cli environment.
Deleting folders and their sub-folders
The command you are about to read can potentially (if used incorrectly) destroy your system!
To force (note most of the time you will not need to use -f)
This command is slightly different to the one before, it uses two options ‘-r’ which means recursive (will delete the folder and all sub-folders) and ‘-f’ means force (will not ask for your permission). This command is perfectly fine for deleting a dir and all its sub-dirs. The next commands should !!**!!NEVER!!**!! be run. Unless you want to say goodbye to your system.
This will delete everything from your root folder downwards, which if you did a standard install would be everything.
Running commands as root
When working on the command line, you usually want to work with the default permissions. This way you insure that you won’t accidentally break anything belonging to the system or other users, so long as the system and other users haven’t altered their file permissions. Yet there will be times when you wish to copy a file to a system folder (like /usr/local/bin) to make it available to all users of the system. Only the system administrator (i.e. the user ‘root’) should have permission to alter the contents of system directories like /usr/local/bin. Therefore trying to copy a file (like a program downloaded from the Internet) into that folder is forbidden by default.
Since it would be very tedious to always login as root to do administrative work (in fact you should avoid logging in as root with a graphical desktop) you can use the sudo program to execute a single command as root.
The default Ubuntu installation is configured so that the user who was created during system installation is allowed to use this command. It will prompt for the password and execute the command as the root user.
Opening GUI applications as root
Sometimes you will want to edit a config file in your root folder, in order to save changes to this file you need root privileges so we need to open our text editor as root. All you will need is just sudo or pkexec to show a gui password popup.
Note a lot of kde apps will not work like kate or dolphin.
Backing up your files
To create a backup of a file, we’re going to use the cp (copy) command. The basic syntax for cp is as follows:
This will copy the ‘source_file’ to the ‘dest_file’. Now, using the previous example, we want to backup ‘/path/to/conf_file.txt’. To accomplish this, we type the following:
That’s fine and dandy, but what if I want to copy my file to another directory? Well that’s just as easy. Let’s say instead of copying /path/to/conf_file.txt to the /path/to/ directory, you want to copy it to a directory where you store all of your backup files, say /my/backup/folder/. In order to accomplish this you would type:
***This is a typical safety measure that has saved many users in the past from a complete disaster.***
Okay, so we know how to copy a file: a) to a different filename and b) to a different folder. But how do we copy entire directories?
Backing up your Directories
To backup one directory to another, we introduce cp -r (recursive) option. The basic syntax is as follow:
So if we wanted to copy all of the contents of our /path/to/ folder to our /my/backup/folder, we would type the following:
Checking system performance
If your computer starts to lag, you can see which applications are using the most CPU power with this command:
This is generally the same information given as the GUI application ‘System Monitor’.
Check Devices
If a USB device stops working, you may want to see if it is still connected/detected. To check if a device is connected/detected, type the following:
As PCI devices are checked with:
Show network Information
To see the status of your network connection, use the command:
This command will show you your ip, what type of connection you are using, etc.
Show wireless information
Like the command ip stated above, you can use iwconfig to check the settings of your wireless connection without editing anything. In a terminal enter:
This also shows packets sent/received.
Scripting
NOTE: The commands given in the scripting section are to be put into the text editor and not in the terminal unless instructed otherwise.
Bash is primarily a scripting language, so it would be a crime not to talk about scripting. Let’s dive straight in with a bash script. More precisely the infamous «Hello World» script. You can create a bash script by opening your favorite text editor to edit your script and then saving it (typically the .sh file extension is used for your reference, but is not necessary. In our examples, we will be using the .sh extension but instead Linux uses #!/path/to/runtime or in this case #!/bin/bash).
The first line of the script just defines which interpreter to use. NOTE: There is no leading whitespace before #!/bin/bash. That’s it, simple as that. To run a bash script you first have to have the correct file permissions. We do this with chmod command in terminal (change mode) as follows:
This will give the file the appropriate permissions so that it can be executed. Now open a terminal and run the script like this:
Hopefully you should have seen it print Hello, World onto your screen. If so well done! That is your first Bash script.
TIP If you type:
You will see the directory that you are currently working in (pwd stands for ‘print working directory’). If your current working directory is /where/i/saved/it/, then you can shorten the above command to:
Now, lets get to more interesting aspects of Bash programming, Variables!
Variables
Variables basically store information. You set variables like this using text editor:
‘var’ can be anything you want as long as it doesn’t begin with a number. «FOO» can be anything you want.
To access the information from the variable you need to put a ‘$’ in front of it like this:
Try entering those lines into a terminal one at a time; you will see that the first one just gives you another prompt and the second one prints FOO.
But that’s all a bit boring. So let’s make a script to ask the user for some information and then echo that information.
read allows the user to input information where it is then stored in the variable defined after the read. read variable would take whatever input the user entered and store it in $variable. We then access this with echo and set up a neat sentence. This script is reasonably messy though; read has another function that could halve the size of this script.
That is more efficient code. However it’s still a bit messy when run. A solution? Good old white spaces!
Now we have an efficient and clean Bash script.
If Statements
An if statement can be used to check for something and do something else depending on the outcome of the check. For example, if I had an ‘apple’, I would want to make sure it’s still an ‘apple’ and not an ‘orange’ because I don’t like Oranges!
The syntax for an if statement is
The else if statement or (elif) is not necessary, but it can be used if needed.
An if statement to check if our $fruit variable is an ‘apple’ would look like this
Just to explain this statement,
If statements are an easy concept to grasp as they are similar to the «if» used in spoken English. But say you wanted to have 4 or 5 checks, the answer may be to write 4 or 5 statements but that’s not the most practical way. This is where elif comes in handy.
This saves us from from repetitive scripting. There are better ways to check what the fruit is, but we won’t go into that now.
Storing application stdout to a variable:
Application stdout ( what you see on the terminal screen, with an un-piped application ) can be saved and used in Bash. The simplest and most elegant way is to use command substitution, by wrapping the code in $(. )
Example
This code should output the current users, their respective ttys, and date of login. Note that this strips newlines. Be sure to do any parsing in line ( | grep, etc ) and then pass it to a variable. We will try this again, but grep for tty7, the GUI’s tty.
Example 2
This should output the single user that is currently logged into the WM. Let’s move on to more advanced data manipulation within command substitution.
FUNctions
Bash lets you create a function on the fly, really handy if you plan on using a code block more then once. Functions reduce the amounts of editing you have to do in a script, if and when you have to update your script. Let’s get to it!
Example
Here is an example script:
Although this example is simple, you can see that if you want to change «echo is Called» to say «foo is Called» you would have to edit twice.
Below is the same app using functions.
This example, as you can see may be longer now, but you can imagine how, adding features, this will eliminate code and reduce complexity. Also, you can see if you want to change the echo call, you have to edit one line, not two.
Debugging
I always find it useful to trace a script to find out why something does not work as expected. To trace, start it through bash explicitly and use the -x option, like so:
This will write each command to standard error (preceded by a ‘+ ’) before it is executed.
Other Scripting Languages related to Bash
tr is one of the most basic applications to pipe data through that uses a basic scripting syntax. In this case, it accepts Regular Expressions. Let’s do a normally complicated task, transforming a string to all uppercase.
Example
The output should look something like this:
tr also can TRanslate strings, so let’s translate all «tar» in $foo to «bar».
Example
the output should look something like this:
AWK ( Short for Aho, Weinberger & Kernighan )
awk has its own custom scripting language, suitable for a tutorial by itself, so I will cover only the basics to help assist when you are bash scripting. This is not meant to be complete or comprehensive in any way.
pidof clone
Let’s make a quick pidof clone that prompts for a process identifier, then echoes the process ID.
Let’s take some pipes out and use only awk for the filtering
Single quotes are used to pass the awk command(s). The curly braces are to use the awk language (for stuff like prints, ifs, etc.). Print prints the column passed given by the $ markup, space delimited.
The awk -v option allow passing a shell value into an awk variable, the $8 is a field variable (column 8 of the ps -ef command’s output) and the operator
is a regular expression match.
There are a lot more commands than the print command, including if statements, etc., and is worth looking into if you are interested in what you see here!
sed is one of the most complicated scripting languages on the GNU / Linux system. I am only going to cover the s/ command here.
Basic Substitution
Try this out to show that sed can not only replace inline, but unlike tr, replace with a longer or shorter string than before.
When this command is run, it should substitute the first appearance of «foo» with «bars».
This is an example of the output.
Beginners/BashScripting (последним исправлял пользователь lnee 2022-02-01 17:36:41)
The material on this wiki is available under a free license, see Copyright / License for details
You can contribute to this wiki, see Wiki Guide for details
compizomania

Прежде всего давайте разберём, что такое script и для чего он нужен.
Script в переводе с английского — сценарий. Все мы смотрим фильмы, многие из нас — спектакли. Чтобы создать фильм/спектакль, сценаристы пишут к ним сценарии, на основании которых артисты, сценка за сценкой исполняют на сцене свои роли, из чего и складывается фильм/спектакль. Работа по созданию сценария довольно кропотливая, где нужно учесть всё до мелочей, чтобы в конечном итоге артисты могли выполнить задуманное сценаристом, а зритель увидел целостное произведение.
Подобным же образом пишутся скрипты для выполнения списка задач, которые пользователь составляет вместе (код), чтобы сделать их выполнение проще и быстрее в операционной системе. Для написания простых скриптов совсем не обязательно иметь образование программиста.
Для начала давайте создадим самый, что ни на есть, простейший скрипт-Shell для обновления системы.
Все действия я буду проводить с системе Ubuntu, но они применимы и к другим системам Linux, производных от Ubuntu. Для этого нам понадобятся: Текстовый редактор, чтобы наполнить его нужными задачами для создания скрипта (кода) и Терминал — для выполнения созданного скрипта. Эти инструменты установлены в любом дистрибутие Linux по умолчанию.
Итак, открываем текстовый редактор Gedit и вводим в него первые обязательные символы под названием shebang.
shebang в программировании, это последовательность из двух символов: решётки и восклицательного знака (#!) в начале файла скрипта. И добавляем к данным символам без пробелов /bin/sh — интерпретатор, где будет выполняться скрипт. /bin/sh — это обычно Bourne shell или совместимый интерпретатор командной строки, который передаёт «path/to/script» как первый параметр.
Первая обязательная строка скрипта будет выглядеть следующим образом:
Далее, следующей строкой следует описание того, что должен выполнить наш первый скрипт/сценарий:
# Мой первый Script обновления Ubuntu
Знак решётки (#) в самом начале строки даёт понять интерпретатору/терминалу, что эту строку читать и выполнять не нужно. Строка нужна в коде данного скрипта для того чтобы сам создатель скрипта знал, что он собирается выполнить на данном отрезке/сценке в коде, чтобы не запутаться в дальнейшем, когда таких строк будет много. Такие строки с знаком решётки называются — закомментированные.
Далее в скрипте следуют выполняемые строки с командами, в данном случае для обновления системы Ubuntu:
sudo apt update
sudo apt upgrade -y
-y в конце второй команды даёт понять интерпретатору/терминалу, что это действие/команду нужно выполнить автоматически, без дополнительного подтверждения пользователем, нажатия клавиши Ввод. y — сокращённо от английского yes, т.е. да.
Вот и всё. Ваш первый скрипт создан. У вас должно получиться как на снимке:

Остаётся сохранить созданный файл/скрипт и дать ему Имя с обязательным расширением в конце — .sh. Расширение .sh присваивается исполняемому файлу.
Я дал ему Имя — обновление.sh, сохранив в Домашней папке пользователя:
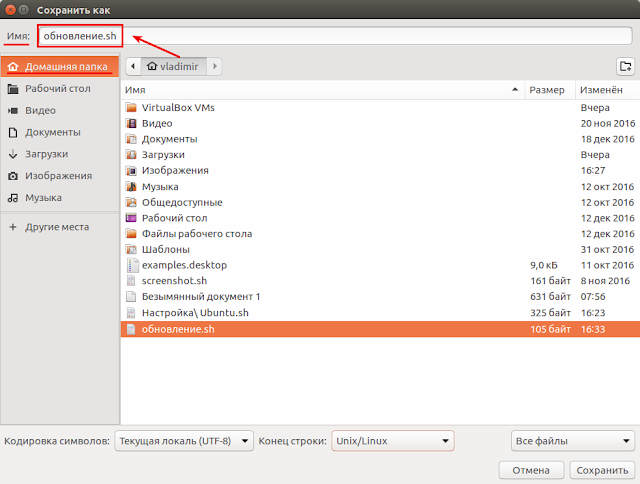
Для того чтобы созданный файл/скрипт был исполняемый, ему нужно дать на это разрешение. Сделать это можно двумя способами.
1. Выполнить следующую команду в терминале:
sudo chmod +x обновление.sh
2. Либо открыть файловый менеджер в Домашней папке (где вы сохранили созданный скрипт), правый клик на файле, в контекстном меню — Свойства — Права и активировать пункт — Выполнение: Разрешить выполнение файла как программы:
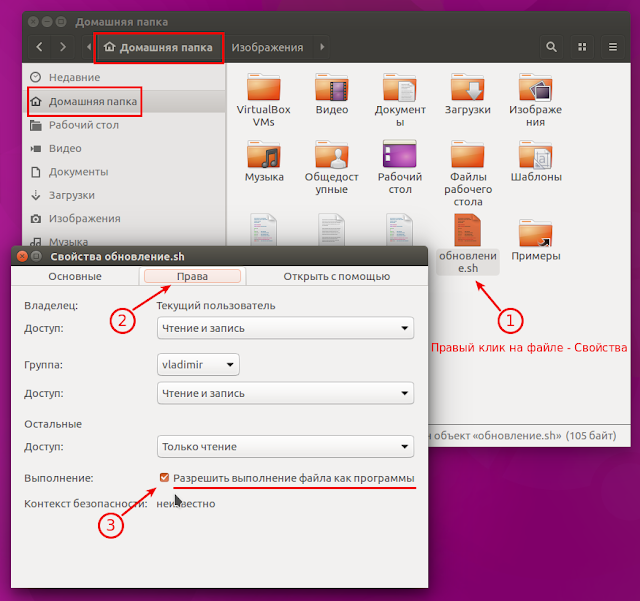
Чтобы выполнить созданный скрипт, нужно открыть терминал ( о чём я писал в самом начале статьи, что терминал — необходимый атрибут/инструмент для выполнения скрипта), ввести sh, через пробел название скрипта — обновление.sh и нажать клавишу Ввод:
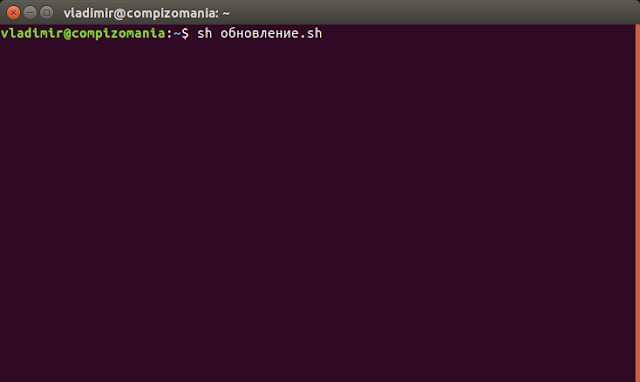
Либо в терминале вводим sh и перетаскиваем из файлового менеджера созданный файл с скриптом (также через пробел):
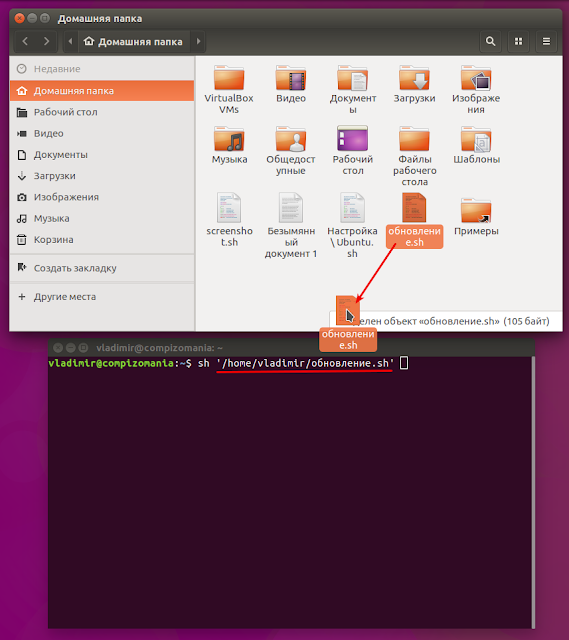
После того как путь к файлу отобразится после команды sh и пробела, достаточно нажать клавишу Enter (Ввод), чтобы выполнить обновление системы:

Теперь в любой момент вы можете сделать обновление системы созданным собственным скриптом.
Да, кто-то может возразить, что обновление системы не сложно сделать выполнением этих двух команд в терминале, зачем пыжиться и создавать какие-то скрипты? Всё верно. Но это пример создания простейшего скрипта, чтобы показать, что «не боги горшки обжигают» ��.
Научившись писать и использовать простейшие скрипты, можно создать скрипт по настройке системы, с тем чтобы в случае переустановки системы могли воспользоваться созданным сценарием без необходимости искать каждый раз в сети сайты с подобными настройками.
Многие из вас, скорее всего, пользуются сайтами по настройке системы, типа тех что я публикую после выхода очередного релиза Ubuntu — Ubuntu после установки или подобными сайтами. Откройте один из таких сайтов: http://compizomania.blogspot.com/2016/04/ubuntu-1604.html, затем текстовый редактор для создания скрипта.
Для примера я сделал следующую заготовку.
В текстовом редакторе вводим первую обязательную строку:
Далее закомментированные строки с описанием:
# Настройка Ubuntu после уставновки
# Обновление системы
Ниже следуют команды обновления системы:
sudo apt update
sudo apt upgrade -y
Строка описания: Добавление репозиториев:
# Добавление репозиториев
И добавляете необходимые репозитории для дальнейшей установки программного обеспечения:
sudo add-apt-repository «deb http://archive.canonical.com/ $(lsb_release -sc) partner» -y
sudo add-apt-repository ppa:atareao/telegram -y
sudo add-apt-repository ppa:atareao/atareao -y
sudo add-apt-repository ppa:nemh/systemback -y
sudo add-apt-repository ppa:gerardpuig/ppa -y
sudo add-apt-repository ppa:haecker-felix/gradio-daily -y
После того как необходимые репозитории добавлены (повторюсь, у вас могут быть свои репозитории, у меня пример), необходимо обновить систему:
Строка с описанием:
# Обновление системы после подключения репозиториев
И команда на выполнение:
sudo apt update
Теперь, когда репозитории добавлены и система обновлена, наступила очередь в установке программ:
# Установка программ
Для установки программ достаточно один раз ввести команду sudo apt install, а затем через пробел в данную строку добавлять сколько угодно программ, главное чтобы они были правильно составлены. Если какая-то программа состоит из нескольких слов, её команда должна быть монолитной, т.е. все слова в ней должны вводится через чёрточку, например: unity-tweak-tool:
sudo apt install my-weather-indicator telegram skype lm-sensors hddtemp psensor gdebi systemback unity-tweak-tool ubuntu-cleaner gradio -y
Установка дополнительных кодеков
# Мультимедиа и кодеки
sudo apt install ubuntu-restricted-extras -y
Отключение о сбоях в системе
# Отключить отчёты о сбоях в системе
sudo sed -i «s/enabled=1/enabled=0/g» ‘/etc/default/apport’
Ну вот, пожалуй, и всё. Данный созданный файл сценария должен выглядеть следующим образом:
Необходимо сохранить его (нажать кнопку Сохранить) и дать Имя с расширением .sh. Я назвал его Настройка\ Ubuntu.sh (вы можете назвать по-другому, но обязвтельно с расширением .sh):
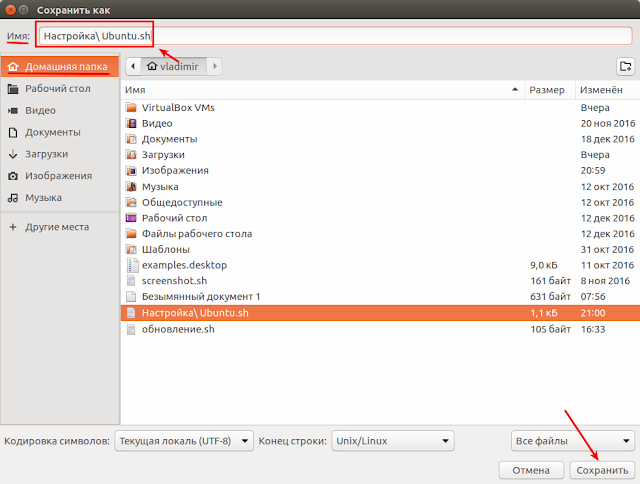
Делаем созданный скрипт исполняемым:
sudo chmod +x Настройка\ Ubuntu.sh
Для выполнения созданного скрипта введите в терминале sh и название созданного скрипта через пробел, либо sh, пробел и перетащить в терминал созданный файл, как объяснялось ранее в простейшем скрипте и нажмите клавишу Ввод, для его выполнения.