How do you copy a file from Windows to a VMware virtual hard disk (Ubuntu)?
I have VMware Player, and I run Ubuntu with it on my Windows 7 system. Now I want to copy some files from my Windows folders into the VMware virtual hard disk, so that I can view these files on Ubuntu.
How do I do that?
![]()
6 Answers 6
Mount a shared folder that’s on the Windows host onto Ubuntu. That way you don’t even need to copy them.
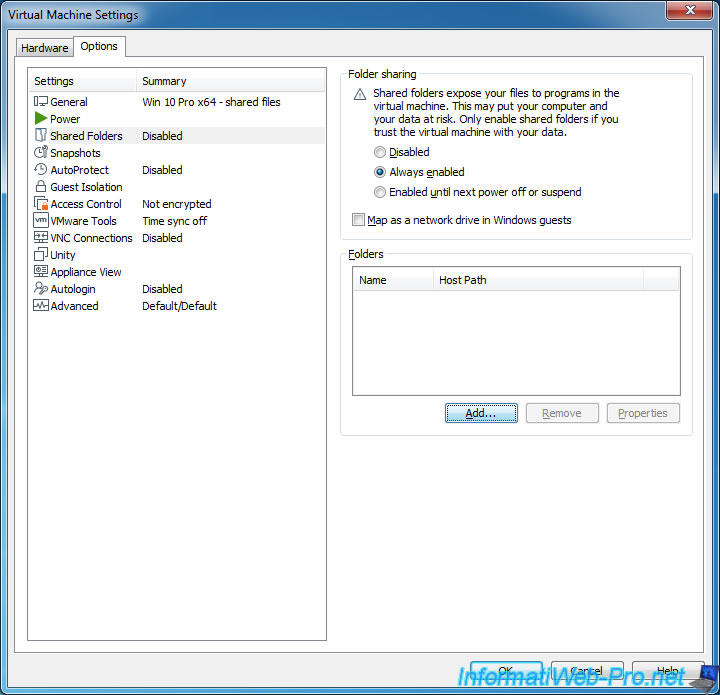
Go to Virtual Machine » Virtual Machine Settings » Shared Folders.
![]()
The easiest way to do is to install the VMware Tools in Ubuntu, then you are able to drag the file into the Ubuntu VM.
To install VMware Tools, you need to switch to Ubuntu, then go to the VMware menu VM » Install VMware Tools, and then follow the instructions to finish the installation.
![]()
If no suggestions works, put your files in a FAT32 formatted pendrive. You’ll see Mass Storage Device icon in bottom right corner of you VM window. Right click press Connect(Disconnect from Host).
If you don’t manage to configure a shared folder, or just really want a separate copy inside the VM, you can also just rightclick->copy in the host and paste in the guest. At least that works here with VMware player, windows 7 (host) and linux mint (guest).
Login to your linux machine (ubuntu) in vmware. Click on «Places» and go to «Network» . Go inside «Windows Network» and go deeper and you will find «user» and then «Public» . This folder is nothing but your windows «Public» folder. You can use this folder as a shared folder between host and guest machine.
Как работать с VMware Workstation
wikiHow работает по принципу вики, а это значит, что многие наши статьи написаны несколькими авторами. При создании этой статьи над ее редактированием и улучшением работали авторы-волонтеры.
Количество просмотров этой статьи: 48 663.
VMware Workstation является программой, эмулирующей самостоятельный компьютер (виртуальная машина) и позволяющей работать с ним как с обычным компьютером, то есть ставить на него операционные системы и приложения. Виртуальная машина отлично подходит для тестирования новых операционных систем, посещения подозрительных веб-сайтов, создания вычислительной среды специально для детей, изучения влияния компьютерных вирусов и многого другого. Вы даже можете подключать принтеры и USB-накопители к виртуальной машине.
With VMware Workstation VMware Tools available for many types of operating systems, you can easily transfer folders and files from your physical computer to a virtual machine and vice versa.
For this, you can use :
- drag and drop
- VMware Workstation folder shares
Note that in both cases, you will need the VMware Tools in the guest OS and activate the corresponding option in the settings of your virtual machine.
1. Windows file transfer
1.1. Drag and drop and copy/paste
To begin, you can easily transfer files from the physical PC to the virtual machine with a simple drag and drop.
But, you can also use copy/paste in both directions (physical machine to virtual machine and vice versa).
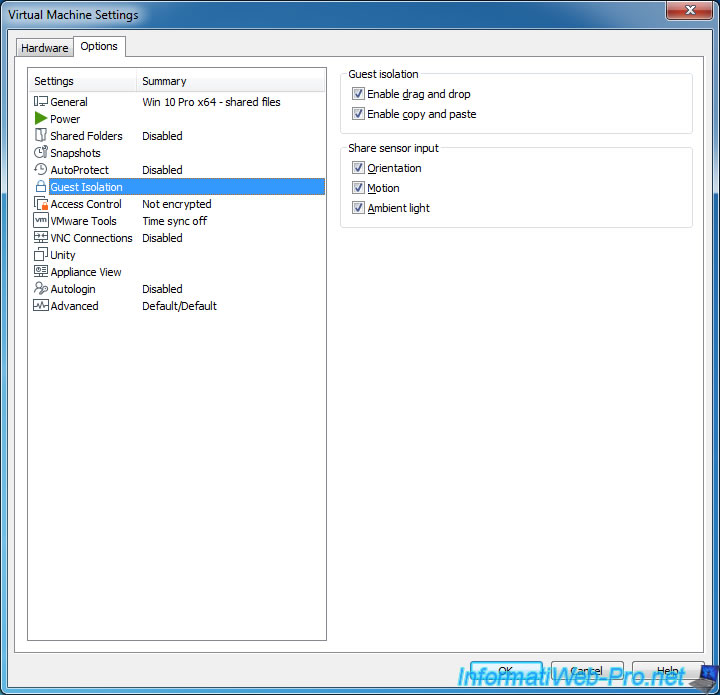
However, to do this, make sure that these features are enabled in the settings of your virtual machine.
By default, these options are enabled and are available in the «Guest isolation» section :
- Enable drag and drop
- Enable copy and paste
Note : if these options are disabled and dimmed, shut down the virtual machine to enable them.
To transfer a file from the physical computer to the virtual machine, simply drag it to the virtual machine window (where the guest OS is displayed).
You can also right-click «Copy» on the physical computer and right-click «Paste» in the guest OS.
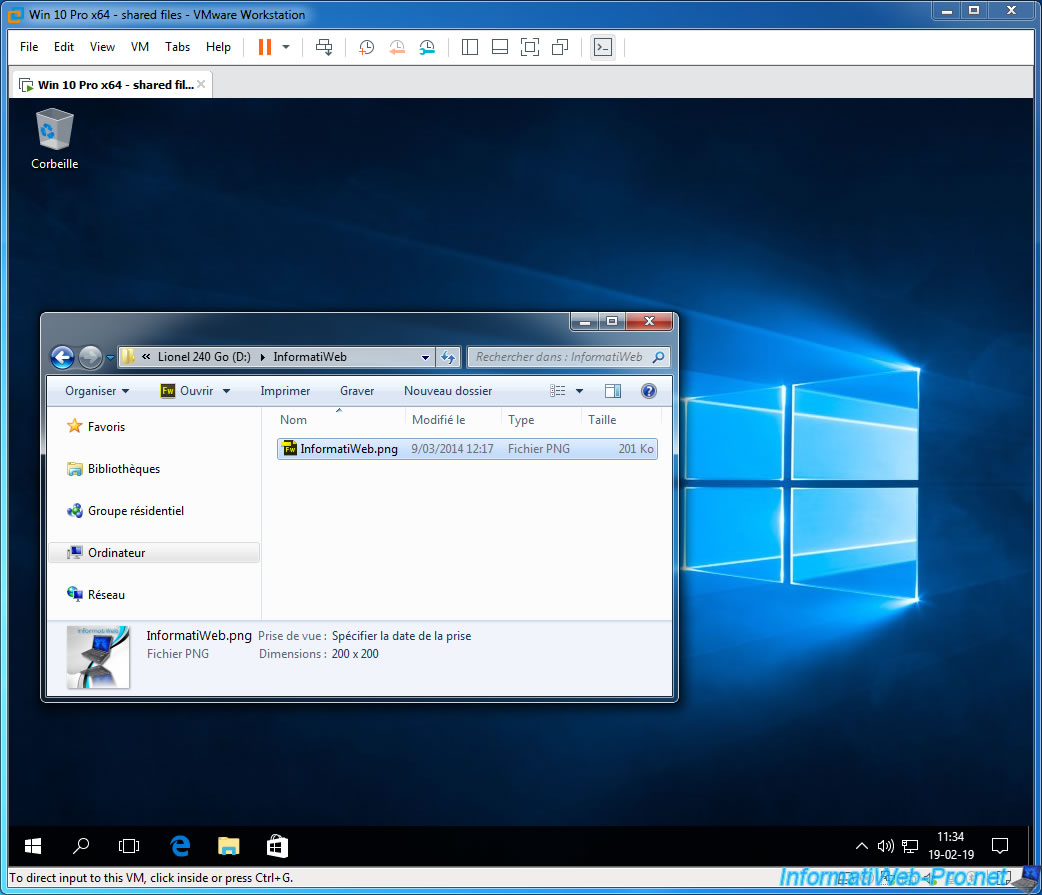
A VMware transfer window will be displayed and another will be displayed by the guest OS.
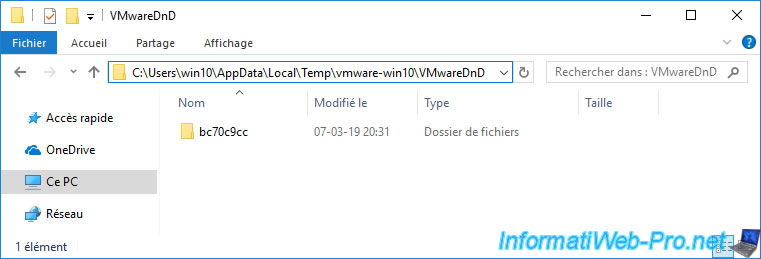
As you can see, the files or folders dragged/dropped will be copied by the guest OS from a folder with a weird name.
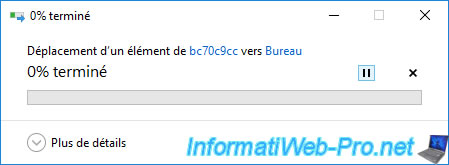
In fact, when you use drag and drop, the VMware tools temporarily copy the data into a subfolder «vmware-xxxx\VMwareDnD» of the temporary folder of the guest OS.
1.2. VMware file sharing on Windows
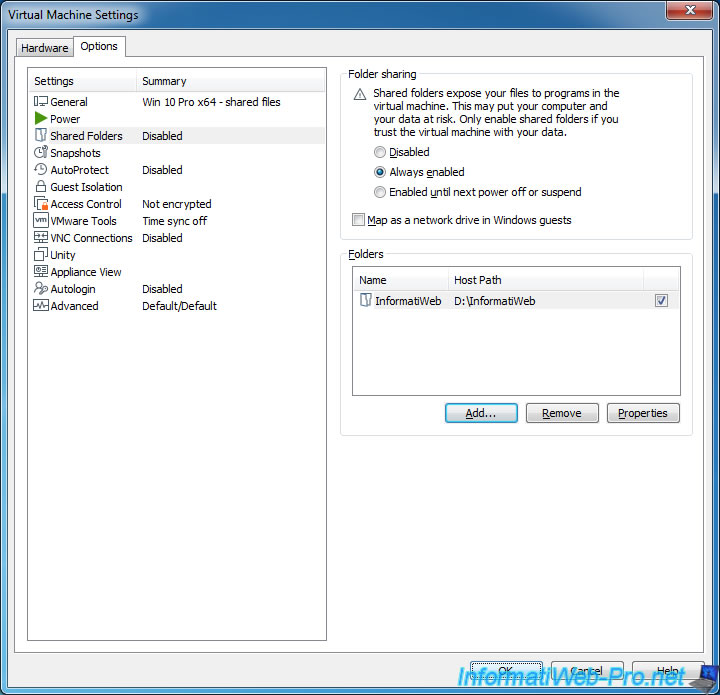
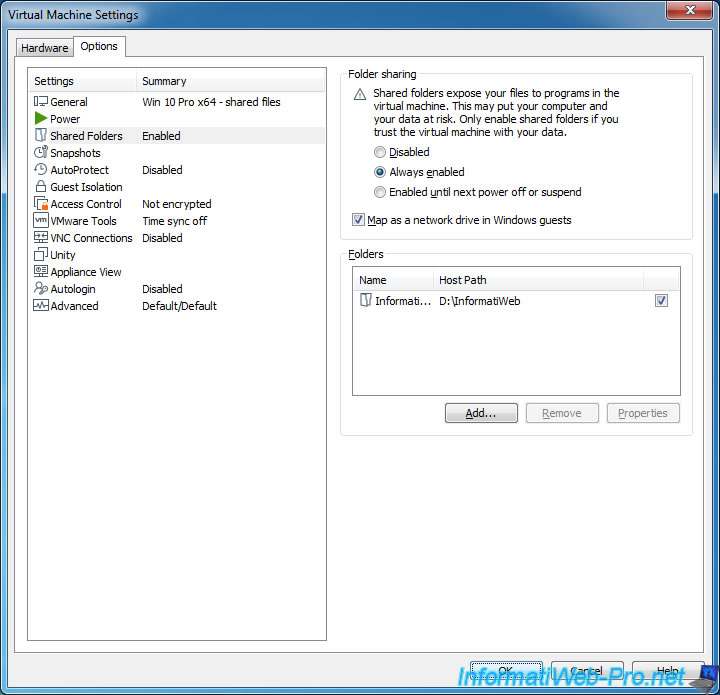
To share folders on your physical PC to make them read-only (for security) or read/write (if needed) by the virtual machine.
To do this, open the settings of the virtual machine and go to the «Shared Folders» section and select the desired option :
- Disabled : VMware file sharing disabled (default value)
- Always enabled : always enabled (for this virtual machine)
- Enabled until next power off or suspend : activated until the virtual machine is power off or paused
- Map as a network drive in Windows guests : Automatically create a network drive where you will find all the shares created here. Which makes it easier to access these shares.
Click Add to create a new share.
The Add Shared Folder Wizard appears.
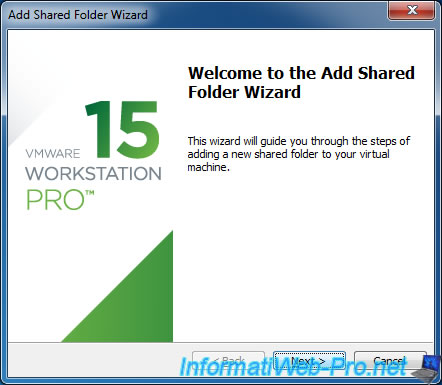
Click Browse to select the folder you want to share and make available to the virtual machine.
Then, enter the name under which this share will appear in the guest OS.

Enable sharing by checking the «Enable this share» box and check the «Read-only» box if you want this share to be read only.
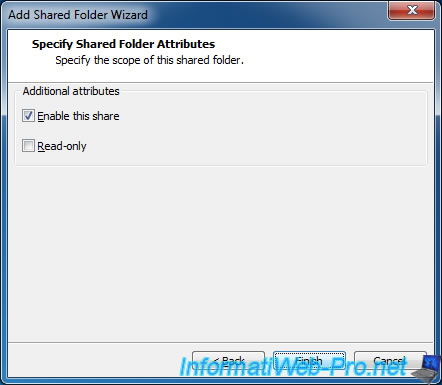
Save the settings and click Yes.
If you don’t check the «Map as a network drive . » box, the share will not appear in Computer (or This PC) by default.
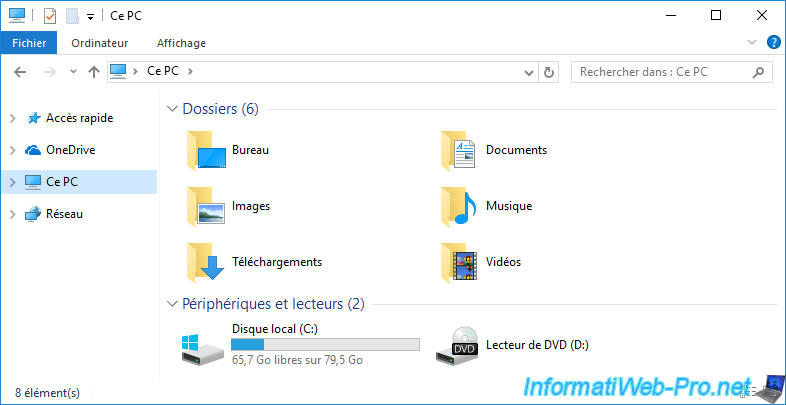
In order to access it, you will have to go through the network option (but you will probably encounter a network discovery disabled by default error).
To access them without problem, type : \\vmware-host\Shared Folders
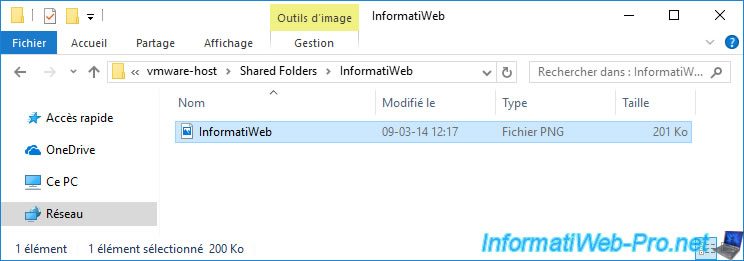
As you can see, our InformatiWeb share appears.
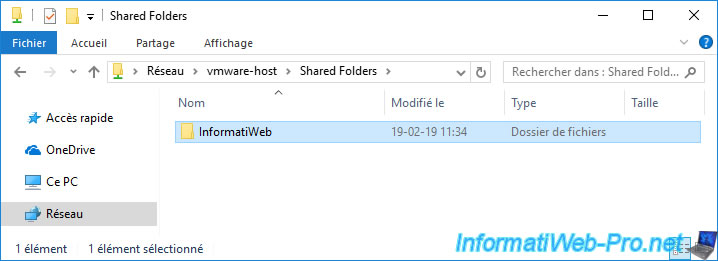
In this folder, we find the files of this shared folder.
To make your life easier, we recommend that you check the «Map as a network drive in Windows guests» box to have VMware Workstation automatically create a network drive whose contents will match the list of shared folders here.
In Computer (or This PC), you will see a «Shared Folders» network drive that is accessible with the letter Z and is mapped to \\vmware-host\Shared Folders.
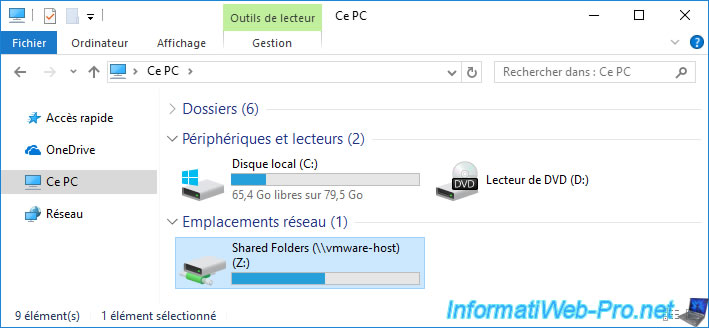
As expected, you will have access to the list of shares created in the virtual machine settings.
VMWARE + LINUX: How to share folder between host and VM
This is a quick article about a recurring question: How can I share a local directory with my VMware Virtual Machine using a Linux Distribution?
PRE-REQUISITE
To make this tutorial possible, first of all you need be sure you have installed vmtools drivers. In case you are not sure, please execute:
STEP-BY-STEP
First we need to share a local folder using your VMware. Go to VM menu, after Settings > Options > Shared Folders and click on ‘Always enabled’. After, click on ‘Add…’ button and choose your local folder to share it.
In order to confirm if your local selected folder was really shared, run the below command and check if your folder will be listed.
After that, create a directory inside /mnt/hgfs. Thus, open your terminal in order to create a directory called ‘shared’ and execute the following command.
Now, let’s share the ‘shared’ directory we just created.
That’s it! It is sharing and you can check it by clicking on Activities > Files > Other locations > Computer or running the commands:
If you have experiencing some issues, please restart your VM and check again if the folder is shared following the above commands.
Keeping Sharing After VM Re-start
The procedure instructed above work until the next VM restart. Thus, if you want to persist this change, please follow as instructed below.
You must have administrator permission to edit /etc/fstab. In this example, we will use nano editor.
If you do not have a section reserved to shared folders, please add this instructions at the end of the file.
After edit it, press CTRL + O simultaneously and press ENTER to confirm the changes. Next, press CTRL + X to exit nano editor.
Now you can turn your VM off or simply restart it without lose the sharing.