estorgio / Mounting VirtualBox shared folders on Ubuntu Server 18.04 LTS (Bionic Beaver).md
This guide will walk you through the steps on how to setup a VirtualBox shared folder inside your Ubuntu Server guest.
This guide assumes that you are using the following setup:
-
with Extension Pack installed
- Microsoft Windows 7 SP1 as the host OS
- A fresh install of Ubuntu Server 18.04.2 LTS as the guest OS
You could still make this guide work with other setups (possibly with some modifications to the commands and whatnot). But if you want to do it the way I did then please feel free to use my setup above.

Right-click your VM, then click Settings

Go to Shared Folders section

Add a new shared folder

On Add Share prompt, select the Folder Path in your host that you want to be accessible inside your VM. Type shared for the Folder Name. Make sure that Read-only and Auto-mount are unchecked and Mount point is blank. Then click OK.


Once your VM is up and running, go to Devices -> Insert Guest Additions CD image

Use the following command to mount the CD
Install dependencies for VirtualBox guest additions
Run the installation script for the guest additions. Wait until the installation completes.
Create shared directory in your home
Mount the shared folder from the host to your
The host folder should now be accessible inside the VM.
Make the mount folder persistent
This directory mount we just made is temporary and it will disappear on next reboot. To make this permanent, we’ll set it so that it will mount our
/shared directory on system startup
Edit fstab file in /etc directory
Add the following line to fstab (separated by tabs). Make sure to replace <username> with your username. Save the file.
Add the following line to /etc/modules and save
Reboot the VM and log-in again
Go to your home directory and check to see if the directory is highlighted in green.

If it is then congratulations! You successfully linked the directory within your VM with your host folder.
Bonus: Using shared folders as Apache root directory
How to point apache’s web directory to our folder in the host.
- Remove apache’s old html directory (WARNING! Backup your data if necessary)
- Add a symbolic link in its place
Note: This setup works fine with Windows hosts. But if you are using Linux or Mac as the host then you may have to set appropriate file permissions on your host directory with chmod in order to make it work.
Still not working?
If you’ve followed the steps above and it still doesn’t work, please let me know by posting a comment below. Please use the following format and be sure to be as detailed as possible so that I can have enough information to help you out.
Do note that I’m mostly a Windows user and I’m not that well versed with Linux but I will do my best to help you out.
Some extra notes:
- If you can’t insert Guest Additions CD Image (Error dialog box popped out), try «Devices->Optical Drives->Remove Disk From . «, and then load it again.
- The command:
sudo apt-get install -y build-essential linux-headers-`uname -r` , PLEASE DO NOT CHANGE THE uname -r part, it is an embedded command. - The command in (2) is VERY time-consuming. If it fails at some point in time, just run it again, it will continue the download.
In case you lost your Guest Additions CD Image or you want to get the one that suits your current version of VirtualBox, get your iso from this link:
http://download.virtualbox.org/virtualbox/
and you might need to rename your iso file.

*Notice the path and expected name of the iso file!
BTW Thanks estorgio, your article really helped!
Great help, many thanks.
@ngjuping
Thanks for the extra notes. That really helps.
I also would like to add that some users are installing Guest Additions from the official repositories using apt or apt-get . I don’t think this is a good idea since Guest Additions offered by official repositories might not match with the VirtualBox version you are using. By opting to use the Guest Additions that comes with your VirtualBox installation, you can be sure that the Guest Additions version installed on your guest OS exactly matches with the VirtualBox version installed on your host OS.
@estorgio Thanks. I was able to get a shared folder working fine in virtual box.
@estorgio thank you for your article been using your help, anyway why not use the article as tree branch? so just select branch version 16.04 or 18.04, it will help a lot and also it will be good if the url for this article is clear not hash
@rsyqvthv okay i got it, for those in need for special chmod and chown,
in /etc/fstab
shared /home/<username>/shared vboxsf rw,exec,uid=<youruserid>,gid=<yourusergroupid>,dmode=755,fmode=644 0 0
example :
modul /odoo/custom/addons vboxsf rw,exec,uid=112,gid=115,dmode=755,fmode=644 0 0
dmode = directory mode
fmode = file mode
after that as usual shutdown -r now
if you check stat /home/<username>/shared it will show you the right ownership with your custom user and group also this apply to the folder and also child files or folders
how to find your user id and your group id or user group id, check this: https://kb.iu.edu/d/adwf (i’m lazy to write it LoL)
Note 1:
auto-mount and make permanent doesn’t work using multi folder setting, just tested and only work on Transient folder (or maybe I just don’t know how to use ‘mount points’) anyway i just don’t thick those two and multi folder sharing worked fine
Write multi line for multi Shared Folders:
i’m using multiple odoo version and it must have their own user:group (defaults, you can customized it, but better leave it as is)
so i need
user name odoo
group name odoo
or at least for best practice not root:root
Note 2:
again something is not right,
virtual box: Version 6.1.6 r137129 (Qt5.6.2)
host: windows 10
guest: ubuntu 18.04.4
if you edit Shared Folder settings while the terminal is on, for some unknown reason the saved path of Transient Folders is gone when you power down terminal (never happen on latest v5.x and v6.0 vbox).
so have to save while terminal is off and you can tick the auto mount option to use Machine Folders mode
Смонтируйте общую папку VirtualBox в гостевой системе Ubuntu или Linux
Возможно, вы настроили общую папку VirtualBox, как мы описывали ранее, но вы не можете использовать ее или копировать в нее файлы, пока не смонтируете общую папку VirtualBox в гостевой ОС Ubuntu или Linux. Настройка общей папки VBox позволяет легко обмениваться файлами между хост-ОС и гостевой ОС. В этом посте показано, как смонтировать общую папку VBox в гостевой системе Ubuntu. Этот метод работает практически во всех дистрибутивах Linux.
Смонтировать виртуальную папку VirtualBox в Ubuntu
Шаги для монтирования общих папок VBox различны для Windows и Ubuntu / Debian. Руководство по Windows для отображения общей папки VBox будет опубликовано далее. В этом руководстве только показано, как смонтировать общую папку VirtualBox в Ubuntu и других гостевых ОС Linux. Хост-ОС, на которой установлена Oracle VirtualBox VM, может быть любой.
Прежде чем пытаться подключить общую папку, как описано в этом руководстве, убедитесь, что у вас есть настроенная общая папка на VirtualBox.
Рекомендуемые сборки HTPC / Home Server:
Общие папки VBox для монтирования Ubuntu / Debian Guest
Монтировать общие папки VirtualBox легко на гостевых ОС Linux. Если вы включили его Auto-mount при создании общей папки, она должна автоматически подключаться к /media/USER/sf_ShareName или /media/sf_ShareName , в зависимости от вашей гостевой ОС.
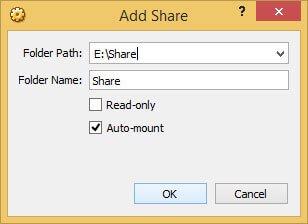
VirtualBox Shared Folder Auto-mount
В примере общей папки, показанной на рисунке выше, Folder Name также известен как ShareName . Его точка монтирования будет: /media/htpcbeginner/sf_Share или /media/sf_Share , в зависимости от гостевой ОС. Имя пользователя htpcbeginner будет другим в вашем случае. Перейдите к этим папкам для доступа к файлам.
Разрешения для общей папки VitualBox
При попытке доступа к общей папке VirtualBox в Ubuntu (или других дистрибутивах Linux) могут возникнуть проблемы с разрешениями. Общая папка монтируется с 770 разрешениями для root пользователя и vboxsf группы. Следовательно, вам необходимо включить root (права администратора) доступ к общим файлам. Но это может быть неудобно, и вы можете захотеть, чтобы текущий пользователь (вы) имел доступ к файлам без необходимости включать root или открывать проводник с правами root.
Чтобы подключить общую папку VirtualBox в Ubuntu и получить доступ ко всему в общей папке как пользователь, в этом примере htpcbeginner вам нужно будет вручную добавить пользователя в vboxsf группу, используя следующую команду:
Конечно, замените USER своим именем пользователя. После этого пользователь получит доступ на чтение / запись к общей папке VBox. Для удобства доступа вы можете создать символическую ссылку на смонтированную общую папку в вашей домашней папке:
Обратите внимание, что это /media/htpcbeginner/sf_Share может /media/sf_Share зависеть от того, как ваша ОС Linux монтирует общую папку VBox. Также замените htpcbeginner своим именем пользователя. После этого у вас будет символическая ссылка, созданная для общей папки Vbox VM в вашем домашнем каталоге, как показано ниже.
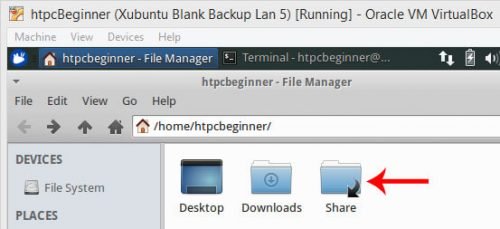
Совместно используемая папка VBox в Xubuntu
Смонтируйте общую папку VBox в Ubuntu
А что, если вы не смонтировали общую папку? Вы можете перейти к Device -> Shared Folder Settings , отредактировать общую папку и включить автоматическое монтирование. Вы также можете проверить «Сделать постоянным», если вы хотите, чтобы крепление прилипало при перезагрузке. Кроме того, вы можете в любое время вручную смонтировать общую папку VirtualBox в Ubuntu или Linux, используя следующую команду:
Замените ShareName с Folder Name первого изображения NewFolder на нужное имя папки (может быть таким же, как ShareName ). Использование этой команды для монтирования общей папки VirtualBox в Ubuntu / Debian автоматически активирует разрешения на чтение / запись для текущего пользователя. Эти инструкции по монтажу работают во всех дистрибутивах Linux.
Использование fstab для автоматического монтирования общих папок VirtualBox во время загрузки не работает в последних версиях Ubuntu, так как службы VirtualBox запускаются после монтирования файловой системы. Вы можете столкнуться с ошибкой «нет такого устройства», так как ОС не может найти общую папку для монтирования. ОС может перестать загружаться. Таким образом, что позволяет Auto-mount в Shared Folder Settings и добавлении пользователя к vboxsf группе является способом установки автомонтирования во время загрузки с необходимыми разрешениями. Итак, вы можете смонтировать общую папку VBox в Ubuntu или других гостевых ОС Linux и наслаждаться плавным обменом файлами между двумя ОС.