Управление IP-адресом в Ubuntu
В наше время все происходит через Интернет. Не ошибусь, если скажу, что «Интернет стал основным условием нашей жизни». А Интернет — это сеть сетей, которые связаны между собой. Чтобы пользоваться Интернетом, необходимо знать основы работы сети и способы подключения локальной сети к Интернету. Первое и самое важное при подключении к Интернету — это IP-адрес. IP-адрес — это ваш идентификатор в Интернете, такой же, как номер телефона, номер социального страхования и т.д.
Чтобы просматривать Интернет, вам нужен IP-адрес. Если сеть не работает или не работает, пользователь должен уметь найти причину проблемы. Чтобы определить проблему, необходимо знать основы работы в сети. Сетевой стек Linux обеспечивает большую гибкость в управлении сетью через графический интерфейс пользователя и командную строку. В этом учебнике мы рассмотрим, как управлять, отлаживать и устранять сетевые проблемы с помощью графического интерфейса Linux и интерфейса командной строки.
Как назначить статически IP-адрес
Когда вы подключаетесь к сети, первое, что получает ваш компьютер, — это IP-адрес от сетевого маршрутизатора. Существует два способа присвоения IP-адреса. Один из них — статический, а другой — динамический. В этом разделе мы покажем вам, как назначить IP-адрес статически через графический интерфейс пользователя и через командную строку.
Шаг 1: Сначала откройте терминал. Когда терминал будет открыт, вы увидите экран, похожий на этот:
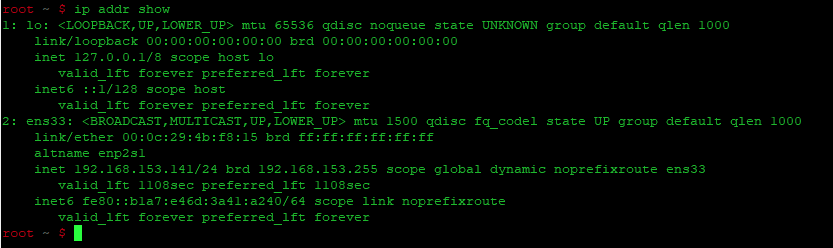
Шаг 2: Введите команду «ip addr show», чтобы увидеть доступные сетевые адаптеры, которым вы хотите изменить IP-адрес, и нажмите кнопку execute.
В этом руководстве мы сосредоточимся на «ens33». Результат будет выглядеть следующим образом:
Шаг 3: Используйте команду «ip addr add X.X.X.X/24 dev ens33» для изменения IP-адреса. В нашем примере адрес X.X.X.X равен 192.168.153.142.
Шаг 4: Выполните вышеуказанную команду, и IP-адрес будет успешно изменен. Вы можете проверить это с помощью команды «ip addr show».
Как изменить статический IP-адрес
Чтобы изменить статический IP-адрес, назначенный нашему компьютеру, выполните следующие действия:
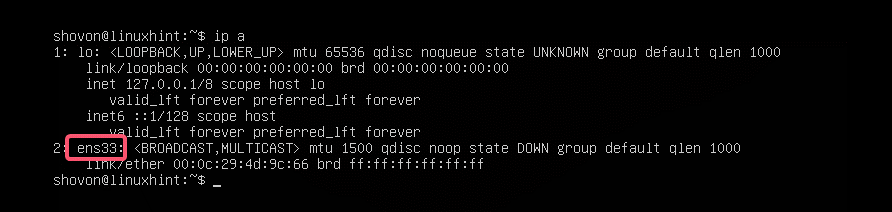
Шаг 1: Прежде всего, откройте Терминал. Введите команду «ip addr show», чтобы увидеть доступные сетевые адаптеры, которым вы хотите изменить IP-адрес, и нажмите кнопку execute.
В этом руководстве мы сосредоточимся на «ens33». Результат будет выглядеть следующим образом:
Шаг 2: Используйте команду «sudo ifconfig ens33 X.X.X.X netmask 255.255.255.0» для изменения IP-адреса. В нашем примере X.X.X.X.X адрес 192.168.153.142.
Шаг 3: Выполните вышеуказанную команду, и IP-адрес будет успешно изменен. Вы можете проверить это с помощью команды «ip addr show».
Как установить, какой DNS-сервер будет использоваться для разрешения доменных имен
DNS-сервер является одним из наиболее важных компонентов сети. Задача DNS-сервера заключается в преобразовании доменного имени или URL в IP-адрес, используемый сетью для связи с сервером. Если DNS-сервер настроен неправильно или перестал работать, пользователь не сможет просматривать Интернет. Чтобы изменить IP-адрес DNS, выполните следующие действия:
Шаг 1: Прежде всего, откройте Терминал. Перед изменением DNS-сервера сделайте резервную копию существующего файла конфигурации сети. Для этого выполните следующую команду:
Шаг 2: Ввведите команду:
В данном примере 1.1.1.1 — это адрес сервера DNS.
После выполнения вышеуказанных команд адрес DNS-сервера был успешно обновлен. Для проверки выполните команду:
Как установить IP-адрес шлюза
Шлюз, также известный как шлюз по умолчанию, является очень важным компонентом в сети. Обычно он представляет собой пограничный маршрутизатор и используется, когда компьютер хочет отправить информацию через Интернет в другую сеть. Чтобы изменить IP-адрес шлюза, выполните следующие действия:
How to Configure Network on Ubuntu 18.04 LTS with Netplan?
Starting from Ubuntu 18.04 LTS, Ubuntu uses Netplan to configure network interfaces by default.
In this article, I will show you how to use Netplan on Ubuntu 18.04 LTS.
Let’s get started!
Netplan Configuration Files:
On Ubuntu 18.04 LTS, the Netplan YAML configuration files are placed in the /etc/netplan/ directory. To configure a network interface, you have to create or modify the required YAML files in this directory.
YAML configuration files has the .yaml extension. The default Netplan YAML configuration file /etc/netplan/50-cloud-init.yaml is used to configure network interfaces using Netplan.
Configuring Network Interface via DHCP with Netplan:
In this section, I will show you how to configure a network interface via DHCP on Ubuntu with Netplan.
First, find the network interface name that you want to configure with the following command:
As you can see, I have one network interface card (NIC) installed on my Ubuntu 18.04 LTS machine named ens33. It does not have any IP address configured right now. So, let’s use Netplan to configure it via DHCP.
To configure the network interface ens33 via DHCP using Netplan, open the default Netplan configuration file on Ubuntu 18.04 LTS /etc/netplan/50-cloud-init.yaml with the following command:

You should see the following window.

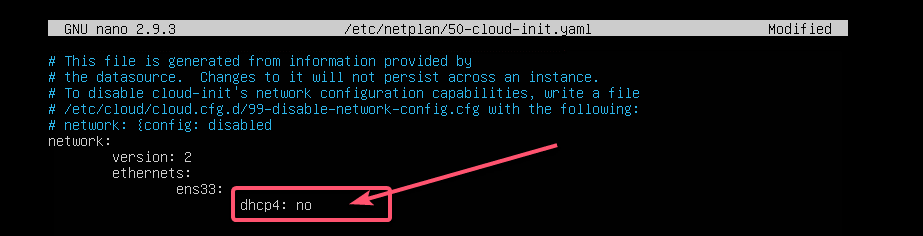
Now add the following lines in the network section.
Here, dhcp4: yes means, use DHCP for IPv4 protocol to configure the network interface ens33.
NOTE: The indentations are really useful. Make sure you indent each line correctly. It will make the syntax clearer and more comfortable to the eye.
Finally, the configuration file should look something like this.

Now, press <Ctrl> + x, then press y, and followed by <Enter> to save the file.
The good thing about Netplan is that before you apply the changes, you can make sure the configuration file has no typos or any other mistakes with the following command:
Now press <Enter>.

If everything is alright, you should see the Configuration accepted message as marked in the screenshot below.
If there’s any problem with the configuration file, you will see appropriate error messages here.
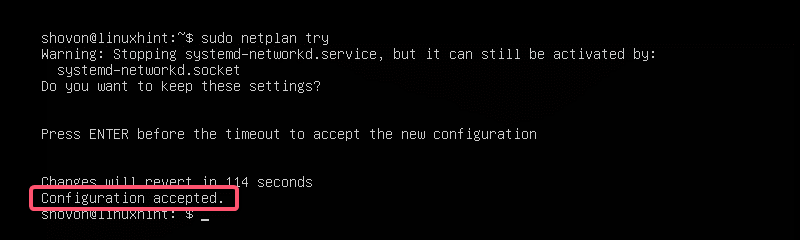
This feature will surely help you avoid complex hard to track future problems with Netplan configuration files.
Finally, apply the changes permanently using Netplan with the following command:

As you can see, the network interface ens33 is configured via DHCP.

Setting Up Static IP Address with Netplan:
If you want to set up a static IP on your network interface using Netplan, then this section is for you.
You can manually set the IP address, name server, gateway, etc. of your network interface using Netplan.
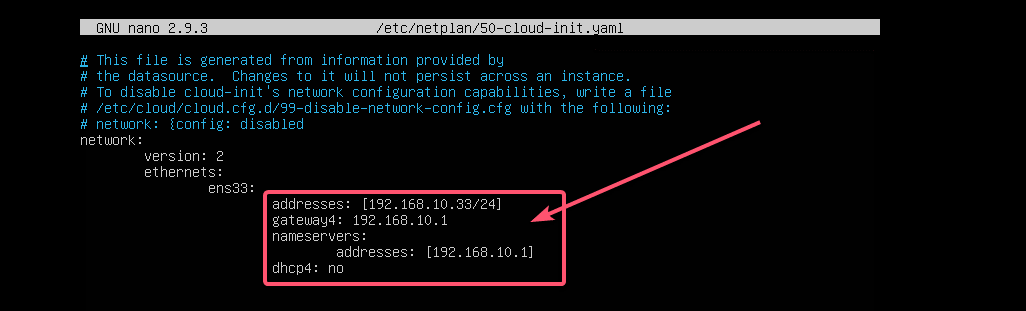
Let’s say, you want to configure your network interface ens33 as follows:
First, check the network configuration of the ens33 network interface with the following command:
This is to help you verify that the network interface settings really changed.

Now, edit the Netplan YAML configuration file, /etc/netplan/50-cloud-init.yaml, with the following command:
If you’ve followed me throughout the article, then the configuration file should be like this. Now, remove the line as marked in the screenshot below.
And type in the lines as marked in the screenshot below.
NOTE: Remember, indentation is essential for YAML files. If you forget to indent correctly, Netplan will not let you apply the configuration file. So, you must indent every step of the YAML configuration file, as shown in the screenshot below.
Now, press <Ctrl> + x, then press y, and followed by <Enter> to save the file.
Now, check whether there’s any error in the configuration file with the following command:
Что такое ens33 в Linux?
Команда ip — самая популярная команда для поиска IP-адресов, назначенных сетевым интерфейсам вашего Linux-сервера или рабочей станции. … Сетевой интерфейс ens33 имеет IPv4-адрес 192.168. 21.131, а сетевой интерфейс ens37 имеет IPv4-адрес 192.168. 50.1.
Как мне найти свой IP в Linux?
Следующие команды позволят вам получить частный IP-адрес ваших интерфейсов:
- если конфиг -а.
- IP-адрес (IP-адрес)
- имя хоста -I | awk ‘
‘ - ip маршрут получить 1.2. …
- (Fedora) Настройки Wi-Fi → щелкните значок настройки рядом с именем Wi-Fi, к которому вы подключены → Ipv4 и Ipv6 можно увидеть.
- nmcli -p устройство показать.
7 февраля. 2020 г.
Что такое eno1 в Linux?
eno1 — это встроенный адаптер Ethernet (проводной). lo — это устройство с обратной связью. Вы можете представить его как виртуальное сетевое устройство, которое есть во всех системах, даже если они не подключены к какой-либо сети. Он имеет IP-адрес 127.0. 0.1 и может использоваться для локального доступа к сетевым сервисам.
Где eth0 в Ubuntu?
Вы можете использовать команду ifconfig или команду ip с командой grep и другими фильтрами, чтобы узнать IP-адрес, назначенный eth0, и отобразить его на экране.
Как мне найти имя моего интерфейса Ubuntu?
Вы можете использовать ifconfig для обнаружения активных сетевых устройств, для немного меньшего вывода используйте ifconfig -s. ifconfig печатает активные интерфейсы, с -a вы можете распечатать все интерфейсы, которые распознаются системой как сетевые интерфейсы. Или используйте ip addr. Показать активность в этом сообщении.
Как использовать Linux?
- pwd — Когда вы впервые открываете терминал, вы находитесь в домашнем каталоге вашего пользователя. …
- ls — используйте команду «ls», чтобы узнать, какие файлы находятся в каталоге, в котором вы находитесь.…
- cd — Используйте команду «cd», чтобы перейти в каталог. …
- mkdir & rmdir — используйте команду mkdir, когда вам нужно создать папку или каталог.
Как мне найти свой локальный IP-адрес?
Нажмите на значок шестеренки справа от беспроводной сети, к которой вы подключены, а затем нажмите «Дополнительно» в нижней части следующего экрана. Прокрутите немного вниз, и вы увидите IPv4-адрес вашего устройства.
Как включить Интернет в Linux?
Как подключиться к Интернету с помощью командной строки Linux
- Найдите интерфейс беспроводной сети.
- Включите беспроводной интерфейс.
- Поиск точек беспроводного доступа.
- Файл конфигурации соискателя WPA.
- Найдите имя драйвера беспроводной сети.
- Подключиться к Интернету.
2 колода 2020 г.
Что такое сеть в Linux?
Компьютеры соединены в сеть для обмена информацией или ресурсами друг с другом. Два или более компьютера, подключенных через сетевой носитель, называются компьютерной сетью. … Компьютер, на котором установлена операционная система Linux, также может быть частью сети, будь то маленькая или большая сеть, благодаря своей многозадачности и многопользовательской природе.
Как мне найти версию для Linux?
Проверить версию ОС в Linux
- Откройте приложение терминала (оболочка bash)
- Для входа на удаленный сервер с помощью ssh: ssh user @ server-name.
- Введите любую из следующих команд, чтобы найти имя и версию ОС в Linux: cat / etc / os-release. lsb_release -a. hostnamectl.
- Введите следующую команду, чтобы узнать версию ядра Linux: uname -r.
Как найти eth0 или eth1?
Разберите вывод ifconfig. Он предоставит вам аппаратный MAC-адрес, который вы можете использовать, чтобы определить, какая карта какая. Подключите к коммутатору только один из интерфейсов, затем используйте вывод mii-diag, ethtool или mii-tool (в зависимости от того, какой из них установлен), чтобы увидеть, на какой из них есть ссылка.
Как мне найти свою сетевую карту в Linux?
HowTo: Linux Показать список сетевых карт
- Команда lspci: вывести список всех устройств PCI.
- Команда lshw: вывести список всего оборудования.
- Команда dmidecode: вывести список всех аппаратных данных из BIOS.
- Команда ifconfig: Устаревшая утилита настройки сети.
- Команда ip: Рекомендуемая новая утилита настройки сети.
- Команда hwinfo: Проверить Linux на сетевые карты.
17 колода 2020 г.
Как мне получить Ifconfig в Ubuntu?
Команда ifconfig не найдена в Ubuntu 18.04
Вы можете установить утилиту ifconfig, запустив sudo apt install net-tools, или вы можете использовать новую команду ip. Рекомендуется использовать утилиту ip, которая имеет множество опций, чтобы предоставить вам всю необходимую информацию о конфигурации вашей сети.
Как мне увидеть все интерфейсы в Linux?
Linux Показать / отобразить доступные сетевые интерфейсы
- Команда ip — используется для отображения или управления маршрутизацией, устройствами, политикой маршрутизации и туннелями.
- Команда netstat — используется для отображения сетевых подключений, таблиц маршрутизации, статистики интерфейса, маскарадных подключений и многоадресного членства.
- Команда ifconfig — используется для отображения или настройки сетевого интерфейса.
Как создать интерфейс в Linux?
Как включить (UP) / отключить (DOWN) порт сетевого интерфейса (NIC) в Linux?
- Команда ifconfig: команда ifconfig используется для настройки сетевого интерфейса. …
- Команда ifdown / ifup: команда ifdown отключает сетевой интерфейс, тогда как команда ifup запускает сетевой интерфейс.
Что такое Ens33?
Команда ip — самая популярная команда для поиска IP-адресов, назначенных сетевым интерфейсам вашего Linux-сервера или рабочей станции. … Сетевой интерфейс ens33 имеет IPv4-адрес 192.168. 21.131, а сетевой интерфейс ens37 имеет IPv4-адрес 192.168. 50.1.
Network configuration
Ubuntu ships with a number of graphical utilities to configure your network devices. This document is geared toward server administrators and will focus on managing your network on the command line.
Ethernet interfaces
Ethernet interfaces are identified by the system using predictable network interface names. These names can appear as eno1 or enp0s25. However, in some cases an interface may still use the kernel eth# style of naming.
Identify Ethernet interfaces
To quickly identify all available Ethernet interfaces, you can use the ip command as shown below.
Another application that can help identify all network interfaces available to your system is the lshw command. This command provides greater details around the hardware capabilities of specific adapters. In the example below, lshw shows a single Ethernet interface with the logical name of eth4 along with bus information, driver details and all supported capabilities.
Ethernet Interface logical names
Interface logical names can also be configured via a Netplan configuration. If you would like control which interface receives a particular logical name use the match and set-name keys. The match key is used to find an adapter based on some criteria like MAC address, driver, etc. The set-name key can be used to change the device to the desired logical name.
Ethernet Interface settings
ethtool is a program that displays and changes Ethernet card settings such as auto-negotiation, port speed, duplex mode, and Wake-on-LAN. The following is an example of how to view the supported features and configured settings of an Ethernet interface.
IP addressing
The following section describes the process of configuring your system’s IP address and default gateway needed for communicating on a local area network and the Internet.
Temporary IP address assignment
For temporary network configurations, you can use the ip command which is also found on most other GNU/Linux operating systems. The ip command allows you to configure settings which take effect immediately – however they are not persistent and will be lost after a reboot.
To temporarily configure an IP address, you can use the ip command in the following manner. Modify the IP address and subnet mask to match your network requirements.
The ip can then be used to set the link up or down.
To verify the IP address configuration of enp0s25 , you can use the ip command in the following manner:
To configure a default gateway, you can use the ip command in the following manner. Modify the default gateway address to match your network requirements.
You can also use the ip command to verify your default gateway configuration, as follows:
If you require DNS for your temporary network configuration, you can add DNS server IP addresses in the file /etc/resolv.conf . In general, editing /etc/resolv.conf directly is not recommended, but this is a temporary and non-persistent configuration. The example below shows how to enter two DNS servers to /etc/resolv.conf , which should be changed to servers appropriate for your network. A more lengthy description of the proper (persistent) way to do DNS client configuration is in a following section.
If you no longer need this configuration and wish to purge all IP configuration from an interface, you can use the ip command with the flush option:
Note
Flushing the IP configuration using the ip command does not clear the contents of /etc/resolv.conf . You must remove or modify those entries manually (or re-boot), which should also cause /etc/resolv.conf , which is a symlink to /run/systemd/resolve/stub-resolv.conf , to be re-written.
Dynamic IP address assignment (DHCP client)
To configure your server to use DHCP for dynamic address assignment, create a Netplan configuration in the file /etc/netplan/99_config.yaml . The following example assumes you are configuring your first Ethernet interface identified as enp3s0 .
The configuration can then be applied using the netplan command:
Static IP address assignment
To configure your system to use static address assignment, create a netplan configuration in the file /etc/netplan/99_config.yaml . The example below assumes you are configuring your first Ethernet interface identified as eth0 . Change the addresses , routes , and nameservers values to meet the requirements of your network.
The configuration can then be applied using the netplan command.
NOTE
netplan in Ubuntu Bionic 18.04 LTS doesn’t understand the “ to: default ” syntax to specify a default route, and should use the older gateway4: 10.10.10.1 key instead of the whole routes: block.
The loopback interface is identified by the system as lo and has a default IP address of 127.0.0.1. It can be viewed using the ip command.
Name resolution
Name resolution (as it relates to IP networking) is the process of mapping hostnames to IP addresses, and vice-versa, making it easier to identify resources on a network. The following section will explain how to properly configure your system for name resolution using DNS and static hostname records.
DNS client configuration
Traditionally, the file /etc/resolv.conf was a static configuration file that rarely needed to be changed, or it automatically changed via DCHP client hooks. systemd-resolved handles nameserver configuration, and it should be interacted with through the systemd-resolve command. Netplan configures systemd-resolved to generate a list of nameservers and domains to put in /etc/resolv.conf , which is a symlink:
To configure the resolver, add the IP addresses of the appropriate nameservers for your network to the netplan configuration file. You can also add optional DNS suffix search-lists to match your network domain names. The resulting file might look like the following:
The search option can also be used with multiple domain names so that DNS queries will be appended in the order in which they are entered. For example, your network may have multiple sub-domains to search; a parent domain of example.com , and two sub-domains, sales.example.com and dev.example.com .
If you have multiple domains you wish to search, your configuration might look like the following:
If you try to ping a host with the name server1 , your system will automatically query DNS for its Fully Qualified Domain Name (FQDN) in the following order:
If no matches are found, the DNS server will provide a result of notfound and the DNS query will fail.
Static hostnames
Static hostnames are locally defined hostname-to-IP mappings located in the file /etc/hosts . Entries in the hosts file will have precedence over DNS by default. This means that if your system tries to resolve a hostname and it matches an entry in /etc/hosts , it will not attempt to look up the record in DNS. In some configurations, especially when Internet access is not required, servers that communicate with a limited number of resources can be conveniently set to use static hostnames instead of DNS.
The following is an example of a hosts file where a number of local servers have been identified by simple hostnames, aliases and their equivalent Fully Qualified Domain Names (FQDN’s):
Note
In this example, notice that each of the servers were given aliases in addition to their proper names and FQDN’s. Server1 has been mapped to the name vpn, server2 is referred to as mail, server3 as www, and server4 as file.
Name Service Switch (NSS) configuration
The order in which your system selects a method of resolving hostnames to IP addresses is controlled by the Name Service Switch (NSS) configuration file /etc/nsswitch.conf . As mentioned in the previous section, typically static hostnames defined in the systems /etc/hosts file have precedence over names resolved from DNS. The following is an example of the line responsible for this order of hostname lookups in the file /etc/nsswitch.conf .
files first tries to resolve static hostnames located in /etc/hosts .
mdns4_minimal attempts to resolve the name using Multicast DNS.
[NOTFOUND=return] means that any response of notfound by the preceding mdns4_minimal process should be treated as authoritative and that the system should not try to continue hunting for an answer.
dns represents a legacy unicast DNS query.
mdns4 represents a multicast DNS query.
To modify the order of these name resolution methods, you can simply change the hosts: string to the value of your choosing. For example, if you prefer to use legacy unicast DNS versus multicast DNS, you can change the string in /etc/nsswitch.conf as shown below:
Bridging multiple interfaces
Bridging is a more advanced configuration, but is very useful in multiple scenarios. One scenario is setting up a bridge with multiple network interfaces, then using a firewall to filter traffic between two network segments. Another scenario is using bridge on a system with one interface to allow virtual machines direct access to the outside network. The following example covers the latter scenario:
Configure the bridge by editing your netplan configuration found in /etc/netplan/ , entering the appropriate values for your physical interface and network:
Now apply the configuration to enable the bridge:
The new bridge interface should now be up and running. The brctl provides useful information about the state of the bridge, controls which interfaces are part of the bridge, etc. See man brctl for more information.
networkd-dispatcher for hook scripts
Users of the former ifupdown may be familiar with using hook scripts (e.g., pre-up, post-up) in their interfaces file. Netplan configuration does not currently support hook scripts in its configuration definition.
Instead, to achieve this functionality with the networkd renderer, users can use networkd-dispatcher. The package provides both users and packages with hook points when specific network states are reached, to aid in reacting to network state.
Note:
If you are on Desktop (not Ubuntu Server) the network is driven by Network Manager — in that case you need NM Dispatcher scripts instead.
The Netplan FAQ has a great table that compares event timings between ifupdown / systemd-networkd / network-manager .
It is important to be aware that these hooks run asynchronously; i.e. they will not block transition into another state.
The Netplan FAQ also has an example on converting an old ifupdown hook to networkd-dispatcher .
Resources
The Ubuntu Wiki Network page has links to articles covering more advanced network configuration.
The Netplan website has additional examples and documentation.
The Netplan man page has more information on Netplan.
The systemd-resolved man page has more information on systemd-resolved service.