Scale
Scaling means changing proportions of objects. Pressing S will enter the Scale transformation mode where the selected element is scaled inward or outward according to the mouse pointer’s location. The element’s scale will increase as the mouse pointer is moved away from the Pivot Point and decrease as the pointer is moved towards it. If the mouse pointer crosses from the original side of the Pivot Point to the opposite side, the scale will continue in the negative direction and flip the element.
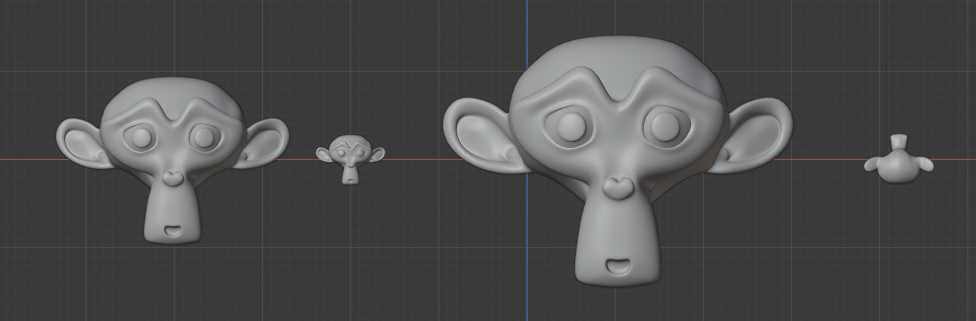
Basic scale usage. From left to right, the panels show: the original object, a scaled down object, a scaled up object and a scale-flipped object.
The amount of scaling will be displayed in the header of the 3D Viewport.

Using a combination of shortcuts gives you more control over your transformation. See Transform Control .
Options
The amount to resize the selection on the respected axis.
Aligns the transformation axes to a specified orientation constraint. See Transform Orientations for more information.
The extruded face will affect nearby geometry. See Proportional Editing for a full reference.
© Copyright : This page is licensed under a CC-BY-SA 4.0 Int. License. Last updated on 02/15/2023.
How and why do we apply scale in Blender?
Applying scale in Blender is a big mystery to many Blender users. Most 3D artists know that when a tool isn’t working as intended, you apply the scale. But why?
How and why do we apply scale? In object mode, you select your object, hit «ctrl+a» and select scale. Most commonly this is done during the modeling phase of a project to make modeling tools and modifiers behave as intended.
In the rest of this article, we will go into more depth about why this is done.
Why do we apply the scale?
Above we learned that applying scale is one of the most common solutions to problems that occur when we model and tools and modifiers do not behave as intended.
To understand why this is we need to understand a few things about Blender objects. An object in Blender is simply a container of whatever is included inside it. The object itself is represented by its origin.
In Blender, an object also has 3 primary vectors that describe its relation to the world. These are location, rotation, and scale. Everything that is inside an object will then have to comply with these basic primary values of the object. Let me explain.
If you have seen the movie, Harry Potter and the prisoner from Azkaban, you know that in one scene when Harry is riding the knight bus, the bus squeezes into a very narrow space between two other classic London buses. During this scene, we get a view from inside the bus where everything becomes squeezed.
Imagine your object being the bus and the contents inside it are everything inside the bus. Your geometry, modifiers, textures and everything else. It all has to conform to the location, rotation, and scale of the object, or in this case, the bus.
When we change the scale value of the object it has the same effect as when the bus is squeezed. Everything inside it squeezes as well. There is no magic even in Harry Potter, just some twisted logic.
Modeling tools and modifiers are also considered inside the object. This means that whatever they happen to do to our geometry, that operation will be influenced by the basic transformation values of the object.
What happens when we apply the scale?
Ok, back to Blender. If you open what I like to call the «n-panel», that is the panel on the right side of the 3D viewport that has the hotkey «n» to toggle.
In object mode with a mesh-object selected, you will find the «Item» tab. It has a section called «Transform». Here we have the location, rotation and scale vectors we spoke about earlier.
What really happens when we apply either scale, rotation or location is that these values will be reset to its default value without affecting the actual location, scale or location of everything that is contained within the object.
However, you might see a difference to your object if you have modifiers in the modifier stack. This is because the modifiers are not part of the actual mesh. They are added after the edit mode mesh but also depend on the location, scale, and rotation. The modifiers are simply recalculated after we apply any of these.
Therefore, when we apply the scale, we might see bevels coming from a bevel modifier instantly change thanks to the reset scale value as an example.
The object is a container for everything in it and everything inside will depend on these basic transformation values.
Another way to put it is that we just tell Blender that, hey, for this object, this is the new resting position. The bus is now squashed and that is the new normal.
This means that when we reset the values to their default without affecting the actual shape or size of the object, tools will go back to function as they were intended without the modification of these basic transformation values.
What about applying rotation and location?
Applying location is not something we generally want to do. It will take the origin point of the object and move it back to the center of the world while the mesh and everything inside the object stay in the same place.
More likely we want to move the origin with everything inside the object to center it to the world before we finish up our asset. For example, we want the object to be centered in the world before we export to another file format.
To do this I usually use the «shift+s» shortcut in object mode and choose «cursor to world origin» Then I hit «shift+s» again with my object selected and this time choose «Selection to 3D cursor».
Rotation is a different story. If we rotated the object in object mode, the rotation values may have been changed. If we don’t have modifiers, constraints, or keyframes set on our object that depend on the changed rotation we probably want to apply the rotation as well.
Just like with applied scale, the rotation will be set to zero on all axis and the current position of the object will be its new resting position.
What does dimension values do?
If you take a look at the transformation values for an object in the «n-panel» you will notice that there is a fourth vector there called dimension. This has to do with the bounding box of the object.
Every object in Blender has a bounding box around it. No matter the shape of the object it will always fit in a box. The dimension vector is just showing the size of that box. It is a primitive representation of the object that also can be used to make certain calculations.
If we change the dimension values you will notice that the object will resize and the scale values will increase or decrease together with the dimensions.
I personally never touch the values of the dimension when working in Blender. But I do imagine that the dimension values can be a good indicator for the size of an object for anyone that models for 3D printing.
How can I prevent the need to apply scale?
The simplest way is to never scale in object mode during your modeling phase. Always do your scaling in edit mode.
If this is not good enough for you and you really want to avoid scaling in object mode you can always lock the scale values from being changed in object mode.
Next to the scale values in the «n-panel» is a little lock icon. Press it for each of the scale axes and you will not be able to directly change these values with the scale tool. But you can still change the scale by changing the dimension or just change the scale directly in the «n-panel».
Related questions
How do you change the center of an object in Blender?
Use the right-click context menu and go to «set origin». Here you will find a menu with multiple options to move the origin of an object. The most versatile option is to use the 3D cursor. The 3D cursor can be moved with the «shift+s» menu then snapped to a selection by using the operation «cursor to selected» before you set the origin point.
How do you scale multiple objects in Blender?
Hold shift while you select the objects with left-click. Press «s» to scale. We can also scale the individual size of selected objects instead of scaling the distance between object along with the scaling of the objects themselves. Go to the pivot point menu at the top middle of the 3D viewport and set the pivot point to «individual origins» before scaling.
How do you separate objects in Blender?
Go into edit mode, select the piece you want to separate, press «p» and choose «selection». This piece will be separated into its own object.
Как применить scale в blender
Scaling means changing proportions of objects. Pressing S will enter the Scale transformation mode where the selected element is scaled inward or outward according to the mouse pointer’s location. The element’s scale will increase as the mouse pointer is moved away from the Pivot Point and decrease as the pointer is moved towards it. If the mouse pointer crosses from the original side of the Pivot Point to the opposite side, the scale will continue in the negative direction and flip the element.
Basic scale usage. From left to right, the panels show: the original object, a scaled down object, a scaled up object and a scale-flipped object.
The amount of scaling will be displayed in the header of the 3D Viewport.
Using a combination of shortcuts gives you more control over your transformation. See Transform Control .
Options
The amount to resize the selection on the respected axis.
Aligns the transformation axes to a specified orientation constraint. See Transform Orientations for more information.
The extruded face will affect nearby geometry. See Proportional Editing for a full reference.
© Copyright : This page is licensed under a CC-BY-SA 4.0 Int. License. Last updated on 06/13/2022.
Приёмы работы в Blender. Часть 1
Вопросы ставившие меня в тупик когда я начинал осваивать Blender.
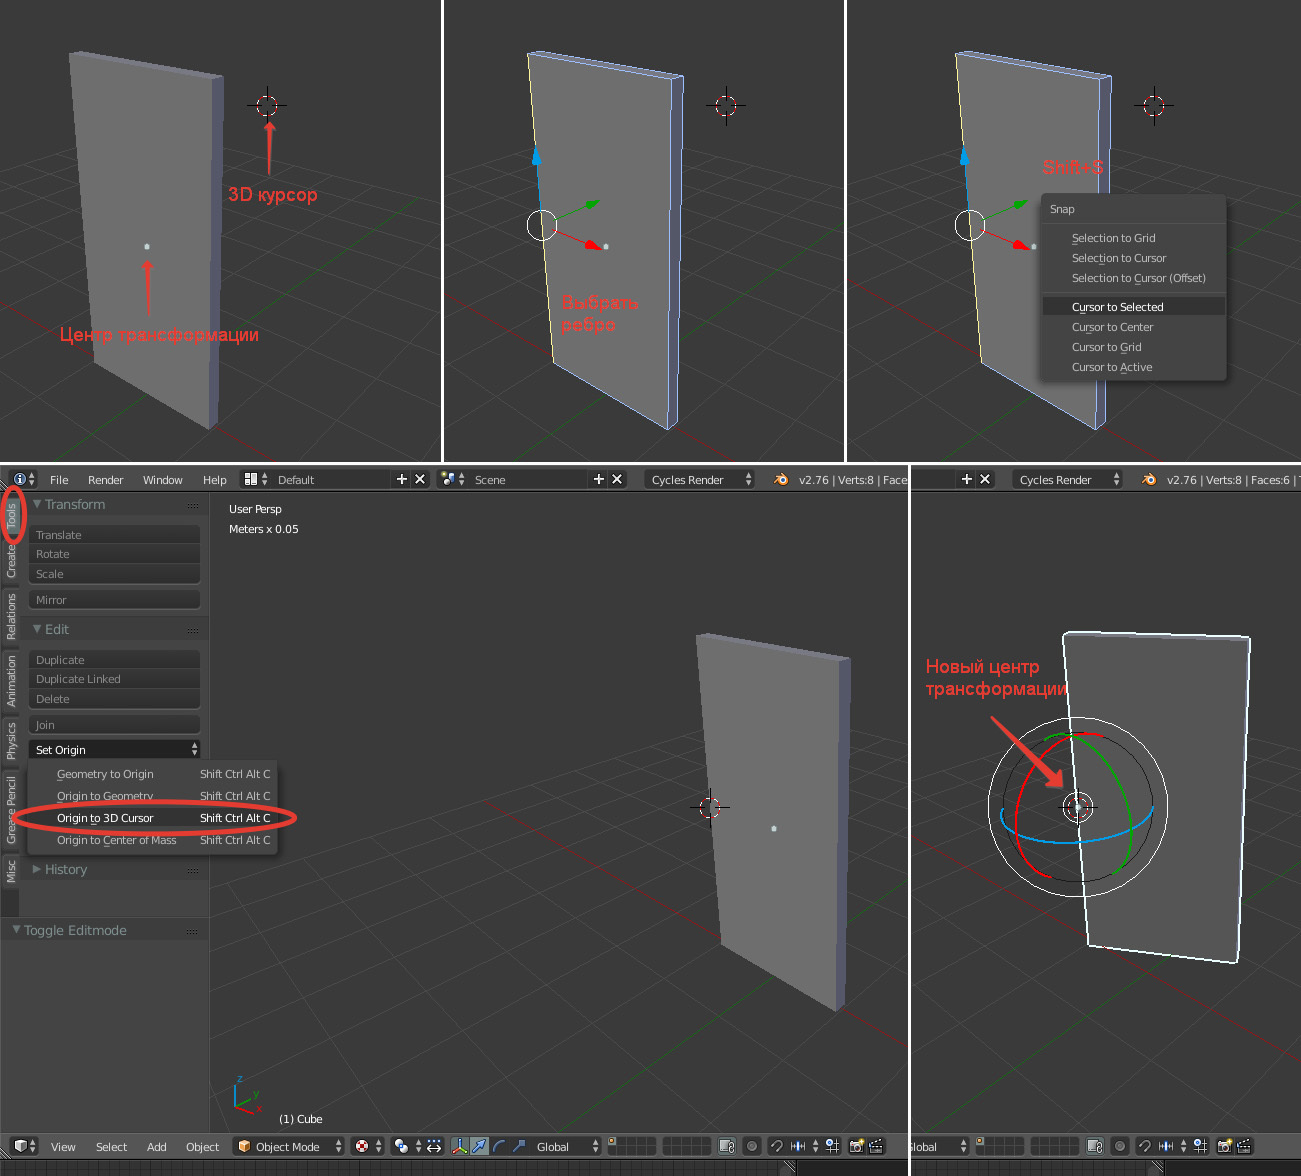
Перенос центра трансформации
Нужно, чтобы дверь поворачивалась вокруг петель, а не вокруг центра двери. Петли условно сейчас находятся на ребре. Переносим 3D курсор точно на центр ребра: Shift+S (Snap)> Cursor to Selected. Потом даём команду перенести центр трансформации в 3D курсор.
Не пропорциональные результаты скруглений и модификаторов
Нужно скруглить рёбра крышки стола. В режиме редактирования объекта (кнопка Tab) выбираем сразу все необходимые рёбра и давим Ctrl+B (Bevel). Проблема — скругление происходит не одинаково на всех гранях:

Так работает скругление потому, что размер объекта в процентах не равен 100%:
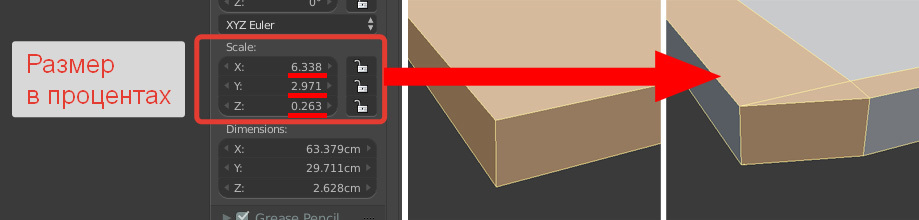
Сейчас с точки зрения блендера крышка стола — это растянутый куб, и все деформации рассчитываются тоже растянутыми. В этом есть смысл. Объекты могут менять размеры не пропорционально во время анимации, и все модификаторы должны так же менять размеры. Решение: нужно сказать блендеру, что текущие размеры — это и есть 100%. В обычном режиме давим Ctrl+A (Apply). Выбираем здесь Scale:

Ctrl+B (Bevel), должно получиться так:

Это также влияет на результаты модификаторов. Лично я уже рефлекторно нажимаю Ctrl+A (Apply) → Scale.
Сброс координат положения, вращения, размера
Вы создали объект, а он создался далеко, там где был 3D курсор, и его не видно и не понятно где он.
- Alt+G — сброс положения
- Alt+R — сброс вращения
- Alt+S — сброс размера
Ходовые кнопки
Помните: важно, над каким окном находится указатель мыши. Не торопитесь.
- G (Grab) — движение
- R (Rotate) — вращение (второе нажатие — второй режим вращения)
- S (Scale) — размер
- Кнопки X, Y, Z ограничивает манипуляцию только по одной оси
- Shift+X, Shift+Y, Shift+Z исключают из манипуляций выбранную ось
- « / » (View Local) (цифровая клавиатура) — режим, когда пропадают все объекты кроме выделенного
- «. » (View Selected) (цифровая клавиатура) — приблизиться к выбранному
- Home (View all) – зум, что бы всё влезло в экран
- С (Circle Select) — выбор окружностью
- B (Border Select) — выбор рамкой
- F (Face) (режим Tab) — создать полигон на основе точек, или объединить уже выбранные полигоны в один
- K (Knife) (режим Tab) — разрезать полигон
- J (Join) — объединить объекты
- P (seParate) (режим Tab) — разделить объект
- Ctrl+R (Loop cut and slide) (режим Tab) — разрезание цепочки квадратных полигонов вдоль
- Del или X > Dissolve edges / faces (режим Tab) — удаление разрезания цепочки квадратных полигонов вдоль
- E (Extrude) (режим Tab) — выдавливание
- Ctrl+B (Bevel) — фаска или скругление
- W (Specials) (режим Tab) — полезное меню с пунктами которых нигде больше нет. Мне часто нужно «Bridge edge loops» – мост между двумя цепочками граней.
- Ctrl+«+» и Ctrl+«-» (режим Tab) — прибавить в выбор соседние с уже выбранными полигоны или снять выбор с крайних полигонов
- Shift-F (Fly) — режим полёта вида, управление как в игре, W, S, A, D, E, Q
Как выровнять грань?
Конкретно речь идёт о подобной операции:

Нужно уменьшить размер группы точек до нуля по какой-либо оси. Команды можно вводить, последовательно нажимая кнопки. В данном случае давим последовательно S, Z, 0 (ноль) В левом нижнем углу рабочего 3D окна будет вот такая надпись:

А в самом окне будет так:

«Вперёд» — это ось Y
Старайтесь фронтальное направление предмета делать по глобальной и локальной оси Y. В некоторых модификаторах и игровом движке это направление принято за направление «вперёд» и не везде его можно изменить на другую ось.
Модификаторы Subdivision Surface и Multiresolution – в чём разница?
Subdivision Surface — это сглаженные поверхности. Multiresolution — это сглаженные поверхности с возможностью скульптинга поверх. С помощью Subdivision Surface удобно делать основную форму дивана. Потом поменять его на Multiresolution и кисточкой вылепить складки ткани.
Линкованые обьекты
Интерьер. Не надо делать все предметы в одном файле. Не удобно. Создавайте утюг отдельным файлом, стул другим файлом, комнату в третьем файле — главном.