Setting up a Debian Linux VM in VMware
There are many GNU+Linux distributions out there. Debian is our choice. Start by reading a little bit about it.
Download and Install VMware desktop hypervisor
Download and install the latest version of VMware desktop hypervisor for your computer:
Install VMware as a 30-day trial for now. Registered students will receive VMware Workstation/Fusion Pro license in 2-3 weeks. You can then enter the license to remove the trial status.
Download Debian
The current stable distribution of Debian is version 11, codenamed bullseye.
If your computer has Intel (x86) CPU, download debian-11.6.0-amd64-netinst.iso from here.
If your computer has M1/M2 CPU/GPU, download debian-11.6.0-arm64-netinst.iso from here.
Always verify the checksums of what you download.
Create a VM
Create a new virtual machine in VMware using the Debian ISO image you just downloaded.
For the OS for the VM, choose Debian 11.x 64-bit if available. Depending on your platform, it may not be an option yet. In that case, choose Other Linux 5.x and later kernel 64-bit .
If prompted to select boot firmware, choose the default provided.
If you are using an M1/M2 machine, the above two options may be selected for you by default upon selecting the Debian ISO image.
The default settings for memory and storage are probably too small. Customize your VM as follows:
Name: (your choice)
- John, a former OS TA suggests naming it after your favorite Pokemon, such as Poliwhirl
CPU: 2 processor cores
RAM: 2 GB minimum; 4 GB or more highly recommended, provided that your host machine has 8 GB of RAM or more
Hard disk: 100 GB minimum, 200 GB or more recommended
Installing Debian
After configuring the VM, start the VM. The VM will now boot from its CD-ROM drive containing the Debian GNU/Linux install disk, which is virtually mapped to the ISO file that you downloaded.
Use the “graphical installer”. You’ll be guided through a somewhat lengthy installation process. Most of the default settings are acceptable – below is an outline for some of the choices you should be making:
Language: English — English
Location: United States
Keyboard: American English
Hostname: Whatever you named your VM, in lower case (e.g. poliwhirl )
Domain name: (blank)
Root password: (your choice)
Users: Create your user account, which you will use for development
Full name: (your choice)
Username: (your choice; for our examples, we chose debbie )
Password: (your choice)
Timezone: Eastern
Partition disks: This will format your virtual hard disk so that you can install your operating system in it and boot into it
Partitioning method: Guided — use entire disk
Select disk to partition: (there should only be one option, use it)
- e.g. SCSI3 (0,0,0) (sda) — <size> .
Partitioning scheme: All files in one partition (recommended for new users)
Partition disks overview: Finish partitioning and write changes to disk
Write the changes to disks?: Select Yes
Configure the package manager:
Scan extra installation media?: No
Debian archive mirror country: United States
Debian archive mirror: (accept the default)
HTTP proxy information: (blank)
Participate in popularity-contest ?: No
Software select:
Debian desktop environment
- We recommed Xfce but you can use any desktop environment(s) you’d like
standard system utilities
Installing the GRUB boot loader: this installs a boot loader on your disk, which you can use to select which kernel to boot into.
Install the GRUB boot loader to the master boot record?: Yes
Device for boot loader installation: Instead of entering the device manually, select the /dev/sda option that the menu presents you
Time to reboot into your new system!
Setting up your Debian VM
Once you reboot, you’ll be greeted with a login screen. Use the user account you created earlier (e.g. we would use debbie here as our username).
Welcome to your VM’s desktop environment! Your system may ask you about configuring your desktop. Just select the default configuration for now – you can always tweak it later.
If you chose Xfce as your desktop environment, you should see a dock at the bottom of your screen, quite like the one on macOS. Open the terminal.
You’ll be logged into your user account, which does not have superuser/root privileges yet. Switch into the root account using the following command:
Type in the password you set for the root account. Now you should be logged in as root :
You’ll notice through this guide (and others) that certain shell commands begin with $ , while others begin with # . These shell prompts represent the permissions you should run the command with; you should not be typing the prompts in. The convention is that commands with $ should be run as a regular user (e.g. debbie ), whereas commands beginning with # should be run as a superuser (e.g. root , or using sudo ). Speaking of which, your VM won’t have sudo installed yet! We’ll do that first.
Installing your first package
Update your package lists:
This retrieves the most up-to-date list of packages from APT’s repositories, which tell apt all the things it can install. First, let’s upgrade all packages that can be upgraded:
Now we can install sudo , as well as some other useful packages for getting through the rest of setup:
Feel free to also install any programs you are accustomed to using, such as vim , emacs , tmux , htop , etc. Just add these to the list of programs for apt for install in the above command, after net-tools .
Setting up sudo
sudo stands for SuperUserDO – it helps you run commands with superuser permissions from a regular account. To set this up, you will need to edit the /etc/sudoers configuration file by running:
It will launch an editor (probably vim if you installed, nano if you didn’t). Add the following to the bottom:
Of course, if you chose a different username, use that instead of debbie . Save your changes and quit the text editor.
If you’re still logged in as root at this point from using su — , logout to return to your regular user account:
Now that you added that line to your sudoers file, you should be able to run the following command from your regular user account, without having to type in your password:
Now, when you come across a # shell prompt in any future guide, you may use sudo instead from your user account. For example, to update your packages again, instead of running (as root ):
You can instead run (as debbie ):
Disable Power Management
By default, Debian tries to do its own power management. This is unnecessary in a VM, and may cause your VM to become unresponsive after being inactive for some time.
To disable power management in the Xfce desktop environment, open up the Applications menu on the top left corner of the GUI, and go to Settings -> Power Manager to open up the Xfce Power Manager. On the System tab, make sure it never goes to sleep, and on the Display tab, uncheck “Display power management”.
Disable GUI on boot (optional)
If you prefer to boot directly into a terminal prompt on your serial console, rather than fussing with the graphical desktop environment, you can disable it by running the following:
Now, once you boot, you’ll be greeted with a text-based serial console:
You can login with your regular credentials (e.g. as debbie ). If you need to open up your graphical desktop environment, you can manually launch it:
You can always re-enable the booting into your desktop environment:
Snapshots
Once you’ve set up your VM to your satisfaction, you should take a preliminary snapshot. Snapshots capture the current running state of the VM, store it, and then allows you to revert to that state at a later point. In general, you should snapshot your VM before executing something that can compromise the system. Taking a snapshot now will allow you to revert to a clean state in case your VM breaks somehow.
If you’re running low on disk space, you should take a snapshot while your VM is shut down. Otherwise, VMWare will snapshot the VM’s current memory. While this may be useful sometimes, it adds several extra gigabytes to your snapshot size.
How to Install Debian 11 on VMware Workstation 17
 Last Updated: November 30, 2022 , Tolga Bagci
In this article, we will set up the latest version of Debian 11 Bullseye, a great Linux distribution, on a new virtual machine with VMware Workstation 17 Pro virtualization software installed on a Windows 10 PC, and then configure VMware Tools to be able to share files between the host and the VM.
How to Set Up Debian 11 (11.5) on a Virtual Machine using VMware Workstation 17 Pro on Windows 10
Debian Linux is a free open-source operating system and includes many free tools that can be used by home or business users to do all their work. Examples of these applications are LibreOffice for creating or editing office documents, and VLC Media Player for opening various video files.
You can use and experience Debian Live via a DVD or USB memory without using your computer’s hard disk and without destroying your current operating system. If you plan to install this system on your PC later, you can start the system installation from the Live CD.
Instead of using the Debian operating system as Live, you can use virtualization software such as VMware Workstation in the system installed on your host computer. In particular, it might be a smart idea to use a Linux distribution you want to experience in a virtual machine.
Workstation Pro software developed by VMware company is paid, but you can use the Player version for the free version. Workstation Pro allows you to activate more advanced features of the system you will install or to create a VM professionally to test new technologies.
How to Download Debian ISO Installation Image File
To download Debian Linux as an ISO to your computer, you must first visit the debian.org website.
After viewing the website, click Getting Debian from the options in the top menu to download the ISO file. Then, click on the “complete installation image” link under the Download an installation image option. Then click the “Download CD/DVD images using HTTP” link, and then click amd64 in the subheading “Official CD/DVD images of the stable release”.
You will see two titles, CD and DVD, if you click on the amd64 option in the DVD title, you will be directed to the DVD image download web page, which contains many tools for environments where an Internet connection is not available or very slow.
After downloading the website a little bit, you can download the 3.6 GB ISO file named “debian-11.5.0-amd64-DVD-1.iso” to your computer.
How to Create a New Virtual Machine for Debian
Before you can properly install and run an operating system in VMware virtualization software, you must configure the virtual machine settings correctly.
Step 1
After running the VMware virtualization software, after clicking Create a New Virtual Machine, a Wizard will open as below. Select the Custom (advanced) option in the Virtual Machine Wizard, and then click the Next button.

Step 2
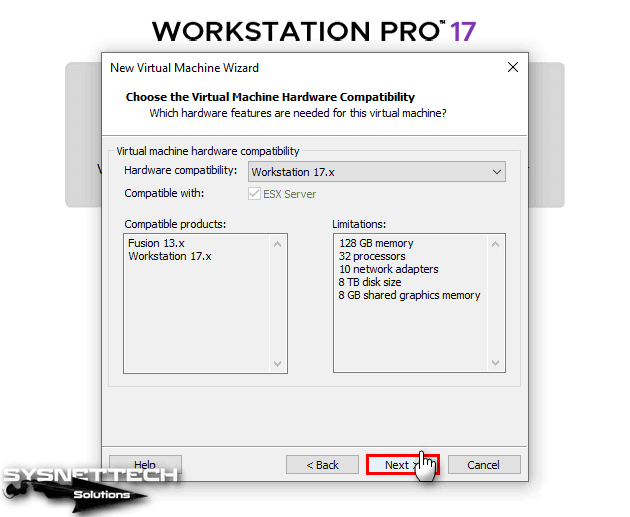
Configure the hardware compatibility setting of the virtual machine to 17.x. If you upgrade the Workstation program to a newer version after installing the VM, do not forget to change the hardware compatibility.
Step 3
Select I will install the operating system later in the Guest Operating System Installation wizard, then click Next.

Step 4
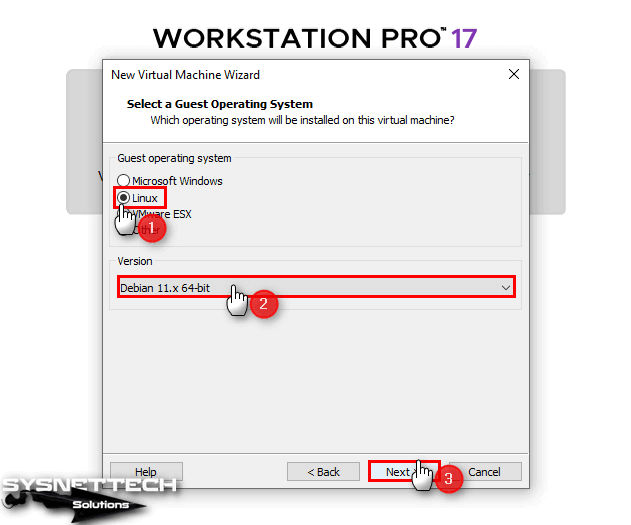
You can configure the type and version of the operating system you will install on the virtual computer from this window. First, select the Linux option and select Debian 10.x 64-bit from the options listed in the Version section, then click Next.
Step 5
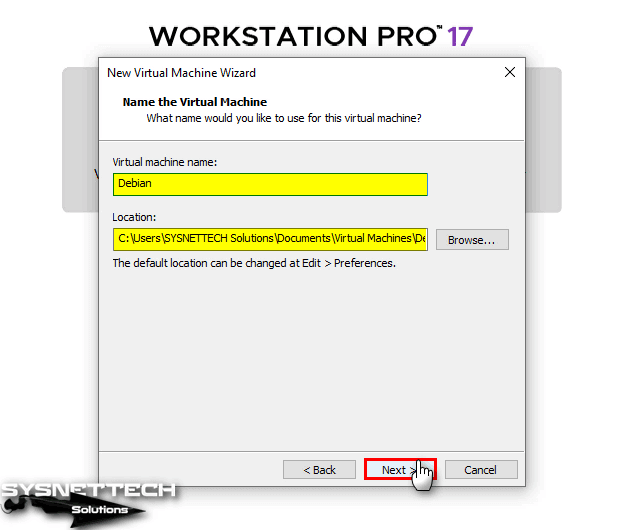
You can choose the location where you want to install your virtual computer from this window. If you have an old computer and are using a mechanical disk, you can gain further performance gain by storing the VM’s location on an external SSD disk in this window.
Type a name for your virtual machine and then choose where you want to store it and continue with Next.
Step 6
In the Processor Configuration window, specify a value for your virtual machine according to the processor power of your PC and click Next.

Step 7
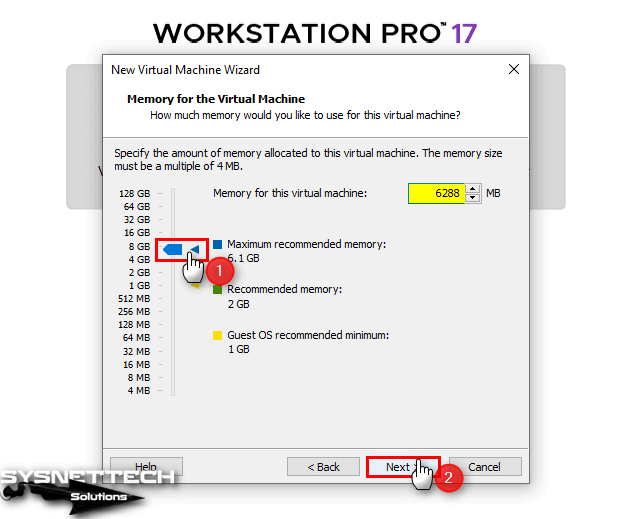
Similarly, in the Memory window, set a value according to the RAM size of your existing host.
Step 8
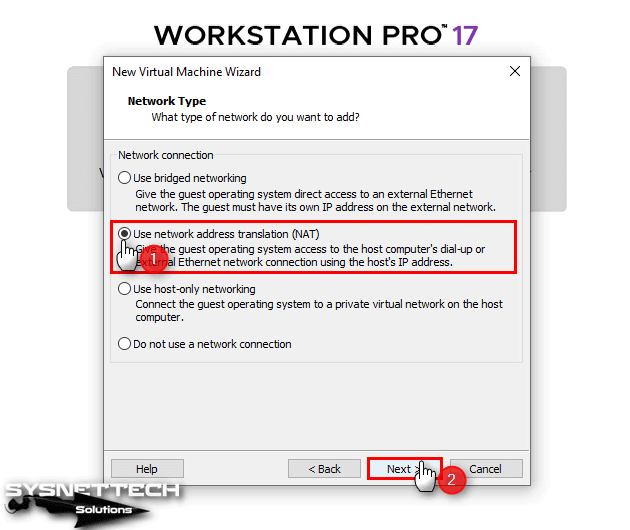
In the Network Type window, you can use the NAT selected by default. If you have configured a Bridged network on Virtual Network Editor, you can select this type.
Step 9
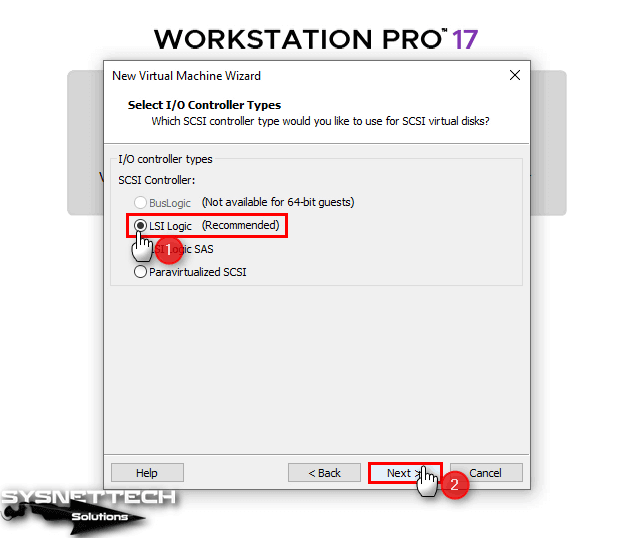
Leave the default option (LSI Logic) for the controller type enabled and click the Next button.
Step 10
Select the NVMe type known as the newest technology as the type of virtual disk. If you try to install older versions of the Debian system, you need to find out if it supports the NVMe disk structure. If not, you can change the disk type to SATA or SCSI.

Step 11
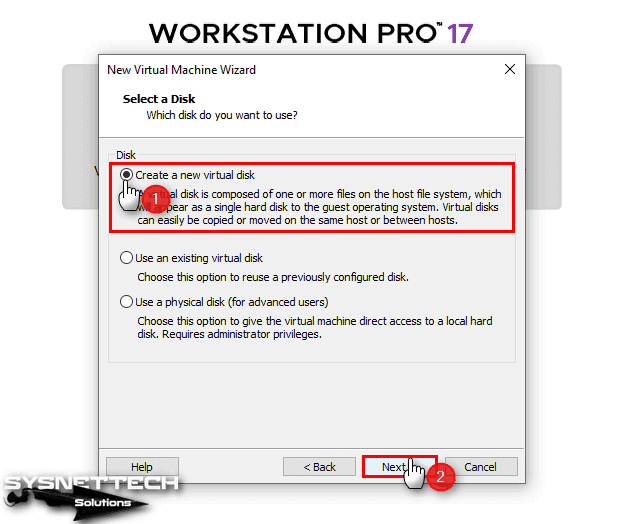
In the Select a Disk window, you must select the Create a new virtual disk option as you will be installing a Debian from scratch.
If you want to use the VMDK file instead of using the Debian ISO file, you need to select the Use an existing virtual disk option in this window during the virtual machine setup.
Step 12
In the Specify Disk Capacity window, specify a size for the new virtual disk and tick to store the virtual disk as a single file, then click Next.
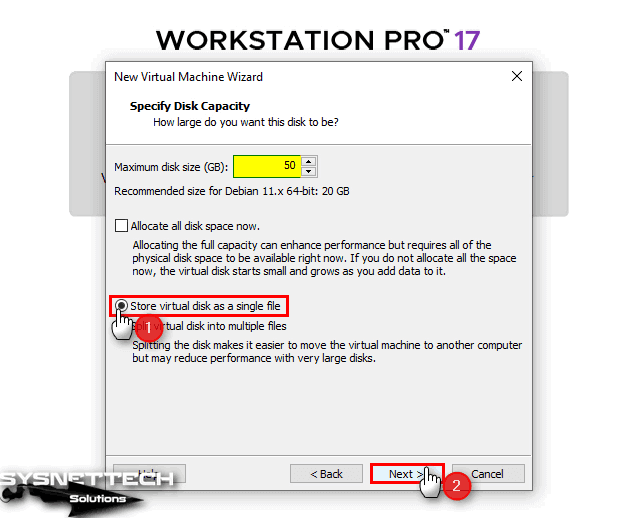
Step 13
You can change the location where you want to back up the disk file from this window. The configuration in this window will only change the location of the virtual disk to be created.
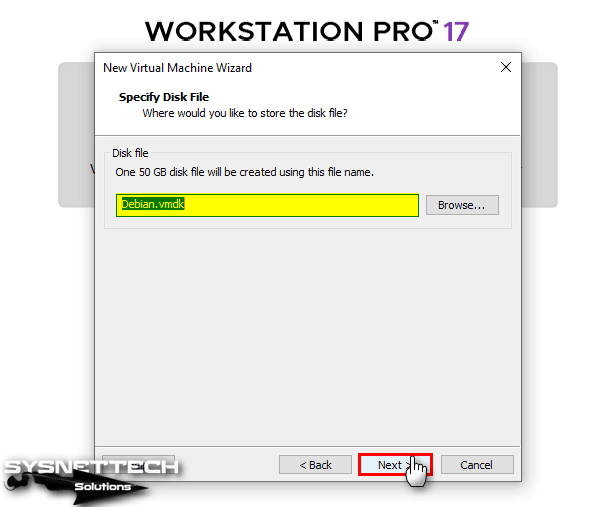
Step 14
The summary hardware information for the virtual computer is as follows. Now, click on the Customize Hardware button to enable a few extra settings.
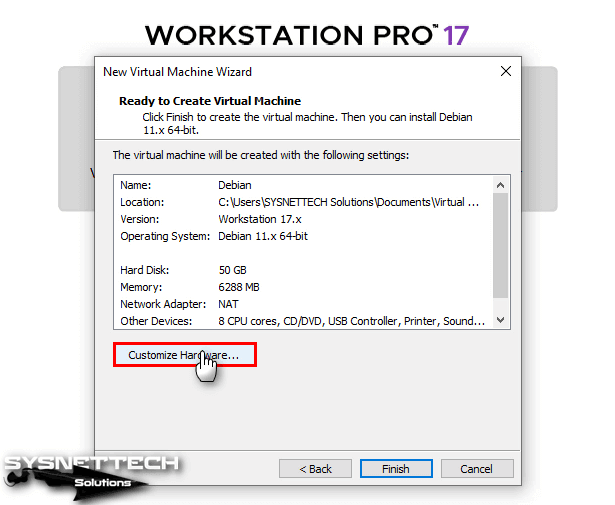
Step 15
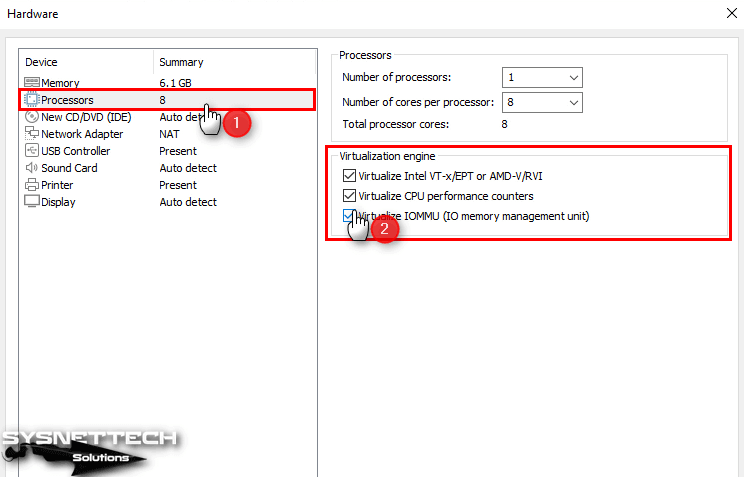
After clicking the Processors device, enable all virtualization options under Virtualization Engine displayed on the right.
- Virtualize Intel VT-x/EPT or AMD-V/RVI
- Virtualize CPU Performance Counters
- Virtualize IOMMU (IO Memory Management Unit)
Step 16
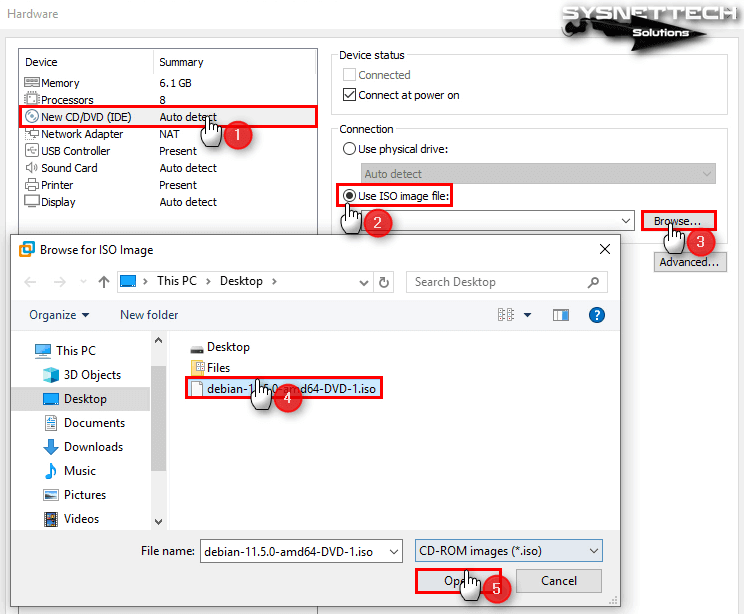
To add the Debian 11 ISO file to the VM, click CD/DVD / Use ISO image file / Browse button and add the file.
Step 17
In your Debian VM, change the Compatibility setting to 3.1 in the USB Controller device settings so that you can transfer files faster using USB 3.0/3.1 devices.

Step 18
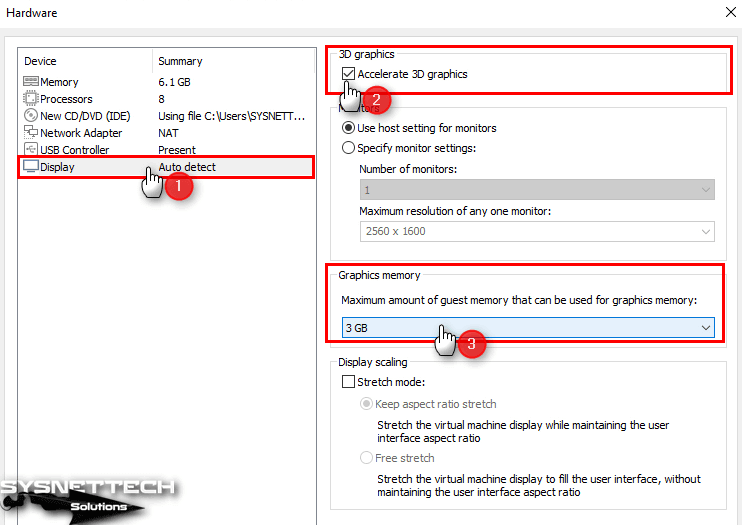
Finally, enable the 3D Graphics (Accelerate 3D Graphics) option in the Display device settings and configure the video memory to a size that your host can support.
Step 19
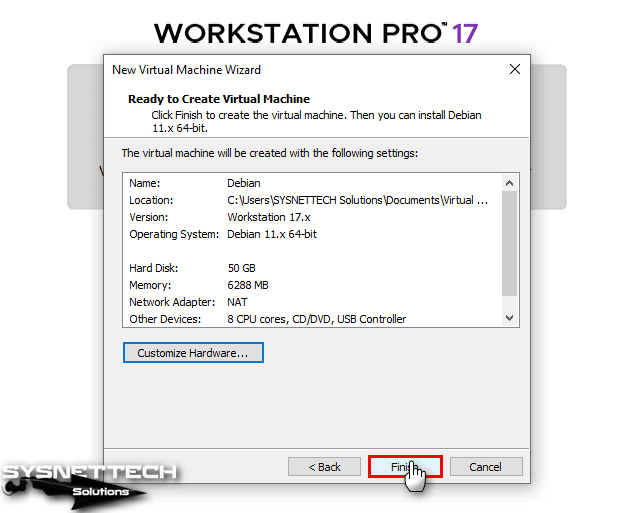
After configuring all the settings of your Debian virtual computer correctly, check the settings in the summary window again and click Finish to close the wizard.
Step 20
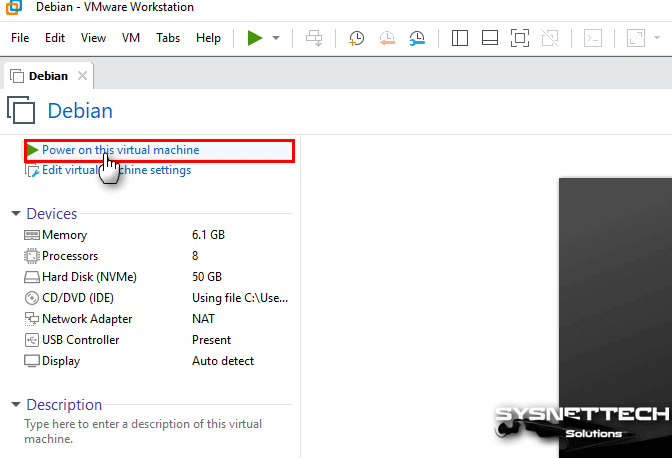
Until this step, you have prepared a new virtual system for Debian distribution. Now, click Power on this VM to run the VM and begin the system setup.
How to Install Debian 11
After preparing the Debian guest operating system, all you have to do is install the Linux distribution on the VM.
Step 1
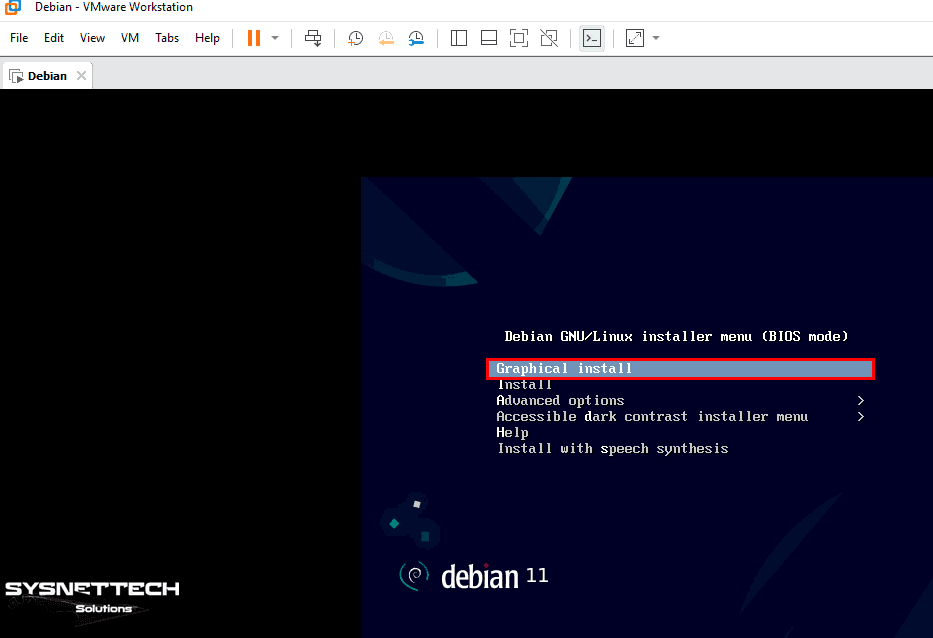
After running your virtual computer, press Enter on the Graphical Install option on the Debian GNU/Linux installer menu (BIOS mode) screen.
Step 2
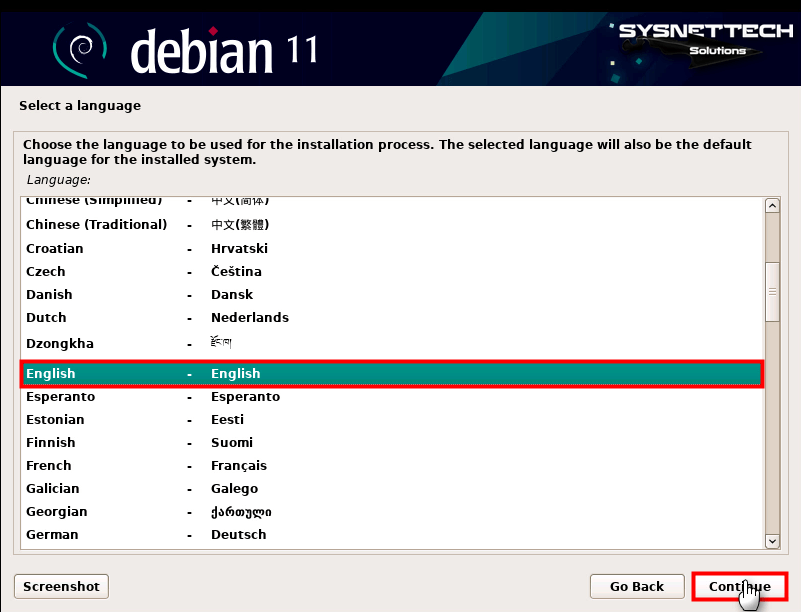
Select the Debian operating system language, that is, the display language, and click the Continue button.
Step 3
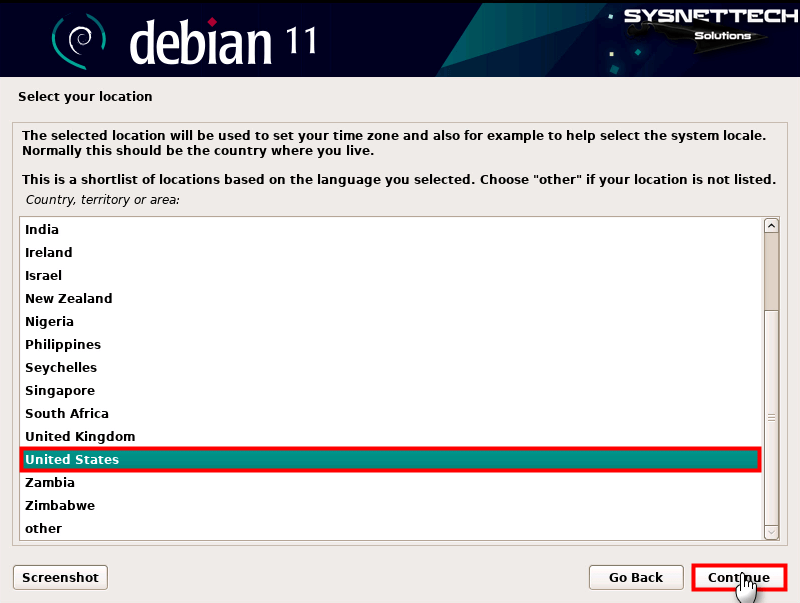
In the Select your location window, select your country of residence and click the Continue button.
Step 4
In the Configure the keyboard window, configure the keyboard layout you want to use and click Continue.

Step 5
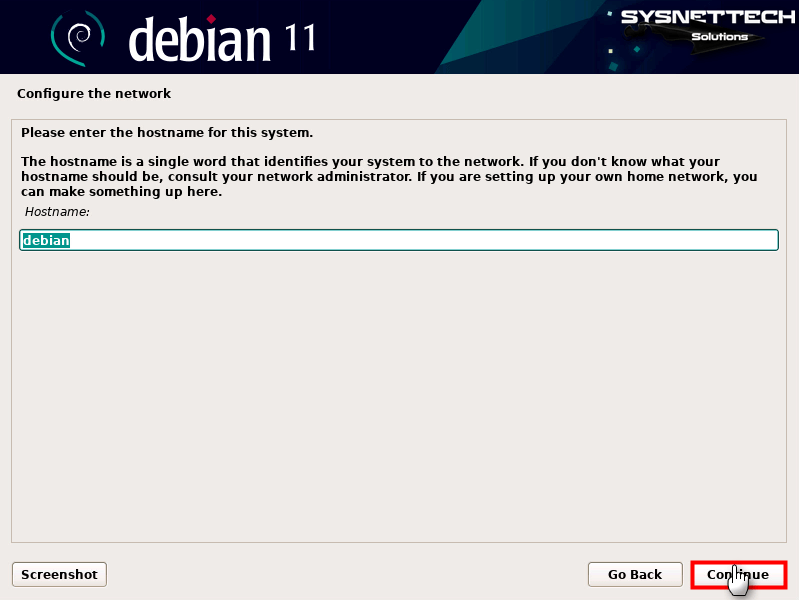
In the Configure the network window, you need to type the hostname to identify your system to a network. You can choose the default configured name as in the image below, or you can specify a hostname according to your network environment.
Step 6
If you are a home user, you can leave the Domain Name blank.

Step 7
In this step, create a strong password for the root account of your Debian system and click Continue.
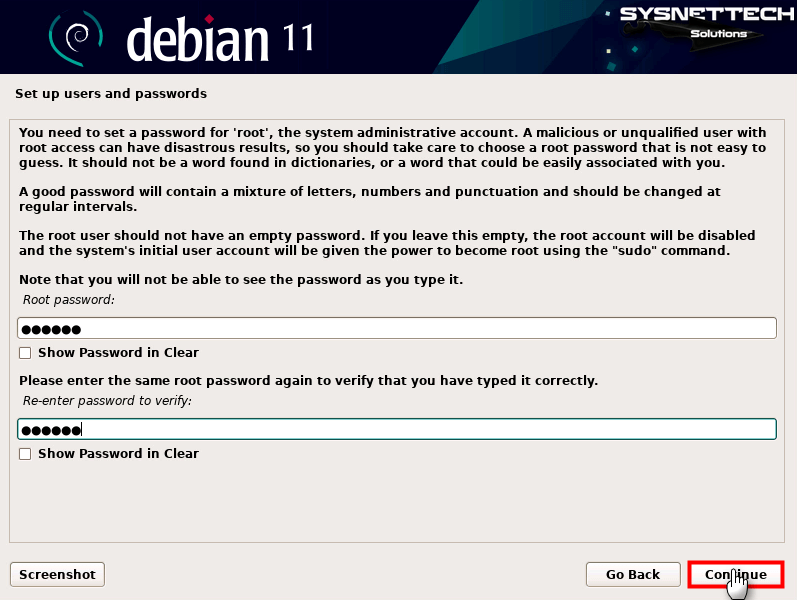
Step 8
To define a new account to be created instead of the Root account for non-administrative activities, type your full name or something else in the Set up users and passwords window and then click Continue.
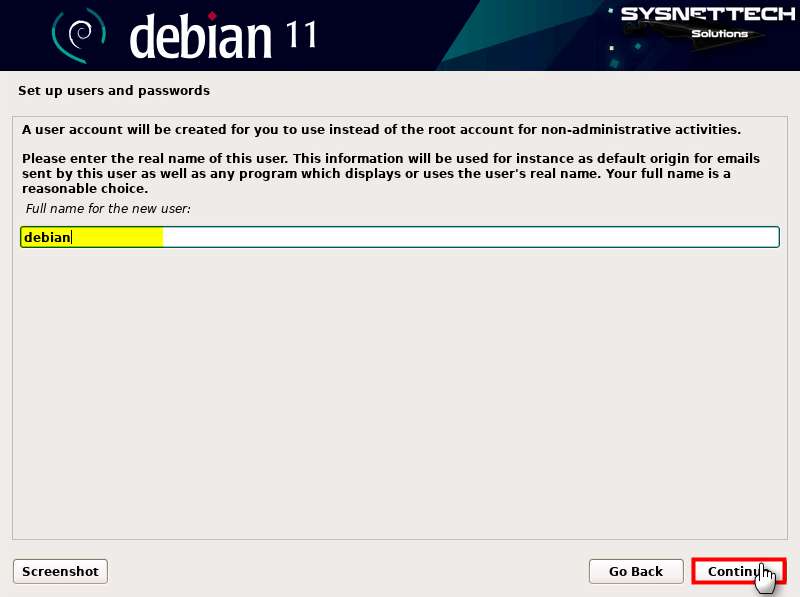
Step 9
Re-type your username for your account in lowercase letters. Or, if you write your Name and Surname in the previous step, you can only write your name in this window.
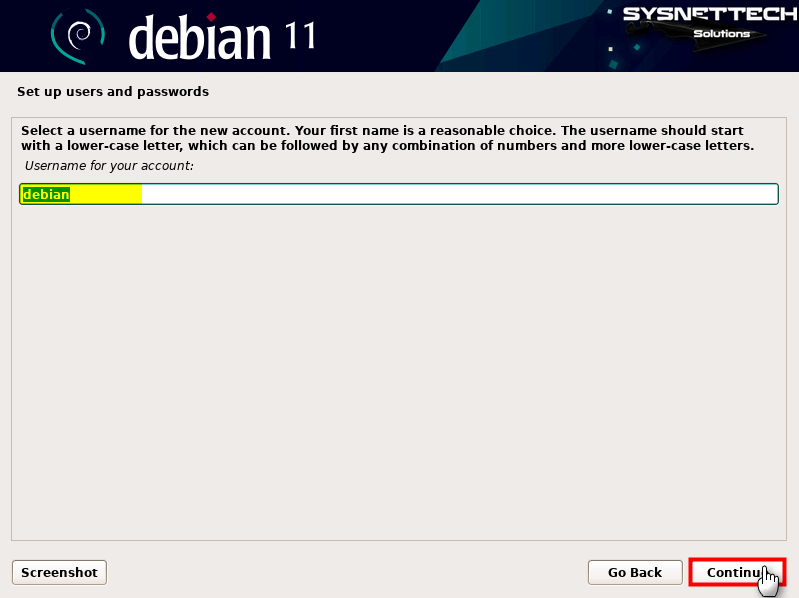
Step 10
To add a password to the new user account you created, type a strong password in both text fields in this window.
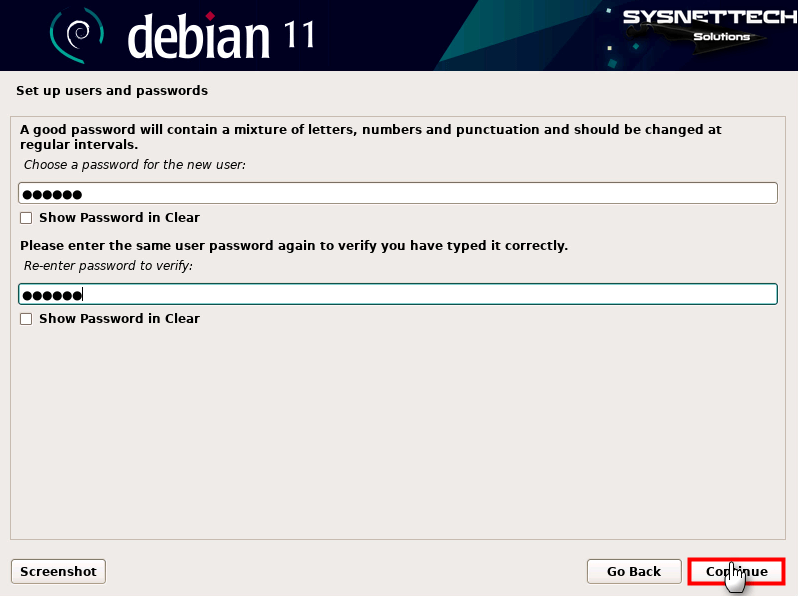
Step 11
Select your time zone according to where you live and click Continue.
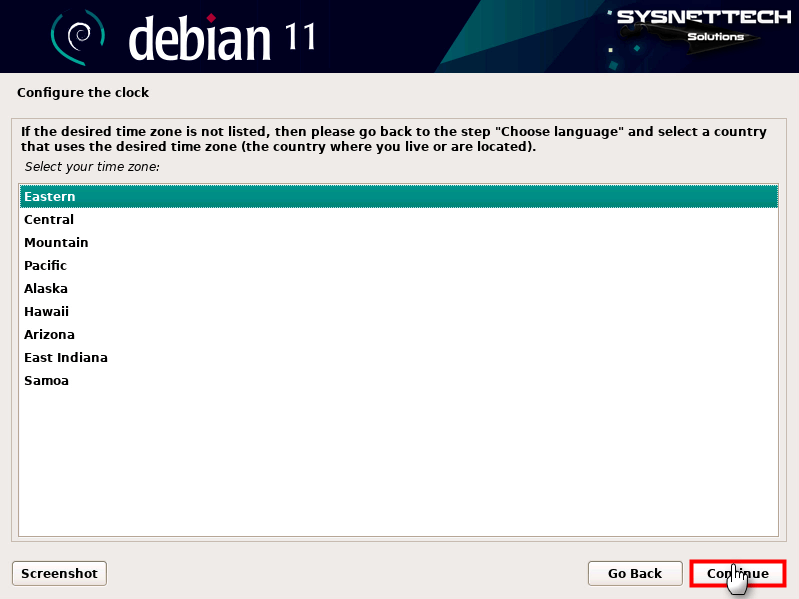
Step 12
In the Partition Disks window, if you are a first-time user of the Linux/Debian system, we recommend that you continue by selecting the Guided – Use Entire Disk option.
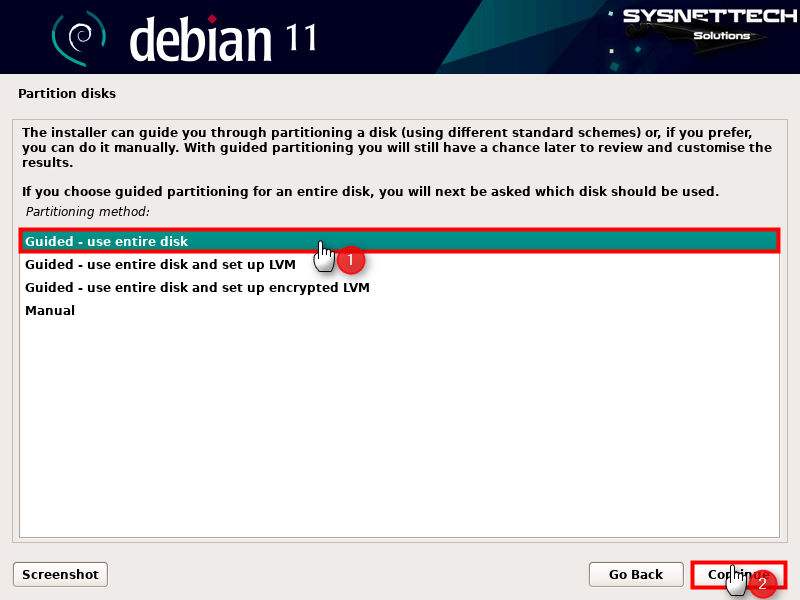
Step 13
At this stage, select your virtual disk to be partitioned.
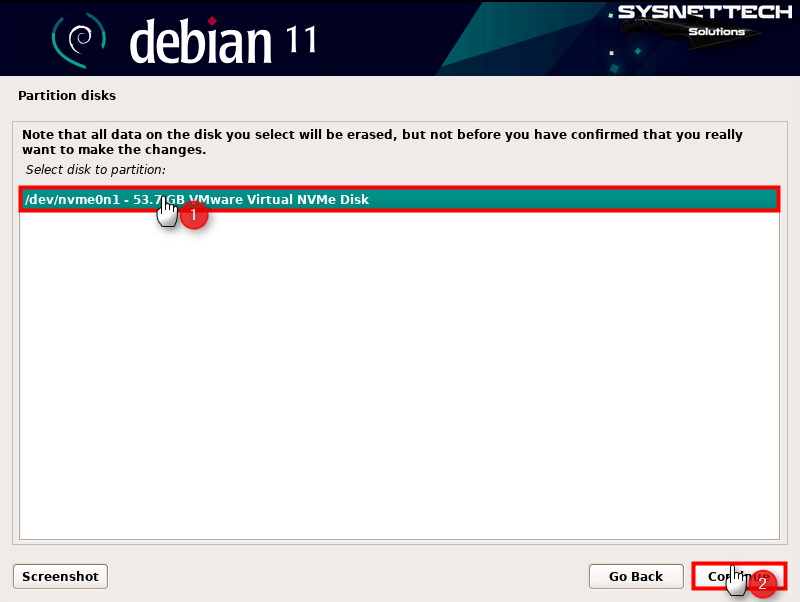
Step 14
Likewise, if you are a new user, as indicated by the installation wizard, select All files in one partition and click Continue.
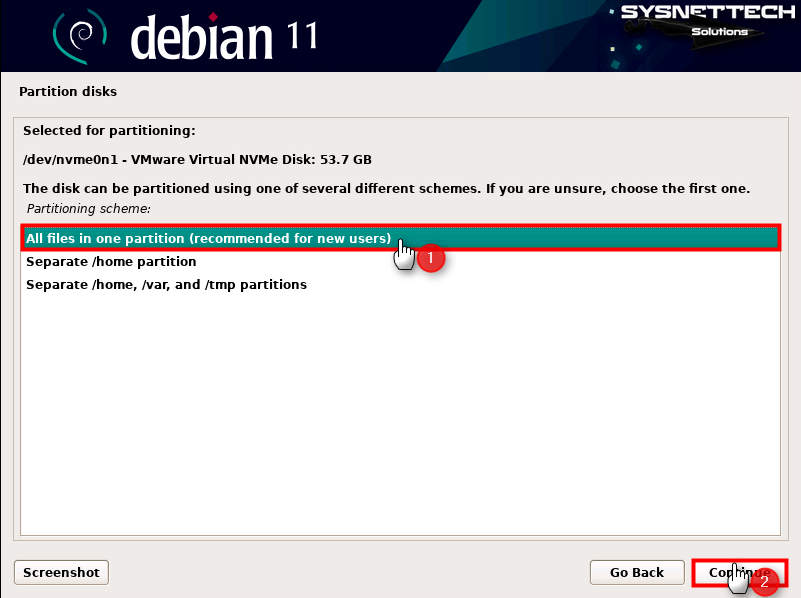
Step 15
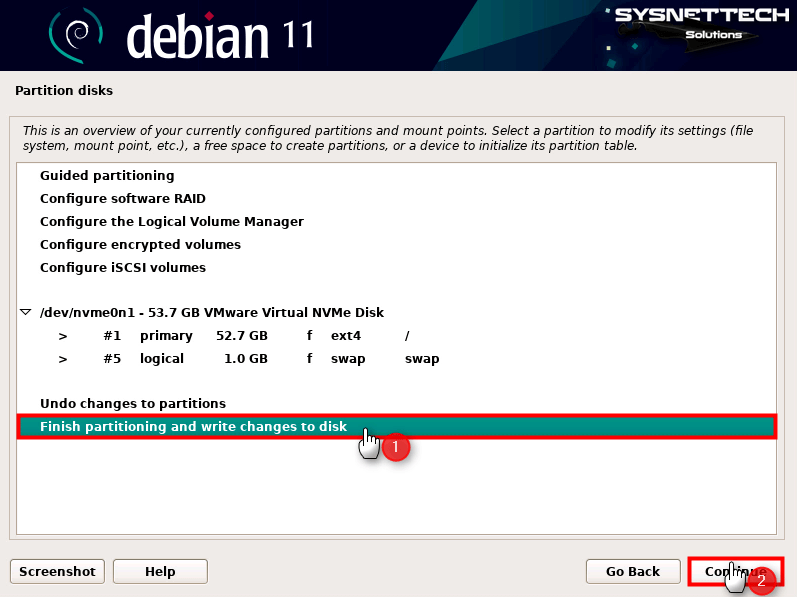
A summary of the disk settings for the Debian VM will be shown to you in the window below. If you are going to make a change to the partition, you can return to the previous configuration step by clicking the Go Back button.
Continue by selecting Finish partitioning and write changes to the disk option.
Step 16
Select Yes for the changes made to the virtual NVMe disk to take effect, and then click Continue.

Step 17
If you want the wizard to scan additional DVD installation media to install some additional packages on your system, continue by ticking the Yes option.

Step 18
When you try to download and install a program from the Internet on your Debian system, the mirror addresses defined in your system are used. If you want to add these addresses to your system manually later, you can select the No option here.
When trying to install a program, the installation media will be scanned first instead of the repository addresses. If the program you want to install is not available on the DVD media, you need to pull it from the mirror network on the Internet. Therefore, continue with Yes as you will need to use Network Mirror.

Step 19
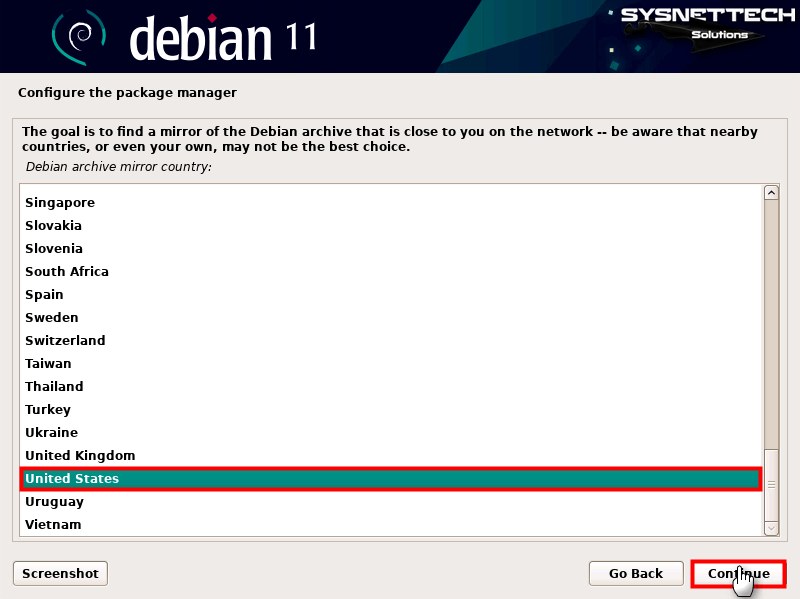
In the Debian archive mirror country window, you can select your country for the Network Mirror setting. Because you can download files faster from servers that are closer to you.
Step 20
For the Debian archive mirror, choose the most preferred server (deb.debian.org) and continue.

Step 21
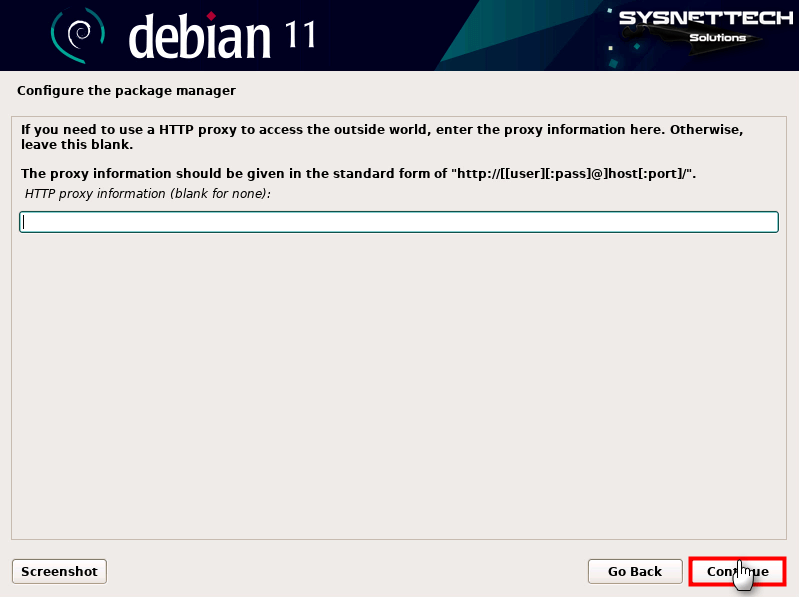
If you are using a proxy server in your network environment, you can configure it from this window. If you are not using it, leave this box blank and continue.
Step 22
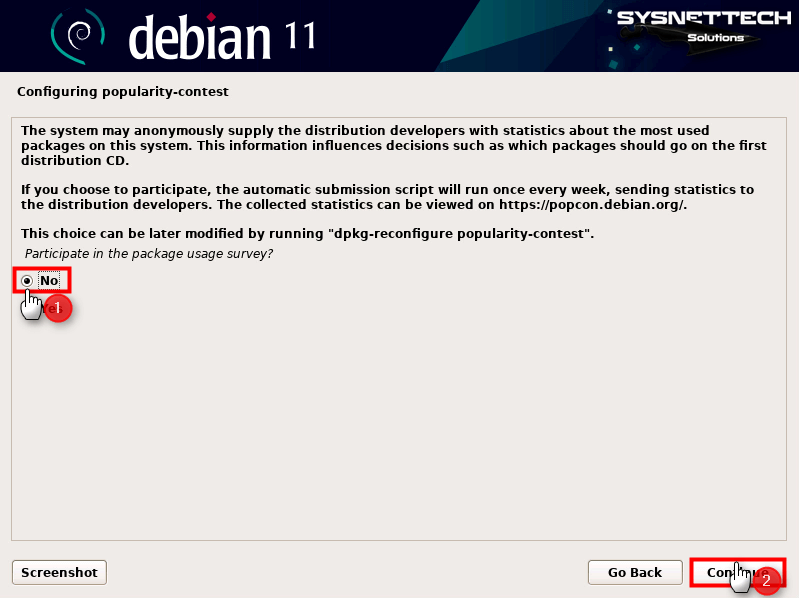
If you want to send the statistics of the applications you use most frequently on your system to the server every week, you can continue with Yes to configure the settings.
Step 23
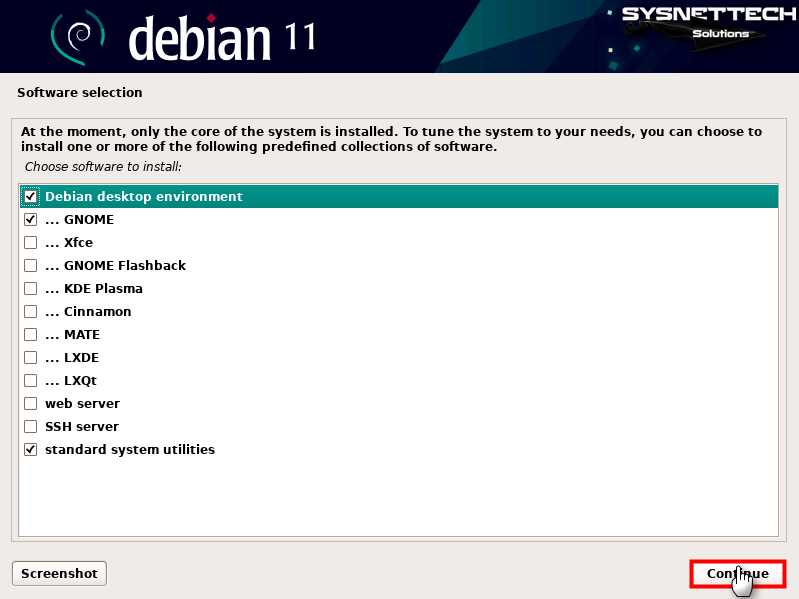
You can continue with GNOME, the default desktop environment of the Debian system, and choose a desktop environment of your choice.
In the Software Selection window, select the desktop environment you want to use. Generally, it is the user’s choice to choose the desktop environment in Linux systems.
Step 24
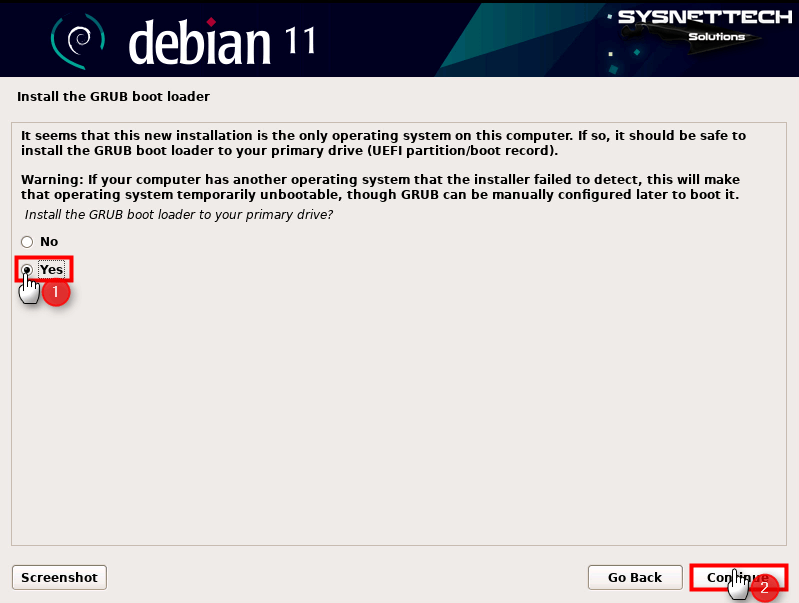
Select Yes to install the GRUB Boot Loader on the primary virtual drive and continue.
Step 25
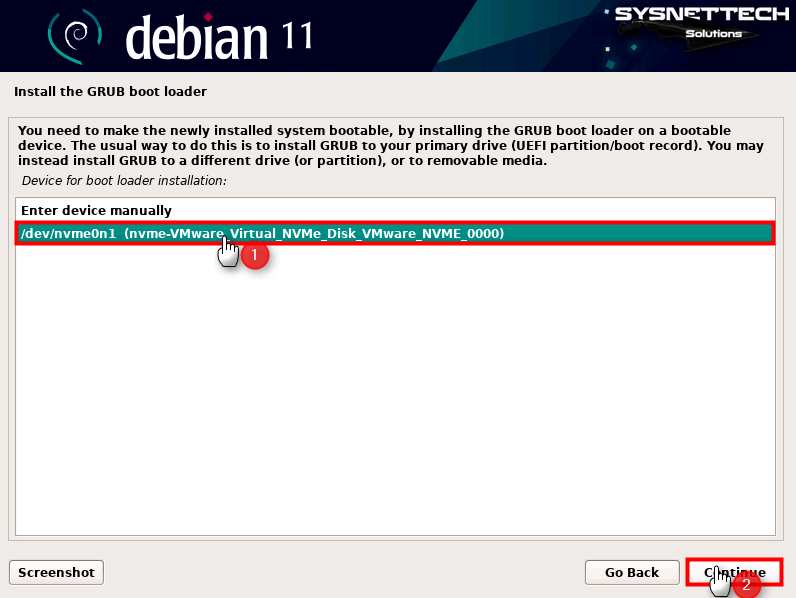
For boot loader installation, select the /dev/nvme0n1/ drive and click Continue.
Step 26
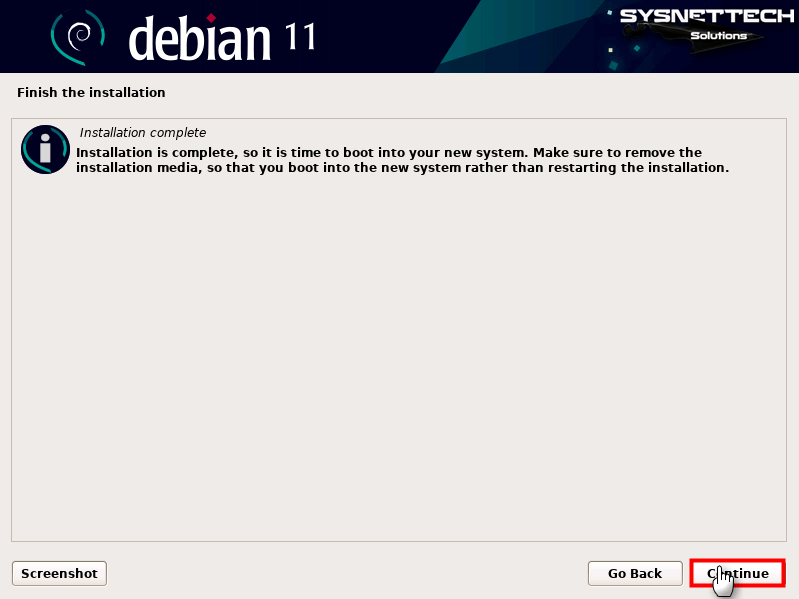
After completing the Debian installation, remove the installation media from the VM and restart your system.
Step 27
Press Enter in the Debian GNU/Linux option in the GNU GRUB menu.

Step 28
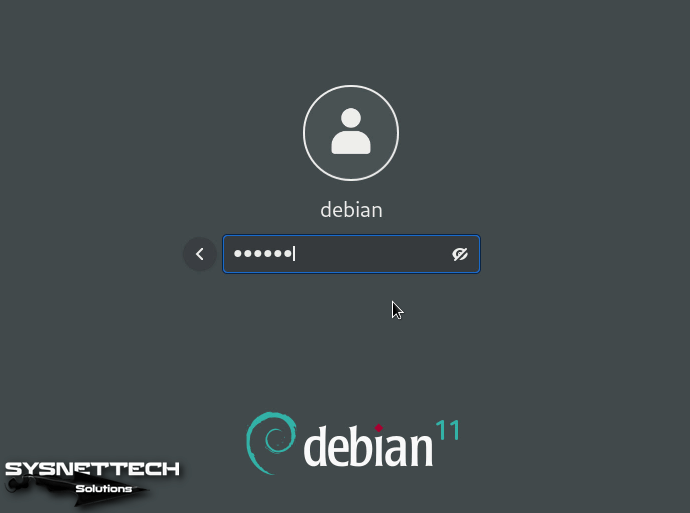
After typing your username and password you created, log in by pressing Enter.
Step 29
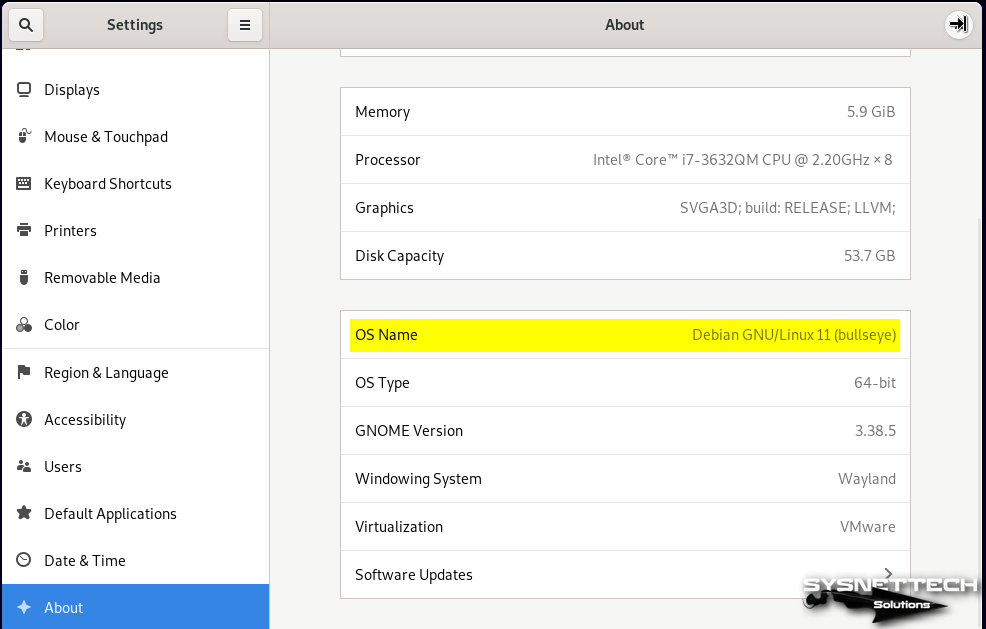
You can check the version of the Debian system you have installed from the Settings / About section.
How to Install VMware Tools
After installing Debian with VMware Workstation, you may need to install the drivers for the virtual computer. Under normal conditions, if the host computer has a network connection, VMware Tools, that is, virtual machine tools, are installed automatically.
If you need to connect your virtual machine to the Internet later, you must install VMware Tools manually.
Step 1
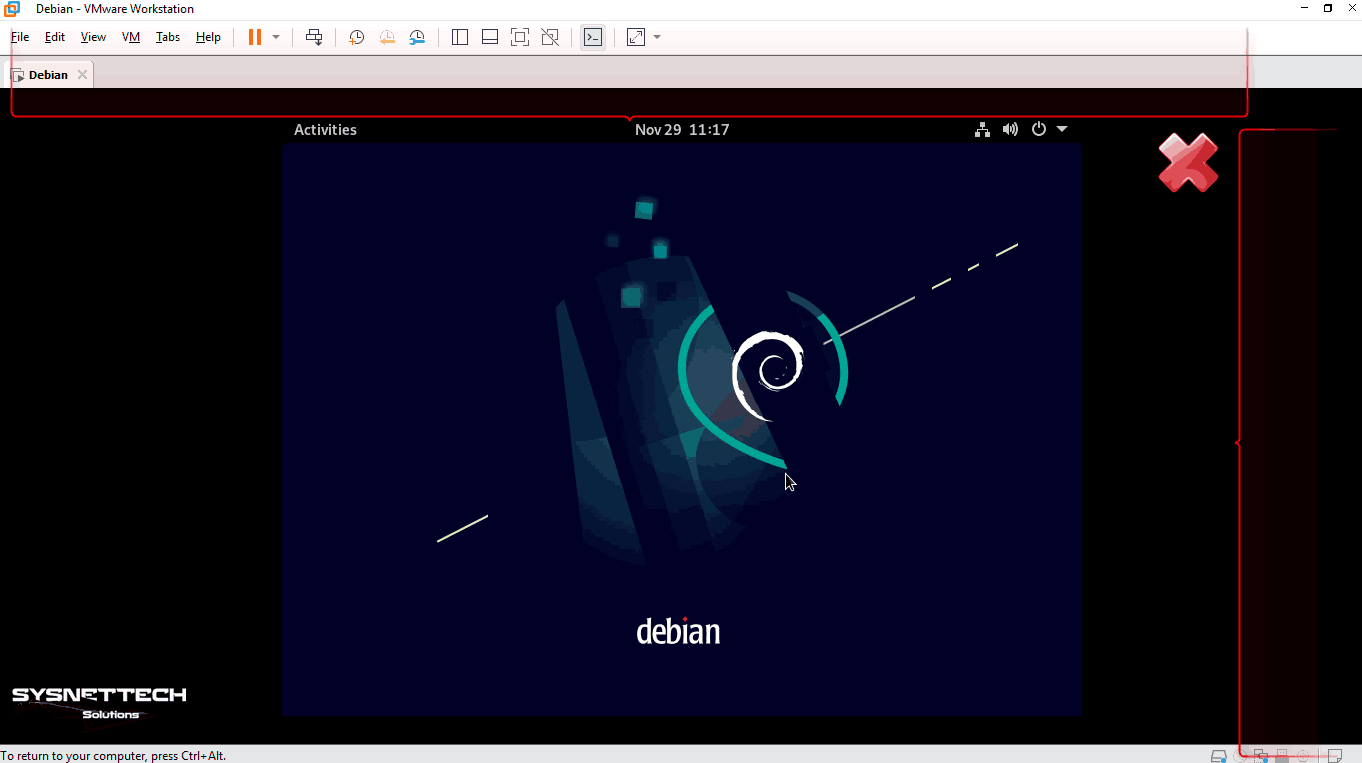
If VMware Tools is not installed automatically, the screen resolution of your guest system will be as in the image below. You need to install these tools in order to both fix the screen resolution problem and transfer files with the host.
Step 2
After making sure that your guest machine is connected to the Internet, open the terminal and execute the command “sudo apt install open-vm-tools-desktop” and press Y and Enter to confirm the new packages to be installed.

Step 3
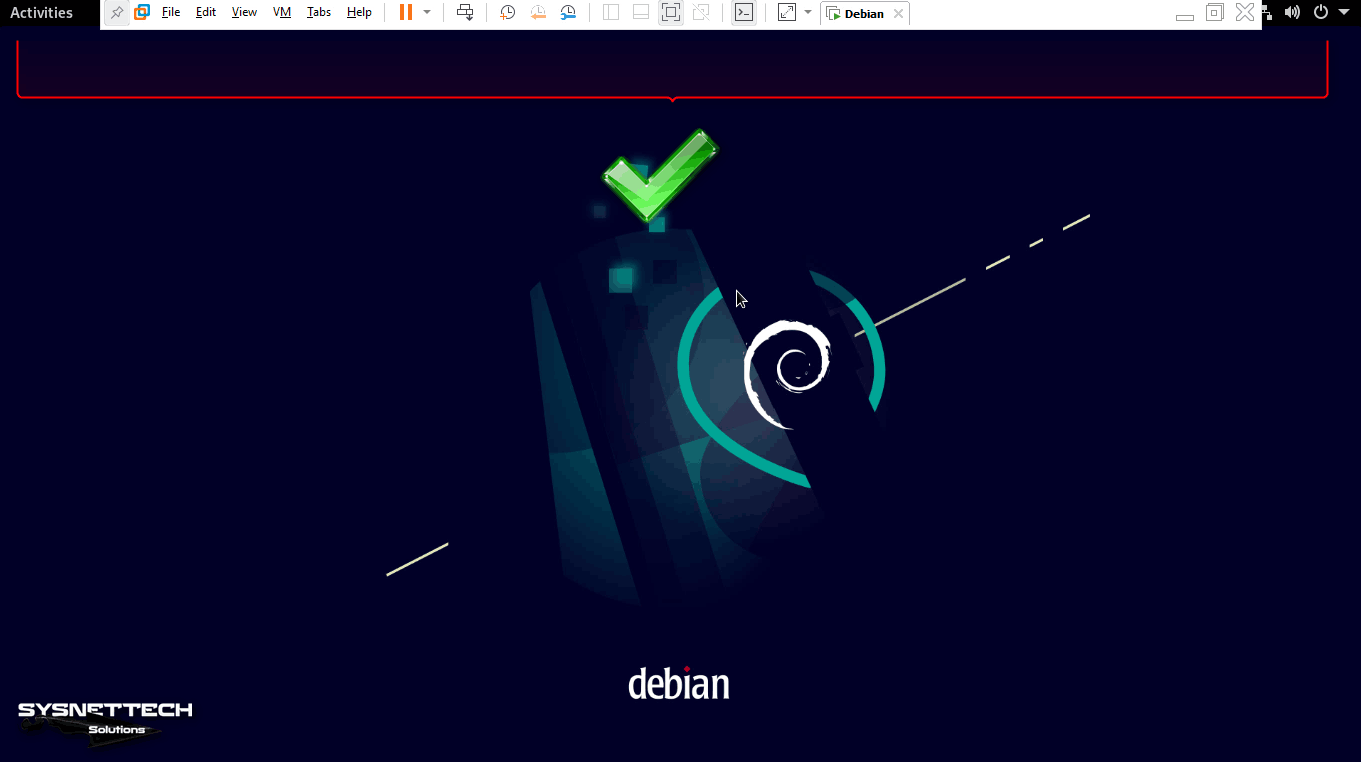
After installing VMware Tools, reboot your system with the “sudo reboot” command and check the screen resolution.
Step 4
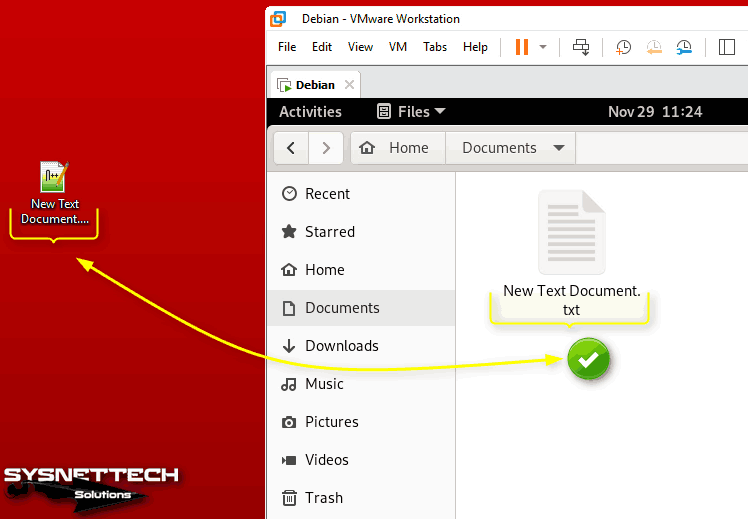
When you drag and drop a document from the desktop or a different location of your host system to your virtual computer, you can see that the file is copyable to the VM.
How to Configure Shared Folder
You can additionally use the Shared Folder feature to make file transfers between the host and the VM faster. To use this feature, VMware Tools must be installed, otherwise, you cannot use this feature.
Step 1
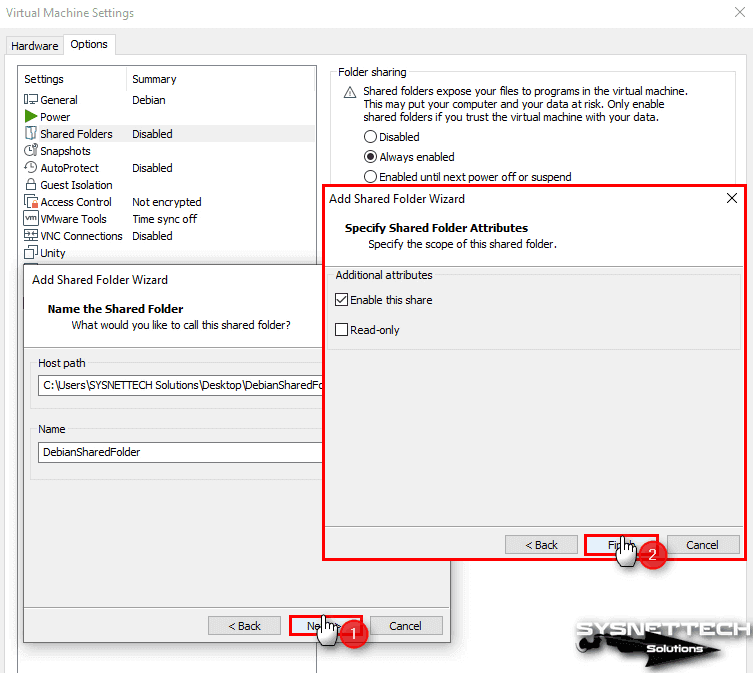
Click VM / Settings from the tool menu of the VMware Workstation program and open the virtual machine settings window. In the settings window with the Hardware and Options tabs, click Options and then select Shared Folders.
Configure the Folder Sharing feature as Always Enabled from the settings listed on the right, and then click the Add button in the Folders section. Then, click Next to make the necessary settings in the Add Shared Folder Wizard window.

Step 2
Click the Browse button in the Name the Shared Folder window and create and select a new folder in any location of your host PC.

Step 3
Check the Enable This Share option in the Shared Folder Attributes settings and close the virtual machine settings after clicking Finish.
Step 4
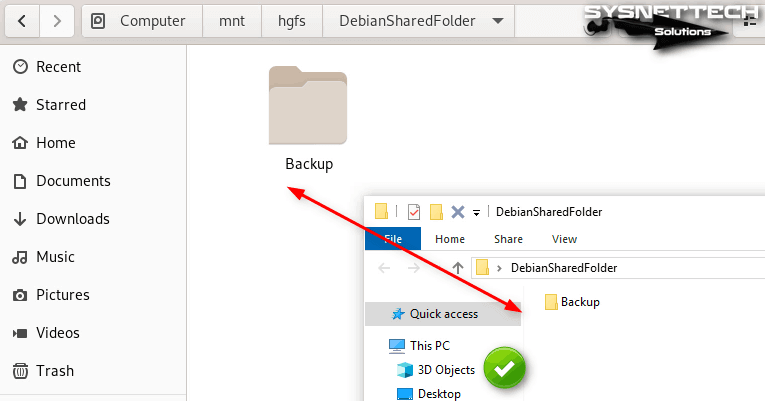
You can find the shared folder at /mnt/hgfs/FolderName on your Debian machine. Create a file or folder in the shared folder and check it on your host PC, and you can see that the file-sharing is successful.
Step 5
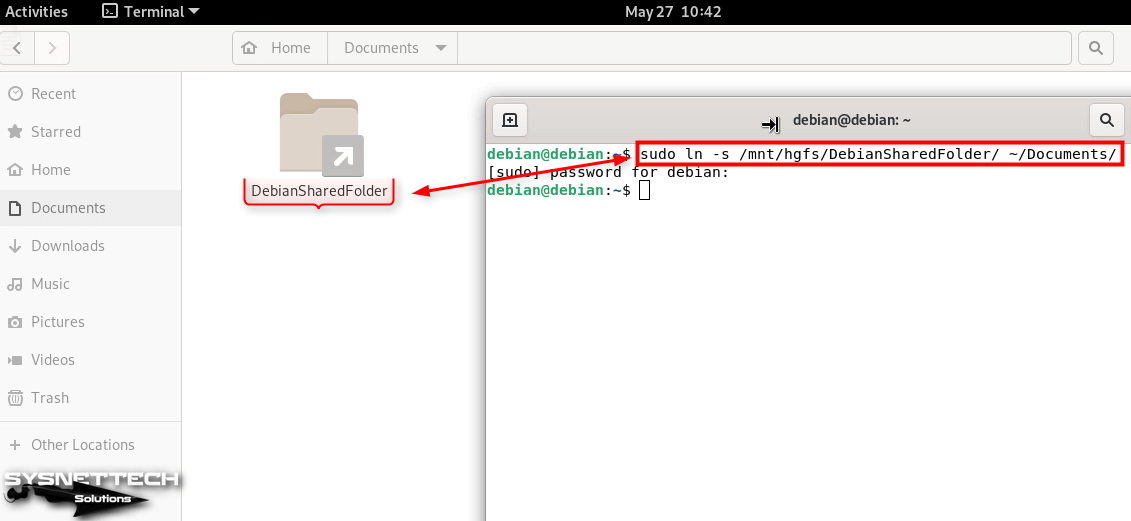
You can create a shortcut for the shared folder in any location on your Debian system. For example, you can use the command below in the terminal to create a shortcut in Documents.
Step 6
To access the common folder faster, right-click on the shortcut location and click Add to Bookmarks.
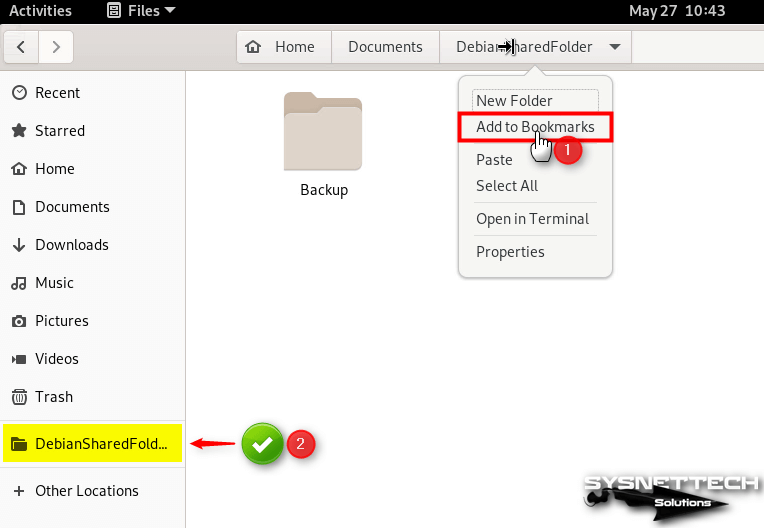
Step 7
When you restart your virtual computer and click Shared Folder, you may see the error “This location could not be displayed”.

Step 8
To fix the Shared Folder error and make it permanent, you need to edit /etc/fstab. To do this, execute the “sudo nano /etc/fstab” command in the terminal and view the contents of the file.
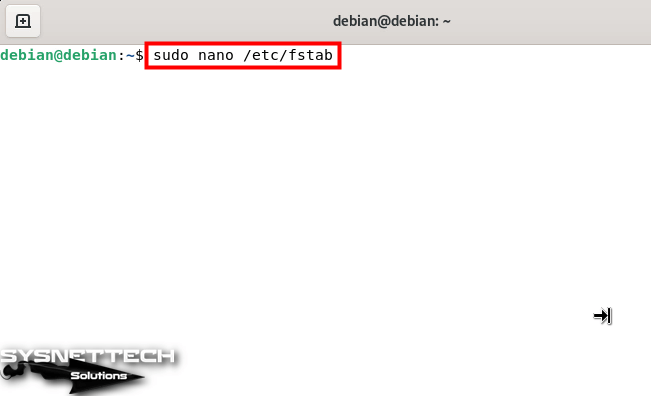
Step 9
Type the command below at the bottom of fstab and press CTRL + X and then Enter to save the file.

How to Use USB Flash Memory
It may make more sense to use a USB flash drive when you want to copy very large files to your virtual system, or you can connect your external SSD storage device to the VM and back up your data faster.
Step 1
Insert a flash memory into one of the USB ports of your host computer and create a folder named Backup, for example.
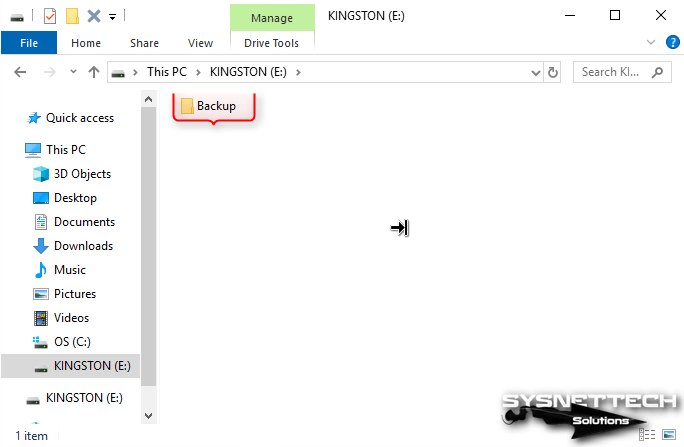
Step 2
You need to click VM / Removable Devices / Name of your USB from the VMware tool menu to mount the USB disk in your guest operating system. However, if you see the Connect option disabled or grayed out, you need to edit the VMX file to fix this issue.

Step 3
Go to the location where you installed your Debian 11 system and open the VMX file with notepad and change the value (usb.restrictions.defaultAllow = “FALSE” ) to “TRUE” and save the file.
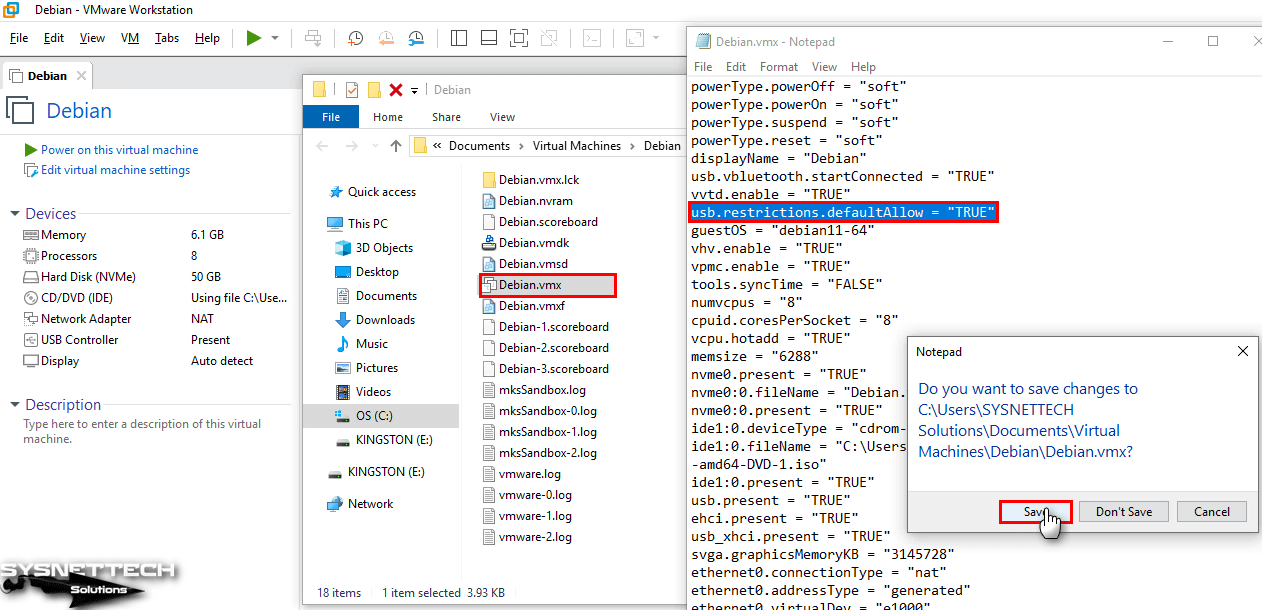
Step 4
After connecting your USB flash memory to your virtual system without any problems, you can see the folder called Backup that you created in it.
How to install Debian 8 Linux in VMware Workstation
Nowadays Linux operating system’s popularity is increasing. Most of the servers are using the Linux Operating System, and personal system also start using various Linux distribution. Debian is one of the popular Linux operating systems.
These days most of the IT professionals learning Linux, as their work environment around Linux based open source and free operating system.
As per my experience, when you are learning anything and for a silly mistake, you are going to format the entire system and reinstall, again and again, the learning period going to be very frustrating and bored.
So, I am suggesting you to at learning time use a virtual environment to configure any Linux and use if any mistake will happen you need to reinstall the only virtual machine, not the system. Or you can keep the previous virtual machine for your experiment to learn to troubleshoot the problem and parallelly you can run new vm to move your learning ahead.
Here, in this article, I am going to explain “How to install Debian 8 Linux in VMware workstation?”. You can use any other virtual environment also like Virtualbox, VMware Player, KVM, etc.
Prerequisites — Debian 8 Linux installation
Debian 8:
Download Debian 8 here.
Virtual Environment:
Download VMware Workstation from here.
Download VMware Player from here.
Download Virtualbox from here.
Anyone application is enough for a virtual environment, I am going to use here VMware Workstation, but the overall process of installation is the same for all virtual environment package.
Installing Debian 8 in VMware Workstation
This is the first screen you will get when open VMware Workstation application. You need to click on “Create a New Virtual Machine” to start the process of preparing a new virtual machine.
Setting up a Debian 11 virtual machine using VMware Player
Well, this is my first post. So don’t hesitate to make some remarks on its content !
Let’s try to install the famous Linux distribution Debian 11 on a virtual machine, hosted on a Windows x86 64 bit platform.
To do that, I will use VMware Workstation Player as virtualization tool (free for personal use).
A bit of context
Why using a virtual machine ? First, this Debian machine is intended to be used to develop Nintendo 64 homebrews using the old official SDK.
However, I’ve read that it will be sometimes necessary to use Windows only compatible tools to develop these N64 programs. I think that a dual boot machine will make things harder when switching between the two operating systems.
Why not using Wine directly on linux ?
-> I tried some years ago, and it was a pain to get it functional . I hope it is better now.
To conclude, my OS dev environment will be :
- A Windows 10 host machine.
- A Debian 11 guest machine.
- A share folder to work with common data.
Installing VM Player
Remark : if you’re using an Intel CPU, you’ll need to enable virtualization in the BIOS (option named Intel VT-x).
Go to this URL to download the tool : here.
The major release version right now is 16.
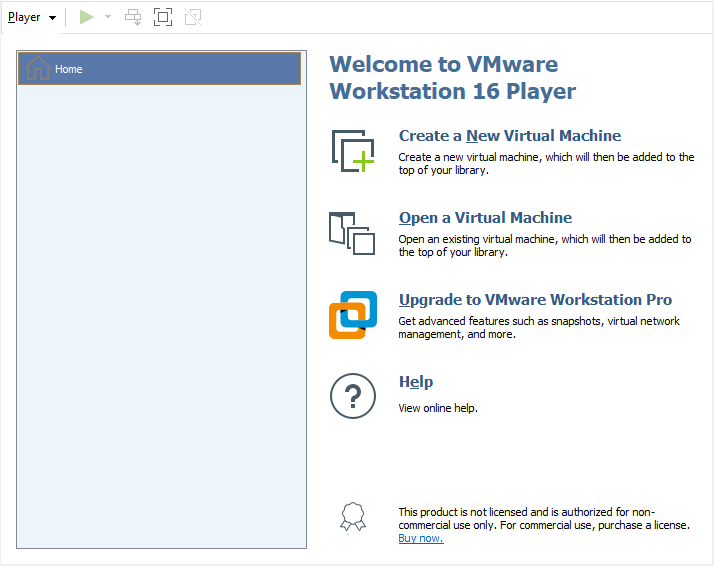
After the installation process succeed, you can start the tool to get the main menu :
Select a Debian installation image
Go to Debian download page here to select the adapted image file to download.
For me, I chose a 64-bit PC netinst iso file as the platform I’m currently working on is intel x86_64 CPU based.
A network install image means that the installation process will need an internet access. Moreover, the repository of Debian packets (.deb files) will be configured to be used through the Internet (nothing local here).
Configuring the virtual machine
Once the Debian iso file is downloaded, you can create a virtual machine on VM Player from the main menu :
- Clic on Create a New Virtual Machine.
- Select Installer disc image file (iso) radio button.
- Browse the Debian iso file you’ve downloaded.
- Clic on Next.
- If not automatically detected, select the operating system of the virtual machine. In our case, choose Linux for the OS, and Debian 10.x 64 bit for the version (11.x not available yet).
- Clic on Next.
- Choose a name and a location for your VM data.
- Clic on Next.
- Set the type and the size for the virtual disk. 10 Gb will be enough for my project (count 2Gb for the OS itself). I recommend also to use split files to avoid allocating all the space at the beginning (almost no impact on read/write performance).
- Clic on Next.
- Clic on Finish.
Now you can see your VM has appeared in the list :
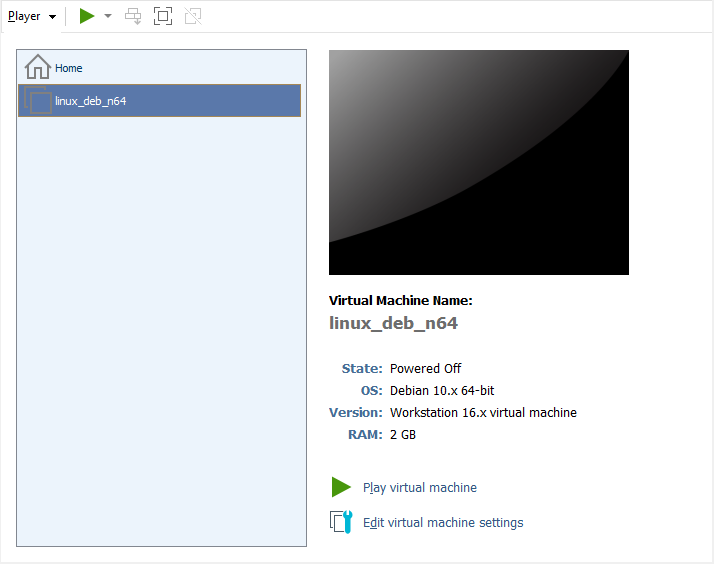
Installing Debian 11.x on the VM
Let’s start the installation process, by launching the VM (clic on Play virtual machine).
You’ll see the Debian install main menu, once the VM has started:
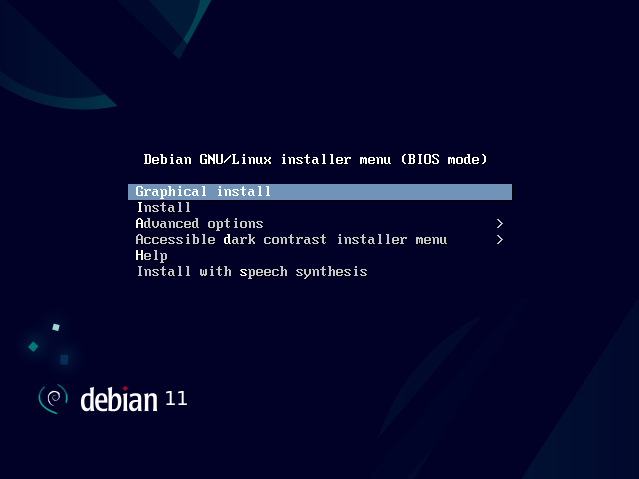
Remark : I’ve provided my choices between parenthesis.
- Select Graphical install
- Select a language (English).
- Clic on Continue.
- Select your location (other >> Europe >> France).
- Clic on Continue.
- Configure locales (United Kingdom — en_GB.UTF-8).
- Clic on Continue.
- Configure the keyboard (French).
- Clic on Continue.
- At this step, the installer checks that it has an internet access, which is mandatory in our case.
- Set an hostname for the VM (debian-n64).
- Clic on Continue.
- Set a domain name (empty for me).
- Clic on Continue.
- Set a password for root user. Don’t forget it!
- Clic on Continue.
- Set a new user (alex) and the associated password. DON’T FORGET IT, because this password will be asked when using sudo command !
- Clic on Continue.
- Select the method for partitioning file system (Guided — use entire disk). I recommend the simplest method for VM use.
- Clic on Continue.
- Select the only disk available.
- Clic on Continue.
- Select partition disk (only one partition). I do not recommend Separate /home partition which broke the installation for me.
- Clic on Continue.
- Clic on Continue.
- Answer yes to format the disk.
- Clic on Continue.
- At this point, the Debian base system is about to be installed.
- Answer no for adding more Debian repositories (the default one is sufficient).
- Clic on Continue.
- Select the Debian Mirror (France).
- Clic on Continue.
- Select the Debian Mirror (ftp.fr.debian.org).
- Clic on Continue.
- Select the proxy if needed (no proxy for me).
- Clic on Continue.
- Answer for participating to Debian packet statistics (no).
- Clic on Continue.
- Select the desktop environnement (default).
- Clic on Continue.
- Now, you’ll have to wait a little when installing all the Debian packet (
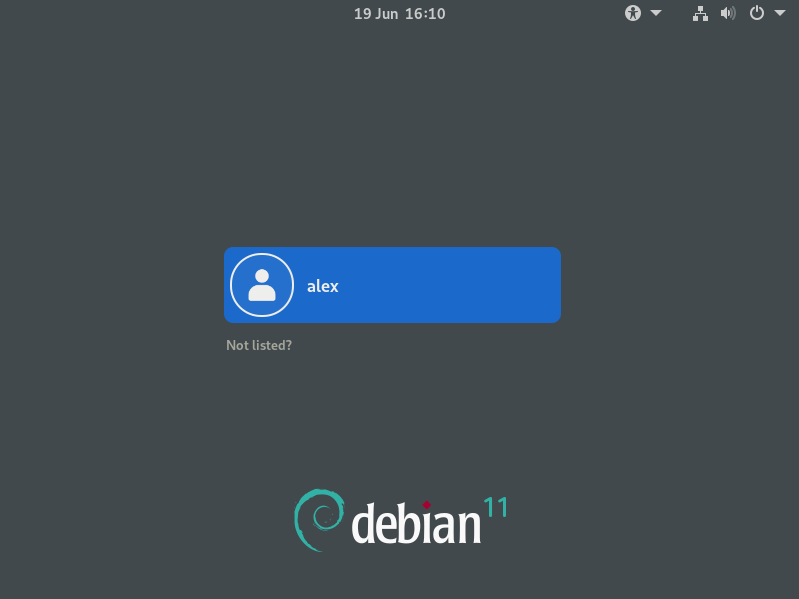
The VM will reboot after that, and the log menu is displayed :
Configuring the Debian virtual machine
Enable common alias
I use all the time the alias ll which is not directly available.
To have that, open a terminal and type : vi
/.bashrc .
Now, uncomment the alias by removing the character #.
Start a new shell : bash
Become a sudoer
To be able to use sudo command, you’ve to be in the sudoers list. For that, in a terminal :
- Log as root : su —
- Type the root password, set during the installation process.
- Edit the sudoers file : visudo . It opens nano as default editor.
- Add the following line, to add your username (alex for me) :
Exit fullscreen mode
- Save and quit the editor.
- quit the root session : exit .
Share a host/guest folder
On the host machine (Windows, VM is powered off), in the VMware Player main menu :
- Select the virtual machine, on the list.
- Clic on Edit virtual machine settings.
- Clic on Options tab.
- Clic on Shared Folders.
- Select Always enabled radio button.
- Add a folder, and keep in memory the name.
Now start the VM and open a terminal :
- Edit the fstab file which list mount configuration when the OS is launched : vi /etc/fstab
- Add the following line :
Exit fullscreen mode
- the local folder /home/alex/share will contain the share folder on the VM. It has to be created using mkdir
- the string after .host:/ is the name set in the VM Player configuration (for me : share).
Next episode
Ok, now I’ve a Debian virtual machine configured.
Next step will be to build an environnement to compile N64 programs using the official SDK!