Openwrt подключение к wifi как клиент
Для работы с wifi в openWrt существует скрипт /sbin/wifi. Файл /etc/config/wireless отвечает за конфигурацию wifi.
Создать конфигурационный файл по умолчанию можно, выполнив:
Он примерно будет иметь следующий вид:
Изменяем его под свою конфигурацию.
Файл /etc/config/wireless для открытой сети:
Файл /etc/config/wireless для шифрованой сети:
sta — режим клиента; ap — режим точки доступа
Для автоматического получения адреса по dhcp в файле /etc/config/network необходимо создать интерфейс:
Выполнить для применения новых настроек:
На этапе конфигурации openWrt нужно отметить wpa-supplicant, иначе wifi не будет подниматься скриптом openWrt /sbin/wifi:
Выполнение «wifi down» приводит к отключению wifi и пропаданию интерфейса wlan0.
Выполнение «wifi up» поднимает интерфейс wlan0, и происходит подключение к сети.
Connect to client Wi-Fi network
This page will explain how to connect your OpenWrt device to another Wi-Fi network by using its own radio. Due to technical limitations, your OpenWrt device will create its own subnet (in the example below it's 192.168.2.x while the Wi-Fi router's subnet is 192.168.1.x ) just as it would when connected to a modem, your OpenWrt device and devices connected to it will be able to reach the Internet, but won't see devices connected to the other Wi-Fi/router).
If you want to actually set up a Wi-Fi repeater or keep devices connected to this device in the same subnet as the devices connected to the other router, you will need to follow this tutorial instead.
Web interface instructions
Refreshed with 21.02 LuCI images.

We will now set up the client Wi-Fi network, the configuration needed to connect to another Wi-Fi network.
Once you are logged into the router,
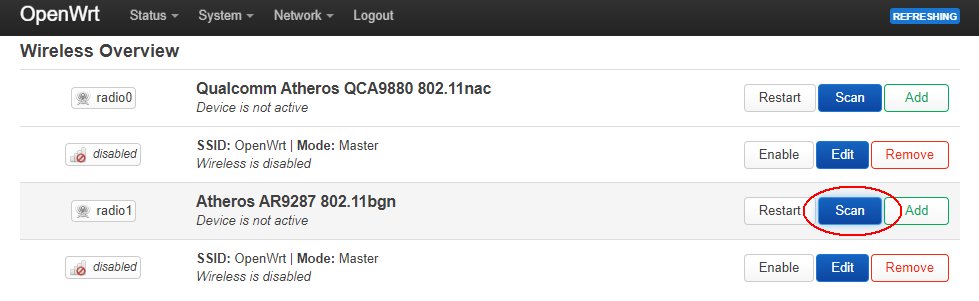

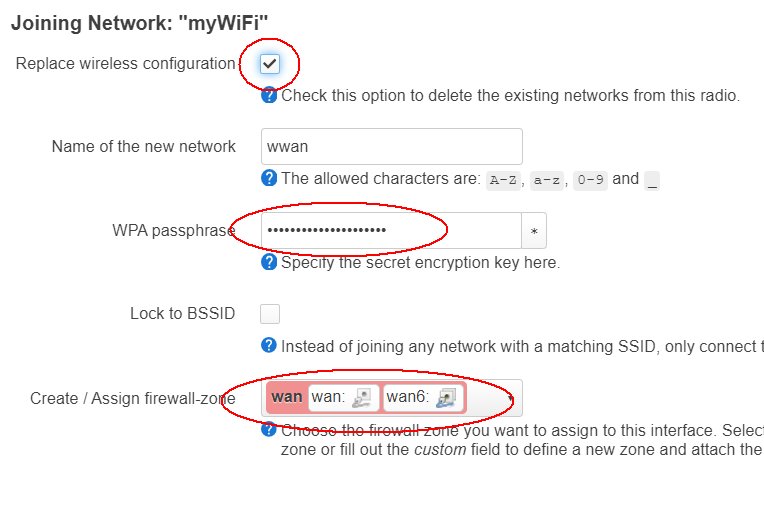
You will land in the client Wi-Fi settings page. Edit as required.
The most important settings are on the Operating Frequency line.

Press Save
Press Save & Apply.
Configuration is now complete.
This is the final result. Note how the client network has a ? instead of a IP address.
The wwan IP address is only visible in the Network Interfaces page.

This step should not be necessary if you had reset the router to OpenWrt defaults. If you have no “wan” firewall zone you must create it.
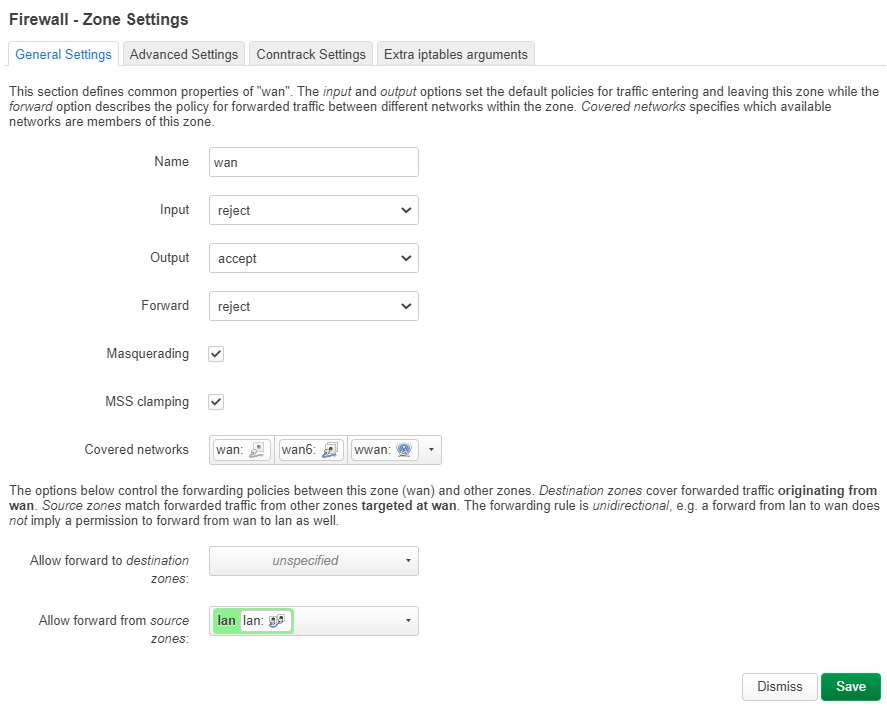
After you have done this, go back and repeat the other steps to add and save the Wi-Fi connection.
Command-line instructions
Before doing any actual configuration, the Wi-Fi interface must be enabled in order to be able to scan for networks in the vicinity:
if you have more than one Wi-Fi radio in your device, then you can use the others in this tutorial instead by substituting their number. For example to enable the second Wi-Fi radio (usually a 5Ghz radio) you would need to uci set wireless.@wifi-device[1].disabled=0 and then use wlan1 instead of wlan0 in the command below.
Now we can list networks in range substituting your actual wireless interface for wlan0 :
In the example, there are two networks, a Wi-Fi g one called Violetta and a Wi-Fi n one called GOinternet_EB20FB. The device was configured to connect to the one called Violetta.
These are the uci values that were added or changed by the configuration procedure.
For SSID, BSSID, and encryption you must use the info you got from the Wi-Fi scan above.
For an explanation of why these values were changed, please read the luci tutorial above.
Openwrt подключение к wifi как клиент
Most wifi routers are used as access point in infrastructure mode. However it is possible to configure then as wifi client so they can connect themselves to other access points. Here is how to do it on OpenWrt.
Package Installation
A freshly installed OpenWrt already have packages to use the router wifi capabilities. But use encryption you have to install the nas package.
Replace WAN with the wifi interface
On a WRT54Gv2, network interfaces are named as follow:
Any error may «brick» your router and you won’t be able to access it anymore, so you’d better double check your network interface naming on the OpenWrt wiki.
OpenWrt uses the «wan_ifname» variable in many scripts to get the external network name (usually it’s your DSL connexion). To ensure proper behavoir for all other services running on OpenWrt (like firewall) we are going to give this variable the wifi interface name.
The LAN interface should get a fixed IP address.
But the WAN side will get its IP address from the access point’s DHCP server.
Connect to wifi network
First of all we have to list available access points. The «iwlist» command gives us SSID and channel for each detected access point.
To join a network we have to unmount the wifi interface, then set the SSID and channel to be used.
Now let’s set the encrpytion method and key. Here I am using WPA2 with TKIP. Please check the OpenWrt wiki for available options.
Once all these parameters are set we’re good to restart the wifi interface (If you are running nas you have to restart it too).
After a few seconds the router should establish a connexion to the accesss point. If everything is ok you just have to commit your changes.
Точка доступа + клиент на OpenWRT
Захотелось мне отвязать модули на ESP8266 от основного WiFi маршрутизатора. Гуру говорят, что так по феншую, сеть стабильнее, аптайм длиннее и русские хакеры не доберутся до домашней сети.
Из чулана достал старый роутер, долго стирал пыль и долго вспоминал пароль от OpenWRT. Прелесть этой прошивки в том, что она умеет на одном радиомодуле прикидываться одновременно и клиентом и точкой доступа! Клиент по WiFi подключается к основному маршрутизатору и раздает с него интернет на все ESP8266 через новую точку доступа. Вроде все легко и понятно, но есть нюансы.
Первым делом надо проверить не пересекаются ли адреса DHCP серверов основного маршрутизатора и новой точки доступа. Идем в Network -> Interfaces выбираем LAN и жмем Edit.

На основном у меня стоит 192.168.1.1 поэтому тут поменял на 192.168.2.1

Лучше сначала создать клиента. Тогда номер канала, тип шифрования будут автоматический скопированы при создании точки доступа. Идем в Network -> WiFi нажимаем копку Scan и подключаемся к основному маршрутизатору. Вводим пароль на доступ к интернету. Главное перед Save & Apply выбрать wwan.

Теперь создаем точку доступа. В том же окне Network -> WiFi нажимаем копку Add. Придумываем название и пароль новой точки доступа. Выбираем lan и жмем Save & Apply.
Если все сделать правильно, то должен появится Master (точка доступа) и Client (клиент) подключенный к основному маршрутизатору. Если связи нет — проверьте и повторите все шаги.