Как настроить Visual Studio Code для C, C++, Java, Python
Visual Studio Code — популярный редактор кода, бесплатный и с открытым исходным кодом. Но я уверен: каждый из нас, кто пытался настроить Visual Studio Code для разработки приложений на C++, Java или Python, прошел через стадию: “О Боже! Почему нельзя как-нибудь попроще?” Я сам пробовал настроить VS Code пару раз и в итоге закончил тем, что использовал CodeBlocks. 🙁
Прочитав много документации, посмотрев ряд роликов на YouTube и потратив несколько дней на саму настройку VS Code, я пишу эту статью, чтобы все это не пришлось проделывать уже вам!
Сегодня я покажу, как настроить среду разработки для спортивного программирования на C++, Java и Python в VS Code с нуля. Мы также посмотрим, какие расширения больше всего пригодятся, чтобы начать работу с VS Code. В конечном счете, ваша среда разработки будет выглядеть примерно так:
1. Устанавливаем Visual Studio Code
Скачайте последнюю версию Visual Studio Code с официального сайта. Рекомендуется загрузить системный установщик (System Installer), но если у вас нет прав администратора, то пользовательский установщик (User Installer) тоже подойдет. Выполните все обычные шаги по установке и обязательно проставьте все следующие чекбоксы:
Если у вас уже установлен VS Code, но вы все равно хотите начать с чистого листа, следуйте этим инструкциям, чтобы полностью удалить VS Code.
2. Настраиваем расширения
Ниже приведен список расширений, которые нам понадобятся для правильной настройки VS Code. Откройте VS Code и перейдите на панель расширений (Ctrl + Shift + X), которая находится на левой панели инструментов, и начните загружать друг за другом следующие расширения:
-
от Microsoft — [Важно] Для корректной работы этого расширения нам понадобится установленный и добавленный в PATH компилятор MinGW. Если у вас его нет, следуйте этому руководству. от austin. от Microsoft — вам нужно будет настроить Python для работы этого расширения. Загрузите и установите последнюю версию отсюда. от Microsoft — [Важно] Перед установкой убедитесь, что в вашей системе настроены Java 8 JDK и JRE и указаны все необходимые переменные среды для Java. Если нет, посмотрите это видео о том, как настроить Java на вашем компьютере. от Jun Han — мы будем использовать это расширение для запуска всех наших программ. Для этого необходимо выполнить некоторые шаги по настройке. Мы увидим эти шаги в следующих разделах.
Расширения, перечисленные ниже, необязательны для дальнейшей настройки, но я рекомендую вам обратить на них внимание, посмотреть, заинтересуют ли они вас, и если нет, то перейти к следующему разделу.
- (Необязательно) Material Theme от Mattia Astronio — это расширение содержит множество приятных глазу тем. Вы можете выбрать любую, какая понравится. Лично я предпочитаю Monokai, которая доступна в VS Code по умолчанию, без каких-либо расширений.
Чтобы выбрать тему, нажмите Ctrl + Shift + P. Откроется палитра команд. Осуществите поиск по слову “theme” и выберите опцию Color Theme. Чтобы настроить иконки, можете выбрать опцию File Icon Theme.
Расширения для тех, кто интересуется FrontEnd-фреймворками для веб-разработки, такими как Angular и React:
- (Необязательно) Angular Language Service от Angular.
- (Необязательно) Angular Snippets от John Papa.
- (Необязательно) ES7 React / Redux / GraphQL / React-Native snippets от dsznajder.
- (Необязательно) React Native Tools от Microsoft.
- (Необязательно) Live Server от Ritwick Dey.
3. Настраиваем внешний вид редактора
Итак, мы уже установили VS Code и несколько расширений. Теперь мы готовы настраивать среду разработки. Я создал шаблон для спортивного программирования в VS Code и загрузил его в свой профиль на Github.
Перейдите по этой ссылке и загрузите шаблон себе на компьютер. Распакуйте его в любое место по вашему выбору. После этого откройте получившуюся папку в VS Code. Вы должны увидеть что-то вроде этого:
Пройдитесь по файлам main.cpp, Main.java и main.py и посмотрите на записанный в них образец кода. По сути, шаблонный код, предоставленный в образцах для каждого из этих трех языков, принимает входящие данные из файла input.txt и обеспечивает вывод в файл output.txt. Для каждой программистской задачи, которую вы хотите решить, просто создайте копию этого шаблона и напишите свой код в функции solve().
Теперь создадим ту разбивку экрана, которую вы могли видеть на самом первом изображении в этой статье. Эта разбивка позволяет сразу видеть как ввод, так и вывод вашего кода, что делает ее очень удобной в использовании.
Visual Studio Code — C/C++ Setup
Visual Studio Code is a great open-source editor with plenty of useful plugins for insane amount of languages and frameworks.
However, as C and C++ environment is pretty janky for today’s standards, so is the configuration. So i made this guide to streamline the process and make it easy for somebody new in C, C++ or VSCode to setup a reasonably working dev environment with some useful quality-of-life tools. It might not be IntelliJ-level of quality, but hey — it’s free.
In this guide, i will tell you:
- What tools you’ll need to start developing C and C++ apps in VSCode
- What extensions you might want to install to ease up the code writing process, and how to configure them
- How do you create a C/C++ project in VSCode (with CMake) and integrate it with VSCode
Prerequisites⌗
VSCode⌗
The obvious prerequisite is Visual Studio Code. Install it from the official site: https://code.visualstudio.com/, or from a repository if you’re using a package manager.
For Windows: either download the installer from official site and run it, or install VSCode via scoop: scoop install vscode . btw; i strongly recommend scoop — great package manager
For Linux: if you have it in your package manager repository, install it from there. Otherwise, use the installer from official site.
For MacOS: same as for Linux. Probably. I don’t use MacOS so i can’t really tell.
Fun fact; there are two versions of VSCode you can find on the internet and in package managers — OSS version, and Non-OSS. The OSS version is basically the VSCode you’d get by downloading it from official repository and building it yourself. Non-OSS version is the one from Microsoft distribution (for example, their official site), and the only difference between them is that Non-OSS version uses some Microsoft propertiary code, while OSS doesn’t. There is some functional difference (IIRC, OSS version lacks proprietary features like Settings Sync or Remote WSL/SSH/Containers), but both are fully compatible in terms of plugins and configuration, so you usually don’t need to worry about the exact version you’ve installed.
C/C++ Toolchain⌗
There are many C/C++ toolchains available, and i’m not gonna enforce one, because this guide is mostly toolchain-independent (in the end we’re gonna use build system, but most of the examples are for GCC). However, if you are new to C/C++, i’d recommend starting with GCC (or MinGW, if you’re on Windows) as it’s easy to install and use out of the box.
If you already have your preferred toolchain installed and configured, feel free to go to the next step. If not, here’s the guide:
For Windows:
- Download MinGW-w64 installer from here — that’s basically 64-bit GCC for Windows.
- Run the installer. Make sure to change the Architecture setting to x86_64 , otherwise you’ll get a 32-bit toolchain and that’s not what we want here. Also; make sure the Threads setting is configured as posix , otherwise you won’t be able to use standard C++ threading library. Don’t change other settings there.

- After installation, add the /bin subdirectory (with gcc.exe and g++.exe inside) of installed toolchain to system PATH variable. It, obviously, can be different than the one on the screenshot below
 Go to “Edit the system environment variables” settings in Windows, then press the “Environment variables…” button and add the new entry with GCC bin directory, either to user, or system PATH variable — doesn’t really matter which one.
- Check if you’ve done it correctly by running PowerShell or cmd.exe and trying out gcc —version command. You should see something like this:
 If that’s not what you see, check if you’ve added correct path to PATH variable. Or restart the shell/computer, and try again.
Important note about MinGW and MinGW-w64 — Both official MinGW and MinGW-w64 distributions are pretty outdated (they’re using GCC 8.1.0, while the latest release at the time of writing is 11.0). If you want a fresh new version of GCC on your Windows machine, either use MSYS2 or WinLibs package. However, MSYS2 setup is a bit longer than MinGW, and both of these packages can have their issues (i’ve managed to get issues with WinAPI and terminal output using both of them), so if you’re an absolute beginner, stick to MinGW-w64 for a while.
For Linux:
Usually, you should have GCC in your repository. On Ubuntu, Debian and similar distributions (Mint, Kubuntu, Lubuntu, PopOS!, Zorin, and so on), you have build-essential package with most tools needed to build C/C++ programs.
On Arch Linux and similar distributions (Manjaro), you have base-devel package.
On other distributions, search for similar package or install latest gcc and g++ packages from your repository.
Test it the same way as on Windows — open terminal and try gcc —version , see what happens.
You also have to install gdb (GCC debugger) separately, as it may not come with the base development packages, and you definitely do want to have it and use it.
For MacOS: probably same thing as on Linux, look for GCC (or any other preferred toolchain) in package manager and install it from there. Verify the installation the same way as on Linux.
VSCode Essential Plugins⌗
If you already have working C/C++ toolchain, time to run VSCode and install some plugins. Run VSCode and go to the Extensions menu.
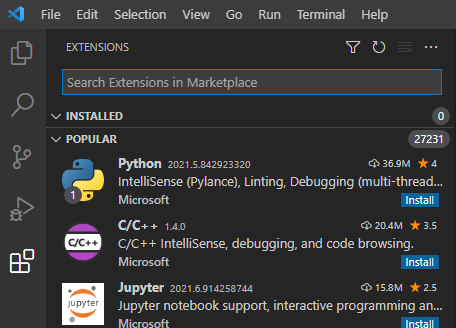
Now, for some general C++ plugins:
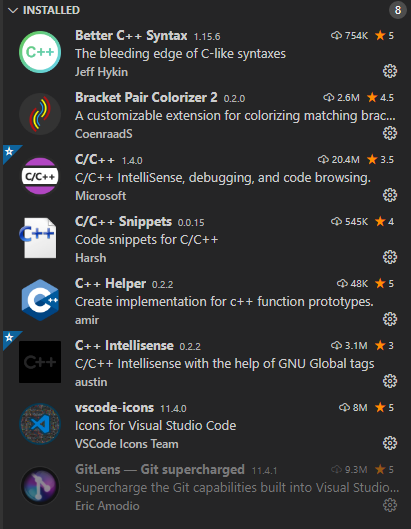
- C/C++ — that’s the core extension we’ll need. It contains the fundamental stuff to work with C/C++ in VSCode.
- Better C++ Syntax — it’s always nice to have better syntax colouring, so i strongly recommend that one. You might want to use one of the themes from this extension description to get full experience.
- C/C++ Snippets — pretty useful extension that adds automatic generation of snippets in C/C++ code — instead of writing loops, structures and class definitions by hand, you can generate them with autocompletion support.
- C++ Intellisense — pretty good plugin with some intelligent autocompletion features.
- C++ Helper — simple extension which adds automatic function definition generation feature.
- C-mantic — very useful plugin that adds auto-generation of function definitions, getters, setters and more. An alternative to C++ Helper — pick whatever seems more ergonomic for you.
And i’d also recommend these:
- Bracket Pair Colorizer 2 — very useful extension which colorize the matching bracket pairs, increasing code clarity. Strongly recommended.
- GitLens — if you want to work with Git repositories, that’s the extension you’re looking for. You need git installed to use it!
- Material Icon Theme — better looking than default ones
With these plugins, you will have a pretty decent bare-bones environment to work with C and C++. You’ll have autocompletion, some refactoring features, some code generation and a pretty decent syntax highlighting. The screenshot below is outdated — use the list above for updated recommended plugins
I have one more plugin to show you, an alternative language server with many useful features, but i’ll leave it as a bonus at the end of this guide, because it needs a bit more configuration. Make sure to check it out!
Creating a project — VSCode and CMake⌗
We’ll start with something simple. As i’ve mentioned before, i’m not gonna teach you how to make a raw VSCode project, which builds the app from scratch and without any other tools, because that’s simply painful, not really scalable, and not worth the trouble.
Instead, i’m gonna teach you how to use a build system.
But what’s a build system?⌗
Well, build system is a tool that tells the toolchain (compiler and his friends) how to create a program out of all the source (and resource) files you’ve created. And sometimes does other things, but that’s out of this tutorial scope.
Without it, you’d have to enter the toolchain commands manually each time you’d want to build the application. That’s fine for small apps with one, two or maybe five files. But it gets messy when your program starts to grow.
So, for example, assuming you use gcc , to build your C program manually, you’d have to enter something like this:
gcc [list of your source files] [some fancy flags for your compiler] [maybe some flags telling the compiler where the libraries are] -o program.exe
An actual example would be:
gcc main.c lib.c lib2.c -O2 -Wall -Wextra -L./some/lib -lmylib -lsomeotherlib -o program.exe
That doesn’t look so bad, right? You could even put this command in some shell script and easily run it every time you’d like to build the code. But then, you’d have to change this command every time your project structure changes — so, every time you add a new file, or library, or change some directory name, you gotta edit this script. And yes, i know that wildcards exist, but for the sake of this example i’m gonna ignore them.
Another issue is that if you’d want to give this code to your friend or teacher, he would either have to use the same shell as you, and gcc , or write his own build script (or project) for the compiler/shell he’s using, and that’s not very user-friendly (or, rather, programmer-friendly) solution.
There are also some other issues with manual building, but the point is: manual building is not comfortable or scalable on a larger scale. So, we’ll use a build system to do it for us and make everyone’s life easier!
Bonus note: Tool i’m going to talk about next — CMake — isn’t technically a build system. It’s a meta-build system. The difference between those is that build system runs the toolchain commands directly, while meta-build system generates the build system files. Basically, meta-build systems are more flexible, and sometimes easier to use, therefore we’re gonna use one.
Bonus note number two: originally, i was going to show how to use Premake and CMake, but due to some pretty bad issues with Premake i’ve decided to stay with CMake. I’ll probably make a Premake guide in the future.
Okay, how do i use it?⌗
Well, let’s start with installation. You can either install it from your package manager, just like VSCode, or download from official site. Make sure to add CMake to your PATH variable if you’re using an official installer!.
Important note: if you’re using your package manager, check the CMake version after installation ( cmake —version command). I’m gonna use some stuff that was added in CMake 3.12, but from what i can see, some older Linux distributions (like Ubuntu 18.04) still have CMake 3.10 in their repositories, so if that’s the case i strongly recommend installing newer version manually. If that’s not possible, i’ll tell what things come from CMake 3.12 and how to make a workaround.
Done? Great. Now a little bit of theory.
How does CMake work?⌗
CMake is a meta-build system. As i’ve mentioned earlier, it means that when we run it, it should give us a project for a build system of our choice, which we can use to build our application. To tell CMake how it should generate the project, a CMakeLists.txt file is used. This file includes the project configuration, written in CMake’s scripting language.
Some toolchains — like GCC, MinGW or Visual C++ — come with their own build systems. In case of GCC/MinGW, it’s GNU Make. In case of Visual C++, it’s MSBuild. CMake can generate the necessary files for these build systems, and then we can use them to build the whole project with a single command. Pretty convenient.
Creating a simple project⌗
Let’s open VSCode (or restart, if you had it opened while installing CMake) and add some extensions.
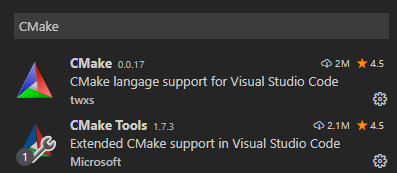
These two plugins will enable CMakeLists.txt syntax highlighting and CMake integration for VSCode. And this integration is a very powerful and helpful tool, as we’ll see in a bit. You can also install a cmake-format extension, if you have Python installed and follow the plugin’s installation guide
Now, make a folder for our new project and create a simple main.cpp (or main.c , if you want to code in C):
You can check if your toolchain works correctly by building the app manually. If you’re using GCC or MinGW, open up integrated VSCode terminal with Ctrl+` command (or Ctrl+Shift+` to create a new one), and run:
C++: g++ main.cpp -o main
C: gcc main.c -o main
And then run the app with ./main command. You should see your Hello World printed in terminal.
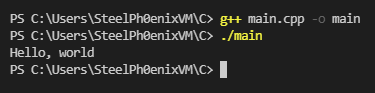
If that doesn’t work, make sure you have correctly added your toolchain to PATH variable.
Now, we can proceed with CMake. Delete the compiled program main you just created and tested, and create a CMakeLists.txt file in the same directory as your code file. We’ll start with bare-bones template and then we’ll expand it a little.
Put this code into CMakeLists.txt :
And then open up the VSCode command list with Ctrl+Shift+P shortcut, and look for CMake: Configure option. Run it.
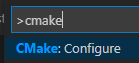
Next, you should see a list of detected toolchains installed in your system. Pick one.

After that, VSCode will run CMake and configure the project for the first time. You should see similar output in your VSCode output window:
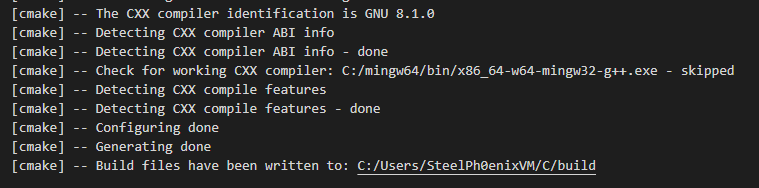
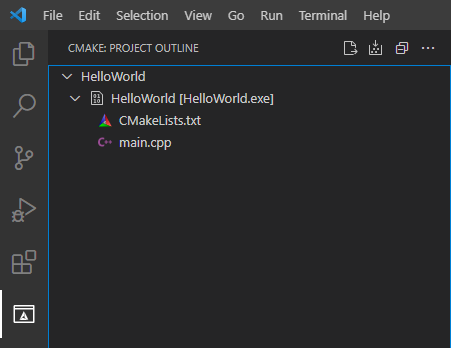
From now on, VSCode will automatically run CMake every time you change CMakeLists.txt to re-generate the project files. You should also see a new menu on left-side toolbar
Building your program⌗
So, we have a project now. How do we build it, and how do we run our program?
Thankfully, CMake plugin for VSCode got us covered. To build the program, either use F7 shortcut, look for the CMake: Build command in command list, or press the Build button either on VSCode bottom bar, or in CMake menu.


You should see similar output in VSCode output window:

Running your program⌗
Now, let’s run it. Press the Run button on the bottom VSCode bar:

And the app should run without any issues. The output should be in terminal window.

Is that it?⌗
Of course not — there’s always more!
But yeah, we just created a very simple project with CMake + VSCode, built it and ran it. Now, let’s talk what actually happened and how can we expand our project.
CMake 101 — how does it work?⌗
CMake, as i’ve mentioned multiple times, is a tool that generates the project files used to build it. However, it can also be used for some other things — like application packaging, managing tests, configuring the project, and so on. At the moment CMake is an industry standard, which means that most of the C and C++ projects have CMake support, therefore it’s a very versatile tool. Not the best, but versatile.
You may notice that after configuring the project a new directory appeared in your project folder, called build . Let’s peek into it.
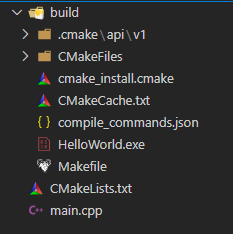
You are usually not supposed to touch and modify these files, as CMake manages them, but i’ll still explain the function of some of the more important ones:
- CMakeCache.txt — inside that file, you can find a list of CMake variables that are used in project generation process. You can find the toolchain paths, compiler flags, user and many different configuration variables there.
- compile_commands.json — that file contains a list of commands used to build your program. This list can be used by some code analyzing tools (and i’ll describe one at the end of this guide).
- HelloWorld.exe — hey, that’s our program!
- Makefile — this file is used by GNU Make to build our program. Basically, that’s the final CMake output. If you’re using a different toochain with different build system, like Visual C++, you will get a different file (usually, a whole Visual Studio solution, so maybe even a whole directory).
CMakeLists — what’s inside?⌗
Let’s analyze our CMakeLists.txt
- cmake_minimum_required defines the minimal version of CMake required to generate this project. We’ll use 3.12 because i’m gonna show you some stuff that was added in this version.
- project defines our project. We can also add information about version, project description, homepage and used languages — which we do in that case.
- add_executable tells CMake to generate a code that will build an executable file with specified name from specified source files. $
is a CMake variable containing the project name defined by project command.
It’s important that add_executable requires a full list of all the source files making up the program. So, in theory, you would have to add every single source file to the list manually, like that: add_executable($
Expanding our project — adding more files⌗
Let’s add some more files for our project. First, create two new directories — include and src in root project directory:
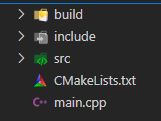
Now, move the main.cpp (or main.c ) to src directory, and make a new file called lib.cpp (or lib.c ) there. Put this code inside:
Then, add a lib.hpp (or lib.h ) file inside include directory. Put this inside:
The project should look like this now:
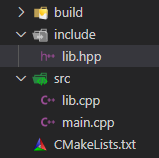
Let’s update the CMakeLists.txt .
We’ll use two new commands now: file and include_directories . file command will generate the list of source files, while include_directories will tell our toolchain where to look for header files.
- file(GLOB PROJECT_SOURCE_FILES CONFIGURE_DEPENDS src/*.cpp) — this command generates the list of files from src dir with .cpp extension, and stores it in PROJECT_SOURCE_FILES variable. The CONFIGURE_DEPENDS flag was added in CMake 3.12, and thanks to it, the list of files will be automatically re-generated every time we add a new file to the project. The command will work without it, but then you would have to manually regenerate CMake project after adding new files.
- include_directories tells the toolchain where to look for header files.
The PROJECT_SOURCE_FILES variable should have a list of all of our code files, and we’ll pass it to add_executable instead of adding a new file manually. Of course, this variable can be called anyhow you want — it’s not a special name or anything.
Now, let’s configure our project again (VSCode should do this automatically, but i wanna show you how to do it in case it doesn’t). Right-click on CMakeLists.txt and select “Configure All Projects”
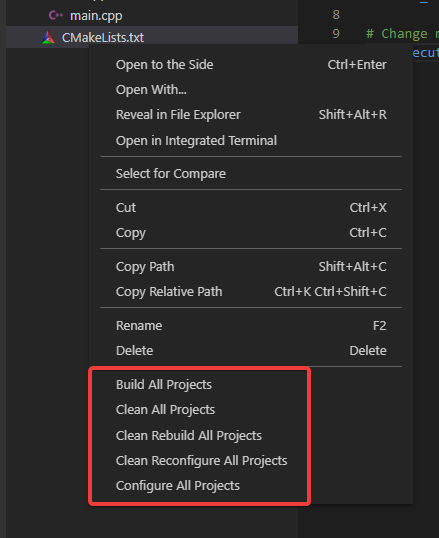
Sometimes, when something goes wrong and CMake or VSCode starts behaving strange or getting buggy, it’s good to clean up and reconfigure the project (“Clean Reconfigure All Projects” and “Clean Rebuild All Projects”). This can sometimes happen when playing with CMakeLists.
Let’s add some code to our main.cpp (or main.c ) to test if additional files are added properly to our project:
Now, we should be able to build our program


At this point, everything should work automatically. You should be able to add new source files to src dir, and new headers to include , and CMake should handle them without having to touch CMakeLists.txt manually. Adding new directories with source/include files is done the same way — just file the source files, add include path with include_directories and voila.
Debugging our code⌗
Time for a last step in our setup — using a debugger. Fortunately, CMake integration does most of the work for us here.
Let’s add a breakpoint in the first line of our main function — click on the left of line number, you should see a red dot:
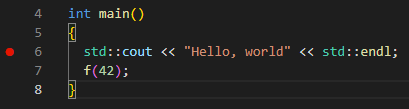
And start a debugging session by pressing a little bug icon on the bottom of VSCode window, or by using CMake: Debug command

VSCode should now switch into debugging perspective and program should stop at breakpoint.
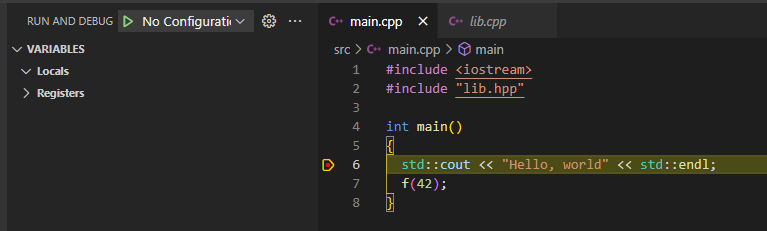
And that’s basically it. Don’t worry about lack of configuration for run/debug in VSCode — CMake integration does everything for us, so there’s no need to make them. Just make sure you run/debug the program via CMake commands in VSCode, instead of it’s own. Setting up the run/debug configs manually can be pretty annoying at the times, so that’s a subject for another guide.
There’s one subject i haven’t touched yet, and it’s adding external libraries. Since this guide is already long enough, i’ll make another one for that. Now, it’s the time for some bonus content.
Bonus: clangd setup⌗
clangd is a language server for C++. It provides functionalities like code completion, code linting (showing warning and errors in real-time), simple refactoring, and so on. There is a C++ language server in VSCode already, as we installed C/C++ extension, but clangd is better in some ways, and it’s more multi-platform (default VSCode C++ language server doesn’t work on ARM yet, so if you wanna code on RaspberryPi via SSH — clangd is your best friend).
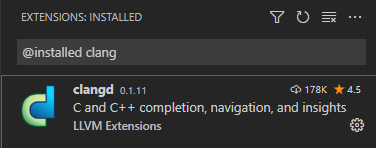
In order to work, clangd requires compile_commands.json file to know how your code is compiled and with what flags. Fortunately for us, CMake generates that file automatically, so no further configuration is required on our side!
Right after the plugin installation, you should see a popup like this one:
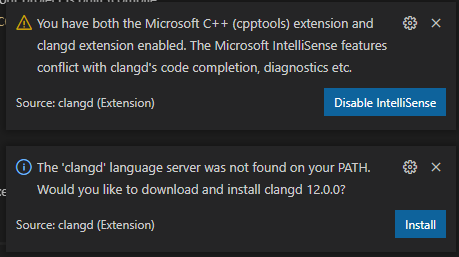
In order for clangd to work, you have to disable the default Intellisense server (press Disable IntelliSense ), and download clangd binary (which VSCode does for us). After it’s downloaded, you should see this popup:
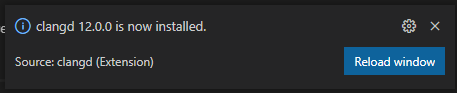
Reload the window, open up a C/C++ source file, and check if clangd info is displayed on the bottom of the screen
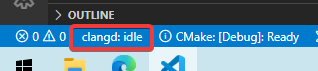
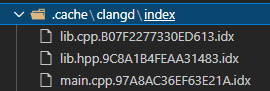
If that’s the case, congratulations, it should work now. Check if there’s no include errors, and if the autocompletion works (you can manually trigger autocompletion with Ctrl+Space shortcut). There should also be a .cache directory in your project folder now, with clangd ’s cache files — make sure to add it to .gitignore before making a commit 😛
Full list of clangd features can be found here: https://clangd.llvm.org/features.html. I strongly recommend checking it out.
Clang-Format setup⌗
clangd embeds clang-format support, which is a code formatting tool — one of the best in C and C++ environment. clang-format allows you to manually or automatically format the code (for example, on-save, format-while-typing is not yet supported with clangd ) according to your preferences, which you can set by creating .clang-format file in your workspace root, with configuration options for clang-format .
The list of configuration options is pretty long and can be found here: https://clang.llvm.org/docs/ClangFormatStyleOptions.html. I’m not gonna describe them all of course, i’ll just show an setup example.
Let’s create a .clang-format file in our workspace root dir, and put this inside:
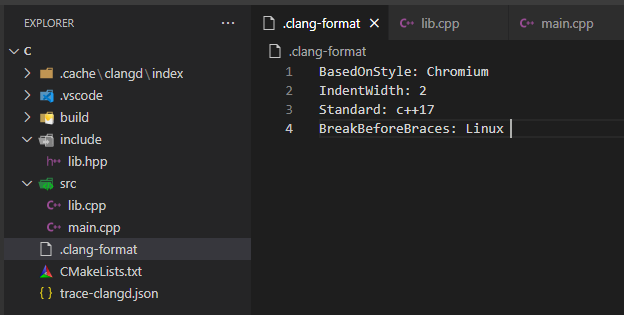
If clangd is the only formatter you have installed, it should be treated as default. If not, make sure it is by opening command list ( Ctrl+Shift+P ), looking for Format Document With. option, and setting default formatter to clangd .
Now, open a main file and either right-click and pick Format document option, or use a shortcut ( Shift+Alt+F on Windows by default). The code should now look like this:
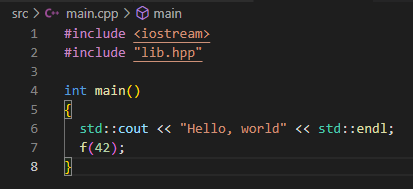
If it had been formatted differently, check the clangd output in VSCode window. All the issues and errors with .clang-format file should be there.
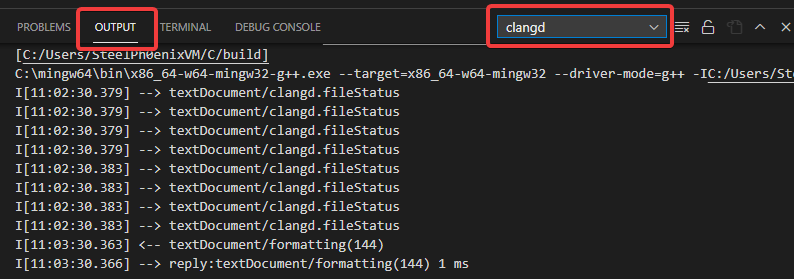
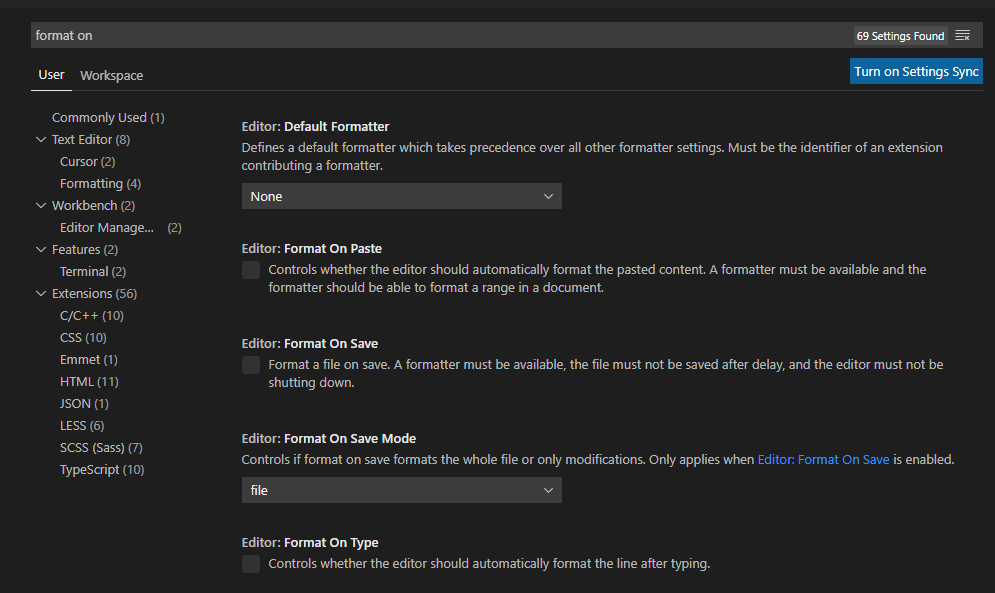
You can set autoformatting in VSCode settings — open settings window with Ctrl+, or File -> Preferences -> Settings , and look for format on options
Summary⌗
And that would be it. I hope it’s not too long.
If there are any issues or questions about the guide itself or the setup process, feel free to contact me!
Как в VisualStudio писать на Си
Можно по отдельности использовать текстовый редактор и компилятор, в ручном режиме компилировать и запускать программу в терминале или консоли, но намного удобнее использовать IDE или разные среды разработки. Обычно они включают встроенный текстовый редактор, который связан с компилятором, позволяя скомпилировать и запустить программу по одному клику. Также пользователю предоставляется огромное количество других дополнительных возможностей.
В нашем примере в качестве среды разработки (для программирования под Виндовс) мы будем использовать полнофункциональную и бесплатному среду VisualStudio 2019 Community, которую нашли по ссылке https://www.visualstudio.com/ru/vs/.
После загрузки и запуска VisualStudio в нем нужно отметить пункт «Разработка классических приложений на C++»:
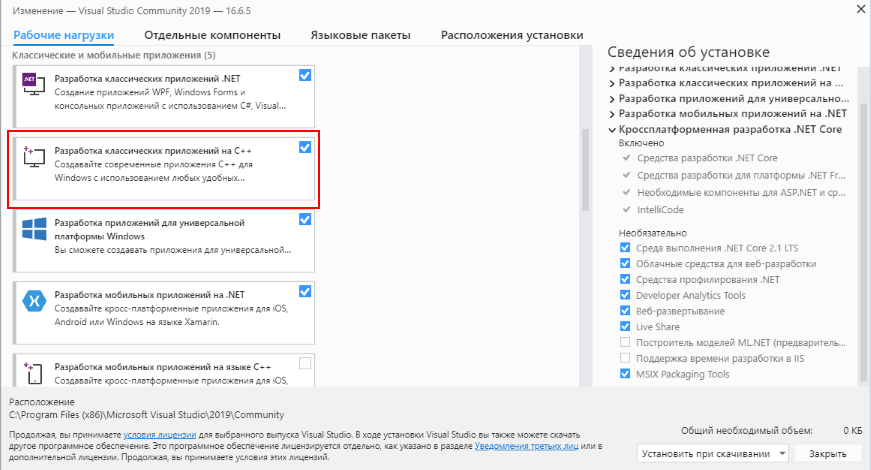
Теперь выберите все необходимые пункты и запустите установку, нажав ОК. По завершению установке создадим первый проект. Откройте VisualStudio. На первом экране выберем тип EmptyProject для языка C++:
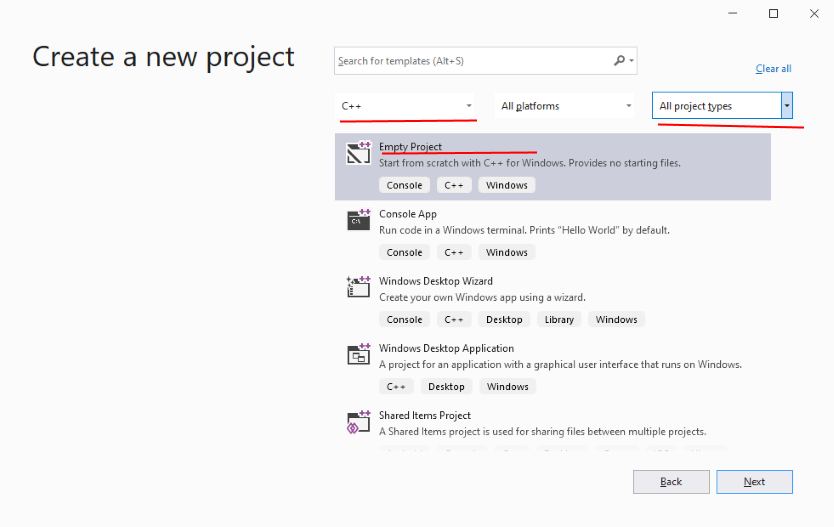
На втором экране в поле для имени проекта. Назовем его HelloApp. Тут же можно указать его расположение. После этого нажимаем Create.
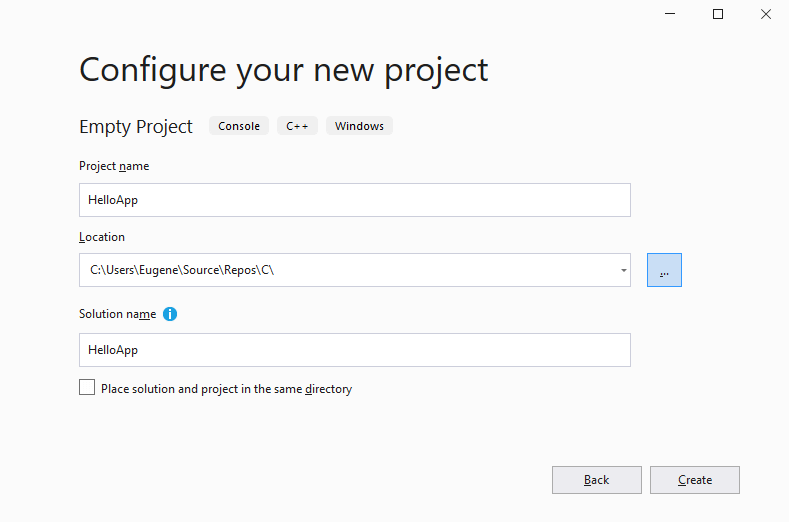
Если в VisualStudio уже открыт какой-то проект, то можно создать новый проект для C через меню File (Файл) ->New (Создать) ->Project… (Проект) и затем повторить те же действия.
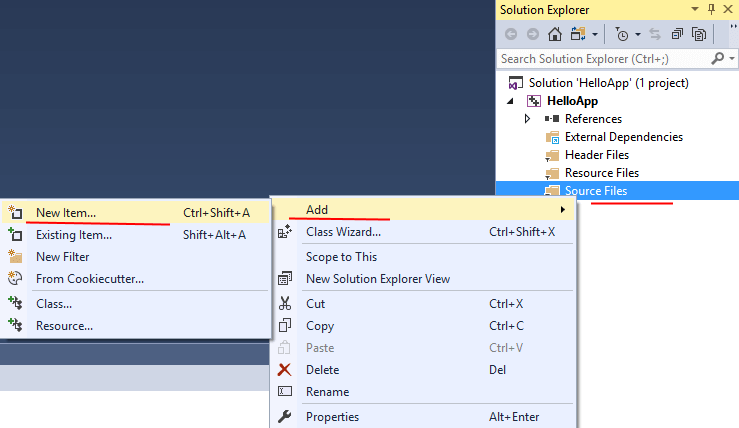
После этого VS создаст пустой проект. Теперь добавим в него текстовый файл, в котором будем набирать код. Для этого в окне SolutionExplorer (Обозреватель решений) нажмем правой кнопкой мыши на узел SourceFiles и выберем в контекстом меню: Add ->NewItem…:
Теперь откроется окно для добавления нового элемента:
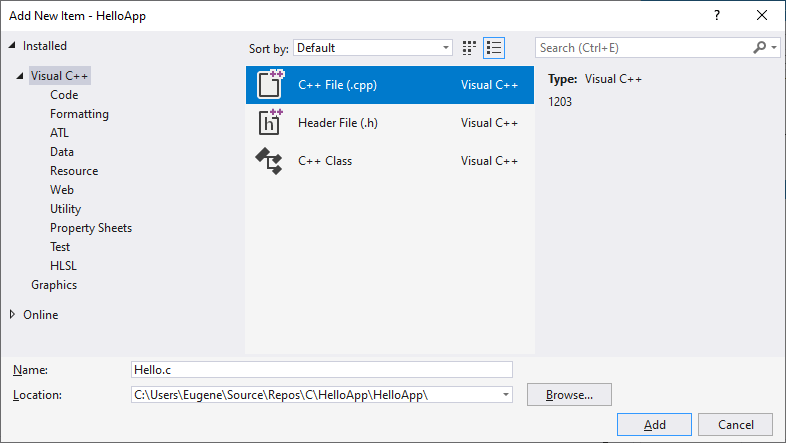
Теперь надо выбрать пункт C++ File(.cpp), а внизу окна добавим имя для файла Hello.c. Обычно, исходные файлы на Си имеют расширение .с. Оно значит, что этот файл содержит исходный код на языке С, и он будет обрабатываться соответствующим компилятором.
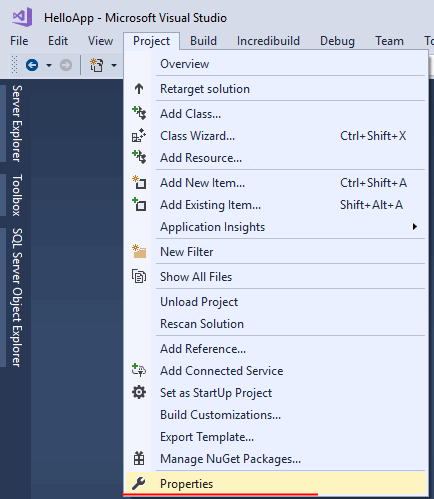
На этом этапе изменим опции проекта. Для этого перейдем к пункту меню Project ->Properties
Для начала в свойствах проекта установим, что это будет консольное приложение: Linker->System и затем для поля SubSystem установим значение Console(/SUBSYSTEM:CONSOLE), выбрав необходимый элемент в списке:
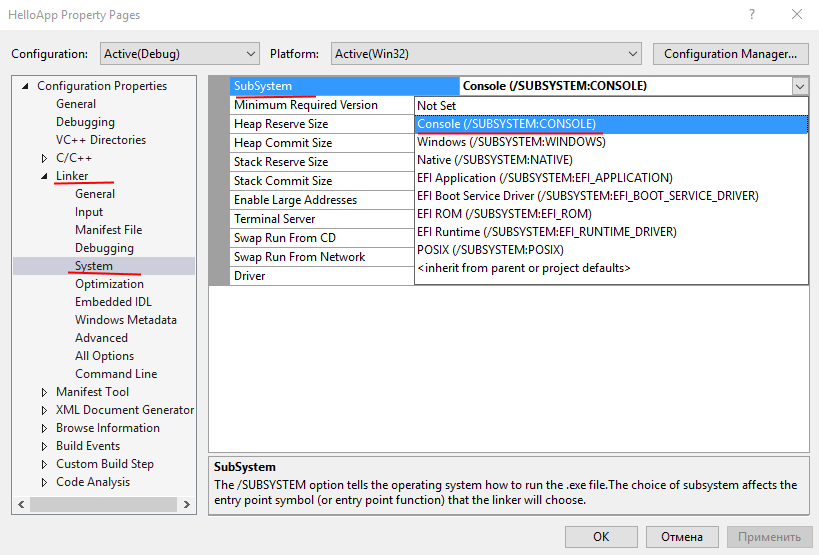
После установки данного значения нажмем на кнопку «Применить», чтобы использовались новые настройки конфигурации.
Еще в окне свойств проекта в левой части перейдем к секции С/С++ и далее к пункту Advanced:
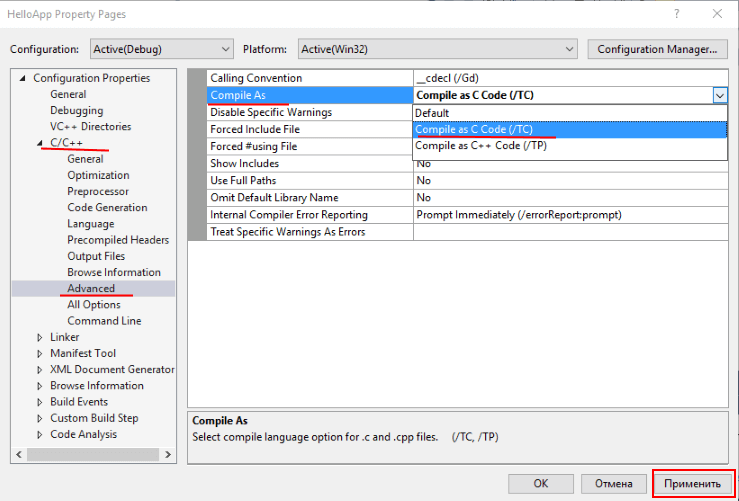
В правой части окна для поля CompileAs укажем значение Compileas C Code (/TC). Тем самым мы говорим, чтобы исходный код по умолчанию компилировался именно как код С, а не С++. По завершению установки данной опции нажмем «Применить».
После добавления файла проект будет иметь такую структуру:
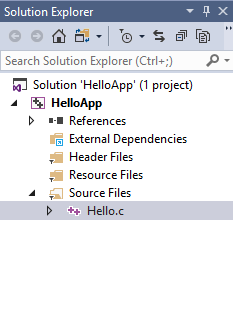
Рассмотрим эту структуру. Окно SolutionExplorer содержит в решение. В нашем примере оно называется HelloApp. Решение может содержать несколько проектов. У нас один проекты с таким же именем HelloApp. В проекте содержится ряд узлов:
- ExternalDependencies: отображает файлы, которые используются в файлах исходного кода, но не относятся к проекту
- HeaderFiles: используется для хранения заголовочных файлов с расширением .h
- ResourceFiles: используется для хранения файлов ресурсов, к примеру, изображений
- SourceFiles: хранит файлы с исходным кодом
На текущем этапе определим в файле Hello.c простейший код, который будет отвечать за вывод строки на консоль:
#include // подключаем заголовочный файл stdio.h
int main(void) // определяем функцию main
< // начало функции
printf(«Hello world! \n»); // выводим строку на консоль
return0; // выходим из функции
> // конец функции
Запустим программу. Для этого в VS выберем пункт меню Debug ->StartWithoutDebugging или нажмем на сочетание клавиш Ctrl+F5:
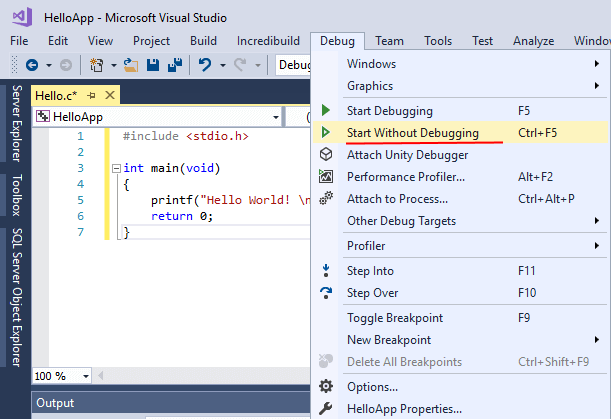
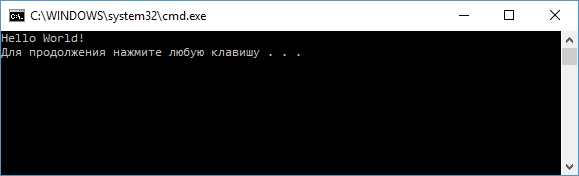
В результате VS передаст исходный код компилятору, который скомпилирует из кода исполняемый файл exe, а он, потом будет запущен на выполнение. И мы увидим на запущенной консоли наше сообщение:
Дальше в папке Debug в проекте вы увидите скомпилированный файл exe, который можно запускать независимо от VS:
Name already in use
vscode-docs / docs / languages / cpp.md
- Go to file T
- Go to line L
- Copy path
- Copy permalink
- Open with Desktop
- View raw
- Copy raw contents Copy raw contents
Copy raw contents
Copy raw contents
C/C++ for Visual Studio Code
C/C++ support for Visual Studio Code is provided by a Microsoft C/C++ extension to enable cross-platform C and C++ development on Windows, Linux, and macOS.

Install the extension
- Open VS Code.
- Select the Extensions view icon on the Activity bar or use the keyboard shortcut ( kb(workbench.view.extensions) ).
- Search for ‘C++’ .
- Select Install.

After you install the extension, when you open or create a *.cpp file, you will have syntax highlighting (colorization), smart completions and hovers (IntelliSense), and error checking.

Install a compiler
C++ is a compiled language meaning your program’s source code must be translated (compiled) before it can be run on your computer. VS Code is first and foremost an editor, and relies on command-line tools to do much of the development workflow. The C/C++ extension does not include a C++ compiler or debugger. You will need to install these tools or use those already installed on your computer.
There may already be a C++ compiler and debugger provided by your academic or work development environment. Check with your instructors or colleagues for guidance on installing the recommended C++ toolset (compiler, debugger, project system, linter).
Some platforms, such as Linux or macOS, have a C++ compiler already installed. Most Linux distributions have the GNU Compiler Collection (GCC) installed and macOS users can get the Clang tools with Xcode.
Check if you have a compiler installed
Make sure your compiler executable is in your platform path ( %PATH on Windows, $PATH on Linux and macOS) so that the C/C++ extension can find it. You can check availability of your C++ tools by opening the Integrated Terminal ( kb(workbench.action.terminal.toggleTerminal) ) in VS Code and trying to directly run the compiler.
Checking for the GCC compiler g++ :
Checking for the Clang compiler clang :
Note : If you would prefer a full Integrated Development Environment (IDE), with built-in compilation, debugging, and project templates (File > New Project), there are many options available, such as the Visual Studio Community edition.
If you don’t have a compiler installed, in the example below, we describe how to install the Minimalist GNU for Windows (MinGW) C++ tools (compiler and debugger). MinGW is a popular, free toolset for Windows. If you are running VS Code on another platform, you can read the C++ tutorials, which cover C++ configurations for Linux and macOS.
Example: Install MinGW-x64
We will install Mingw-w64 via MSYS2, which provides up-to-date native builds of GCC, Mingw-w64, and other helpful C++ tools and libraries. You can download the latest installer from the MSYS2 page or use this link to the installer.
Follow the Installation instructions on the MSYS2 website to install Mingw-w64. Take care to run each required Start menu and pacman command.
You will need to install the full Mingw-w64 toolchain ( pacman -S —needed base-devel mingw-w64-x86_64-toolchain ) to get the gdb debugger.
Add the MinGW compiler to your path
Add the path to your Mingw-w64 bin folder to the Windows PATH environment variable by using the following steps:
- In the Windows search bar, type ‘settings’ to open your Windows Settings.
- Search for Edit environment variables for your account.
- Choose the Path variable in your User variables and then select Edit.
- Select New and add the Mingw-w64 destination folder path, with \mingw64\bin appended, to the system path. The exact path depends on which version of Mingw-w64 you have installed and where you installed it. If you used the settings above to install Mingw-w64, then add this to the path: C:\msys64\mingw64\bin .
- Select OK to save the updated PATH. You will need to reopen any console windows for the new PATH location to be available.
Check your MinGW installation
To check that your Mingw-w64 tools are correctly installed and available, open a new Command Prompt and type:
If you don’t see the expected output or g++ or gdb is not a recognized command, make sure your PATH entry matches the Mingw-w64 binary location where the compiler tools are located.
If the compilers do not exist at that PATH entry, make sure you followed the instructions on the MSYS2 website to install Mingw-w64.
To make sure the compiler is installed and configured correctly, we’ll create the simplest Hello World C++ program.
Create a folder called «HelloWorld» and open VS Code in that folder ( code . opens VS Code in the current folder):
The «code .» command opens VS Code in the current working folder, which becomes your «workspace». Accept the Workspace Trust dialog by selecting Yes, I trust the authors since this is a folder you created.
Now create a new file called helloworld.cpp with the New File button in the File Explorer or File > New File command.


Add Hello World source code
Now paste in this source code:
Now press kb(workbench.action.files.save) to save the file. You can also enable Auto Save to automatically save your file changes, by checking Auto Save in the main File menu.
Build Hello World
Now that we have a simple C++ program, let’s build it. Select the Terminal > Run Build Task command ( kb(workbench.action.tasks.build) ) from the main menu.

This will display a dropdown with various compiler task options. If you are using a GCC toolset like MinGW, you would choose C/C++: g++.exe build active file.

This will compile helloworld.cpp and create an executable file called helloworld.exe , which will appear in the File Explorer.

Run Hello World
From a command prompt or a new VS Code Integrated Terminal, you can now run your program by typing «.\helloworld».

If everything is set up correctly, you should see the output «Hello World».
This has been a very simple example to help you get started with C++ development in VS Code. The next step is to try one of the tutorials listed below on your platform (Windows, Linux, or macOS) with your preferred toolset (GCC, Clang, Microsoft C++) and learn more about the Microsoft C/C++ extension’s language features such as IntelliSense, code navigation, build configuration, and debugging.
Get started with C++ and VS Code with tutorials for your environment:
You can find more documentation on using the Microsoft C/C++ extension under the C++ section of the VS Code website, where you’ll find topics on:

VS Code and the C++ extension support Remote Development allowing you to work over SSH on a remote machine or VM, inside a Docker container, or in the Windows Subsystem for Linux (WSL).
To install support for Remote Development:
- Install the VS Code Remote Development Extension Pack.
- If the remote source files are hosted in WSL, use the WSL extension.
- If you are connecting to a remote machine with SSH, use the Remote — SSH extension.
- If the remote source files are hosted in a container (for example, Docker), use the Dev Containers extension.
Enhance completions with AI
GitHub Copilot is an AI-powered code completion tool that helps you write code faster and smarter. You can use the GitHub Copilot extension in VS Code to generate code, or to learn from the code it generates.

GitHub Copilot provides suggestions for numerous languages and a wide variety of frameworks, and it works especially well for Python, JavaScript, TypeScript, Ruby, Go, C# and C++.
You can learn more about how to get started with Copilot in the Copilot documentation.
If you run into any issues or have suggestions for the Microsoft C/C++ extension, please file issues and suggestions on GitHub. If you haven’t already provided feedback, please take this quick survey to help shape this extension for your needs.