How to SSH into Docker Containers [Step-by-Step]
Download a free trial of Veeam Backup for Microsoft 365 and eliminate the risk of losing access and control over your data!
Table of Contents
When you need to troubleshoot or take a quick peek into a Docker container, SSH is a great option. SSH allows you to quickly connect to a running container and see what’s going on. But connecting to a Docker container first involves some setup, and you have a few different options.
In this tutorial, you will learn how to SSH into Docker containers using the docker run command and a Dockerfile.
Prerequisites
If you’d like to follow along step-by-step, ensure you have the following:
- A Linux host. This tutorial uses Ubuntu 18.04.5 LTS.
- Docker installed on the Linux host. This tutorial uses Docker v19.03.8.
Starting a Container and SSH into Docker Containers with docker run
The docker run command is a Docker command that runs a command when a new container first comes up. Using docker run , you can launch an interactive SSH session to a container using the steps below.
Before you start this section, be sure you have a Docker image downloaded and available. This tutorial uses the latest Ubuntu Docker image available on Docker Hub.
To SSH into Docker containers with docker run :
1. Open a terminal on your local machine.
2. Run the docker run command providing:
- The name of the container to run ( ubuntu_container_ssh )
- The i flag indicating you’d like to open an interactive SSH session to the container. The i flag does not close the SSH session even if the container is not attached.
- The t flag allocates a pseudo-TTY which much be used to run commands interactively.
- The base image to create the container from ( ubuntu ).

Creating the container named ubuntu_container_ssh and start a Bash session.
At this point, you’re SSHed to the container and can run any commands you’d like.
3. Next, run any command, such as the touch command. Touch command will create a new folder named myfolder in the tmp directory, as shown below.

Creating the new folder on tmp directory in a Docker container
You can now run any commands you’d like!
Finally, when you’re done running commands, type exit to close the session.
SSH into Running Docker Containers with docker exec
In the previous section, you learned how to run SSH commands when starting a new Docker container. But what if you need to SSH into Docker containers that are already running? You run the docker exec command.
The docker exec command creates a Bash shell inside a running container and is a great way to send SSH commands into a container.
Before you start this section, be sure you have a Docker image downloaded and available. This tutorial uses the latest NGINX Docker image available on Docker Hub.
To SSH into a running Docker container with docker exec :
1. Open a terminal on your local machine.
2. Next, run the docker run command to start the container. Be sure to specify the -d flag to run the container in the background to keep it alive until you remove it. The command below starts a container called nginx-testing .

Creating and running the new container using docker run command
3. Now, run the docker ps command to verify the container is running. The docker ps command will list all the running containers running on the Docker host.

listing all the running containers
4. Finally, run docker exec , as shown below, to SSH into the running container called nginx-testing . In the below code snippet:
- docker exec command runs ( /bin/bash ) to get a Bash shell in the container.
- -it flag allows you to run a container in interactive mode, that is, you can execute commands inside the container while it is still running.
- nginx-testing is the name of the container.

ssh into an already running container
Setting up an OpenSSH Server and Connecting with a Dockerfile
Until now, the tutorial has assumed you’re connecting to a container that already has some SSH server installed. But what if it doesn’t? Perhaps the image you’re using doesn’t already have OpenSSH installed, and you need to configure it first?
Using a Dockerfile, you can configure all of the tasks necessary to not only SSH into Docker containers but set up an OpenSSH server from scratch too.
Assuming you still have your local terminal open:
1. Optionally create a directory to store the Dockerfile. This tutorial will use the
2. Open your favorite text editor, copy/paste the below Dockerfile inside and save the file as Dockerfile inside the
/DockerFileContainerTest directory. This Dockerfile contains all the commands and configurations to build a new Docker image on top of any base image and set up OpenSSH.
The DockerFile below contains various steps/instructions that will build the container:
- FROM– Defines the ubuntu:16.04 base image to use.
- RUN – Executes commands in a new layer on the top of the base image.
- CMD – CMD allows you to run the commands. There are two ways in which commands are executed either via exec or using shell formats.
- EXPOSE – Informs Docker that the container listens on the specified network ports at runtime. The container will be exposed on pot 22 .
3. Next, run the docker build command to create the Docker image. The t flag tags the image sshd_container and . allows Docker to pick all the necessary files from the present working directory.
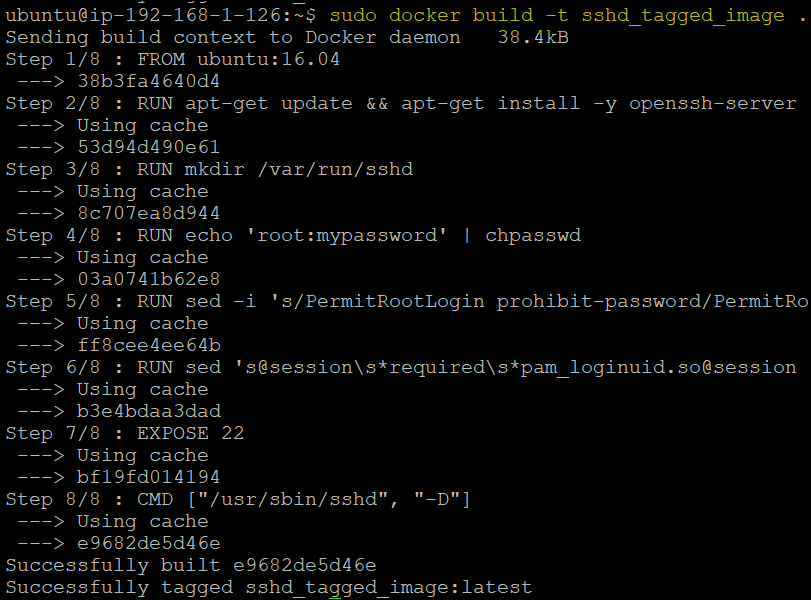
Building the Docker Image on top of ubuntu image
4. Now, run the docker images command to inspect the created image. Note the REPOSITORY attribute. This attribute is the tag created with the -t flag in the previous step.

Run Docker images command
5. Run docker run to create and run the container from the image telling Docker to run the image in the background ( -d ),
The command below instructs Docker to create and run the container called test_sshd_container in the background ( -d ), using the sshd_tagged_image newly built image that you created in step 3 and to publish all ports defined in the Dockerfile as random ports.
After the successful execution of the Docker run command, you will see that the container ID is generated below.

Running the container using the newly built image.
6. Run docker port to verify SSH connectivity between the Docker host and the container. The docker port command list’s the port mappings or a specific mapping for the container.
You should see the output of 22/TCP → 0.0.0.0:32769 , which indicates the container’s port 22 is mapped to the external port 32769 .

Running the docker port command.
7. Next, find the IP address of the container. To do that, run the docker inspect command. The docker inspect command queries Docker information and renders the results in JSON array using a format parameter.
You’ll see the format parameter argument below uses the range attribute to find the container’s IP address by checking in NetworkSettings → Networks → IPAddress .
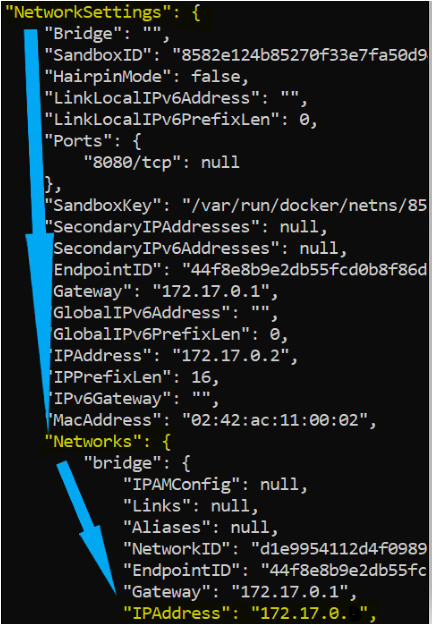
format parameter argument

IP address
8. Finally, now that you have the IP address to SSH to, try to SSH to the container, and it should work!
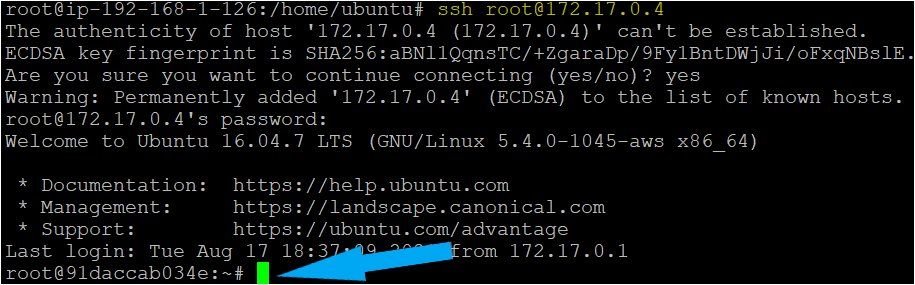
try to SSH the container
Conclusion
You show now know a few ways to SSH to a Docker container using a few different approaches. Using one of these approaches, you should be able to troubleshoot and manage your containers.
With this newfound knowledge, how do you plan to SSH to your container now?
Hate ads? Want to support the writer? Get many of our tutorials packaged as an ATA Guidebook.
More from ATA Learning & Partners
Recommended Resources!
Recommended Resources for Training, Information Security, Automation, and more!
Get Paid to Write!
ATA Learning is always seeking instructors of all experience levels. Regardless if you’re a junior admin or system architect, you have something to share. Why not write on a platform with an existing audience and share your knowledge with the world?
ATA Learning Guidebooks
ATA Learning is known for its high-quality written tutorials in the form of blog posts. Support ATA Learning with ATA Guidebook PDF eBooks available offline and with no ads!
Sorry, you have been blocked
This website is using a security service to protect itself from online attacks. The action you just performed triggered the security solution. There are several actions that could trigger this block including submitting a certain word or phrase, a SQL command or malformed data.
What can I do to resolve this?
You can email the site owner to let them know you were blocked. Please include what you were doing when this page came up and the Cloudflare Ray ID found at the bottom of this page.
Cloudflare Ray ID: 7a287b5bdee12307 • Your IP: Click to reveal 88.135.219.175 • Performance & security by Cloudflare
How to SSH into a Running Docker Container and Run Commands
Docker is a utility that lets you create a container for running applications. A Docker container is a fully-contained virtual machine.
This guide will show you three methods to SSH into a Docker container and run commands.
- A Linux system running Docker
- Preconfigured containers loaded and running
- Access to a terminal window/command prompt (Ctrl+Alt+T or Ctrl+Alt+F2)
- A user account with sudo privileges
Method 1: Use docker exec to Run Commands in a Docker Container
The docker exec command runs a specified command within an already running container. You can use it to SSH into a Docker container by creating a bash shell (a shell where you can type commands).
The basic syntax for using docker exec to run a command in containers is:
Start by pulling a Docker image if you haven’t already. For example, you can load Nginx:
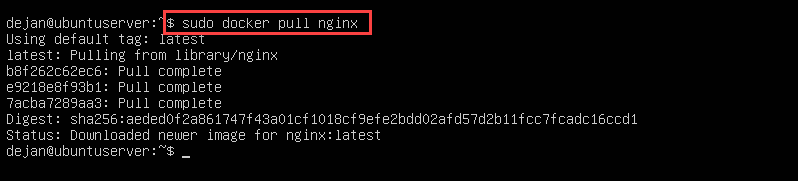
Then, run the image:
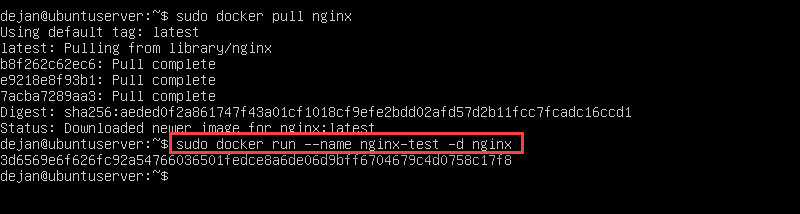
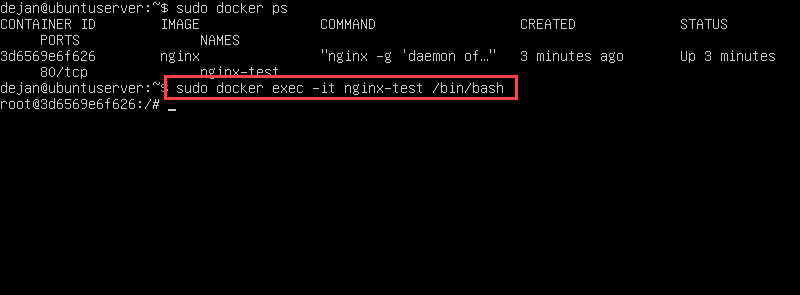
List all running containers to verify:
You should now see your nginx-test image loaded.

To get access and run commands in that Docker container, type the following:
Now, you are logged in to the nginx-test container. Therefore, any commands you enter will perform in that container. The –i option specifies interactive, and the –t enables a terminal typing interface.
Method 2: Use the docker attach Command to Connect to a Running Container
The docker attach command links a local input, output, and error stream to a container. By default, it launches in a bash shell. To connect to a running container, enter the following:
In the example below, the system will connect to the nginx-test container:
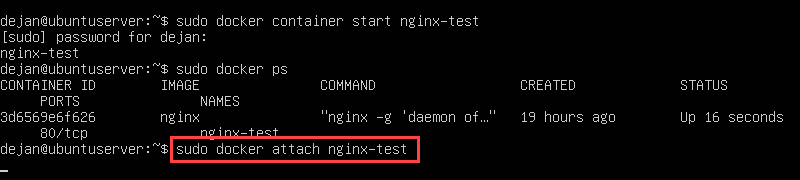
Once the command is executed, you will be working in the container. Any commands you run will affect the virtual Docker environment.
Method 3: Use SSH to Connect to a Docker Container
You can connect to a Docker container using SSH (Secure Shell). Normally, SSH is used to connect remotely over a network to a server. The technology works the same when connecting to a virtual Docker container on your system.
Important: We do not recommend this method, since it inflates the image beyond the normal scope. You will need to have an image with SSL already configured for this to work.
Step 1: Enable SSH on System
Start by installing and enabling the SSH service:
Step 2: Get IP Address of Container
Get the container’s IP address by using the docker inspect command and filtering out the results.
For modern Docker engines, use the command:
For older Docker engines, run:

The system will display the IP address as seen in the image above.
Note: The targeted docker container must be running to be able to get its IP address. If you need to start an existing docker container, run sudo docker start container_name .
Step 3: SSH Into Docker Container
Ping the IP address to make sure it’s available:
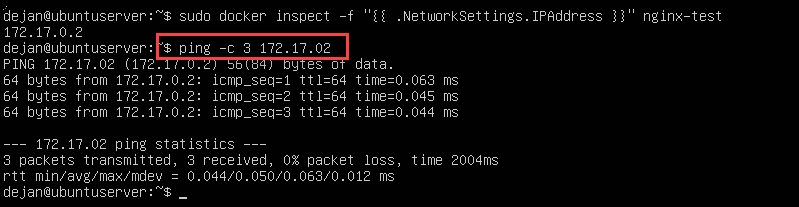
Use the SSH tool to connect to the image:
The system should prompt for a password of the root user for that container. If it says Connection refused, likely the container is not provisioned for SSH. If the prompt changes, you are now connected via SSH, and can run commands in the container.
Docker containers are lightweight and transitional, so a traditional SSH connection isn’t recommended. The recommended method to run commands in a Docker container is either docker exec or docker attach .
If you are provisioning multiple remote virtual machines, you could use the docker-machine ssh command to connect to a virtual machine through Docker. For most users, the first two command methods are recommended.
Прямое подключение к док-контейнеру с помощью SSH

Веб-разработчикам, тестировщикам и операторам необходимо запускать сценарии или проверять журналы на сервере. Вероятно, они используют докер или другой инструмент виртуализации для локальной среды. В некоторых случаях в тестовой и производственной средах используются одни и те же настройки и виртуализация.
Если у вас есть доступ к хосту, вы можете легко подключиться к докеру с помощью одной из команд докера. Предположим, вы использовали изображение, содержащее bash, а имя вашего контейнера — «app_container». Вы можете использовать:
Если использовать docker-compose, ситуация будет аналогичной. Допустим, ваша служба называется app_container. Вы можете подключиться к нему с помощью:
Но что, если у вас нет доступа к хосту? Как подключиться к докер-контейнеру? Позвольте мне объяснить, что мы сделали и почему у нас вообще возникла такая проблема.
Почему мы посмотрели на проблему
Для начала рассмотрим некоторые общие требования, которые предъявляются в нашей компании. В большинстве проектов у нас есть четыре основных среды: разработка, тестирование, предварительная версия, производственная среда. Dev — это среда местных разработчиков. Тест автоматически обновляется Jenkins, когда код объединяется с веткой dev в репозитории git. Предварительный просмотр и производственное развертывание активируются вручную. Большая часть этого автоматизирована. Но иногда разработчику / тестеру / оператору необходимо вызвать некоторые команды на сервере или проверить журналы. Для этого ему / ей необходимо подключиться к серверу по ssh и запустить некоторую команду на терминале.
Теперь рассмотрим нашу инфраструктуру. Для предварительного просмотра и тестирования у нас есть частные серверы с Ubuntu. Мы не развертываем приложения непосредственно на наших серверах. Вместо этого мы используем докер для единой конфигурации сервера. Для каждой системы на нашем сервере мы создаем отдельный каталог. Этот корневой каталог содержит подкаталоги, прикрепленные к контейнеру как тома. Один из этих подкаталогов — наша кодовая база. С докером мы запускаем каждое приложение отдельно. Таким образом, у нас есть несколько приложений с разными конфигурациями серверов на одном физическом сервере. Операторы могут легко изменить конфигурацию для конкретного приложения, не мешая другим приложениям.
Итак, в чем проблема? Над каждым проектом у нас своя команда. Каждый проект индивидуален, и иногда даже при предварительном просмотре у нас могут быть конфиденциальные данные (клиенты делают странные вещи даже на серверах предварительного просмотра). Нам нужно ограничить доступ к таким данным. Кроме того, мы хотим контролировать, что люди делают на серверах. Мы не хотим предоставлять всем полный доступ ко всему. Поэтому мы решили, что разработчики / тестировщики получат доступ напрямую к контейнерам, а не к основному серверу со всеми контейнерами. Операторы по-прежнему имеют доступ к основным серверам.
Когда мы узнаем, зачем нам SSH в докере, давайте сделаем это.
Установите ssh-сервер на докере
Нам нужно настроить две вещи: хост и контейнер. Сначала займемся контейнером.
Мы будем использовать изображение php: 7.3-apache. У него не установлен ssh-сервер, поэтому нам нужно его добавить. Создаем Dockerfile:
Первая строка определяет, какое изображение является нашим базовым. Далее обновляем список репозиториев и устанавливаем openssh-server. В конце мы очищаем список репозиториев, чтобы сделать наш образ докера меньше.
Мы также хотим использовать docker-compose, поэтому давайте создадим docker-compose.yml:
Мы бы не стали добавлять никаких дополнительных услуг прямо сейчас. Мы хотим сосредоточиться на веб-сервере.
Если мы запустим `docker-compose up`, наш веб-сервер запустится, и у нас будет установлен ssh-сервер.
Запустить ssh при запуске контейнера
Но есть проблема — наш ssh-сервер не запускается автоматически. Поэтому всякий раз, когда мы перезапускаем контейнер, нам нужно его запускать.
Создаем файл ./docker/start.sh:
Затем нам нужно настроить наш Dockerfile, чтобы убедиться, что мы запускаем этот скрипт при запуске контейнера. Добавим одну строчку:
Здесь мы делаем три вещи: убеждаемся, что можем запустить скрипт, запускаем скрипт, запускаем сервер apache.
Основная проблема безопасности — отключить root ssh
Отлично, мы настроили ssh, и мы сможем подключиться к нему с учетной записью root. Но делать root доступным через ssh — не лучшая идея. Мы добавим нового пользователя и отключим root ssh.
Начнем с отключения root. Мы создаем новый файл. / docker / sshd_config, и можем скопировать его из контейнера. Нам нужно найти строку с PermitRootLogin и изменить ее. Если такой строки нет, нам нужно ее добавить. У вас должна получиться такая строка:
Теперь вам нужно изменить docker-compose.yml. В томах для веб-сервера добавить
После перезапуска ssh пользователь root не сможет войти в систему.
Добавить пользователя ssh
После отключения пользователя root нам нужно создать нового, которым мы будем пользоваться. Мы назовем это webssh. Мы хотим определить пароль для каждой среды, поэтому мы сохраним его в файле .env, который нужно добавить в gitignore. Создадим и настроим пользователя на изображении.
Начнем с создания файла .env:
Файл .env будет автоматически использоваться docker-compose. Мы настраиваем нашу docker-compose для передачи параметров для сборки:
В конце концов, нам нужно добавить нашего пользователя в Docekrfile. Сначала мы добавляем новую строку, чтобы принять аргумент и присвоить ему значение по умолчанию:
Перед последней строкой (перед строкой с CMD) добавляем
После того, как мы перестроим наш образ и запустим контейнер, мы сможем использовать ssh с пользователем webssh и паролем somesshpass.
Убедитесь, что он работает с автоматизацией
Во многих приложениях возникают проблемы, связанные с пользователями, группами, владением файлами и т. Д. Например, вы можете запустить командную строку, которая будет записывать ошибки в файл журнала. Этот файл будет принадлежать вашему пользователю root или новому пользователю ssh. Когда apache пытается запустить сценарии, и он должен что-то регистрировать в том же файле, мы можем получить сообщение об ошибке, что у пользователя apache нет прав доступа к файлу.
Прежде всего, вам нужно проверить группу пользователей apache. В нашем случае это www-data. Теперь нам нужно добавить нашего пользователя ssh и пользователя root в эту группу. Добавляем новую строку в Dockerfile:
Теперь наш пользователь, пользователь root и пользователь apache находятся в одной группе.
Следующий шаг — убедиться, что у файлов правильные владельцы и разрешения. Поскольку мы используем автоматическое обновление и не можем быть уверены, что права собственности и права доступа к файлам не изменились (или были созданы новые файлы), нам необходимо настроить скрипты для запуска нашего контейнера. Вам необходимо проверить требования для вашего приложения и настроить их в соответствии со своими потребностями. Давайте упростим его и изменим только владельца всех файлов. Мы добавляем новую строку в /docker/start.sh:
Конфигурация хоста
Итак, мы почти у цели. Прямо сейчас мы можем ssh с новым пользователем в контейнер и вносить изменения, не тормозя приложение. И последнее. На данный момент мы могли использовать ssh только с хоста. Мы хотим убедиться, что наша команда отправляет ssh со своих машин прямо в контейнер.
Прежде всего, нам нужно сопоставить порт хоста с портом контейнера. Мы снова будем использовать файл .env, чтобы сделать его независимым для каждой среды. В .env добавляем новую строку:
в нашем docker-compose.yml для веб-сервера мы добавляем отображение портов:
Когда мы перестраиваем контейнер, мы должны иметь возможность подключиться к нему по ssh с адресом хоста и портом 14403. Например, если наш хост доступен в домене my-test-ssh.com, мы сможем запустить `ssh webssh @ my-test-ssh.com: 14403`
Стоит упомянуть две вещи:
- убедитесь, что выбранный порт открыт и доступен на вашем хосте
- если вы используете другой интернет-шлюз, на который направляет DNS (вместо вашего хоста), обязательно настройте трафик для выбранного порта, который будет перенаправлен на ваш хост из интернет-шлюза.
Резюме
Как видите, мы можем предоставить ssh-доступ напрямую к нашему контейнеру для нашей команды. Конечно, в реальной жизни наши файлы докеров были бы намного сложнее, и вам нужно было бы настроить конфигурацию для вашего приложения и требований безопасности. Но я надеюсь, что эта короткая статья объяснила основную идею.