How to Download, Install, and Use QEMU on Windows 10? [MiniTool Tips]
Do you want to use QEMU for Windows? This post from MiniTool shows you how to download and install the QEMU software on Windows. It also shows you how to use QEMU on Windows to create an Ubuntu VM.
What Is QEMU
QEMU, short for Quick Emulator, is a free open-source hosted virtual machine manager that can execute hardware virtualization. With the help of KVM (Kernel-based Virtual Machine), QEMU can offer fast running speed. Therefore, it develops fast and is going to replace VirtualBox and VMware on Linux.
However, on Windows, the advantages of QEMU are not significant, because the KVM technology is not applicable on the Windows host machine. In addition, the quickgui is also not available to Windows. But QEMU develops fast and many people still want to use this VM software on Windows.
QEMU for Windows Download and Install
1. Download QEMU for Windows
To use QEMU for Windows, you should download and install it first. Please refer to the following QEMU download guide:
Step 1: Go to the official QEMU website (https://www.qemu.org). Click the Download button at the top section. You will go to the QEMU download page.
Step 2: Click the Windows tab to get the QEMU Windows version. Click 32-bit or 64-bit according to what OS you are running (for me, I click the 64-bit because my OS is 64-bit).
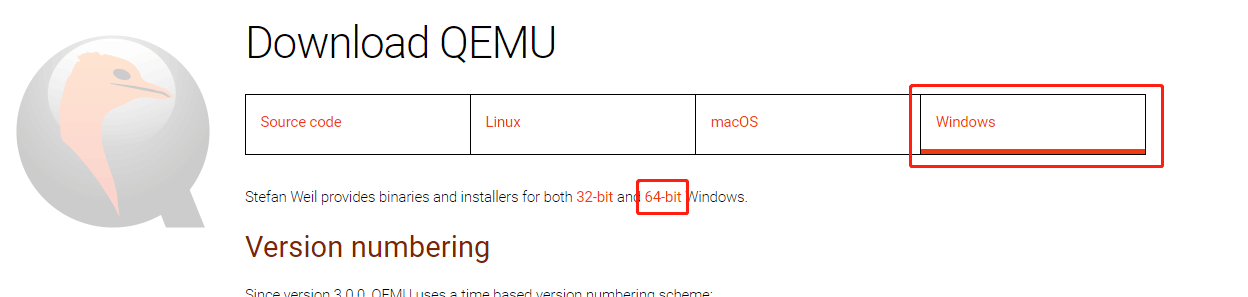
Step 3: On the new page, click the .exe file to download it. This file is the installer file.

2. Install QEMU for Windows
After the installer file is downloaded, you can double-click it to run directly. Before doing that, I recommend you to create a partition separately for it. For any virtual machine software, I will recommend you create a separate partition to store the software and the VM files so that you can manage them better.
To create a separate partition, you can use the shrink feature in the Windows Disk Management tool. But this tool can’t help you move the location of partitions, so I recommend you to use MiniTool Partition Wizard.
If the free space of one partition is not enough, you can move/resize another partition to get more unallocated space and then gather the unallocated space together to create one partition. Here is the guide:
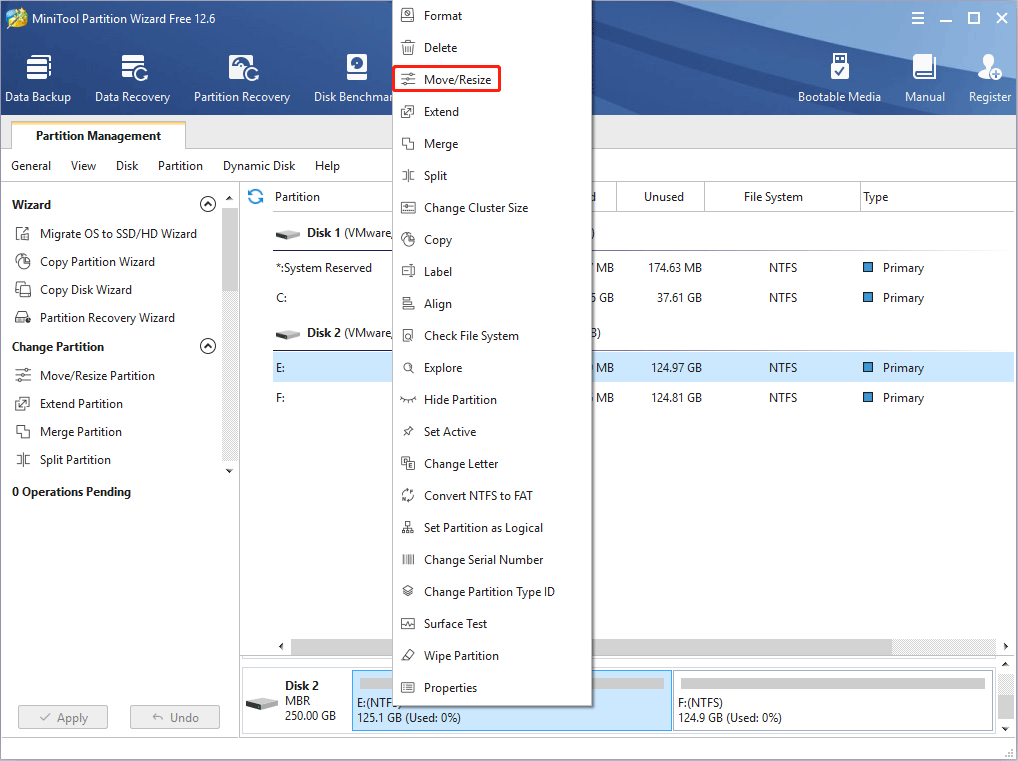
Step 1: Launch MiniTool Partition Wizard and go to its main interface. Right-click a partition and choose Move/Resize.
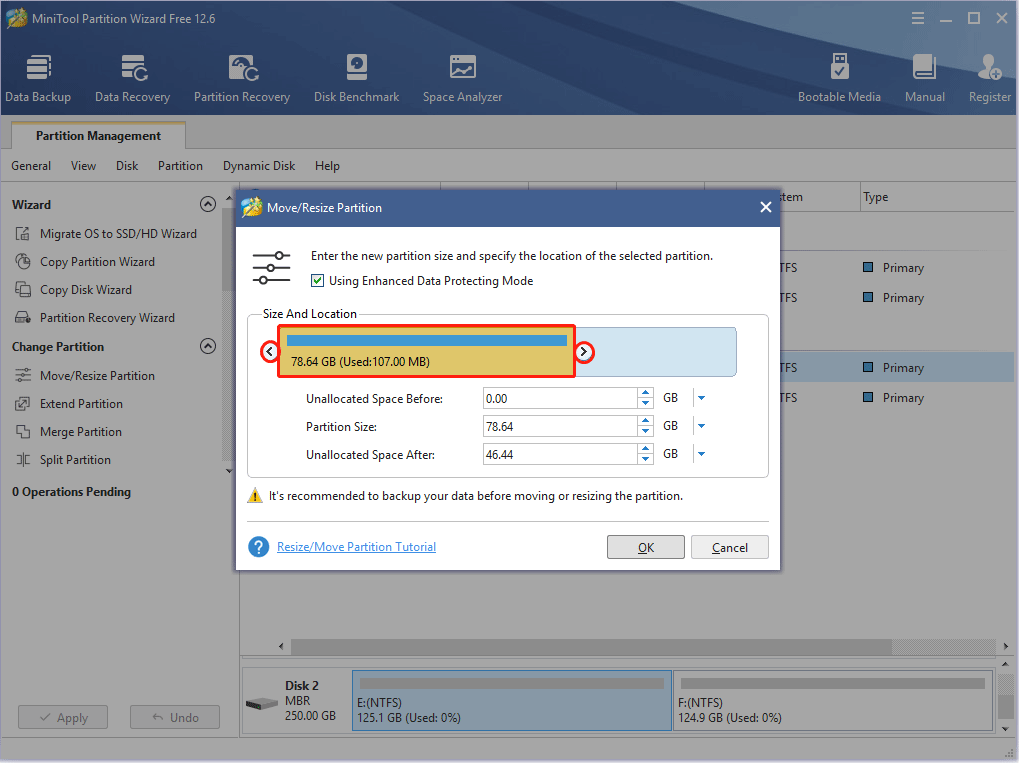
Step 2: Drag the two arrows on the two sides of the partition to shrink the partition, and then drag the block to move the location of the partition. Then, click the OK button. In this way, you can get unallocated space.
Step 3: Right-click the unallocated space and choose the Create button.

Step 4: Set parameters for the new partition. You can keep all of them to the default value if you don’t have specific demands. Then, click the OK button.

Step 5: Click the Apply button to execute pending operations.
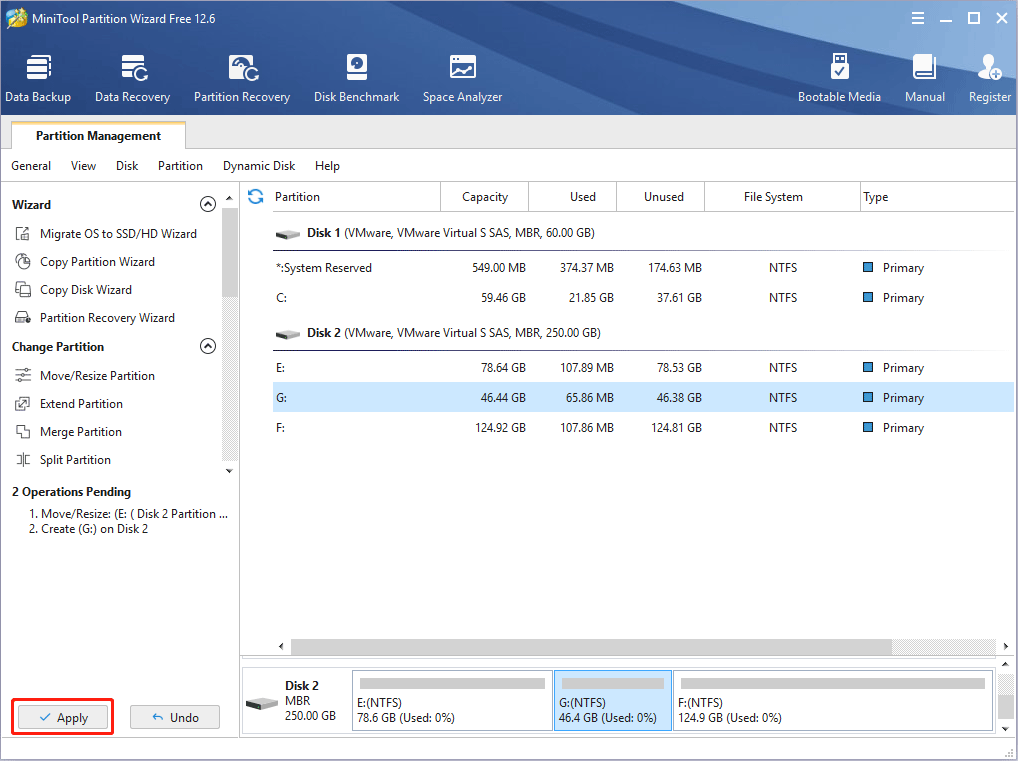
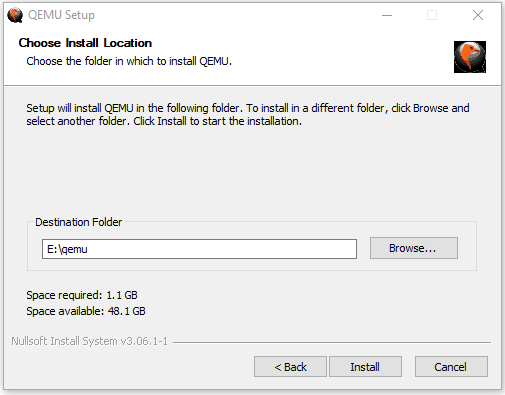
After the new partition is created, you can then double-click the QEMU installer file to install this VM software. You just need to follow the on-screen instructions to complete the installation.
How to Use QEMU on Windows
After installing the QEMU Windows version, you may want to know how to use QEMU to create a virtual machine. Here are 2 ways and the 2 nd way is better.
Way 1. Create a Virtual Machine Using Commands
QEMU doesn’t come with a GUI. If you don’t install a GUI manually, you need to use commands to run QEMU. Here is the guide on how to use QEMU on Windows to create a VM via commands (taking Ubuntu as an example).
Step 1: Download the Ubuntu ISO file from the official website.
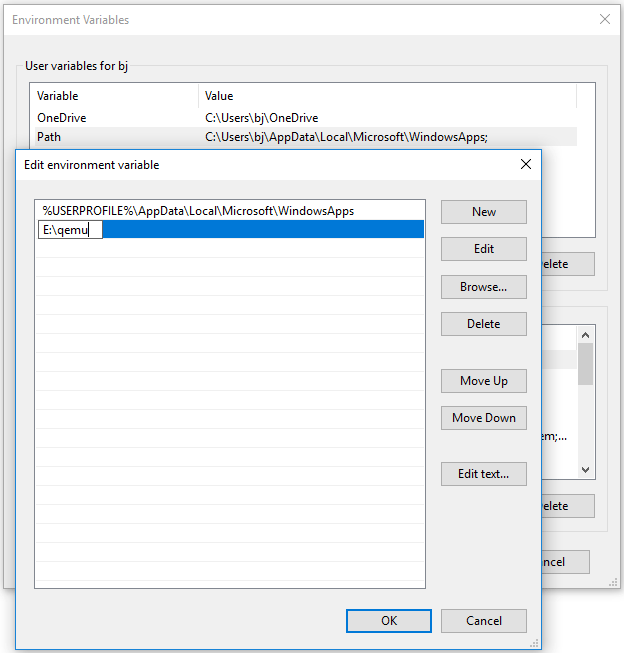
Step 2: Add QEMU path into Environment Variables.
- Open File Explorer, go to the QEMU installation location, and then copy the path (E:\qemu).
- Right-click This PC / Computer, choose Properties, and then click Advanced system settings.
- Under the Advanced tab, click Environment Variables.
- In the User variables box, double-click the Path variable, click New, and then paste the QEMU path.
- Click the OK button to save changes, and then click the OK button again to save and exit the Environment Variables
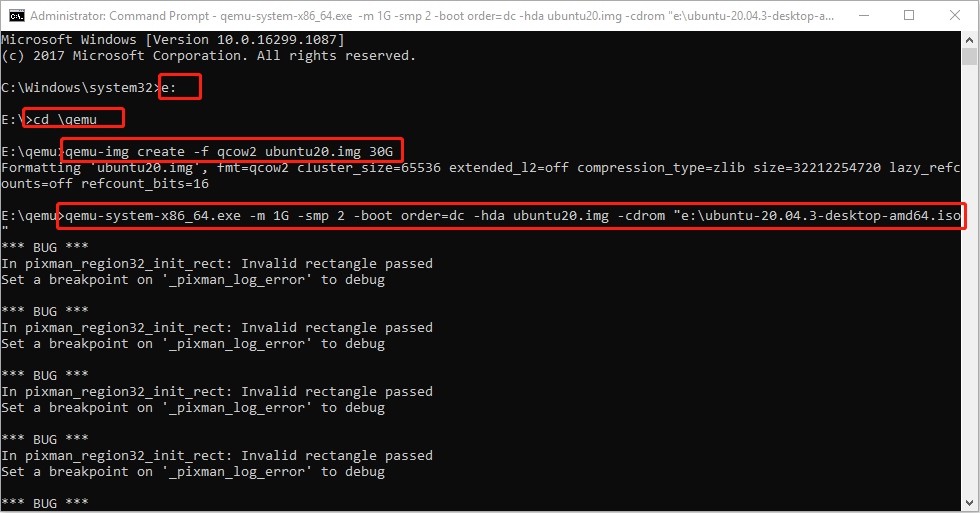
Step 3: Run Command Prompt as administrator and then execute the following commands.
- E: (this will open the e drive where QEMU is installed).
- cd \qemu (this will open the qemu folder).
- qemu-img create -f qcow2 ubuntu20.img 30G (this will create a virtual hard drive of 30GB).
- qemu-system-x86_64.exe -m 1G -smp 2 -boot order=dc -hda ubuntu20.img -cdrom “e:\ubuntu-20.04.3-desktop-amd64.iso” (this will run Ubuntu using CD/ROM).
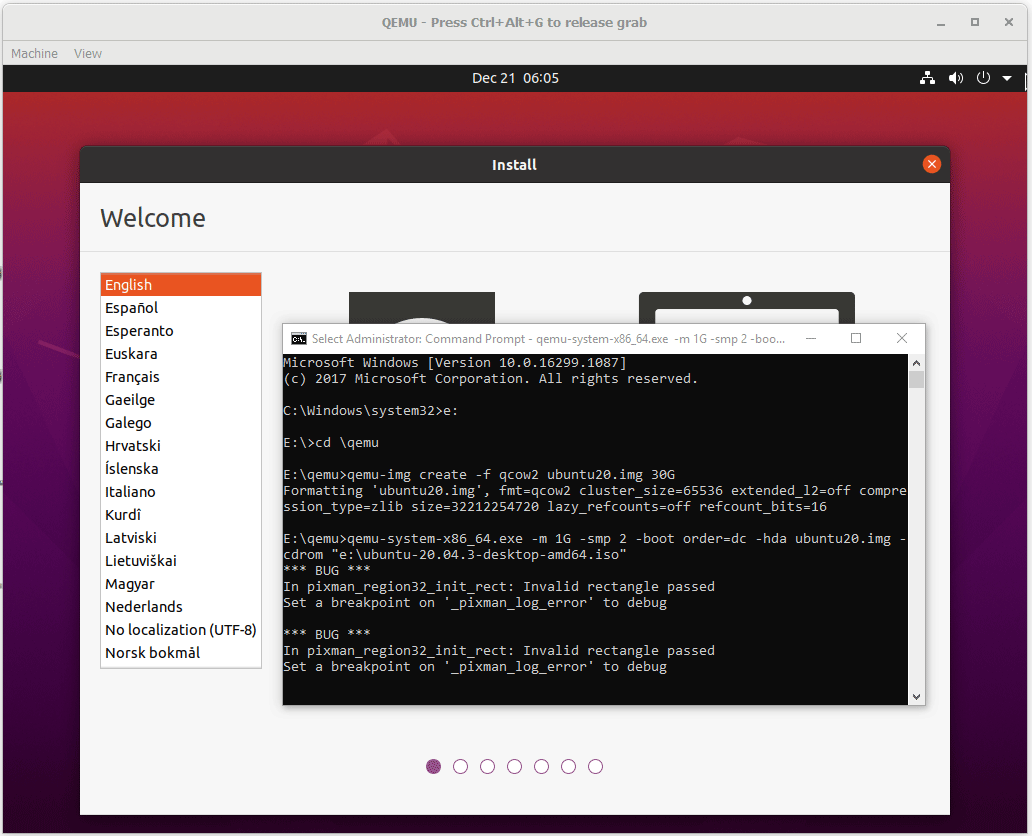
Step 4: Go through the Ubuntu installation process. Although there may be many bugs, I launch Ubuntu 20 successfully and then just need to complete the installation process.
Way 2. Create a Virtual Machine Using QtEmu
As you can see, creating a VM using QEMU via commands is a tough job. You need to search for various tutorials online. In addition, once errors occur, you may have no idea how to solve them. Therefore, I recommend you to use QtEmu, an open-source GUI for QEMU Windows.
How to use QEMU on Windows via QtEmu? Here is the guide:
Step 1: Download the Ubuntu ISO file and QtEmu. The QtEmu official website is https://qtemu.org and the QtEmu source is placed on https://gitlab.com/qtemu/gui. Go to the GitLab source page, scroll down to find the Downloads section, and click the first link to download the QtEmu installer.

Step 2: Double-click the QtEmu installer file and go through the installation process. When you are asked to specify the installation location (where to create the QtEmu folder), please install the QtEmu under the QEMU folder. For me, I type: E:\qemu\QtEmu.
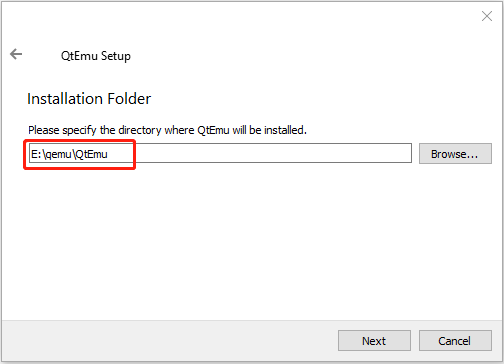
Step 3: After QtEmu is installed, go to E:\qemu\QtEmu. Right-click the qtemu.exe file and choose Send to > Desktop (create shortcut). Then, create a folder named VMs under the E drive to store all VM files to be created.
Step 4: Double-click the QtEmu shortcut to launch this software. In the QEMU options window, please set QEMU binaries path to E:\qemu, set QEMU img path to E:\qemu, and set QEMU machines path to E:\VMs. Then, click the Finish button.
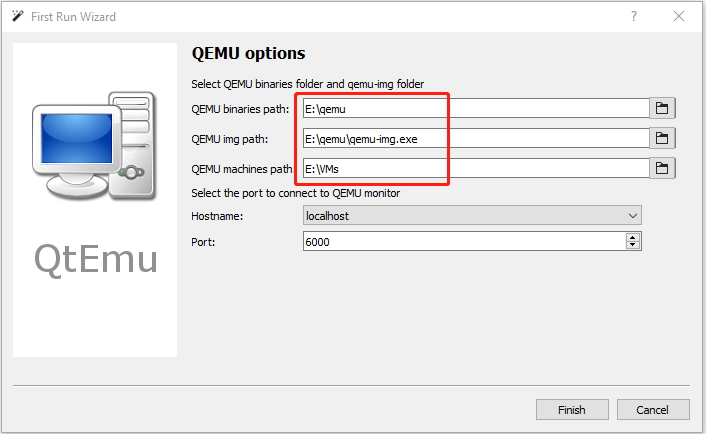
Step 5: Click Machine > New Machine. Then, give a name to the new machine (Ubuntu20), choose OS type (GNU/Linux), choose OS version (Ubuntu), and then click Next.
Step 6: On the Filter page, if you don’t need to specify certain motherboard chipsets, you can click the Next button directly to skip this step.
Step 7: Select a correct CPU Type, and set CPU, Graphics, Audio, and Network parameters. If all is OK, click the Next button.
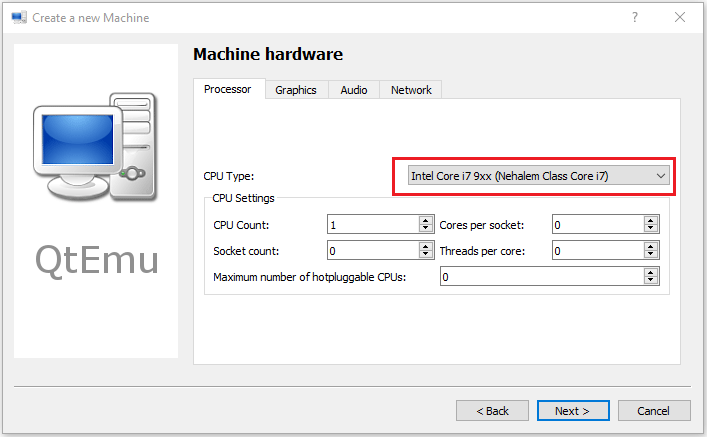
Step 8: Select the machine accelerator. HAXM is chosen by default. However, some computers may not support this technology. Therefore, I recommend you uncheck HAXM and then choose TCG instead. Then, click Next.
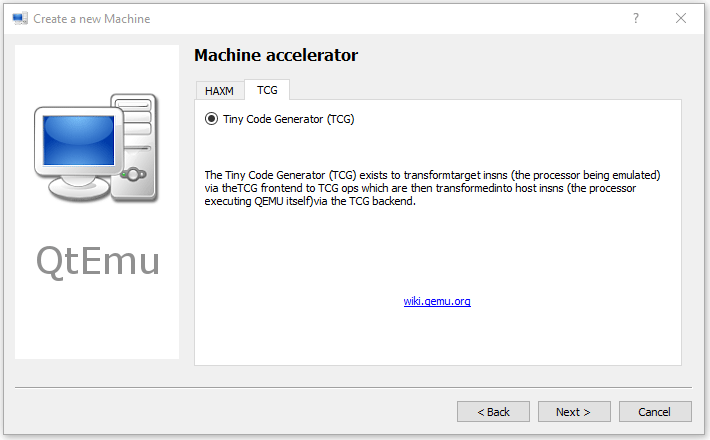
Step 9: Follow the on-screen wizard to set memory size, create a new virtual hard disk, set disk size and type, and then check the VM summary.
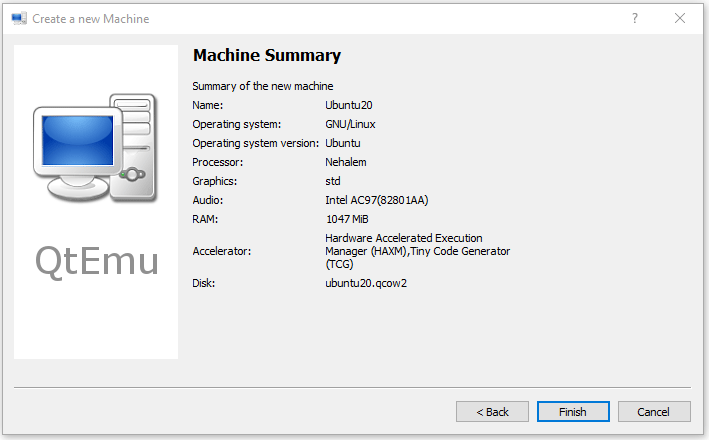
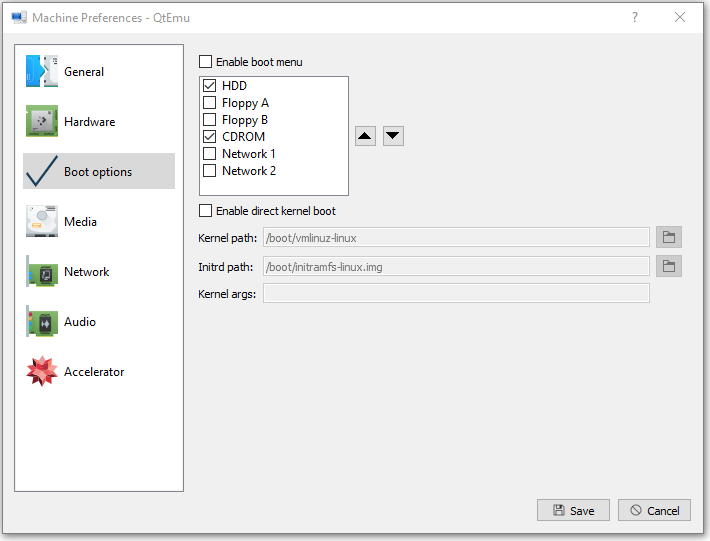
Step 10: Right-click on the newly-created VM and choose Machine Settings. Go to the Boot options tab, and tick CDROM.
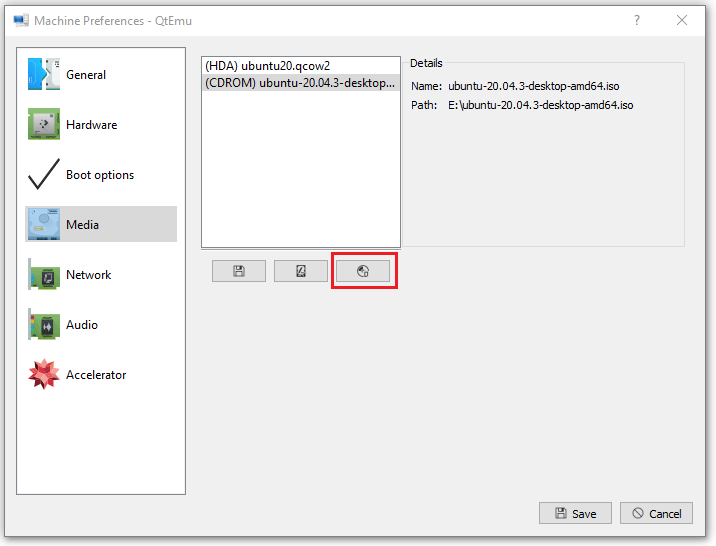
Step 11: Go to the Media tab, click the disc icon, and select the Ubuntu ISO file. Then, click Save.
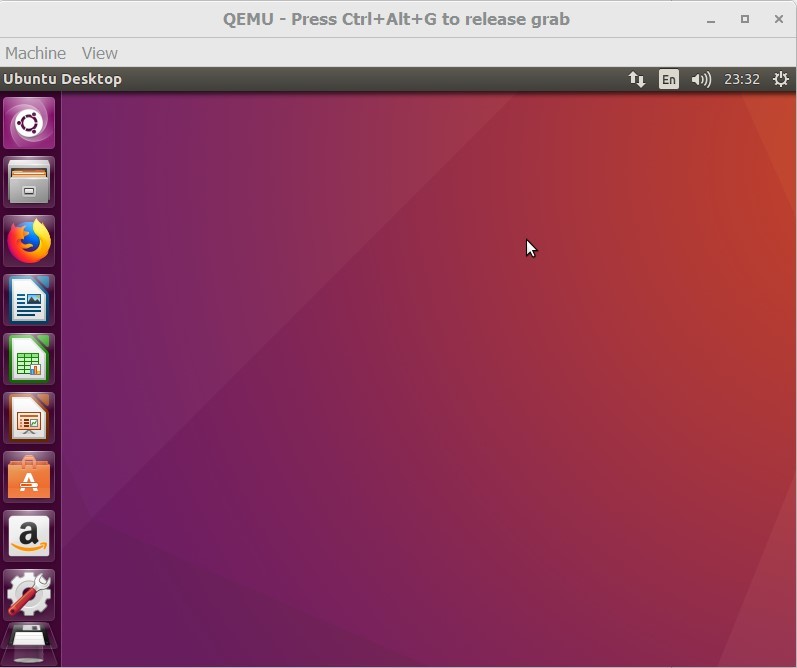
Step 12: Select the VM and then click the Play icon. Then, you may need to go through the Ubuntu installation process. After the installation process is completed, you can enjoy the VM.
Bottom Line
Is this post helpful to you? Do you have other ideas about how to run QEMU on Windows? Please leave a comment in the following zone for sharing. In addition, if you have difficulty in moving or resizing partitions, please feel free to contact us via [email protected] . We will get back to you as soon as possible.
About The Author
Author Linda has been working as an editor at MiniTool for 1 year. As a fresh man in IT field, she is curious about computer knowledge and learns it crazily. Maybe due to this point, her articles are simple and easy to understand. Even people who do not understand computer can gain something.
By the way, her special focuses are data recovery, partition management, disk clone, and OS migration.
Qemu Windows Using Qemu on Windows 10 Home Edition
Recently I had an assignment that asked us to use Qemu. It took me some trouble to get it running on Windows so I thought I could document it here in case I need it in the future. It would be nice if this helps someone, too!
- Download Qemu and .iso
- Add Qemu path to environment variables settings
- Create an image
- Starting the VM
- Some problems you might encounter
1. Download Qemu and .iso
Click here to download Qemu and download your desired .iso file. After installing Qemu, open Windows Powershell and type qemu-img . Now you might see that it does not recognize the command. This takes us to number 2.
2. Add Qemu path to environment variables settings
Copy the Qemu path (should be C:\Program Files\qemu if you didn’t change anything) and open environment variables settings by Right click on «This PC» -> Properties -> Advanced system settings -> Environment Variables .
Click on path once and click «Edit. «. Click «New» and paste the Qemu path.
Here’s the youtube video that taught me how to do this. Otherwise, I’d stuck here forever :P.
3. Create an image
Now you can create an image by typing qemu-img create -f qcow2 [name].qcow2 30G .

4. Starting the VM
When starting the VM, you would want to use an accelerator, or else it is going to take a lot of time installing the OS. It took me more than an hour to install Ubuntu 16.04 without the accelerator.
For Windows, there are two options: HAXM and whpx. Note that HAXM can only be used on Windows Enterprise/Pro/Education so I’m not going to introduce it here. Although I did get it working for whatever reason and after a Windows update, it just stopped working.��
Go to Windows Features and tick Windows Hypervisor Platform . After that, restart the computer and type this command in the powershell (in the directory where the image and .iso resides): qemu-system-x86_64 -accel whpx -hda .\[name].qcow2 -m 512 -net nic,model=virtio -net user -cdrom .\[name].iso -vga std -boot strict=on . It should start up and you can proceed to install the OS.
The second time you start up the machine you don’t need to type -cdrom anymore. Just qemu-system-x86_64 -accel whpx -hda .\[name].qcow2 -m 512 -net nic,model=virtio -net user -vga std -boot strict=on should do it.
5. Some problems you might encounter
You might get stuck when rebooting after installing the OS
My friend and I both encountered the problem and we both used Ubuntu 16.04 for the VM. Just close the window and restart it and it should work fine. Pretty sure this is not best practice, though.
You can’t seem to do migration using whpx
I got this error when trying to do migration. I found this Github code and I think it has something to do with whpx. I’m not sure how to resolve this. My TA simply allowed me to do migration on the server.
Qemu как пользоваться windows
QEMU is a FAST! processor emulator using dynamic translation to achieve good emulation speed.
-
Full system emulation. In this mode, QEMU emulates a full system (for example a PC), including one or several processors and various peripherals. It can be used to launch different Operating Systems without rebooting the PC or to debug system code. User mode emulation. In this mode, QEMU can launch processes compiled for one CPU on another CPU. It can be used to launch the Wine Windows API emulator (http://www.winehq.org) or to ease cross-compilation and cross-debugging.
QEMU can run without a host kernel driver and yet gives acceptable performance.
- PC (x86 or x86_64 processor)
- ISA PC (old style PC without PCI bus)
- PREP (PowerPC processor)
- G3 Beige PowerMac (PowerPC processor)
- Mac99 PowerMac (PowerPC processor, in progress)
- Sun4m/Sun4c/Sun4d (32-bit Sparc processor)
- Sun4u/Sun4v (64-bit Sparc processor, in progress)
- Malta board (32-bit and 64-bit MIPS processors)
- MIPS Magnum (64-bit MIPS processor)
- ARM Integrator/CP (ARM)
- ARM Versatile baseboard (ARM)
- ARM RealView Emulation/Platform baseboard (ARM)
- Spitz, Akita, Borzoi, Terrier and Tosa PDAs (PXA270 processor)
- Luminary Micro LM3S811EVB (ARM Cortex-M3)
- Luminary Micro LM3S6965EVB (ARM Cortex-M3)
- Freescale MCF5208EVB (ColdFire V2).
- Arnewsh MCF5206 evaluation board (ColdFire V2).
- Palm Tungsten|E PDA (OMAP310 processor)
- N800 and N810 tablets (OMAP2420 processor)
- MusicPal (MV88W8618 ARM processor)
- Gumstix «Connex» and «Verdex» motherboards (PXA255/270).
- Siemens SX1 smartphone (OMAP310 processor)
- AXIS-Devboard88 (CRISv32 ETRAX-FS).
- Petalogix Spartan 3aDSP1800 MMU ref design (MicroBlaze).
- Avnet LX60/LX110/LX200 boards (Xtensa)
For user emulation, x86 (32 and 64 bit), PowerPC (32 and 64 bit), ARM, MIPS (32 bit only), Sparc (32 and 64 bit), Alpha, ColdFire(m68k), CRISv32 and MicroBlaze CPUs are supported.
2 Installation
If you want to compile QEMU yourself, see compilation.
2.1 Linux
If a precompiled package is available for your distribution — you just have to install it. Otherwise, see compilation.
2.2 Windows
Download the experimental binary installer at http://www.free.oszoo.org/download.html. TODO (no longer available)
2.3 Mac OS X
Download the experimental binary installer at http://www.free.oszoo.org/download.html. TODO (no longer available)
3 QEMU PC System emulator
3.1 Introduction
- i440FX host PCI bridge and PIIX3 PCI to ISA bridge
- Cirrus CLGD 5446 PCI VGA card or dummy VGA card with Bochs VESA extensions (hardware level, including all non standard modes).
- PS/2 mouse and keyboard
- 2 PCI IDE interfaces with hard disk and CD-ROM support
- Floppy disk
- PCI and ISA network adapters
- Serial ports
- Creative SoundBlaster 16 sound card
- ENSONIQ AudioPCI ES1370 sound card
- Intel 82801AA AC97 Audio compatible sound card
- Intel HD Audio Controller and HDA codec
- Adlib (OPL2) — Yamaha YM3812 compatible chip
- Gravis Ultrasound GF1 sound card
- CS4231A compatible sound card
- PCI UHCI USB controller and a virtual USB hub.
SMP is supported with up to 255 CPUs.
Note that adlib, gus and cs4231a are only available when QEMU was configured with –audio-card-list option containing the name(s) of required card(s).
QEMU uses the PC BIOS from the Bochs project and the Plex86/Bochs LGPL VGA BIOS.
QEMU uses YM3812 emulation by Tatsuyuki Satoh.
QEMU uses GUS emulation (GUSEMU32 http://www.deinmeister.de/gusemu/) by Tibor «TS» Schütz.
Note that, by default, GUS shares IRQ(7) with parallel ports and so QEMU must be told to not have parallel ports to have working GUS.
Or some other unclaimed IRQ.
CS4231A is the chip used in Windows Sound System and GUSMAX products
3.2 Quick Start
Download and uncompress the linux image ( linux.img ) and type:
Linux should boot and give you a prompt.
3.3 Invocation
disk_image is a raw hard disk image for IDE hard disk 0. Some targets do not need a disk image.
Standard options: -h Display help and exit
-version Display version information and exit
-machine [type=] name [,prop= value [. ]] Select the emulated machine by name . Use -machine help to list available machines. Supported machine properties are: accel= accels1 [: accels2 [. ]] This is used to enable an accelerator. Depending on the target architecture, kvm, xen, or tcg can be available. By default, tcg is used. If there is more than one accelerator specified, the next one is used if the previous one fails to initialize.
kernel_irqchip=on|off Enables in-kernel irqchip support for the chosen accelerator when available.
kvm_shadow_mem=size Defines the size of the KVM shadow MMU.
dump-guest-core=on|off Include guest memory in a core dump. The default is on.
mem-merge=on|off Enables or disables memory merge support. This feature, when supported by the host, de-duplicates identical memory pages among VMs instances (enabled by default).
-cpu model Select CPU model ( -cpu help for list and additional feature selection)
-smp n [,cores= cores ][,threads= threads ][,sockets= sockets ][,maxcpus= maxcpus ] Simulate an SMP system with n CPUs. On the PC target, up to 255 CPUs are supported. On Sparc32 target, Linux limits the number of usable CPUs to 4. For the PC target, the number of cores per socket, the number of threads per cores and the total number of sockets can be specified. Missing values will be computed. If any on the three values is given, the total number of CPUs n can be omitted. maxcpus specifies the maximum number of hotpluggable CPUs.
-numa opts Simulate a multi node NUMA system. If mem and cpus are omitted, resources are split equally.
-fda file
-fdb file Use file as floppy disk 0/1 image (see disk_images). You can use the host floppy by using /dev/fd0 as filename (see host_drives).
-hda file
-hdb file
-hdc file
-hdd file Use file as hard disk 0, 1, 2 or 3 image (see disk_images).
-cdrom file Use file as CD-ROM image (you cannot use -hdc and -cdrom at the same time). You can use the host CD-ROM by using /dev/cdrom as filename (see host_drives).
-drive option [, option [, option [. ]]] Define a new drive. Valid options are: file= file This option defines which disk image (see disk_images) to use with this drive. If the filename contains comma, you must double it (for instance, «file=my,,file» to use file «my,file»).
Special files such as iSCSI devices can be specified using protocol specific URLs. See the section for «Device URL Syntax» for more information.
if= interface This option defines on which type on interface the drive is connected. Available types are: ide, scsi, sd, mtd, floppy, pflash, virtio.
bus= bus ,unit= unit These options define where is connected the drive by defining the bus number and the unit id.
index= index This option defines where is connected the drive by using an index in the list of available connectors of a given interface type.
media= media This option defines the type of the media: disk or cdrom.
cyls= c ,heads= h ,secs= s [,trans= t ] These options have the same definition as they have in -hdachs .
snapshot= snapshot snapshot is «on» or «off» and allows to enable snapshot for given drive (see -snapshot ).
cache= cache cache is «none», «writeback», «unsafe», «directsync» or «writethrough» and controls how the host cache is used to access block data.
aio= aio aio is «threads», or «native» and selects between pthread based disk I/O and native Linux AIO.
format= format Specify which disk format will be used rather than detecting the format. Can be used to specifiy format=raw to avoid interpreting an untrusted format header.
serial= serial This option specifies the serial number to assign to the device.
addr= addr Specify the controller’s PCI address (if=virtio only).
werror= action ,rerror= action Specify which action to take on write and read errors. Valid actions are: «ignore» (ignore the error and try to continue), «stop» (pause QEMU), «report» (report the error to the guest), «enospc» (pause QEMU only if the host disk is full; report the error to the guest otherwise). The default setting is werror=enospc and rerror=report .
readonly Open drive file as read-only. Guest write attempts will fail.
copy-on-read= copy-on-read copy-on-read is «on» or «off» and enables whether to copy read backing file sectors into the image file.
By default, the cache=writeback mode is used. It will report data writes as completed as soon as the data is present in the host page cache. This is safe as long as your guest OS makes sure to correctly flush disk caches where needed. If your guest OS does not handle volatile disk write caches correctly and your host crashes or loses power, then the guest may experience data corruption.
For such guests, you should consider using cache=writethrough . This means that the host page cache will be used to read and write data, but write notification will be sent to the guest only after QEMU has made sure to flush each write to the disk. Be aware that this has a major impact on performance.
The host page cache can be avoided entirely with cache=none . This will attempt to do disk IO directly to the guest’s memory. QEMU may still perform an internal copy of the data. Note that this is considered a writeback mode and the guest OS must handle the disk write cache correctly in order to avoid data corruption on host crashes.
The host page cache can be avoided while only sending write notifications to the guest when the data has been flushed to the disk using cache=directsync .
In case you don’t care about data integrity over host failures, use cache=unsafe . This option tells QEMU that it never needs to write any data to the disk but can instead keep things in cache. If anything goes wrong, like your host losing power, the disk storage getting disconnected accidentally, etc. your image will most probably be rendered unusable. When using the -snapshot option, unsafe caching is always used.
Copy-on-read avoids accessing the same backing file sectors repeatedly and is useful when the backing file is over a slow network. By default copy-on-read is off.
Instead of -cdrom you can use:
Instead of -hda , -hdb , -hdc , -hdd , you can use:
You can open an image using pre-opened file descriptors from an fd set:
You can connect a CDROM to the slave of ide0:
If you don’t specify the «file example»> qemu-system-i386 -drive if=ide,index=1,media=cdrom
You can connect a SCSI disk with unit ID 6 on the bus #0:
Instead of -fda , -fdb , you can use:
By default, interface is «ide» and index is automatically incremented:
is interpreted like:
-add-fd fd= fd ,set= set [,opaque= opaque ] Add a file descriptor to an fd set. Valid options are: fd= fd This option defines the file descriptor of which a duplicate is added to fd set. The file descriptor cannot be stdin, stdout, or stderr.
set= set This option defines the ID of the fd set to add the file descriptor to.
opaque= opaque This option defines a free-form string that can be used to describe fd .
You can open an image using pre-opened file descriptors from an fd set:
-set TODO
-global driver . prop = value Set default value of driver ‘s property prop to value , e.g.:
In particular, you can use this to set driver properties for devices which are created automatically by the machine model. To create a device which is not created automatically and set properties on it, use — device .
-mtdblock file Use file as on-board Flash memory image.
-sd file Use file as SecureDigital card image.
-pflash file Use file as a parallel flash image.
-boot [order= drives ][,once= drives ][,menu=on|off][,splash= sp_name ][,splash-time= sp_time ][,reboot-timeout= rb_timeout ] Specify boot order drives as a string of drive letters. Valid drive letters depend on the target achitecture. The x86 PC uses: a, b (floppy 1 and 2), c (first hard disk), d (first CD-ROM), n-p (Etherboot from network adapter 1-4), hard disk boot is the default. To apply a particular boot order only on the first startup, specify it via once .
Interactive boot menus/prompts can be enabled via menu=on as far as firmware/BIOS supports them. The default is non-interactive boot.
A splash picture could be passed to bios, enabling user to show it as logo, when option splash= sp_name is given and menu=on, If firmware/BIOS supports them. Currently Seabios for X86 system support it. limitation: The splash file could be a jpeg file or a BMP file in 24 BPP format(true color). The resolution should be supported by the SVGA mode, so the recommended is 320×240, 640×480, 800×640.
A timeout could be passed to bios, guest will pause for rb_timeout ms when boot failed, then reboot. If rb_timeout is ‘-1’, guest will not reboot, qemu passes ‘-1’ to bios by default. Currently Seabios for X86 system support it.
Note: The legacy format ‘-boot drives ‘ is still supported but its use is discouraged as it may be removed from future versions.
-snapshot Write to temporary files instead of disk image files. In this case, the raw disk image you use is not written back. You can however force the write back by pressing <C-a s> (see disk_images).
-m megs Set virtual RAM size to megs megabytes. Default is 128 MiB. Optionally, a suffix of “M” or “G” can be used to signify a value in megabytes or gigabytes respectively.
-mem-path path Allocate guest RAM from a temporarily created file in path .
-mem-prealloc Preallocate memory when using -mem-path.
-k language Use keyboard layout language (for example fr for French). This option is only needed where it is not easy to get raw PC keycodes (e.g. on Macs, with some X11 servers or with a VNC display). You don’t normally need to use it on PC/Linux or PC/Windows hosts.
The available layouts are:
The default is en-us .
-audio-help Will show the audio subsystem help: list of drivers, tunable parameters.
-soundhw card1 [, card2 . ] or -soundhw all Enable audio and selected sound hardware. Use ‘help’ to print all available sound hardware.
Note that Linux’s i810_audio OSS kernel (for AC97) module might require manually specifying clocking.
-balloon none Disable balloon device.
-balloon virtio[,addr= addr ] Enable virtio balloon device (default), optionally with PCI address addr . USB options: -usb Enable the USB driver (will be the default soon)
-usbdevice devname Add the USB device devname . See usb_devices. mouse Virtual Mouse. This will override the PS/2 mouse emulation when activated.
tablet Pointer device that uses absolute coordinates (like a touchscreen). This means QEMU is able to report the mouse position without having to grab the mouse. Also overrides the PS/2 mouse emulation when activated.
disk:[format= format ]: file Mass storage device based on file. The optional format argument will be used rather than detecting the format. Can be used to specifiy format=raw to avoid interpreting an untrusted format header.
host: bus . addr Pass through the host device identified by bus . addr (Linux only).
host: vendor_id : product_id Pass through the host device identified by vendor_id : product_id (Linux only).
serial:[vendorid= vendor_id ][,productid= product_id ]: dev Serial converter to host character device dev , see -serial for the available devices.
braille Braille device. This will use BrlAPI to display the braille output on a real or fake device.
net: options Network adapter that supports CDC ethernet and RNDIS protocols.
-device driver [, prop [= value ][. ]] Add device driver . prop = value sets driver properties. Valid properties depend on the driver. To get help on possible drivers and properties, use -device help and -device driver ,help .
File system options:
-fsdev fsdriver ,id= id ,path= path ,[security_model= security_model ][,writeout= writeout ][,readonly][,socket= socket |sock_fd= sock_fd ] Define a new file system device. Valid options are: fsdriver This option specifies the fs driver backend to use. Currently «local», «handle» and «proxy» file system drivers are supported.
id= id Specifies identifier for this device
path= path Specifies the export path for the file system device. Files under this path will be available to the 9p client on the guest.
security_model= security_model Specifies the security model to be used for this export path. Supported security models are «passthrough», «mapped-xattr», «mapped-file» and «none». In «passthrough» security model, files are stored using the same credentials as they are created on the guest. This requires QEMU to run as root. In «mapped-xattr» security model, some of the file attributes like uid, gid, mode bits and link target are stored as file attributes. For «mapped-file» these attributes are stored in the hidden .virtfs_metadata directory. Directories exported by this security model cannot interact with other unix tools. «none» security model is same as passthrough except the sever won’t report failures if it fails to set file attributes like ownership. Security model is mandatory only for local fsdriver. Other fsdrivers (like handle, proxy) don’t take security model as a parameter.
writeout= writeout This is an optional argument. The only supported value is «immediate». This means that host page cache will be used to read and write data but write notification will be sent to the guest only when the data has been reported as written by the storage subsystem.
readonly Enables exporting 9p share as a readonly mount for guests. By default read-write access is given.
socket= socket Enables proxy filesystem driver to use passed socket file for communicating with virtfs-proxy-helper
sock_fd= sock_fd Enables proxy filesystem driver to use passed socket descriptor for communicating with virtfs-proxy-helper. Usually a helper like libvirt will create socketpair and pass one of the fds as sock_fd
-fsdev option is used along with -device driver «virtio-9p-pci».
-device virtio-9p-pci,fsdev= id ,mount_tag= mount_tag Options for virtio-9p-pci driver are: fsdev= id Specifies the id value specified along with -fsdev option
mount_tag= mount_tag Specifies the tag name to be used by the guest to mount this export point
Virtual File system pass-through options:
-virtfs fsdriver [,path= path ],mount_tag= mount_tag [,security_model= security_model ][,writeout= writeout ][,readonly][,socket= socket |sock_fd= sock_fd ] The general form of a Virtual File system pass-through options are: fsdriver This option specifies the fs driver backend to use. Currently «local», «handle» and «proxy» file system drivers are supported.
id= id Specifies identifier for this device
path= path Specifies the export path for the file system device. Files under this path will be available to the 9p client on the guest.
security_model= security_model Specifies the security model to be used for this export path. Supported security models are «passthrough», «mapped-xattr», «mapped-file» and «none». In «passthrough» security model, files are stored using the same credentials as they are created on the guest. This requires QEMU to run as root. In «mapped-xattr» security model, some of the file attributes like uid, gid, mode bits and link target are stored as file attributes. For «mapped-file» these attributes are stored in the hidden .virtfs_metadata directory. Directories exported by this security model cannot interact with other unix tools. «none» security model is same as passthrough except the sever won’t report failures if it fails to set file attributes like ownership. Security model is mandatory only for local fsdriver. Other fsdrivers (like handle, proxy) don’t take security model as a parameter.
writeout= writeout This is an optional argument. The only supported value is «immediate». This means that host page cache will be used to read and write data but write notification will be sent to the guest only when the data has been reported as written by the storage subsystem.
readonly Enables exporting 9p share as a readonly mount for guests. By default read-write access is given.
socket= socket Enables proxy filesystem driver to use passed socket file for communicating with virtfs-proxy-helper. Usually a helper like libvirt will create socketpair and pass one of the fds as sock_fd
sock_fd Enables proxy filesystem driver to use passed ‘sock_fd’ as the socket descriptor for interfacing with virtfs-proxy-helper
-virtfs_synth Create synthetic file system image
-name name Sets the name of the guest. This name will be displayed in the SDL window caption. The name will also be used for the VNC server. Also optionally set the top visible process name in Linux.
-uuid uuid Set system UUID.
Display options: -display type Select type of display to use. This option is a replacement for the old style -sdl/-curses/. options. Valid values for type are sdl Display video output via SDL (usually in a separate graphics window; see the SDL documentation for other possibilities).
curses Display video output via curses. For graphics device models which support a text mode, QEMU can display this output using a curses/ncurses interface. Nothing is displayed when the graphics device is in graphical mode or if the graphics device does not support a text mode. Generally only the VGA device models support text mode.
none Do not display video output. The guest will still see an emulated graphics card, but its output will not be displayed to the QEMU user. This option differs from the -nographic option in that it only affects what is done with video output; -nographic also changes the destination of the serial and parallel port data.
vnc Start a VNC server on display <arg>
-nographic Normally, QEMU uses SDL to display the VGA output. With this option, you can totally disable graphical output so that QEMU is a simple command line application. The emulated serial port is redirected on the console. Therefore, you can still use QEMU to debug a Linux kernel with a serial console.
-curses Normally, QEMU uses SDL to display the VGA output. With this option, QEMU can display the VGA output when in text mode using a curses/ncurses interface. Nothing is displayed in graphical mode.
-no-frame Do not use decorations for SDL windows and start them using the whole available screen space. This makes the using QEMU in a dedicated desktop workspace more convenient.
-alt-grab Use Ctrl-Alt-Shift to grab mouse (instead of Ctrl-Alt). Note that this also affects the special keys (for fullscreen, monitor-mode switching, etc).
-ctrl-grab Use Right-Ctrl to grab mouse (instead of Ctrl-Alt). Note that this also affects the special keys (for fullscreen, monitor-mode switching, etc).
-no-quit Disable SDL window close capability.
-sdl Enable SDL.
-spice option [, option [. ]] Enable the spice remote desktop protocol. Valid options are port=<nr> Set the TCP port spice is listening on for plaintext channels.
addr=<addr> Set the IP address spice is listening on. Default is any address.
ipv4
ipv6 Force using the specified IP version.
password=<secret> Set the password you need to authenticate.
sasl Require that the client use SASL to authenticate with the spice. The exact choice of authentication method used is controlled from the system / user’s SASL configuration file for the ‘qemu’ service. This is typically found in /etc/sasl2/qemu.conf. If running QEMU as an unprivileged user, an environment variable SASL_CONF_PATH can be used to make it search alternate locations for the service config. While some SASL auth methods can also provide data encryption (eg GSSAPI), it is recommended that SASL always be combined with the ‘tls’ and ‘x509’ settings to enable use of SSL and server certificates. This ensures a data encryption preventing compromise of authentication credentials.
disable-ticketing Allow client connects without authentication.
disable-copy-paste Disable copy paste between the client and the guest.
tls-port=<nr> Set the TCP port spice is listening on for encrypted channels.
x509-dir=<dir> Set the x509 file directory. Expects same filenames as -vnc $display,x509=$dir
x509-key-file=<file>
x509-key-password=<file>
x509-cert-file=<file>
x509-cacert-file=<file>
x509-dh-key-file=<file> The x509 file names can also be configured individually.
tls-ciphers=<list> Specify which ciphers to use.
tls-channel=[main|display|cursor|inputs|record|playback]
plaintext-channel=[main|display|cursor|inputs|record|playback] Force specific channel to be used with or without TLS encryption. The options can be specified multiple times to configure multiple channels. The special name «default» can be used to set the default mode. For channels which are not explicitly forced into one mode the spice client is allowed to pick tls/plaintext as he pleases.
image-compression=[auto_glz|auto_lz|quic|glz|lz|off] Configure image compression (lossless). Default is auto_glz.
jpeg-wan-compression=[auto|never|always]
zlib-glz-wan-compression=[auto|never|always] Configure wan image compression (lossy for slow links). Default is auto.
streaming-video=[off|all|filter] Configure video stream detection. Default is filter.
agent-mouse=[on|off] Enable/disable passing mouse events via vdagent. Default is on.
playback-compression=[on|off] Enable/disable audio stream compression (using celt 0.5.1). Default is on.
seamless-migration=[on|off] Enable/disable spice seamless migration. Default is off.
-portrait Rotate graphical output 90 deg left (only PXA LCD).
-rotate Rotate graphical output some deg left (only PXA LCD).
-vga type Select type of VGA card to emulate. Valid values for type are cirrus Cirrus Logic GD5446 Video card. All Windows versions starting from Windows 95 should recognize and use this graphic card. For optimal performances, use 16 bit color depth in the guest and the host OS. (This one is the default)
std Standard VGA card with Bochs VBE extensions. If your guest OS supports the VESA 2.0 VBE extensions (e.g. Windows XP) and if you want to use high resolution modes (>= 1280x1024x16) then you should use this option.
vmware VMWare SVGA-II compatible adapter. Use it if you have sufficiently recent XFree86/XOrg server or Windows guest with a driver for this card.
qxl QXL paravirtual graphic card. It is VGA compatible (including VESA 2.0 VBE support). Works best with qxl guest drivers installed though. Recommended choice when using the spice protocol.
none Disable VGA card.
-full-screen Start in full screen.
-g width x height [x depth ] Set the initial graphical resolution and depth (PPC, SPARC only).
-vnc display [, option [, option [. ]]] Normally, QEMU uses SDL to display the VGA output. With this option, you can have QEMU listen on VNC display display and redirect the VGA display over the VNC session. It is very useful to enable the usb tablet device when using this option (option -usbdevice tablet ). When using the VNC display, you must use the -k parameter to set the keyboard layout if you are not using en-us. Valid syntax for the display is host : d TCP connections will only be allowed from host on display d . By convention the TCP port is 5900+ d . Optionally, host can be omitted in which case the server will accept connections from any host.
unix: path Connections will be allowed over UNIX domain sockets where path is the location of a unix socket to listen for connections on.
none VNC is initialized but not started. The monitor change command can be used to later start the VNC server.
Following the display value there may be one or more option flags separated by commas. Valid options are reverse Connect to a listening VNC client via a “reverse” connection. The client is specified by the display . For reverse network connections ( host : d , reverse ), the d argument is a TCP port number, not a display number.
password Require that password based authentication is used for client connections.
The password must be set separately using the set_password command in the pcsys_monitor. The syntax to change your password is: set_password <protocol> <password> where <protocol> could be either «vnc» or «spice».
If you would like to change <protocol> password expiration, you should use expire_password <protocol> <expiration-time> where expiration time could be one of the following options: now, never, +seconds or UNIX time of expiration, e.g. +60 to make password expire in 60 seconds, or 1335196800 to make password expire on «Mon Apr 23 12:00:00 EDT 2012» (UNIX time for this date and time).
You can also use keywords «now» or «never» for the expiration time to allow <protocol> password to expire immediately or never expire.
tls Require that client use TLS when communicating with the VNC server. This uses anonymous TLS credentials so is susceptible to a man-in-the-middle attack. It is recommended that this option be combined with either the x509 or x509verify options.
x509= /path/to/certificate/dir Valid if tls is specified. Require that x509 credentials are used for negotiating the TLS session. The server will send its x509 certificate to the client. It is recommended that a password be set on the VNC server to provide authentication of the client when this is used. The path following this option specifies where the x509 certificates are to be loaded from. See the vnc_security section for details on generating certificates.
x509verify= /path/to/certificate/dir Valid if tls is specified. Require that x509 credentials are used for negotiating the TLS session. The server will send its x509 certificate to the client, and request that the client send its own x509 certificate. The server will validate the client’s certificate against the CA certificate, and reject clients when validation fails. If the certificate authority is trusted, this is a sufficient authentication mechanism. You may still wish to set a password on the VNC server as a second authentication layer. The path following this option specifies where the x509 certificates are to be loaded from. See the vnc_security section for details on generating certificates.
sasl Require that the client use SASL to authenticate with the VNC server. The exact choice of authentication method used is controlled from the system / user’s SASL configuration file for the ‘qemu’ service. This is typically found in /etc/sasl2/qemu.conf. If running QEMU as an unprivileged user, an environment variable SASL_CONF_PATH can be used to make it search alternate locations for the service config. While some SASL auth methods can also provide data encryption (eg GSSAPI), it is recommended that SASL always be combined with the ‘tls’ and ‘x509’ settings to enable use of SSL and server certificates. This ensures a data encryption preventing compromise of authentication credentials. See the vnc_security section for details on using SASL authentication.
acl Turn on access control lists for checking of the x509 client certificate and SASL party. For x509 certs, the ACL check is made against the certificate’s distinguished name. This is something that looks like C=GB,O=ACME,L=Boston,CN=bob . For SASL party, the ACL check is made against the username, which depending on the SASL plugin, may include a realm component, eg bob or bob@EXAMPLE.COM . When the acl flag is set, the initial access list will be empty, with a deny policy. Thus no one will be allowed to use the VNC server until the ACLs have been loaded. This can be achieved using the acl monitor command.
lossy Enable lossy compression methods (gradient, JPEG, . ). If this option is set, VNC client may receive lossy framebuffer updates depending on its encoding settings. Enabling this option can save a lot of bandwidth at the expense of quality.
non-adaptive Disable adaptive encodings. Adaptive encodings are enabled by default. An adaptive encoding will try to detect frequently updated screen regions, and send updates in these regions using a lossy encoding (like JPEG). This can be really helpful to save bandwidth when playing videos. Disabling adaptive encodings allows to restore the original static behavior of encodings like Tight.
share=[allow-exclusive|force-shared|ignore] Set display sharing policy. ‘allow-exclusive’ allows clients to ask for exclusive access. As suggested by the rfb spec this is implemented by dropping other connections. Connecting multiple clients in parallel requires all clients asking for a shared session (vncviewer: -shared switch). This is the default. ‘force-shared’ disables exclusive client access. Useful for shared desktop sessions, where you don’t want someone forgetting specify -shared disconnect everybody else. ‘ignore’ completely ignores the shared flag and allows everybody connect unconditionally. Doesn’t conform to the rfb spec but is traditional QEMU behavior.
i386 target only: -win2k-hack Use it when installing Windows 2000 to avoid a disk full bug. After Windows 2000 is installed, you no longer need this option (this option slows down the IDE transfers).
-no-fd-bootchk Disable boot signature checking for floppy disks in Bochs BIOS. It may be needed to boot from old floppy disks. TODO: check reference to Bochs BIOS.
-no-acpi Disable ACPI (Advanced Configuration and Power Interface) support. Use it if your guest OS complains about ACPI problems (PC target machine only).
-no-hpet Disable HPET support.
-acpitable [sig= str ][,rev= n ][,oem_id= str ][,oem_table_id= str ][,oem_rev= n ] [,asl_compiler_id= str ][,asl_compiler_rev= n ][,data= file1 [: file2 ]. ] Add ACPI table with specified header fields and context from specified files. For file=, take whole ACPI table from the specified files, including all ACPI headers (possible overridden by other options). For data=, only data portion of the table is used, all header information is specified in the command line.
-smbios file= binary Load SMBIOS entry from binary file.
-smbios type=0[,vendor= str ][,version= str ][,date= str ][,release= %d.%d ] Specify SMBIOS type 0 fields
-smbios type=1[,manufacturer= str ][,product= str ] [,version= str ][,serial= str ][,uuid= uuid ][,sku= str ] [,family= str ] Specify SMBIOS type 1 fields Network options: -net nic[,vlan= n ][,macaddr= mac ][,model= type ] [,name= name ][,addr= addr ][,vectors= v ] Create a new Network Interface Card and connect it to VLAN n ( n = 0 is the default). The NIC is an e1000 by default on the PC target. Optionally, the MAC address can be changed to mac , the device address set to addr (PCI cards only), and a name can be assigned for use in monitor commands. Optionally, for PCI cards, you can specify the number v of MSI-X vectors that the card should have; this option currently only affects virtio cards; set v = 0 to disable MSI-X. If no -net option is specified, a single NIC is created. QEMU can emulate several different models of network card. Valid values for type are virtio , i82551 , i82557b , i82559er , ne2k_pci , ne2k_isa , pcnet , rtl8139 , e1000 , smc91c111 , lance and mcf_fec . Not all devices are supported on all targets. Use -net nic,model=help for a list of available devices for your target.
-netdev user,id= id [, option ][, option ][. ]
-net user[, option ][, option ][. ] Use the user mode network stack which requires no administrator privilege to run. Valid options are: vlan= n Connect user mode stack to VLAN n ( n = 0 is the default).
id= id
name= name Assign symbolic name for use in monitor commands.
net= addr [/ mask ] Set IP network address the guest will see. Optionally specify the netmask, either in the form a.b.c.d or as number of valid top-most bits. Default is 10.0.2.0/24.
host= addr Specify the guest-visible address of the host. Default is the 2nd IP in the guest network, i.e. x.x.x.2.
restrict=on|off If this option is enabled, the guest will be isolated, i.e. it will not be able to contact the host and no guest IP packets will be routed over the host to the outside. This option does not affect any explicitly set forwarding rules.
hostname= name Specifies the client hostname reported by the built-in DHCP server.
dhcpstart= addr Specify the first of the 16 IPs the built-in DHCP server can assign. Default is the 15th to 31st IP in the guest network, i.e. x.x.x.15 to x.x.x.31.
dns= addr Specify the guest-visible address of the virtual nameserver. The address must be different from the host address. Default is the 3rd IP in the guest network, i.e. x.x.x.3.
dnssearch= domain Provides an entry for the domain-search list sent by the built-in DHCP server. More than one domain suffix can be transmitted by specifying this option multiple times. If supported, this will cause the guest to automatically try to append the given domain suffix(es) in case a domain name can not be resolved.
Example:
tftp= dir When using the user mode network stack, activate a built-in TFTP server. The files in dir will be exposed as the root of a TFTP server. The TFTP client on the guest must be configured in binary mode (use the command bin of the Unix TFTP client).
bootfile= file When using the user mode network stack, broadcast file as the BOOTP filename. In conjunction with tftp , this can be used to network boot a guest from a local directory.
Example (using pxelinux):
smb= dir [,smbserver= addr ] When using the user mode network stack, activate a built-in SMB server so that Windows OSes can access to the host files in dir transparently. The IP address of the SMB server can be set to addr . By default the 4th IP in the guest network is used, i.e. x.x.x.4.
In the guest Windows OS, the line:
must be added in the file C:\WINDOWS\LMHOSTS (for windows 9x/Me) or C:\WINNT\SYSTEM32\DRIVERS\ETC\LMHOSTS (Windows NT/2000).
Then dir can be accessed in \smbserver\qemu .
Note that a SAMBA server must be installed on the host OS. QEMU was tested successfully with smbd versions from Red Hat 9, Fedora Core 3 and OpenSUSE 11.x.
hostfwd=[tcp|udp]:[ hostaddr ]: hostport -[ guestaddr ]: guestport Redirect incoming TCP or UDP connections to the host port hostport to the guest IP address guestaddr on guest port guestport . If guestaddr is not specified, its value is x.x.x.15 (default first address given by the built-in DHCP server). By specifying hostaddr , the rule can be bound to a specific host interface. If no connection type is set, TCP is used. This option can be given multiple times.
For example, to redirect host X11 connection from screen 1 to guest screen 0, use the following:
To redirect telnet connections from host port 5555 to telnet port on the guest, use the following:
Then when you use on the host telnet localhost 5555 , you connect to the guest telnet server.
guestfwd=[tcp]: server : port — dev
guestfwd=[tcp]: server : port — cmd:command Forward guest TCP connections to the IP address server on port port to the character device dev or to a program executed by cmd:command which gets spawned for each connection. This option can be given multiple times.
You can either use a chardev directly and have that one used throughout QEMU’s lifetime, like in the following example:
Or you can execute a command on every TCP connection established by the guest, so that QEMU behaves similar to an inetd process for that virtual server:
Note: Legacy stand-alone options -tftp, -bootp, -smb and -redir are still processed and applied to -net user. Mixing them with the new configuration syntax gives undefined results. Their use for new applications is discouraged as they will be removed from future versions.
-netdev tap,id= id [,fd= h ][,ifname= name ][,script= file ][,downscript= dfile ][,helper= helper ]
-net tap[,vlan= n ][,name= name ][,fd= h ][,ifname= name ][,script= file ][,downscript= dfile ][,helper= helper ] Connect the host TAP network interface name to VLAN n .
Use the network script file to configure it and the network script dfile to deconfigure it. If name is not provided, the OS automatically provides one. The default network configure script is /etc/qemu-ifup and the default network deconfigure script is /etc/qemu-ifdown . Use script=no or downscript=no to disable script execution.
If running QEMU as an unprivileged user, use the network helper helper to configure the TAP interface. The default network helper executable is /usr/local/libexec/qemu-bridge-helper .
fd = h can be used to specify the handle of an already opened host TAP interface.
Examples:
-netdev bridge,id= id [,br= bridge ][,helper= helper ]
-net bridge[,vlan= n ][,name= name ][,br= bridge ][,helper= helper ] Connect a host TAP network interface to a host bridge device.
Use the network helper helper to configure the TAP interface and attach it to the bridge. The default network helper executable is /usr/local/libexec/qemu-bridge-helper and the default bridge device is br0 .
Examples:
-netdev socket,id= id [,fd= h ][,listen=[ host ]: port ][,connect= host : port ]
-net socket[,vlan= n ][,name= name ][,fd= h ] [,listen=[ host ]: port ][,connect= host : port ] Connect the VLAN n to a remote VLAN in another QEMU virtual machine using a TCP socket connection. If listen is specified, QEMU waits for incoming connections on port ( host is optional). connect is used to connect to another QEMU instance using the listen option. fd = h specifies an already opened TCP socket.
- Several QEMU can be running on different hosts and share same bus (assuming correct multicast setup for these hosts).
- mcast support is compatible with User Mode Linux (argument eth N =mcast ), see http://user-mode-linux.sf.net.
- Use fd=h to specify an already opened UDP multicast socket.
Example (User Mode Linux compat.):
Example (send packets from host’s 1.2.3.4):
-netdev vde,id= id [,sock= socketpath ][,port= n ][,group= groupname ][,mode= octalmode ]
-net vde[,vlan= n ][,name= name ][,sock= socketpath ] [,port= n ][,group= groupname ][,mode= octalmode ] Connect VLAN n to PORT n of a vde switch running on host and listening for incoming connections on socketpath . Use GROUP groupname and MODE octalmode to change default ownership and permissions for communication port. This option is only available if QEMU has been compiled with vde support enabled.
Example:
-net dump[,vlan= n ][,file= file ][,len= len ] Dump network traffic on VLAN n to file file ( qemu-vlan0.pcap by default). At most len bytes (64k by default) per packet are stored. The file format is libpcap, so it can be analyzed with tools such as tcpdump or Wireshark.
-net none Indicate that no network devices should be configured. It is used to override the default configuration ( -net nic -net user ) which is activated if no -net options are provided.
Character device options:
The general form of a character device option is: -chardev backend ,id= id [,mux=on|off] [, options ] Backend is one of: null , socket , udp , msmouse , vc , file , pipe , console , serial , pty , stdio , braille , tty , parport , spicevmc . The specific backend will determine the applicable options.
All devices must have an id, which can be any string up to 127 characters long. It is used to uniquely identify this device in other command line directives.
A character device may be used in multiplexing mode by multiple front-ends. The key sequence of <Control-a> and <c> will rotate the input focus between attached front-ends. Specify mux=on to enable this mode.
Options to each backend are described below.
-chardev null ,id= id A void device. This device will not emit any data, and will drop any data it receives. The null backend does not take any options.
-chardev socket ,id= id [ TCP options or unix options ] [,server] [,nowait] [,telnet] Create a two-way stream socket, which can be either a TCP or a unix socket. A unix socket will be created if path is specified. Behaviour is undefined if TCP options are specified for a unix socket.
server specifies that the socket shall be a listening socket.
nowait specifies that QEMU should not block waiting for a client to connect to a listening socket.
telnet specifies that traffic on the socket should interpret telnet escape sequences.
TCP and unix socket options are given below: TCP options: port= port [,host= host ] [,to= to ] [,ipv4] [,ipv6] [,nodelay] host for a listening socket specifies the local address to be bound. For a connecting socket species the remote host to connect to. host is optional for listening sockets. If not specified it defaults to 0.0.0.0 .
port for a listening socket specifies the local port to be bound. For a connecting socket specifies the port on the remote host to connect to. port can be given as either a port number or a service name. port is required.
to is only relevant to listening sockets. If it is specified, and port cannot be bound, QEMU will attempt to bind to subsequent ports up to and including to until it succeeds. to must be specified as a port number.
ipv4 and ipv6 specify that either IPv4 or IPv6 must be used. If neither is specified the socket may use either protocol.
nodelay disables the Nagle algorithm.
unix options: path= path path specifies the local path of the unix socket. path is required.
-chardev udp ,id= id [,host= host ] ,port= port [,localaddr= localaddr ] [,localport= localport ] [,ipv4] [,ipv6] Sends all traffic from the guest to a remote host over UDP.
host specifies the remote host to connect to. If not specified it defaults to localhost .
port specifies the port on the remote host to connect to. port is required.
localaddr specifies the local address to bind to. If not specified it defaults to 0.0.0.0 .
localport specifies the local port to bind to. If not specified any available local port will be used.
ipv4 and ipv6 specify that either IPv4 or IPv6 must be used. If neither is specified the device may use either protocol.
-chardev msmouse ,id= id Forward QEMU’s emulated msmouse events to the guest. msmouse does not take any options.
-chardev vc ,id= id [[,width= width ] [,height= height ]] [[,cols= cols ] [,rows= rows ]] Connect to a QEMU text console. vc may optionally be given a specific size.
width and height specify the width and height respectively of the console, in pixels.
cols and rows specify that the console be sized to fit a text console with the given dimensions.
-chardev file ,id= id ,path= path Log all traffic received from the guest to a file.
path specifies the path of the file to be opened. This file will be created if it does not already exist, and overwritten if it does. path is required.
-chardev pipe ,id= id ,path= path Create a two-way connection to the guest. The behaviour differs slightly between Windows hosts and other hosts:
On Windows, a single duplex pipe will be created at \.pipe\ path .
On other hosts, 2 pipes will be created called path .in and path .out . Data written to path .in will be received by the guest. Data written by the guest can be read from path .out . QEMU will not create these fifos, and requires them to be present.
path forms part of the pipe path as described above. path is required.
-chardev console ,id= id Send traffic from the guest to QEMU’s standard output. console does not take any options.
console is only available on Windows hosts.
-chardev serial ,id= id ,path= path Send traffic from the guest to a serial device on the host.
serial is only available on Windows hosts.
path specifies the name of the serial device to open.
-chardev pty ,id= id Create a new pseudo-terminal on the host and connect to it. pty does not take any options.
pty is not available on Windows hosts.
-chardev stdio ,id= id [,signal=on|off] Connect to standard input and standard output of the QEMU process.
signal controls if signals are enabled on the terminal, that includes exiting QEMU with the key sequence <Control-c>. This option is enabled by default, use signal=off to disable it.
stdio is not available on Windows hosts.
-chardev braille ,id= id Connect to a local BrlAPI server. braille does not take any options.
-chardev tty ,id= id ,path= path Connect to a local tty device.
tty is only available on Linux, Sun, FreeBSD, NetBSD, OpenBSD and DragonFlyBSD hosts.
path specifies the path to the tty. path is required.
-chardev parport ,id= id ,path= path parport is only available on Linux, FreeBSD and DragonFlyBSD hosts.
Connect to a local parallel port.
path specifies the path to the parallel port device. path is required.
-chardev spicevmc ,id= id ,debug= debug , name= name spicevmc is only available when spice support is built in.
debug debug level for spicevmc
name name of spice channel to connect to
Connect to a spice virtual machine channel, such as vdiport.
Device URL Syntax:
In addition to using normal file images for the emulated storage devices, QEMU can also use networked resources such as iSCSI devices. These are specified using a special URL syntax. iSCSI iSCSI support allows QEMU to access iSCSI resources directly and use as images for the guest storage. Both disk and cdrom images are supported.
Syntax for specifying iSCSI LUNs is “iscsi://<target-ip>[:<port>]/<target-iqn>/<lun>”
By default qemu will use the iSCSI initiator-name ‘iqn.2008-11.org.linux-kvm[:<name>]’ but this can also be set from the command line or a configuration file.
Example (without authentication):
Example (CHAP username/password via URL):
Example (CHAP username/password via environment variables):
iSCSI support is an optional feature of QEMU and only available when compiled and linked against libiscsi.
iSCSI parameters such as username and password can also be specified via a configuration file. See qemu-doc for more information and examples.
NBD QEMU supports NBD (Network Block Devices) both using TCP protocol as well as Unix Domain Sockets.
Syntax for specifying a NBD device using TCP “nbd:<server-ip>:<port>[:exportname=<export>]”
Syntax for specifying a NBD device using Unix Domain Sockets “nbd:unix:<domain-socket>[:exportname=<export>]”
Example for TCP
Example for Unix Domain Sockets
Sheepdog Sheepdog is a distributed storage system for QEMU. QEMU supports using either local sheepdog devices or remote networked devices.
Syntax for specifying a sheepdog device “sheepdog:<vdiname>”
See also http://http://www.osrg.net/sheepdog/. GlusterFS GlusterFS is an user space distributed file system. QEMU supports the use of GlusterFS volumes for hosting VM disk images using TCP, Unix Domain Sockets and RDMA transport protocols.
Syntax for specifying a VM disk image on GlusterFS volume is
See also http://www.gluster.org. Bluetooth(R) options: -bt hci[. ] Defines the function of the corresponding Bluetooth HCI. -bt options are matched with the HCIs present in the chosen machine type. For example when emulating a machine with only one HCI built into it, only the first -bt hci[. ] option is valid and defines the HCI’s logic. The Transport Layer is decided by the machine type. Currently the machines n800 and n810 have one HCI and all other machines have none.
The following three types are recognized: -bt hci,null (default) The corresponding Bluetooth HCI assumes no internal logic and will not respond to any HCI commands or emit events.
-bt hci,host[: id ] ( bluez only) The corresponding HCI passes commands / events to / from the physical HCI identified by the name id (default: hci0 ) on the computer running QEMU. Only available on bluez capable systems like Linux.
-bt hci[,vlan= n ] Add a virtual, standard HCI that will participate in the Bluetooth scatternet n (default 0 ). Similarly to -net VLANs, devices inside a bluetooth network n can only communicate with other devices in the same network (scatternet).
-bt vhci[,vlan= n ] (Linux-host only) Create a HCI in scatternet n (default 0) attached to the host bluetooth stack instead of to the emulated target. This allows the host and target machines to participate in a common scatternet and communicate. Requires the Linux vhci driver installed. Can be used as following:
-bt device: dev [,vlan= n ] Emulate a bluetooth device dev and place it in network n (default 0 ). QEMU can only emulate one type of bluetooth devices currently: keyboard Virtual wireless keyboard implementing the HIDP bluetooth profile.
Linux/Multiboot boot specific:
When using these options, you can use a given Linux or Multiboot kernel without installing it in the disk image. It can be useful for easier testing of various kernels. -kernel bzImage Use bzImage as kernel image. The kernel can be either a Linux kernel or in multiboot format.
-append cmdline Use cmdline as kernel command line
-initrd file Use file as initial ram disk.
-initrd » file1 arg=foo, file2 » This syntax is only available with multiboot.
Use file1 and file2 as modules and pass arg=foo as parameter to the first module.
-dtb file Use file as a device tree binary (dtb) image and pass it to the kernel on boot.
Debug/Expert options: -serial dev Redirect the virtual serial port to host character device dev . The default device is vc in graphical mode and stdio in non graphical mode.
This option can be used several times to simulate up to 4 serial ports.
Use -serial none to disable all serial ports.
Available character devices are: vc[: W x H ] Virtual console. Optionally, a width and height can be given in pixel with
It is also possible to specify width or height in characters:
pty [Linux only] Pseudo TTY (a new PTY is automatically allocated)
none No device is allocated.
null void device
/dev/XXX [Linux only] Use host tty, e.g. /dev/ttyS0 . The host serial port parameters are set according to the emulated ones.
/dev/parport N [Linux only, parallel port only] Use host parallel port N . Currently SPP and EPP parallel port features can be used.
file: filename Write output to filename . No character can be read.
stdio [Unix only] standard input/output
pipe: filename name pipe filename
COM n [Windows only] Use host serial port n
udp:[ remote_host ]: remote_port [@[ src_ip ]: src_port ] This implements UDP Net Console. When remote_host or src_ip are not specified they default to 0.0.0.0 . When not using a specified src_port a random port is automatically chosen.
If you just want a simple readonly console you can use netcat or nc , by starting QEMU with: -serial udp::4555 and nc as: nc -u -l -p 4555 . Any time QEMU writes something to that port it will appear in the netconsole session.
If you plan to send characters back via netconsole or you want to stop and start QEMU a lot of times, you should have QEMU use the same source port each time by using something like -serial udp::4555@:4556 to QEMU. Another approach is to use a patched version of netcat which can listen to a TCP port and send and receive characters via udp. If you have a patched version of netcat which activates telnet remote echo and single char transfer, then you can use the following options to step up a netcat redirector to allow telnet on port 5555 to access the QEMU port. QEMU Options: -serial udp::4555@:4556
netcat options: -u -P 4555 -L 0.0.0.0:4556 -t -p 5555 -I -T
telnet options: localhost 5555
tcp:[ host ]: port [, server ][,nowait][,nodelay] The TCP Net Console has two modes of operation. It can send the serial I/O to a location or wait for a connection from a location. By default the TCP Net Console is sent to host at the port . If you use the server option QEMU will wait for a client socket application to connect to the port before continuing, unless the nowait option was specified. The nodelay option disables the Nagle buffering algorithm. If host is omitted, 0.0.0.0 is assumed. Only one TCP connection at a time is accepted. You can use telnet to connect to the corresponding character device. Example to send tcp console to 192.168.0.2 port 4444 -serial tcp:192.168.0.2:4444
Example to listen and wait on port 4444 for connection -serial tcp::4444,server
Example to not wait and listen on ip 192.168.0.100 port 4444 -serial tcp:192.168.0.100:4444,server,nowait
telnet: host : port [,server][,nowait][,nodelay] The telnet protocol is used instead of raw tcp sockets. The options work the same as if you had specified -serial tcp . The difference is that the port acts like a telnet server or client using telnet option negotiation. This will also allow you to send the MAGIC_SYSRQ sequence if you use a telnet that supports sending the break sequence. Typically in unix telnet you do it with Control-] and then type «send break» followed by pressing the enter key.
unix: path [,server][,nowait] A unix domain socket is used instead of a tcp socket. The option works the same as if you had specified -serial tcp except the unix domain socket path is used for connections.
mon: dev_string This is a special option to allow the monitor to be multiplexed onto another serial port. The monitor is accessed with key sequence of <Control-a> and then pressing <c>. See monitor access pcsys_keys in the -nographic section for more keys. dev_string should be any one of the serial devices specified above. An example to multiplex the monitor onto a telnet server listening on port 4444 would be: -serial mon:telnet::4444,server,nowait
braille Braille device. This will use BrlAPI to display the braille output on a real or fake device.
msmouse Three button serial mouse. Configure the guest to use Microsoft protocol.
-parallel dev Redirect the virtual parallel port to host device dev (same devices as the serial port). On Linux hosts, /dev/parportN can be used to use hardware devices connected on the corresponding host parallel port.
This option can be used several times to simulate up to 3 parallel ports.
Use -parallel none to disable all parallel ports.
-monitor dev Redirect the monitor to host device dev (same devices as the serial port). The default device is vc in graphical mode and stdio in non graphical mode.
-qmp dev Like -monitor but opens in ‘control’ mode.
-mon chardev=[name][,mode=readline|control][,default] Setup monitor on chardev name .
-debugcon dev Redirect the debug console to host device dev (same devices as the serial port). The debug console is an I/O port which is typically port 0xe9; writing to that I/O port sends output to this device. The default device is vc in graphical mode and stdio in non graphical mode.
-pidfile file Store the QEMU process PID in file . It is useful if you launch QEMU from a script.
-singlestep Run the emulation in single step mode.
-S Do not start CPU at startup (you must type ‘c’ in the monitor).
-gdb dev Wait for gdb connection on device dev (see gdb_usage). Typical connections will likely be TCP-based, but also UDP, pseudo TTY, or even stdio are reasonable use case. The latter is allowing to start QEMU from within gdb and establish the connection via a pipe:
-s Shorthand for -gdb tcp::1234, i.e. open a gdbserver on TCP port 1234 (see gdb_usage).
-d Output log in /tmp/qemu.log
-D logfile Output log in logfile instead of /tmp/qemu.log
-hdachs c , h , s ,[, t ] Force hard disk 0 physical geometry (1 <= c <= 16383, 1 <= h <= 16, 1 <= s <= 63) and optionally force the BIOS translation mode ( t =none, lba or auto). Usually QEMU can guess all those parameters. This option is useful for old MS-DOS disk images.
-L path Set the directory for the BIOS, VGA BIOS and keymaps.
-bios file Set the filename for the BIOS.
-enable-kvm Enable KVM full virtualization support. This option is only available if KVM support is enabled when compiling.
-xen-domid id Specify xen guest domain id (XEN only).
-xen-create Create domain using xen hypercalls, bypassing xend. Warning: should not be used when xend is in use (XEN only).
-xen-attach Attach to existing xen domain. xend will use this when starting QEMU (XEN only).
-no-reboot Exit instead of rebooting.
-no-shutdown Don’t exit QEMU on guest shutdown, but instead only stop the emulation. This allows for instance switching to monitor to commit changes to the disk image.
-loadvm file Start right away with a saved state ( loadvm in monitor)
-daemonize Daemonize the QEMU process after initialization. QEMU will not detach from standard IO until it is ready to receive connections on any of its devices. This option is a useful way for external programs to launch QEMU without having to cope with initialization race conditions.
-option-rom file Load the contents of file as an option ROM. This option is useful to load things like EtherBoot.
-clock method Force the use of the given methods for timer alarm. To see what timers are available use -clock help .
-rtc [base=utc|localtime| date ][,clock=host|vm][,driftfix=none|slew] Specify base as utc or localtime to let the RTC start at the current UTC or local time, respectively. localtime is required for correct date in MS-DOS or Windows. To start at a specific point in time, provide date in the format 2006-06-17T16:01:21 or 2006-06-17 . The default base is UTC.
By default the RTC is driven by the host system time. This allows to use the RTC as accurate reference clock inside the guest, specifically if the host time is smoothly following an accurate external reference clock, e.g. via NTP. If you want to isolate the guest time from the host, you can set clock to rt instead. To even prevent it from progressing during suspension, you can set it to vm .
Enable driftfix (i386 targets only) if you experience time drift problems, specifically with Windows’ ACPI HAL. This option will try to figure out how many timer interrupts were not processed by the Windows guest and will re-inject them.
-icount [ N |auto] Enable virtual instruction counter. The virtual cpu will execute one instruction every 2^ N ns of virtual time. If auto is specified then the virtual cpu speed will be automatically adjusted to keep virtual time within a few seconds of real time.
Note that while this option can give deterministic behavior, it does not provide cycle accurate emulation. Modern CPUs contain superscalar out of order cores with complex cache hierarchies. The number of instructions executed often has little or no correlation with actual performance.
-watchdog model Create a virtual hardware watchdog device. Once enabled (by a guest action), the watchdog must be periodically polled by an agent inside the guest or else the guest will be restarted.
The model is the model of hardware watchdog to emulate. Choices for model are: ib700 (iBASE 700) which is a very simple ISA watchdog with a single timer, or i6300esb (Intel 6300ESB I/O controller hub) which is a much more featureful PCI-based dual-timer watchdog. Choose a model for which your guest has drivers.
Use -watchdog help to list available hardware models. Only one watchdog can be enabled for a guest.
-watchdog-action action The action controls what QEMU will do when the watchdog timer expires. The default is reset (forcefully reset the guest). Other possible actions are: shutdown (attempt to gracefully shutdown the guest), poweroff (forcefully poweroff the guest), pause (pause the guest), debug (print a debug message and continue), or none (do nothing).
Note that the shutdown action requires that the guest responds to ACPI signals, which it may not be able to do in the sort of situations where the watchdog would have expired, and thus -watchdog-action shutdown is not recommended for production use.
Examples: -watchdog i6300esb -watchdog-action pause
-watchdog ib700
-echr numeric_ascii_value Change the escape character used for switching to the monitor when using monitor and serial sharing. The default is 0x01 when using the -nographic option. 0x01 is equal to pressing Control-a . You can select a different character from the ascii control keys where 1 through 26 map to Control-a through Control-z. For instance you could use the either of the following to change the escape character to Control-t. -echr 0x14
-echr 20
-virtioconsole c Set virtio console.
This option is maintained for backward compatibility.
Please use -device virtconsole for the new way of invocation.
-show-cursor Show cursor.
-tb-size n Set TB size.
-incoming port Prepare for incoming migration, listen on port .
-nodefaults Don’t create default devices. Normally, QEMU sets the default devices like serial port, parallel port, virtual console, monitor device, VGA adapter, floppy and CD-ROM drive and others. The -nodefaults option will disable all those default devices.
-chroot dir Immediately before starting guest execution, chroot to the specified directory. Especially useful in combination with -runas. This option is not supported for Windows hosts.
-runas user Immediately before starting guest execution, drop root privileges, switching to the specified user.
-prom-env variable = value Set OpenBIOS nvram variable to given value (PPC, SPARC only).
-semihosting Semihosting mode (ARM, M68K, Xtensa only).
-old-param Old param mode (ARM only).
-sandbox Enable Seccomp mode 2 system call filter. ‘on’ will enable syscall filtering and ‘off’ will disable it. The default is ‘off’.
-readconfig file Read device configuration from file . This approach is useful when you want to spawn QEMU process with many command line options but you don’t want to exceed the command line character limit.
-writeconfig file Write device configuration to file . The file can be either filename to save command line and device configuration into file or dash — ) character to print the output to stdout. This can be later used as input file for -readconfig option.
-nodefconfig Normally QEMU loads configuration files from sysconfdir and datadir at startup. The -nodefconfig option will prevent QEMU from loading any of those config files.
-no-user-config The -no-user-config option makes QEMU not load any of the user-provided config files on sysconfdir , but won’t make it skip the QEMU-provided config files from datadir .
-trace-unassigned Trace unassigned memory or i/o accesses to stderr.
-trace [events= file ][,file= file ] Specify tracing options. events= file Immediately enable events listed in file . The file must contain one event name (as listed in the trace-events file) per line. This option is only available if QEMU has been compiled with either simple or stderr tracing backend.
file= file Log output traces to file .
This option is only available if QEMU has been compiled with the simple tracing backend.
-enable-fips Enable FIPS 140-2 compliance mode.
3.4 Keys
During the graphical emulation, you can use special key combinations to change modes. The default key mappings are shown below, but if you use -alt-grab then the modifier is Ctrl-Alt-Shift (instead of Ctrl-Alt) and if you use -ctrl-grab then the modifier is the right Ctrl key (instead of Ctrl-Alt): <Ctrl-Alt-f> Toggle full screen
<Ctrl-Alt-+> Enlarge the screen
<Ctrl-Alt–> Shrink the screen
<Ctrl-Alt-u> Restore the screen’s un-scaled dimensions
<Ctrl-Alt-n> Switch to virtual console ‘n’. Standard console mappings are: 1 Target system display
2 Monitor
3 Serial port
<Ctrl-Alt> Toggle mouse and keyboard grab.
In the virtual consoles, you can use <Ctrl-Up>, <Ctrl-Down>, <Ctrl-PageUp> and <Ctrl-PageDown> to move in the back log.
During emulation, if you are using the -nographic option, use <Ctrl-a h> to get terminal commands: <Ctrl-a h>
<Ctrl-a ?> Print this help
<Ctrl-a x> Exit emulator
<Ctrl-a s> Save disk data back to file (if -snapshot)
<Ctrl-a t> Toggle console timestamps
<Ctrl-a b> Send break (magic sysrq in Linux)
<Ctrl-a c> Switch between console and monitor
<Ctrl-a Ctrl-a> Send Ctrl-a
3.5 QEMU Monitor
- Remove or insert removable media images (such as CD-ROM or floppies).
- Freeze/unfreeze the Virtual Machine (VM) and save or restore its state from a disk file.
- Inspect the VM state without an external debugger.
3.5.1 Commands
The following commands are available: help or ? [ cmd ] Show the help for all commands or just for command cmd .
commit Commit changes to the disk images (if -snapshot is used) or backing files.
q or quit Quit the emulator.
block_resize Resize a block image while a guest is running. Usually requires guest action to see the updated size. Resize to a lower size is supported, but should be used with extreme caution. Note that this command only resizes image files, it can not resize block devices like LVM volumes.
block_stream Copy data from a backing file into a block device.
block_job_set_speed Set maximum speed for a background block operation.
block_job_cancel Stop an active background block operation (streaming, mirroring).
block_job_complete Manually trigger completion of an active background block operation. For mirroring, this will switch the device to the destination path.
block_job_pause Pause an active block streaming operation.
block_job_resume Resume a paused block streaming operation.
eject [-f] device Eject a removable medium (use -f to force it).
drive_del device Remove host block device. The result is that guest generated IO is no longer submitted against the host device underlying the disk. Once a drive has been deleted, the QEMU Block layer returns -EIO which results in IO errors in the guest for applications that are reading/writing to the device.
change device setting Change the configuration of a device. change diskdevice filename [ format ] Change the medium for a removable disk device to point to filename . eg
format is optional.
change vnc display , options Change the configuration of the VNC server. The valid syntax for display and options are described at sec_invocation. eg
change vnc password [ password ] Change the password associated with the VNC server. If the new password is not supplied, the monitor will prompt for it to be entered. VNC passwords are only significant up to 8 letters. eg
screendump filename Save screen into PPM image filename .
logfile filename Output logs to filename .
trace-event changes status of a trace event
trace-file on|off|flush Open, close, or flush the trace file. If no argument is given, the status of the trace file is displayed.
log item1 [. ] Activate logging of the specified items to /tmp/qemu.log .
savevm [ tag | id ] Create a snapshot of the whole virtual machine. If tag is provided, it is used as human readable identifier. If there is already a snapshot with the same tag or ID, it is replaced. More info at vm_snapshots.
loadvm tag | id Set the whole virtual machine to the snapshot identified by the tag tag or the unique snapshot ID id .
delvm tag | id Delete the snapshot identified by tag or id .
singlestep [off] Run the emulation in single step mode. If called with option off, the emulation returns to normal mode.
stop Stop emulation.
c or cont Resume emulation.
system_wakeup Wakeup guest from suspend.
gdbserver [ port ] Start gdbserver session (default port =1234)
x/fmt addr Virtual memory dump starting at addr .
xp / fmt addr Physical memory dump starting at addr .
fmt is a format which tells the command how to format the data. Its syntax is: /
format can be x (hex), d (signed decimal), u (unsigned decimal), o (octal), c (char) or i (asm instruction).
size can be b (8 bits), h (16 bits), w (32 bits) or g (64 bits). On x86, h or w can be specified with the i format to respectively select 16 or 32 bit code instruction size.
- Dump 10 instructions at the current instruction pointer:
- Dump 80 16 bit values at the start of the video memory.
This command is useful to send keys that your graphical user interface intercepts at low level, such as ctrl-alt-f1 in X Window.
system_reset Reset the system.
system_powerdown Power down the system (if supported).
sum addr size Compute the checksum of a memory region.
usb_add devname Add the USB device devname . For details of available devices see usb_devices
usb_del devname Remove the USB device devname from the QEMU virtual USB hub. devname has the syntax bus.addr . Use the monitor command info usb to see the devices you can remove.
device_add config Add device.
device_del id Remove device id .
cpu index Set the default CPU.
mouse_move dx dy [ dz ] Move the active mouse to the specified coordinates dx dy with optional scroll axis dz .
mouse_button val Change the active mouse button state val (1=L, 2=M, 4=R).
mouse_set index Set which mouse device receives events at given index , index can be obtained with
wavcapture filename [ frequency [ bits [ channels ]]] Capture audio into filename . Using sample rate frequency bits per sample bits and number of channels channels .
- Sample rate = 44100 Hz — CD quality
- Bits = 16
- Number of channels = 2 — Stereo
The values that can be specified here depend on the machine type, but are the same that can be specified in the -boot command line option.
nmi cpu Inject an NMI on the given CPU (x86 only).
migrate [-d] [-b] [-i] uri Migrate to uri (using -d to not wait for completion). -b for migration with full copy of disk -i for migration with incremental copy of disk (base image is shared)
migrate_cancel Cancel the current VM migration.
migrate_set_cache_size value Set cache size to value (in bytes) for xbzrle migrations.
migrate_set_speed value Set maximum speed to value (in bytes) for migrations.
migrate_set_downtime second Set maximum tolerated downtime (in seconds) for migration.
migrate_set_capability capability state Enable/Disable the usage of a capability capability for migration.
client_migrate_info protocol hostname port tls-port cert-subject Set the spice/vnc connection info for the migration target. The spice/vnc server will ask the spice/vnc client to automatically reconnect using the new parameters (if specified) once the vm migration finished successfully.
dump-guest-memory [-p] protocol begin length Dump guest memory to protocol . The file can be processed with crash or gdb. filename: dump file name paging: do paging to get guest’s memory mapping begin: the starting physical address. It’s optional, and should be specified with length together. length: the memory size, in bytes. It’s optional, and should be specified with begin together.
snapshot_blkdev Snapshot device, using snapshot file as target if provided
drive_mirror Start mirroring a block device’s writes to a new destination, using the specified target.
drive_add Add drive to PCI storage controller.
pci_add Hot-add PCI device.
pci_del Hot remove PCI device.
pcie_aer_inject_error Inject PCIe AER error
host_net_add Add host VLAN client.
host_net_remove Remove host VLAN client.
netdev_add Add host network device.
netdev_del Remove host network device.
hostfwd_add Redirect TCP or UDP connections from host to guest (requires -net user).
hostfwd_remove Remove host-to-guest TCP or UDP redirection.
balloon value Request VM to change its memory allocation to value (in MB).
set_link name [on|off] Switch link name on (i.e. up) or off (i.e. down).
watchdog_action Change watchdog action.
acl_show aclname List all the matching rules in the access control list, and the default policy. There are currently two named access control lists, vnc.x509dname and vnc.username matching on the x509 client certificate distinguished name, and SASL username respectively.
acl_policy aclname allow|deny Set the default access control list policy, used in the event that none of the explicit rules match. The default policy at startup is always deny .
acl_add aclname match allow|deny [ index ] Add a match rule to the access control list, allowing or denying access. The match will normally be an exact username or x509 distinguished name, but can optionally include wildcard globs. eg *@EXAMPLE.COM to allow all users in the EXAMPLE.COM kerberos realm. The match will normally be appended to the end of the ACL, but can be inserted earlier in the list if the optional index parameter is supplied.
acl_remove aclname match Remove the specified match rule from the access control list.
acl_reset aclname Remove all matches from the access control list, and set the default policy back to deny .
nbd_server_start host : port Start an NBD server on the given host and/or port. If the -a option is included, all of the virtual machine’s block devices that have an inserted media on them are automatically exported; in this case, the -w option makes the devices writable too.
nbd_server_add device Export a block device through QEMU’s NBD server, which must be started beforehand with nbd_server_start . The -w option makes the exported device writable too.
nbd_server_stop Stop the QEMU embedded NBD server.
mce cpu bank status mcgstatus addr misc Inject an MCE on the given CPU (x86 only).
getfd fdname If a file descriptor is passed alongside this command using the SCM_RIGHTS mechanism on unix sockets, it is stored using the name fdname for later use by other monitor commands.
closefd fdname Close the file descriptor previously assigned to fdname using the getfd command. This is only needed if the file descriptor was never used by another monitor command.
block_set_io_throttle device bps bps_rd bps_wr iops iops_rd iops_wr Change I/O throttle limits for a block drive to bps bps_rd bps_wr iops iops_rd iops_wr
block_passwd device password Set the encrypted device device password to password
set_password [ vnc | spice ] password [ action-if-connected ] Change spice/vnc password. Use zero to make the password stay valid forever. action-if-connected specifies what should happen in case a connection is established: fail makes the password change fail. disconnect changes the password and disconnects the client. keep changes the password and keeps the connection up. keep is the default.
expire_password [ vnc | spice ] expire-time Specify when a password for spice/vnc becomes invalid. expire-time accepts: now Invalidate password instantly.
never Password stays valid forever.
+nsec Password stays valid for nsec seconds starting now.
nsec Password is invalidated at the given time. nsec are the seconds passed since 1970, i.e. unix epoch.
info subcommand Show various information about the system state. info version show the version of QEMU
info network show the various VLANs and the associated devices
info chardev show the character devices
info block show the block devices
info blockstats show block device statistics
info registers show the cpu registers
info cpus show infos for each CPU
info history show the command line history
info irq show the interrupts statistics (if available)
info pic show i8259 (PIC) state
info pci show emulated PCI device info
info tlb show virtual to physical memory mappings (i386, SH4, SPARC, PPC, and Xtensa only)
info mem show the active virtual memory mappings (i386 only)
info jit show dynamic compiler info
info numa show NUMA information
info kvm show KVM information
info usb show USB devices plugged on the virtual USB hub
info usbhost show all USB host devices
info profile show profiling information
info capture show information about active capturing
info snapshots show list of VM snapshots
info status show the current VM status (running|paused)
info pcmcia show guest PCMCIA status
info mice show which guest mouse is receiving events
info vnc show the vnc server status
info name show the current VM name
info uuid show the current VM UUID
info cpustats show CPU statistics
info usernet show user network stack connection states
info migrate show migration status
info migrate_capabilities show current migration capabilities
info migrate_cache_size show current migration XBZRLE cache size
info balloon show balloon information
info qtree show device tree
info qdm show qdev device model list
info roms show roms
info trace-events show available trace events and their state
3.5.2 Integer expressions
The monitor understands integers expressions for every integer argument. You can use register names to get the value of specifics CPU registers by prefixing them with $.
3.6 Disk Images
Since version 0.6.1, QEMU supports many disk image formats, including growable disk images (their size increase as non empty sectors are written), compressed and encrypted disk images. Version 0.8.3 added the new qcow2 disk image format which is essential to support VM snapshots.
3.6.1 Quick start for disk image creation
You can create a disk image with the command:
where myimage.img is the disk image filename and mysize is its size in kilobytes. You can add an M suffix to give the size in megabytes and a G suffix for gigabytes.
See qemu_img_invocation for more information.
3.6.2 Snapshot mode
If you use the option -snapshot , all disk images are considered as read only. When sectors in written, they are written in a temporary file created in /tmp . You can however force the write back to the raw disk images by using the commit monitor command (or <C-a s> in the serial console).
3.6.3 VM snapshots
VM snapshots are snapshots of the complete virtual machine including CPU state, RAM, device state and the content of all the writable disks. In order to use VM snapshots, you must have at least one non removable and writable block device using the qcow2 disk image format. Normally this device is the first virtual hard drive.
Use the monitor command savevm to create a new VM snapshot or replace an existing one. A human readable name can be assigned to each snapshot in addition to its numerical ID.
Use loadvm to restore a VM snapshot and delvm to remove a VM snapshot. info snapshots lists the available snapshots with their associated information:
A VM snapshot is made of a VM state info (its size is shown in info snapshots ) and a snapshot of every writable disk image. The VM state info is stored in the first qcow2 non removable and writable block device. The disk image snapshots are stored in every disk image. The size of a snapshot in a disk image is difficult to evaluate and is not shown by info snapshots because the associated disk sectors are shared among all the snapshots to save disk space (otherwise each snapshot would need a full copy of all the disk images).
When using the (unrelated) -snapshot option (disk_images_snapshot_mode), you can always make VM snapshots, but they are deleted as soon as you exit QEMU.
- They cannot cope with removable devices if they are removed or inserted after a snapshot is done.
- A few device drivers still have incomplete snapshot support so their state is not saved or restored properly (in particular USB).
3.6.4 qemu-img Invocation
qemu-img allows you to create, convert and modify images offline. It can handle all image formats supported by QEMU.
Warning: Never use qemu-img to modify images in use by a running virtual machine or any other process; this may destroy the image. Also, be aware that querying an image that is being modified by another process may encounter inconsistent state.
The following commands are supported: check [-f fmt ] [-r [leaks | all]] filename
create [-f fmt ] [-o options ] filename [ size ]
commit [-f fmt ] [-t cache ] filename
convert [-c] [-p] [-f fmt ] [-t cache ] [-O output_fmt ] [-o options ] [-s snapshot_name ] [-S sparse_size ] filename [ filename2 [. ]] output_filename
info [-f fmt ] [—output= ofmt ] [—backing-chain] filename
update [-f fmt ] filename [ attr1=val1 attr2=val2 . ]»)
snapshot [-l | -a snapshot | -c snapshot | -d snapshot ] filename
rebase [-f fmt ] [-t cache ] [-p] [-u] -b backing_file [-F backing_fmt ] filename
resize filename [+ | -] size
Command parameters: filename is a disk image filename
fmt is the disk image format. It is guessed automatically in most cases. See below for a description of the supported disk formats.
–backing-chain will enumerate information about backing files in a disk image chain. Refer below for further description.
size is the disk image size in bytes. Optional suffixes k or K (kilobyte, 1024) M (megabyte, 1024k) and G (gigabyte, 1024M) and T (terabyte, 1024G) are supported. b is ignored.
output_filename is the destination disk image filename
output_fmt is the destination format
options is a comma separated list of format specific options in a name=value format. Use -o ? for an overview of the options supported by the used format or see the format descriptions below for details.
-c indicates that target image must be compressed (qcow format only)
-h with or without a command shows help and lists the supported formats
-p display progress bar (convert and rebase commands only)
-S size indicates the consecutive number of bytes that must contain only zeros for qemu-img to create a sparse image during conversion. This value is rounded down to the nearest 512 bytes. You may use the common size suffixes like k for kilobytes.
-t cache specifies the cache mode that should be used with the (destination) file. See the documentation of the emulator’s -drive cache=. option for allowed values.
Parameters to snapshot subcommand: snapshot is the name of the snapshot to create, apply or delete
-a applies a snapshot (revert disk to saved state)
-c creates a snapshot
-d deletes a snapshot
-l lists all snapshots in the given image
Command description: check [-f fmt ] [-r [leaks | all]] filename Perform a consistency check on the disk image filename .
If -r is specified, qemu-img tries to repair any inconsistencies found during the check. -r leaks repairs only cluster leaks, whereas -r all fixes all kinds of errors, with a higher risk of choosing the wrong fix or hiding corruption that has already occurred.
Only the formats qcow2 , qed and vdi support consistency checks.
create [-f fmt ] [-o options ] filename [ size ] Create the new disk image filename of size size and format fmt . Depending on the file format, you can add one or more options that enable additional features of this format.
If the option backing_file is specified, then the image will record only the differences from backing_file . No size needs to be specified in this case. backing_file will never be modified unless you use the commit monitor command (or qemu-img commit).
The size can also be specified using the size option with -o , it doesn’t need to be specified separately in this case.
commit [-f fmt ] [-t cache ] filename Commit the changes recorded in filename in its base image.
convert [-c] [-p] [-f fmt ] [-t cache ] [-O output_fmt ] [-o options ] [-s snapshot_name ] [-S sparse_size ] filename [ filename2 [. ]] output_filename Convert the disk image filename or a snapshot snapshot_name to disk image output_filename using format output_fmt . It can be optionally compressed ( -c option) or use any format specific options like encryption ( -o option).
Only the formats qcow and qcow2 support compression. The compression is read-only. It means that if a compressed sector is rewritten, then it is rewritten as uncompressed data.
Image conversion is also useful to get smaller image when using a growable format such as qcow or cow : the empty sectors are detected and suppressed from the destination image.
You can use the backing_file option to force the output image to be created as a copy on write image of the specified base image; the backing_file should have the same content as the input’s base image, however the path, image format, etc may differ.
info [-f fmt ] [—output= ofmt ] [—backing-chain] filename Give information about the disk image filename . Use it in particular to know the size reserved on disk which can be different from the displayed size. If VM snapshots are stored in the disk image, they are displayed too. The command can output in the format ofmt which is either human or json .
If a disk image has a backing file chain, information about each disk image in the chain can be recursively enumerated by using the option —backing-chain .
For instance, if you have an image chain like:
To enumerate information about each disk image in the above chain, starting from top to base, do:
snapshot [-l | -a snapshot | -c snapshot | -d snapshot ] filename List, apply, create or delete snapshots in image filename .
rebase [-f fmt ] [-t cache ] [-p] [-u] -b backing_file [-F backing_fmt ] filename Changes the backing file of an image. Only the formats qcow2 and qed support changing the backing file.
The backing file is changed to backing_file and (if the image format of filename supports this) the backing file format is changed to backing_fmt . If backing_file is specified as “” (the empty string), then the image is rebased onto no backing file (i.e. it will exist independently of any backing file).
There are two different modes in which rebase can operate: Safe mode This is the default mode and performs a real rebase operation. The new backing file may differ from the old one and qemu-img rebase will take care of keeping the guest-visible content of filename unchanged.
In order to achieve this, any clusters that differ between backing_file and the old backing file of filename are merged into filename before actually changing the backing file.
Note that the safe mode is an expensive operation, comparable to converting an image. It only works if the old backing file still exists.
Unsafe mode qemu-img uses the unsafe mode if -u is specified. In this mode, only the backing file name and format of filename is changed without any checks on the file contents. The user must take care of specifying the correct new backing file, or the guest-visible content of the image will be corrupted.
This mode is useful for renaming or moving the backing file to somewhere else. It can be used without an accessible old backing file, i.e. you can use it to fix an image whose backing file has already been moved/renamed.
You can use rebase to perform a “diff” operation on two disk images. This can be useful when you have copied or cloned a guest, and you want to get back to a thin image on top of a template or base image.
Say that base.img has been cloned as modified.img by copying it, and that the modified.img guest has run so there are now some changes compared to base.img . To construct a thin image called diff.qcow2 that contains just the differences, do:
At this point, modified.img can be discarded, since base.img + diff.qcow2 contains the same information.
resize filename [+ | -] size Change the disk image as if it had been created with size .
Before using this command to shrink a disk image, you MUST use file system and partitioning tools inside the VM to reduce allocated file systems and partition sizes accordingly. Failure to do so will result in data loss!
After using this command to grow a disk image, you must use file system and partitioning tools inside the VM to actually begin using the new space on the device.
3.6.5 qemu-nbd Invocation
Export QEMU disk image using NBD protocol. filename is a disk image filename
-p, —port= port port to listen on (default ‘ 1024 ’)
-o, —offset= offset offset into the image
-b, —bind= iface interface to bind to (default ‘ 0.0.0.0 ’)
-k, —socket= path Use a unix socket with path path
-r, —read-only export read-only
-P, —partition= num only expose partition num
-s, —snapshot use snapshot file
-n, —nocache disable host cache
-c, —connect= dev connect filename to NBD device dev
-d, —disconnect disconnect the specified device
-e, —shared= num device can be shared by num clients (default ‘ 1 ’)
-t, —persistent don’t exit on the last connection
-v, —verbose display extra debugging information
-h, —help display this help and exit
-V, —version output version information and exit
3.6.6 Disk image file formats
QEMU supports many image file formats that can be used with VMs as well as with any of the tools (like qemu-img ). This includes the preferred formats raw and qcow2 as well as formats that are supported for compatibility with older QEMU versions or other hypervisors.
Depending on the image format, different options can be passed to qemu-img create and qemu-img convert using the -o option. This section describes each format and the options that are supported for it. raw Raw disk image format. This format has the advantage of being simple and easily exportable to all other emulators. If your file system supports holes (for example in ext2 or ext3 on Linux or NTFS on Windows), then only the written sectors will reserve space. Use qemu-img info to know the real size used by the image or ls -ls on Unix/Linux.
qcow2 QEMU image format, the most versatile format. Use it to have smaller images (useful if your filesystem does not supports holes, for example on Windows), optional AES encryption, zlib based compression and support of multiple VM snapshots.
Supported options: compat Determines the qcow2 version to use. compat=0.10 uses the traditional image format that can be read by any QEMU since 0.10 (this is the default). compat=1.1 enables image format extensions that only QEMU 1.1 and newer understand. Amongst others, this includes zero clusters, which allow efficient copy-on-read for sparse images.
backing_file File name of a base image (see create subcommand)
backing_fmt Image format of the base image
encryption If this option is set to on , the image is encrypted.
Encryption uses the AES format which is very secure (128 bit keys). Use a long password (16 characters) to get maximum protection.
cluster_size Changes the qcow2 cluster size (must be between 512 and 2M). Smaller cluster sizes can improve the image file size whereas larger cluster sizes generally provide better performance.
preallocation Preallocation mode (allowed values: off, metadata). An image with preallocated metadata is initially larger but can improve performance when the image needs to grow.
lazy_refcounts If this option is set to on , reference count updates are postponed with the goal of avoiding metadata I/O and improving performance. This is particularly interesting with cache=writethrough which doesn’t batch metadata updates. The tradeoff is that after a host crash, the reference count tables must be rebuilt, i.e. on the next open an (automatic) qemu-img check -r all is required, which may take some time.
This option can only be enabled if compat=1.1 is specified.
qed Old QEMU image format with support for backing files and compact image files (when your filesystem or transport medium does not support holes).
When converting QED images to qcow2, you might want to consider using the lazy_refcounts=on option to get a more QED-like behaviour.
Supported options: backing_file File name of a base image (see create subcommand).
backing_fmt Image file format of backing file (optional). Useful if the format cannot be autodetected because it has no header, like some vhd/vpc files.
cluster_size Changes the cluster size (must be power-of-2 between 4K and 64K). Smaller cluster sizes can improve the image file size whereas larger cluster sizes generally provide better performance.
table_size Changes the number of clusters per L1/L2 table (must be power-of-2 between 1 and 16). There is normally no need to change this value but this option can be used for performance benchmarking.
qcow Old QEMU image format with support for backing files, compact image files, encryption and compression.
Supported options: backing_file File name of a base image (see create subcommand)
encryption If this option is set to on , the image is encrypted.
cow User Mode Linux Copy On Write image format. It is supported only for compatibility with previous versions. Supported options: backing_file File name of a base image (see create subcommand)
vdi VirtualBox 1.1 compatible image format. Supported options: static If this option is set to on , the image is created with metadata preallocation.
vmdk VMware 3 and 4 compatible image format.
Supported options: backing_file File name of a base image (see create subcommand).
compat6 Create a VMDK version 6 image (instead of version 4)
subformat Specifies which VMDK subformat to use. Valid options are monolithicSparse (default), monolithicFlat , twoGbMaxExtentSparse , twoGbMaxExtentFlat and streamOptimized .
vpc VirtualPC compatible image format (VHD). Supported options: subformat Specifies which VHD subformat to use. Valid options are dynamic (default) and fixed .
3.6.6.1 Read-only formats
More disk image file formats are supported in a read-only mode. bochs Bochs images of growing type.
cloop Linux Compressed Loop image, useful only to reuse directly compressed CD-ROM images present for example in the Knoppix CD-ROMs.
dmg Apple disk image.
parallels Parallels disk image format.
3.6.7 Using host drives
In addition to disk image files, QEMU can directly access host devices. We describe here the usage for QEMU version >= 0.8.3.
3.6.7.1 Linux
On Linux, you can directly use the host device filename instead of a disk image filename provided you have enough privileges to access it. For example, use /dev/cdrom to access to the CDROM or /dev/fd0 for the floppy. CD You can specify a CDROM device even if no CDROM is loaded. QEMU has specific code to detect CDROM insertion or removal. CDROM ejection by the guest OS is supported. Currently only data CDs are supported.
Floppy You can specify a floppy device even if no floppy is loaded. Floppy removal is currently not detected accurately (if you change floppy without doing floppy access while the floppy is not loaded, the guest OS will think that the same floppy is loaded).
Hard disks Hard disks can be used. Normally you must specify the whole disk ( /dev/hdb instead of /dev/hdb1 ) so that the guest OS can see it as a partitioned disk. WARNING: unless you know what you do, it is better to only make READ-ONLY accesses to the hard disk otherwise you may corrupt your host data (use the -snapshot command line option or modify the device permissions accordingly).
3.6.7.2 Windows
Currently there is no specific code to handle removable media, so it is better to use the change or eject monitor commands to change or eject media.
Hard disks Hard disks can be used with the syntax: \\.\PhysicalDrive N where N is the drive number (0 is the first hard disk). /dev/hda is supported as an alias to the first hard disk drive \\.\PhysicalDrive0 .
WARNING: unless you know what you do, it is better to only make READ-ONLY accesses to the hard disk otherwise you may corrupt your host data (use the -snapshot command line so that the modifications are written in a temporary file).
3.6.7.3 Mac OS X
/dev/cdrom is an alias to the first CDROM.
Currently there is no specific code to handle removable media, so it is better to use the change or eject monitor commands to change or eject media.
3.6.8 Virtual FAT disk images
QEMU can automatically create a virtual FAT disk image from a directory tree. In order to use it, just type:
Then you access access to all the files in the /my_directory directory without having to copy them in a disk image or to export them via SAMBA or NFS. The default access is read-only.
Floppies can be emulated with the :floppy: option:
A read/write support is available for testing (beta stage) with the :rw: option:
- use non-ASCII filenames ;
- use «-snapshot» together with «:rw:» ;
- expect it to work when loadvm’ing ;
- write to the FAT directory on the host system while accessing it with the guest system.
3.6.9 NBD access
QEMU can access directly to block device exported using the Network Block Device protocol.
If the NBD server is located on the same host, you can use an unix socket instead of an inet socket:
In this case, the block device must be exported using qemu-nbd:
The use of qemu-nbd allows to share a disk between several guests:
and then you can use it with two guests:
If the nbd-server uses named exports (supported since NBD 2.9.18, or with QEMU’s own embedded NBD server), you must specify an export name in the URI:
The URI syntax for NBD is supported since QEMU 1.3. An alternative syntax is also available. Here are some example of the older syntax:
3.6.10 Sheepdog disk images
Sheepdog is a distributed storage system for QEMU. It provides highly available block level storage volumes that can be attached to QEMU-based virtual machines.
You can create a Sheepdog disk image with the command:
where image is the Sheepdog image name and size is its size.
To import the existing filename to Sheepdog, you can use a convert command.
You can boot from the Sheepdog disk image with the command:
You can also create a snapshot of the Sheepdog image like qcow2.
where tag is a tag name of the newly created snapshot.
To boot from the Sheepdog snapshot, specify the tag name of the snapshot.
You can create a cloned image from the existing snapshot.
where base is a image name of the source snapshot and tag is its tag name.
If the Sheepdog daemon doesn’t run on the local host, you need to specify one of the Sheepdog servers to connect to.
3.6.11 iSCSI LUNs
iSCSI is a popular protocol used to access SCSI devices across a computer network.
There are two different ways iSCSI devices can be used by QEMU.
The first method is to mount the iSCSI LUN on the host, and make it appear as any other ordinary SCSI device on the host and then to access this device as a /dev/sd device from QEMU. How to do this differs between host OSes.
The second method involves using the iSCSI initiator that is built into QEMU. This provides a mechanism that works the same way regardless of which host OS you are running QEMU on. This section will describe this second method of using iSCSI together with QEMU.
In QEMU, iSCSI devices are described using special iSCSI URLs
Username and password are optional and only used if your target is set up using CHAP authentication for access control. Alternatively the username and password can also be set via environment variables to have these not show up in the process list
Various session related parameters can be set via special options, either in a configuration file provided via ‘-readconfig’ or directly on the command line.
If the initiator-name is not specified qemu will use a default name of ‘iqn.2008-11.org.linux-kvm[:<name>’] where <name> is the name of the virtual machine.
These can also be set via a configuration file
Setting the target name allows different options for different targets
Howto use a configuration file to set iSCSI configuration options:
Howto set up a simple iSCSI target on loopback and accessing it via QEMU:
3.6.12 GlusterFS disk images
GlusterFS is an user space distributed file system.
You can boot from the GlusterFS disk image with the command:
gluster is the protocol.
transport specifies the transport type used to connect to gluster management daemon (glusterd). Valid transport types are tcp, unix and rdma. If a transport type isn’t specified, then tcp type is assumed.
server specifies the server where the volume file specification for the given volume resides. This can be either hostname, ipv4 address or ipv6 address. ipv6 address needs to be within square brackets [ ]. If transport type is unix, then server field should not be specifed. Instead socket field needs to be populated with the path to unix domain socket.
port is the port number on which glusterd is listening. This is optional and if not specified, QEMU will send 0 which will make gluster to use the default port. If the transport type is unix, then port should not be specified.
volname is the name of the gluster volume which contains the disk image.
image is the path to the actual disk image that resides on gluster volume.
You can create a GlusterFS disk image with the command:
3.7 Network emulation
QEMU can simulate several network cards (PCI or ISA cards on the PC target) and can connect them to an arbitrary number of Virtual Local Area Networks (VLANs). Host TAP devices can be connected to any QEMU VLAN. VLAN can be connected between separate instances of QEMU to simulate large networks. For simpler usage, a non privileged user mode network stack can replace the TAP device to have a basic network connection.
3.7.1 VLANs
QEMU simulates several VLANs. A VLAN can be symbolised as a virtual connection between several network devices. These devices can be for example QEMU virtual Ethernet cards or virtual Host ethernet devices (TAP devices).
3.7.2 Using TAP network interfaces
This is the standard way to connect QEMU to a real network. QEMU adds a virtual network device on your host (called tapN ), and you can then configure it as if it was a real ethernet card.
3.7.2.1 Linux host
As an example, you can download the linux-test-xxx.tar.gz archive and copy the script qemu-ifup in /etc and configure properly sudo so that the command ifconfig contained in qemu-ifup can be executed as root. You must verify that your host kernel supports the TAP network interfaces: the device /dev/net/tun must be present.
See sec_invocation to have examples of command lines using the TAP network interfaces.
3.7.2.2 Windows host
There is a virtual ethernet driver for Windows 2000/XP systems, called TAP-Win32. But it is not included in standard QEMU for Windows, so you will need to get it separately. It is part of OpenVPN package, so download OpenVPN from : http://openvpn.net/.
3.7.3 Using the user mode network stack
By using the option -net user (default configuration if no -net option is specified), QEMU uses a completely user mode network stack (you don’t need root privilege to use the virtual network). The virtual network configuration is the following:
The QEMU VM behaves as if it was behind a firewall which blocks all incoming connections. You can use a DHCP client to automatically configure the network in the QEMU VM. The DHCP server assign addresses to the hosts starting from 10.0.2.15.
In order to check that the user mode network is working, you can ping the address 10.0.2.2 and verify that you got an address in the range 10.0.2.x from the QEMU virtual DHCP server.
Note that ping is not supported reliably to the internet as it would require root privileges. It means you can only ping the local router (10.0.2.2).
When using the built-in TFTP server, the router is also the TFTP server.
When using the -redir option, TCP or UDP connections can be redirected from the host to the guest. It allows for example to redirect X11, telnet or SSH connections.
3.7.4 Connecting VLANs between QEMU instances
Using the -net socket option, it is possible to make VLANs that span several QEMU instances. See sec_invocation to have a basic example.
3.8 Other Devices
3.8.1 Inter-VM Shared Memory device
With KVM enabled on a Linux host, a shared memory device is available. Guests map a POSIX shared memory region into the guest as a PCI device that enables zero-copy communication to the application level of the guests. The basic syntax is:
If desired, interrupts can be sent between guest VMs accessing the same shared memory region. Interrupt support requires using a shared memory server and using a chardev socket to connect to it. The code for the shared memory server is qemu.git/contrib/ivshmem-server. An example syntax when using the shared memory server is:
When using the server, the guest will be assigned a VM ID (>=0) that allows guests using the same server to communicate via interrupts. Guests can read their VM ID from a device register (see example code). Since receiving the shared memory region from the server is asynchronous, there is a (small) chance the guest may boot before the shared memory is attached. To allow an application to ensure shared memory is attached, the VM ID register will return -1 (an invalid VM ID) until the memory is attached. Once the shared memory is attached, the VM ID will return the guest’s valid VM ID. With these semantics, the guest application can check to ensure the shared memory is attached to the guest before proceeding.
The role argument can be set to either master or peer and will affect how the shared memory is migrated. With role=master , the guest will copy the shared memory on migration to the destination host. With role=peer , the guest will not be able to migrate with the device attached. With the peer case, the device should be detached and then reattached after migration using the PCI hotplug support.
3.9 Direct Linux Boot
This section explains how to launch a Linux kernel inside QEMU without having to make a full bootable image. It is very useful for fast Linux kernel testing.
Use -kernel to provide the Linux kernel image and -append to give the kernel command line arguments. The -initrd option can be used to provide an INITRD image.
When using the direct Linux boot, a disk image for the first hard disk hda is required because its boot sector is used to launch the Linux kernel.
If you do not need graphical output, you can disable it and redirect the virtual serial port and the QEMU monitor to the console with the -nographic option. The typical command line is:
Use <Ctrl-a c> to switch between the serial console and the monitor (see pcsys_keys).
3.10 USB emulation
QEMU emulates a PCI UHCI USB controller. You can virtually plug virtual USB devices or real host USB devices (experimental, works only on Linux hosts). QEMU will automatically create and connect virtual USB hubs as necessary to connect multiple USB devices.
3.10.1 Connecting USB devices
USB devices can be connected with the -usbdevice commandline option or the usb_add monitor command. Available devices are: mouse Virtual Mouse. This will override the PS/2 mouse emulation when activated.
tablet Pointer device that uses absolute coordinates (like a touchscreen). This means QEMU is able to report the mouse position without having to grab the mouse. Also overrides the PS/2 mouse emulation when activated.
disk: file Mass storage device based on file (see disk_images)
host: bus.addr Pass through the host device identified by bus.addr (Linux only)
host: vendor_id:product_id Pass through the host device identified by vendor_id:product_id (Linux only)
wacom-tablet Virtual Wacom PenPartner tablet. This device is similar to the tablet above but it can be used with the tslib library because in addition to touch coordinates it reports touch pressure.
keyboard Standard USB keyboard. Will override the PS/2 keyboard (if present).
serial:[vendorid= vendor_id ][,product_id= product_id ]: dev Serial converter. This emulates an FTDI FT232BM chip connected to host character device dev . The available character devices are the same as for the -serial option. The vendorid and productid options can be used to override the default 0403:6001. For instance,
will connect to tcp port 4444 of ip 192.168.0.2, and plug that to the virtual serial converter, faking a Matrix Orbital LCD Display (USB ID 0403:FA00).
braille Braille device. This will use BrlAPI to display the braille output on a real or fake device.
net: options Network adapter that supports CDC ethernet and RNDIS protocols. options specifies NIC options as with -net nic, options (see description). For instance, user-mode networking can be used with
Currently this cannot be used in machines that support PCI NICs.
bt[: hci-type ] Bluetooth dongle whose type is specified in the same format as with the -bt hci option, see allowed HCI types. If no type is given, the HCI logic corresponds to -bt hci,vlan=0 . This USB device implements the USB Transport Layer of HCI. Example usage:
3.10.2 Using host USB devices on a Linux host
- If you use an early Linux 2.4 kernel, verify that no Linux driver is actually using the USB device. A simple way to do that is simply to disable the corresponding kernel module by renaming it from mydriver.o to mydriver.o.disabled .
- Verify that /proc/bus/usb is working (most Linux distributions should enable it by default). You should see something like that:
- Since only root can access to the USB devices directly, you can either launch QEMU as root or change the permissions of the USB devices you want to use. For testing, the following suffices:
- Launch QEMU and do in the monitor:
When relaunching QEMU, you may have to unplug and plug again the USB device to make it work again (this is a bug).
3.11 VNC security
The VNC server capability provides access to the graphical console of the guest VM across the network. This has a number of security considerations depending on the deployment scenarios.
3.11.1 Without passwords
The simplest VNC server setup does not include any form of authentication. For this setup it is recommended to restrict it to listen on a UNIX domain socket only. For example
This ensures that only users on local box with read/write access to that path can access the VNC server. To securely access the VNC server from a remote machine, a combination of netcat+ssh can be used to provide a secure tunnel.
3.11.2 With passwords
The VNC protocol has limited support for password based authentication. Since the protocol limits passwords to 8 characters it should not be considered to provide high security. The password can be fairly easily brute-forced by a client making repeat connections. For this reason, a VNC server using password authentication should be restricted to only listen on the loopback interface or UNIX domain sockets. Password authentication is not supported when operating in FIPS 140-2 compliance mode as it requires the use of the DES cipher. Password authentication is requested with the password option, and then once QEMU is running the password is set with the monitor. Until the monitor is used to set the password all clients will be rejected.
3.11.3 With x509 certificates
The QEMU VNC server also implements the VeNCrypt extension allowing use of TLS for encryption of the session, and x509 certificates for authentication. The use of x509 certificates is strongly recommended, because TLS on its own is susceptible to man-in-the-middle attacks. Basic x509 certificate support provides a secure session, but no authentication. This allows any client to connect, and provides an encrypted session.
In the above example /etc/pki/qemu should contain at least three files, ca-cert.pem , server-cert.pem and server-key.pem . Unprivileged users will want to use a private directory, for example $HOME/.pki/qemu . NB the server-key.pem file should be protected with file mode 0600 to only be readable by the user owning it.
3.11.4 With x509 certificates and client verification
Certificates can also provide a means to authenticate the client connecting. The server will request that the client provide a certificate, which it will then validate against the CA certificate. This is a good choice if deploying in an environment with a private internal certificate authority.
3.11.5 With x509 certificates, client verification and passwords
Finally, the previous method can be combined with VNC password authentication to provide two layers of authentication for clients.
3.11.6 With SASL authentication
The SASL authentication method is a VNC extension, that provides an easily extendable, pluggable authentication method. This allows for integration with a wide range of authentication mechanisms, such as PAM, GSSAPI/Kerberos, LDAP, SQL databases, one-time keys and more. The strength of the authentication depends on the exact mechanism configured. If the chosen mechanism also provides a SSF layer, then it will encrypt the datastream as well.
Refer to the later docs on how to choose the exact SASL mechanism used for authentication, but assuming use of one supporting SSF, then QEMU can be launched with:
3.11.7 With x509 certificates and SASL authentication
If the desired SASL authentication mechanism does not supported SSF layers, then it is strongly advised to run it in combination with TLS and x509 certificates. This provides securely encrypted data stream, avoiding risk of compromising of the security credentials. This can be enabled, by combining the ‘sasl’ option with the aforementioned TLS + x509 options:
3.11.8 Generating certificates for VNC
The GNU TLS packages provides a command called certtool which can be used to generate certificates and keys in PEM format. At a minimum it is necessary to setup a certificate authority, and issue certificates to each server. If using certificates for authentication, then each client will also need to be issued a certificate. The recommendation is for the server to keep its certificates in either /etc/pki/qemu or for unprivileged users in $HOME/.pki/qemu .
3.11.8.1 Setup the Certificate Authority
This step only needs to be performed once per organization / organizational unit. First the CA needs a private key. This key must be kept VERY secret and secure. If this key is compromised the entire trust chain of the certificates issued with it is lost.
A CA needs to have a public certificate. For simplicity it can be a self-signed certificate, or one issue by a commercial certificate issuing authority. To generate a self-signed certificate requires one core piece of information, the name of the organization.
The ca-cert.pem file should be copied to all servers and clients wishing to utilize TLS support in the VNC server. The ca-key.pem must not be disclosed/copied at all.
3.11.8.2 Issuing server certificates
Each server (or host) needs to be issued with a key and certificate. When connecting the certificate is sent to the client which validates it against the CA certificate. The core piece of information for a server certificate is the hostname. This should be the fully qualified hostname that the client will connect with, since the client will typically also verify the hostname in the certificate. On the host holding the secure CA private key:
The server-key.pem and server-cert.pem files should now be securely copied to the server for which they were generated. The server-key.pem is security sensitive and should be kept protected with file mode 0600 to prevent disclosure.
3.11.8.3 Issuing client certificates
If the QEMU VNC server is to use the x509verify option to validate client certificates as its authentication mechanism, each client also needs to be issued a certificate. The client certificate contains enough metadata to uniquely identify the client, typically organization, state, city, building, etc. On the host holding the secure CA private key:
The client-key.pem and client-cert.pem files should now be securely copied to the client for which they were generated.
3.11.9 Configuring SASL mechanisms
The following documentation assumes use of the Cyrus SASL implementation on a Linux host, but the principals should apply to any other SASL impl. When SASL is enabled, the mechanism configuration will be loaded from system default SASL service config /etc/sasl2/qemu.conf. If running QEMU as an unprivileged user, an environment variable SASL_CONF_PATH can be used to make it search alternate locations for the service config.
The default configuration might contain
This says to use the ‘Digest MD5’ mechanism, which is similar to the HTTP Digest-MD5 mechanism. The list of valid usernames & passwords is maintained in the /etc/qemu/passwd.db file, and can be updated using the saslpasswd2 command. While this mechanism is easy to configure and use, it is not considered secure by modern standards, so only suitable for developers / ad-hoc testing.
A more serious deployment might use Kerberos, which is done with the ‘gssapi’ mechanism
For this to work the administrator of your KDC must generate a Kerberos principal for the server, with a name of ‘qemu/somehost.example.com@EXAMPLE.COM’ replacing ‘somehost.example.com’ with the fully qualified host name of the machine running QEMU, and ‘EXAMPLE.COM’ with the Kerberos Realm.
Other configurations will be left as an exercise for the reader. It should be noted that only Digest-MD5 and GSSAPI provides a SSF layer for data encryption. For all other mechanisms, VNC should always be configured to use TLS and x509 certificates to protect security credentials from snooping.
3.12 GDB usage
QEMU has a primitive support to work with gdb, so that you can do ‘Ctrl-C’ while the virtual machine is running and inspect its state.
In order to use gdb, launch QEMU with the ‘-s’ option. It will wait for a gdb connection:
Then launch gdb on the ‘vmlinux’ executable:
In gdb, connect to QEMU:
Then you can use gdb normally. For example, type ‘c’ to launch the kernel:
- Use info reg to display all the CPU registers.
- Use x/10i $eip to display the code at the PC position.
- Use set architecture i8086 to dump 16 bit code. Then use x/10i $cs*16+$eip to dump the code at the PC position.
Advanced debugging options:
The default single stepping behavior is step with the IRQs and timer service routines off. It is set this way because when gdb executes a single step it expects to advance beyond the current instruction. With the IRQs and and timer service routines on, a single step might jump into the one of the interrupt or exception vectors instead of executing the current instruction. This means you may hit the same breakpoint a number of times before executing the instruction gdb wants to have executed. Because there are rare circumstances where you want to single step into an interrupt vector the behavior can be controlled from GDB. There are three commands you can query and set the single step behavior: maintenance packet qqemu.sstepbits This will display the MASK bits used to control the single stepping IE:
maintenance packet qqemu.sstep This will display the current value of the mask used when single stepping IE:
maintenance packet Qqemu.sstep=HEX_VALUE This will change the single step mask, so if wanted to enable IRQs on the single step, but not timers, you would use:
3.13 Target OS specific information
3.13.1 Linux
To have access to SVGA graphic modes under X11, use the vesa or the cirrus X11 driver. For optimal performances, use 16 bit color depth in the guest and the host OS.
When using a 2.6 guest Linux kernel, you should add the option clock=pit on the kernel command line because the 2.6 Linux kernels make very strict real time clock checks by default that QEMU cannot simulate exactly.
When using a 2.6 guest Linux kernel, verify that the 4G/4G patch is not activated because QEMU is slower with this patch. The QEMU Accelerator Module is also much slower in this case. Earlier Fedora Core 3 Linux kernel (< 2.6.9-1.724_FC3) were known to incorporate this patch by default. Newer kernels don’t have it.
3.13.2 Windows
If you have a slow host, using Windows 95 is better as it gives the best speed. Windows 2000 is also a good choice.
3.13.2.1 SVGA graphic modes support
QEMU emulates a Cirrus Logic GD5446 Video card. All Windows versions starting from Windows 95 should recognize and use this graphic card. For optimal performances, use 16 bit color depth in the guest and the host OS.
If you are using Windows XP as guest OS and if you want to use high resolution modes which the Cirrus Logic BIOS does not support (i.e. >= 1280x1024x16), then you should use the VESA VBE virtual graphic card (option -std-vga ).
3.13.2.2 CPU usage reduction
Windows 9x does not correctly use the CPU HLT instruction. The result is that it takes host CPU cycles even when idle. You can install the utility from http://www.user.cityline.ru/
maxamn/amnhltm.zip to solve this problem. Note that no such tool is needed for NT, 2000 or XP.
3.13.2.3 Windows 2000 disk full problem
Windows 2000 has a bug which gives a disk full problem during its installation. When installing it, use the -win2k-hack QEMU option to enable a specific workaround. After Windows 2000 is installed, you no longer need this option (this option slows down the IDE transfers).
3.13.2.4 Windows 2000 shutdown
Windows 2000 cannot automatically shutdown in QEMU although Windows 98 can. It comes from the fact that Windows 2000 does not automatically use the APM driver provided by the BIOS.
In order to correct that, do the following (thanks to Struan Bartlett): go to the Control Panel => Add/Remove Hardware & Next => Add/Troubleshoot a device => Add a new device & Next => No, select the hardware from a list & Next => NT Apm/Legacy Support & Next => Next (again) a few times. Now the driver is installed and Windows 2000 now correctly instructs QEMU to shutdown at the appropriate moment.
3.13.2.5 Share a directory between Unix and Windows
See sec_invocation about the help of the option -smb .
3.13.2.6 Windows XP security problem
Some releases of Windows XP install correctly but give a security error when booting:
The workaround is to install a service pack for XP after a boot in safe mode. Then reboot, and the problem should go away. Since there is no network while in safe mode, its recommended to download the full installation of SP1 or SP2 and transfer that via an ISO or using the vvfat block device («-hdb fat:directory_which_holds_the_SP»).
3.13.3 MS-DOS and FreeDOS
3.13.3.1 CPU usage reduction
DOS does not correctly use the CPU HLT instruction. The result is that it takes host CPU cycles even when idle. You can install the utility from http://www.vmware.com/software/dosidle210.zip to solve this problem.
4 QEMU System emulator for non PC targets
QEMU is a generic emulator and it emulates many non PC machines. Most of the options are similar to the PC emulator. The differences are mentioned in the following sections.
4.1 PowerPC System emulator
Use the executable qemu-system-ppc to simulate a complete PREP or PowerMac PowerPC system.
- UniNorth or Grackle PCI Bridge
- PCI VGA compatible card with VESA Bochs Extensions
- 2 PMAC IDE interfaces with hard disk and CD-ROM support
- NE2000 PCI adapters
- Non Volatile RAM
- VIA-CUDA with ADB keyboard and mouse.
- PCI Bridge
- PCI VGA compatible card with VESA Bochs Extensions
- 2 IDE interfaces with hard disk and CD-ROM support
- Floppy disk
- NE2000 network adapters
- Serial port
- PREP Non Volatile RAM
- PC compatible keyboard and mouse.
QEMU uses the Open Hack’Ware Open Firmware Compatible BIOS.
Since version 0.9.1, QEMU uses OpenBIOS http://www.openbios.org/ for the g3beige and mac99 PowerMac machines. OpenBIOS is a free (GPL v2) portable firmware implementation. The goal is to implement a 100% IEEE 1275-1994 (referred to as Open Firmware) compliant firmware.
The following options are specific to the PowerPC emulation: -g W x H [x DEPTH ] Set the initial VGA graphic mode. The default is 800x600x15.
-prom-env string Set OpenBIOS variables in NVRAM, for example:
These variables are not used by Open Hack’Ware.
4.2 Sparc32 System emulator
- SPARCstation 4
- SPARCstation 5
- SPARCstation 10
- SPARCstation 20
- SPARCserver 600MP
- SPARCstation LX
- SPARCstation Voyager
- SPARCclassic
- SPARCbook
The emulation is somewhat complete. SMP up to 16 CPUs is supported, but Linux limits the number of usable CPUs to 4.
It’s also possible to simulate a SPARCstation 2 (sun4c architecture), SPARCserver 1000, or SPARCcenter 2000 (sun4d architecture), but these emulators are not usable yet.
- IOMMU or IO-UNITs
- TCX Frame buffer
- Lance (Am7990) Ethernet
- Non Volatile RAM M48T02/M48T08
- Slave I/O: timers, interrupt controllers, Zilog serial ports, keyboard and power/reset logic
- ESP SCSI controller with hard disk and CD-ROM support
- Floppy drive (not on SS-600MP)
- CS4231 sound device (only on SS-5, not working yet)
The number of peripherals is fixed in the architecture. Maximum memory size depends on the machine type, for SS-5 it is 256MB and for others 2047MB.
Since version 0.8.2, QEMU uses OpenBIOS http://www.openbios.org/. OpenBIOS is a free (GPL v2) portable firmware implementation. The goal is to implement a 100% IEEE 1275-1994 (referred to as Open Firmware) compliant firmware.
A sample Linux 2.6 series kernel and ram disk image are available on the QEMU web site. There are still issues with NetBSD and OpenBSD, but some kernel versions work. Please note that currently Solaris kernels don’t work probably due to interface issues between OpenBIOS and Solaris.
The following options are specific to the Sparc32 emulation: -g W x H x[x DEPTH ] Set the initial TCX graphic mode. The default is 1024x768x8, currently the only other possible mode is 1024x768x24.
-prom-env string Set OpenBIOS variables in NVRAM, for example:
-M [SS-4|SS-5|SS-10|SS-20|SS-600MP|LX|Voyager|SPARCClassic] [|SPARCbook|SS-2|SS-1000|SS-2000] Set the emulated machine type. Default is SS-5.
4.3 Sparc64 System emulator
Use the executable qemu-system-sparc64 to simulate a Sun4u (UltraSPARC PC-like machine), Sun4v (T1 PC-like machine), or generic Niagara (T1) machine. The emulator is not usable for anything yet, but it can launch some kernels.
- UltraSparc IIi APB PCI Bridge
- PCI VGA compatible card with VESA Bochs Extensions
- PS/2 mouse and keyboard
- Non Volatile RAM M48T59
- PC-compatible serial ports
- 2 PCI IDE interfaces with hard disk and CD-ROM support
- Floppy disk
The following options are specific to the Sparc64 emulation: -prom-env string Set OpenBIOS variables in NVRAM, for example:
-M [sun4u|sun4v|Niagara] Set the emulated machine type. The default is sun4u.
4.4 MIPS System emulator
- A generic ISA PC-like machine «mips»
- The MIPS Malta prototype board «malta»
- An ACER Pica «pica61». This machine needs the 64-bit emulator.
- MIPS emulator pseudo board «mipssim»
- A MIPS Magnum R4000 machine «magnum». This machine needs the 64-bit emulator.
- A range of MIPS CPUs, default is the 24Kf
- PC style serial port
- PC style IDE disk
- NE2000 network card
- Core board with MIPS 24Kf CPU and Galileo system controller
- PIIX4 PCI/USB/SMbus controller
- The Multi-I/O chip’s serial device
- PCI network cards (PCnet32 and others)
- Malta FPGA serial device
- Cirrus (default) or any other PCI VGA graphics card
- MIPS R4000 CPU
- PC-style IRQ and DMA controllers
- PC Keyboard
- IDE controller
- A range of MIPS CPUs, default is the 24Kf
- PC style serial port
- MIPSnet network emulation
- MIPS R4000 CPU
- PC-style IRQ controller
- PC Keyboard
- SCSI controller
- G364 framebuffer
4.5 ARM System emulator
- ARM926E, ARM1026E, ARM946E, ARM1136 or Cortex-A8 CPU
- Two PL011 UARTs
- SMC 91c111 Ethernet adapter
- PL110 LCD controller
- PL050 KMI with PS/2 keyboard and mouse.
- PL181 MultiMedia Card Interface with SD card.
- ARM926E, ARM1136 or Cortex-A8 CPU
- PL190 Vectored Interrupt Controller
- Four PL011 UARTs
- SMC 91c111 Ethernet adapter
- PL110 LCD controller
- PL050 KMI with PS/2 keyboard and mouse.
- PCI host bridge. Note the emulated PCI bridge only provides access to PCI memory space. It does not provide access to PCI IO space. This means some devices (eg. ne2k_pci NIC) are not usable, and others (eg. rtl8139 NIC) are only usable when the guest drivers use the memory mapped control registers.
- PCI OHCI USB controller.
- LSI53C895A PCI SCSI Host Bus Adapter with hard disk and CD-ROM devices.
- PL181 MultiMedia Card Interface with SD card.
Several variants of the ARM RealView baseboard are emulated, including the EB, PB-A8 and PBX-A9. Due to interactions with the bootloader, only certain Linux kernel configurations work out of the box on these boards.
Kernels for the PB-A8 board should have CONFIG_REALVIEW_HIGH_PHYS_OFFSET enabled in the kernel, and expect 512M RAM. Kernels for The PBX-A9 board should have CONFIG_SPARSEMEM enabled, CONFIG_REALVIEW_HIGH_PHYS_OFFSET disabled and expect 1024M RAM.
- ARM926E, ARM1136, ARM11MPCore, Cortex-A8 or Cortex-A9 MPCore CPU
- ARM AMBA Generic/Distributed Interrupt Controller
- Four PL011 UARTs
- SMC 91c111 or SMSC LAN9118 Ethernet adapter
- PL110 LCD controller
- PL050 KMI with PS/2 keyboard and mouse
- PCI host bridge
- PCI OHCI USB controller
- LSI53C895A PCI SCSI Host Bus Adapter with hard disk and CD-ROM devices
- PL181 MultiMedia Card Interface with SD card.
- Intel PXA270 System-on-chip (ARM V5TE core)
- NAND Flash memory
- IBM/Hitachi DSCM microdrive in a PXA PCMCIA slot — not in «Akita»
- On-chip OHCI USB controller
- On-chip LCD controller
- On-chip Real Time Clock
- TI ADS7846 touchscreen controller on SSP bus
- Maxim MAX1111 analog-digital converter on I^2C bus
- GPIO-connected keyboard controller and LEDs
- Secure Digital card connected to PXA MMC/SD host
- Three on-chip UARTs
- WM8750 audio CODEC on I^2C and I^2S busses
- Texas Instruments OMAP310 System-on-chip (ARM 925T core)
- ROM and RAM memories (ROM firmware image can be loaded with -option-rom)
- On-chip LCD controller
- On-chip Real Time Clock
- TI TSC2102i touchscreen controller / analog-digital converter / Audio CODEC, connected through MicroWire and I^2S busses
- GPIO-connected matrix keypad
- Secure Digital card connected to OMAP MMC/SD host
- Three on-chip UARTs
- Texas Instruments OMAP2420 System-on-chip (ARM 1136 core)
- RAM and non-volatile OneNAND Flash memories
- Display connected to EPSON remote framebuffer chip and OMAP on-chip display controller and a LS041y3 MIPI DBI-C controller
- TI TSC2301 (in N800) and TI TSC2005 (in N810) touchscreen controllers driven through SPI bus
- National Semiconductor LM8323-controlled qwerty keyboard driven through I^2C bus
- Secure Digital card connected to OMAP MMC/SD host
- Three OMAP on-chip UARTs and on-chip STI debugging console
- A Bluetooth(R) transceiver and HCI connected to an UART
- Mentor Graphics «Inventra» dual-role USB controller embedded in a TI TUSB6010 chip — only USB host mode is supported
- TI TMP105 temperature sensor driven through I^2C bus
- TI TWL92230C power management companion with an RTC on I^2C bus
- Nokia RETU and TAHVO multi-purpose chips with an RTC, connected through CBUS
- Cortex-M3 CPU core.
- 64k Flash and 8k SRAM.
- Timers, UARTs, ADC and I^2C interface.
- OSRAM Pictiva 96×16 OLED with SSD0303 controller on I^2C bus.
- Cortex-M3 CPU core.
- 256k Flash and 64k SRAM.
- Timers, UARTs, ADC, I^2C and SSI interfaces.
- OSRAM Pictiva 128×64 OLED with SSD0323 controller connected via SSI.
- Marvell MV88W8618 ARM core.
- 32 MB RAM, 256 KB SRAM, 8 MB flash.
- Up to 2 16550 UARTs
- MV88W8xx8 Ethernet controller
- MV88W8618 audio controller, WM8750 CODEC and mixer
- 128×64 display with brightness control
- 2 buttons, 2 navigation wheels with button function
- Texas Instruments OMAP310 System-on-chip (ARM 925T core)
- ROM and RAM memories (ROM firmware image can be loaded with -pflash) V1 1 Flash of 16MB and 1 Flash of 8MB V2 1 Flash of 32MB
- On-chip LCD controller
- On-chip Real Time Clock
- Secure Digital card connected to OMAP MMC/SD host
- Three on-chip UARTs
A Linux 2.6 test image is available on the QEMU web site. More information is available in the QEMU mailing-list archive.
The following options are specific to the ARM emulation: -semihosting Enable semihosting syscall emulation.
On ARM this implements the «Angel» interface.
Note that this allows guest direct access to the host filesystem, so should only be used with trusted guest OS.
4.6 ColdFire System emulator
Use the executable qemu-system-m68k to simulate a ColdFire machine. The emulator is able to boot a uClinux kernel.
- MCF5208 ColdFire V2 Microprocessor (ISA A+ with EMAC).
- Three Two on-chip UARTs.
- Fast Ethernet Controller (FEC)
- MCF5206 ColdFire V2 Microprocessor.
- Two on-chip UARTs.
The following options are specific to the ColdFire emulation: -semihosting Enable semihosting syscall emulation.
On M68K this implements the «ColdFire GDB» interface used by libgloss.
Note that this allows guest direct access to the host filesystem, so should only be used with trusted guest OS.
Qemu как пользоваться для windows
Виртуализация операционных систем с помощью QEMU. Основы работы с эмулятором
Виртуализация — наиболее доступный способ запустить на одном ПК вторую операционную систему, не устанавливая ее непосредственно на жесткий диск. Вместо этого вторая ОС устанавливается на диск виртуальный, представленный специальным файлом-контейнером, созданным в гипервизоре — программе, позволяющей эмулировать работу гостевой системы в системе хостовой. Наибольшей популярностью среди домашних юзеров пользуются гипервизоры VirtualBox и VMware с мощным функционалом и наглядным GUI .
Но есть и другие, в чём-то даже более гибкие и продуктивные решения хотя и куда менее удобные в использовании. Например, QEMU — бесплатная программа с открытым исходным кодом, предназначенная для эмуляции программного обеспечения и операционных систем. Инструмент использует аппаратную виртуализацию, поддерживая два режима работы:
• Полная эмуляция — данный режим применяется для запуска операционных систем, в его рамках QEMU эмулирует физическое устройство со всеми его компонентами, встроенными и периферийными.
• Эмуляция пользовательского режима — дает возможность запускать программы, созданные для конкретной архитектуры на другой архитектуре, например, приложения ARM в x86 . Режим доступен только в хостовой системе Linux.
QEMU поддерживается эмуляция архитектуры x86 , ARM , MIPS , PowerPC , m68k , Alpha , SPARC , SH-4 , CRISv2 , MicroBlaze и это более солидный список, чем у того же Виртуалбокс.
Как установить QEMU в Windows
Скачать установочный файл эмулятора можно с официального сайта www.qemu.org/download/#windows,
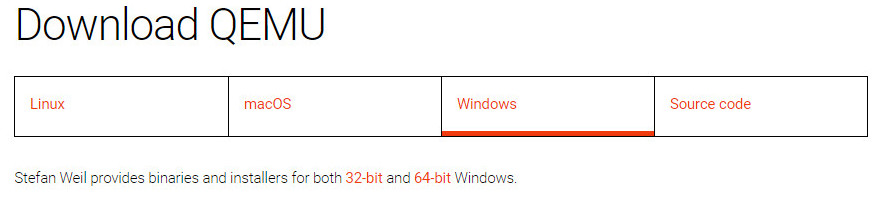
есть редакции 32-битные и 64-битные, версию выбираем последнюю.

Устанавливается QEMU как обычная программа в папку Program Files\qemu , но можно выбрать и другое расположение.
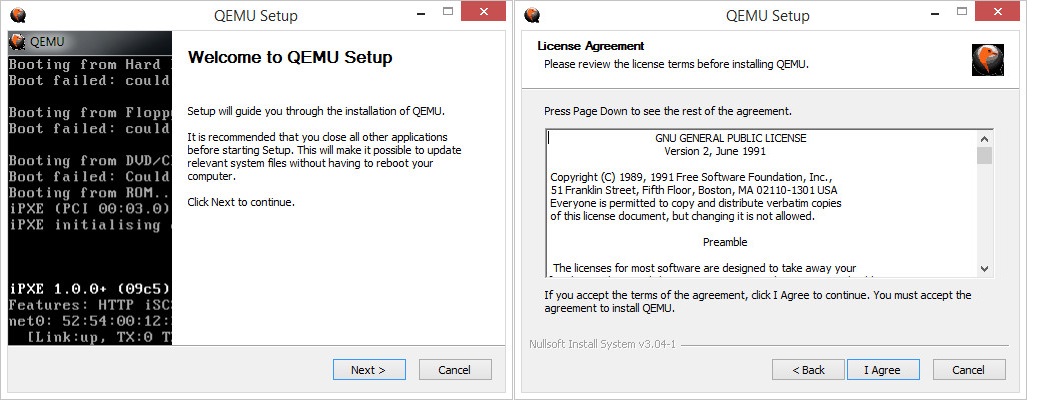
Установку выполняем с параметрами по умолчанию, ничего менять не нужно, просто жмем в окне мастера «Next».
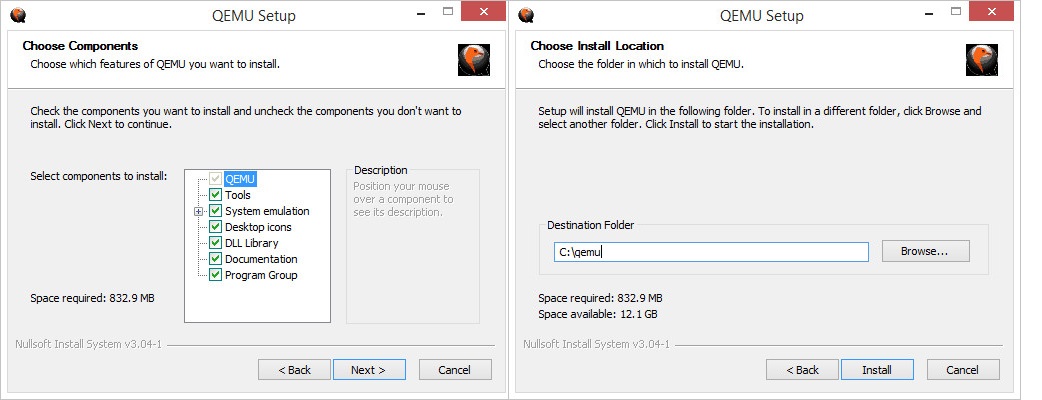
Виртуализация операционных систем в QEMU
В отличие от VirtualBox и подобных гипервизоров, QEMU не имеет графического интерфейса, работа с ней ведется через командную строку. Команд и параметров для создания и управления виртуальными машинами много, но для начала вам нужно знать хотя бы эти шесть.
• qemu-system — задает архитектуру виртуальной машины.
• qemu-img create — создает файл виртуального IMG -диска, на который будет устанавливаться операционная система.
• -m — выделяет виртуальной ОС указанный объем оперативной памяти.
• -hda — подключает созданный виртуальный диск.
• -boot IMG — указывает, что загрузка должна производиться с виртуального диска, вместо IMG следует указать имя IMG -файла.
• cdrom — содержит путь к установочному образу ISO , эмулирует дисковод.
Чтобы вам стало всё немного понятнее, установим и запустим с помощью QEMU какую-нибудь операционную систему. Для примера мы выбрали Windows XP, так как она легкая и занимает на диске мало места. QEMU у нас уже установлен, открываем командную строку, переходим в каталог установки и создаем виртуальный жесткий диск следующей командой:
qemu-img.exe create -f raw c.img 5000M
Файл qemu-img.exe в эмуляторе отвечает за создание IMG -образов, с — это название образа, 5000 — размер виртуального диска в мегабайтах. По умолчанию образ будет создан в папке QEMU .
Теперь сформируем следующую команду:
qemu-system-i386w.exe -boot c -m 350 -hda c.img -cdrom «E:\WinXP_SP3.iso»
Исполняемый файл в начале команды отвечает за создание виртуальной машины с архитектурой х86 , -boot с ключом -с сообщает, что грузиться она будет с диска, в значение параметра -hda подставляем созданный образ, а в качестве значения параметра –cdrom указываем путь к дистрибутиву Windows.
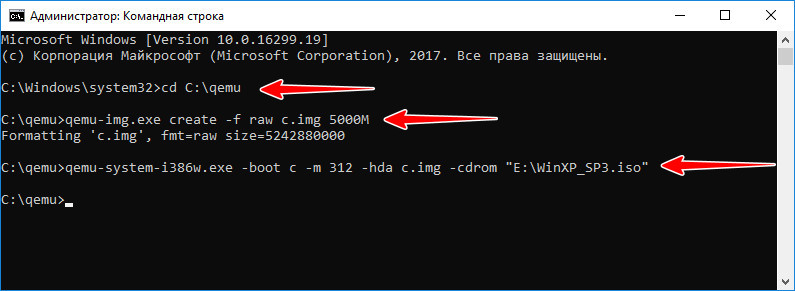
После выполнения команды появляется окошко QEMU с загрузочным меню, в котором мы выбираем установку на диск.
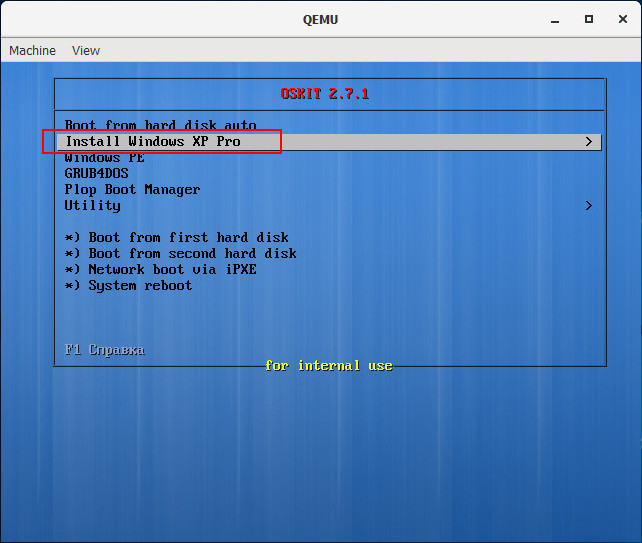
Далее проходим все этапы установки операционной системы вплоть до локальных настроек и загрузки рабочего стола.
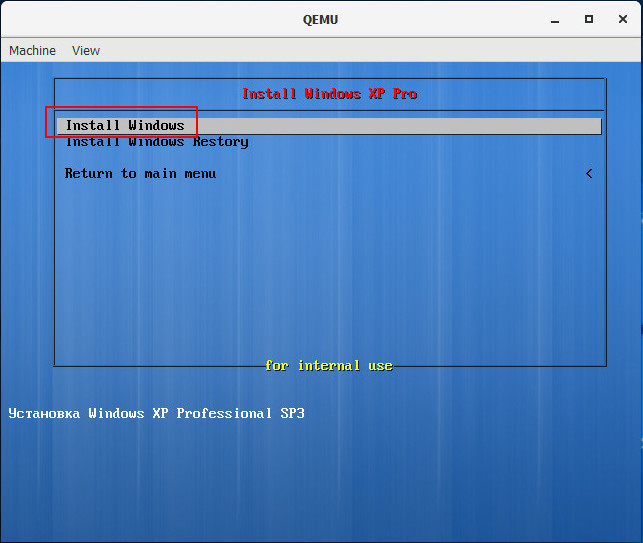
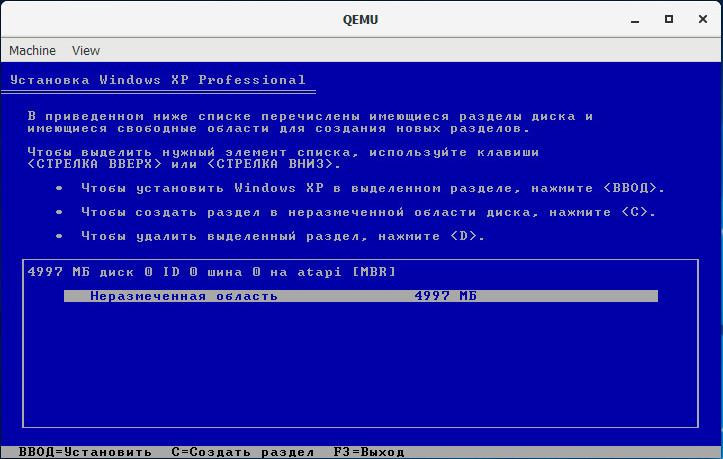
Чтобы запустить закрытую виртуальную машину, выполните команду qemu-system-i386w.exe -hda name.img , где name — название вашего виртуального диска, чтобы удалить ставшую ненужной VM, просто удалите из каталога установки QEMU созданный IMG -образ.
Управлять QEMU можно с помощью клавиатуры и мыши, для переключения между эмулятором и хостовой машиной используйте комбинацию Ctrl + Alt + G . Запущенная с минимальными настройками ОС не будет иметь доступа к аудио- и сетевой карте, не будет также возможности обмена файлами между виртуальной и хостовой системами.
Нельзя сказать, что QEMU лучше или хуже VirtualBox либо VMware, это альтернативное средство виртуализации, имеющие как свои плюсы, так и минусы. QEMU менее удобен, требует знания документации и демонстрирует весьма небольшую производительность. Для ускорения работы в Windows требуется установка и настройка Диспетчера аппаратного ускорения HAXM, в Linux – подключение загружаемого модуля ядра KVM . С другой стороны, инструмент позволяет эмулировать работу устройств на базе разных архитектур, не поддерживаемые популярными гипервизорами.
Обзор и установка QEMU
Введение
QEMU – это приложение виртуализации, бесплатный инструмент с открытым исходным кодом, который используется для эмуляции различных архитектур.
Перед знакомством с QEMU стоит рассказать о том, что такое виртуализация и эмуляция в частности.
Виртуализация и виртуальная машина
Если говорить обобщенно, виртуализация позволяет использовать на одном физическом компьютере несколько виртуальных машин. 
А виртуальная машина, в свою очередь, это программа, которая эмулирует (имитирует) работу другого компьютера. То есть на виртуальную машину можно установить операционную систему, она имеет свою оперативную память, жесткий диск и так далее.
Если мощностей компьютера хватает, то на нем можно запускать несколько виртуальных машин, в том числе и одновременно.
Поэтому чаще всего виртуальные машины используются в тех случаях, когда нужно получить новое рабочее окружение без переустановки основной операционной системы (например, Linux на машине с Windows и наоборот). Виртуальные машины позволяют эмулировать архитектуры игровых приставок. Также они используются для защиты информации и ограничения возможностей запускаемых процессов. Виртуальную машину удобно переносить на другой компьютер: для этого нужно только установить на нем программу эмуляции и перенести образ нужной виртуальной машины. В общем, существует множество преимуществ использования виртуальных машин.
Популярные программы виртуализации это:
О последней и пойдет речь в этой статье. 
QEMU — это программа, которая используется для эмуляции программного обеспечения разных платформ. Она распространяется бесплатно и имеет открытый исходный код. Работает во всех популярных операционных системах — Microsoft Windows, Linux, MacOS, а также ее можно запускать на Android.
Существует программная и аппаратная виртуализация — QEMU использует вторую. Аппаратная виртуализация дает возможность использовать изолированные гостевые операционные системы, которые будут управляться гипервизором (используется гипервизор XEN либо модуль ядра KVM в Linux).
Два режима работы, в которых может работать QEMU, это:
- Полная эмуляция системы (full-system emulation) — в этом режиме QEMU полностью эмулирует устройство со всеми его компонентами и периферийными устройствами. Режим используется для запуска операционных систем.
- Эмуляция пользовательского режима (user-mode emulation) — режим позволяет программы, созданные на одном процессоре, запускать на другом, эмулируемом движке.
QEMU может эмулировать следующие архитектуры:
- x86 (32 и 64 бит),
- ARM,
- SPARC,
- PowerPC (32 и 64 бит),
- MIPS,
- m68k (Coldfire),
- SH-4,
- CRISv2,
- Alpha,
- MicroBlaze.
QEMU чуть сложнее использовать, чем некоторые другие программы виртуализации, так как она больше похожа на командную строку Linux, чем на приложение. Поэтому ее стоит использовать опытным пользователям.
Установка QEMU
Информация об установке есть на официальном сайте, в разделе Download QEMU . Тем, кто использует Windows, нужно будет скачать установочный файл (в зависимости от разряда своей системы).
Команда для установки QEMU на Linux выглядит следующим образом (для примера взята Ubuntu):
Все довольно просто, так как QEMU есть в официальных репозиториях Ubuntu.
Для изучения всех возможностей QEMU стоит обратиться к официальной документации .
Команда для создания образа:
- myimage.img — название файла с образом диска;
- mysize — размер в килобайтах (для размера в мегабайтах в конце надо добавить M, в гигабайтах — G: 10G);
- если нужно указать формат (qcow2 — формат, который используется QEMU по умолчанию), то нужно использовать ключ -f:
Более подробную информацию о команде qemu-img можно посмотреть здесь .
Команда для запуска системы:
- жесткий диск подключается как -hda (другие возможные варианты: -hdb, -hdc, -hdd);
- если указать -boot d, то загрузка будет начинаться с CD-ROM (в противном случае -с жесткого диска);
- -cdrom указывает, что файл будет использоваться как образ CD-ROM (поэтому нельзя одновременно использовать ключи -cdrom и -hdc);
- в конце указывается количество оперативной памяти, которое будет выделено для машины.
После этого будет выполнена установка новой системы, которую потом можно запустить командой:
Для того, чтобы включить поддержку KVM, нужно добавить -enable-kvm в конце.
Заключение
QEMU — хороший инструмент виртуализации, обладающий широкими возможностями. Он подойдет не всем, однако может составить конкуренцию даже VirtualBox.
А вы пользуетесь программами виртуализации? Какими именно?
Бесплатные программы для Windows скачать бесплатно
Бесплатная программа QEMU — виртуальная машина для Виндовс
Виртуальная машина (далее ВМ) QEMU для Windows XP, Vista, 7, 8, 8.1, 10 (32-бит и 64-бит) — бесплатная программа эмуляции вычислительной системы в составе программно-аппаратного комплекса для симуляции в среде настольного ПК или удаленного сервера. Результатом работы КУЭМЬЮ является виртуальный компьютер с одним или несколькими процессорами (SMP), чипсетом, памятью, жесткими дисками, прочим периферийным компьютерным оборудованием, например, таким как видео, аудио, сетевые и другие адаптеры, поддерживающий различные архитектуры, операционные системы, сервисное и прикладное программное обеспечение. Поддерживаются компьютерные интерфейсы PCI, VGA, IDE, CD-ROM, PS/2, PCI UHCI, USB и другие.
Из возможных альтернатив, например, таких как Oracle VM VirtualBox, Virtual PC, Bochs, Wine, VMware Workstation и пр., рекомендуем бесплатно скачать QEMU для Windows 10, 8.1, 8, 7, Vista, XP (32-bit и 64-bit) по прямым ссылкам с сайта https://programswindows.ru для создания ВМ методом эмуляции. На официальном сайте программы найдутся исходные тексты, бинарные сборки, готовые образы систем и множество другой полезной информации.
ВМ как основа
Виртуализация — это предоставление некоторых вычислительных ресурсов с целью обеспечения определенных логически изолированных процессов, которые выполняются на конкретном физическом ресурсе. Под данным термином обычно понимается виртуализация программно-аппаратной платформы. Для конкретного оборудования виртуализирующая программа является гипервизором. Гостевые системы разворачиваются на базе гипервизора и могут ориентироваться на ту же архитектуру центрального процессора, или могут быть различными (например, гостевая система PowerPC работает на x86 платформе). Ячейкой вычислительных ресурсов, используемых для протекания определенных процессов, является так или иначе сконфигурированная ВМ (виртуальная машина с установленным и настроенным под определенные задачи программным обеспечением).
Сегодня в основном используются три метода. В случае полной виртуализации гипервизор отделяет физическое оборудование от гостевой системы. При паравиртуализации реализуется API прикладных программ гипервизора, используемый гостевой OS. Такой софт использует метод эмуляции, когда гостевая система симулируется посредством точной имитации аппаратной среды. Рекомендуем скачать бесплатно QEMU для Windows, Android, Mac OS X, Linux (Debian и Ubuntu), FreeBSD и использовать наиболее практичный из способов применения ВМ. Эта технология стала популярной не только среди профессионалов-системщиков, но и в среде продвинутых домашних пользователей. Данная страница сайта https://programswindows.ru будет полезна всем, кого интересует информация: как создать ВМ на своем компьютере, как эмулировать гостевую операционную систему на машине-хосте, как установить виртуальную машину на сервер, как правильно произвести запуск виртуальной машины, а также тем, кого интересуют облачное хранение данных и облачные вычисления. Здесь можно последнюю версию QEMU скачать бесплатно для Виндовс, не покидая сайт https://programswindows.ru без регистрации и СМС.
Виртуализация методом эмуляции
Чтобы обеспечить режим эмуляции, динамический транслятор QEMU, исполняя, позволяет переводить инструкции гостевого процессора в инструкции хостового. Это решение не только интересно и эффективно, но и позволяет обеспечить переносимость. Посредством тонкой настройки симулированной машины можно реализовать ряд скрытых функциональных возможностей, причем некоторые из них следует включать в процессе установки. Многие системные администраторы и продвинутые IT-специалисты в своих отзывах и комментариях рекомендуют рядовым пользователям, перед тем как скачать QEMU бесплатно и инсталлировать на свой компьютер, ознакомиться с документацией к КЕМИ.
Программа способна работать в двух режимах эмуляции: пользовательском и системном. В пользовательском режиме производится динамическая конвертация инструкций процессора и конвертирование системных вызовов. Второй режим эмулирует программно-аппаратный комплекс полностью.
Установка и запуск QEMU под Windows
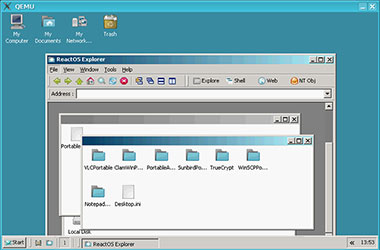
Мало просто бесплатно скачать виртуальную машину и инсталлировать на свой компьютер, проблемой может стать создание виртуальной машины или ошибки. Часто встречаются вопросы такого плана: не получилось открыть виртуальную машину, не удалось открыть сессию, установка виртуальной машины прошла не корректно, не получается создать сервер виртуальных машин, не корректно работает виртуализация серверов.
Установку и запуск под Windows проведем на примере OS Win 64-bit. Во первых, нужно виртуальную машину для Windows QEMU скачать бесплатно не покидая сайт https://programswindows.ru без регистрации и SMS по одной из ссылок на этой странице в предпоследнем абзаце на светло зеленом фоне. Далее устанавливаем программу, например, в C:/qemu — и не стоит сразу искать на рабочем столе ярлык для запуска. Прежде следует создать образ жесткого диска, на котором будут работать гостевые ОС. Для этого набираем на клавиатуре Win+R >> cmd >> Enter и попадаем в консоль (cmd) куда копипастим две строки:
1. cd C:/qemu
2. qemu-img create xp.img 4096M
В результате видим: Formating ‘xp.img’, fmt=raw, size=4194304 kB. В папке программы проверяем размер образа, который должен быть заданного размера, а не нулевого. После этого запускаем саму машину командой с указанием загрузочного диска и примерно такими параметрами:
qemu-system-x86_64.exe -L . -boot c -m 800 -hda //./PhysicalDrive1 —hdb C:/Qemu/XP.img
. и приступаем к работе. Эмуляция другого компьютера сходна с началом эксплуатации сегодня купленного компа или ноута без предустановленной OS. Для начала нужно установить операционную систему и все необходимое программное обеспечение.
Бесплатно скачать QEMU для Windows x86, x64
| Обновление от: | 09.03.2019 |
| Последняя версия: | 4.2.0 |
| Синонимы: | куэмью, кэмью, кэму, кему, кьеми, кьему |
| Операционная система: | Windows 10, 8.1, 8, 7, Vista, XP (32-бит и 64-бит), другие ОС |
| Размеры файлов: | 120,0 МБ, 129,0 МБ |
| Скачать бесплатно: | QEMU 32-BIT |
| Скачать бесплатно: | QEMU 64-BIT |
Бесплатные программы скачать бесплатно
Сейчас Вы находитесь на странице «Бесплатная программа QEMU — виртуальная машина для Виндовс» сайта «Программы для Виндовс». Спасибо, что посетили раздел посвященный программам виртуализации.