Как запустить Memtest в Ubuntu 20.04
Эта статья покажет вам, как запустить memtest в Ubuntu 20.04. В статье также будет рассказано больше об утилитах командной строки memtester, которые можно использовать для проверки ошибок ОЗУ.
Предварительные условия
Чтобы выполнить тест памяти, показанный в этой статье, Ubuntu 20.04 должен быть установлен в вашей системе, а опция memtest86 + должна быть доступна в меню GRUB.
Как запустить Memtest86 + в Ubuntu 20.04
Выполнить тест памяти в Ubuntu легко по сравнению с другими дистрибутивами. Выполните следующие шаги, чтобы запустить memtest на вашем Ubuntu 20.04 система.
Шаг 1. Войдите в меню GRUB
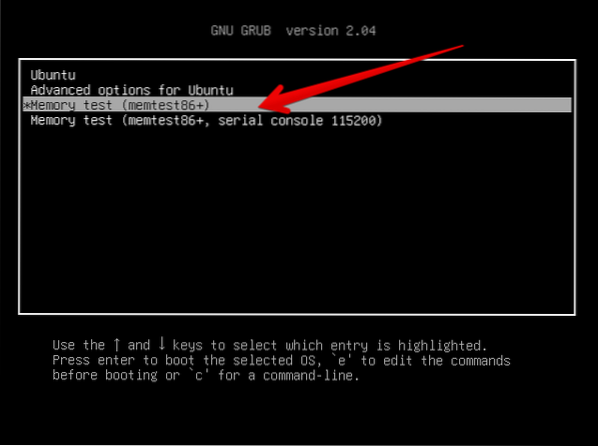
Как вы знаете, Memtest86 + работает без операционной системы. Следовательно, у вас должен быть доступ к меню GRUB в Ubuntu. Включите или перезапустите вашу систему и удерживайте клавишу Shift, чтобы получить доступ к меню GRUB. При запуске системы отобразится следующее окно:
Шаг 2: выберите Memtest86+
Следующий список параметров будет отображаться в меню GRUB. Используя клавиши со стрелками, выберите опцию Memtest86 +, отмеченную стрелкой на изображении ниже:
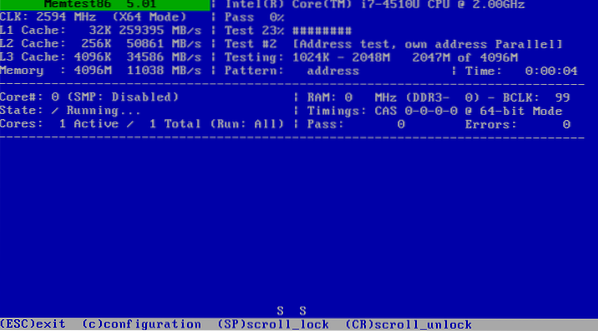
Нажмите клавишу Enter, чтобы запустить программу Memtest86 +.
Шаг 3: Выйти из теста
Тест начнется автоматически в вашей системе и будет продолжаться до тех пор, пока вы не выйдете из текущего процесса, нажав клавишу «Esc». Лучше всего запускать тест за один полный проход. В окне вывода, показанном на следующем изображении, сведения о тесте выделены красным цветом.
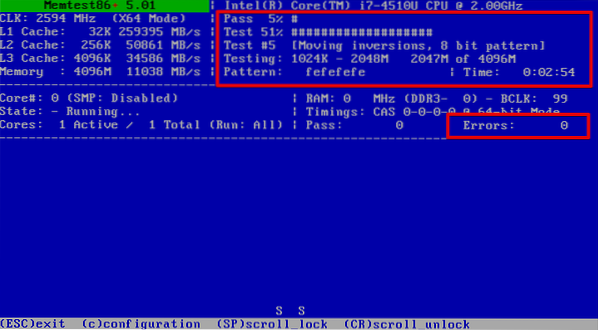
Теперь вы успешно выполнили memtest в своей системе Ubuntu. Это похоже на игру, чтобы проверить, не обнаружены ли какие-либо ошибки или перезагружается ли ваша система. Рекомендуется запускать memtest для нескольких проходов, потому что иногда ошибка может быть обнаружена только на втором проходе. Каждый проход может занять много часов или дней, в зависимости от того, сколько памяти установлено в вашей системе. Итак, рекомендуется запускать тест памяти в конце дня, чтобы получить наилучшие результаты. Если ваша система имеет большой объем памяти и сбои случаются нечасто, то может быть хорошей идеей запустить тест на выходных. Если у вас есть память с кодом исправления ошибок (ECC), вы можете легко получить ошибки, выполнив только один проход. Он исправит все ошибки самостоятельно. Если у вас есть время выполнить второй проход для обнаружения ошибок, в этом случае мы рекомендуем вам это сделать.
Запустите тест памяти с помощью утилиты Memtester
Memtester — это утилита командной строки, которую можно использовать для проверки оперативной памяти на наличие ошибок.
Установить Memtester
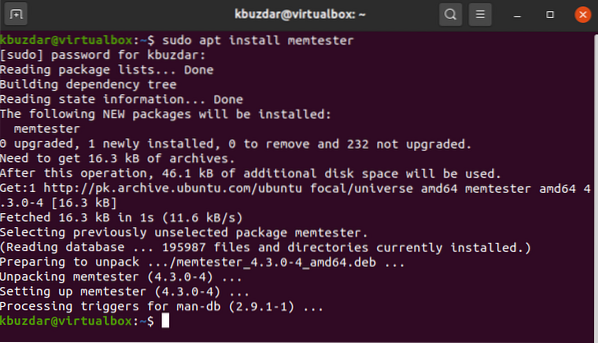
Утилита memtester по умолчанию не установлена в системе Ubuntu. Но вы можете установить утилиту с помощью следующей команды:
$ sudo apt установить memtester
Проверьте ошибки с помощью Memtester
После того, как memtester установлен в вашей системе, вы можете запустить команду memtester в своей системе, чтобы проверить оперативную память на наличие ошибок. Используйте следующий синтаксис для запуска команды memtester:
$ sudo memtester size итерация
В приведенной выше команде «размер» — это объем памяти, который вы хотите выделить, а «итерация» — это количество раз, когда команда запускается для проверки на наличие ошибок, или количество проходов.
Например, чтобы запустить команду memtester для памяти размером 200 МБ на 1 итерацию, приведенная выше команда изменится на следующий формат:
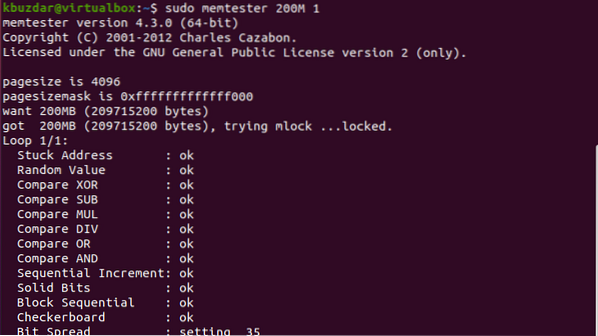
$ sudo memtester 200M 1
После ввода указанной выше команды на терминале должен отобразиться следующий вывод:
Заключение
Из информации, представленной в этой статье, вы узнали, как запустить Memtest86 + в Ubuntu 20.04. Эта функция может быть полезна, если ваша система много раз ломалась. Прежде чем отправлять отчет об ошибке, сначала следует выполнить тест памяти. Кроме того, вы также узнали, как запустить тест памяти с помощью утилиты командной строки memtester. Надеюсь, после прочтения этой статьи вы теперь можете выполнить тест памяти для своей собственной системы.
Мышь 
Memtest86+
Memtest86+ is a free, open-source, stand-alone memory tester for x86 and x86-64 architecture computers. It provides a much more thorough memory check than that provided by BIOS memory tests.
It is also able to access almost all the computer’s memory, not being restricted by the memory used by the operating system and not depending on any underlying software like UEFI libraries.
Memtest86+ can be loaded and run either directly by a PC BIOS (legacy or UEFI) or via an intermediate bootloader that supports the Linux 16-bit, 32-bit, 64-bit, or EFI handover boot protocol. It should work on any Pentium class or later 32-bit or 64-bit CPU.
Binary releases (both stable and nightly dev builds) are available on memtest.org.
Table of Contents
Origins
Memtest86+ v6.00 was based on PCMemTest, which was a fork and rewrite of the earlier Memtest86+ v5, which in turn was a fork of MemTest-86. The purpose of the PCMemTest rewrite was to:
- make the code more readable and easier to maintain
- make the code 64-bit clean and support UEFI boot
- fix failures seen when building with newer versions of GCC
In the process of creating PCMemTest, a number of features of Memtest86+ v5 that were not strictly required for testing the system memory were dropped. In particular, no attempt was made to measure the cache and main memory speed, or to identify and report the DRAM type. These features were added back and expanded in Memtest86+ v6.0 to create a unified, fully-featured release.
Licensing
Memtest86+ is released under the terms of the GNU General Public License version 2 (GPLv2). Other than the provisions of the GPL there are no restrictions for use, private or commercial. See the LICENSE file for details.
Build and Installation
Build is only tested on a Linux system, but should be possible on any system using the GNU toolchain and the ELF file format. The tools required are:
- GCC
- binutils
- make
- dosfstools and mtools (optional)
- xorrisofs (optional)
To build a 32-bit image, change directory into the build32 directory and type make . The result is a memtest.bin binary image file which can be booted directly by a legacy BIOS (in floppy mode) or by an intermediate bootloader using the Linux 16-bit boot protocol and a memtest.efi binary image file which can be booted directly by a 32-bit UEFI BIOS. Either image can be booted by an intermediate bootloader using the Linux 32-bit or 32-bit EFI handover boot protocols.
To build a 64-bit image, change directory into the build64 directory and type make . The result is a memtest.bin binary image file which can be booted directly by a legacy BIOS (in floppy mode) or by an intermediate bootloader using the Linux 16-bit boot protocol and a memtest.efi binary image file which can be booted directly by a 64-bit UEFI BIOS. Either image can be booted by an intermediate bootloader using the Linux 32-bit, 64-bit, or 64-bit EFI handover boot protocols.
In either case, to build an ISO image that can be used to create a bootable CD, DVD, or USB Flash drive, type make iso , The result is a memtest.iso ISO image file. This can then be written directly to a blank CD or DVD, or to a USB Flash drive, which can then be booted directly by a legacy or UEFI PC BIOS.
Note that when writing to a USB Flash drive, the ISO image must be written directly (‘dumped’) to the raw device, either by using the dd command or by using a utility that provides the same functionality.
When using an intermediate bootloader, either the memtest.bin file or the memtest.efi file should be stored in a disk partition the bootloader can access, and the bootloader configuration should be updated to boot from that file as if it were a Linux kernel with no initial RAM disk. Several boot command line options are recognised, as described below. If using the 16-bit boot protocol, Memtest86+ will use the display in text mode (640×400). If using the 32-bit or 64-bit boot protocols, Memtest86+ will use the display in either text mode or graphics mode, as specified in the boot_params struct passed to it by the bootloader. If in graphics mode, the supplied framebuffer must be at least 640×400 pixels; if larger, the display will be centred. If the system was booted in UEFI mode, graphics mode must be used.
For test purposes, there is also an option to build an ISO image that uses GRUB as an intermediate bootloader. See the Makefile in the build32 or build64 directory for details. The ISO image is both legacy and UEFI bootable, so you need GRUB modules for both legacy and EFI boot installed on your build system (e.g. on Debian, the required GRUB modules are located in packages grub-pc-bin , grub-efi-ia32-bin and grub-efi-amd64-bin ). You may need to adjust some path and file names in the Makefile to match the naming on your system.
The GRUB configuration files contained in the grub directory are there for use on the test ISO, but also serve as an example of how to boot Memtest86+ from GRUB.
Boot Options
An intermediate bootloader may pass a boot command line to Memtest86+. The command line may contain one or more options, separated by spaces. Each option consists of an option name, optionally followed by an = sign and one or more parameters, separated by commas. The following options are recognised:
- nosmp
- disables ACPI table parsing and the use of multiple CPU cores
- disables the integrated memory benchmark
- disables the big PASS/FAIL pop-up status display
- disables SMBUS/SPD parsing, DMI decoding and memory benchmark
- skips the pause for configuration at startup
- where type is one of
- legacy
- usb
- both
- pauses after probing for USB keyboards
- where mode is one of
- 1 = use the two-step init sequence for high speed devices
- 2 = add a second USB reset in the init sequence
- 3 = the combination of modes 1 and 2
- activate serial/tty console output, where x is one of the following IO port
- 0 = 0x3F8
- 1 = 0x2F8
- 2 = 0x3E8
- 3 = 0x2E8
- 9600
- 19200
- 38400
- 57600
- 115200 (default if not specified or invalid)
- 230400
Keyboard Selection
Memtest86+ supports both the legacy keyboard interface (using I/O ports 0x60 and 0x64) and USB keyboards (using its own USB device drivers). One or the other or both can be selected via the boot command line, If not specified on the command line, the default is to use both if the system was booted in UEFI mode, otherwise to only use the legacy interface.
Older BIOSs usually support USB legacy keyboard emulation, which makes USB keyboards act like legacy keyboards connected to ports 0x60 and 0x64. This can often be enabled or disabled in the BIOS setup menus. If Memtest86+’s USB device drivers are enabled, they will override this and access any USB keyboards directly. The downside of that is that the USB controllers and device drivers require some memory to be reserved for their private use, which means that memory can’t then be covered by the memory tests. So to maximise test coverage, if it is supported, enable USB legacy keyboard emulation and, if booting in UEFI mode, add keyboard=legacy on the boot command line.
NOTE: Some UEFI BIOSs only support USB legacy keyboard emulation when you enable the Compatibility System Module (CSM) in the BIOS setup. Others only support it when actually booting in legacy mode.
Many USB devices don’t fully conform to the USB specification. If the USB keyboard probe hangs or fails to detect your keyboard, try the various workarounds provided by the «usbinit» boot option.
NOTE: Hot-plugging is not currently supported by the Memtest86+ USB drivers. When using these, your USB keyboard should be plugged in before running Memtest86+ and should remain plugged in throughout the test.
Operation
Once booted, Memtest86+ will initialise its display, then pause for a few seconds to allow the user to configure its operation. If no key is pressed, it will automatically start running all tests using a single CPU core, continuing indefinitely until the user reboots or halts the machine.
At startup, and when running tests, Memtest86+ responds to the following keys:
- F1
- enters the configuration menu
- toggles use of multiple CPU cores (SMP)
- toggles scroll lock (stops/starts error message scrolling)
- single message scroll (only when scroll lock enabled)
- exits the test and reboots the machine
Note that testing is stalled when scroll lock is enabled and the scroll region is full.
The configuration menu allows the user to:
- select which tests are run (default: all tests)
- limit the address range over which tests are performed (default: all memory)
- select the CPU sequencing mode (default: parallel)
- parallel
- each CPU core works in parallel on a subset of the memory region being tested
- each CPU core works in turn on the full memory region being tested
- a single CPU core works on the full memory region being tested, with a new CPU core being selected (in round-robin fashion) for each test
- error counts only
- error summary
- individual errors
- BadRAM patterns
- a maximum of 256 CPU cores can be selected, due to memory and display limits
- the bootstrap processor (BSP) cannot be deselected
In all cases, the number keys may be used as alternatives to the function keys (1 = F1, 2 = F2, . 0 = F10).
Error Reporting
The error reporting mode may be changed at any time without disrupting the current test sequence. Error statistics are collected regardless of the current error reporting mode (so switching to error summary mode will show the accumulated statistics since the current test sequence started). BadRAM patterns are only accumulated when in BadRAM mode.
Any change to the selected tests, address range, or CPU sequencing mode will start a new test sequence and reset the error statistics.
Error Counts Only
The error counts only mode just displays the total number of errors found since the current test sequence started.
Error Summary
The error summary mode displays the following information:
- Lowest Error Address
- the lowest address that where an error has been reported
- the highest address that where an error has been reported
- a hexadecimal mask of all bits that have been in error
- total bits in error for all error instances and the min, max and average number of bits in error across each error instance
- the maximum of contiguous addresses with errors
- the total number of errors for each individual test
Individual Errors
The individual error mode displays the following information for each error instance:
- pCPU
- the physical CPU core number that detected the error
- the test pass number where the error occurred (a test pass is a single run over all the currently selected tests)
- the individual test number where the error occurred
- the memory address where the error occurred
- the hexadecimal data pattern expected to be found
- the hexadecimal data pattern read from the failing address
- a hexadecimal mask showing the bits in error
BadRAM Patterns
The BadRAM patterns mode accumulates and displays error patterns for use with the Linux BadRAM feature. Lines are printed in the form badram=F1,M1,F2,M2. In each F,M pair, the F represents a fault address and the M is a bitmask for that address. These patterns state that faults have occurred in addresses that equal F on all 1 bits in M. Such a pattern may capture more errors that actually exist, but at least all the errors are captured. These patterns have been designed to capture regular patterns of errors caused by the hardware structure in a terse syntax.
The BadRAM patterns are grown incrementally rather than calculated from an overview of all errors. The number of pairs is constrained to ten for a number of practical reasons. As a result, handcrafting patterns from the output in address printing mode may, in exceptional cases, yield better results.
Trouble-shooting Memory Errors
Please be aware that not all errors reported by Memtest86+ are due to bad memory. The test implicitly tests the CPU, caches, and motherboard. It is impossible for the test to determine what causes the failure to occur. Most failures will be due to a problem with memory. When it is not, the only option is to replace parts until the failure is corrected.
Once a memory error has been detected, determining the failing module is not a clear cut procedure. With the large number of motherboard vendors and possible combinations of memory slots it would be difficult if not impossible to assemble complete information about how a particular error would map to a failing memory module. However, there are steps that may be taken to determine the failing module. Here are some techniques that you may wish to use:
- This is the simplest method for isolating a failing modules, but may only be employed when one or more modules can be removed from the system. By selectively removing modules from the system and then running the test you will be able to find the bad module(s). Be sure to note exactly which modules are in the system when the test passes and when the test fails.
- When none of the modules can be removed then you may wish to rotate modules to find the failing one. This technique can only be used if there are three or more modules in the system. Change the location of two modules at a time. For example put the module from slot 1 into slot 2 and put the module from slot 2 in slot 1. Run the test and if either the failing bit or address changes then you know that the failing module is one of the ones just moved. By using several combinations of module movement you should be able to determine which module is failing.
- If you are unable to use either of the previous techniques then you are left to selective replacement of modules to find the failure.
Sometimes memory errors show up due to component incompatibility. A memory module may work fine in one system and not in another. This is not uncommon and is a source of confusion. The components are not necessarily bad but certain combinations may need to be avoided.
In the vast majority of cases errors reported by Memtest86+ are valid. There are some systems that cause Memtest86+ to be confused about the size of memory and it will try to test non-existent memory. This will cause a large number of consecutive addresses to be reported as bad and generally there will be many bits in error. If you have a relatively small number of failing addresses and only one or two bits in error you can be certain that the errors are valid. Also intermittent errors are always valid.
All valid memory errors should be corrected. It is possible that a particular error will never show up in normal operation. However, operating with marginal memory is risky and can result in data loss and even disk corruption.
Memtest86+ can not diagnose many types of PC failures. For example a faulty CPU that causes your OS to crash will most likely just cause Memtest86+ to crash in the same way.
Execution Time
The time required for a complete pass of Memtest86+ will vary greatly depending on CPU speed, memory speed, and memory size. Memtest86+ executes indefinitely. The pass counter increments each time that all of the selected tests have been run. Generally a single pass is sufficient to catch all but the most obscure errors. However, for complete confidence when intermittent errors are suspected testing for a longer period is advised.
Memory Testing Philosophy
There are many good approaches for testing memory. However, many tests simply throw some patterns at memory without much thought or knowledge of memory architecture or how errors can best be detected. This works fine for hard memory failures but does little to find intermittent errors. BIOS based memory tests are useless for finding intermittent memory errors.
Memory chips consist of a large array of tightly packed memory cells, one for each bit of data. The vast majority of the intermittent failures are a result of interaction between these memory cells. Often writing a memory cell can cause one of the adjacent cells to be written with the same data. An effective memory test attempts to test for this condition. Therefore, an ideal strategy for testing memory would be the following:
- write a cell with a zero
- write all of the adjacent cells with a one, one or more times
- check that the first cell still has a zero
It should be obvious that this strategy requires an exact knowledge of how the memory cells are laid out on the chip. In addition there is a never ending number of possible chip layouts for different chip types and manufacturers making this strategy impractical. However, there are testing algorithms that can approximate this ideal strategy.
Memtest86+ Test Algorithms
Memtest86+ uses two algorithms that provide a reasonable approximation of the ideal test strategy above. The first of these strategies is called moving inversions. The moving inversion tests work as follows:
- Fill memory with a pattern
- Starting at the lowest address
- check that the pattern has not changed
- write the pattern’s complement
- increment the address
- repeat 2.i to 2.iii
- check that the pattern has not changed
- write the pattern’s complement
- decrement the address
- repeat 3.i — 3.iii
This algorithm is a good approximation of an ideal memory test but there are some limitations. Most high density chips today store data 4 to 16 bits wide. With chips that are more than one bit wide it is impossible to selectively read or write just one bit. This means that we cannot guarantee that all adjacent cells have been tested for interaction. In this case the best we can do is to use some patterns to ensure that all adjacent cells have at least been written with all possible one and zero combinations.
It can also be seen that caching, buffering, and out of order execution will interfere with the moving inversions algorithm and make it less effective. It is possible to turn off caching but the memory buffering in new high performance chips cannot be disabled. To address this limitation a new algorithm called Modulo-20 was created. This algorithm is not affected by caching or buffering. The algorithm works as follows:
- For starting offsets of 0 — 19 do
- write every 20th location with a pattern
- write all other locations with the pattern’s complement
- repeat 1.ii one or more times
- check every 20th location for the pattern
This algorithm accomplishes nearly the same level of adjacency testing as moving inversions but is not affected by caching or buffering. Since separate write passes (1.i, 1.ii) and the read pass (1.iv) are done for all of memory we can be assured that all of the buffers and cache have been flushed between passes. The selection of 20 as the stride size was somewhat arbitrary. Larger strides may be more effective but would take longer to execute. The choice of 20 seemed to be a reasonable compromise between speed and thoroughness.
Individual Test Descriptions
Memtest86+ executes a series of numbered tests to check for errors. These tests consist of a combination of test algorithm, data pattern and caching. The execution order for these tests were arranged so that errors will be detected as rapidly as possible. A description of each test follows.
To allow testing of more than 4GB of memory on 32-bit CPUs, the physical address range is split into 1GB windows which are be mapped one at a time into a virtual memory window. Each 1GB window may contain one or more contiguous memory regions. For most tests, the test is performed on each memory region in turn. Caching is enabled for all but the first test.
Test 0 : Address test, walking ones, no cache
In each memory region in turn, tests all address bits by using a walking ones address pattern. Errors from this test are not used to calculate BadRAM patterns.
Test 1 : Address test, own address in window
In each memory region in turn, each address is written with its own address and then each address is checked for consistency. This test is performed sequentially with each available CPU, regardless of the CPU sequencing mode selected by the user.
Test 2 : Address test, own address + window
Across all memory regions, each address is written with its own virtual address plus the window number (for 32-bit images) or own physical address (for 64-bit images) and then each address is checked for consistency. This catches any errors in the high order address bits that would be missed when testing each window in turn. This test is performed sequentially with each available CPU, regardless of the CPU sequencing mode selected by the user.
Test 3 : Moving inversions, ones & zeros
In each memory region in turn, and for each pattern in turn, uses the moving inversions algorithm with patterns of all ones and all zeros.
Test 4 : Moving inversions, 8 bit pattern
In each memory region in turn, and for each pattern in turn, uses the moving inversions algorithm with patterns of 8-bit wide walking ones and walking zeros.
Test 5 : Moving inversions, random pattern
In each memory region in turn, and for each pattern in turn, uses the moving inversions algorithm with patterns of a random number and its complement. The random number is different on each test pass so multiple passes increase effectiveness.
Test 6 : Moving inversions, 32/64 bit pattern
In each memory region in turn, and for each pattern in turn, uses the moving inversions algorithm with patterns of 32-bit wide (on 32-bit builds) or 64-bit wide (on 64-bit builds) walking ones and walking zeros. Unlike previous tests, the pattern is rotated 1 bit on each successive address.
Test 7 : Block move, 64 moves
This test stresses memory by using block move (movs) instructions and is based on Robert Redelmeier’s burnBX test.
In each memory region in turn, memory is initialized with shifting patterns that are inverted every 8 bytes. Then blocks of memory are moved around using the movs instruction. After the moves are completed the data patterns are checked. Because the data is checked only after the memory moves are completed it is not possible to know where the error occurred. The addresses reported are only for where the bad pattern was found. In consequence, errors from this test are not used to calculate BadRAM patterns.
Test 8 : Random number sequence
In each memory region in turn, each address is written with a random number, then each address is checked for consistency and written with the complement of the original data, then each address is again checked for consistency.
Test 9 : Modulo 20, random pattern
In each memory region in turn, and for each pattern in turn, uses the Modulo-20 algorithm with patterns of a random number and its complement. The random number is different on each test pass so multiple passes increase effectiveness.
Test 10 : Bit fade test, 2 patterns
Across all memory regions, and for each pattern in turn, initialises each memory location with a pattern, sleeps for a period of time, then checks each memory location for consistency. The test is performed with patterns of all zeros and all ones.
Known Limitations and Bugs
Please see the list of open issues and enhancement requests on GitHub.
Feel free to submit bug reports!
Code Contributions
Code contributions are welcomed, either to fix bugs or to make enhancements. See the README_DEVEL.md in the doc directory for some basic guidelines.
Acknowledgments
Memtest86+ v6.0 was based on PCMemTest, developed by Martin Whitaker, which was based on Memtest86+ v5.01, developed by Samuel Demeulemeester, which in turn was based on Memtest86, developed by Chris Brady with the resources and assistance listed below:
The initial versions of the source files bootsect.S, setup.S, head.S and build.c are from the Linux 1.2.1 kernel and have been heavily modified.
Doug Sisk provided code to support a console connected via a serial port. (not currently used)
Code to create BadRAM patterns was provided by Rick van Rein.
The block move test is based on Robert Redelmeier’s burnBX test.
Screen buffer code was provided by Jani Averbach. (not used by Memtest86+ v6.0)
Eric Biederman provided all of the feature content for version 3.0 plus many bugfixes and significant code cleanup.
Major enhancements to hardware detection and reporting in version 3.2, 3.3 and 3.4 provided by Samuel Demeulemeester (from Memtest86+ v1.11, v1.60 and v1.70).
In addition, several bug fixes for Memtest86+ were imported from anphsw/memtest86.
Быстрый ответ: как запустить Memtest в Ubuntu?
Вы можете сделать это, удерживая клавишу «Shift» во время запуска системы. Memtest должен появиться в списке опций. Используйте клавиши со стрелками на с клавиатуры, чтобы выделить параметр «Memtest86 +», и нажмите клавишу «Enter».. Memtest должен правильно загрузиться и начать работу.
Как использовать memtest?
Как проверить оперативную память с помощью Passmark Memtest86
- Скачать Passmark Memtest86.
- Распакуйте содержимое в папку на рабочем столе.
- Вставьте USB-накопитель в свой компьютер. …
- Запустите исполняемый файл «imageUSB».
- Выберите правильный USB-накопитель вверху и нажмите «Запись»…
- Прежде чем продолжить, проверьте, все ли правильно.
Как установить Memtest86 + в Linux?
Выполните следующие шаги, чтобы запустить memtest в вашей системе Ubuntu 20.04.
- Шаг 1. Войдите в меню GRUB. Как вы, возможно, знаете, Memtest86 + работает без операционной системы. …
- Шаг 2: Выберите Memtest86 + В меню GRUB отобразится следующий список опций. …
- Шаг 3: Выйти из теста.
Как мне найти память в Linux?
- Откройте командную строку.
- Введите следующую команду: grep MemTotal / proc / meminfo.
- В результате вы должны увидеть что-то похожее на следующее: MemTotal: 4194304 kB.
- Это ваша общая доступная память.
Как я узнаю, что у меня плохая оперативная память Linux?
Введите команда «мемтестер 100 5» для проверки памяти. Замените «100» размером оперативной памяти, установленной на компьютере, в мегабайтах. Замените «5» количеством раз, которое вы хотите запустить тест.
Можете ли вы запустить Memtest без USB?
MemTest86 это автономная программа, которая не требует и не использует для выполнения какую-либо операционную систему. Используемая версия Windows, Linux или Mac не имеет значения для выполнения. Однако для создания загрузочного USB-накопителя необходимо использовать Windows, Linux или Mac.
Как долго нужно запускать Memtest?
MemTest86 + необходимо запустить для минимум 8 проходов Чтобы быть близким к окончательному, что-либо меньшее не даст полного анализа оперативной памяти. Если вас попросили запустить MemTest86 + от участника Ten Forums, убедитесь, что вы выполнили все 8 проходов для окончательного результата. Если вы выполните менее 8 проходов, вам будет предложено запустить его снова.
Как я узнаю, что моя оперативная память выходит из строя?
Общие симптомы и диагностика плохой памяти компьютера (ОЗУ)
- Bluescreens (синий экран смерти)
- Случайные сбои или перезагрузки.
- Сбои во время задач с интенсивным использованием памяти, таких как игры, Photoshop и т. Д.
- Искаженная графика на экране вашего компьютера.
- Отсутствие загрузки (или включения) и / или повторяющиеся длинные звуковые сигналы.
- На экране появляются ошибки памяти.
Как использовать командную строку grub?
С BIOS, быстро нажмите и удерживайте клавишу Shift, что вызовет меню GNU GRUB. (Если вы видите логотип Ubuntu, вы пропустили момент, когда вы можете войти в меню GRUB.) В UEFI нажмите (возможно, несколько раз) клавишу Escape, чтобы открыть меню grub. Выберите строку, которая начинается с «Дополнительные параметры».
Как остановить MemTest?
Прерывание memtest86 + ничего не даст, поскольку он никогда не записывает никаких постоянных данных. Если нажатие клавиши Esc не приводит к выходу из сеанса memtest86 +, вы можете безопасно прервать memtest86 + в любое время, просто выключив компьютер.
Что такое MemTest?
MemTest86 — это оригинальный, бесплатный, автономный ПО для тестирования памяти для компьютеров x86 и ARM. MemTest86 загружается с USB-накопителя и проверяет оперативную память вашего компьютера на наличие неисправностей, используя ряд комплексных алгоритмов и тестовых шаблонов.
Yosoygames
Think out of the box. A site about software, video games, graphics, music and media in general
Think out of the box. A site about software, video games, graphics, music and media in general
Installing memtest86 on UEFI Grub2 Ubuntu
memtest86+ is not available on UEFI.
memtest86 (a non FOSS product with a free and a commercial option) is often in the answers as the alternative.However the only option you have is to download it, and format an entire USB stick and boot for it.
Well… that’s not necessary! We can add memtest86 as an entry to GRUB2, just like memtest86+ used to be, which is very convenient.
There’s already an article about this, but it’s Arch oriented, and outdated because the ISO image is no longer provided, only the USB image is available now.
Besides, Arch users already have an AUR for this.
Steps:
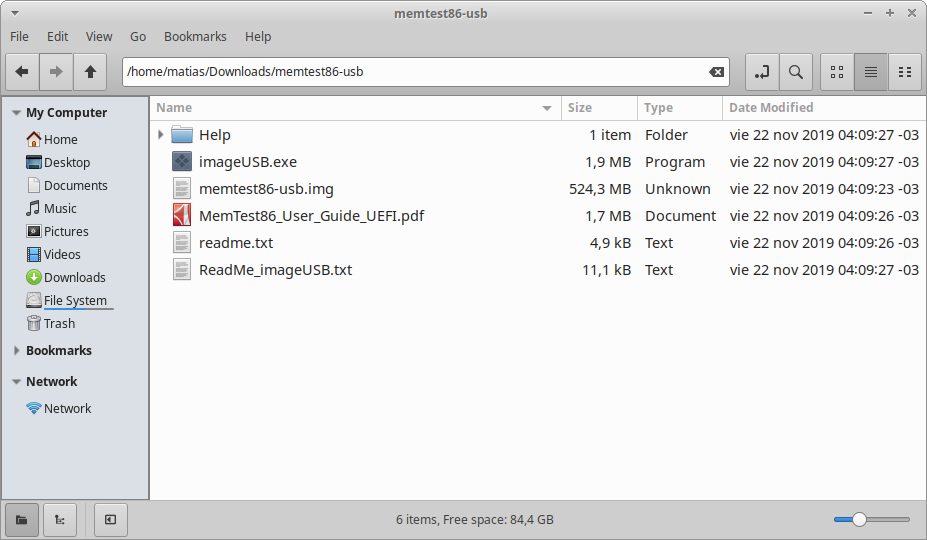
2. Unzip it somewhere, e.g. /home/matias/Downloads/memtest86-usb You will see its contents:
3. We need to analyze memtest86-usb.img using fdisk -lu to see it’s mount offset:
We need to mount memtest86-usb.img2. Because each sector is 512 and it starts at 514048, we need to multiply these two together and mount byte offset 514048*512 = 263192576
4. Now we create a folder (e.g. /home/matias/memtest-tmp) and mount it:
5. Now we need to copy the folder /home/matias/memtest-tmp/EFI/BOOT to the EFI partition. This should be at /boot/efi, but we double check with gnome-disks:
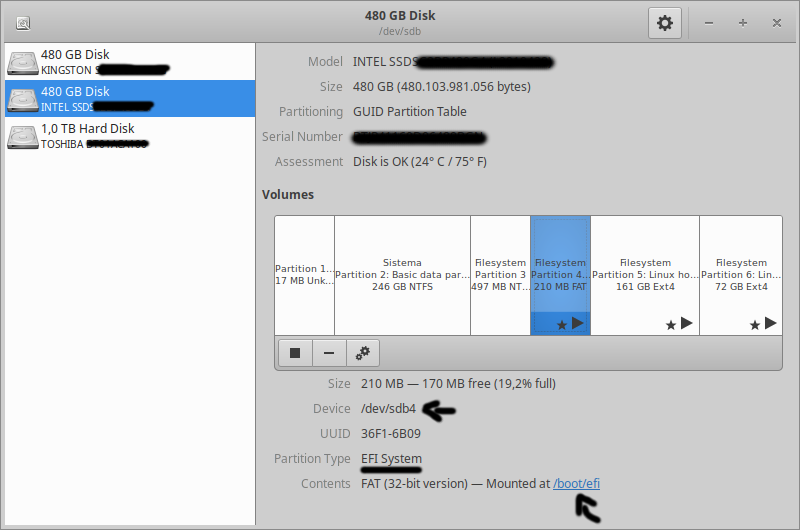
You need to write down the following information:
- That the partition type is the EFI System (there’s only one per disk)
- Where it is mounted (/boot/efi)
- The device letter. It’s /dev/sdb4; thus it’s the letter b. This will be important later
- The partition number. It’s /dev/sdb4; thus it’s partition 4. This will be important later
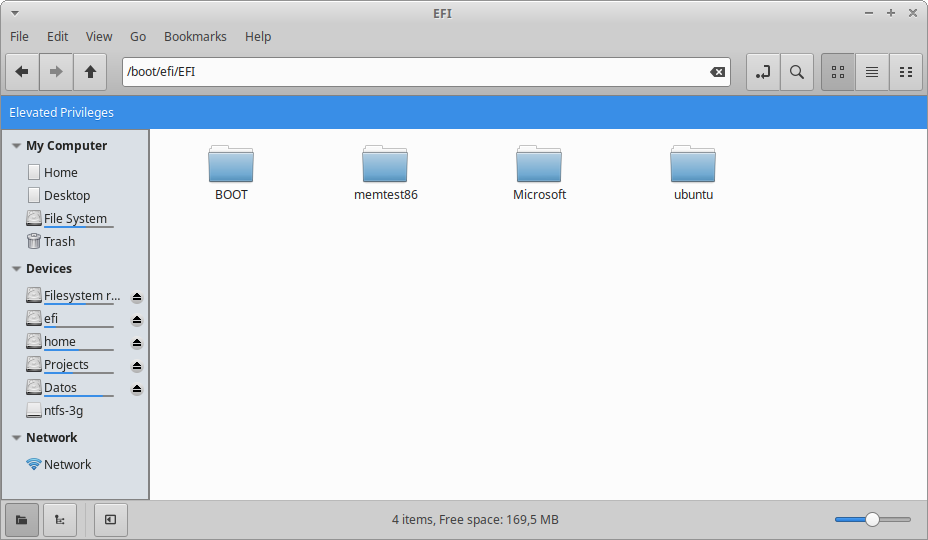
6. Now let’s copy it to /boot/efi. If done correctly, it should look like this:
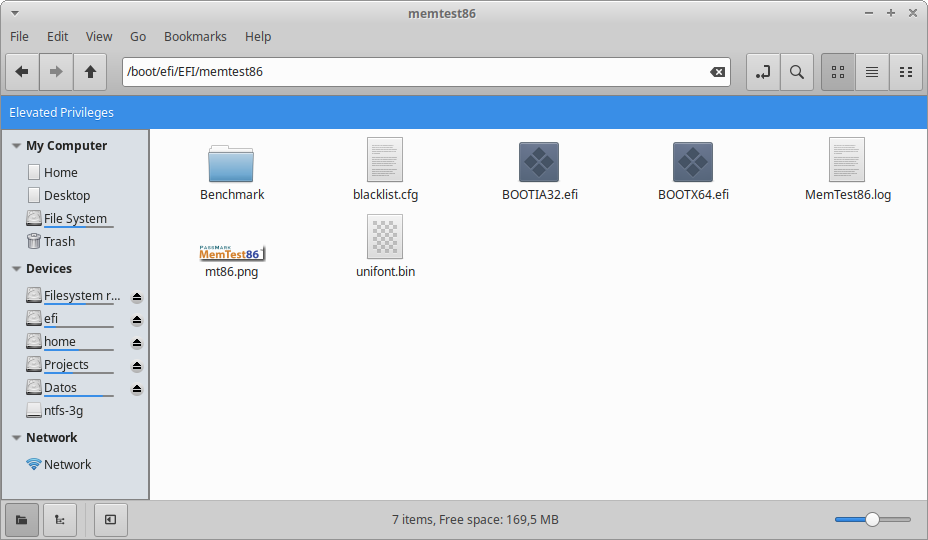
7. We need to create a GRUB chainloader entry now. Create a file /etc/grub.d/40_memtest, be careful not to overwrite anything. If that file already exists, then use another name with the 40_ or 41_ prefix and fill it with this:
Important: We know in my computer it’s ‘hd1,gpt4‘ because:
- Mount point was /dev/sdb4; meaning it’s hd1. If it had been /dev/sda4, then it would be hd0
- Mount point was /dev/sdb4; meaning it’s gpt4. If it had been /dev/sdb0, then it would be gpt0
In your computer it may be different.
btw make sure access is right:
8. Run:
And now you’re done! After rebooting, memtest86 should be selectable from your GRUB loader.
- parallel