How do I execute a PowerShell script automatically using Windows task scheduler?
I have one PowerShell script which sends emails. I want to execute that script automatically, every 1 minute. How can I do it, using task scheduler?
Currently I have created a task and provided the path of my script. But that scheduler opens my script, instead of executing.
I am using Windows 7 Professional and PowerShell version 2.0.5.
![]()
![]()
7 Answers 7
Create the scheduled task and set the action to:
Arguments: -File «C:\Users\MyUser\Documents\ThisisMyFile.ps1»
![]()
Here is an example using PowerShell 3.0 or 4.0 for -RepeatIndefinitely and up:
![]()
Instead of only using the path to your script in the task scheduler, you should start PowerShell with your script in the task scheduler, e.g.
See powershell /? for an explanation of those switches.
If you still get problems you should read this question.
![]()
In my case, my script has parameters, so I set:
Arguments: -Command «& C:\scripts\myscript.ps1 myParam1 myParam2»
![]()
![]()
After several hours of test and research over the Internet, I’ve finally found how to start my PowerShell script with task scheduler, thanks to the video Scheduling a PowerShell Script using Windows Task Scheduler by Jack Fruh @sharepointjack.
Program/script -> put full path through powershell.exe
Add arguments -> Full path to the script, and the script, without any » «.
Start in (optional) -> The directory where your script resides, without any » «.
Запуск PowerShell скриптов по расписанию
В задачи практически любого системного администратора входит написание различных скриптов и их запуск. Запланировать запуск скрипта по расписанию с помощью Task Sheduler — задача несложная, но при использовании PowerShell есть некоторые нюансы, о которых я расскажу в этой статье.
Итак, предположим, у меня есть скрипт start.ps1, который мне необходимо запускать ежедневно в течении 10 дней. Есть два способа решить эту задачу.
Способ 1
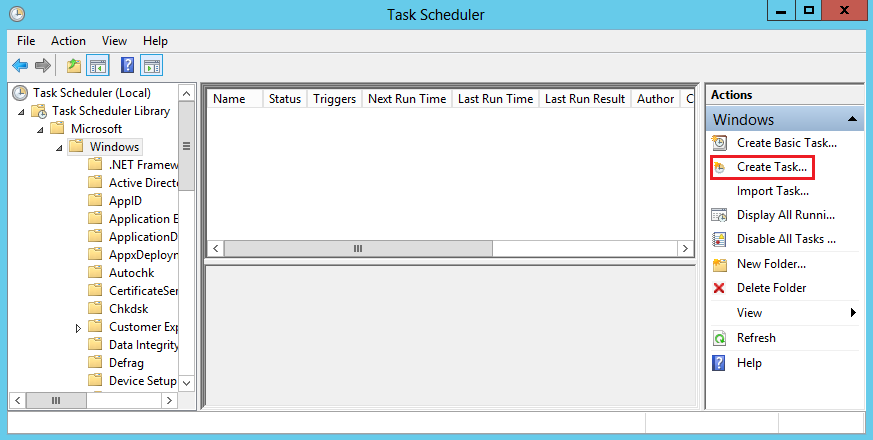
Для запуска скрипта воспользуемся оснасткой Task Scheduler, он же планировщик заданий. Найти его можно в разделе Administrative Tools, либо нажав Win+R и введя команду taskschd.msc. Открываем планировщик и в разделе Actions выбираем пункт Create Task.
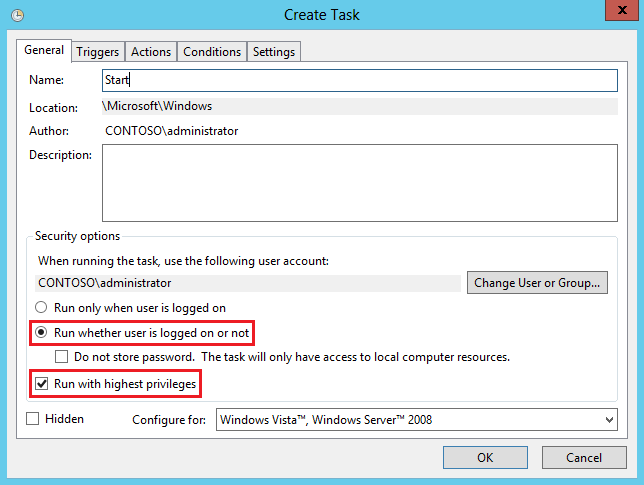
На вкладке General указываем имя и описание задания, а также (по необходимости) пользователя, от имени которого задание будет запускаться. Для того, чтобы задание выполнялось вне зависимости от того, залогинен ли пользователь в системе, выбираем опцию «Run whether user is logged on or not». Если для выполнения задания требуется повышение привилегий, то отмечаем опцию «Run with highest privileges».
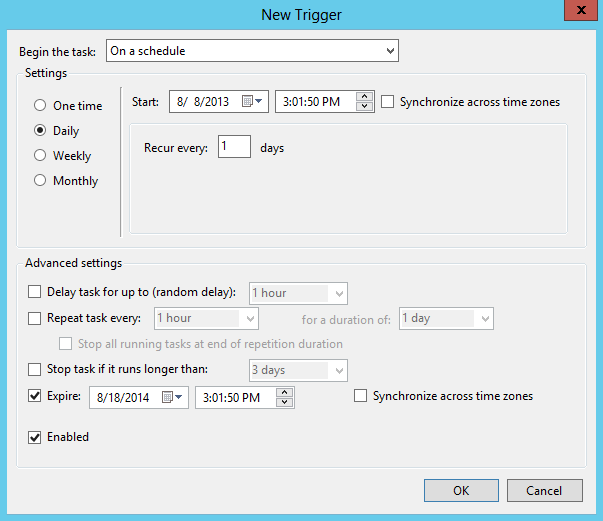
Далее идем на вкладку Triggers и создаем новый триггер, в котором будет храниться расписание запуска нашего задания. В поле Start указываем дату и время запуска, а в поле Expire — дату и время завершения задания. Указываем выполнять задание ежедневно (Daily) и задаем период повтора (Recur every) 1 день.
Примечание. Если вы хотите запускать задание чаще, чем раз в день, то надо выбрать одноразовое выполнение (One time), а в разделе Advanced settings отметить пункт Repeat task every и указать время повторения, минимум 5 минут, максимум 1 час. Если этого недостаточно, то дополнительно в поле Delay task for up to можно указать временную задержку.
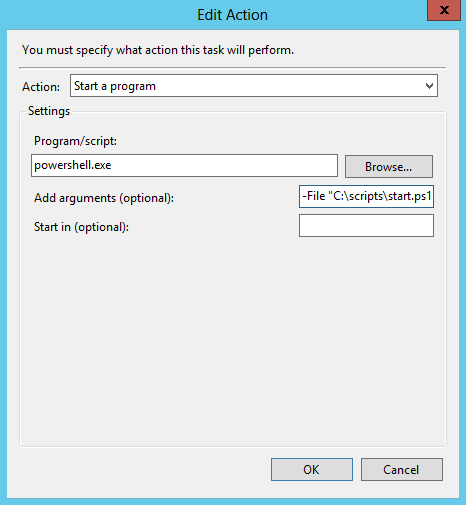
И основное. Переходим на вкладку Action и указываем действие для запланированного задания. Напомню, что в целях безопасности PowerShell скрипты могут выполняться только интерактивно, то есть сначала надо запустить оболочку PowerShell и уже в ней указать путь к скрипту. Поэтому в поле «Action» указываем запуск powershell.exe, а в поле «Add Arguments» параметр -File и путь к нашему скрипту, вот так:
Также в поле аргументы можно указать:
-Command — выполняет указанные команды и любые другие параметры. Этот параметр тоже можно использовать для запуска скрипта, например: -Command ″&
-ExecutionPolicy — задает политику выполнения скриптов для текущего сеанса, может принимать значения Unrestricted, RemoteSigned, AllSigned и Restricted. Заданная политика будет действовать только в текущем сеансе и имеет приоритет над любыми ранее созданными политиками;
-NonInteractive — отключить вывод интерактивных запросов к пользователю;
-WindowStyle Hidden — запуск окна PowerShell в скрытом режиме, незаметно для пользователя;
-NoProfile — предотвращает загрузку профиля, что может несколько ускорить выполнение скрипта;
-NoExit — оставить оболочку открытой после отработки скрипта. Это может понадобиться при проверке и отладке скрипта.
Заполнив необходимые поля жмем ОК и сохраняем задание. Теперь скрипт будет запускаться по расписанию ежедневно в заданное время в течении 10 дней.
Способ 2
В PowerShell 3.0 появился новый функционал Sheduled Job, дающий возможность создавать запланированные задания прямо из консоли, не пользуясь оснасткой планировщика. Воспользуемся им для планового запуска нашего скрипта.
Сначала создаем расписание запуска (ежедневно в полпятого вечера, в течении 10 дней):
$t = New-JobTrigger -Daily -At 4:30PM -DaysInterval 10
Затем сохраняем в переменной учетные данные:
$cred = Get-Credential contoso\administrator
В качестве опции указываем запуск задания с повышенными привилегиями:
$o = New-ScheduledJobOption -RunElevated
И регистрируем задание с именем Start:
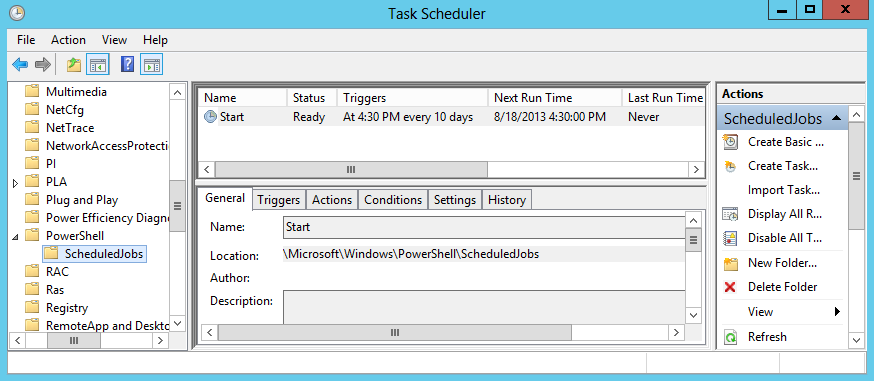
Register-ScheduledJob -Name Start -FilePath C:\Scripts\start.ps1 -Trigger $t -Credential $cred -ScheduledJobOption $o
Чтобы убедится в том, что задание создано, можно открыть планировщик и найти наше задание в разделе Microsoft\Windows\PowerShell\SheduledJobs.
Примечание. Для каждого запланированного задания PowerShell в директории %systemdrive%\Users\%username%\AppData\Local\Microsoft\Windows\PowerShell\ScheduledJobs создается одноименная папка. В этой папке находится само задание в XML-файле и папка Output, в которой, в подпапках по времени выполнения, хранится история выполнения задания — результат выполнения (файлs Result.xml) и статус задания (Status.xml). Эти файлы могут пригодиться для отладки и диагностики в том случае, если задание не отрабатывает должным образом.
Execution Policy
В заключение напомню об одном немаловажном моменте, а именно о политике выполнения скриптов Execution Policy. Посмотреть текущее значение политики можно командой Get-ExecutionPolicy . Политика выполнения может иметь значения:
• Restricted — блокируется выполнение любых скриптов. Значение по умолчанию;
• AllSigned — разрешено выполнение скриптов, имеющих цифровую подпись;
• RemoteSigned — скрипты, подготовленные на локальном компьютере, можно запускать без ограничений, скрипты, загруженные из Интернета — только при наличии цифровой подписи;
• Unrestricted — разрешено выполнение любых скриптов. При запуске неподписанного скрипта, который был загружен из Интернета, программа может потребовать подтверждение;
• Bypass — ничего не блокируется, никакие предупреждения и запросы не появляются.
Обычно для безпроблемного выполнения скриптов достаточно задать значение RemoteSigned. Изменить текущее значение можно командой Set-ExecutionPolicy , например:
Set-ExecutionPolicy RemoteSigned -force
Примечание. Если указанная в команде политика выполнения противоречит групповой политике, то параметр запишется в реестр, но действовать не будет.
How to Automate PowerShell Scripts with Task Scheduler
Microsoft Windows Task Scheduler can help you automatically launch a program or PowerShell script at a certain time or when certain conditions are met. You can also schedule sending emails and even displaying certain messages. In this blog, we will show you how to run a PowerShell script from Task Scheduler that will alert on any software installation on a local computer.
We will also create scheduled tasks using PowerShell scripts. You will learn how to:
- Create Tasks with Task Scheduler
- Modify or Delete Scheduled Tasks
- Create Scheduled Tasks with PowerShell Scripts.
Creating Tasks with Task Scheduler
Open Task Scheduler by pressing “Windows+R” and then typing “taskschd.msc” in the window that opens. Then take the following steps:

1. Click “Create a task” and enter a name and description for the new task. To run the program with administrator privileges, check the “Run with the highest privileges” box. In our example, we’ll assign a service account to run the task, and run it regardless of whether the user is logged on.
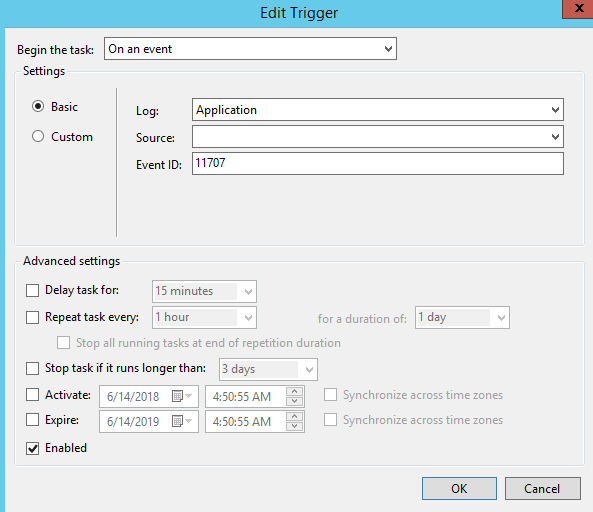
2. Switch to the Triggers tab and click the “New…” button. Here you can specify the conditions that trigger the task to be executed. For example, you can have it executed on schedule, at logon, on idle, at startup or whenever a particular event occurs. We want our task to be triggered by any new software installation, so we choose “On an event” from the drop-down menu and select “Application” from the Log settings. Leave the “Source” parameter blank and set the EventID to “11707”. Click “OK” to save the changes.
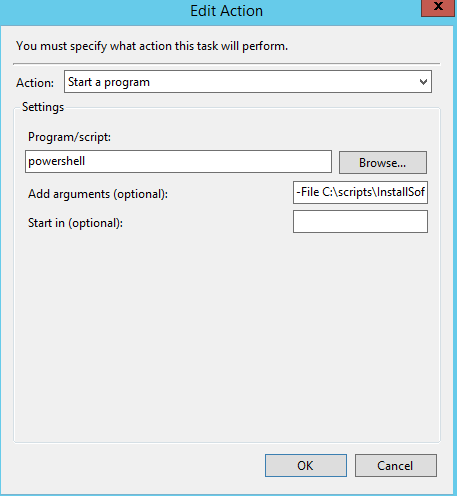
3. Navigate to the “Actions” tab, and click “New…”. Here you can specify the actions that will be executed whenever the trigger conditions are met. For instance, you can send an email or display a message. In our case, we want to start a program, so we need to create the PowerShell script we want to run and save it with the “ps1” extension. You can find the script here; it will send an alert with the event details about the installed software.
To schedule the PowerShell script, specify the following parameters:
- Action: Start a program
- Program\script: powershell
- Add arguments (optional): -File [Specify the file path to the script here]
Click “OK” to save your changes.
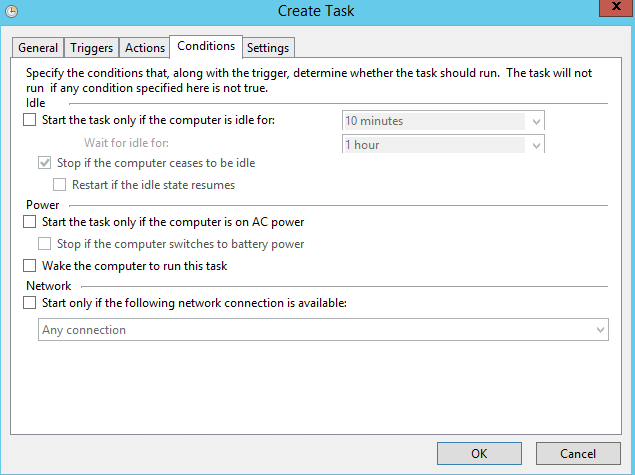
4. The “Conditions” tab enables you to specify the conditions that, along with the trigger, determine whether the task should be run. In our case, we should leave the default settings on this tab.
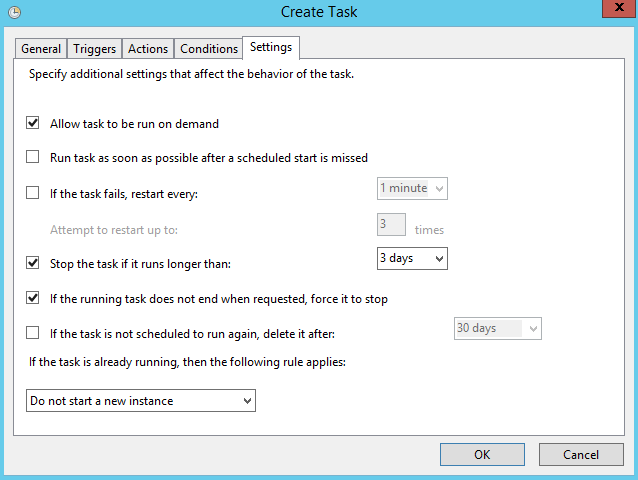
5. You can also set up additional parameters for your scheduled task on the “Settings” tab. For our example, though, we’ll leave them unchanged.
6. When the task is completely set up, the system will ask you for the service account password. Note that this account must have the “Log on as Batch Job” right. Enter the password and click “OK” to save the task.
7. For Task Scheduler to function properly, the Job Scheduler service must be set to start Run “Services.msc”. In the list of services, find Task Scheduler and double-click it. On the General tab, set the startup type to “Automatic” and click OK to save your change.
Now whenever new software is installed on your Microsoft Windows Server, you will be notified via an email that details the time of the installation, the name of the software and the user ID (SID) of the person who installed it.
Modifying or Deleting Scheduled Tasks
To modify an existing task, right-click it in the list, select Properties, edit the required settings and click OK. To delete a scheduled task, right-click it, select Delete and confirm the action.
Creating Scheduled Tasks with PowerShell Scripts
Now that you know how to create a task using Task Scheduler, let’s find out how to create a scheduled task using PowerShell. Suppose we want our task to be launched daily at 10 AM, and it must execute the PowerShell script you can find here, which will monitor changes to group membership in the Active Directory site.
In Windows Powershell 2.0 (Windows 7, Windows Server 2008 R2), to create a scheduled job, you must use the TaskScheduler module. Install the module by running the “Import-Module TaskScheduler” command and use the following script to create a task that will execute the PowerShell script named GroupMembershipChanges.ps1 daily at 10 AM:
Windows PowerShell 4.0 (Windows Server 2012 R2 and above) doesn’t include the Task Scheduler module, so this script will not work. Instead, PowerShell 3.0 and 4.0 introduced new cmdlets for creating scheduled tasks, New-ScheduledTaskTrigger and Register-ScheduledTask, which make creating a scheduled task much easier and more convenient. So let’s create a task that will execute our script daily at 10 AM using the system account (SYSTEM). This task will be performed by an account with elevated privileges.

Other trigger options that could be useful in creating new tasks include:
- -AtStartup — Triggers your task at Windows startup.
- -AtLogon — Triggers your task when the user signs in.
- -Once — Triggers your task once. You can set a repetition interval using the –RepetitionInterval parameter.
- -Weekly — Triggers your task once a week.
Note that, using these cmdlets, it is not possible to trigger execution “on an event” as we did with the Task Scheduler tool. PowerShell scripts with “on an event” triggers are much more complicated, so this is a real disadvantage of using PowerShell rather than Task Scheduler.
Conclusion
As you can see, it is easy to create scheduled tasks using Task Scheduler or PowerShell. But remember that improper changes to your scheduled tasks can cause service interruptions and degrade server performance. Therefore, it’s essential to track all changes to your scheduled tasks.
Запуск PowerShell скриптов по расписанию
Одним из несомненных достоинств PowerShell является то, что сценарии этого языка программирования очень удобно использовать для автоматизации периодически возникающих задач, добавив их в Планировщик задач.
Однако настроить запуск скриптов PowerShell по расписанию не так-то легко: простое указание в задаче ссылки на .ps1-файл ни к чему не приведет. Существует несколько хитростей, позволяющих использовать Планировщик задач для работы с PowerShell.
Запуск из vbs-скрипта
Проще всего настроить запуск Powershell-сценария по расписанию, добавив в Планировщик задач vbs-скрипт, который, в свою очередь, и будет запускать сценарий PowerShell.
Чтобы открыть Диспетчер задач, нажмите Пуск –> Выполнить –> введите в появившемся окне taskschd.msc и нажмите OK. Появится окно Диспетчера задач.

Затем щелкнете по строке меню «Действие» и выбираем пункт «Создать задачу». Более подробную инструкцию можно прочесть в статьей Планировщик заданий.
Указывать путь к vbs-файлу необходимо в окне «Создание действия». Кликните по кнопке «Обзор» и укажите путь к vbs-скрипту.