Export AD Users to CSV with PowerShell
In this tutorial, you will learn how to export Active Directory users to CSV with PowerShell.
I’ll also show you how to export users from an OU, and get specific user attributes like last logon, email addresses, state, city, and so on.
To run the commands from this guide you need to make sure PowerShell is up to date and you have the RSAT tools installed. For this demo, I’m using a Windows 10 computer and using PowerShell version 5.1. You can check your version with this command.
How to Export Active Directory Users to CSV
Here are the steps to export Active Directory users to CSV.
Step 1: Get-ADUser PowerShell Command
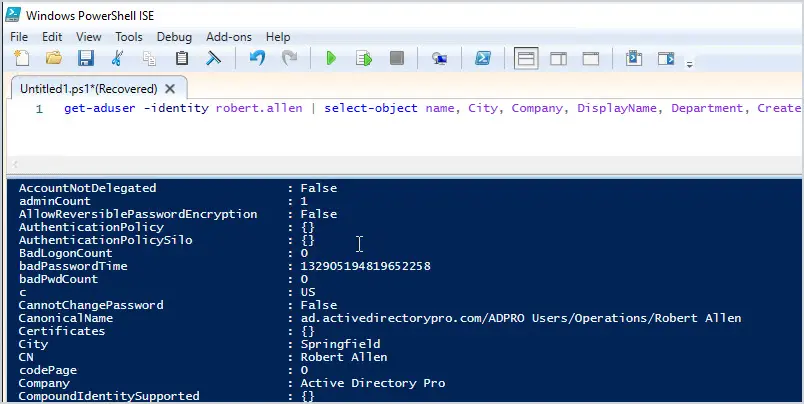
To export users with PowerShell, the Get-ADUser cmdlet is used. This command will get user accounts from Active Directory and display all or selected attributes. It’s important to know how this command works so you can export the data you need.
The most important thing to remember is how to display all the user attributes. This will come in useful when you want to export only specific account details.
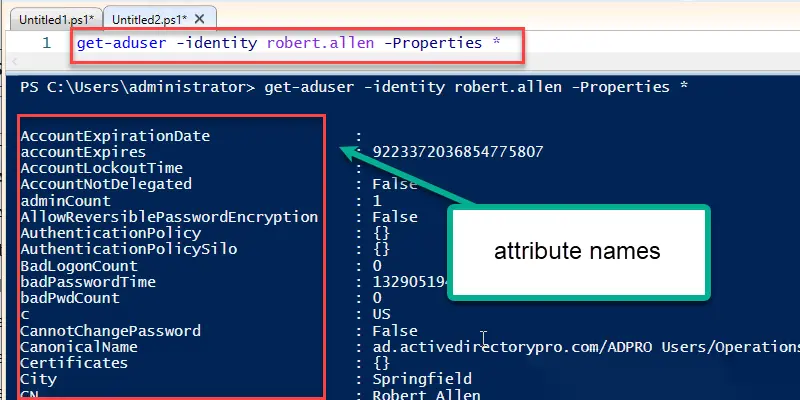
The below command will get all user attributes for a single user.
Change the “username” to a user in your domain.
Pay attention to the left column. These are the user attribute names and the values on the right. In example 4, I’ll show you how to select specific attributes to include in the export.
Step 2: Export to CSV command
Add “export-CSV -path” to the end of the command to export to a CSV file. See the below example, I’m exporting all the properties for this user to c:\temp\export.csv.
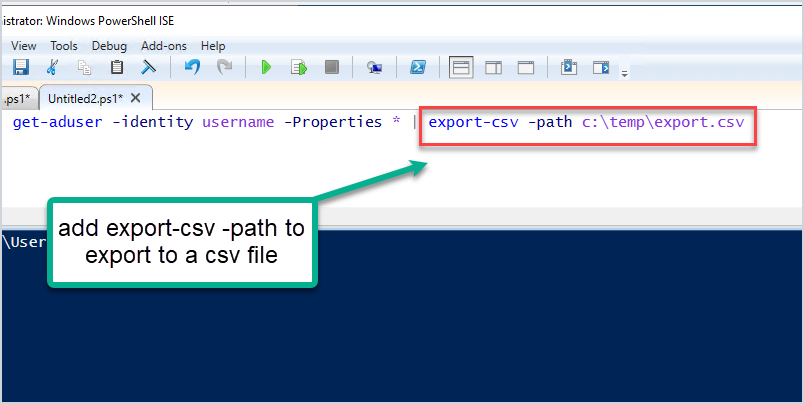
You should now have a CSV export of all user properties for a single user.
Step 3: Export specific user attributes
If you don’t want to export all user attributes then use the “select-object” command and enter only the attributes you need. If you have followed along from the beginning then you know how to find the attribute names, if not then jump to example 2.
In the below example I’ll export the DisplayName, City and State.
Step 4: How to export all users
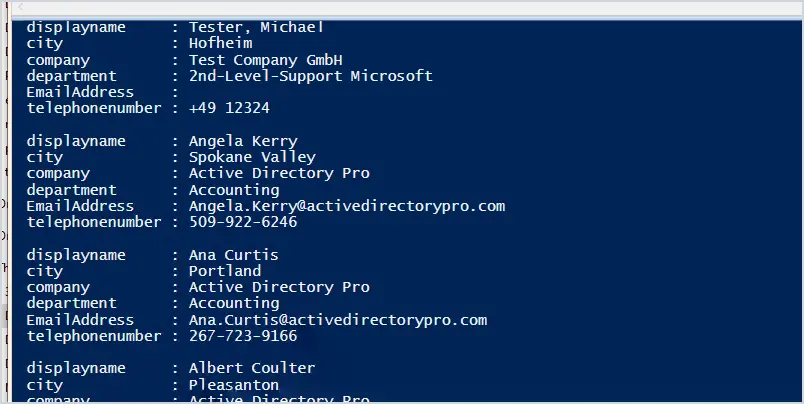
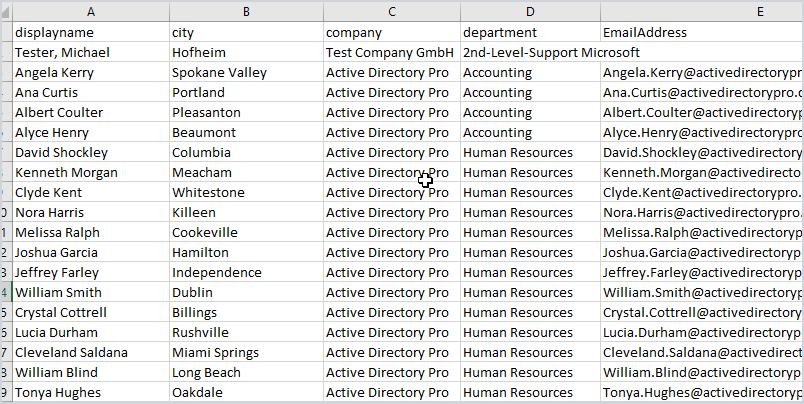
To export all users remove (-identity) and add (-filter *) to the command. In the below example I’m exporting all users and selecting displayname, city, company, department, EmailAddress, and telephonenumber.
Here is what this looks like in Powershell.
Here is the CSV.
Step 5: Export Users from a specific OU
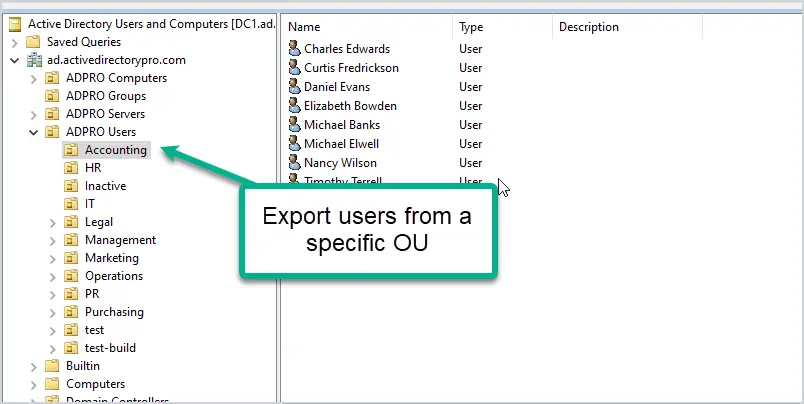
To export users from specific OUs use the “-SearchBase” command and the “distinguishedName” value of the OU.
In the below example I’m getting all the users in my accounting OU.
Here is the PowerShell output.
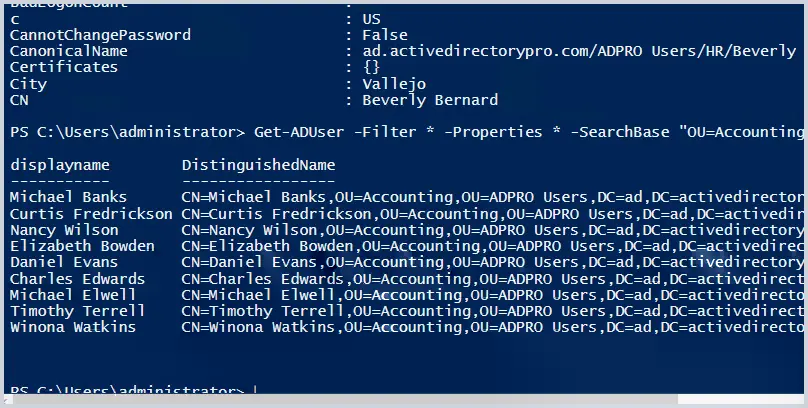
Then add export-csv -path to the end to export this to CSV.
At this point, you should be able to export single, all users, or users from a specific OU. I also showed you how to export all or specific user attributes.
Below are a few more PowerShell examples.
Export only enabled users
To get just the enabled user accounts you need to add a filter that searches for enabled = true.
Export users to CSV with last logon date
Export Users With the GUI AD Export Tool
If you need advanced exports such as adding additional user properties or users group membership then check out the examples below of the AD User Export Tool.
 Export User information to CSV using AD Pro Toolkit
You can download a free trial of the AD User Export Tool by clicking the button below.
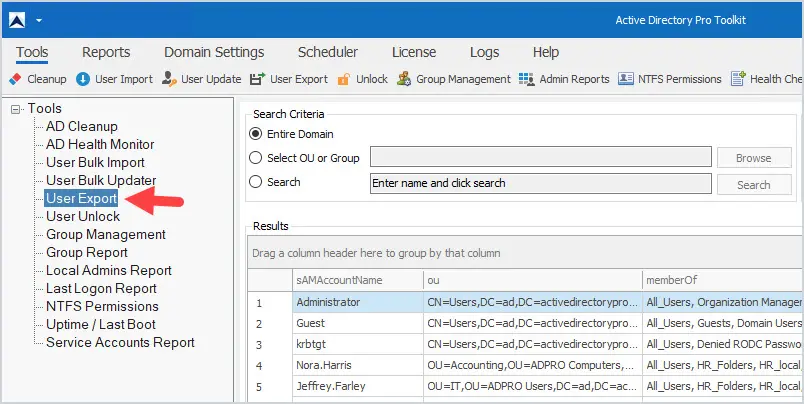
Step 1: Open the AD User Export Tool
Once you have the AD Pro toolkit installed click on “User Export”
Step 2: Choose Path to Export
In the search criteria box pick where you want to export from, you can pick the following:
- Entire Domain – This will export all users in your domain
- Select OU or Group – This allows you to select one or multiple OUs or groups to export.
In this example, I’m going to export all users from two security groups “Management_folders” and Management_Printers”.

Step 3: Pick AD User Fields to include in the Export
The attribute picker has over 50 attributes you can easily add or remove to the export.
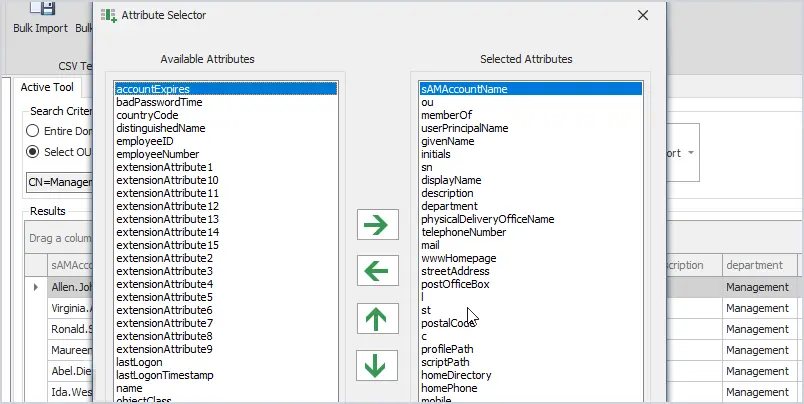
For this example, I’m going to leave the default fields selected. You can always remove unwanted fields after exporting by deleting the columns in the CSV file.
Step 4: Click the Run button to preview the export
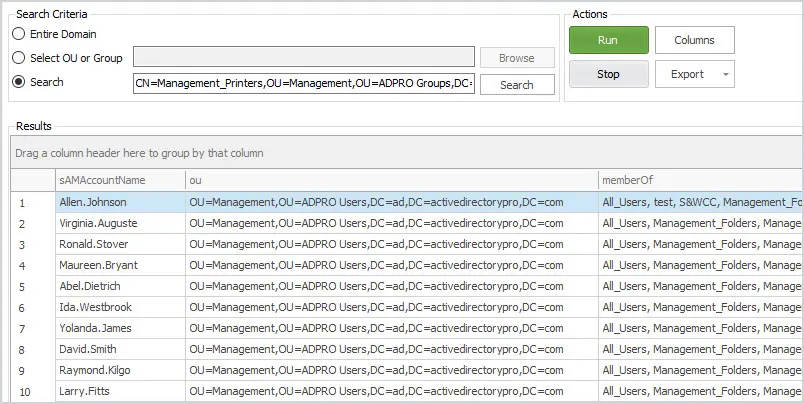
The last step is to click the export button and select the export file type.
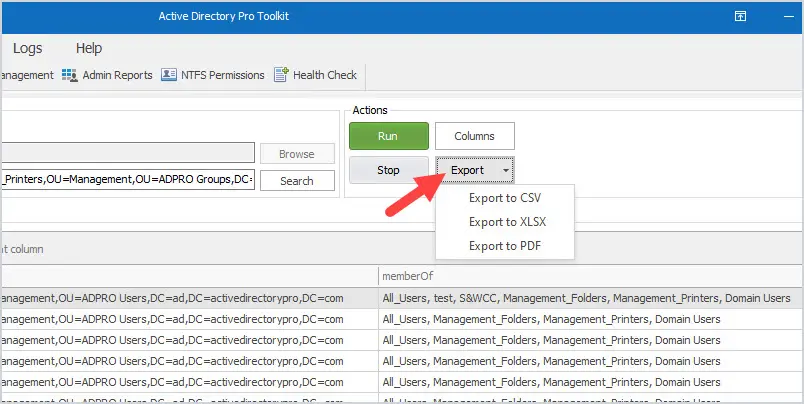
You will be prompted to save the file. Give the file a name and save it to your computer.
Here is an example export.
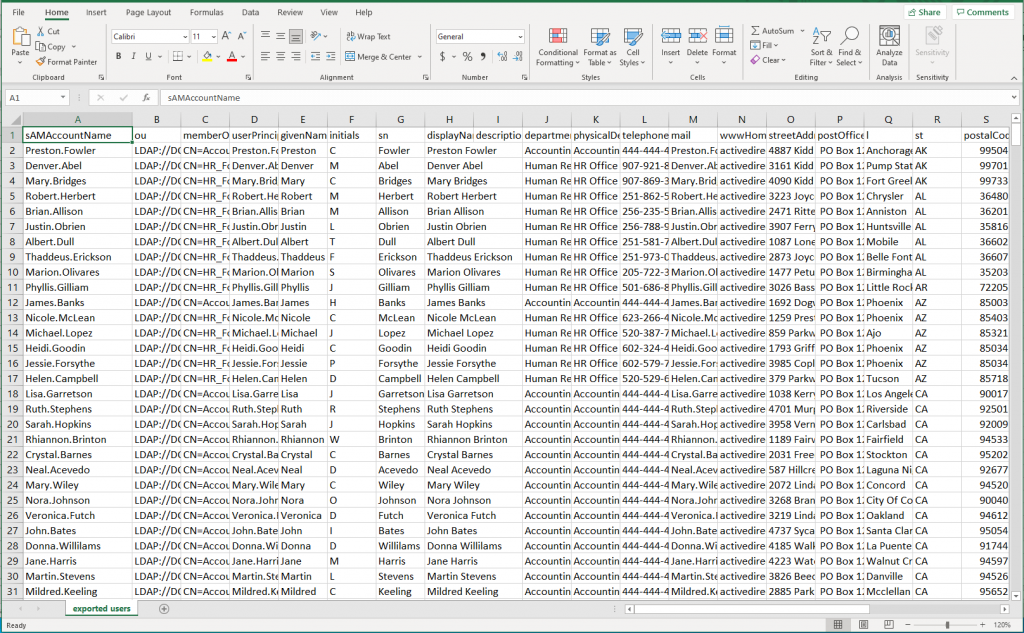
Include Users Group Membership in the CSV
One nice feature of the GUI tool is it will include the user’s group membership. Below is an example from my export. So for each user, it will show you which security groups they are a member of. Of course, you can just uncheck “memberOf” in the columns picker if you don’t want to see this info.
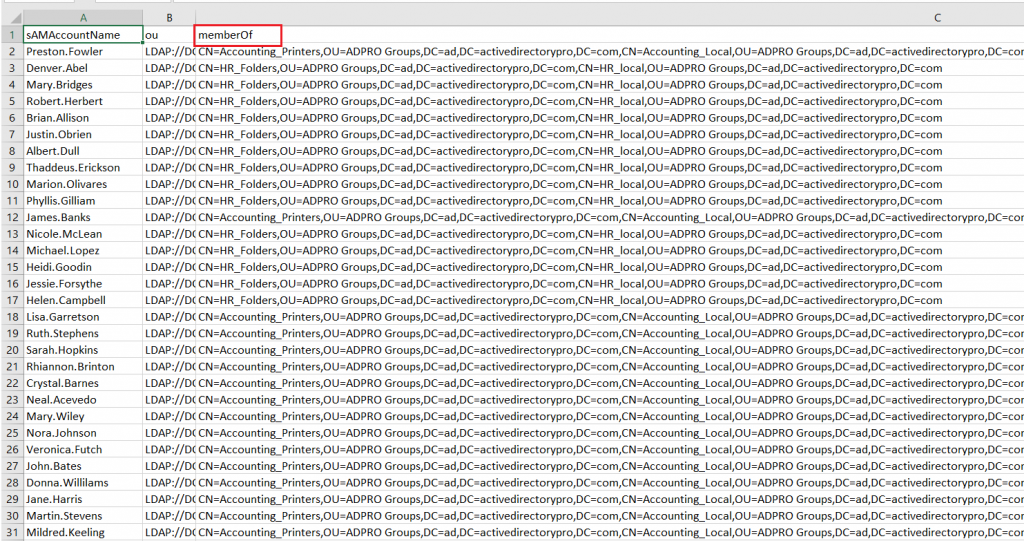
The graphical user export tool makes it easy for anyone to export user information to CSV. If you don’t want to mess with complicated PowerShell scripts then I recommend checking it out.
Export Users with Active Directory Users and Computers
This method uses the Active Directory Users and Computers console to export users. If you need a very basic export with limited user fields then this option is for you. The one problem is it is limited to a single folder.
Step 1: Open Active Directory Users and Computers
Step 2: Browse to the container that has the users you want to export.
In my test environment, I’ll be exporting the users from the HR container.
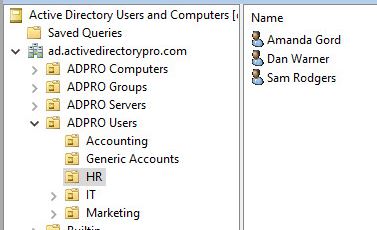
Step 3: Click the export button
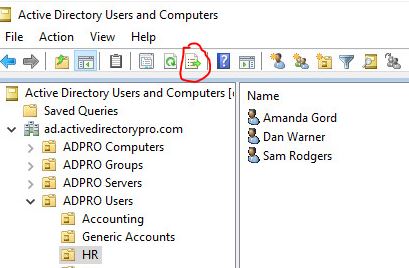
Now just browse to where you want to save the file, name it and change save as type to CSV.
I’ll open the CSV file in excel to verify it was exported.
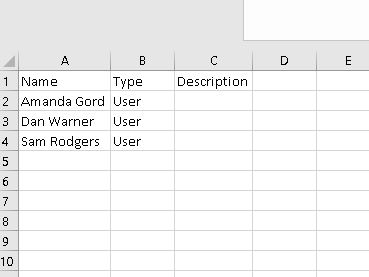
How Do You Export all Users to CSV?
The problem with exporting users from ADUC (Active Directory Users and Computers Console)is that it only exports users from a specific folder. If you have users organized into many different folders, you would have to export from each one of them.
To Export all Users you have two options.
- User Export GUI Tool
- PowerShell
Using the GUI tool you just select “Entire Domain” and click run.
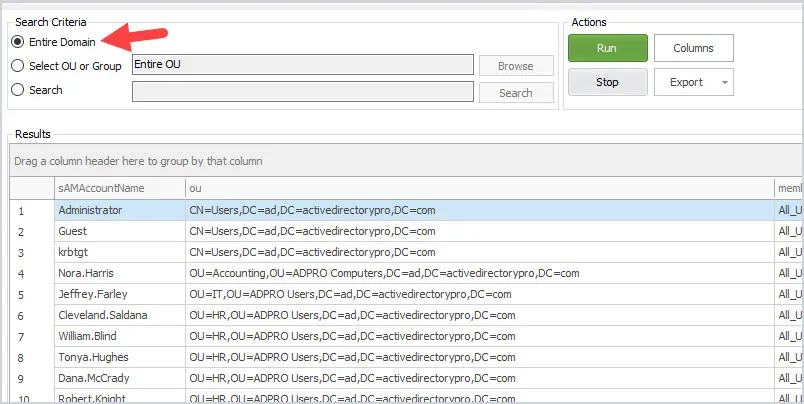
With PowerShell, the below command will export all users to CSV. This will just export the user’s name, you will need to add additional attributes as needed.
Summary
I just showed you 3 options for exporting Active Directory users to CSV. I recommend you try them all out and see which option is best for you. The built-in Microsoft console has the fewest options but if you just need a simple export then it works ok.
PowerShell can be a great option for exporting user accounts but it can be complex and challenging at times for quick solutions. If you are not into PowerShell and need an option to export from groups, OUs, and to select which fields to export then the AD User Export Tool is a great choice.
Recommended Tool: Permissions Analyzer for Active Directory
This FREE tool lets you get instant visibility into user and group permissions and allows you to quickly check user or group permissions for files, network, and folder shares.
You can analyze user permissions based on an individual user or group membership.
Импорт — Экспорт пользователей Active Directory
Иногда возникают задачи по вводу новых пользователей в каталог Active Directory. Если речь идет об одном или двух пользователях, то это легко сделать с помощью консоли (если сервер имеет GUI), а если из PowerShell, то командой New-ADUser.
Подробнее о команде:
Добавить пользователя с параметрами:
После ввода команды нужно будет ввести пароль для пользователя MyName.
Чтобы увидеть структуру данных для пользователя AD:
или выгрузить в файл данные:
Выгрузить все объекты в файл:
Загрузим в AD заранее подготовленных пользователей списком из файла формата .csv
Сам файл имеет такой вид:
Скрипт PowerShell для загрузки пользователей в AD:
Скрипт сохраняем в формате .ps1 и не забываем разрешить выполнение скриптов:
Файл .csv может быть отредактирован согласно требованиям заполнения каталога AD и соответственно нужно внести правки с скрипт по необходимым полям.
Скрипты выгрузки всех пользователей из MS Active Directory (ITGC)
Одной из стандартных процедур проведения аудита ITGC для каталога Active Directory является получение выгрузки всех пользователей домена. На основании полученных данных далее формируются процедуры тестирования, к примеру изучение списка администраторов или выявление пользователей с истекшим паролем. Наиболее эффективным для формирования такой выгрузки будет использование стандартного интерфейса PowerShell , примеры которого мы и рассмотрим в данной статье
1. Экспресс выгрузка скриптом на PowerShell
Ниже представлен скрипт PowerShell, как один из наиболее простых и быстрых способов получить список всех пользователей домена AD в формате CSV, который без проблем открывается тем же Excel»ем.
$objSearcher = New-Object System.DirectoryServices.DirectorySearcher $objSearcher.SearchRoot = «LDAP://ou=Users,ou=Departmets,dc=test,dc=ru» $objSearcher.Filter = «(&(objectCategory=person)(!userAccountControl:1.2.840.113556.1.4.803:=2))» $users = $objSearcher.FindAll() # Количество учетных записей $users.Count $users | ForEach-Object < $user = $_.Properties New-Object PsObject -Property @< Должность = $user.description Отдел = $user.department Логин = $user.userprincipalname Телефон = $user.telephonenumber Комната = $user.physicaldeliveryofficename ФИО = $user.cn >> | Export-Csv -NoClobber -Encoding utf8 -Path С:list_domen_users.csv
Для того что бы скрипт отработал на вашей системе, необходимо его чуть подкорректировать, а именно вписать необходимые параметры, т.е. как в данном примере это параметры Users в подразделении Departments в домене Test.ru. А так же указать путь к месту сохранения файла list_domen_users.csv
После выгрузки, если сразу открыть list_domen_users.csv , будет выглядеть в не читабельном виде, однако, станалртыми средствами мы легко его приведем в нужный нам формат. Открываем в Excel list_domen_users.csv , выделяем первый столбец, затем заходим во вкладку «Данные» и нажимаем «Текст по столбцам». Выбираем «с разделителями» и нажимаем «Далее». Готово!
!Необходимо заметить , что данный скрипт не отобразит более 1000 пользователей. Для небольшой компании вполне подойдет, а тем же у кого в домене огромное количество пользователей стоит прибегнуть к методам описанным ниже.
2. Продвинутый командлет PowerShell для получения выгрузки пользователей Active Directory
Инструмент Active Directory Module for Windows PowerShell (представлен в Windows Server 2008 R2 и выше), позволяет формировать командлеты которые выполняют различные манипуляции с объектами каталога AD. Для получения информации о пользователях и их свойствах предназначен командлет Get-ADUser.
Для начала запускаем окно Powershell с правами администратора и импортируем модуль Active Directory для дальнейших действия:
Import-Module activedirectory
Чтобы вывести список всех учетных записей домен а, выполним команду:
Чтобы вывести полную информации обо всех доступных атрибутах пользователя tuser, выполним команду
Get-ADUser -identity tuser -properties *
К примеру, нас интересует информация о дате смены пароля и времени, когда он истечет . Результат выполнения команды можно выгрузить в текстовый файл:
Get-ADUser -filter * -properties PasswordExpired, PasswordLastSet, PasswordNeverExpires | ft Name, PasswordExpired, PasswordLastSet, PasswordNeverExpires > C:tempusers.txt
Или сразу выгрузить в CSV , который в дальнейшем будет удобно экспортировать в Excel (дополнительно с помощью sort-object отсортируем таблицу по столбцу PasswordLastSet , а также добавим условие where – имя пользователя должно содержать строку «Dmitry»)
Get-ADUser -filter * -properties PasswordExpired, PasswordLastSet, PasswordNeverExpires | where <$_.name –like “*Dmitry*”>| sort-object PasswordLastSet | select-object Name, PasswordExpired, PasswordLastSet, PasswordNeverExpires | Export-csv -path c:tempuser-password-expires-2015.csv
В комментариях к предыдущей статье вспомнили про учет в Excel вместо 1С. Что ж, проверим, насколько вы знаете Excel. Сегодня я покажу, как получать данные из Active Directory и работать с ними без макросов и PowerShell — только штатными механизмами Office. Например, можно запросто получить аналитику по использованию операционных систем в организации, если у вас еще нет чего-либо вроде Microsoft SCOM. Ну, или просто размяться и отвлечься от скриптов.
Для работы с данными я буду использовать механизм Power Query . Для офиса 2010 и 2013 придется устанавливать плагин , в Microsoft Office 2016 этот модуль уже встроен. К сожалению, стандартной редакции нам не хватит, понадобится Professional.
Сам механизм предназначен для получения и обработки данных из самых разных источников ― от старого ODBC и текстовых файлов, до Exchange, Oracle и Facebook. Подробнее о механизме и встроенном скриптовом языке «M» уже писали на Хабре , я же разберу пару примеров использования Power Query для получения данных из Active Directory.
Разминка: посмотрим, когда наши пользователи логинились
Сам запрос к базе домена создается на вкладке «Данные ― Новый запрос ― Из других источников ― Из Active Directory».

Указываем источник данных.
Понадобится выбрать название домена, указать необходимые данные для подключения. Далее выберем тип объектов, в этом примере ― user . Справа в окне предпросмотра запрос уже выполняется, показывая предварительный вид данных.

Подготавливаем запрос, любуемся предпросмотром.
Предварительно запрос стоит подготовить, нажав кнопку «изменить» и выбрав нужные колонки. По сути эти колонки ― это классы Каждый из них содержит набор определенных атрибутов объекта Active Directory, кроме основной колонки displayName , которая сама является атрибутом. Я остановлюсь на классах user , person , top и securityPrincipal . Теперь необходимо выбрать нужные атрибуты из каждого класса с помощью «расширения» ― значок с двумя стрелочками у заголовка колонки:
- класс user расширим, выбрав lastLogonTimestamp и userAccountControl ;
- в person выберем telephoneNumber ;
- в top ― whenCreated ;
- и в securityPrincipal ― SamAccountName .

Расширяем запрос.
Теперь настроим фильтр: в частности, чтобы не получить заблокированные аккаунты, нужно чтобы атрибут userAccountControl имел значение 512 или 66048. Фильтр может быть другой в вашем окружении. Подробнее про атрибут можно прочитать в документации Microsoft .

Применяем фильтр .
Теперь столбец userAccountControl стоит удалить ― в отображении он не нужен совершенно. И нажимаем «Загрузить и закрыть».
Получилась табличка, которую осталось совсем немного довести до ума. Например, переименовать столбцы в что-то удобочитаемое. И настроить автоматическое обновление данных.
Автоматическое обновление при открытии таблицы или по таймауту настраивается во вкладке «Данные» в «Свойствах».

Настройка обновления данных.
После того, как настройка обновления будет завершена, можно смело отдавать таблицу сотрудникам отдела персонала или службе безопасности ― пусть знают, кто и когда входил в систему.
Код запроса на языке «М» под спойлером.
let Источник = ActiveDirectory.Domains(«domain.ru»), domain.ru = Источник<>[#»Object Categories»], user1 = domain.ru<>, #»Удаленные столбцы» = Table.RemoveColumns(user1,<"organizationalPerson", "shadowAccount", "posixAccount", "msExchOmaUser", "msExchBaseClass", "msExchIMRecipient", "msExchCertificateInformation", "msExchMultiMediaUser", "msExchMailStorage", "msExchCustomAttributes", "mailRecipient", "distinguishedName">), #»Развернутый элемент securityPrincipal» = Table.ExpandRecordColumn(#»Удаленные столбцы», «securityPrincipal», <"sAMAccountName">, <"sAMAccountName">), #»Развернутый элемент top» = Table.ExpandRecordColumn(#»Развернутый элемент securityPrincipal», «top», <"whenCreated">, <"whenCreated">), #»Развернутый элемент person» = Table.ExpandRecordColumn(#»Развернутый элемент top», «person», <"telephoneNumber">, <"telephoneNumber">), #»Развернутый элемент user» = Table.ExpandRecordColumn(#»Развернутый элемент person», «user», <"lastLogonTimestamp", "userAccountControl">, <"lastLogonTimestamp", "userAccountControl">), #»Строки с применным фильтром» = Table.SelectRows(#»Развернутый элемент user», each ( = 512 or = 66048)), #»Измененный тип» = Table.TransformColumnTypes(#»Строки с примененным фильтром»,<<"lastLogonTimestamp", type datetime>>), #»Удаленные столбцы1″ = Table.RemoveColumns(#»Измененный тип»,<"userAccountControl">) in #»Удаленные столбцы1″
Создаем адресную книгу, или что делать, когда корпоративный портал с AD не дружит
Другой вариант использования Excel в связке с Active Directory ― это формирование адресной книги, исходя из данных AD. Понятно, что адресная книга получится актуальной, только если в домене порядок.
Создадим запрос по объекту user , развернем класс user в mail , а класс person в telephoneNumber . Удалим все столбцы, кроме distinguishedName ― структура домена повторяет структуру предприятия, поэтому названия Organizational Units соответствуют названиям подразделений. Аналогично в качестве основы названий подразделений можно использовать и группы безопасности.
Теперь из строки CN=Имя Пользователя, OU=Отдел Бухгалтерии, OU=Подразделения, DC=domain, DC=ru нужно извлечь непосредственно название отдела. Проще всего это сделать с использованием разделителей на вкладке «Преобразование».

Извлекаем текст.
В качестве разделителей я использую OU= и ,OU= . В принципе, достаточно и запятой, но я перестраховываюсь.

Вводим разделители.
Теперь с помощью фильтра можно отсечь ненужные OU , вроде заблокированных пользователей и Builtin , настроить сортировку и загрузить данные в таблицу.

Вид итоговой таблицы.
Быстрый отчет по составу рабочих станций, без внедрения агентов и прочей подготовки
Теперь попробуем создать полезную таблицу, получив данные по компьютерам. Сделаем отчет по используемым компанией операционным системам: для этого создадим запрос, но в навигаторе на этот раз выберем computer .

Делаем запрос по объекту computer.
Оставим классы-колонки computer и top и расширим их:
- класс computer расширим, выбрав cn , operatingSystem , operatingSystemServicePack и operatingSystemVersion ;
- в классе top выберем whenCreated .

Расширенный запрос.
При желании можно сделать отчет только по серверным операционным системам. Например, применить фильтр по атрибуту operatingSystem или operatingSystemVersion. Я не буду этого делать, но поправлю отображение времени создания ― мне интересен только год. Для этого на вкладке «Преобразование» выберем нужную нам колонку и в меню «Дата» выберем «Год».

Извлекаем год из времени ввода компьютера в домен.
Теперь останется удалить столбец displayname за ненадобностью и загрузить результат. Данные готовы. Теперь можно работать с ними, как с обычной таблицей. Для начала сделаем сводную таблицу на вкладке «Вставка» ― «Сводная таблица». Согласимся с выбором источника данных и настроим ее поля.

Настройки полей сводной таблицы.
Теперь остается настроить по вкусу дизайн и любоваться итогом:
/>
Сводная таблица по компьютерам в AD.
При желании можно добавить сводный график, также на вкладке «Вставка». В «Категории» (или в «Ряды», по вкусу) добавим operatingSystem , в данные ― cn . На вкладке «Конструктор» можно выбрать тип диаграммы по душе, я предпочел круговую.

Круговая диаграмма.
Теперь наглядно видно, что, несмотря на идущее обновление, общее количество рабочих станций с Windows XP и серверов с Windows 2003 довольно велико. И есть к чему стремиться.
Код запроса под спойлером.
let Источник = ActiveDirectory.Domains(«domain.ru»), domain.ru = Источник<>[#»Object Categories»], computer1 = domain.ru<>, #»Удаленные столбцы» = Table.RemoveColumns(computer1,<"user", "organizationalPerson", "person">), #»Другие удаленные столбцы» = Table.SelectColumns(#»Удаленные столбцы»,<"displayName", "computer", "top">), #»Развернутый элемент computer» = Table.ExpandRecordColumn(#»Другие удаленные столбцы», «computer», <"cn", "operatingSystem", "operatingSystemServicePack", "operatingSystemVersion">, <"cn", "operatingSystem", "operatingSystemServicePack", "operatingSystemVersion">), #»Развернутый элемент top» = Table.ExpandRecordColumn(#»Развернутый элемент computer», «top», <"whenCreated">, <"whenCreated">), #»Извлеченный год» = Table.TransformColumns(#»Развернутый элемент top»,<<"whenCreated", Date.Year>>), #»Удаленные столбцы1″ = Table.RemoveColumns(#»Извлеченный год»,<"displayName">) in #»Удаленные столбцы1″
В этой статье мы рассмотрим возможности PowerShell по управлению группами домена Active Directory. Мы рассмотрим, как создать новую группу в AD, добавить в нее пользователей (или удалить), вывести список пользователей группы и несколько других полезных действия с доменными группами, которые чрезвычайно полезны при повседневном администрировании. Для управления группами AD в модуле PowerShell для Active Directory имеются следующие основные командлеты:
Для использования данных командлетов в вашей сессии PowerShell должен быть загружен специальный модуль взаимодействия с AD — Active Directory Module for Windows PowerShell . Данный модуль впервые был представлен в Windows Server 208 R2. В Windows Server 2012 и выше этот модуль включен по умолчанию. На клиентских компьютерах его можно установить и включить в качестве одного из компонентов RSAT. Проверить, загружен ли модуль можно так:

Как вы видите, модуль ActiveDirectory загружен. Если нет – импортируйте его командой:
Полный список команд модуля можно получить так:
Get-Command -Module ActiveDirectory
В модуле всего доступно 147 командлетов, из которых с группами могут работать 11.
Get-Command -Module ActiveDirectory -Name «*Group*»

- Add-ADPrincipalGroupMembership
- Get-ADAccountAuthorizationGroup
- Get-ADGroup
- Get-ADGroupMember
- Get-ADPrincipalGroupMembership
- New-ADGroup
- Remove-ADGroup
- Remove-ADPrincipalGroupMembership
- Set-ADGroup
Создадим новую группу в указанном контейнере (OU) Active Directory с помощью команды New-ADGroup :
New-ADGroup «TestADGroup» -path «OU=Groups,OU=Moscow,DC=corp,dc=winitpro,DC=ru» -GroupScope Global -PassThru –Verbose
С помощью атрибута Description можно задать описание группы, а с помощью DisplayName изменить отображаемое имя.

Параметром GroupScope можно задать один из следующих типов групп:
- 0 = DomainLocal
- 1 = Global
- 2 = Universal
Создать группу распространения можно так:
New-ADGroup «TestADGroup-Distr» -path «OU=Groups,OU=Moscow,DC=corp,dc=winitpro,DC=ru» -GroupCategory Distribution -GroupScope Global -PassThru –Verbose
Add-AdGroupMember – добавить пользователей в группу AD
Добавить пользователей в группу Active Directory можно с помощью командлета Add-AdGroupMember . Добавим в новую группу двух пользователей:
Add-AdGroupMember -Identity TestADGroup -Members user1, user2
Если список пользователей, которых нужно добавить в группу довольно большой, можно сохранить список учетных записей в CSV файл, затем импортировать данный файл и добавить каждого пользователя в группу.
Формат CSV файла такой (список пользователей по одному в строке, имя столбца – users)

Import-CSV .\users.csv -Header users | ForEach-Object
Чтобы получить всех членов одной группы (groupA) и добавить их в другую группу (groupB), воспользуйтесь такой командой:
Get-ADGroupMember “GroupA” | Get-ADUser | ForEach-Object
В том случае, если нужно скопировать в новую группу и членов всех вложенных групп (рекурсивно), нужно воспользоваться такой командой:
Get-ADGroupMember -Identity “GroupA” -Recursive | Get-ADUser | ForEach-Object
Remove-ADGroupMember – удалить пользователей из группы
Для удаления пользователей из группы AD нужно использовать командует Remove-ADGroupMember. Удалим из группы двух пользователей:
Remove-ADGroupMember -Identity TestADGroup -Members user1, user2
Подтвердите удаление пользователей из группы:
Если нужно удалить из группы пользователей по списку из CSV файла, воспользуйтесь такой командой:
Import-CSV .\users.csv -Header users | ForEach-Object
Get-ADGroup – получить информацию о группе AD
Получить информацию о группе поможет командлет Get-ADGroup :
Даная команда выводит информацию об основных атрибутах группы (DN, тип группы, имя, SID). Чтобы вывести значение всех атрибутов группы домена AD, выполните такую команду:
Get-ADGroup «TestADGroup» -properties *

Как вы видите, теперь стали отображаться такие атрибуты, как время создания и модификации группы, описание и т.д.
С помощью командлета Get-ADGroup можно найти все интересующие вас группы по определенному шаблону. Например, нужно найти все группы AD, в имени которых содержится фраза admins :
Get-ADGroup -LDAPFilter “(name=*admins*)” | Format-Table
Get-ADGroupMember – вывести список пользователей группы AD
Вывести на экран список пользователей группы:
Чтобы оставить в результатах только имена пользователей, выполните:
Get-ADGroupMember «TestADGroup»| ft name

Если в данную группу включены другие группы домена, чтобы вывести полный список членов, в том числе всех вложенных групп, воспользуйтесь параметром Recursive .
Get-ADGroupMember ‘server-admins» -recursive| ft name
Чтобы выгрузить список учетных записей, состоящих в определённой группе в CSV файл (для дальнейшего использования в Excel), выполните такую команду:
Get-ADGroupMember ‘server-admins» -recursive| ft samaccountname| Out-File c:\ps\admins.csv
Чтобы добавить в текстовый файл данные учетных записей пользователей в AD, воспользуемся командлетом . Например, помимо учетной записи нужно вывести должность и телефон пользователя группы:
Get-ADGroupMember -Identity ’server-admins’ -recursive| foreach
(Get-ADGroupMember -Identity «domain admins»).Count
Оказалось, что в группе «domain admins» у нас состоит 7 учетных записей администраторов.
Чтобы найти список пустых групп в определенном OU, воспользуйтесь такой командой:
Get-ADGroup -Filter * -Properties Members -searchbase “OU=Moscow,DC=corp,dc=winitpro,DC=ru” | where <-not $_.members>| select Name
Сегодня мы попробуем выгрузить список все пользователей в отдельный файл из Active Directory. Главным помощником в этом деле у нас будет PowerShell. Всё дело в том, что Microsoft изначально планировала командную консоль PowerShell как основной инструмент для управления серверными компонентами Windows. И на сегодняшний день, когда мы имеем уже версию 2.0, по большому счету, это так и есть.
Ещё в недалеком прошлом, чтобы хоть как-то взаимодействовать с AD, администраторам необходимо было иметь в своем распоряжении либо утилиту dsquery, либо разного рода скрипты или утилиты. Сегодня же начиная с версии Windows Server 2008 R2, мы можем работать с AD через PowerShell. С приходом PowerShell 2.0 для взаимодействия с Active Directory используется специальный модуль Active Directory Module for Windows PowerShell , который содержит в себе необходимый список командлетов. Для наших задач мы будем использовать команду Get-ADUser .
Итак, в зависимости под управлением какой операционной системы мы будем запускать консоль PowerShell, нам необходимо будет выполнить “подготовительные действия”.
1) Если мы работаем из-под Windows Server до версии 2012 , то нам необходимо выполнить команду:
- Import-Module activedirectory – команда для импортирования модуля в AD
Для версий операционной системы от 2012 и выше, данный модуль уже включен по умолчанию.
2) Если мы работаем из под любой клиентской Windows, то на ней должен быть установлен пакет удаленного администрирования RSAT, с проинсталлированным компонентом Active Directory Module for Windows PowerShell.
Стоит отметить, что командлет Get-ADUser рекомендуется выполнять при количестве выгружаемых данных до 1000 пользователей.
Экспортируем пользователей AD при помощи PowerShell в отдельный файл
Для начала вызовем справку для команды Get-ADUser. В результате Вы получите все необходимые команды для дальнейшего администрирования.
- help Get-ADUser – команда для вызова справки
Чтобы получить в окне PowerShell список всех пользователей со всеми свойствами, необходимо выполнить следующую команду:
- Get-ADUser -filter * – экспорт списка пользователей AD
Данная выгрузка не совсем информативна и не умещает в окне всю необходимую информацию. Поэтому попробуем сузить поиск и выведем свойства конкретного пользователя с именем user1:
- Get-ADUser -identity user1 -properties * – экспорт свойств определенного пользователя
А теперь попробуем экспортировать список всех пользователей с их свойствами во внешний txt или csv файл:
- Get-ADUser -filter * -properties * | Export-csv -path c:\users.csv -encoding Unicode – экспорт пользователей в отдельный файл

Хотелось бы обратить отдельное внимание на ключ -encoding Unicode . Он служит для того, чтобы русская кириллица, после экспорта из AD, могла корректно отображаться в выгруженном файле. Например, через Microsoft Excel мы увидим вопросительные знаки вместо русских букв.
При просмотре файла данные экспортируются в одну строку и тем самым не пригодны для чтения. Чтобы это изменить, нам необходимо выполнить следующие действия:

У меня есть следующий рабочий скрипт, который проверяет, является ли большой список пользователей в CSV-файле членом группы AD и записывает результаты в results.csv.
Не знаете, как преобразовать сценарий, чтобы я мог изменить $group = «InfraLite» на $group = DC .\List_Of_AD_Groups.CSV .
Таким образом, сценарий не просто возвращает совпадения для одной группы AD, но так что он возвращает совпадения для групп 80 AD, содержащихся в List_of_AD_groups.csv. Написание YES/NO для каждой группы AD в новом столбце CSV (или, если это невозможно, создание отдельного CSV-файла для каждой группы с результатами будет также.
Я мог бы сделать это вручную, изменив значение из $group и имя файла экспорта и повторного запуска скрипта в 80 раз, но должен быть быстрым был с PS, чтобы сделать это
NAME AD_GROUP1 AD_GROUP2 AD_GROUP80 etc etc. user1 yes no yes user2 no no yes user3 no yes no echo «UserName`InfraLite» >> results.csv $users = GC .\user_list.csv $group = «InfraLite» $members = Get-ADGroupMember -Identity $group -Recursive | Select -ExpandProperty SAMAccountName foreach ($user in $users) < if ($members -contains $user) < echo "$user $group`tYes" >> results.csv > else < echo "$user`tNo" >> results.csv > >
2 ответа
тривиальное решение вашей проблемы было бы обернуть ваш существующий код в другом цикле и создать выходной файл для каждой группы:
$groups = Get-Content «C:\groups.txt» foreach ($group in $groups)
Более изящный подход был бы создать шаблон отображения группы, клонировать его для каждого пользователя, и заполнить копию с членством в группах пользователя. Нечто подобное должно работать:
$template = @<> Get-Content «C:\groups.txt» | ForEach-Object < $template[$_] = $false >$groups = @<> Get-ADGroup -Filter * | ForEach-Object < $groups[$_.DistinguishedName] = $_.Name >Get-ADUser -Filter * -Properties MemberOf | ForEach-Object < $groupmap = $template.Clone() $_.MemberOf | ForEach-Object < $groups[$_] >| Where-Object < $groupmap.ContainsKey($_) >| ForEach-Object < $groupmap[$_] = $true >New-Object -Type PSObject -Property $groupmap > | Export-Csv «C:\user_group_mapping.csv» -NoType
я играл с этим на некоторое время, и я думаю, что я нашел способ, чтобы получить Вас именно то, что вы были после.
Я думаю, что Ansgar был на правильном пути, но я не мог заставить его делать то, что было после. Он упомянул, что на момент написания статьи он не имел доступа к среде AD.
Вот что я придумал:
$UserArray = Get-Content «C:\Temp\Users.txt» $GroupArray = Get-Content «C:\Temp\Groups.txt» $OutputFile = «C:\Temp\Something.csv» # Setting up a hashtable for later use $UserHash = New-Object -TypeName System.Collections.Hashtable # Outer loop to add users and membership to UserHash $UserArray | ForEach-Object < $UserInfo = Get-ADUser $_ -Properties MemberOf # Strips the LPAP syntax to just the SAMAccountName of the group $Memberships = $UserInfo.MemberOf | ForEach-Object< ($_.Split(",")).replace("CN=","") >#Adding the User=Membership pair to the Hash $UserHash.Add($_,$Memberships) > # Outer loop to create an object per user $Results = $UserArray | ForEach-Object < # First create a simple object $User = New-Object -TypeName PSCustomObject -Property @< Name = $_ ># Dynamically add members to the object, based on the $GroupArray $GroupArray | ForEach-Object < #Checking $UserHash to see if group shows up in user"s membership list $UserIsMember = $UserHash.($User.Name) -contains $_ #Adding property to object, and value $User | Add-Member -MemberType NoteProperty -Name $_ -Value $UserIsMember >#Returning the object to the variable Return $User > #Convert the objects to a CSV, then output them $Results | ConvertTo-CSV -NoTypeInformation | Out-File $OutputFile
Будем надеяться, что все имеет смысл. Я прокомментировал столько, сколько мог. Было бы очень просто преобразовать в ADSI, если у вас не было RSAT, установленного на любой машине, на которой вы запускаете это. Если вам это нужно, дайте мне знать, и я сделаю некоторые быстрые изменения.
Get-ADUser: Find AD Users Using PowerShell Ultimate Deep Dive
Get-ADUser, Arguably one of the most used cmdlets I use on a day to day basis. I’m sure the same goes for other sysadmins around the world if they’re managing a Windows environment. Today we’re going to do a deep dive on Get-ADUser and the multiple ways to find Active Directory users using Powershell. As always, let’s touch on the requirements needed to use Get-ADUser.
Table Of Contents
Requirements
Using the Active Directory Module has a few requirements that we’ll need to make sure are up and running in order for your queries to run successfully.
- An Active Directory Domain must be setup
- The Domain Controller you’re querying must have Active Directory Web Services Service running
- Remote Server Administration Tools (RSAT)
- For Windows 10 1903 and later, view setup guide
- Active Directory Light-Weight Directory Tools Windows Feature (RSAT-AD-Tools) if running on a Windows Server
Get-ADUser Examples and Parameter Overview
In this article we’ll cover several of the parameters used in the cmdlet along with examples and screenshots so you can see exactly how to utilize these to your benefit.
Find ADUser With Identity Parameter
Get-ADUser using the -Identity Parameter is typically the most commonly used parameter when people want to query a specific user. This is because the -Identity parameter is positioned as the first parameter so it can be omitted when running the actual query.
Example: Get-ADUser -Identity aryastark will produce the exact same results as Get-ADUser aryastark
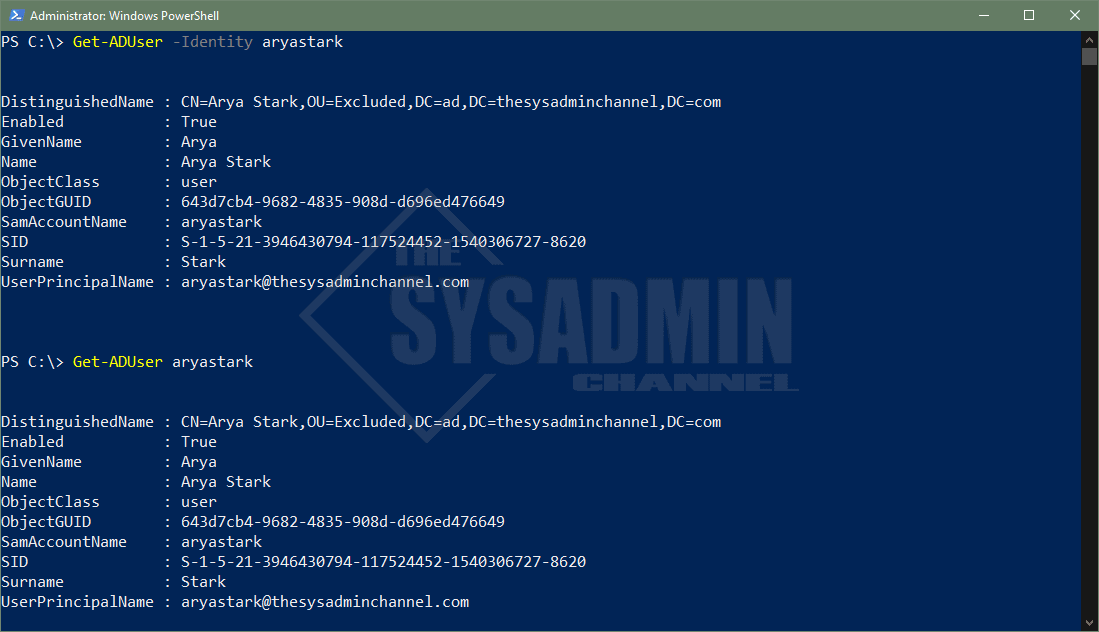
There are 4 attributes that are allowed when using Identity parameter. Let’s list them here along with an example of what it typically looks like.
- Distinguished Name
- CN=Arya Stark,OU=Excluded,DC=ad,DC=thesysadminchannel,DC=com
- ObjectGuid
- 643d7cb4-9682-4835-908d-d696ed476649
- Security Identifier (SID)
- S-1-5-21-3946430794-117524452-1540306727-8620
- sAMAccountName (username)
- aryastark
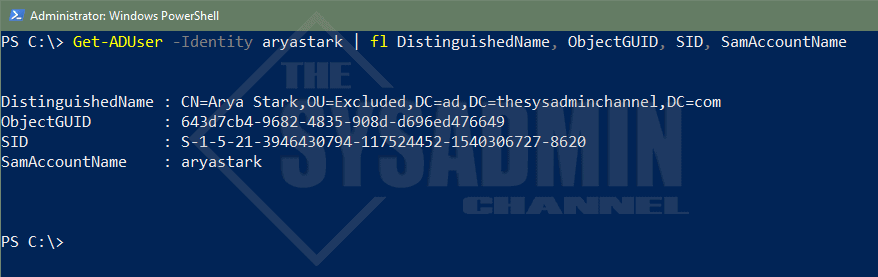
Example of the 4 attributes that are accepted
Get-ADUser Using The Filter Parameter
The -Filter parameter in the Get-ADUser cmdlet is definitely also another fan favorite. The phrase “Filter Left, Format right” definitely applies here in getting the data you need in a reduced amount of time. This is one of those fundamental Powershell concepts that everyone should learn early on.
Get AD User Properties
Let’s take a look at get ad user properties in action. Say we wanted to get everyone with the GivenName (firstname) of ‘Arya’ – What exactly would that query look like?
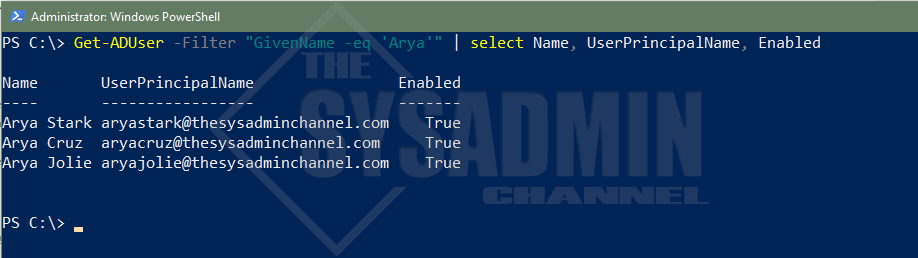
Select object was added to condense output
You can find other filterable attributes by choosing any one of the attributes when running -Properties * . Commonly used filters are UserPrincipalName, Surname, Mail and even Name or DisplayName.
Filter With Operators
Regarding operators, there are several choices such as equal, like, less than and even greater than that’s convenient for us to use.
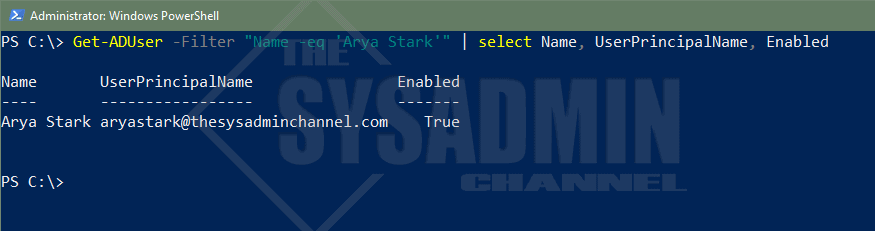
When using the -eq operator, the filter has to match the property exactly so make sure you specify the text exactly as it’s shown in AD. As noted in the above example, we searched for all users with the first name ‘Arya.’ Say we wanted to only filter for the Name ‘Arya Stark’.
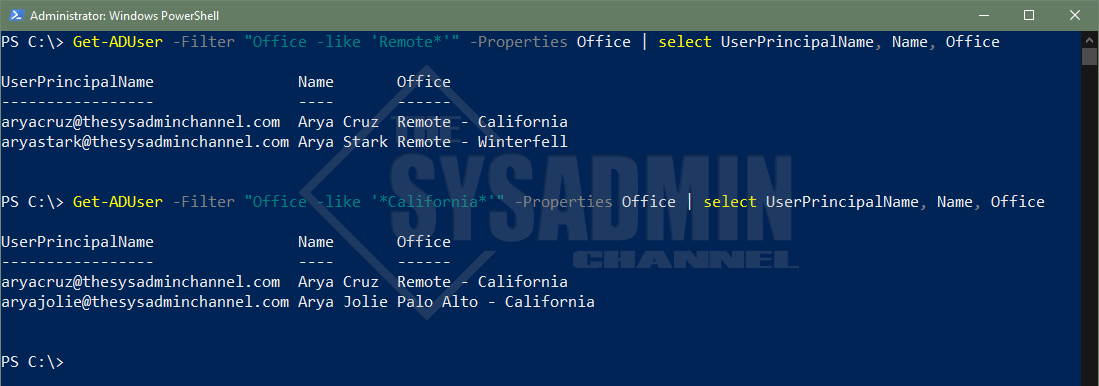
Let’s now dive into the -like operator and how to specifically use it for filters. A great example I’ve used in the past is to see who are all the people that have the word Remote in their AD Office Attribute.
With regard to auditing, I’ve always found filtering accounts by LastLogonDate has always been extremely helpful. For an in-depth write-up check out the link above. Otherwise, let’s go over a quick example to get the gist of what’s happening. We’ll also couple it with the -and operator to string multiple queries together and narrow down your filter.
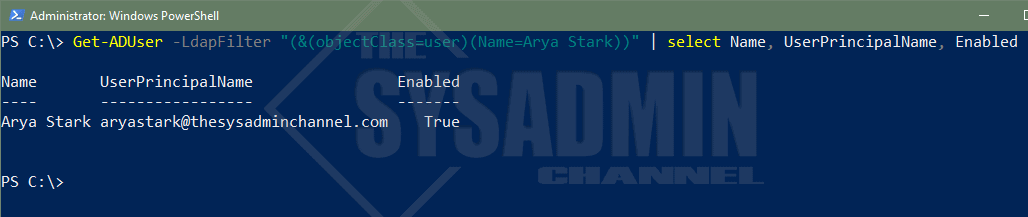
How To Use LDAP Filters
To be perfectly honest, I can probably count the number of times on one hand that I’ve used an LDAP filter. The methods mentioned above have been ingrained into my brain since that’s how I learned. The reason being is that the syntax is a bit more complex and the standard operators like -and/-or don’t really come into play here.
If you’re great with VBScript then it might be up your alley. In any event, here we go.
Filter Using Ambiguous Name Resolution (ANR)
Ambiguous Name Resolution, aka ANR, allows multiple objects to be resolved on a single query. Think of it like a built-in -like operator that queries against GivenName, Surname, DisplayName, SamAccountName, physicalDeliveryOfficeName and even the Exchange MailNickName without any added effort.
ANR is especially useful in larger organizations where people share a similar display name. It just helps to truncate multiple -and/-or queries into a single function to ease your searches. Let’s cover an example of using ambiguous name resolution in an actual filter (using Arya Stark as our example).
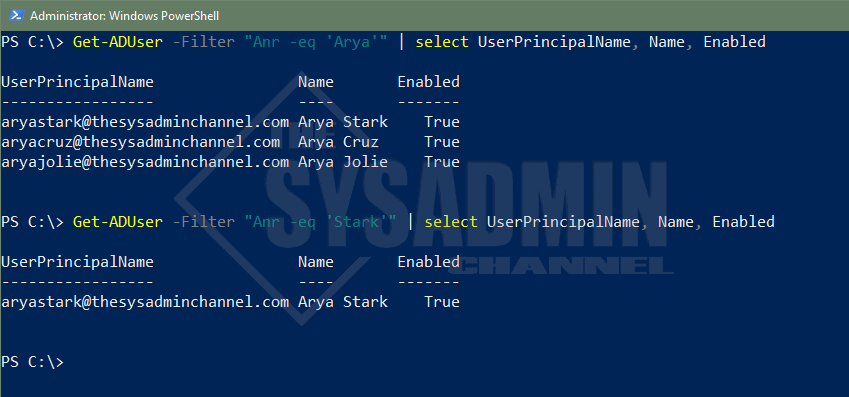
Notice we didn’t need to specify GivenName, Surname or even use the -Like Operator.
Display All Of The Properties For A Specified User
All Active Directory users have the same core attributes populated but they’re not displayed by default. If you notice in the examples above, I had to specify -Property in order for Powershell to know to check those AD properties. If you omit the property parameter, the filter won’t find it even though the attribute is there on the user’s account.
A good thing is this allows a wildcard (*) so you can see what’s available. I would also recommend to explicitly specify your properties when querying many users so you’re not putting to much stress on the remote Domain Controller.
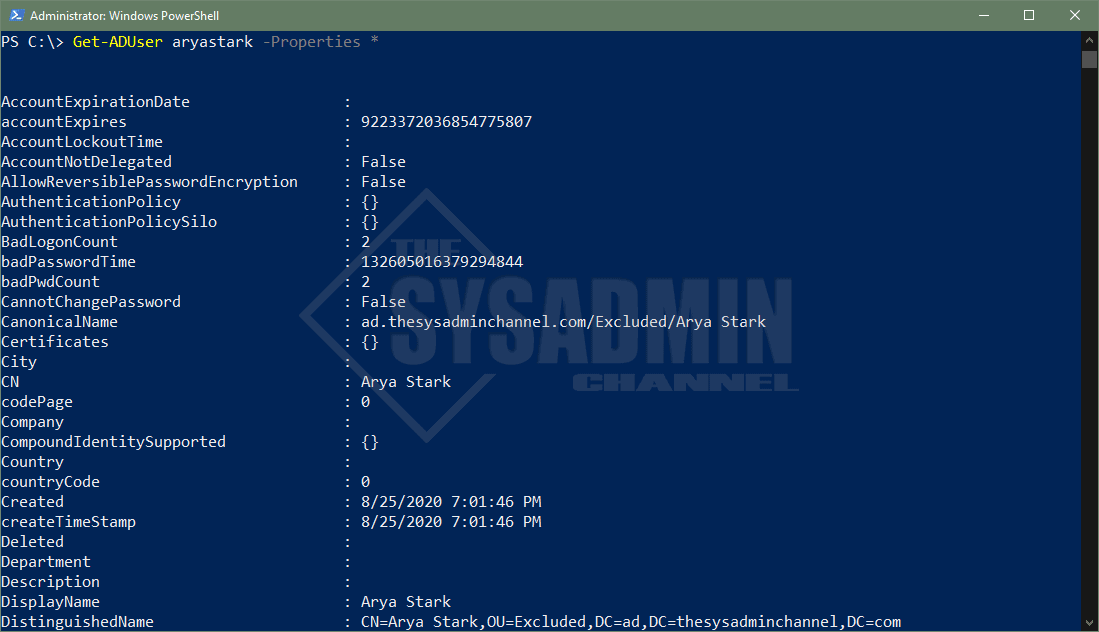
Query Active Directory Users By Organizational Unit
The ability to query users by an Organizational Unit is an excellent method to ensure you’re getting the most out of your Active Directory OU structure. A great, real world example for this would be if you have your AD Org units structured by regional location and you’re looking to get all users in that location.
SearchBase uses the DistinguishedName as the parameter input. You can grab the DN by one of 2 ways.
- Query a user in that OU and select the DN property. Extract OU DN from there
- Use Get-ADOrganizationalUnit and filter by name
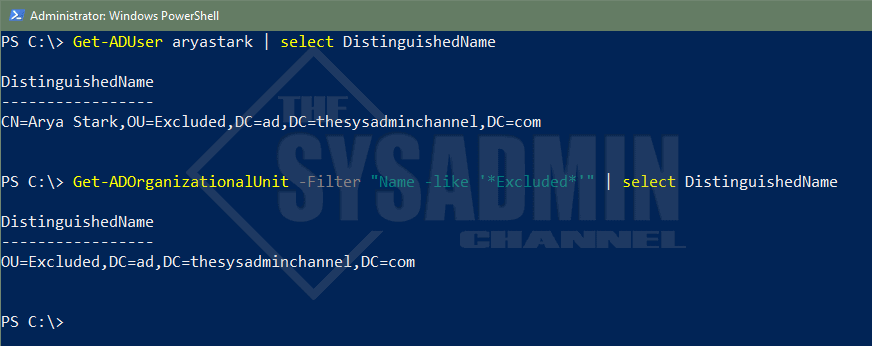
Now that we have the Organizational Unit’s DistinguishedName, we can use that as the input parameter. This coupled with the -Filter parameter will help narrow your search by Org Unit.
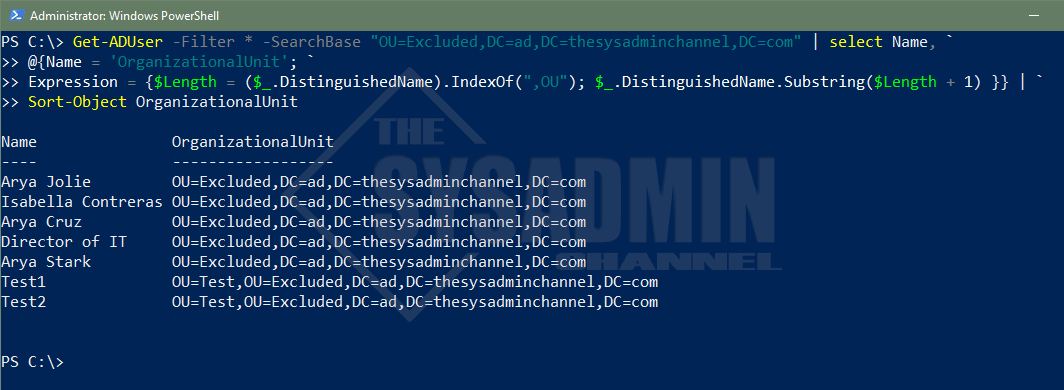
Wildcards are also allowed to use with Filter to search for All
Specify The OU Depth Of A Search
Building off of the SearchBase parameter from above, you might have noticed that the search was recursive. Meaning that it drilled down to all Sub OU’s without having the need to specify them. The question however, is what if we don’t want to drill down. What if we only want that explicit OU?
This is where the SearchScope parameter comes into play. Using the same query above, let’s exclude the two test accounts in the Test OU.
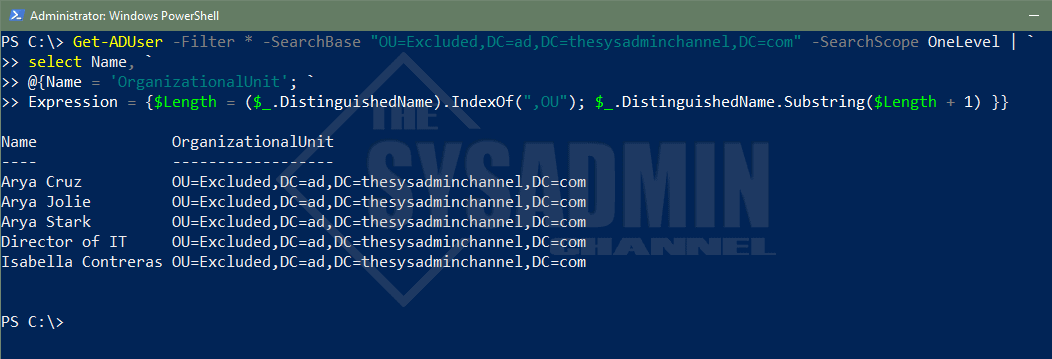
When SearchScope is omitted, it will default to Subtree
Target The Domain Controller Of Your Choice
Anytime you make an Active Directory query, you’ll most likely always default to a Domain Controller in your site. This is defined by Active Directory Sites and Services and an easy way to check what Domain Controller you’re currently authenticating against is to use $env:LogonServer .
This is great and all, but what if you wanted to query a Domain Controller in another site, perhaps one across the globe? You would use the -Server parameter to do this. Specifically for me, I always like to use the Primary Domain Controller, PDC Emulator, as this is the heart of all replication changes. If you specify this Domain Controller specifically, you can avoid waiting for replication and can move on with your script without adding sleep commands.
Let’s walk through an example for how to use the server parameter to specify the PDC emulator dynamically.
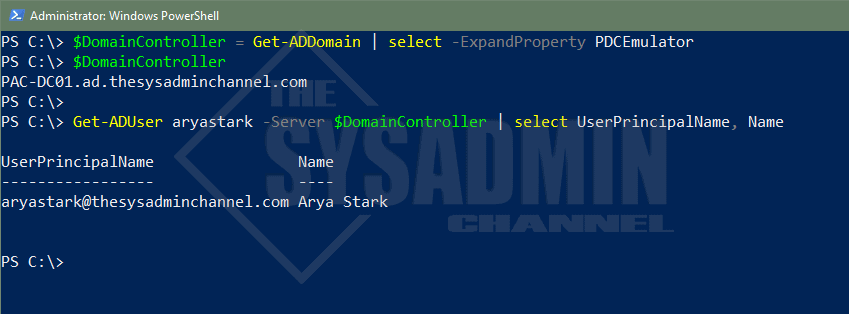
Using the Server parameter can bypass replication times and it recommended for automation.
Passing Alternate Credentials for Get-ADUser
Being able to pass a different set of credentials would come in handy for use cases like automation or other use cases like users in a different domain. Since Active Directory grants read-only access to all users by default, there really isn’t a need to pass in alternate credentials if you’re querying something in the same domain. It should be able to do it with no problem.
When this comes in handy is if you need to make changes to AD Objects and you need to use different credentials. To make this happen you’ll use the -Credential parameter and use Get-Credential to securely set the username and password. Since we’re so keen on examples, let’s test it.
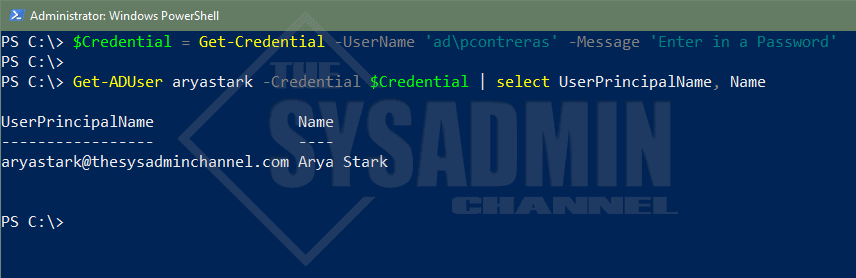
In the sprit of this article, we’ll pass on credentials for Get-ADUser
Get-ADUser From A Different Domain
If you happen to have multiple Domains in your forest and you’re too lazy to Remote Desktop into a Domain Controller on that domain to run the query (guilty of it myself from time to time), it’s absolutely helpful to be able to run your query from a single machine. You can do this by combining two of the parameters above. Those parameters being -Credential as well as -Server .
I don’t have any other domains in my forest so I won’t be able to provide a working screenshot. However, one thing to keep in mind is that you’ll need to provide the Fully Qualified Domain Name (FQDN) for the remote DC. Overall, the basic syntax should look like this:
Conclusion
Hopefully this deep dive on how to use Powershell Get AD User has been incredible helpful for you. I’m also hoping you learned a thing or two that you can implement in your environment. As I mentioned, Get-ADUser is probably one of the most fundamental cmdlets that anyone administrator should have in their arsenal of tools.
It can be useful, especially when providing reports on the current state of your environment. If you liked this article, feel free to browse our other Active Directory as well as our own personal Powershell gallery full of useful scripts. Finally, if you’re interested in video content, check out our Youtube Channel for sysadmin videos