Основы Postman для самых маленьких

Начнем с пары слов о том, что такое Postman. Это инструмент для работы с API, который позволяет тестировщику посылать запросы к сервисам и работать с их ответами. С его помощью можно протестировать бекэнд и убедиться, что он корректно работает.
Инструментов с аналогичным функционалом существует много. Я выбрала Postman, поскольку он самый популярный. Но у него есть и другие преимущества. Postman:
интуитивно-понятен и простой в использовании, не требует какой-то сложной настройки или знания языков программирования;
поддерживает разные API (REST, SOAP, GraphQL);
расширяется под любые нужды с помощью Postman API;
легко интегрируется в CI/CD с помощью Newman — консольной утилиты для запуска тестов;
запускается на любых ОС;
поддерживает ручное и автоматизированное тестирование;
собрал вокруг себя большое комьюнити, где можно найти ответы на любые вопросы.
Тестировщику этот инструмент позволяет:
отправлять запросы и получать ответы;
сохранять запросы в папки и коллекции;
изменять параметры запросов;
изменять окружения (dev, test, production);
выполнять автотесты, используя Collections runner, в том числе по расписанию;
импортировать и экспортировать коллекции запросов и наборы тестов, чтобы обмениваться данными с коллегами.
Перейдем к сути.
На нашем проекте мы разрабатываем менеджер рекламных кампаний. У каждой кампании в нашей системе есть ряд полей — имя, описание, ID и креатив (реклама, которую видит пользователь). Для демонстрации возможностей Postman буду использовать запросы на создание и обновление кампании и креатива из “боевого” проекта.
Экспериментируем с запросом на обновление
Создадим самый простой запрос на обновление кампании.
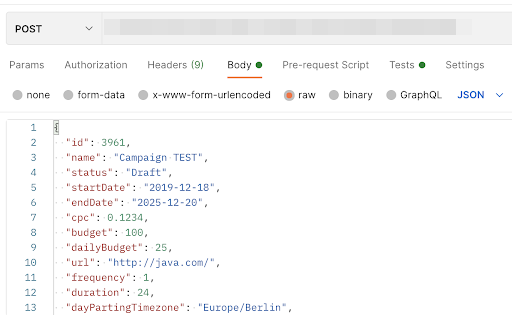
Простейший запрос на обновление кампании
При его успешном выполнении мы получим ответ 200 OK.
Напишем самый простой автотест, который будет это проверять. Для этого в интерфейсе Postman переходим на вкладку Tests. Код с этой вкладки будет выполняться после получения ответа на запрос.
Код не обязательно писать с нуля. В Postman есть уже готовый список тестов для проверки API. Любой из них можно отредактировать под свои нужды для экономии времени.
Готовые скрипты (сниппеты) есть в списке справа. Там можно найти код для проверки всего ответа или его части, времени выполнения запроса и множества других вещей.
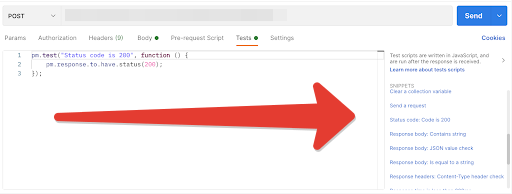
Список готовых скриптов справа
Выбираем сниппет, он добавляется на вкладку Tests. Этот код можно отредактировать — задать другое имя теста или ответ.
Сохраняем код и отправляем запрос.
Результат можно найти на вкладке Test Results. Мы видим:

Результат выполнения теста
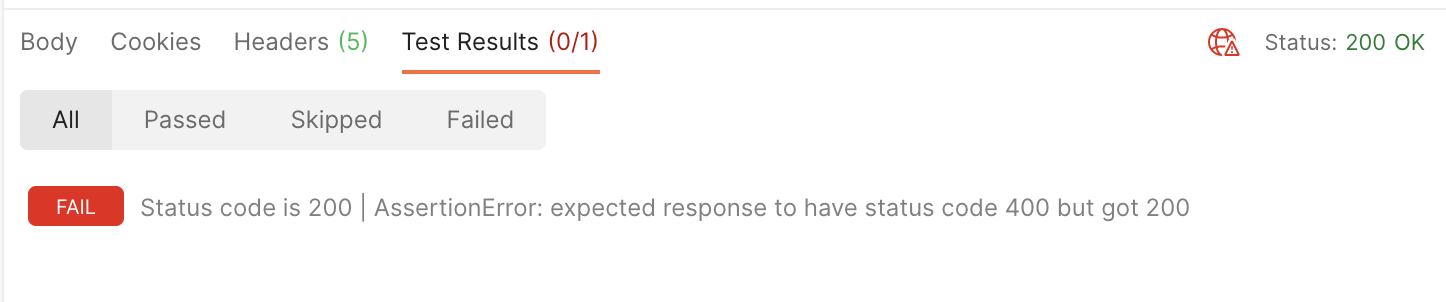
Давайте проверим, что тест действительно работает. Изменим код ответа на 400.
Сохраним запрос еще раз запустим тест.
Вполне ожидаемо тест падает, ведь реальный ответ — 200 ОК:
Аналогично можно проверить, что в теле ответа содержится определенная строка. В нашем случае посмотрим, есть ли там название рекламной кампании, которое мы передавали в запросе на обновление данных.
Ищем соответствующий сниппет и правим его под свою задачу:
Сохраняем и отправляем запрос. Видим, что тест выполнен успешно.
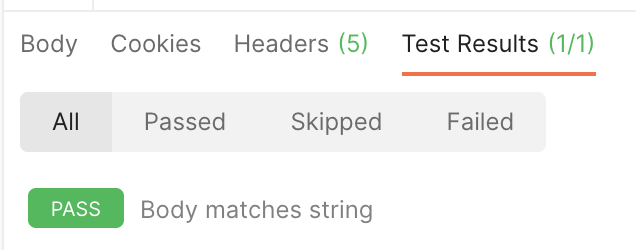
Как и в прошлом примере, мы можем проверить работоспособность теста, исправив искомую строку:
Искать строку можно не во всем теле ответа, а в конкретном поле. Для проверки, что название кампании присутствует именно в поле Name, отредактируем другой сниппет:
Для одного запроса можно создать несколько тестов. Например, так:
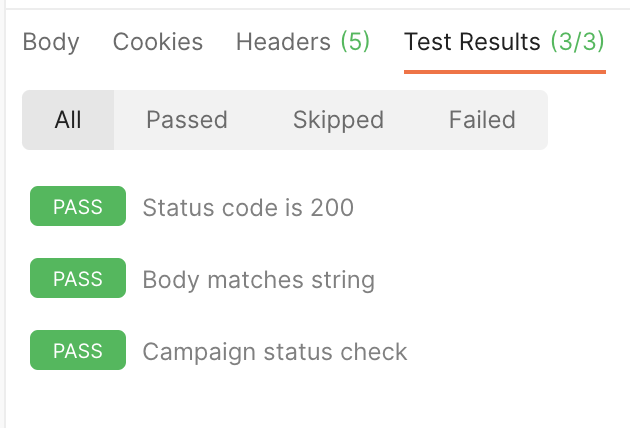
Здесь мы проверяем status code, содержание в теле ответа названия кампании и тот факт, что после обновления статус кампании “Draft”.
На вкладке Test Results мы увидим, что все три теста выполнены успешно:
Запуск автотестов с Collection runner
Collection runner запускает не отдельные тесты, а их коллекции.
Новую коллекцию можно создать с помощью значка + на закладке Collections (в каждой такой коллекции можно создать папку с тестами с помощью Add Folder).
Если создать несколько коллекций, выглядеть это будет примерно так:
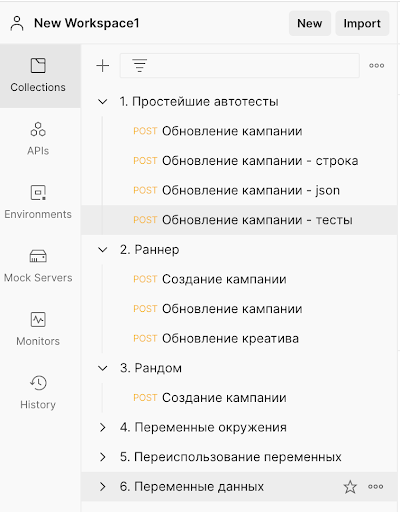
Чтобы запустить Collection runner, нужно выбрать коллекцию и на открывшейся вкладке нажать Run. Запросы будут выполняться поочередно. После окончания выполнения можно увидеть все результаты:

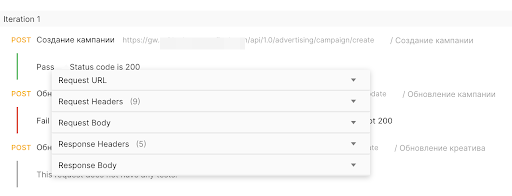
По каждому запросу в выпадающем меню можно посмотреть подробные данные — на какой URL запрос был отправлен, какие данные в header и т.п.
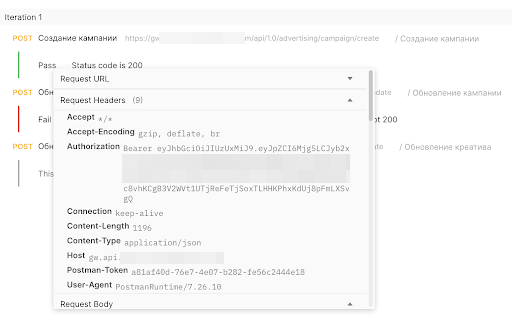
Аналогично можно посмотреть тело и заголовок ответа. Но для этого необходимо включить логирование (включить галочку Save response перед запуском коллекции).
При запуске коллекции Collection runner позволяет задать количество итераций. Это очень удобно, особенно когда запросов много — тесты не придется запускать вручную.
Также Postman умеет запускать коллекции по расписанию. Нажимаем на название коллекции, открываем меню Action и задаем расписание на вкладке Monitor collection.
Переменные в Postman
В ходе тестирования удобно использовать переменные.
Допустим, недавно почистили базу и для тестирования нам нужно ее заполнить — создать несколько рекламных кампаний с разными именами. Чтобы не делать это вручную, можно использовать динамические рандомные переменные.
Рандомных переменных в Postman много. Если при написании кода начать вводить парные фигурные скобки, Postman сам подскажет, какие из них доступны.
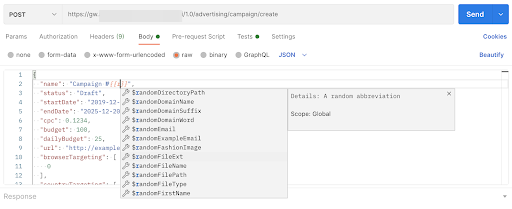
Подробнее про переменные можно почитать в документации к Postman.
Для нашего теста выберем $randomInt. Сохраним и отправим запрос.
Он выполняется успешно, кампания получает рандомное название.
Вместо $randomInt можно выбрать, допустим, рандомный месяц — $randomMonth.

Чтобы получать уникальные данные, точно так же можно вставлять переменные в header и URL.
Области видимости
Postman поддерживает несколько видов переменных, в зависимости от пространств и областей видимости. Идею хорошо иллюстрирует картинка из документации:
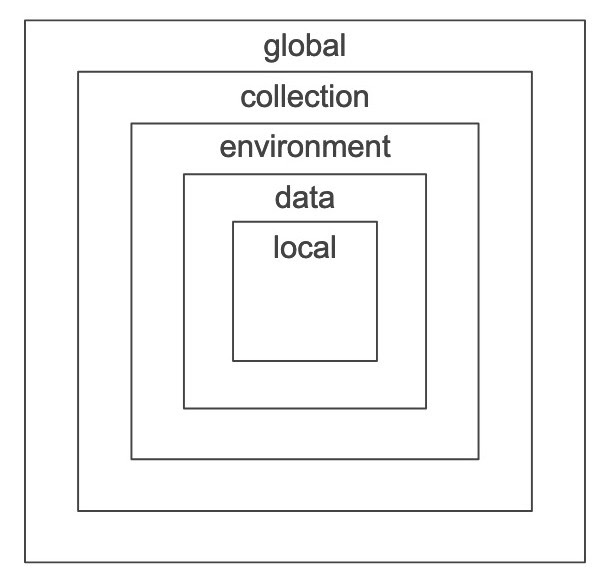
Области видимости переменных в Postman
Поддерживаются следующие типы переменных:
Глобальные — переменные, которые не относятся ни к какому окружению, они доступны во всем рабочем пространстве, из всех окружений. Глобальные переменные могут использоваться для передачи данных между коллекциями, запросами и окружениями.
Переменные коллекции доступны во всех запросах внутри одной коллекции.
Переменные окружения изменяются в зависимости от выбранного окружения.
Локальные переменные являются временными. Они доступны только внутри запроса и используются, когда нужно переписать переменные коллекции или какие-то глобальные значения.
Переменные данных — файловые переменные. Я остановлюсь на них подробно далее.
Глобальные переменные не могут иметь дубликаты. А вот локальные переменные могут иметь одни и те же имена, но только если они находятся в разных окружениях. Если Postman встречается с двумя переменными с одинаковыми именами, высший приоритет будет у локальной переменной (она затрет глобальную).
Переменные окружения
Поговорим о переменных окружения. Они позволяют передавать данные из запроса в запрос внутри этого окружения.
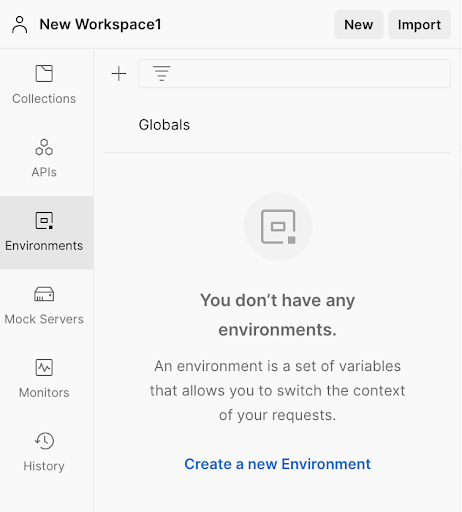
Перед началом экспериментов создадим окружение. Для этого в левом меню надо выбрать Environments и нажать либо на плюсик, либо на Create a new environment. На открывшейся вкладке можно задать название окружения. Пусть это будет Environment token.
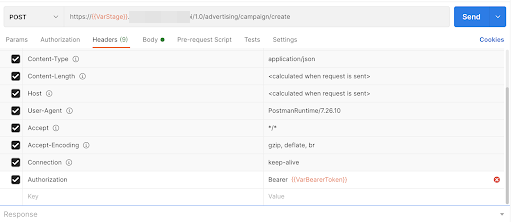
Отличный пример использования переменных окружения — передача токена авторизации. Если токен истекает, то тест падает с ошибкой 401. Во всех запросах, которые я отправляла до этого, свежие токены авторизации я получала и вставляла вручную (“за кадром” моего рассказа). Когда запросов всего несколько, это не сложно. Но когда запросов много, проще реализовать это через переменную окружения. Для этого мы зададим переменную и присвоим ей соответствующее значение, а потом используем переменную во всех запросах.
Зададим в окружении Environment token переменную varBearerToken. В качестве начального значения подставим наш токен. Остается в header запросов заменить значение токена на переменную.
Как и с рандомными переменными, можно начать вводить двойные фигурные скобки. Поскольку Postman знает эту переменную (в данном окружении), он подскажет значение.

Если мы уберем Environment, Postman подсказок уже не предложит, поскольку вне своего окружения переменная недоступна. Нет окружения — нет и переменных окружения.
Точно также можно выполнять наши запросы на разных стендах. Чтобы в каждом запросе вручную не изменять URL, можно прописать стенд-попеременную. Пусть это будет varStage со значением по умолчанию test.
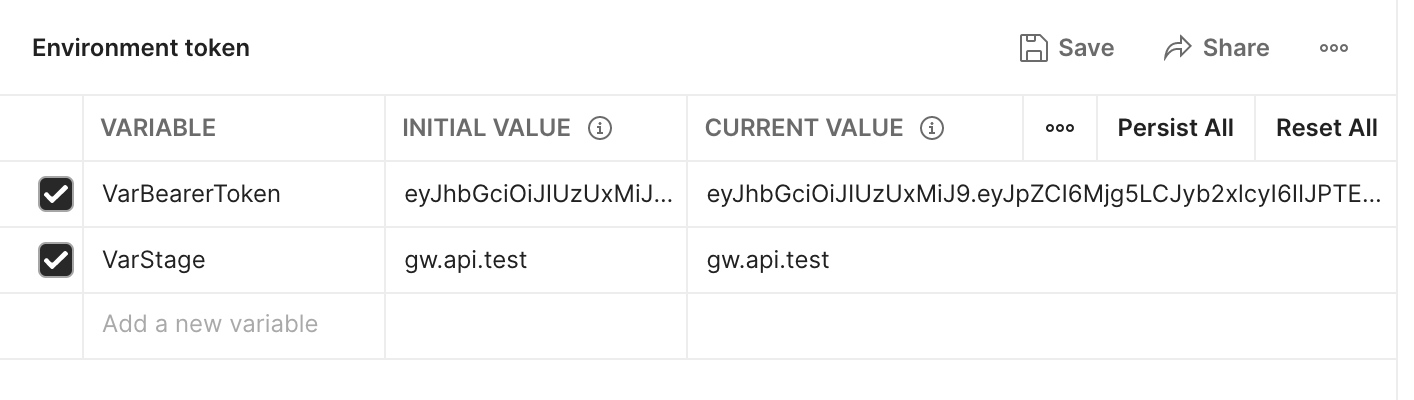
Аналогично можно было бы прописать dev и другие стенды.
Остается добавить эту переменную в URL. Как и в случае с токеном, Postman будет ее подсвечивать, только если выбрано то окружение, в котором она задана.
Окружение со всеми переменными можно пошарить коллегам через экспорт в файл json. Они смогут открыть его на своем рабочем месте в Postman.
Передача данных между запросами
Очень важная возможность для написания тестов — передача значений из запроса в запрос с помощью переменных окружения.
В предыдущем примере я создала переменную окружения varToken и в неё вручную приписала токен. Но вместо копирования токен можно получить в ответе на запрос авторизации и передать его в другие запросы.
Создадим новое окружение Environment Auth. Не будем на старте прописывать никаких переменных. Просто выберем это окружение и возьмем из списка сниппетов соответствующий скрипт. Прямо в нем объявим переменную varToken и присвоим ей значение токена (для этого парсим JSON ответа):
Для наглядности я добавила еще вывод переменных в консоль, чтобы видеть их значения.
Чистим консоль, запускаем. И видим результат — переменную jsonData и значение токена, которое присваиваем varToken.
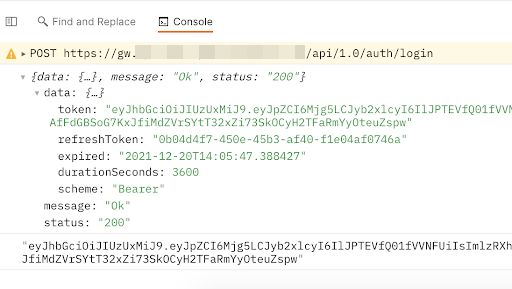
Остается прописать переменную varToken в Header наших запросов на создание кампании.
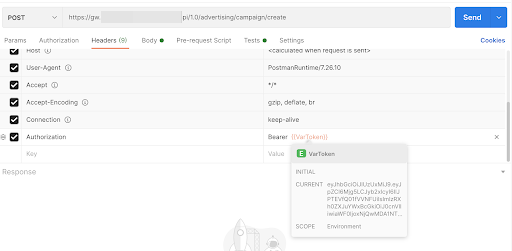
Поскольку работаем мы внутри окружения Environment Auth, Postman о ней знает.
А теперь усложним пример. Допустим, мы хотим создать рекламную кампанию, выяснить ее ID, а затем обновить кампанию с этим ID.
Объявим еще одну переменную — varID. Для этого название переменной задаем в скрипте, там же присваиваем ей значение из ответа на запрос:
Запускаем Collection runner и видим, что запросы работают.
Мы получили токен, передали его во все последующие запросы, получили ID кампании и передали его в запрос на обновление. После этого обновили.
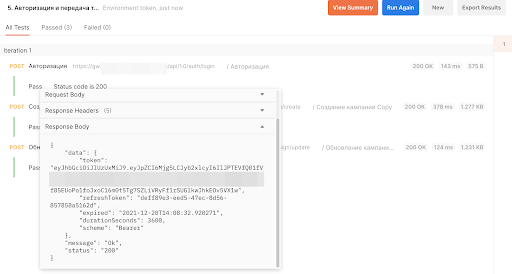
Кстати, в окружении, которое мы создавали, все эти переменные будут указаны, вместе с текущими значениями:

Используя возможности Postman, обновление кампании можно выполнять по расписанию.
Переменные данных
В Collection runner можно использовать переменные данных.
Чтобы продемонстрировать, как это работает, создам несколько рекламных кампаний с параметрами, заданными через файл. Предположим, нам не подходят рандомные значения и нужны строго определенные имена кампаний для проверки сортировки или фильтрации.
Создаем файл с расширением csv или json. Postman поддерживает оба типа файлов, вопрос лишь в формате.
В файле csv в первой строке указывается название переменной или нескольких переменных через запятую. Далее на отдельных строках следуют значения (или несколько значений через запятую).


В файле json можно прописать то же самое, но в JSON-формате “ключ-значение”.
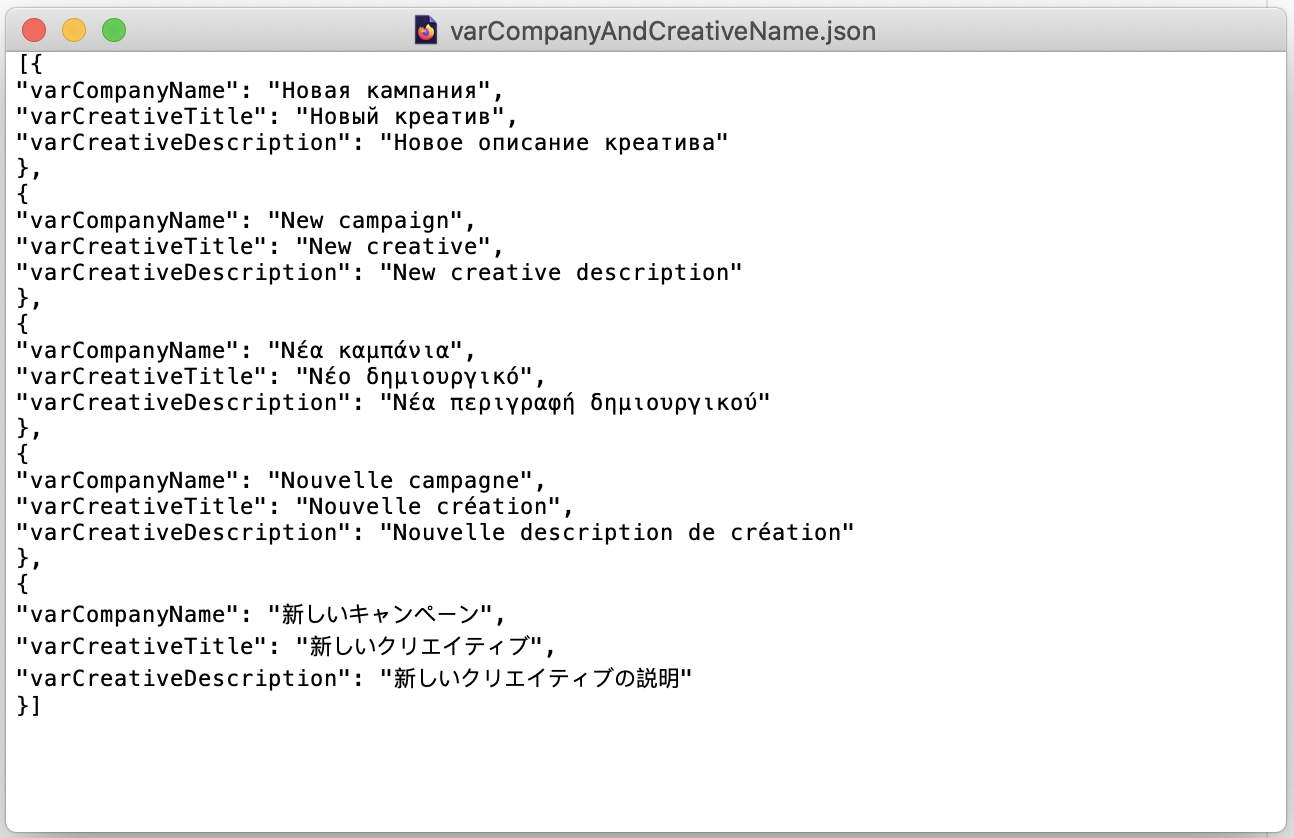
Чтобы добавить переменные в Collection runner, нужно нажать кнопку Select File и загрузить любой из этих файлов. Collection runner автоматически посчитает количество значений (и соответственно итераций тестов). Там же можно посмотреть названия и значения переменных, нажав на кнопку Preview Data.
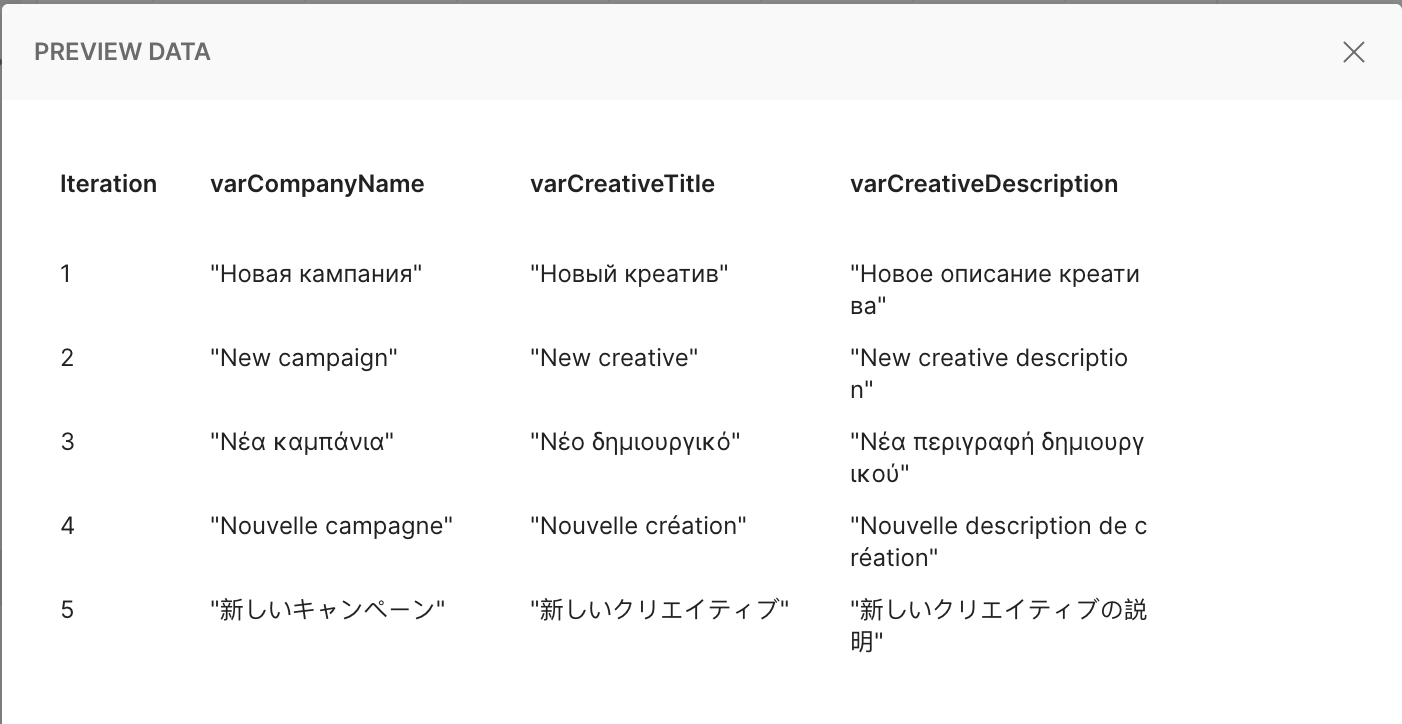
Если запустить Collection runner, а потом проверить названия кампаний, мы увидим, что использованы значения из файлов.
Надеюсь, вам это было полезно. У Postman есть множество возможностей, которые могут помочь в тестировании даже новичкам.
Name already in use
postman-docs / src / pages / docs / writing-scripts / script-references / test-examples.md
- Go to file T
- Go to line L
- Copy path
- Copy permalink
8 contributors
Users who have contributed to this file
- Open with Desktop
- View raw
- Copy raw contents Copy raw contents
Copy raw contents
Copy raw contents
Use the Tests tab in your requests, folders, and collections to write tests that will execute when Postman receives a response from the API you sent the request to. Add however many tests you need for each request. When you add tests to a folder or Collection, they will execute after each request inside it.
Getting started with tests
To write your first test script, open a request in Postman, then select the Tests tab. Enter the following JavaScript code:
This code uses the pm library to run the test method. The text string will appear in the test output. The function inside the test represents an assertion. Postman tests can use Chai Assertion Library BDD syntax, which provides options to optimize how readable your tests are to you and your collaborators. In this case, the code uses BDD chains to.have to express the assertion.
This test checks the response code returned by the API. If the response code is 200 , the test will pass, otherwise it will fail. Select Send and go to the Test Results tab in the response area.
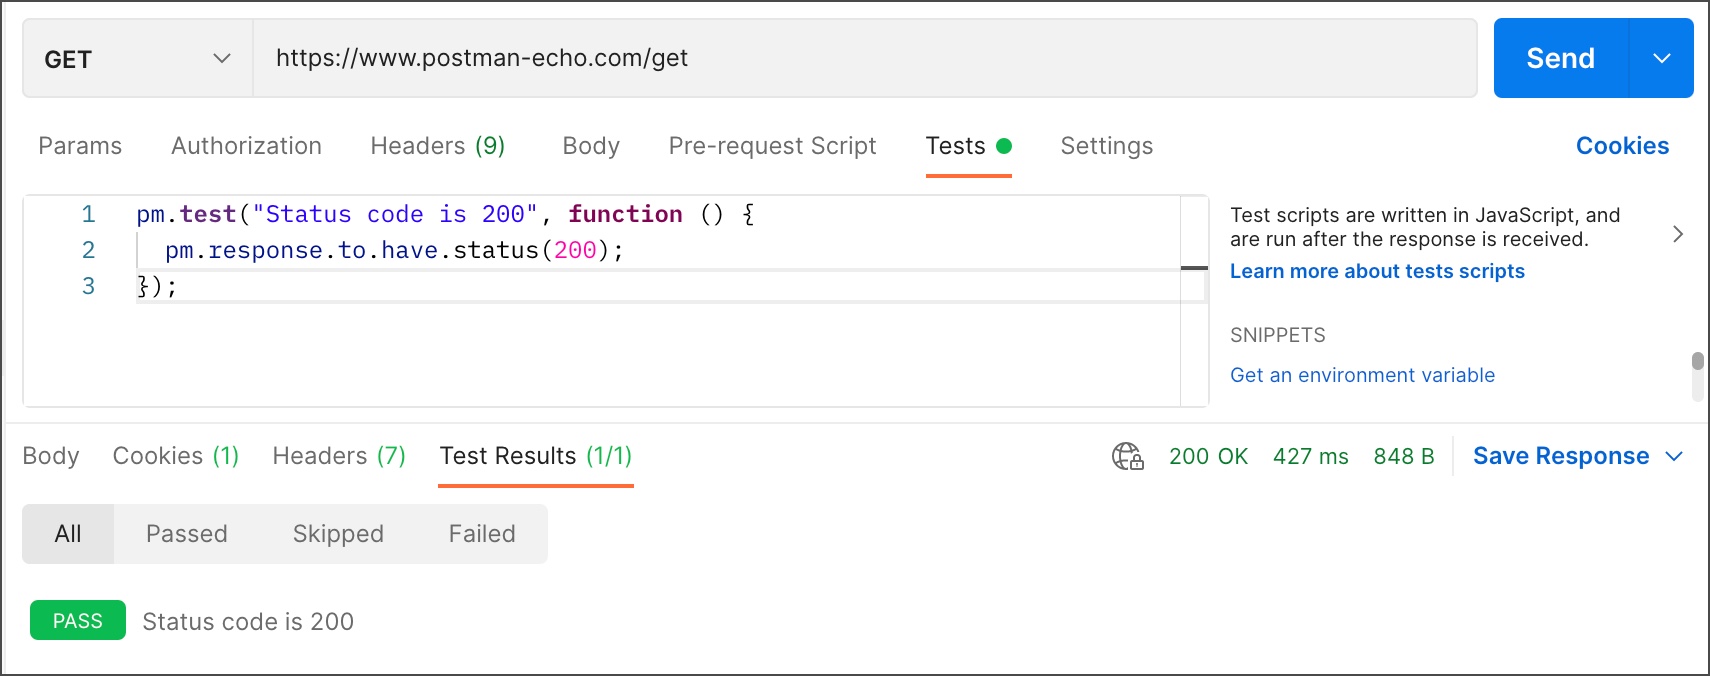
To learn what test results look like when they pass or fail, change the status code in the assertion code and send the request again.
Structure your test assertions in a variety of ways to suit your logic and preference in terms of how you want the results to output. The following code is an alternative way of achieving the same test as the one above using the expect syntax:
Refer to the Chai Assertion Library Docs for a complete overview of assertion syntax options.
Using multiple assertions
Your tests can include multiple assertions as part of a single test. Use this to group together related assertions:
If any of the contained assertions fails, the test as a whole will fail. All assertions must be successful for the test to pass.
Parsing response body data
To carry out assertions on your responses, you will first need to parse the data into a JavaScript object that your assertions can use.
To parse JSON data, use the following syntax:
To parse XML, use the following:
If you’re dealing with complex XML responses you may find console logging useful.
To parse CSV, use the CSV parse utility:
To parse HTML, use cheerio:
Handling responses that don’t parse
If you can’t parse the response body to JavaScript because it’s not formatted as JSON, XML, HTML, CSV, or any other parsable data format, you can still make assertions on the data.
Test if the response body contains a string:
This doesn’t tell you where the string was encountered because it carries out the test on the whole response body. Test if a response matches a string (which will typically only be effective with short responses):
Making assertions on the HTTP response
Your tests can check various aspects of a request response, including the body, status codes, headers, cookies, response times, and more.
Testing response body
Check for particular values in the response body:
Testing status codes
Test for the response status code:
If you want to test for the status code being one of a set, include them all in an array and use oneOf :
Check the status code text:
Check that a response header is present:
Test for a response header having a particular value:
Test if a cookie is present in the response:
Test for a particular cookie value:
Testing response times
Test for the response time to be within a specified range:
Common assertion examples
Read on for some examples of common assertions you might find useful in your scripts, either as outlined below or by editing the detail to suit your own needs.
For a more comprehensive overview of what you can include in your assertions, refer to the Chai Assertion Library Docs.
Asserting a response value against a variable
Check if a response property has the same value as a variable (in this case an environment variable):
See Using Variables for an overview of operations you can use to manipulate variables in your scripts.
Asserting a value type
Test the type of any part of the response:
Asserting array properties
Check if an array is empty, and if it contains particular items:
The order in .members doesn’t affect the test.
Asserting object properties
Assert that an object contains keys or properties:
Target can be an object , set , array or map . If .keys is run without .all or .any , the expression defaults to .all . As .keys behavior varies based on the target type , it’s recommended to check the type before using .keys with .a .
Asserting that a value is in a set
Check a response value against a list of valid options:
Asserting that an object is contained
Check that an object is part of a parent object:
Using .deep causes all .equal , .include , .members , .keys , and .property assertions that follow in the chain to use deep equality (loose equality) instead of strict ( === ) equality. While the .eql also compares loosely, .deep.equal causes deep equality comparisons to also be used for any other assertions that follow in the chain, while .eql doesn’t.
Asserting the current environment
Check the active (currently selected) environment in Postman:
Troubleshooting common test errors
When you encounter errors or unexpected behavior in your test scripts, the Postman Console can help you to identify the source. By combining console.log() , console.info() , console.warn() and console.error() debug statements with your test assertions, you can examine the content of the HTTP requests and responses, as well as Postman data items such as variables. You can also use the console.clear() method to clear information from the console. Select Console from the Postman footer to open it.
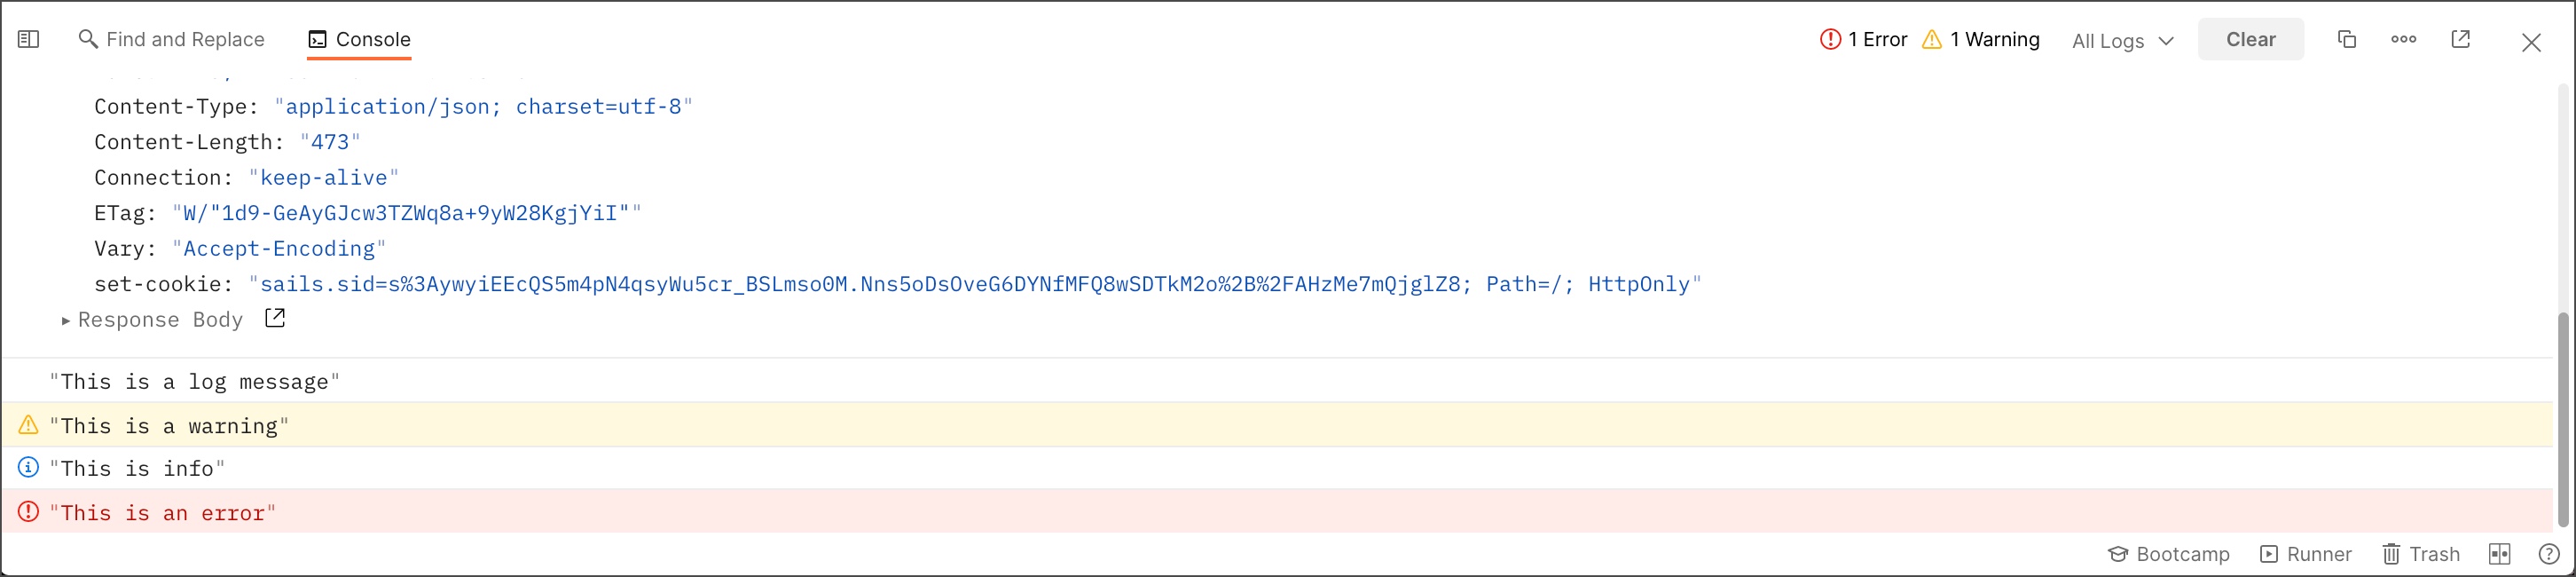
Log the value of a variable or response property:
Log the type of a variable or response property:
Use console logs to mark code execution, sometimes known as «trace statements»:
Assertion deep equality error
You may encounter the AssertionError: expected <value> to deeply equal ‘<value>’ . For example, this would arise with the following code:
This happens because the test is comparing a number to a string value. The test will only return true if both the type and value are equal.
JSON not defined error
You may encounter the ReferenceError: jsonData is not defined issue. This typically happens when you are attempting to reference a JSON object that hasn’t been declared or is outside the scope of your test code.
Make sure that any code setting your response data to a variable is accessible to all test code, for example in this case moving const jsonData = pm.response.json(); before the first pm.test would make it available to both test functions.
Assertion undefined error
You may encounter the AssertionError: expected undefined to deeply equal.. issue. Typically this happens when you are referring to a property that doesn’t exist or is out of scope.
In this example, if you get the error AssertionError: expected undefined to deeply equal ‘John’ , this indicates that the name property isn’t defined in the jsonData object.
Test not failing
There may be occasions where you expect a test to fail and it doesn’t.
Make sure your test code is syntactically correct and send your request again.
Validating response structure
Carry out JSON schema validation with Tiny Validator V4 (tv4):
Validate JSON schema with the Ajv JSON schema validator:
Sending an asynchronous request
Send a request from your test code and log the response.
Previous style of writing Postman tests (deprecated)
This section refers to deprecated script syntax used in previous versions of Postman. If you are writing new scripts, use the current syntax.
The previous style of writing Postman tests relies on setting values for the tests object. Set a descriptive key for an element in the object and then assert if it’s true or false. For example, the following will check if the response body contains the user_id string:
Add as many keys as needed, depending on how many things you want to test for. View your test results in the response viewer under the Tests tab. The tab header shows how many tests passed, and the keys that you set in the tests variable are listed there. If the value evaluates to true, the test passed.
Now that you have seen test script examples for various scenarios, you may be interested in extending your own tests:
The Ultimate Postman Tutorial for API Testing

The internet is increasingly built on Application Programming Interfaces . In a world where more websites and applications are hosted on cloud platforms, APIs are the glue that holds everything together.
Applications built on service-based architectures use APIs to communicate with each other. There are many public APIs that companies use to drive the adoption and engagement of their tools.
These APIs all need testing, however, unlike applications with an automated User Interface using functional automation testing tools such as TestProject , APIs lack a graphical user interface (GUI) and are generally designed to be interacted with programmatically.
Many tools can help with API testing, but it can be hard to find a tool in that sweet spot between power and simplicity.
Some API testing tools pack a big punch with great features but are inherently tricky to use, while others are easy to pick up but don’t do everything you might want when it comes to an API testing tool. Here’s a quick diagram of how APIs work:

So where do you find an API testing tool that navigates the balance between ease of use and depth of features? Enter Postman ����
Table of contents
What is Postman?
Postman is the most popular API testing tool , because it is free, packed with powerful testing features, and is also intuitive to use and get started with.
This Postman tutorial will show you how easy it is to get started with API testing and how powerful Postman is for testing . We’ll walk you through everything from getting started with it, to using Postman in your CI and CD.
Exploratory testing is important when testing APIs and a UI, but since APIs are intended to be interacted with programmatically, they lend themselves well to test automation. This Postman tutorial will walk you through setting up effective API test automation.
The tutorial covers how to use Postman to create API mocks and how to organize and structure your data so you may create effective test automation. It also goes over how you may integrate your Postman tests directly into your CI/CD pipelines with Newman and explore the powerful scripting abilities built into this tool.
Why should you use Postman for API testing?
Postman is a simple and user-friendly application to use. Tests are shared easily and are easy to move into different environments and to another test in Postman. Postman ensures whether your API testing is working correctly or not and also allows you to create a collection of integration tests and stories data for multiple tests. It involves providing code snippets if you are new to working with the Postman tool.
Common HTTP methods in Postman
The HTTP request methods enable communication between the client and servers. HTTP acts as a request-response protocol between client and server. The most commonly used HTTP request methods are as follows:
- GET
- POST
- PUT
- PATCH
- DELETE
GET- The GET method retrieves information from the given server using the data sent in the URL. The GET method is better to use for data that doesn’t have any images or security and limits from the length of the URL.
POST- The POST method creates necessary data. Post is a request method that sends necessary data to the server from an HTTP client.
PUT- The PUT method updates the existing data and if it doesn’t have any data, it will create a new one. It remains unchanged when the same data is sent multiple times to be updated.
PATCH- The PATCH method updates only the existing data and it allows only partial updates.
HTTP responses(status code)
HTTP is a HyperText Transfer Protocol response status code ���� It is produced by the server in response to client requests made to the server. HTTP response code is divided into five classes. The first digit of the response code defines the class of response, while the last two digits don’t have any categorization role. The five different response code classes include:
- 1xx informational response- the request was received and is continuing in the process.
- 2xx successful- the request was successfully received, understood, and accepted by the server.
- 3xx redirection- the request is incomplete and some actions need to be taken to complete it.
- 4xx client error- the request contains bad syntax.
- 5xx server error- the server failed to fulfill a valid request.
Here is the important response code with screenshots that the server gets:
2xx successful
The request was successfully received, understood, and accepted by the server.
200(OK) – It indicates that the API successfully carried out the client’s request. It is a successful HTTP response status.

201(created) – The request is sent and it involves creating a new resource.

204(No content) – The request is successfully sent and it doesn’t send back the response messages. Delete method is used to define 204 response code.

4xx client error
The request contains bad syntax.
400(Bad request) – The server will not process the request due to the error from the client’s end. Example: invalid request URL.

401(Unauthorized) – 401 indicates that the client tried to operate on a protected resource and is unauthorized.

403(Forbidden) – The client sends the correct request but the server refuses to give the response.

404(Not found) – The requested resource could not be identified at present and may be available in the future.

405(Method not allowed) – The client uses an invalid request method that the resource doesn’t allow.

5xx server error
The server failed to fulfill a valid request.
500(Internal server error) – This happens when the server faces an unexpected condition.

Example API
This Postman tutorial will help you understand the basics, but there’s no substitute for experience. It’s best to practice with Postman to get the most out of it.. Most of the examples this article uses are based on the JSONPlaceholder API . This is a sample API that is specifically designed to be used for testing purposes.
This tutorial requires you to have an up-to-date version of the Postman tool installed. If you don’t yet have the Postman tool, you may download and install it here . There are some command line calls and scripting throughout, but don’t worry if you haven’t done much scripting because all code examples will be included in each of the chapters of this tutorial ✅
Detailed Postman Tutorials
This chapter covers basic steps to install the Postman tool and execute a simple API request using the GET method. This helps you with the execution of API requests, the demo, and the screenshots in a stepwise manner to execute it. Most of the QA testers use the Postman tool for testing API as it provides benefits for those using it.
- What is an API?
- What is Postman?
- Postman Setu
- Executing an API Request
- API Testing with Postman
- Summary
This chapter covers the Execution of API requests using Authorization. It helps you to know how authorization works and what to do with it. It also helps in authorizing third-party APIs. Most people may know about authorization but they may not know how it is linked with API. So this chapter will guide you through the Authorization process.
- Basic Auth
- API Keys
- OAuth 2
This chapter focuses on how to use collections and variables. You will also learn about sharing data between tests. The main goal of the chapter is toexplains the automation testing using the Postman tool. Postman tools can be used for both manual and automation purposes.
- Organizing tests with Collections
- Sharing data between tests in Postman
- Variables
- Collection Runner
This chapter explains the method of testing and the results. It also explains the pre-request script tests when you need to add variables or data to run your script.
- Postman Test Scripts
- Pre-request Scripts
- Ready for Automating Requests
This chapter covers Newman. Many of the QA testers may not know what Newman is so this chapter is useful for them. It also explains running tests in Newman and about running Newman in the command line.
- What is Newman?
- Running Tests with Newman
- Running Newman in CI
This chapter covers mock data. Mock data should be used safely because it will simulate the behavior of real data. So, this chapter explains the use of Postman with Mock.
- What is Mock Data?
- Create Mock Examples
- Using a Postman Mock Server
- Conclusion
Conclusion
Postman is a free open-source tool that is used by many QA testers to simplify and reshape API testing. However, in order to achieve your target results and save time and effort go with the Postman tool and it must be used properly.
Well, we are ready to go now, so buckle up and get ready for a fun and informative ride into the land of API Testing with Postman! ��
Postman: базовые вещи простым языком
Итак, если ты здесь, то ты наверняка искал что-то типо: «Да кто такой этот ваш Postman?». Спокойно, сейчас расскажу.
Довольно простое определение для данного инструмента будет таким:
Postman — инструмент для работы с API, который позволяет посылать запросы к сервисам и работать с их ответами.
- отправлять запросы и получать ответы;
- сохранять запросы в папки и коллекции;
- делиться коллекциями ваших запросов и наборов тестов с коллегами;
- выполнять автотесты, в том числе по расписанию;
- изменять параметры запросов.
1.Собственно, рабочая область, в которой вы можете редактировать свой запрос:
— Response — полученный ответ и его status code;
2. Основное меню;
3. Боковая панель, в которой можно:
— cоздать коллекцию запросов (как бы разделить их и сгруппировать в отдельные файлы);
— создавать новые окружения с индивидуальными настройками;
4. Выбор типа запроса и сам URL.
Давай отправим GET-запрос с помощью Postman:
Чтобы выполнить запрос, нажми «+» и выбери его тип (GET). После укажи URL в адресной строке и щелкни Send.
Ты увидишь 200 OK в результате, если запрос выполнится успешно:
ВАУ! ТЫ сделал СВОЙ первый запрос, поздравляю!
А теперь задачка посложнее — отправим POST-запрос.
Если ты это читаешь, то, скорее всего, ты знаешь, чем отличаются типы запросов. Но на всякий случай я уточню. POST-запрос отличается от GET-запроса тем, что в POST-запросе мы должны отправить какую-то информацию в Body.
Чтобы выполнить запрос, нажми «+» и выбери его тип (POST). После укажи URL в адресной строке и…
Нажимаем на вкладку Body, выбираем «Raw» — JSON и вставляем данные пользователя:
После этого нажимаем кнопку SEND и отправляем наш запрос.
Вы увидите 201 Created message (как на скриншоте ниже) если запрос выполнился успешно:
Точно так же, как и POST, отправляются PATCH, PUT и delete запросы.
Тесты в Postman позволяют убедиться, что API работает так, как этого от него ожидают.
Возвращаемся к GET-запросу и переходим во вкладку Tests. Находим Snippets и нажимаем на «Status code: Code is 200». В окне теста появится скрипт. Этот тест будет проверять, что запрос возвращает код ответа 200:
Нажимаем кнопку SEND и проверяем результаты теста:
Все получилось. Поздравляю — вы великолепны!
Я познакомила тебя лишь с малой частью данного инструмента. Мне кажется, о Postman можно написать еще 1000 и 1 статью, но чтобы все точно получилось, будем действовать постепенно и идти шаг за шагом к обширным знаниям о Postman.