Yarn 2 — Устанавливаем и разбираемся

Yarn 2 (Berry) — это новый выпуск революционного и хорошо зарекомендовавшего себя менеджера пакетов Yarn, включающий в себя такие особенности, как: Plug’n’Play, возможность расширения модульного API, оффлайн-кэш и улучшенную поддержку рабочих пространств.
Plug’n’Play
Yarn PnP — это новая функция, которая по умолчанию включена в Yarn 2. PnP избавляет проекты от папки node_modules в пользу файла .pnp.js.
Файл .pnp.js сопоставляет все пакеты, установленные в проекте, с тем местом, где Yarn разместил их на вашем диске. Это избавляет от большого количества операций ввода-вывода при генерации node_modules, обеспечивая более быструю и надёжную установку.
В новой документации Yarn подробно рассказывается о недостатках node_modules, как структуры папок, и объясняется, почему необходим новый взгляд на управление зависимостями.
Монорепозитории
Не зависимо от того, являетесь бы поклонником монорепозиториев или нет, чтобы обеспечить качественное управление большими проектами и сложными рабочими процессами, потребуется хороший набор инструментов.
Популярным рецептом настойки JavaScript монорепозитория является комбинация рабочих пространств Yarn и использование Lerna в качестве менеджера проектов.
Хорошая новость заключается в том, что теперь Yarn может одновременно выполнять функции как менеджера пакетов, так и менеджера проектов, пытаясь обеспечить положительный опыт работы в этом аспекте.
Модульная архитектура, плагины
Сделав важный шаг вперед, Yarn 2 был переработан в пользу нового модульного API, расширяемого при помощью плагинов. В настоящее время большинство функций уже реализовано с их помощью — даже yarn add и yarn install являются предустановленными плагинами!
Вы можете сами написать плагин для Yarn, а чтобы дать вам представление об этом процессе, разработчики Yarn создали плагин TypeScript, который будет автоматически добавлять соответствующие @types/packages каждый раз, когда вы запускаете yarn add .
Как начать работу?
Установка
Yarn придерживается стратегии глобальной установки первой версии, а уже затем переключения на вторую для конкретного проекта.
Сначала установим глобальный Yarn, который мы будем использовать для создания локальных экземпляров:
Выполнив данную инструкцию (запуск yarn —version должен вывести что-то вроде 1.22.x ), перейдём к созданию каталога для запуска нового проекта:
“Berry” — кодовое имя релизной ветки Yarn 2.
Изменим версию Yarn конкретно для каталога my-app :
После выполнения данной команды установка будет завершена, и можно переходить к установке зависимостей!
Добавление зависимостей
Общие команды управления остались теми же, что и в предыдущих версиях:
yarn init — инициализация проекта
yarn add <package> [—dev] — добавление пакета
yarn remove <package> — удаление пакета
yarn up <package> — обновление пакета
Также, вы можете увидеть некоторые изменения консольного интерфейса в новой версии Yarn:
каждый набор связанных задач, выполняемых в процессе установки, сгруппирован;
почти все сообщения имеют собственные коды ошибок, которые можно найти в документации;
цвета теперь используются только для обозначения важных частей каждого сообщения.
Установка React.js с Yarn-плагином TypeScript
Далеко не все пакеты поставляются с собственными определениями типов, но уже нет поводов для волнения, ведь там, где их нет, Yarn возьмёт работу на себя.
Перед выполнением операцией ниже, следует установить Yarn Berry для рабочей директории и убрать детей от экрана.
Инициализируем package.json и установим плагин TypeScript:
Проведем установку библиотеки React:
Зависимости @types/ были успешно установлены!
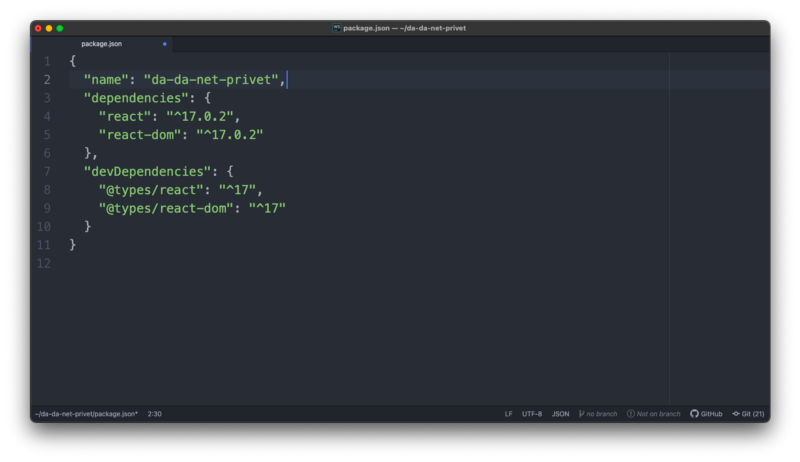
package.json
Что в итоге
Ветка Yarn 1.x (Classic) уже официально перешла в статус поддержки, предполагающей только исправление уязвимостей.
Все новые функции будут разрабатываться исключительно для Yarn 2, версия которого будет распространяться через yarn set version .
Для React Native всё таки придётся подключать node modules.
Если Yarn не подружится с вашей IDE, нужно будет кое-что установить. Не скучайте!
4 Methods for How to Install Yarn on Windows Server
Yarn is a package manager that helps develop JavaScript code and share it through software packages. A team at Facebook developed it as an alternative to the Node package manager (NPM) client and focused on speed, security, and consistency. Packages, also known as modules, are used to distribute the code. A package.json file outlines the contents of the package and all associated, distributed code.
There are multiple ways to install the Yarn on a Windows server. This tutorial offers four methods for how to install Yarn on Windows Server.
Prerequisites to Installing Yarn on Windows Server
- A host with Windows Server installed. on the server.
- Windows PowerShell running on the server.
- Administrator access to the server.
4 Methods for How to Install Yarn on Windows Server
Here are 4 Methods to install Yarn on a windows server.
Install Yarn on Windows Server via the MSI Installer
Step 1:
First, you need to download the Yarn install package. Download the Yarn .msi installer from the official Yarn website.
Step 2:
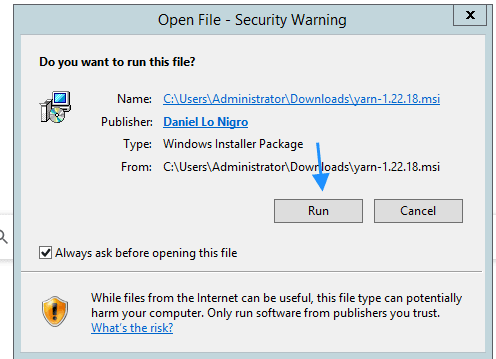
Locate and double-click on the downloaded package. A message box will appear, where you will click Run.
Step 3:
A new welcome wizard will pop up for the Yarn install setup. Click Next.

Step 4:
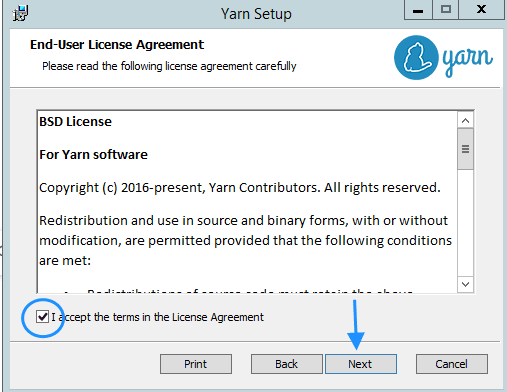
The next screen displays the license agreement details. Click the checkbox near the bottom of the window to accept the license agreement, and click Next.
Step 5:
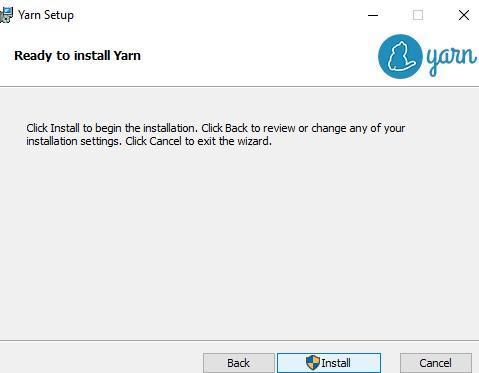
To complete the Yarn package installation, click Install.
Step 6:
Once the Yarn install is completed, a confirmation message box will appear. Click Finish.

Step 7:
Now, run the following Yarn version check command on the Windows PowerShell to verify the completion of the Yarn package install.
The output will show the version number, signifying that it is installed.
How to Install the Yarn Package Using Chocolatey
Chocolatey is a command line package manager and installer for Windows. The Chocolatey package manager automatically installs all dependencies for the Yarn package on the server. It also checks for a Node.js install, and if it isn't present, it will install it immediately.
Step 1:
To start the installation, open the Windows PowerShell as Administrator.
Step 2:
Run the following command to verify the execution status.
The output should be similar to the following.
In this example, the Get-ExecutionPolicy is Unrestricted, which is the expected output. In some cases, the output will be Restricted, and you will need to execute the following command to change it and complete the installation.
Type Y at the prompt to enable the Unrestricted option.
Step 3:
Run the below command on the PowerShell to complete the installation.
Here is the output.
Step 4:
Once the Chocolatey installation completes, install the Yarn package on the Windows server by running the following command.
Here is the output. You need to type Y to run the script and complete the Yarn installation.
Here is the output along with confirmation that Yarn has been installed.
Step 5:
To confirm Yarn installed correctly, check the version in the Windows Command Prompt (CMD). A quick way to access it is by the Run menu. Press the Windows + R keys and type CMD at the prompt.
Yarn installation
In the previous tutorial we told you that you have to install yarn to be able to use it, this tutorial will show you different ways of installing yarn for different operating systems.
Installing yarn on Alpine, Arch and Gentoo Linux
To install yarn on Alpine Linux (3.6+) you can use the following commands:
To install Yarn on Arch Linux you can use:
To install Yarn on Gentoo Linux you can use portage:
Both the RC and nightly builds of Yarn do not have packages for Alpine, Arch and Gentoo.
Installation Scripts
Yarn will be installed when you run the following commands in your terminal:
During the installation, a GPG signature will have to be verified.
If you want to use a particular version, you can also specify that using:
Manual install via tarball
It is possible to install Yarn by downloading and extracting a tarball following any of the steps below:
Before you extract Yarn, we recommend that you verify the tarball using GPG:
Path Setup
If Yarn is not in PATH, you can follow these steps to add it and enable it to run anywhere.
It should be noted that your profile can be found in your .profile, .bash_profile, .bashrc, .zshrc, etc.
- You have to add this to your profile, using export PATH=»$PATH:/opt/yarn-[version]/bin» (the path varies depending on where you extracted Yarn to)
- Log in and log out in the terminal, for the changes to take effect
If you want to access Yarn’s executable globally, you need to set up the PATH environment variable in your terminal by adding export PATH=»$PATH:`yarn global bin`» to your profile, or you if you are familiar with fish, you set PATH $PATH (yarn global bin) in the
Installing Yarn on CentOS/ Fedora /RHEL
You can install Yarn on CentOS, Fedora and RHEL using the RPM package repository provided by Yarn.
You should configure the NodeSource repository, if you don’t have Node.js is not installed.
Then you can run any of these commands:
Installation Script
Yarn will be installed when you run the following commands in your terminal:
During the installation, a GPG signature will have to be verified.
If you want to use a particular version, you can also specify that using:
Manual install via tarball
It is possible to install Yarn by downloading and extracting a tarball following any of the steps below:
Before you extract Yarn, we recommend that you verify the tarball using GPG:
Path Setup
If Yarn is not in PATH, you can follow these steps to add it and enable it to run anywhere.
It should be noted that your profile can be found in your .profile, .bash_profile, .bashrc, .zshrc, etc.
- You have to add this to your profile, using export PATH=»$PATH:/opt/yarn-[version]/bin» (the path varies depending on where you extracted Yarn to)
- Log in and log out in the terminal, for the changes to take effect
If you want to access Yarn’s executable globally, you need to set up the PATH environment variable in your terminal by adding export PATH=»$PATH:`yarn global bin`» to your profile, or you if you are familiar with fish, you set PATH $PATH (yarn global bin) in the
Installing Yarn on Debian/Ubuntu
You can install Yarn on Debian or Ubuntu, using the Debian package repository provided by Yarn. However, you have to configure the repository first:
Install YARN on Linux and Windows [Step-by-Step]
YARN is an npm alternative package manager developed by Facebook and with support from Google, Exponent and Tilde engineers. Yarn promises to be better than npm for speed and security.
In this article, we will explain the installation of YARN.
Let’s explain the installation steps on the successor of Centos and the Redhat-based operating system Rocky Linux, the popular Linux distribution Ubuntu and finally the Windows operating system.
Install YARN on Ubuntu (Debian based Linux Distributions)
Yarn can be installed with 3 different methods on Ubuntu 22.04.
Method-1: Install From Yarn Repository
The package list is updated:
Curl is needed to download yarn repo key:
Repo key is pulled and added into the system:
/etc/apt/sources.list.d under the repo file is created and the file information is defined:
After the newly added repo, the repo package list is updated again:
And now the yarn package is loaded:
The command above is also Node.js. will install. If the node.js is already installed, skip the installation as follows:
The installation was successfully completed. Installed Yarn version:
Method-2: Install From Script
The loading steps with this method are shorter than the previous method. Repo package list is updated and Curl package is installed:
Then pull the install.sh script using curl, run:
Yarn was founded. If you do not have Node.js installed on your system, you will get the following warning:
When we want to get information about tomorrow, the following warning appears:
If Node.js is already installed, it’s fine. Yarn version:
Method-3: Install Yarn using NPM
This step may be easier for you if you have NPM installed on your system. Or you can choose this step if you are going to use NPM.
NPM (Node Package Manager) is a package management system that Node.js accepts as a standard. npm is run from the command line and provides dependency management for applications.
If you haven’t installed NPM, update the repo package list and install the npm package:
NPM successfully installed, version:
Then install the yarn package with npm:
Installed yarn version:
Install YARN on Rocky Linux (Red Hat based Linux Distributions)
If you are using a Redhat based operating system (Centos, AlmaLinux, Fedora), you must follow the steps below to install Yarn. We will explain how to install Yarn with 3 methods on Rocky Linux.
Method-1: Install From Yarn Repository
To pull the Yarn repo file, curl must be installed on the system:
The yarn.repo file is created under the /etc/yum.repos.d directory and the information is defined:
The gpg key is loaded:
Install yarn package from newly added repo:
Method-2: Install From Script
To install Yarn with bash script on Rocky Linux, curl must be installed on the system:
Then the script is get and the installation starts:
Exit the terminal you’re installing from and login:
If the system does not have Node.js, you will get the following warning, but Yarn will be successfully installed.
Method-3: Install Yarn using NPM
If you have NPM installed on your system, this step may be easier for you. If you want to install npm, run the following command in terminal:
Install the yarn package with NPM:
Install YARN on Windows
This step will assist you in installing Yarn on the Windows operating system. Download the setup file for Windows from the Yarn official website.

Double-click the downloaded file and start the installation.
![Install YARN on Linux and Windows [Step-by-Step]](https://www.golinuxcloud.com/wp-content/uploads/yarn-2-e1667842844429.jpg)
Proceed by accepting the license terms.
![Install YARN on Linux and Windows [Step-by-Step]](https://www.golinuxcloud.com/wp-content/uploads/yarn-3-e1667842870176.jpg)
Specify the installation directory, it is recommended to remain the default.
![Install YARN on Linux and Windows [Step-by-Step]](https://www.golinuxcloud.com/wp-content/uploads/yarn-4-e1667842895625.jpg)
Click the Install button.
![Install YARN on Linux and Windows [Step-by-Step]](https://www.golinuxcloud.com/wp-content/uploads/yarn-5-e1667842915538.jpg)
Complete the installation with the Finish button.
![Install YARN on Linux and Windows [Step-by-Step]](https://www.golinuxcloud.com/wp-content/uploads/yarn-6-e1667842938872.jpg)
Installation completed successfully. You can check the installed Yarn version from the cmd screen.
![Install YARN on Linux and Windows [Step-by-Step]](https://www.golinuxcloud.com/wp-content/uploads/yarn-7-e1667842959814.jpg)
Summary
We reviewed Yarn installation steps for 3 different operating systems. We have installed for 2 different distribution types, especially in Linux distributions. You can use this guide for Linux distributions of the same type (Ubuntu=Debian=Pardus etc).
For more information about Yarn, you can visit the Yarn Official website.
References
Didn’t find what you were looking for? Perform a quick search across GoLinuxCloud
If my articles on GoLinuxCloud has helped you, kindly consider buying me a coffee as a token of appreciation.

For any other feedbacks or questions you can either use the comments section or contact me form.