Postman — менеджмент, структурирование, импорт и экспорт коллекций.
В предыдущей статье был рассмотрен инструмент для тестирования API — Postman. Эта статья посвящается организации коллекций, как экспортировать и импортировать коллекции.
Менеджмент коллекций
Когда вы тестируете несколько проектов параллельно, чтобы избежать путаницы в списке запросов, логичнее всего будет создать коллекцию для каждого проекта. Важно разделить проекты именно на этапе создания запросов. В примере я создам три проекта и назову их “Test 1”, “Test 2” и “Test 3”.
- Создать новую коллекцию в Postman
- Назвать эту коллекцию и опционально заполнить описание.
Совет! Используйте название тестируемого проекта.
Скорее всего, когда вы будете создавать свою первую коллекцию, она будет одна. В примере я покажу сразу несколько проектов/коллекций, какую именно схему менеджмента коллекции выбрать — решать вам.
Итак, коллекция создана. Что дальше? При нажатии на пустую коллекцию, Postman сам подсказывает, что можно добавить запрос или создать папку.
Создадим папку внутри коллекции.
Тут начинается самое интересное. Как же назвать папку? Есть несколько способов организовать папки внутри коллекции:
1) По функциональным блокам
2) По user flow
3) По версии API (V1, V2 и т.д.)
4) По критично важной функциональности
Организация коллекций по функциональным блокам
Например, в приложении или на сайте есть следующие функциональности:
- Регистрация, авторизация, восстановление аккаунта
- Каталог
- Поддержка
- Личный кабинет
- Корзина
и т.д до бесконечности.
Один из способов — разбить папки на функциональные блоки, чтобы облегчить проверку тех запросов, где произошли изменения, или регрессом проверять отдельные части приложения/веб-сервиса. Этот способ подходит в том случае, когда нужно держать под контролем абсолютно весь API и когда проект уже находится на стадии поддержки, но API еще не тестировался ранее.
Организация коллекций по user flow
Папки можно организовать, подумав о наборе шагов, которые обычно проходит пользователь. Например: пользователь логинится, заходит в каталог, добавляет товар в корзину, переходит на оформление заказа, заполняет все данные, переходит к оплате… Это один из user flow пользователя, которых может быть большое количество. Еще пример — пользователь заходит в каталог, добавляет несколько позиций в избранное, проверяет, что в разделе “избранное” эти позиции остались. По таким сценариям и можно оформить папки. Этот вариант подходит, когда стоит задача проверить именно путь пользователя от входа в приложение до его конечной цели. Даже если его цель — поменять пароль, или посмотреть новые акции. На практике этот подход применяется достаточно редко, т.к. такие коллекции крайне специфичны.
Организация коллекций по версии API
Разработка веб-сервиса или приложения состоит из этапов. В случае, когда с клиентом существует договоренность в первом этапе сделать определённый набор функциональностей, таких как регистрация, авторизация, каталог, корзина, оформление заказа, оплата, уместно разбить коллекцию по версиям API, которые от этапа к этапу обновляются. Например API v1, API v2 (где добавятся акции, раздел избранного, бонусные программы), API v3 и т.д. Зачастую, это один из самых распространённых случаев, т.к. в основном тестирование API и создание коллекции в Postman происходит в самом начале разработки.
Организация коллекций по критично важной функциональности
Согласно теории тестирования программного обеспечения, невозможно обеспечить отсутствие дефектов в разрабатываемом продукте. Особенно в случае сжатых сроков (ну куда же мы без дедлайнов когда наш клиент внезапно хочет сделать демо своим клиентам, потому что его бизнес идея раскрутилась?). В таких случаях нам необходимо убедиться, что основные или наиболее часто используемые части продукта работоспособны и исправны. То есть мы выделяем критичную функциональность и фокусируемся только на ней. Можно использовать этот метод при проведении приёмки минорного релиза, либо для создания коллекции в Postman, где будет отдельная папка с критичной функциональностью. В этом случае тестирование займет меньше времени за счёт фокусировки на конкретной части продукта, дешевле для клиента, но при этом клиент не будет терять деньги из-за того, что фичи типа “сканер штрих-кода товара” или “редирект на сайт из приложения” работают, а оплата отвалилась, т.к. она проверяется намного чаще, потому что входит в скоуп критично важной функциональности.
Экспорт
Коллекция создана, формат коллекции удобен, вдруг менеджер проекта или другой QA спрашивает “А есть коллекция в постмане? Хочу тоже посмотреть”. Коллекция есть, и для того, чтобы поделиться коллекцией и существует экспорт, чтобы по несколько раз не делать разным людям в команде одну и ту же работу. Да, можно импортировать коллекцию из Swagger’a, но ведь не всегда в Swagger’e указаны нужные параметры и прочие необходимые вещи для успешного запроса. В этом и есть огромный плюс Postman’a. Можно создавать и хранить кастомизированные запросы на основе документации (указывать необходимые ID, предустанавливать токен пользователя и т.д.). В онлайн инструментах типа Swagger’a тоже можно кастомизировать параметры или тело запроса, но нельзя сохранить эти шаблоны для последующего использования.. Также, не у всех сервисов хранения документации по API есть экспорт, иногда это вообще простыня из запросов и методов.
Существует два способа экспорта: с помощью создания файла коллекции .json и по URL.
- Файлом .json:
- Выбрать нужную коллекцию
- Нажать на кнопку “меню” у названия коллекции (или правой кнопкой мыши нажать на коллекцию)
- Выбрать пункт “Export”
- В открывшемся меню выбрать нужную версию коллекции (лучше использовать 2.1, т.к. эта версия является более универсальной и наиболее используемой. Про версии коллекций можно больше узнать здесь: Postman blog)
- Нажать кнопку “Export”
- Указать директорию, где будет храниться .json файл
- Сохранить
Вы великолепны! Файл создан, можно его скидывать заинтересованным людям.
2. С помощью URL ссылки:
- Выбрать нужную коллекцию
- Нажать на кнопку “Меню” у названия коллекции (или правой кнопкой мыши нажать на коллекцию)
- Выбрать пункт “Share collection”
- Включить вкладку “Get link”
- Нажать на кнопку “Get link” для генерации ссылки
Готово! 🙂 Ссылка получена, можно её скопировать и отправить кому нужно.
Импорт
Представим, что вы с другой стороны баррикады. С вами делятся файлом .json или ссылкой на коллекцию. Как этот файл открыть? Для этого существует импорт коллекций.
- Импорт с помощью файла .json:
- Нажать на кнопку “Import” в левом верхнем углу
- Выбрать вкладку “Import file”
- Нажать на кнопку “Choose file” (либо просто драг-н-дропнуть .json файл в диалоговое окно с кнопкой “Choose file”)
- Выбрать нужный файл
Вот и всё, коллекция добавлена и доступна в вашем списке коллекций.
2. Импорт с помощью сгенерированного URL:
- Нажать на кнопку “Import”
- Выбрать вкладку “Import from link”
- Ввести ссылку на коллекцию, сгенерированную при экспорте
- Нажать на кнопку “Import”
Теперь вы имеете представление о менеджменте коллекций и способах их экспорта и импорта. Конечно, можно вести коллекции так, как удобно вам. Материалы в этой статье лишь демонстрируют возможности организации коллекций и работы с ними. Зато теперь после вопроса “Скинь мне свою коллекцию”, вы не будете тратить время на то, чтобы разобраться как это сделать, ведь вы уже всё знаете!
В следующей статье будут рассмотрены предустановки для запросов, окружения, на которые будут отправляться запросы, предавторизация перед запросами, а также, коснемся темы инкремента значений в теле запроса.
Collections In Postman

Till now, we have learnt the terminologies of Postman in-depth and also have made some GET Requests. In the previous tutorials, we mentioned and briefly explained collections. Recall that Collections are a group of requests grouped into one folder. So that we can use them and share them easily. But in this tutorial, we will learn that a Collection is much more than that.
The definition of Collections is confined to a just grouping of requests. But, a grouping of requests can have unparalleled advantages and make the work of a software developer many folds easy. We will now learn how to step by step save a Collection.
You may also go through the recording of the Postman Tutorial where our experts have explained the concepts in depth.
How to create and save collections in Postman?
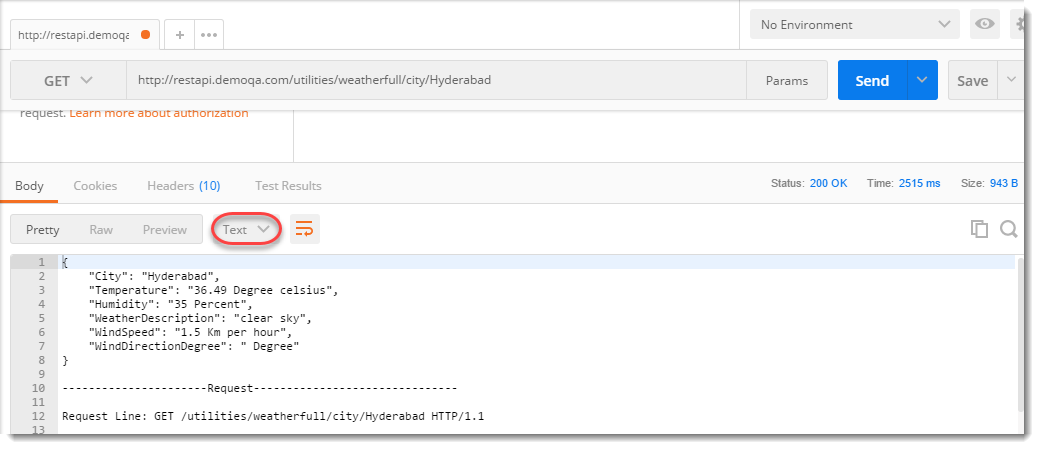
1.First of all, hit the endpoint http://restapi.demoqa.com/utilities/weatherfull/city/Hyderabad and in the response box change the format to Text to see the result.
- Now go to Collections Tab and press the icon that says, New Collection.
- Write a name of your choice for your first collection and it’s description. In the following image you can see I chose the name MyFirstCollection and a simple description.
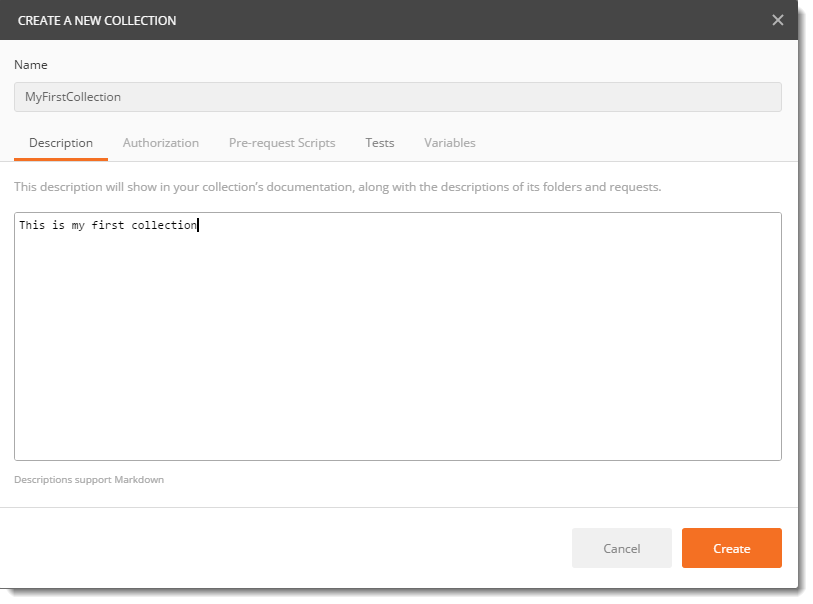
Press Create to create your first collection.
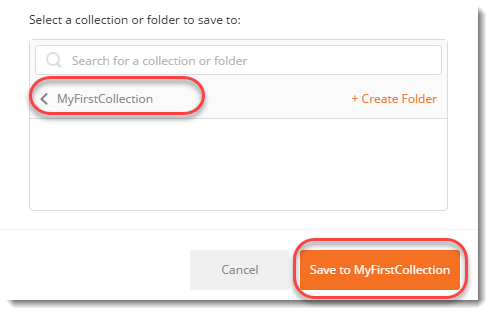
Now, you have your first collection created but it’s empty as of now. Press Save button in the side of address bar.

- Choose your collection name in the panel as shown in the image. Press Save.
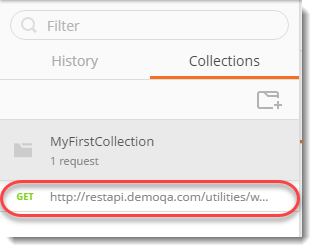
Now look at the collections tab, you will have the request saved below your collection name.
You can click on the Meatballs menu in the side of the collection name and you will see some options. We will talk about the following options in this tutorial.
- Share Collection
- Export Collection
- Add Folder to a Collection
- Duplicate the Collection
- Remove the collection from workspace
- Delete the collection
- Leave a comment on the collection
Share Collection
Share collection option is used to share the collection to other people such as your team members.
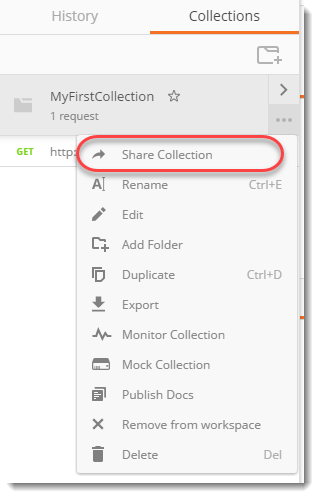
Sharing a collection is very important when you are working in a company or in a team. There are times when developers create a bunch of Postman Requests while developing APIs to test it. You can request developers to share their collections and you get benefits of it. Or even you create a bunch of Postman Requests, save it to a Collections and share it with your team. It is not worth sharing every request one by one. Rather, we share our Collection as a whole to the team members or anyone to whom we want to share through different methods listed below.
For example, if you are a tester and find out some bug, you can save your steps to reproduce in a Collection, and attach the same to the bug for the developer as a proof and to reproduce the issue. For using this option you must be signed into postman. After signing into Postman you get two options to share the collection.
- Through workspace
- Sharing through link
Workspace
A workspace is a collaborative environment for a group of users to develop and test APIs. In simpler terms, workspace is the project in which you work. A setting done in a workspace remains in the same workspace. It is like a shell in which you work. There has to be a workspace to work in Postman, you cannot work isolated. There are two types of workspaces inside Postman
- Team Workspace : To use the option of Team workspace your company or you must have purchased the Postman Pro version or else this feature won’t work. In Team workspace option, your team can test API simultaneously on one workspace and anyone can edit and update (with permissions). This comes handy when teams are located in different locations or different buildings also. Once edited, everyone’s API is updated automatically. There can be any number of Team workspaces.
- Personal Workspace : A personal workspace is similar to the team workspace but the difference being this workspace is completely personal to the user who created it. Postman will have no contribution in updating it at any machine, if present.Collections present in the personal workspace is shared through link which is detailed below.
Individuals can organize their work in personal workspaces and teams can collaborate in team workspaces. When you start Postman, you are already inside personal workspace as shown.

You can create unlimited personal workspace which will be personal to your machine and can test any number of API.
Share Collection through a link
Second option is by creating a link and sending it to the people of your team. This link will be of Postman Cloud. So, your collection will be first uploaded to Postman cloud and then anyone can access it through that link. But, this feature is not recommended while working in a company sometimes because the APIs are personal and companies would not want them to be in other clouds which is not safe.
Export Collections in Postman
Export feature is used to export the collection as a whole by saving it to your computer and which can be later share with the team over the Email in a zip file. Or it can also be shared over a network sharing.
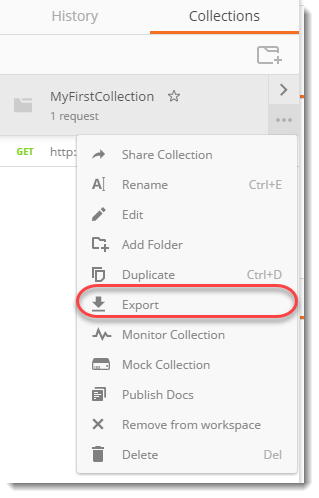
Follow these steps to learn about exporting the collection.
1.Click on export as shown in the above image.
2.You will see two or three options (depending on your version of Postman). For this tutorial we are using Postman ver 6.0.10. We will choose the option Collection v2.1 and press Export.
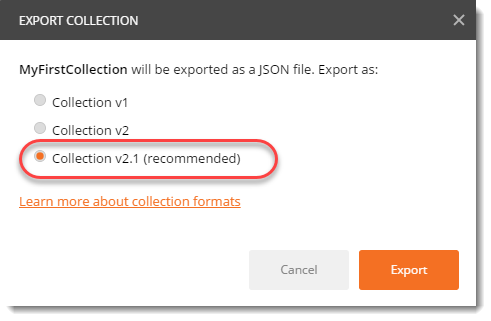
This will open the box to save the collection in JSON format on your computer wherever you want. Then this JSON file can be shared with your teammates by any means just like a file.
Add Folder
Collections also let you make folders inside your collection and then save the requests inside your folders. This can further help you to sub-categorize the requests. For example, in the previous chapters we took the example of movies folder to explain collection where you can store all your movies. Making a folder is like making another folder inside Movies folder, such as "English Movies" which will contain all the English language movies, but they are still movies. Similarly, here we can make folders inside the collection and store our requests.
1.Choose the option Add Folder.
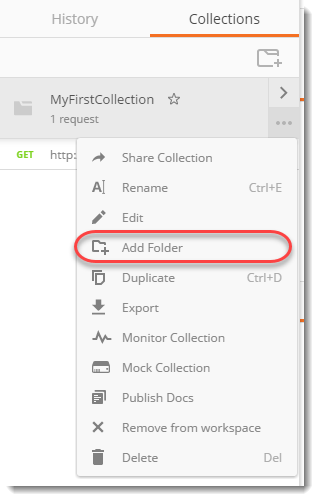
- Name your folder and press Create.
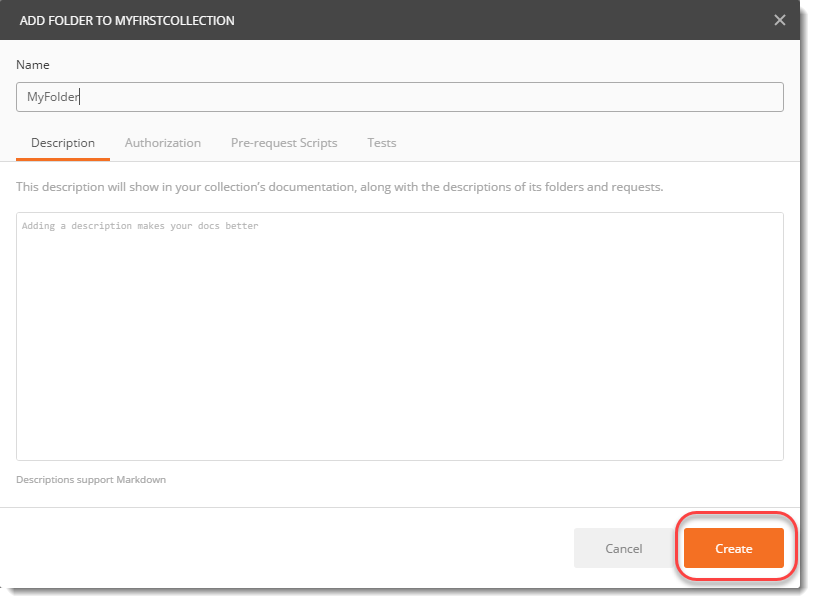
Now you have your folder created but as of now it is empty.
3.Drag the request and drop it on the folder name.
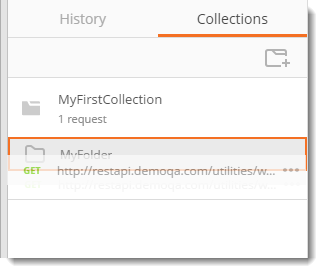
This will move your request to your folder and you are all set.
Duplicate
The option Duplicate as the name suggests, duplicates the collection into a new collection. It means when you click on Duplicate, you make another copy of the same collection in the workspace.
1.Click on Duplicate.
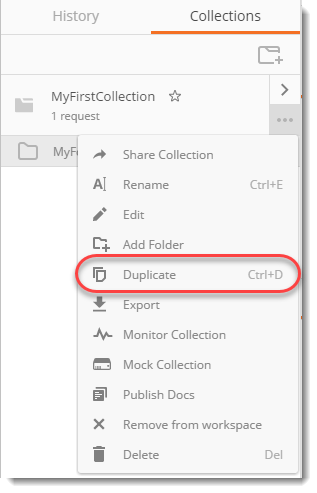
2.You can see the copy in the sidebar underneath the original collection.
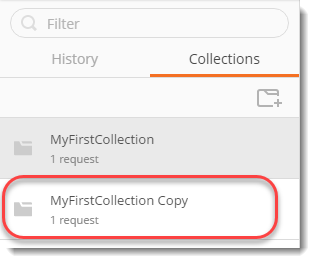
Remove From Workspace
Remove from workspace option deletes the collection from the workspace that you are working on.
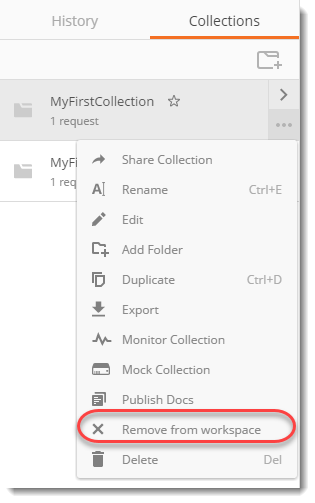
If it is a personal workspace then you can delete it by choosing the option whereas if it is a team workspace then you need to have permission for deleting any collection or request from the workspace.
Delete
Delete and remove from workspace option might seem similar but they differ in just one aspect. Remove from workspace deletes the collection from the current workspace but delete option will delete the collection or request from all the workspaces wherever it is present. Needless to say, you need permissions for this.
Leaving a comment on the collections in Postman
It is quite obvious that when we work in teams, our workspace faces a lot of edit. This can be anything from editing a simple request to editing one test in that request. Now, since you need to apprise everyone what you did, Postman brings you the comment feature. Through this feature you can leave comments in the collection so that everyone can know what you just uploaded in a chronological order.
For this press the arrow button beside the collection name
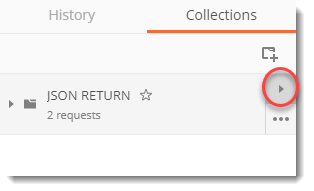
Select View in Web from the options
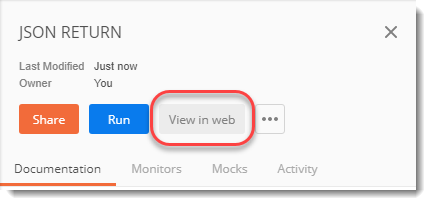
This will open the collection in your browser. This can be seen by everyone working in the same workspace. Select comments on this page.
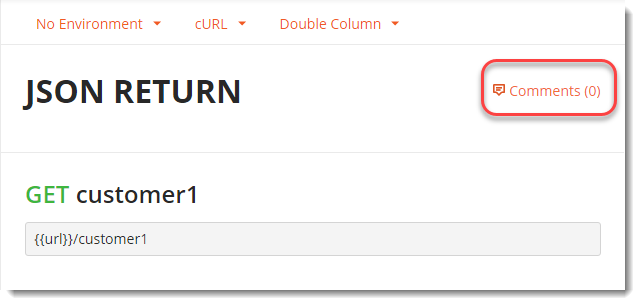
This will show you the popup to enter the comments.
We will learn in the next section how to import collection in Postman.
How to Import Collections in Postman
If we can export our collection then needless to say it must be imported in some other Postman. So, like export we have another option import but that does not reside inside the meatball menu. The import collection is a part of header as shown below.

Importing a collection is easy in Postman. When you click on import you will see the import panel in front of you.
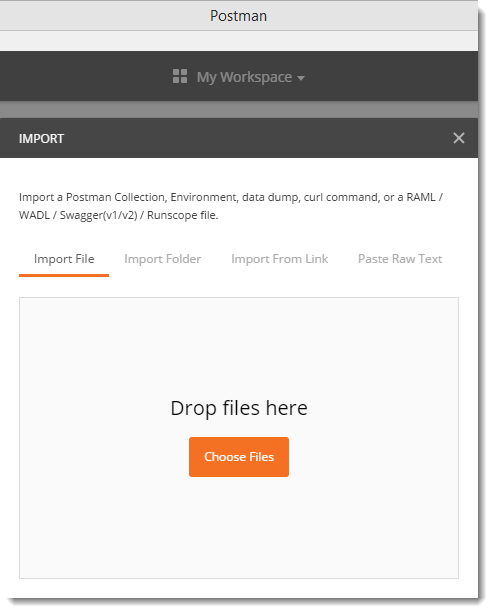
Here, as you can see there are different methods that can be used to import a collection. These methods are
- Importing through drag and drop method
- Importing the folder
- Importing through link
- Pasting the raw text
Importing through drag and drop
Importing through drag and drop is pretty simple. It works the same as the upload feature in many websites such as Google Drive. If you have a collection file in you system just click on that file and drag it to this panel and release the mouse (or drop the file). This way the file/collection will be automatically uploaded in your Postman.
Importing the folder
Importing the folder is same as the previous option just the difference being, in the previous one we were uploading single collection but in this one we can upload multiple collections all at once. Just make a folder inside your system and paste or export many collections in it. When you import the same folder in your Postman, you will see all the Collections being uploaded. If you already have any of the collection from that folder, you will be asked to replace it or form a copy of it.
Importing through link
As we discussed in the previous tutorials, when we work in teams, we often use the Postman cloud or Team workspace which provide us the link to the collection so that everyone can use it without any problem. So importing through a link is the same feature. We can provide link of the same collection in the box and the collection will be imported.
Pasting the raw text
In the above image, the first line in the panel tells us what files can be imported in Postman. There are many files apart from a collection like curl or RAML etc. These files can be imported through raw text coding like in curl file. Although this feature is out of the scope of this course, therefore we won’t be discussing it in detail.
You might wonder about the collection runner which we introduced earlier which is used to run the collection requests all at once. We will talk about it after concluding "Tests" topic. It will make more sense in the next tutorial.
Practice Exercise
Since we have come so far in Postman, it would be better if you try out some scenarios yourself.
Stay Organized with Postman Collections
Keep your API requests and elements organized with Postman Collections.

Postman Collections are Executable API Descriptions
Postman’s collection folders make it easy to keep your API requests and elements organized.
Generate Collections from API schemas
Generate a collection from an API schema to view and edit each request.
Link Collections and API Elements to APIs
Link collections to your APIs to add API elements like mocks, monitors, and tests to your APIs.
Easily Share Your Collections
Share collections via documentation, the Run in Postman button, or by link.
Publish API Documentation
Create beautiful, machine readable API documentation from your collections.
Link API Elements to Your APIs with Postman Collections
API Publication
Publishing an API collection can be done via the Run In Postman button, which allows users to directly download your collection into their own Postman instance.
API Monitoring
Postman API monitoring helps you identify problems with your API like poor performance, response errors, and outages. You can customize your Postman Collections with tests to ensure that your APIs are working as expected.
API Documentation
Postman automatically pulls your sample requests, headers, and code snippets. to populate your documentation page with dynamic examples and machine-readable instructions.
Mock Server
Postman’s mock servers simplify API design and planning, support split-stack development, and help you ensure that your API will run the way it’s supposed to.
Debug
Debug APIs quickly and easily by adding tests to your requests and examining responses.
Automated Testing
Postman allows you to reuse your test suites to create a CI/CD pipeline so you can test at every push. You can integrate your Postman instance with Travis or Jenkins to create your own CI/CD pipeline or add it to your existing pipeline as a build step.
Где хранятся коллекции почтальонов?
Где автономный клиент Postman для Windows сохраняет коллекции при работе в автономном режиме?
Чтобы уточнить, я хочу выяснить, куда Postman сохраняет файлы коллекций по умолчанию, когда онлайн-синхронизация отключена. Я не пытаюсь экспортировать моя коллекция в виде файла JSON.
Я посмотрел в %LocalAppData% , Мои документы и Программные файлы, но я не вижу, где Почтальон сохраняет свои собранные данные.
3 ответа
Похоже, Postman использует LevelDB. В Windows я обнаружил, что моя база данных Postman находится по адресу:
Согласно Piere F, пользователи macOS могут найти его в:
Для версии Postman из расширения Google Chrome вам необходимо скопировать все файлы из пути:
» \ Users \\ AppData \ Local \ Google \ Chrome \ Данные пользователя \ Default \ Storage \ ext \ fhbjgbiflinjbdggehcddcbncdddomop \ def \ IndexedDB \ chrome-extension_fhbjgbiflinjbdggehcddcbncdddomop_0.inlexedb_0.indexedbb
Файлы внутри пути выше содержат всю историю и коллекции от Почтальона
В качестве альтернативы, если вы просто хотите посмотреть коллекцию, вы можете экспортировать ее в формат json из меню коллекции.