How To Import Brushes In Clip Studio Paint
It is important to know how to install new brushes in Clip Studio Paint. After all, we just got some new and good looking brushes to have some fun with and we need to add them to the software! There aren’t as many Clip Studio Brushes around as we wish, but there’s still some very good material.
Besides, Clip Studio also has an Asset Store where you can buy or get for free new and different material, including brushes. Importing these brushes, both from the store or from a folder on your computer is pretty straightforward.
How can you import brushes in Clip Studio Paint? The easiest way is to simply drag the brushes from their folder into a Brush/Pen tab you have opened in Clip Studio Paint.
There are other ways to do it and depending on if you’re on a computer or an iPad, you’ll have to import them differently. I’ll explain each method right here, accompanied by images to make to whole process easier for you!
Table Of Contents
Importing Brushes In Clip Studio Paint
Importing Brushes in Clip Studio Paint is fairly easy, as long as they’re specifically made for Clip Studio. These brushes are usually named with the .sut extension! There are actually two ways to import brushes. A more complex one, but not too much, basically it just take quite a few extra steps.
And then the easiest one, which is very useful if you’re importing more than one brush!
Let’s start with the first method. Go to your pen or brushes tab. It doesn’t really matter which since you can then move your new brush to any tab you want. But if you don’t want to have more work later on, choose the tab you’ll want to have your new brush on.
Right-click any brush in it. Again, it doesn’t really matter which one because it won’t replace it. Now go down and click ‘Import Subtool…’. A new window will open and you just need to find the location of your brush and select it. Click Ok and it’s done!
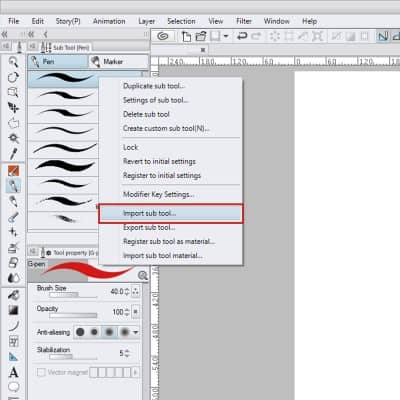
You’ll notice that the brush you just imported will be at the bottom of the list of brushes in that tab. If you wish to change its place simply click and hold it and move the brush to where you want it.
For example, you can create a new Subtool tab, by dragging it to the side of the tab you’re on. You can put it in another Subtool tab by dragging it to the top of an existing tab and releasing it. Finally, you can also create a new brush tool icon on the toolbar. You just need to grab it and drag it in between icons!
The second method is much more simple. You can actually use this method to add just one brush as well. Open up Clip Studio Paint, choose one of the brush or pen tabs. Whichever you prefer. Now open the folder where you have your new brushes.
Select as many as you wish and drag them to the brushes tab. That’s it! The brushes you just imported will appear right away and are now ready to use.
If you want to give your brushes a more personal touch though, you might be interested in creating your own brushes in Clip Studio Paint, which you can learn how to do right here!
How To Import Brushes Into Clip Studio Paint For iPad
There are different ways to import your Brushes into Clip Studio Paint for iPad. The main difference is where you have them stored. You can save your brushes in the Dropbox, for example.
First, you should open up Clip Studio Paint, and choose one of the brush or pen tabs. Make sure that’s where you want your new brush to be in. Now go to the Dropbox app and select the brush you want. Select ‘Export -> Open In…’, now choose Clip Studio!
And that’s it! If you go back to Clip Studio, you’ll notice your new brush in the tab you left open. If not, try to close and open Clip Studio again to refresh it.
Other than Dropbox, you can also import your brushes from Google Drive! Just like before, be sure the tab where you want your brush to go is open in Clip Studio Paint. Then select the brush you want in Google Drive, select ‘Open In…’ and then ‘Copy to Clip Studio’.
Your new brush should now be ready to use!
Notice that you should have each individual .sut file available both in Dropbox and Google Drive instead of a .zip folder. Be sure to unzip the brushes you want and then you can import them.
Unfortunately, I don’t know of any way of importing more than one brush at a time. You need to go one by one. Still, it is rather simple to import your brushes and once in Clip Studio Paint you can move them to any tab you want, just like we do on the computer!
How To Download Brushes From Clip Studio Assets
Clip Studio Paint has a very handy tool where you can download new and different material. It can be brushes, models, textures, etc. There’s a lot you can find there and they’re made by other artists and Clip Studio users. There are paid assets, but there’s also a vast array of free assets that you can download and use!
To access this, simply open the Material Tab and then select the ‘Search for Additional Materials’ button. Alternatively, you can also click the third icon on the tab below the menus!
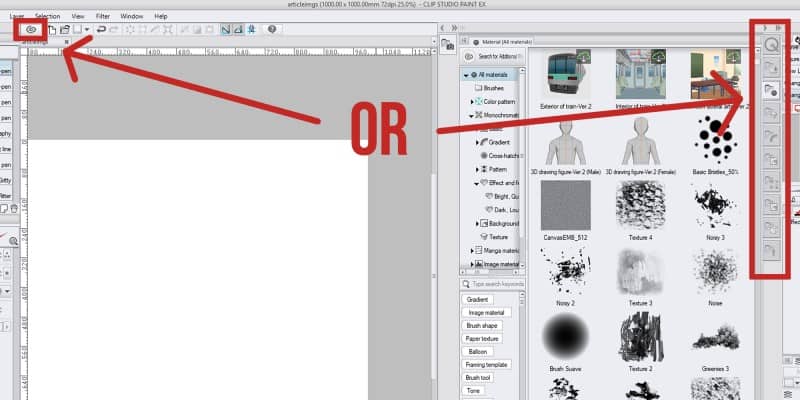
To download a brush, you need to have a Clip Studio account. Be sure to register and login before trying to download anything, because it will ask you for it!
Now that you’re set, feel free to search for brushes or other materials. If there’s something you want to use on Clip Studio, simply open it and then click the ‘Dowload’ button to the right.
When you download a brush, you can then go back to Clip Studio Paint, go to the Material bar on the right side of your screen and go to the ‘Download’ folder. The brush you just downloaded should appear there!
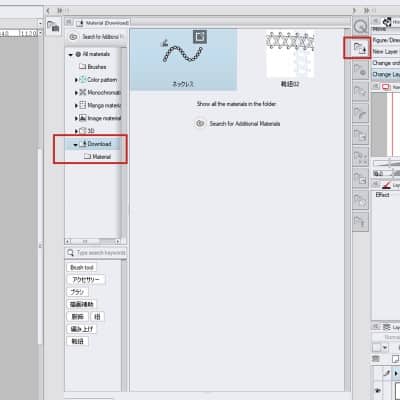
If you had this folder already open, you might need to click another folder and then go back to the downloaded material so it refreshes.
Now you just need to grab your new brush and drag it to the Pen or Brush tab you have selected! The brush you downloaded is now ready to use.
Again, you can move it to another tab if you wish to. Just click on it and drag the brush to where you want it to be!
All material assets that you download can be used both for non-commercial and commercial uses. So feel free to explore the materials available and try them out. You can always credit the people that made the assets so other people can find their work as well and use it!
Additional Questions
How do I export clip studio brushes? To export a brush, simply right-click on it then select ‘Export Subtool…’. Choose a location and save it. You can create your own brushes in Clip Studio and export them to share or sell with other people!
Can I give the downloaded material to another person? No. When downloading something from the Asset store you cannot give it to someone else nor sell it as your own. If you want another friend to use it, simply show it to them, so they can download the material as well!
Tip: Always consider using Vector Layers in Clip Studio Paint so you’ll never lose quality!
Можно ли использовать кисти Photoshop в клип-студии Paint?
Это может стать неожиданностью, но вы действительно можете использовать кисти Photoshop в Clip Studio Paint, и я объясню, как! … Просто найдя идеальную кисть, вы захотите, чтобы она всегда была под рукой.
Могу ли я импортировать кисти Photoshop в краску Clip Studio?
Если вы давно пользуетесь Photoshop, у вас, вероятно, есть коллекция ваших любимых кистей, созданных вами или загруженных из Интернета. Теперь вы можете сохранить эти кисти из Photoshop и поместить их в Clip Studio для собственного использования.
Какие кисти совместимы с краской clip studio?
Если вы рисуете, рисуете или рисуете, вам нужны подходящие кисти для работы. К счастью, все предыдущие кисти Manga Studio 5/EX безупречно работают в Clip Studio Paint. Не говоря уже о том, что после обновления программного обеспечения художники выпускают свои собственные кисти CSP.
Можно ли скачать кисти для пейнта клип студии?
Помимо Dropbox, вы также можете импортировать свои кисти с Google Диска! Как и раньше, убедитесь, что вкладка, на которой вы хотите разместить кисть, открыта в Clip Studio Paint. Затем выберите нужную кисть на Google Диске, выберите «Открыть в…», а затем «Копировать в Clip Studio». Теперь ваша новая кисть должна быть готова к использованию!
Как получить Clip Studio Paint Pro бесплатно?
Бесплатные альтернативы Clip Studio Paint
- Adobe Illustrator. ИСПОЛЬЗУЙТЕ ADOBE ILLUSTRATOR БЕСПЛАТНО. Плюсы Большой выбор инструментов. …
- Корел Пейнтер. ИСПОЛЬЗУЙТЕ БЕСПЛАТНО Corel Painter. Плюсы Много шрифтов. …
- Моя краска. ИСПОЛЬЗУЙТЕ MYPAINT БЕСПЛАТНО. Плюсы Простой в использовании. …
- Инкскейп. ИСПОЛЬЗУЙТЕ INKCAPE БЕСПЛАТНО. Плюсы Удобное расположение инструмента. …
- Пейнтнет. ИСПОЛЬЗУЙТЕ PAINTNET БЕСПЛАТНО. Плюсы Поддерживает слои.
Как импортировать кисти в клип Studio Paint 2021?
Как установить щетки
- Убедитесь, что ваши файлы видны в файловом менеджере.
- Убедитесь, что Clip Studio Paint открыт. …
- Выберите инструмент, в который вы хотите их импортировать.
- Выберите загруженные файлы кистей/вспомогательных инструментов в файловом менеджере.
- Перетащите их на палитру [Вспомогательный инструмент] внутри Clip Studio Paint.
Можете ли вы открыть файлы Photoshop в клип-студии Paint?
Clip Studio Paint поддерживает ввод и вывод в форматах файлов Photoshop, поэтому вы можете доставлять файлы клиентам и типографиям без изменения существующих рабочих процессов. Загружайте, редактируйте и сохраняйте данные PSD и PSB, поддерживая слои для беспрепятственного переключения между программами.
Клип студия без краски?
Бесплатно в течение 1 часа каждый день Clip Studio Paint, известный набор для рисования и рисования, становится мобильным! Дизайнеры, иллюстраторы, художники комиксов и манги во всем мире любят Clip Studio Paint за его естественное ощущение рисования, глубокую настройку и множество функций и эффектов.
Используют ли профессионалы краску clip studio?
Clip Studio Paint имеет функции для профессиональных аниматоров и теперь используется в производственных процессах анимационных студий. Ниппон Анимация Ко., Лтд. Эти корпорации используют Clip Studio Paint для графики в своих играх — такой области, как дизайн персонажей. GCREST, Inc.
Можете ли вы купить краску Clip Studio для кого-то еще?
Могу ли я купить программу для кого-то еще, в подарок? Вам нужен действующий адрес электронной почты, когда вы покупаете и устанавливаете загружаемую версию. После этого, если вы дадите получателю подарка важный серийный номер, у вас не должно возникнуть никаких проблем. …
Где хранятся кисти для рисования clip studio?
Кисти и материалы, загруженные из АКТИВОВ, хранятся в палитре «материалов» «скачать». Это формат файла, который невозможно расшифровать, даже если пользователь напрямую открывает папку в системе, поэтому CLIP STUDIO PAINT управляет им как палитрой.
Где мои скачанные кисти в clip studio paint?
Загруженные вами материалы будут сохранены в разделе «Палитра материалов» > «Загрузка» в Clip Studio Paint. Загруженные материалы также появятся в разделе «Загрузки» на экране «Управление материалами» в Clip Studio.
Какая последняя версия clip studio paint?
Clip Studio Paint EX/PRO/DEBUT Ver. 1.10. 6 Выпущено (23 декабря 2020 г.)
A quick way to install custom brushes in Clip Studio Paint


I’m in the process of preparing some custom brushes for people. So I’m writing this as a quick guide I can point to.
Clip Studio Paint brush files have the file extension .sut (meaning “sub tool”, which is what “brushes” are called in CSP).
 An example of a sub tool file.
How to install brushes
You usually download multiple brushes in a pack, so you’ll want to install multiple of them at once.
The fastest way to install multiple brushes is to select them in your file manager, and drag them into Clip Studio Paint’s [Sub Tool] palette.
- Make sure your files are visible in your file manager
- Make sure Clip Studio Paint is open
- Select the brush/sub tool files.
- Drag them into the [Sub Tool] palette inside Clip Studio Paint
There is also an [Import sub tool…] context menu item but that only allows you to import files one at a time.
Brushes from Clip Studio Assets
Note that this can also apply to sub tool materials you get from the Clip Studio Assets site. These get added to your Materials library rather than downloaded as files.
In this case, you need to browse your Materials library to find the brushes/sub tools you downloaded. Then you just do the same steps mentioned above, except they’ll come from the [Materials] window instead of the operating system file manager.
- Go to Window > Material > Material [Download]. This should open a new Material window and the “Download” material folder.
- In that folder, look for the brushes you downloaded from Clip Studio Assets.
- Select them.
- Drag the brushes to your sub tool list.
If you can’t find Material [Download] just choose any other material window in the list. You can navigate to the “Download” Material folder in the list of folders on the left of any Material folder.
For more info on how downloaded materials from the Clip Studio Assets page works, check out their How-to-Use page: https://assets.clip-studio.com/en-us/help#how-to-use
Brush packs for Clip Studio Paint for iOS
The iOS Files app (since iOS 13) has the ability to unzip files and better manage files independent of the apps they came from.
Look for the file you downloaded, then tap on it. iOS will unzip the file in that folder.
Tapping the zip file in the iOS Files app will unzip it in that folder. You can then follow the normal steps listed above.
You can use iPadOS Split View or Slide Over to drag the files from the Files app to the Clip Studio Paint app.
 Drag and drop subtool files from the Files app to Clip Studio Paint on iPadOS
For older versions of iOS, you need to be able to extract files using a different app, or a computer.
If the brushes you download are not inside an archive file, sub tool files can be imported via drag-and-drop from the apps of your online storage services like Google Drive and Dropbox. The same steps listed above apply.
If this fails, you can try to move those files locally onto your iPad first, and then drag the files from there using the Files App as described above.
Chromebook: How do I import brush files into Clip Studio Paint?
How can I import .sut files and Photoshop brush files into Clip Studio Paint?
Answer
There are two ways to do this: You can import from the Sub tool palette menu, or drag and drop a brush file into the Sub tool palette.
Click here to see the brush formats that can be imported.
Preparation
Be sure to unzip any zipped brush files first.
Imported zip files may not load.
Importing a material from the palette menu
1. Click the menu button in the upper left corner of the Sub tool palette.
2. Select [Import sub tool].
3. Select [Import] from the menu button in the dialog.
4. Open to where the brush is saved, select the brush file you want to import and click [Open].
5. Select the brush file you want to import and click [Open].
6. The brush file will be imported as a sub tool.
Importing via drag and drop
Use the Files app to open the folder with the brush file and drag and drop it into Clip Studio Paint's sub tool palette.