Как обновиться до Ubuntu 20.04
Обновлено 12.07.2020: 17 июля истекает поддержка Ubuntu 19.10.
Обновлено 23.04.2020: 23 апреля состоялся официальный релиз Ubuntu Desktop 20.04 LTS (Focal Fossa).
В этой статье мы рассмотрим варианты по обновлению систем Ubuntu 18.04 и 19.10 до финальной версии Ubuntu 20.04, выход которой состоялся 23 апреля.

Вам не обязательно скачивать ISO-образ, возиться с USB-накопителем или терять какие-либо файлы – вы можете выполнить обновление напрямую, из установленной системы.
Рекомендуем перед обновлением выполнить резервное копирование системы и важных файлов, так же не помешает создать “спасательный образ” на съемном носителе.
Как обновить Ubuntu до Ubuntu 20.04
Релиз стабильной версии Ubuntu 20.04 LTS состоялся 23 апреля 2020 года. Система будет поддерживаться 5 лет, с 23 апреля 2020 года до июля 2025 года.
Для обновления до Ubuntu 20.04 вам потребуется:
- Активное интернет-соединение
- Полностью обновленная система Ubuntu 18.04 LTS или Ubuntu 19.10
- Немного терпения
Примечание: вы НЕ СМОЖЕТЕ обновиться до Ubuntu 20.04 с 32-разрядной версии Ubuntu. Поддержка 32-битной архитектуры была прекращена в версии 19.10.
Обновление Ubuntu 18.04 LTS до финальной версии Ubuntu 20.04 LTS
Рассмотрим обновление системы до Ubuntu 20.04 в день выпуска (23 апреля) и в последующие дни.
Уведомление о доступности новой версии появится после появления первого билда, т.е не раньше июля. Это стандартная практика, нацеленная на максимизацию стабильности (в конце концов, это LTS выпуск).
Чтобы перейти на Ubuntu 20.04 после релиза стабильной версии, но до июльского выпуска, вам достаточно будет изменить настройки обновления следующим образом:
- Откройте утилиту “Программы и обновления”
- Выберите вкладку “Обновления”
- Измените настройку «Уведомлять меня о новой версии Ubuntu» на «При доступности любой новой версии».

Таким образом, после 23 апреля, когда появится новая версия, система обновления отобразит уведомление о доступности обновления до Ubuntu 20.04.
Примечание: Ubuntu 20.04 внесены изменения в способ размещения файловой системы. Несмотря на то, что вы можете выполнить обновление без каких-либо проблем, просто имейте в виду, что расположение некоторых папок может быть слинковано с другим расположением.
Обновление Ubuntu 19.10 до финальной версии Ubuntu 20.04 LTS
Вы сможете обновить Ubuntu 19.10 до 20.04 после 23 апреля с помощью встроенного средства обновления программного обеспечения.
Вы будете уведомлены о доступности новой версии. Уведомление в виде диалогового окна, подобное как на скриншоте ниже, придет автоматически.

Достаточно будет нажать кнопку “Upgrade” (“Обновить”) для того, чтобы перейти к дальнейшему этапу обновления. Имей ввиду, что обновление вводится поэтапно и в день релиза Ubuntu 20.04 LTS будет доступно не всем.
Чтобы принудительно проверить наличие новой стабильной версии и затем выполнить обновление Ubuntu 19.10 до финальной версии Ubuntu 20.04 LTS, в терминале выполните команду:
Как видите, сама процедура обновления максимально простая.
Как обновить Ubuntu 19.10 до 20.04 после 23 апреля:
В нашем случае обновление с Ubuntu 19.10 до Ubuntu 20.04 заняло около 20 минут и прошло корректно. Никаких ошибок не возникло.
How To Upgrade Ubuntu 18.04 to 20.04 LTS using command line
Ubuntu 20.04.2.0 LTS (Focal Fossa) is the current latest stable version the Ubuntu OS. LTS stands for long-term support, which means five years, until April 2025, of free security and maintenance updates, guaranteed.
In this article we will show you an easy and fast way on how to upgrade your Virtual or Dedicated server from Ubuntu Linux 18.04 LTS or 19.10 to Ubuntu 20.04 LTS using the apt / apt-get command.
Step 1 — Make a Backup
Using Acronis Cloud Backup you can easily backup your entire Ubuntu server or choose specific files/folders which you do not wish to lose in case something goes wrong.
If you wish to use any other backup software you are free to do so, just make sure your data are placed in an offsite/off-server repository. With Acronis Backup, your data will be hosted in Acronis’ cloud datacenter and can be easily restored/recovered to a new server.
Step 2 — Upgrade all installed packages on Ubuntu 18.04 LTS
Once you have completed your existing Ubuntu server’s backup process, you can begin with the OS upgrade.
Using a root-privileges account type the following commands:
sudo apt update
sudo apt list —upgradable
sudo apt upgrade
and then type ‘Y’ to continue when prompted
Upon completion, reboot your server by issuing the following command:
sudo reboot
Step 3 — Remove unused old kernels from Ubuntu 18.04
Run the following command:
sudo apt —purge autoremove
At this point you need to install the Update Manager on server as it may or man not installed on your server.
Do so by executing the following command:
sudo apt install update-manager-core
Step 4 — Upgrade Ubuntu Linux to latest 20.04 LTS
Execute the following command:
sudo do-release-upgrade
You might notice the following message appearing after you issue the above command:
In that case, re-execute the command with the -d option appended in order to get the latest supported release forcefully:
sudo do-release-upgrade -d
No valid mirror found warning:
Just say Yes (y) to use the official Ubuntu repo.
You are almost done. Once prompted with the following message press ‘y’ to finish the Upgrade and get your server rebooted.
Step 5 — Ubuntu OS Upgrade Verification
Check your Distro version by running the following command:
lsb_release -a
Verify Linux kernel version and other log files too:
tail -f /var/log/my-app.log
uname -mrs
Congrats! Your Ubuntu server has now been successfully upgraded to Ubuntu 20.0.4 LTS!
Not comfortable with Linux Systems administration? Let us do it for you!
NetShop ISP’s experienced Linux system admins can help you with full server management, whether it’s a virtual or a dedicated server. From Operating System installations, troubleshooting and OS distro upgrades, we can take care the whole aspect of your linux machine’s administration.
Browse our VPS Plans and Dedicated Servers to find the server that satisfies your needs and budgets and get started!
How to upgrade from Ubuntu 18.04 LTS to 20.04 LTS today
Ubuntu 20.04 LTS (Focal Fossa) was officially released on April 23. This is the latest Ubuntu Long Term Support (LTS) release, with security patches and updates available until 2025. If you are currently using an older version of Ubuntu, you may be interested in upgrading.
In this tutorial, we will show how to safely upgrade from Ubuntu 18.04 LTS (Bionic Beaver), the previous LTS, to the current one. We will explain several methods by which you can achieve this, including some advanced tips and tricks that can help you further customise your upgrade process.
Before you upgrade…
There are several things you need to take into account before you go forward with the upgrade:
-
The upgrade process can be done using the Ubuntu update manager or on the command line. The Ubuntu update manager will start showing a prompt for an upgrade to 20.04 once the first dot release of Ubuntu 20.04 LTS (i.e. 20.04.1) is released. The typical timeframe for this is around three months after the official release.
You can still do an upgrade right now, though. However, the process at the moment involves some use of the command line, and therefore requires some level of technical knowledge and confidence. If you are not sure about any of the steps or methods outlined below, you might want to wait for the dot release.
- If you do want to proceed with the upgrade, you can launch the graphical guided wizard from the command line, or complete the entire process using the latter. In this tutorial, we will demonstrate both options.
- Please make sure to back up your data. Upgrades are normally safe, but there is always a chance something may go wrong. It is crucial that you have your personal files safely copied to a backup location, so you can restore them if there are any problems or complications. There are several ways you can do this:
- Ubuntu has its own backup tool, which you can turn on.
- You can also manually copy important files to a different device (second hard disk, USB drive, another computer on the network, etc). You can copy the files manually or use a data backup/replication tool. Good examples for simple, friendly tools of this nature are Timeshift and Grsync. On the command-line, you can use tar or rsync.
- You can also create a full system image of your Ubuntu installation with a dedicated system imaging software like CloneZilla.
- If you want to double-check everything works well on your hardware, you can download the Ubuntu 20.04 LTS ISO image, copy it to a USB drive using a live media creation tool like Ubootnetin, and then start your computer in an Ubuntu 20.04 LTS live session.
- Please make sure your computer has sufficient free disk space. By default, for the best experience, you should have 25 GB of free space for a new installation of Ubuntu. With version upgrades, you can get by with less free disk space, but the process could take longer.
- The upgrade process can take some time. You should not interrupt or cancel the process, as it may leave the system in an unstable state. If you are using a battery-powered device, like a laptop, it is advisable to use the charger.
Upgrade to 20.04 LTS – using a graphical guided wizard
As we mentioned earlier, the Ubuntu update manager will start showing upgrade notifications to users roughly three months after the official release. However, it is possible to upgrade Ubuntu 18.04 LTS without having to wait.
This entails running a command in a terminal window, which will then launch the graphical guided wizard.
If you are not comfortable with this path, it is best to continue running Ubuntu 18.04 LTS until the availability of the upgrade offer through the update manager. The sequence of actions below requires some familiarity with the command-line usage, so it’s best suited for people like developers, administrators or more skilled techies.
The command to start is do-release-upgrade, executed with specific options.
To better understand what we are going to do, you can check what options are available in the do-release-update tool by running the command with the -h flag:
Specifically, the important options are:
- -d – this allows us to upgrade to 20.04; normally, this option is used by early testers to try development versions of Ubuntu ahead of their official release. We will use it to start the upgrade. While the labels say “development”, don’t worry – we will in fact be upgrading to the stable, official release of Ubuntu 20.04 LTS.
- -f – this option will launch a graphical guided wizard. Without it, the do-release-upgrade tool will run in the command-line. The process is otherwise identical.
Another useful option is –allow-third-party. We will talk about it a bit more in the section titled ‘Advanced options & third-party software’. If your Ubuntu setup includes applications from sources other than the standard Ubuntu repository archives, you may want to include this option to preserve and carry over your third-party applications.
Therefore, to start the upgrade to Ubuntu 20.04 LTS using a GUI tool, the full command we need is then:
This will launch the upgrade process using a Gtk3-based GUI.
The wizard will ask you several questions, and run through several steps:
You may be asked one or two questions during the upgrade, specifically if you want to retain existing settings for certain system files (like timezone configuration). If you are not sure, you can safely proceed with the default answer.
After a while, the upgrade should complete, and you should see yourself logged into the 20.04 desktop!
Advanced options & third-party software
For most users, the flow described above will be sufficient. However, you can further customise it, which is particularly useful for those using third-party software that is installed from software channels outside the standard Ubuntu archives. For instance, if you’ve installed the Google Chrome, Skype or VirtualBox software manually, the updates for these applications are provided through separate repositories.
By default, non-Ubuntu software channels will be disabled during the upgrade. You will need to manually enable them after the upgrade is completely. Alternatively, you can instruct the upgrade tool to allow these additional packages.
This can be done by running do-release-upgrade with the –allow-third-party flag, as mentioned earlier.
Alternative options to upgrade
You can start the graphical guided wizard upgrade process in several other ways.
On the command line, you can run update-manager -c to initiate the upgrade. Like the do-release-update tool, you can run the above with the optional -d flag to get the “development” release ahead of the 20.04.1 availability.
On the command line, you can also run /usr/lib/ubuntu-release-upgrader/check-new-release-gtk.
In general, you can control what Ubuntu release upgrades are available, regardless of which tool you use and run. This can be done by editing the following configuration file:
Here, you can check the line Prompt=XXXX, whereby:
- never – no upgrades will be offered.
- normal – supported release that immediately succeeds the currently running release will be offered.
- lts – LTS releases will be offered.
Upgrade to 20.04 LTS – on the command line
The upgrade process on the command-line is very similar to what we have already done. The only difference is no GUI will be launched and you will be asked Y/N questions in the terminal window.
Once complete, you will be logged into the 20.04 desktop:
Summary
In this guide, we laid out several methods for upgrading from Ubuntu 18.04 LTS to 20.04 LTS. These include both visual tools, i.e. graphical wizards, and command-line utilities, which are often best suited for more skilled users. The Ubuntu update manager will start prompting users in about three months, but if you want to upgrade your system now, we also outlined the steps you will need to get underway.
If you are still undecided about the upgrade, and would like to learn more, you may want to sign up for a webinar highlighting the new features and technologies available in Ubuntu 20.04.
We hope you will find this tutorial valuable and useful, and we hope you enjoy your new desktop experience.
Ubuntu desktop
Learn how the Ubuntu desktop operating system powers millions of PCs and laptops around the world.
Как обновить Ubuntu до 20.04
Недавно вышла новая версия Ubuntu с длительным сроком поддержки — Ubuntu 20.04. Согласно информации на официальном сайте она будет получать обновления безопасности до 2025 года. В новой версии мы уже привычно получим обновление программного стека, новую версию Gnome и внешний вид.
Более подробно о том, что нового в Ubuntu 20.04 можно посмотреть в отдельной статье. А сегодня мы поговорим о том, как обновить Ubuntu до 20.04. Примечательно, что у вас нет необходимости ставить промежуточные версии 19.04 или 19.10. Если вы использовали LTS релиз 18.04, то можете обновится прямо с него. Процедура обновления мало чем отличается от предыдущих лет.
Обновление Ubuntu до 20.04
Шаг 1. Обновление дистрибутива
Первым делом необходимо обновить вашу текущую версию дистрибутива до самой свежей версии из репозиториев. Это необходимо, чтобы утилита обновления работала в максимально приближенных условиях к тем, в которых её создавали, и вы не получили никаких ошибок или проблем. Это можно сделать через терминал:
sudo apt update sudo apt full-upgrade
Или же через графический интерфейс. Для этого откройте утилиту Обновление системы из главного меню:
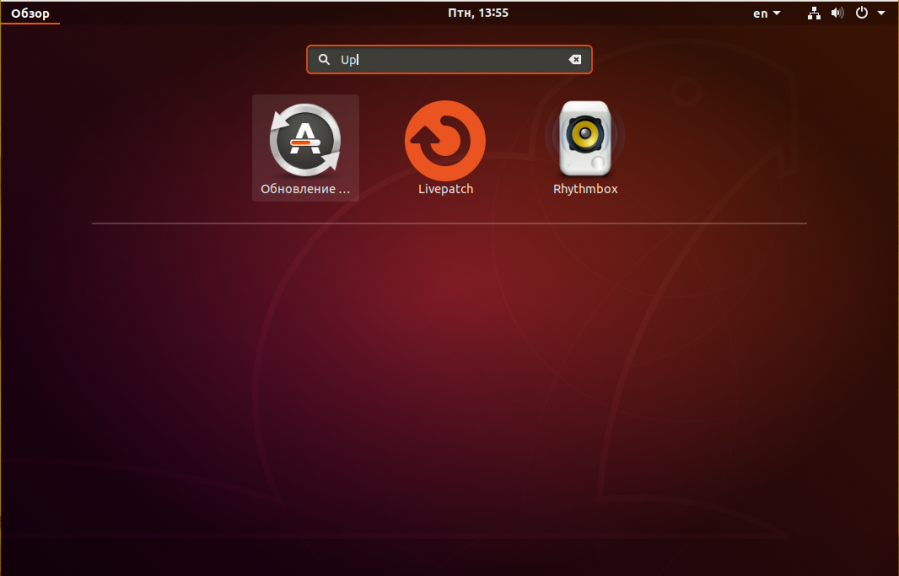
Утилита найдёт обновления и предложит их установить. Вам достаточно согласиться и дождаться завершения установки:
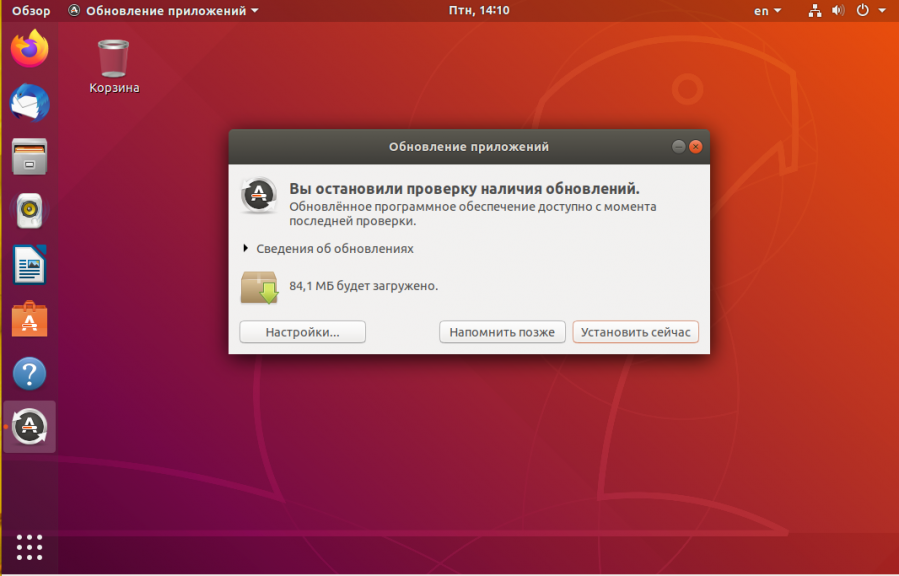
Теперь можем обновить Ubuntu 18.04 до 20.04.
Шаг 2. Настройка источников
Чтобы обновиться именно до LTS, надо настроить источники обновлений. Для этого откройте утилиту Программы и обновления:
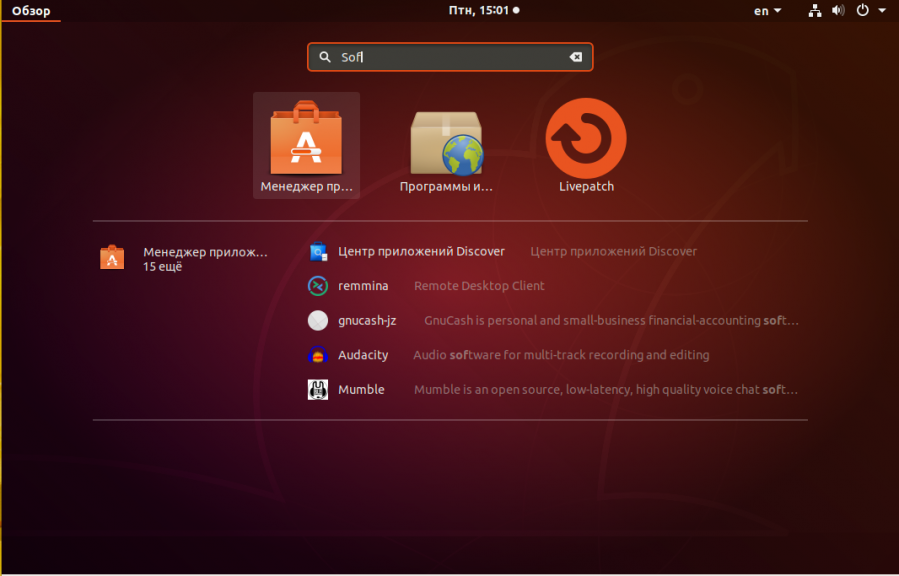
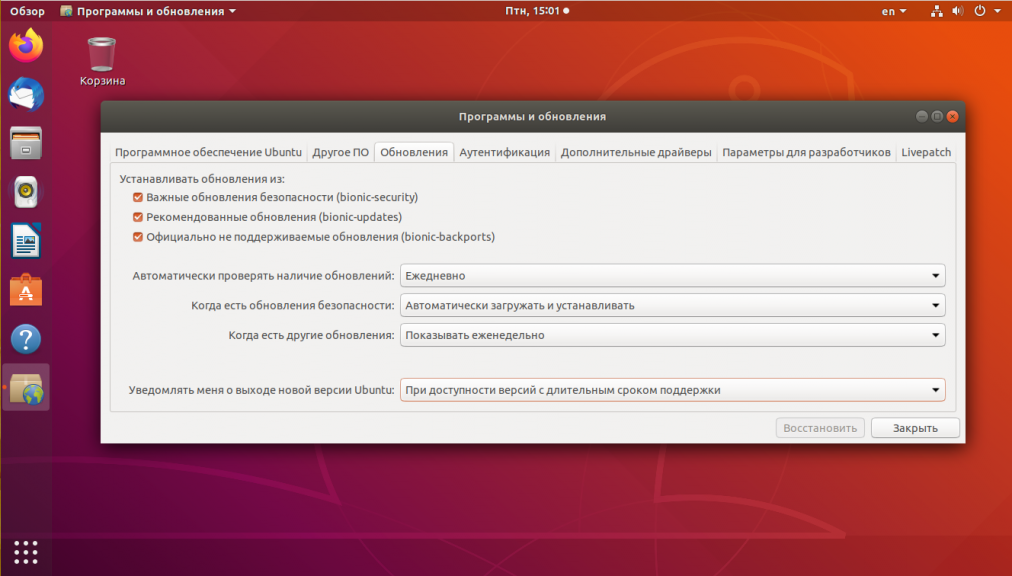
Здесь перейдите на вкладку Обновления и для пункта Уведомлять меня о выходе новой версии Ubuntu выберите При доступности первой с длительным сроком поддержки:
Шаг 3. Запуск менеджера обновлений
Запустите менеджер обновлений, выполнив команду update-manager в терминале:
update-manager -c -d
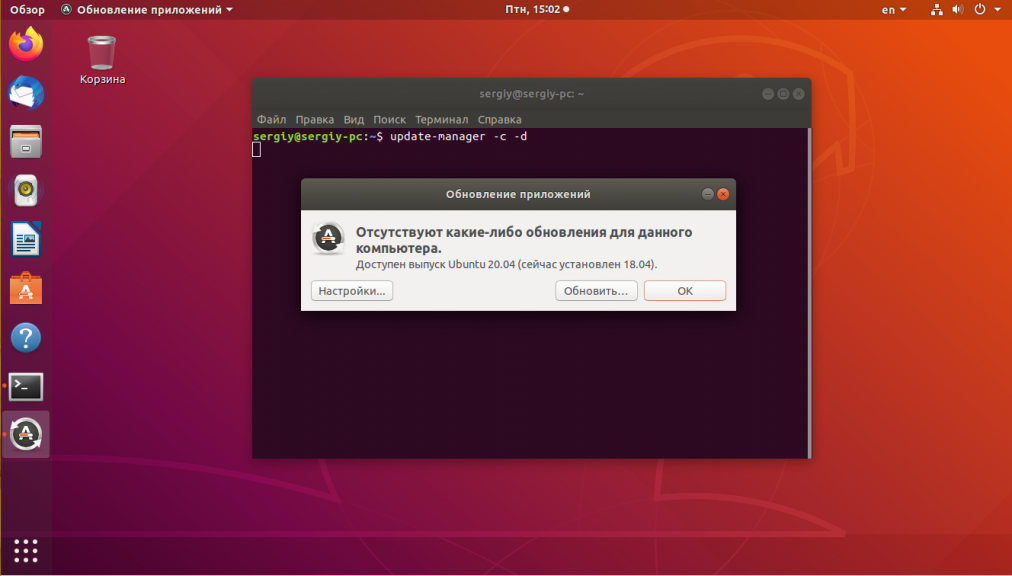
Утилита сообщит, что обнаружен новый выпуск Ubuntu 20.04. Для начала процесса обновления нажмите Обновить.
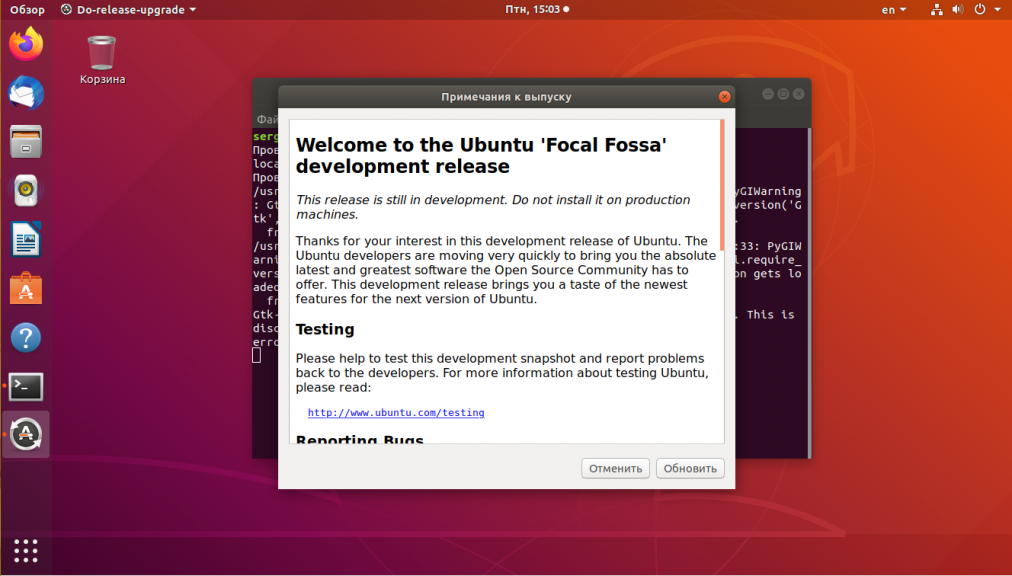
Шаг 4. Примечания к выпуску
Ознакомьтесь с примечаниями к выпуску и нажмите кнопку Обновить, чтобы начать:
Шаг 5. Подтверждение обновления
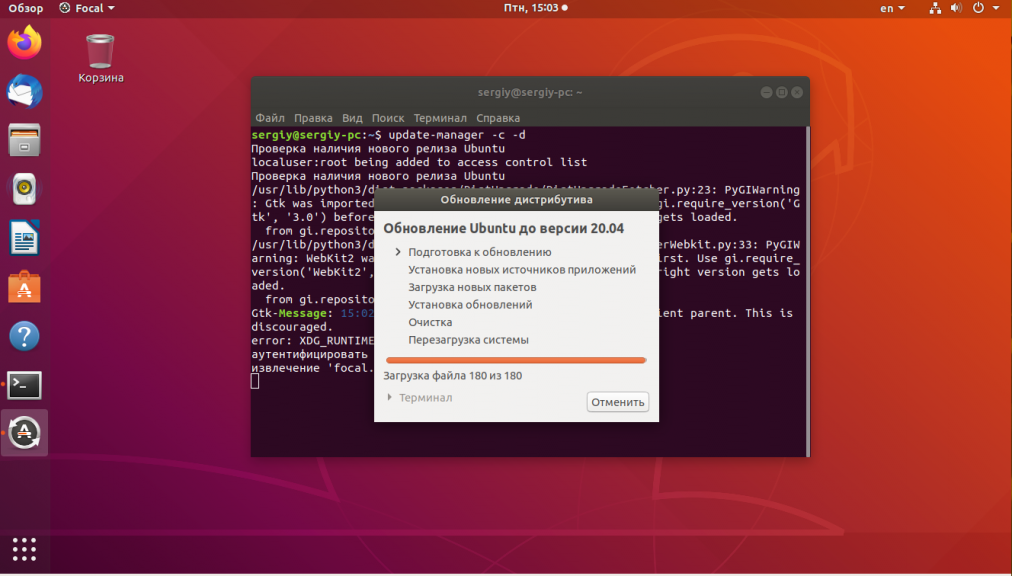
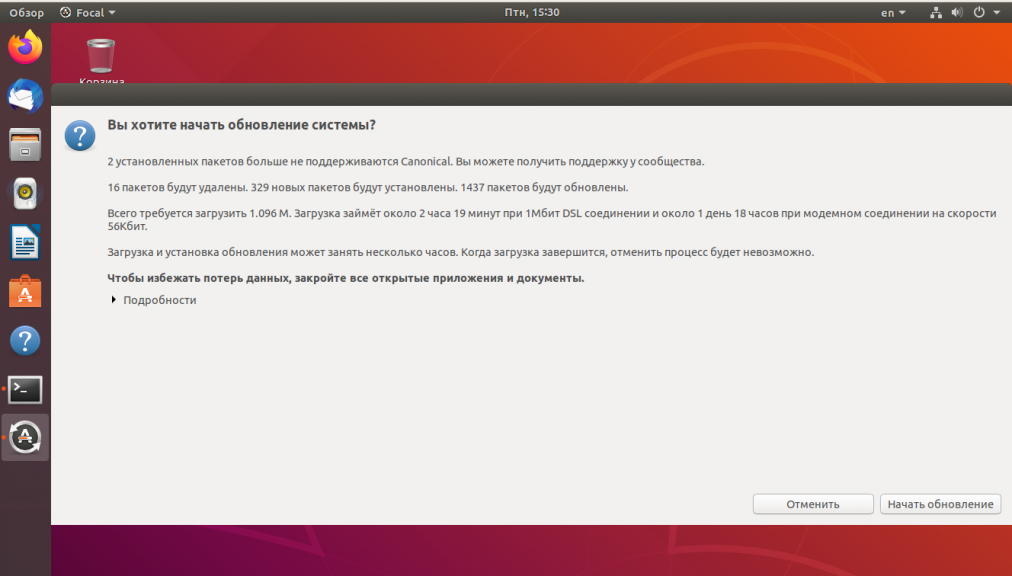
Дождитесь завершения загрузки установщика, а затем подтвердите обновление системы с помощью кнопки Обновить. После этого пути назад уже не будет.
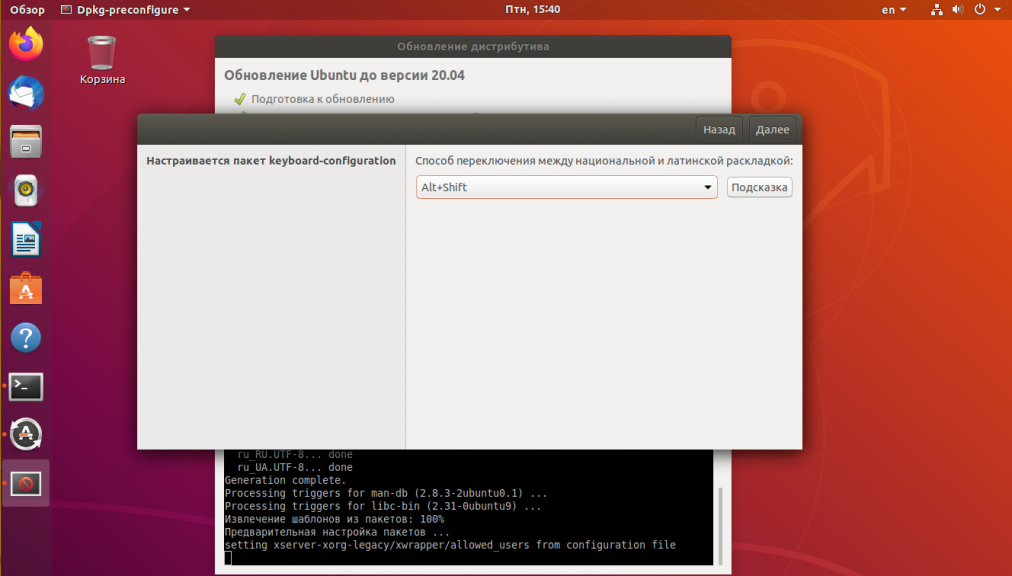
Шаг 6. Настройка раскладки
В процессе обновления утилита предложит выбрать клавишу для переключения раскладки клавиатуры:
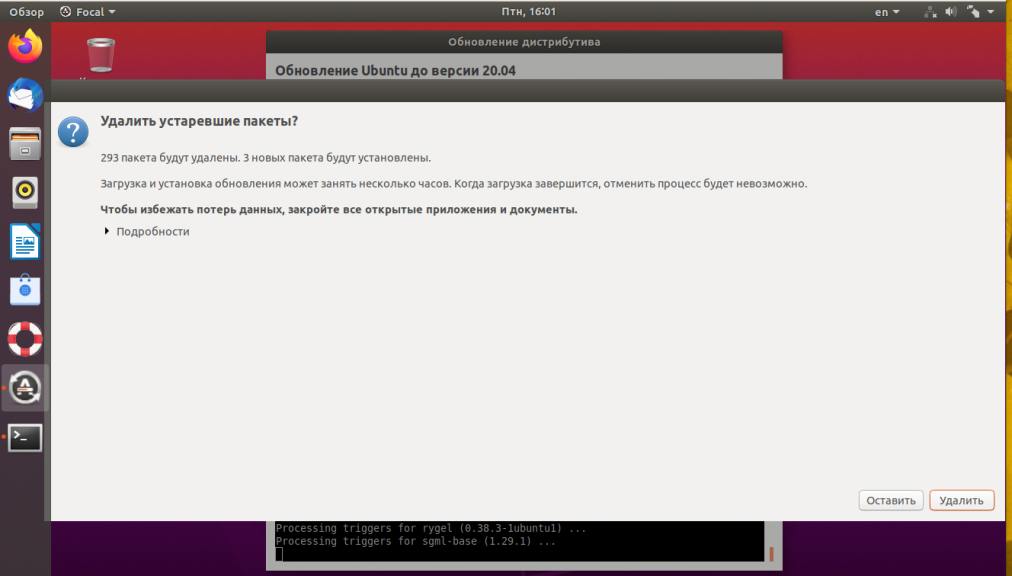
Шаг 7. Очистка ненужных пакетов
Затем система предложит очистить все ненужные пакеты, которые остались от старой установки:
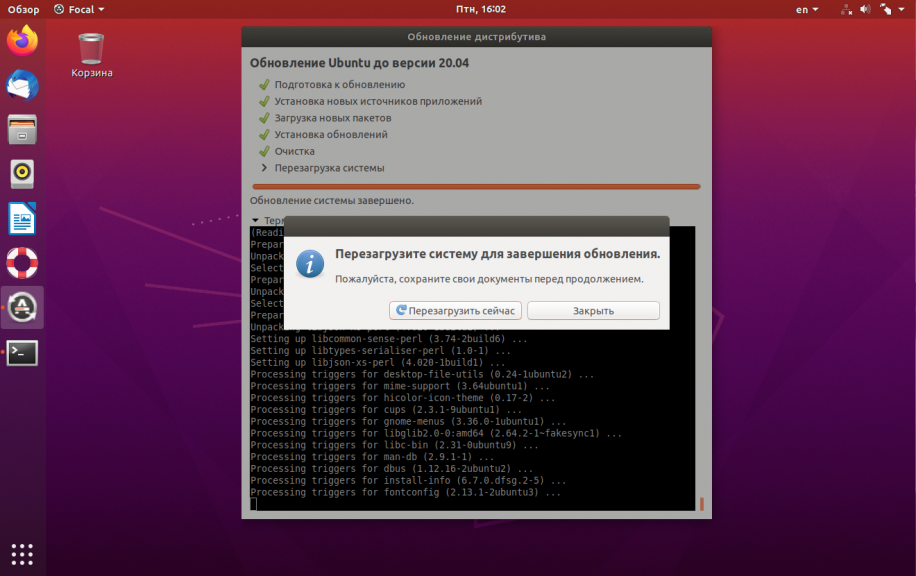
Шаг 8. Перезагрузка
После завершения процесса перезагрузите компьютер, нажав кнопку Перезагрузить сейчас:
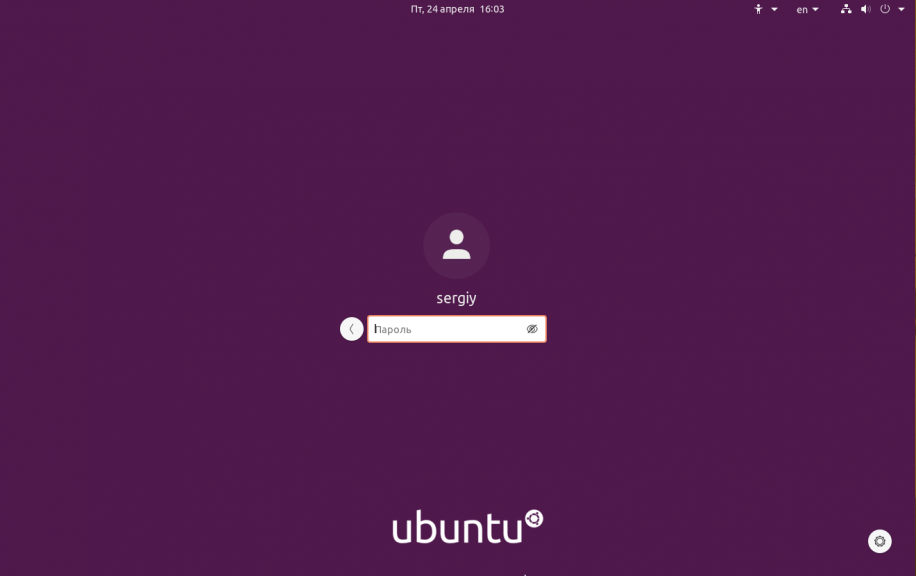
Шаг 9. Вход
После перезагрузки вас встретит уже новая система. Авторизуйтесь в ней с помощью вашего логина и пароля:
Шаг 10. Готово
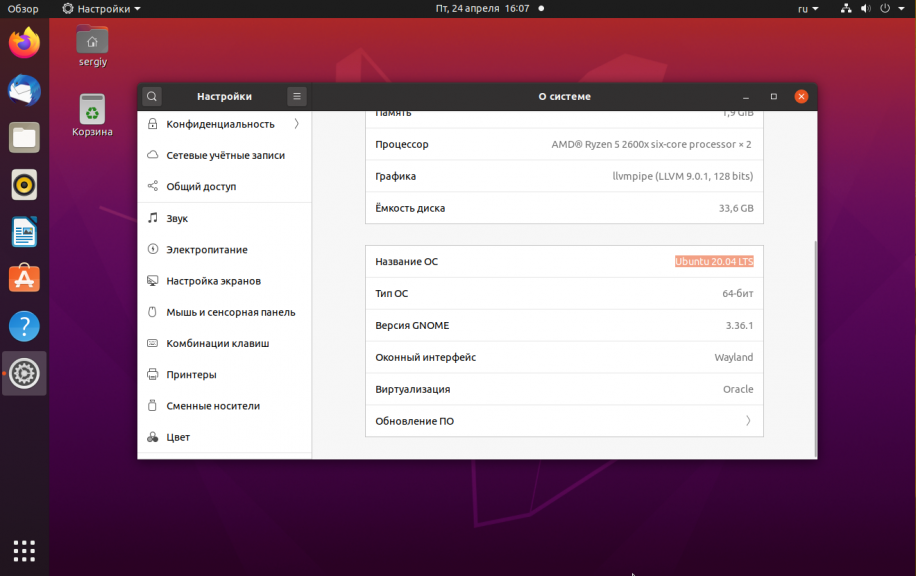
Обновление Ubuntu 18.04 до 20.04 завершено, и вы можете посмотреть версию Ubuntu в настройках системы:
Обновление Ubuntu Server до 20.04
Процедура обновления Ubuntu Server в целом аналогичная версии для рабочего стола. Отличается только тем, что придётся выполнять все команды вручную и работать через терминал. Сначала обновите систему до самой новой версии:
sudo apt dist-upgrade -y
После завершения установки обновлений перезагрузите систему, чтобы все они начали действовать. Затем откройте файл /etc/update-manager/release-upgrades и убедитесь, что значение параметра конфигурации Prompt равняется lts:
sudo vi /etc/update-manager/release-upgrades
Затем запустите утилиту обновления:
sudo do-release-upgrade -d
Она заменит репозитории, загрузит и установит новый релиз Ubuntu на ваш сервер. Во время установки надо будет подтвердить само обновление, а также подтвердить очистку ненужных пакетов. В конце обновления потребуется перезагрузить сервер.
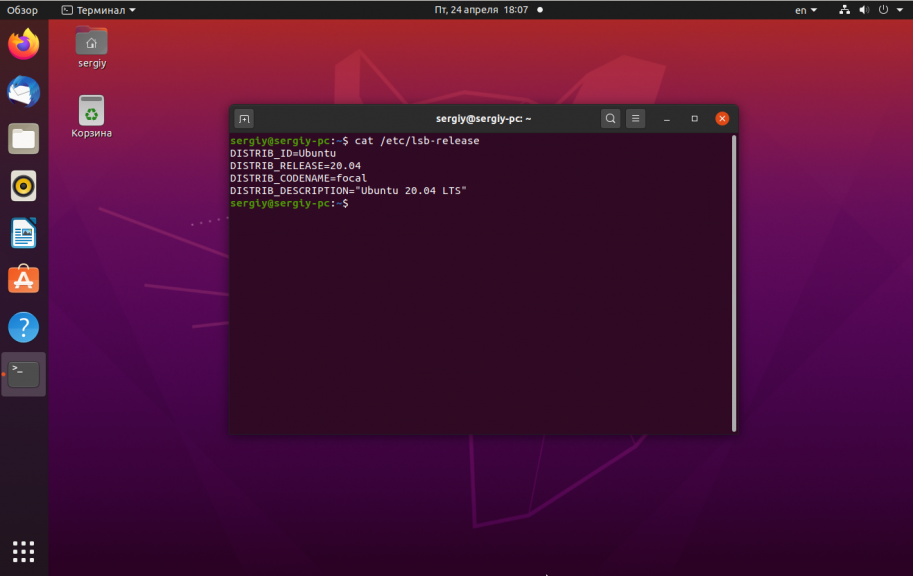
После перезагрузки вы можете посмотреть версию дистрибутива с помощью команды:
Выводы
В этой статье мы рассмотрели, как выполняется обновление ubuntu 19.10 до 20.04 или 18.04 до 20.04 на обычном компьютере или на сервере. Как видите, ничего сложного нет, однако перед обновлением следует сделать резервную копию важных данных. Как бы то ни было, но система, установленная заново, всегда работает стабильнее, чем обновленная, и шансов, что что-то пойдёт не так, намного меньше.