4 Ways to Disable Root Account in Linux
The root account is the ultimate account on a Linux and other Unix-like operating systems. This account has access to all commands and files on a system with full read, write and execute permissions. It is used to perform any kind of task on a system; to create/update/access/delete other users’ accounts, install/remove/upgrade software packages, and so much more.
Because the root user has absolute powers, any actions he/she performs are critical on a system. In this regard, any errors by the root user may have huge implications on the normal operation of a system. In addition, this account may also be abused by using it improperly or inappropriately either accidentally, maliciously, or through contrived ignorance of policies.
Therefore, it is advisable to disable the root access in your Linux server, instead, create an administrative account which should be configured to gain root user privileges using the sudo command, to perform critical tasks on the server.
In this article, we will explain four ways to disable root user account login in Linux.
Attention: Before you block access to the root account, make sure you have created an administrative account, capable of using sudo command to gain root user privileges, with the useradd command and give this user account a strong password. The flag -m means create user’s home directory and -c allows to specify a comment:
Next, add this user to the appropriate group of system administrators using the usermod command, where the switch -a means append user account and -G specifies a group to add the user in (wheel or sudo depending on your Linux distribution):
Once you have created a user with administrative privileges, switch to that account in order to block root access.
1. Change root User’s Shell
The simplest method to disable root user login is to change its shell from /bin/bash or /bin/bash (or any other shell that permits user login) to /sbin/nologin , in the /etc/passwd file, which you can open for editing using any of your favorite command line editors as shown.
Change the line:
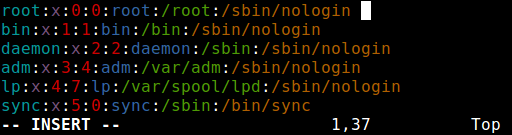
Save the file and close it.
From now on, when root user logs in, he/she will get the message “This account is currently not available.” This is the default message, but, you can change it and set a custom message in the the file /etc/nologin.txt.
This method is only effective with programs that require a shell for user login, otherwise, sudo, ftp and email clients can access the root account.
2. Disable root Login via Console Device (TTY)
The second method uses a PAM module called pam_securetty, which permits root access only if the user is logging in on a “secure” TTY, as defined by the listing in /etc/securetty.
The above file allows you to specify which TTY devices the root user is allowed to login on, emptying this file prevents root login on any devices attached to the computer system.
To create an empty file, run.
This method has some limitations, it only affects programs such as login, display managers (i.e gdm, kdm and xdm) and other network services that launch a TTY. Programs such as su, sudo, ssh, and other related openssh tools will have access to the root account.
3. Disabl SSH Root Login
The commonest way of accessing remote servers or VPSs is via SSH and to block root user login under it, you need to edit the /etc/ssh/sshd_config file.
Then uncomment (if it is commented) the directive PermitRootLogin and set its value to no as shown in the screenshot.
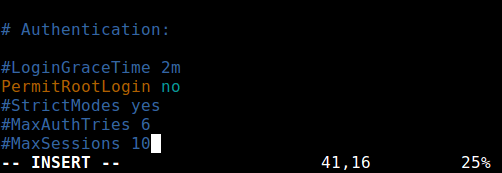
Once you are done, save and close the file. Then restart the sshd service to apply the recent change in configurations.
As you may already know, this method only affects openssh tools set, programs such as ssh, scp, sftp will be blocked from accessing the root account.
4. Restrict root Acess to Services Via PAM
Pluggable Authentication Modules (PAM in short) is a centralized, pluggable, modular, and flexible method of authentication on Linux systems. PAM, through the /lib/security/pam_listfile.so module, allows great flexibility in limiting the privileges of specific accounts.
The above module can be used to reference a list of users who are not allowed to log in via some target services such as login, ssh and any PAM aware programs.
In this case, we want to disable root user access to a system, by restricting access to login and sshd services. First open and edit the file for the target service in the /etc/pam.d/ directory as shown.
Next, add the configuration below in both files.
When you are done, save and close each file. Then create the plain file /etc/ssh/deniedusers which should contain one item per line and not world readable.
Add the name root in it, then save and close it.
Also set the required permissions on this.
This method only affect programs and services that are PAM aware. You can block root access to the system via ftp and email clients and more.
For more information, consult the relevant man pages.
That’s all! In this article, we have explained four ways of disabling the root user login (or account) in Linux. Do you have any comments, suggestions or questions, feel free to reach us via the feedback form below.
Tutorial Feedback.
If You Appreciate What We Do Here On TecMint, You Should Consider:
TecMint is the fastest growing and most trusted community site for any kind of Linux Articles, Guides and Books on the web. Millions of people visit TecMint! to search or browse the thousands of published articles available FREELY to all.
If you like what you are reading, please consider buying us a coffee ( or 2 ) as a token of appreciation.

We are thankful for your never ending support.
Related Posts
21 thoughts on “4 Ways to Disable Root Account in Linux”
Indeed the omnipotent root user and the omnipresent root username is probably the go-to path of any attack by a forged login.
With the development of linux over the years, various tools have been made, including backdoors that need to be managed. That’s why root access is the key place to safeguard and obfuscate, and your article is so useful.
Thank you very much!
From my reading of the article, it looks like there is no one method that will universally (in ALL possible programs) disable root user from logging into the system. Each one of the mentioned methods disables root login for only certain programs. Seems like a hit and miss, error-prone procedure. The procedure to restore root access could be even more error-prone and fraught with pitfalls.
“any errors by the root user may have huge implications on the normal operation of a system. In addition, this account may also be abused by using it improperly or inappropriately either accidentally, maliciously, or through contrived ignorance of policies”.
It is to be assumed that, by the time somebody attains the position of System Administrator, that person has become thoroughly versed in command language and is trusted by management not to abuse his/her powers.
“It is advisable to disable the root access in your Linux server, instead, create an administrative account which should be configured to gain root user privileges using the sudo command, to perform critical tasks on the server”.
But is it logical? A System Administrator needs complete, unfettered access to a system to perform his/her job properly. To create an”administrative account” without access to ALL the commands and utilities is ludicrous. On the other hand, if this artificial “administrative account” has all the root privileges, then no problems have been prevented. Sudo command will in no way prevent system destruction through inappropriate use of commands. Neither will it prevent any abuse or willful bad acts.
This article is an exercise in what is theoretically possible but it has very little practical application.
Security through obfuscation, although not 100% secure, will cause most attackers to stumble. They would need to discover the name or ID of the administrative user before they could continue their attack on the system.
This piece of security goes right in with things like changing the port number for SSH. Neither absolutely stops attackers but making their job harder is still an increase in the security of the system.
Как отключить вход Root в Linux
Пользователь Root — это суперпользователь в Linux, который имеет доступ и привилегии для запуска всех команд, программ и процессов. Он имеет полные права на чтение, запись и выполнение. Фактически, он может даже создавать/изменять/удалять другие учетные записи пользователей. Поскольку пользователь root имеет так много привилегий, любая неправильная команда или действие, выполненное пользователем root, может серьезно повредить вашу систему. Кроме того, если его взломают или злоупотребят, злоумышленник сможет контролировать всю систему и использовать ее против вас. Поэтому рекомендуется отключить доступ root к вашей системе и создать учетные записи административных пользователей, которые могут временно получать доступ root для выполнения привилегированных команд, используя команду sudo.
В этой статье мы рассмотрим 3 способа отключения root-доступа в Linux.

Как отключить вход Root в Linux
Прежде чем блокировать учетную запись root, необходимо создать административную учетную запись, имеющую доступ sudo для получения привилегий root. Это можно сделать с помощью команды useradd с флагом -m и назначить этому пользователю надежный пароль. Вот команда для создания пользователя admin и назначения ему пароля.
Первая команда выше только создает нового пользователя, в то время как вторая команда устанавливает его пароль. Когда вы выполните вторую команду, вам будет предложено ввести пароль, который вы хотите установить для нового пользователя.
Далее мы используем команду usermod для добавления этого нового пользователя в группу административных пользователей. Мы используем флаг -a для добавления этого пользователя и флаг -G для указания группы, в которую вы хотите добавить этого пользователя.
Первая команда выше добавляет нового пользователя в группу пользователей wheel, которая является административной группой в CentOS/RHEL. Вторая команда добавит нового пользователя в группу пользователей sudo, которая является административной группой в Debian/Ubuntu.
После того как вы создали нового административного пользователя, переключитесь на эту учетную запись, чтобы отключить учетную запись root.
1. Изменение оболочки пользователя root
У каждого пользователя Linux есть оболочка по умолчанию, в которую он входит при доступе к своей системе. Если вы установите /sbin/nologin, то они не смогут войти в свою учетную запись. Поэтому мы изменим оболочку пользователя root с /bin/bash на /sbin/nologin в файле /etc/passwd. Откройте его в текстовом редакторе.
Измените следующую строку, как показано ниже.
Сохраните и закройте файл.
Когда вы это сделаете, каждый раз, когда кто-либо попытается войти в систему под именем root, он будет видеть следующее сообщение.
«This account is currently not available.» (Эта учетная запись в настоящее время недоступна)
Это сообщение по умолчанию, но вы можете изменить его, отредактировав файл /etc/nologin.txt. Обратите внимание, что этот метод не позволит пользователям использовать shell от имени пользователя root или запускать программы, требующие доступа к shell.
2. Отключить SSH-доступ к учетной записи root
В этом методе мы просто отключаем SSH-доступ к учетной записи root. SSH является наиболее распространенным способом входа в Linux-системы для разработчиков и злоумышленников. Если вы отключите SSH доступ к учетной записи root, то это предотвратит доступ многих людей к учетной записи root.
Откройте файл конфигурации SSH на вашем сервере, выполнив следующую команду.
Откомментируйте директиву PermitRootLogin и установите значение no.
Сохраните и закройте файл. Перезапустите SSH-сервер, чтобы применить изменения.
Это заблокирует доступ к учетной записи root всем приложениям, использующим OpenSSH, таким как SSH, SCP, SFTP. Другие приложения смогут использовать учетную запись root.
3. Запрет входа под root через TTY
В этом методе мы используем модуль PAM под названием pam_securetty, который разрешает доступ root, только если пользователь входит в систему через защищенный TTY, как определено в файле /etc/securetty.
В этом файле перечислены устройства TTY, через которые пользователь root может входить в систему. Если вы создадите пустой файл, это предотвратит доступ root с любого устройства в вашей сети. Вот команды для создания пустого файла.
Обратите внимание, что это влияет только на такие программы, как login, display managers и сетевые службы, которые требуют TTY для запуска. Однако такие команды, как su, sudo, ssh, по-прежнему могут получить доступ к учетной записи root.
Заключение
В этой статье мы узнали, как отключить вход под root в Linux. Обратите внимание, что для полного блокирования доступа root вам потребуется использовать комбинацию вышеперечисленных методов.
4 способа отключить корневую учетную запись в Linux
Учетная запись root — это основная учетная запись в Linux и других Unix-подобных операционных системах. Эта учетная запись имеет доступ ко всем командам и файлам в системе с полными разрешениями на чтение, запись и выполнение. Он используется для выполнения любых задач в системе; для установки/удаления/обновления программных пакетов и многого другого.
Поскольку пользователь root обладает абсолютными полномочиями, любые действия, которые он выполняет, критически важны для системы. В связи с этим любые ошибки пользователя root могут иметь огромное влияние на нормальную работу системы. Кроме того, этой учетной записью также могут быть злоупотребления, используя ее ненадлежащим или ненадлежащим образом, случайно, злонамеренно или из-за надуманного незнания политик.
Поэтому рекомендуется отключить root-доступ на вашем сервере Linux, вместо этого создать административную учетную запись, которая должна быть настроена для получения привилегий root-пользователя с помощью команды sudo для выполнения критических задач на сервере.
В этой статье мы объясним четыре способа отключить вход в учетную запись пользователя root в Linux.
Внимание: прежде чем заблокировать доступ к учетной записи root, убедитесь, что вы создали учетную запись администратора, способную использовать команду useradd, и дайте этой учетной записи надежный пароль. Флаг -m означает создание домашнего каталога пользователя, а -c позволяет указать комментарий:
Затем добавьте этого пользователя в соответствующую группу системных администраторов с помощью команды usermod, где переключатель -a означает добавление учетной записи пользователя, а -G указывает группу для добавления пользователя. in (wheel или sudo в зависимости от вашего дистрибутива Linux):
После того, как вы создали пользователя с правами администратора, переключитесь на эту учетную запись, чтобы заблокировать root-доступ.
1. Измените оболочку корневого пользователя.
Самый простой способ отключить вход пользователя root — изменить его оболочку с /bin/bash или /bin/bash (или любой другой оболочки, которая разрешает вход пользователя) на /sbin/nologin в файле/etc/passwd, который вы можете открыть для редактирования с помощью любого из ваших любимых редакторов командной строки, как показано.

Сохраните файл и закройте его.
С этого момента, когда пользователь root входит в систему, он/она будет получать сообщение «Эта учетная запись в настоящее время недоступна». Это сообщение по умолчанию, но вы можете изменить его и установить собственное сообщение в файле /etc/nologin.txt.
Этот метод эффективен только для программ, которым требуется оболочка для входа пользователя, в противном случае sudo, ftp и почтовые клиенты могут получить доступ к учетной записи root.
2. Отключить вход root через консольное устройство (TTY).
Второй метод использует модуль PAM под названием pam_securetty, который разрешает root-доступ только в том случае, если пользователь входит в систему через «безопасный» TTY, как определено в листинге в/etc/securetty.
Вышеупомянутый файл позволяет указать, на каких устройствах TTY пользователю root разрешено входить в систему, очистка этого файла предотвращает вход в систему root на любых устройствах, подключенных к компьютерной системе.
Чтобы создать пустой файл, запустите.
Этот метод имеет некоторые ограничения, он влияет только на такие программы, как логин, диспетчеры отображения (например, gdm, kdm и xdm) и другие сетевые службы, запускающие TTY. Такие программы, как su, sudo, ssh и другие связанные инструменты openssh будут иметь доступ к учетной записи root.
3. Отключите вход в систему SSH Root.
Самый распространенный способ доступа к удаленным серверам или VPS — через SSH, и чтобы заблокировать вход пользователя root под ним, вам необходимо отредактировать файл/etc/ssh/sshd_config.
Затем раскомментируйте (если это прокомментировано) директиву PermitRootLogin и установите для нее значение no , как показано на снимке экрана.

Как только вы закончите, сохраните и закройте файл. Затем перезапустите службу sshd, чтобы применить последние изменения в конфигурациях.
Как вы, возможно, уже знаете, этот метод влияет только на набор инструментов openssh, такие программы, как ssh, scp, sftp, будут заблокированы от доступа к учетной записи root.
4. Ограничьте root-доступ к службам через PAM.
Подключаемые модули аутентификации (сокращенно PAM) — это централизованный, подключаемый, модульный и гибкий метод аутентификации в системах Linux. PAM через модуль /lib/security/pam_listfile.so обеспечивает большую гибкость в ограничении привилегий определенных учетных записей.
Вышеупомянутый модуль может использоваться для ссылки на список пользователей, которым не разрешено входить в систему через некоторые целевые службы, такие как логин, ssh и любые программы, поддерживающие PAM.
В этом случае мы хотим отключить доступ пользователя root к системе, ограничив доступ к службам входа и sshd. Сначала откройте и отредактируйте файл целевой службы в каталоге /etc/pam.d/, как показано.
Затем добавьте приведенную ниже конфигурацию в оба файла.
Когда вы закончите, сохраните и закройте каждый файл. Затем создайте простой файл/etc/ssh/deniedusers, который должен содержать по одному элементу в строке и не доступен для чтения всем.
Добавьте в него имя root, затем сохраните и закройте его.
Также установите для этого необходимые разрешения.
Этот метод влияет только на программы и службы, поддерживающие PAM. Вы можете заблокировать root-доступ к системе через ftp, почтовые клиенты и многое другое.
Для получения дополнительной информации обратитесь к соответствующим страницам руководства.
Это все! В этой статье мы объяснили четыре способа отключения входа (или учетной записи) пользователя root в Linux. У вас есть какие-либо комментарии, предложения или вопросы, не стесняйтесь обращаться к нам через форму обратной связи ниже.
How To Disable Root Login on Ubuntu 20.04

All Linux-based machines come with a default root user that has all privileges on the machine; by default, you always act as a root user (a superuser). Good security practices recommend that you disable the root login over SSH to prevent unauthorized access to your Linux-based machine by any other user. Disabling root login prevents root access over SSH to your Linux-based machine, which means that no one will have unlimited privileges. Following the recommended security practices, you should create an additional user with almost all superuser privileges to access the account.
In this tutorial, you will disable the root login on Ubuntu, preventing unauthorized root access over SSH and improving your Linux-based system’s security.
Prerequisites
To complete this tutorial, you will need:
- One Ubuntu 20.04 server with a non-root user with sudo privileges, a firewall, and at least 1GB of RAM, which you can set up by following the Ubuntu 20.04 initial server setup guide.
Step 1 — Logging In and Checking auth.log
In this step, you will access your server via your sudo -enabled, non-root user to check the authentication attempts to your server. By reviewing the authentication log, you may see both authorized and unauthorized login attempts.
During the prerequisites, you created a new user and added that user to the sudo group to grant administrative privileges. You will use this sudo user to access your machine because you won’t be able to SSH as a root user after disabling the root login.
Based on your chosen login method, log into your server using SSH. If you logged into your root account using the SSH keys during the initial server setup, you must use a key-based mechanism as password authentication is disabled when using a key-based login for your server. Otherwise, use the password-based login with the sudo-enabled user password.
Log into your server as your sudo -enabled user (in this tutorial, it will be sammy) using the following command for password-based login:
If using a key-based login method, log into your server as your sudo -enabled user with the following command:
The -i flag represents the identity file from which your_private_key is read for authentication.
Next, inspect the auth.log file by moving to the /var/log directory:
Use cat auth.log to display the contents of the file:
Enter your password if prompted.
You will receive an output similar to this:
The auth.log file logs all authentication attempts made to a server. You might see a lot of unknown and unauthorized requests being received by your server. For this reason, you might want to disable root login on your system and rotate your keys and passwords regularly.
You have now reviewed the authentication logs that indicate your server has received more than just your authentication requests. Next, you will update your server’s SSH configuration so that the root access is completely disabled on your server.
Step 2 — Disabling Root Login
In this step, you will edit the sshd_config file to disable the root login and then restart the sshd daemon to read the configuration after the modifications.
The sshd_config file stores the SSH daemon configuration containing the parameters used by sshd . The daemon is responsible for handling SSH connections. You need to restart the sshd daemon to apply the configuration changes. This configuration change will instruct the sshd not to permit root login over SSH.
Open the file sshd_config located in the /etc/ssh directory using nano or your favorite text editor:
Review the file, looking for the PermitRootLogin line:
Change the value of the key PermitRootLogin from yes to no :
Save and close the file.
Next, you will restart the sshd daemon to read the configuration after the modifications you just made.
Use the following command to restart the daemon:
This command will restart the sshd service using systemctl .
In this step, you changed the configuration file to deny root login requests and restarted the sshd to read the latest configuration. Next, you will test whether root login is disabled or not by making a root login attempt to your server.
Step 3 — Testing Root Login
After disabling the root login, try logging into a new terminal session with SSH as root. Use the following commands based on your preferred login mechanism.
If using password-based login:
If using key-based login:
The attempt to SSH as root will fail with an error message like this:
To access to server again, log into your server with the sudo -enabled non-root user credentials to confirm that you can still access the server.
If using password-based login:
If using key-based login:
You can now continue using the server as needed.
Conclusion
In this article, you configured the sshd configuration to disable the root login on Ubuntu. Now you know how to prevent root login to your Linux-based machines, thus adding an extra layer of security to your machines.
To continue setting up your machine, read more on How to Keep Ubuntu 20.04 Servers Updated.
Thanks for learning with the DigitalOcean Community. Check out our offerings for compute, storage, networking, and managed databases.