Как установить sql server 2012
support@inetshop.in.ua
inetshop-support
- максимальный размер базы данных — 10 Гб
- максимальный объем используемой оперативной памяти 1 Гб
- использование только 1 процессора (сокета), максимум 4 ядра
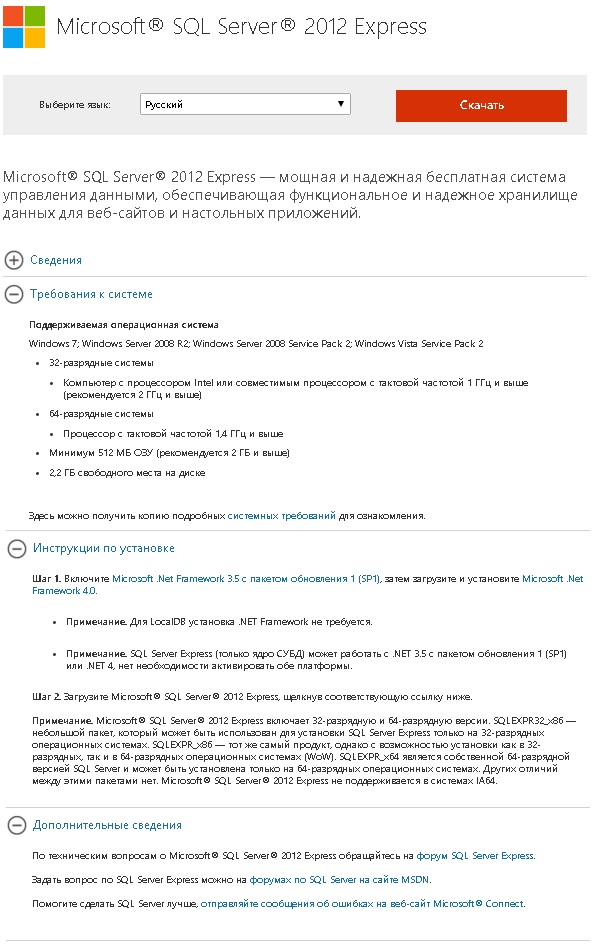
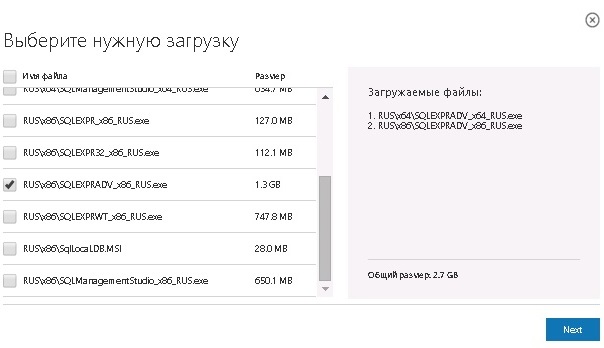
Перед тем, как скачать инсталляционный пакет, вы должны выбрать для какого типа процессоров x86/x64 будете производить установку (операционная система должна быть так же соответствующей разрядности, но на Windows x64 допускается установка MSSQL x86). 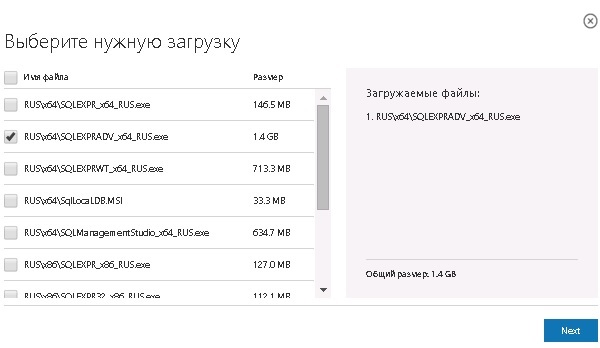
2. Запуск установки Microsoft SQL Server
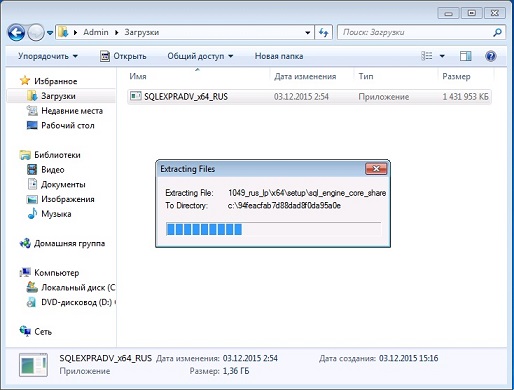
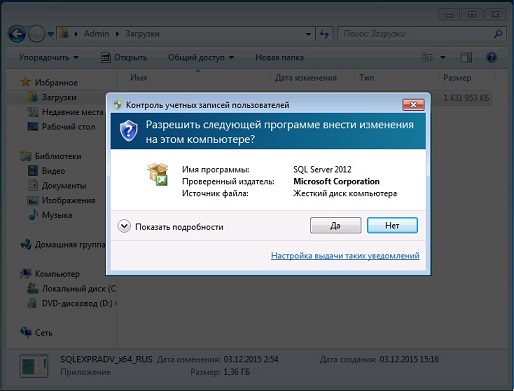
После загрузки инсталляционного пакета запускаем скачанный файл и приступаем к установке: 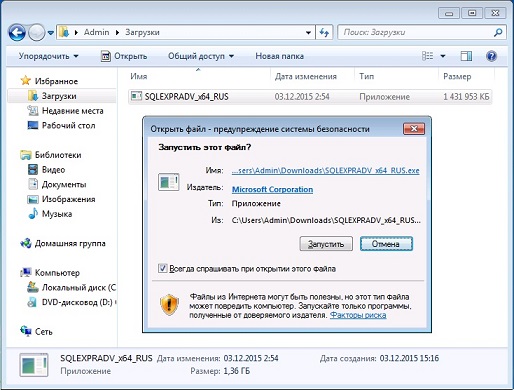
В установщике доступно как установка нового экземпляра СУБД (можно одновременно установить несколько СУБД и подключаться к каждой из них по отдельности по присвоенным именам), так и обновление уже существующих SQL Server 2005, SQL Server 2008, SQL Server 2008 R2. 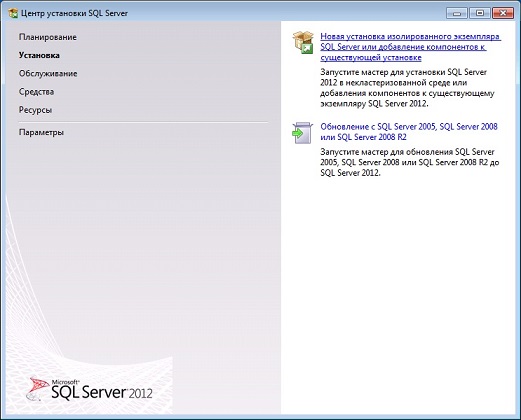
Установим отдельный экземпляр СУБД, т.к. бывали случаи некорректного автоматического обновления, обусловленные разными причинами — наличием установленных программ, компонентов операционной системы, настройками существующих СУБД, нарушениями в работе каких-либо компонентов и.т.п. 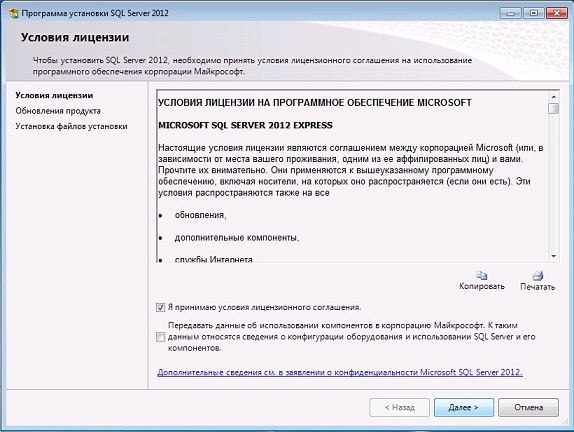
При установке, инсталлятор может сразу автоматически закачать и установить доступные обновления. Их скачать и установить можно как сразу автоматически сейчас, так и после установки. 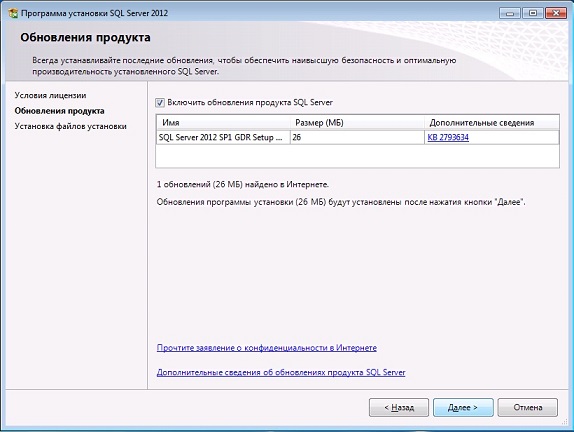
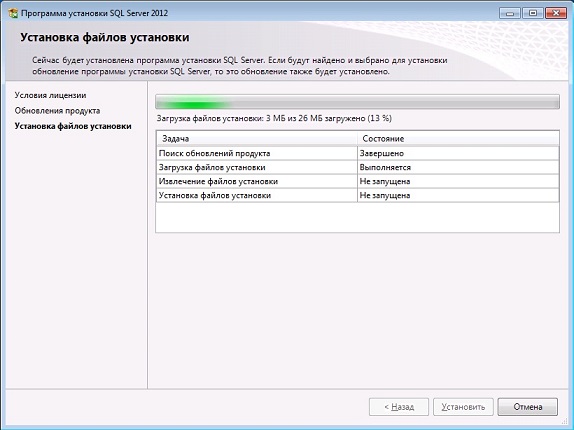
3. Настройка параметров установки Microsoft SQL Server
Выбор компонентов для установки очень важный пункт. В данном случае единственным обязательным для установки компонентом является Database Engine, но мы так же рекомендуем устанавливать средства управления, которые включают в себя очень полезный компонент — Microsoft SQL Server Management studio. Устанавливать LocalDB — не рекомендуется! Установку остальных компонентов можете производить на ваше усмотрение, при желании на всякий случай можете установить все оставшиеся, если планируется когда-либо использование приложений, которые требуют наличие MS SQL Server. 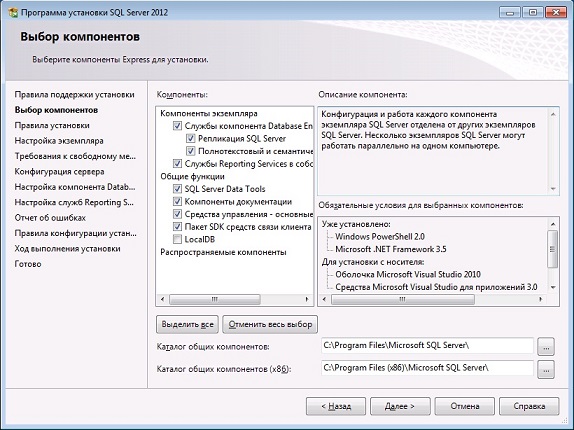
После выбора перечня устанавливаемых компонентов требуется указать/подтвердить имя экземпляра (инстанса) который мы устанавливаем. Он может быть как не именованный (еще называется по уолчанию, что относится больше к полным версиям СУБД MSSQL, так как в нашем случае сразу предлагается имя экземпляра SQLExpress). Отметим, что на одном компьютере можно установить до 50-ти экземпляров СУБД, но «не именнованным» может быть только один. 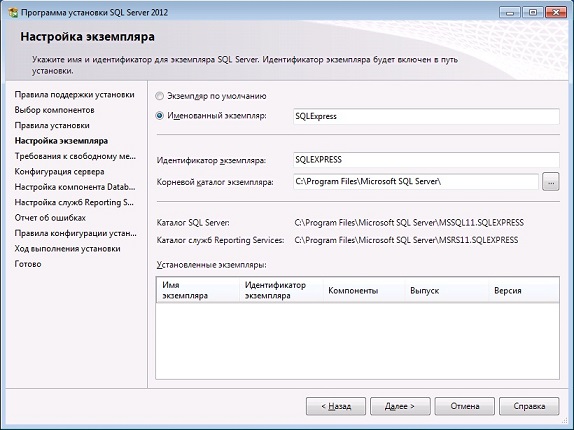
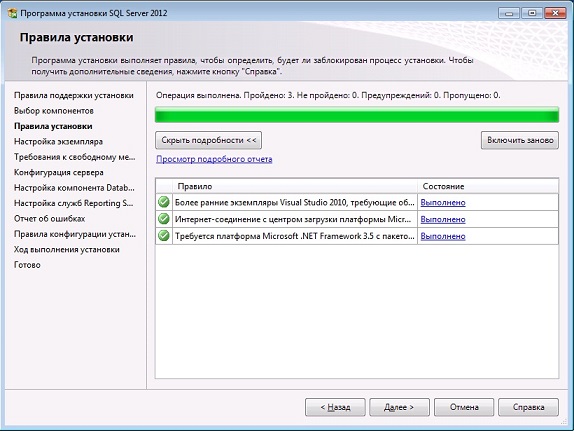
Для каждой службы которая входит в состав сервера MSSQL можно указать индивидуальные параметры запуска и учетной записи от имени которой она будет работать. Для работы программы iNETsHOP требуется только служба Ядро СУБД SQL Server, для удобства можно еще поставить на автоматический запуск Обозреватель SQL Server, что даст возможность выбирать нужный экземпляр при подсоединении к базе данных после запуска программы (в противном случае имя сервера и имя экземпляра потребуется вводить вручную). 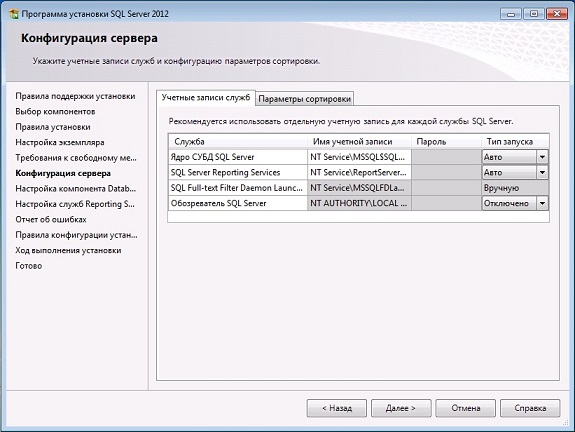
При разных насройках операционной системы, параметры сортировки (collation) которая предлагается по-умолчанию можeт быть различными, следует проверить эту настройку и установить именно Cyrillic_General_CI_AS на которую настроена база данных прогнраммы iNETsHOP. 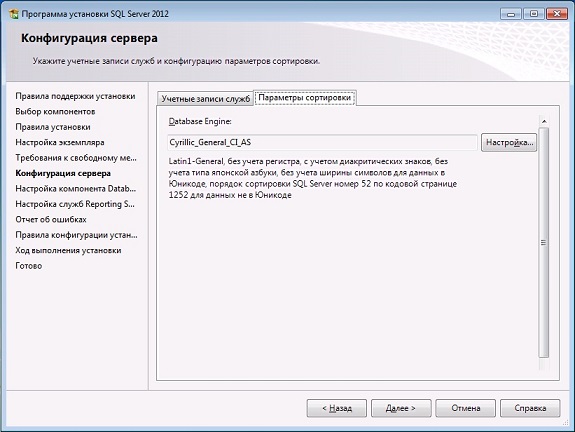
Бесплатная версия программы iNETsHOP использует аутентификацию Windows, полная версия iNETsHOP — испольует аутентификацию SQL Server. Режим проверки подлинности можно изменить после установки СУБД в оболочке SQL Server Management Studio. 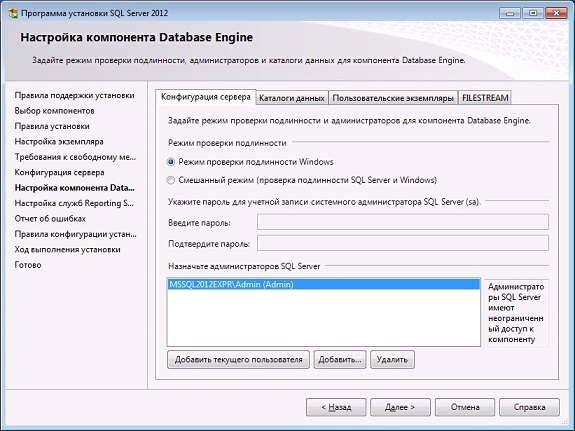
При наличии в системе несколько жестких дисков, стоит распределить нагрузку записи/чтения СУБД на разные диски. Обычно достаточно разделить файлы баз данных и файлы временной базы данных tempdb. Можно так же разделить файлы дынных и файлы журналов по разным дискам, это уже зависимо от загруженности самих дисков. 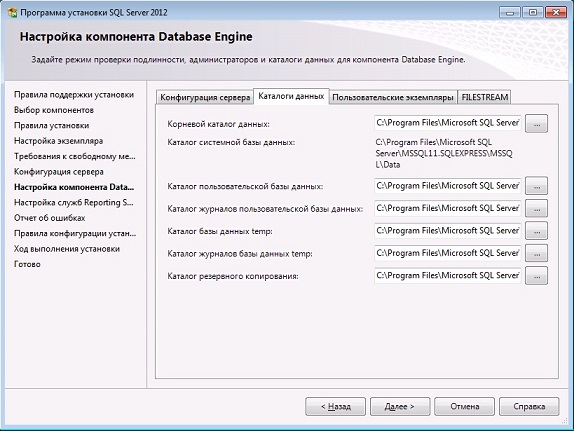
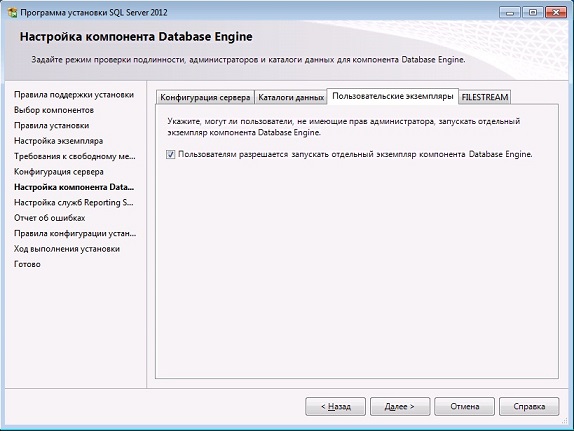
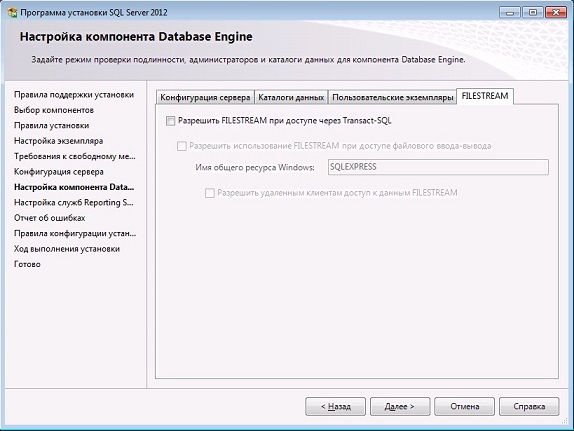
Программа iNETsHOP не использует компонент Reporting Services, потому если в перечне компонентов вы выбрали его установку, можете производить настройку на свое усмотрение. 
Отправлять лог ошибок в компанию Microsoft каждый решает индивидуально, но судя по пользовательским интерфейсам новых продуктов — у компании серьезные проблемы не только с ошибками, о чем явно свидетельствует интерфейс Windows 8 и ряда других продуктов, интерфейс которых если и не ужасно не удобный, то к нему приходится заново привыкать и переучиваться. 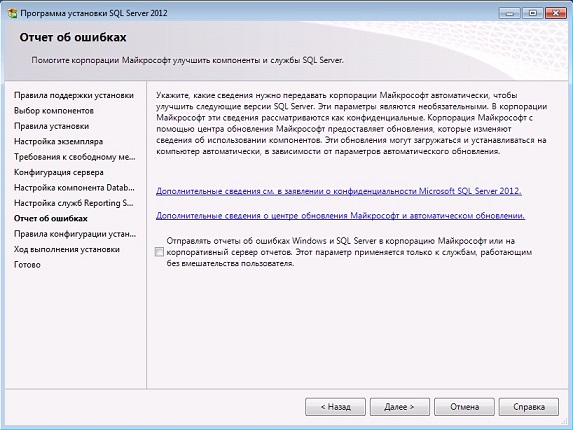
4. Установка Microsoft SQL Server
После всех предварительных настроек конфигурации производится сама установка СУБД — служб, компонентов, дополнений и т.п. 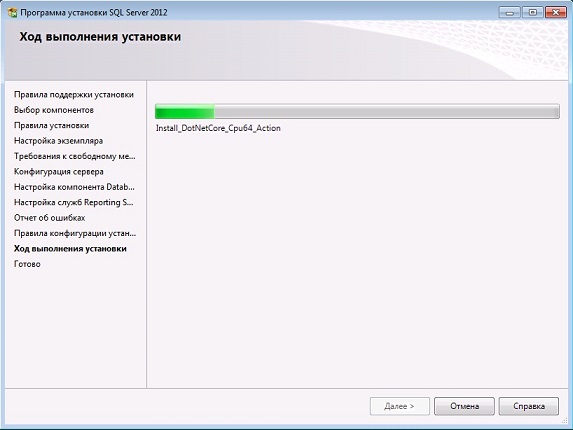
При завершении установки основного инсталляционного пакета может быть произведена так же установка обновлений, если была указана их автоматическая загрузка инсталлятором. 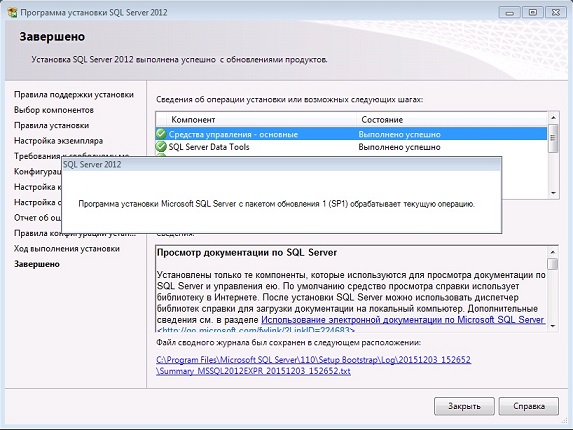
SQL Server 2012 Installation Guide
This article walks the user through installation of SQL Server 2012 on a Windows Server 2008 system using the SQL Server setup installation wizard. The installation process is simple, straight forward and is very similar to SQL Server 2008 / 2008 R2 setup. The procedure described is for a non-clustered server, and can be applied either to a default instance or a named instance. It is intended to be read by Database Administrators and anybody interested in the technical aspects of carrying out this task.
Before beginning, you should check that minimum hardware and software requirements to install and run SQL Server 2012 have been met. For operating system and hardware requirements, visit: http://msdn.microsoft.com/en-us/library/ms143506.aspx.
Preparing for Installation
- Identify drives to which the databases and/or logs will be backed up, ensuring that there is enough disk space to accommodate the backups for the retention period that you choose.
- Identify drive that will be used for data or log files. These will usually be on SAN storage and hence on a different drive from the operating system and SQL Server installations. Decide which folder will be the primary location for data files: you will need to specify this during the installation. If you are installing Analysis Services, identify drives that will host the data and log files for the cube(s).
- Create dedicated service account for each of the service to be installed. Ensure that these accounts are not member of Local Administrator because it will give unnecessary rights to these accounts. Note: for the purpose of this tutorial I’m using local system accounts as a service start-up accounts.
- Assign Deny logon locally right to these service accounts.
- Choose the port number for you SQL Server installation because common TCP\IP ports 1433/1434 ports are well known and are common target for hackers. Therefore it is recommended to change default ports associated with the SQL Server installation.
Installing SQL Server 2012
Insert the SQL Server installation media. From the root folder, double-click Setup.exe. To install from a network share, locate the root folder on the share, and then double-click Setup.exe:
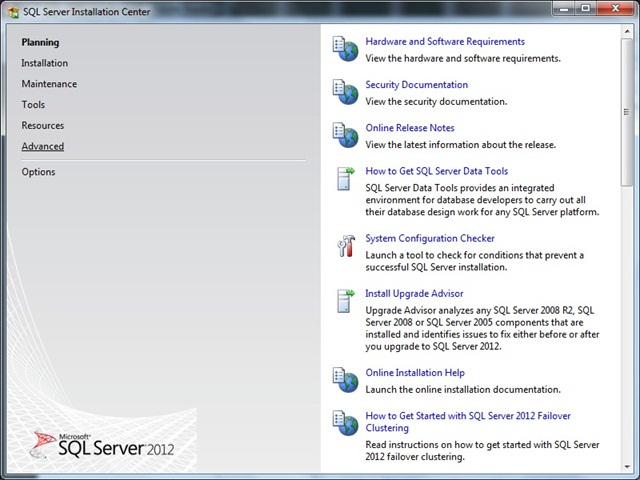
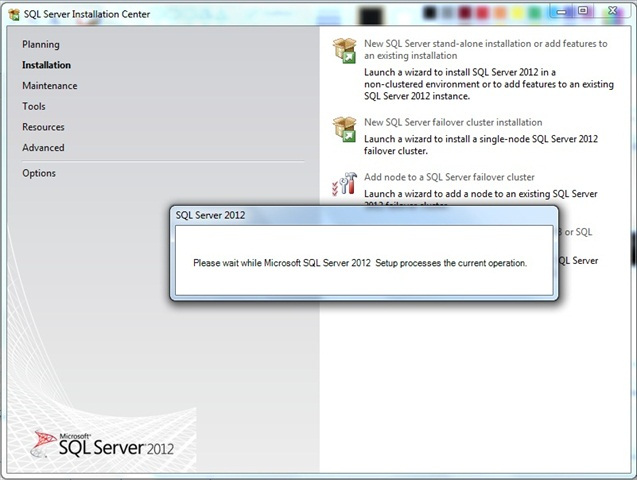
The Installation Wizard runs the SQL Server Installation Center. To create a new installation of SQL Server, select the Installation option on the left side, and then click New SQL Server stand-alone installation or add features to an existing installation:
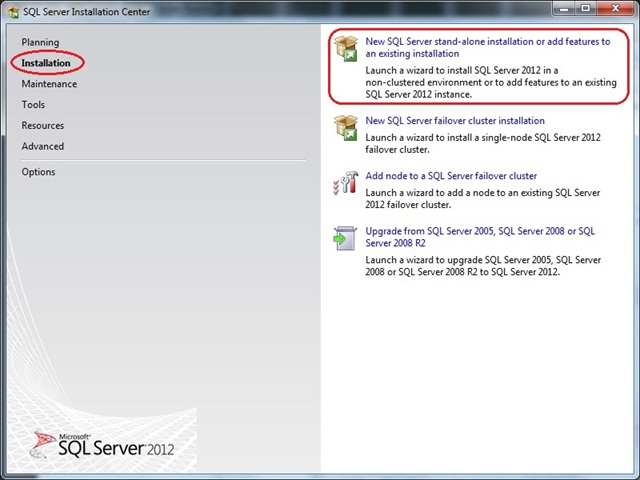
Setup is now preparing to launch Setup Support Rules window:
Now Setup Support Rules will run to identify problems that may occur during the Setup Support Files installation:
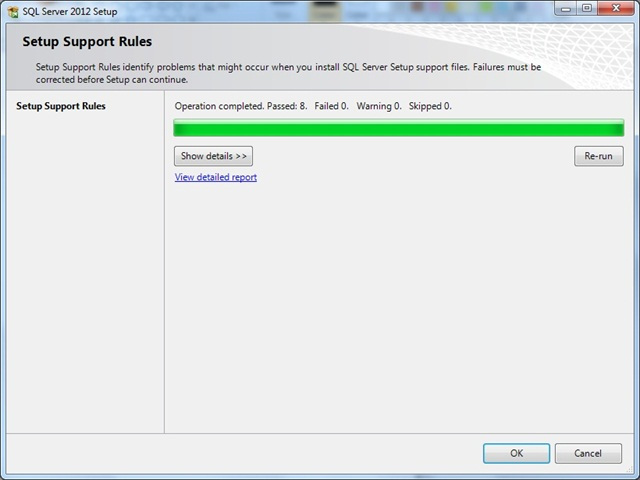
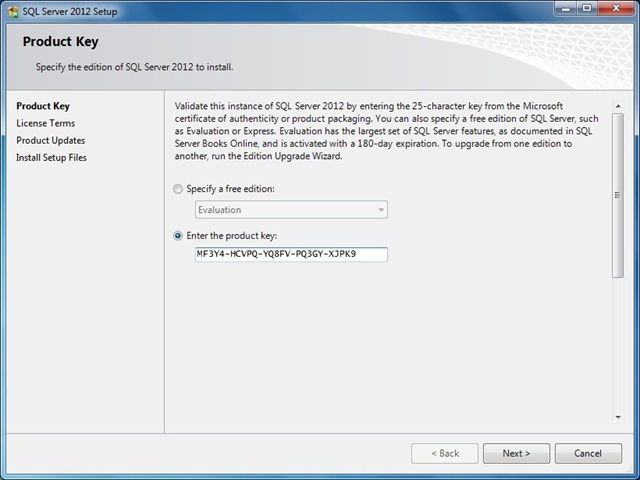
Once this step finishes click OK to proceed to Product Key window, In the Product Key window, enter the Product license key (if required), and click Next to continue:
In the License Terms window, tick the box I accept the license terms and then click Next to continue:
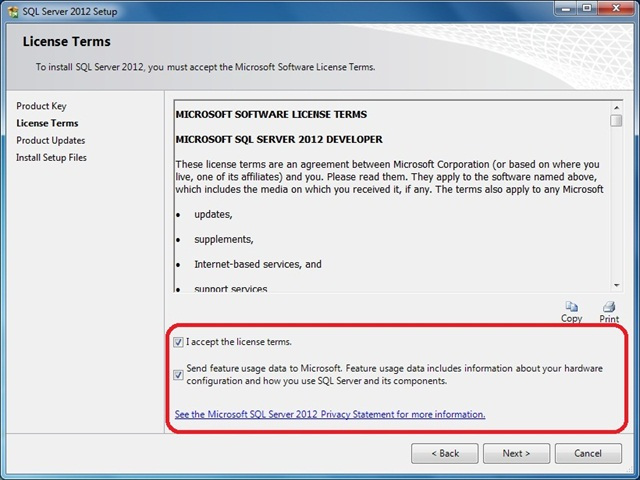
Note: You must accept the license agreement before you can continue the installation of SQL Server 2012. Send feature usage data to Microsoft option is optional.
Click Next and then click Install to Install Setup Files:
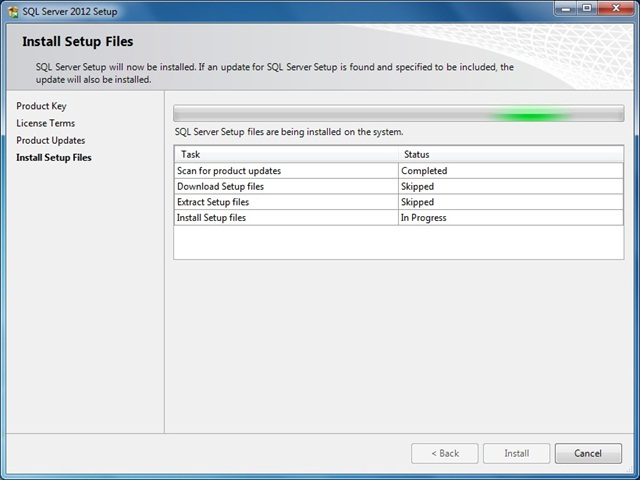
These files are necessary to perform the actual installation. Following the installation of the setup support files, you will be presented with another compatibility check. Following dialog appears once you successfully pass these checks. You can click the Show Details button under the green progress bar if you want to see the individual checks listed:
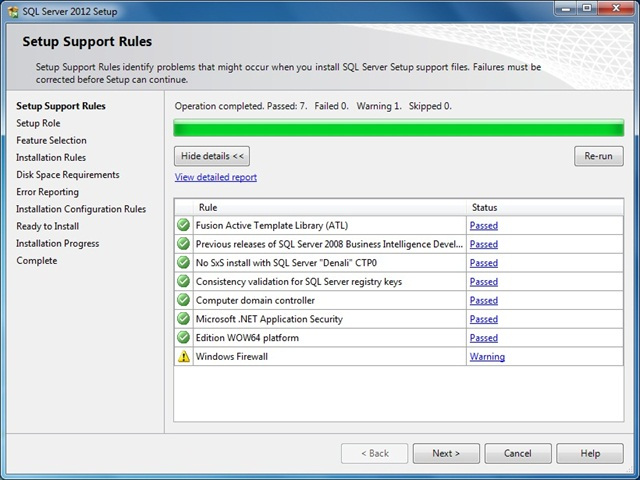
Click Next to continue to the Setup Role page:
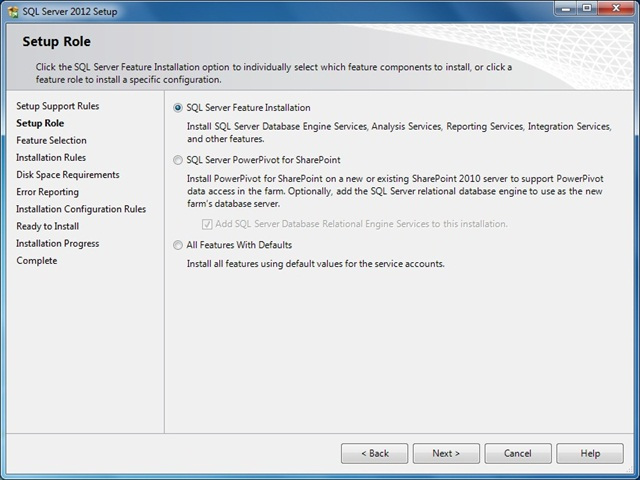
Select SQL Server Feature Installation option and then Next to continue to Feature Selection page:
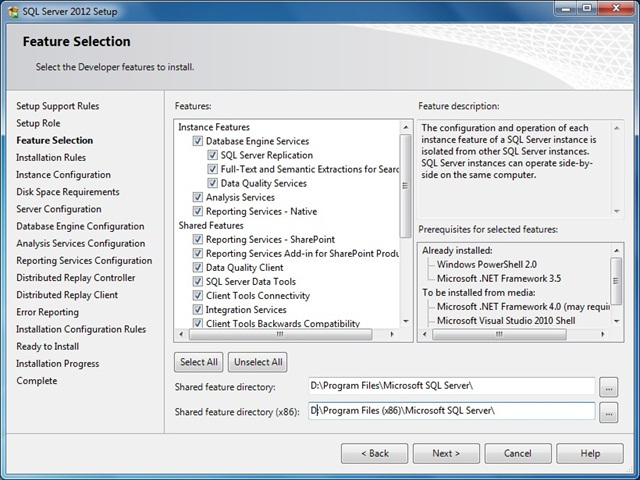
I’m going to select all features so that we can walk through a complete installation process. This will install the Database Engine Services, Analysis Services, Reporting Services, and a number of shared features including SQL Server Books Online. You can also specify the shared feature directory where share features components will be installed. Click Next to continue to the Installation Rules page, Setup verifies the system state of your computer before Setup continues:
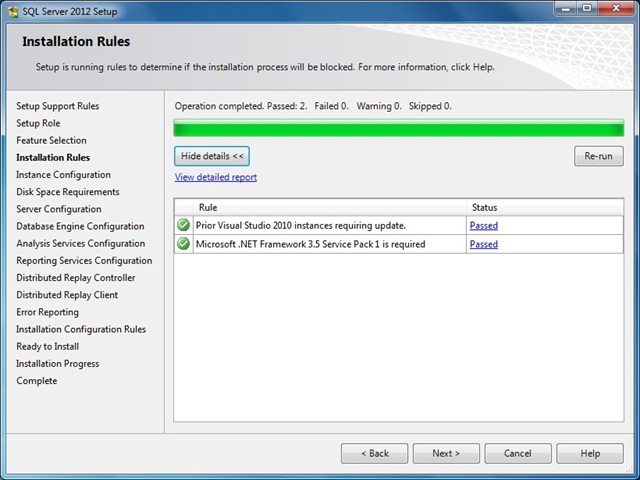
Click Next to continue to the Instance Configuration page. Each server machine can host one default instance of SQL Server, which resolves to the server name, and multiple named instances, which resolves to the pattern ServerName\InstanceName.
In this sample installation, I will install a named instance of SQL Server 2012 called DEV01:
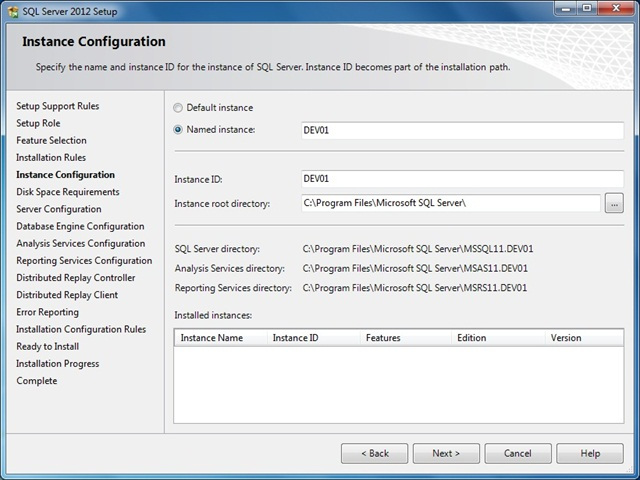
Note: This screen also report on other instances installed on this machine.
Click Next to proceed to the Disk Space Requirements page:
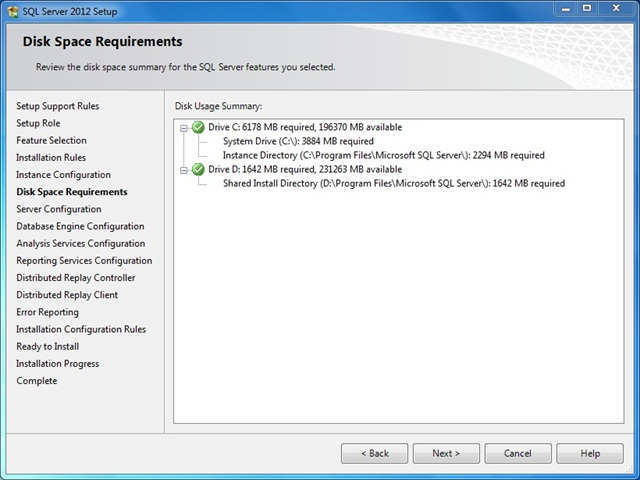
This is just a information page that does not require you to make any choices. Click Next to go to Server Configuration page:
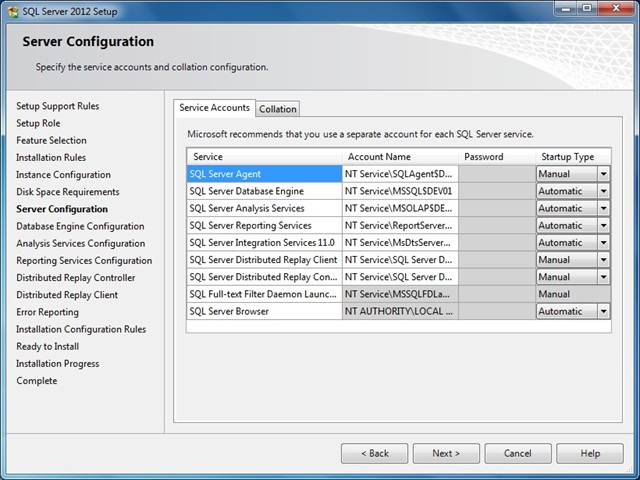
Here you specify service startup and authentication. Microsoft recommends that each service account have separate user accounts as a security best practice as shown in the following figure:

The SQL Server 2012 Books Online makes the following security recommendations:
- Run separate SQL Server services under separate Windows accounts.
- Run SQL Server services with the lowest possible privileges.
- Associate SQL Server services with Windows accounts.
- Require Windows Authentication for connections to the SQL Server.
For the purposes of this article, we will authenticate all services using LocalSystem account.
You may have noticed the Collation tab here in this page. Click Collation tab and then click Customize button to specify the collation for your Database Engine and Analysis Services instance that best matches your application need:
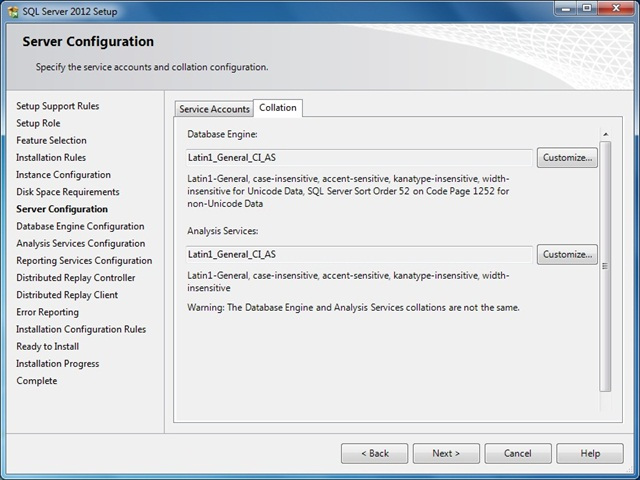
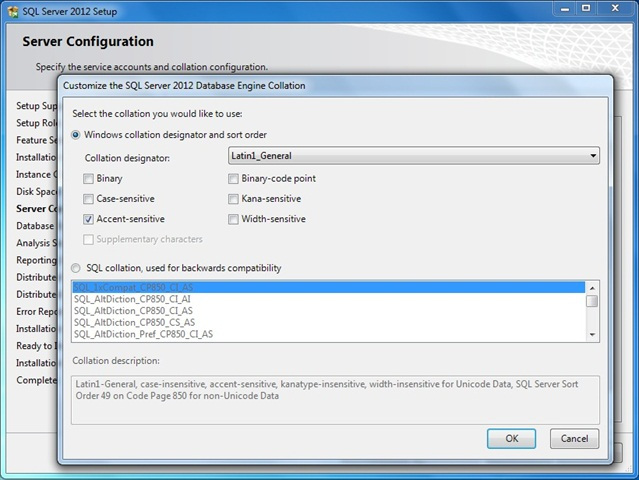
Click Next to continue to Database Engine Configuration page. The SQL Server 2012 authentication mode was configured for “Windows Authentication Mode” per Microsoft security best practice. For the purposes of this article, I will be choosing “Mixed Mode Authentication”. You will also need to specify the SQL Server administrators to be used; in this example I will use the current logged in user by clicking Add Current User button:
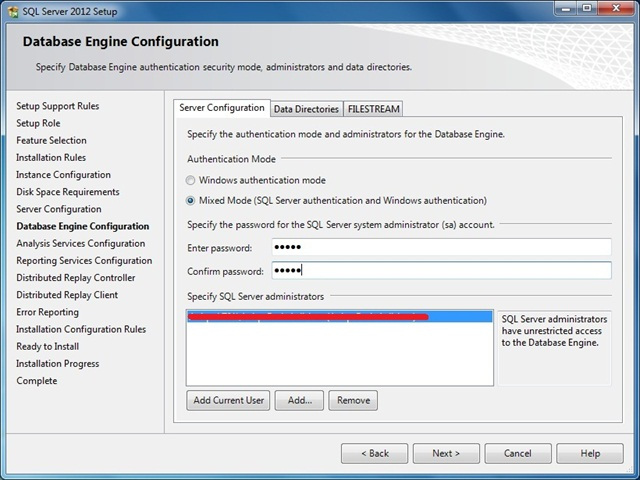
Click Data Dictionary tab and specify default database, log, backup, and tempdb locations:
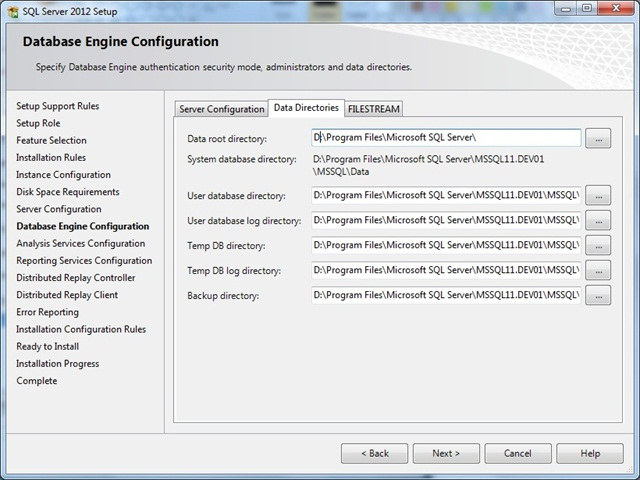
Click FILESTREAM tab and enable this feature as below:
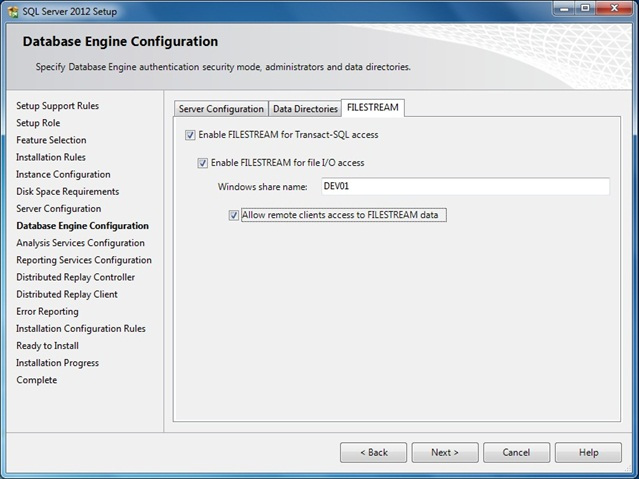
FILESTREAM feature is quiet useful when binaries or other data that does not fit neatly in a table structure.
Click Next to proceed to Analysis Services Configuration page, this is similar to Database Engine Configuration page.
Specify users or accounts that will have administrator permissions for Analysis Services in Account Provisioning page and specify non-default installation directories in Data Directories page:

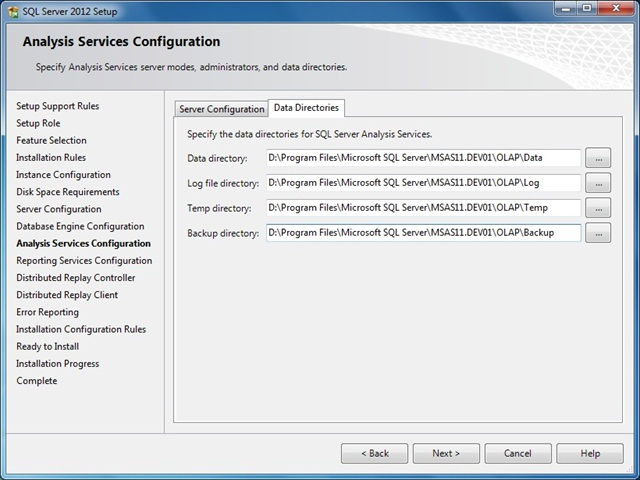
Click Next to continue to Reporting Services Configuration page, specify the kind of Reporting Services installation to create. For the purpose of this article, I will use Install and Configure option:
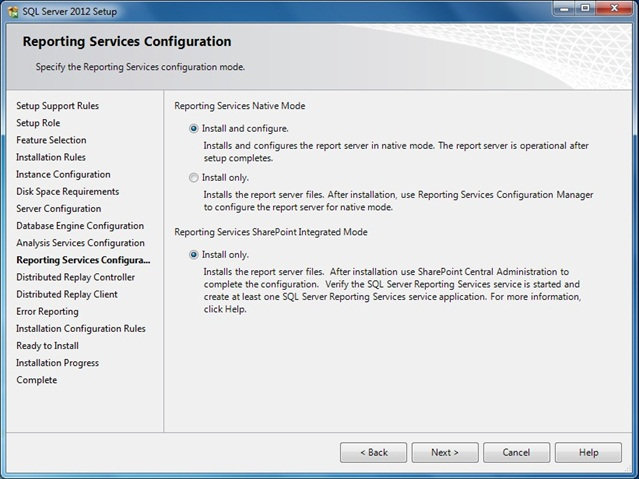
For more information about Reporting Services configuration modes and the options we have, see Reporting Services Configuration Options (SSRS).
Click Next to proceed to Distributed Replay Controller page, specify the users you want to grant administrative permissions to for the Distributed Replay controller service and then click Next to continue:
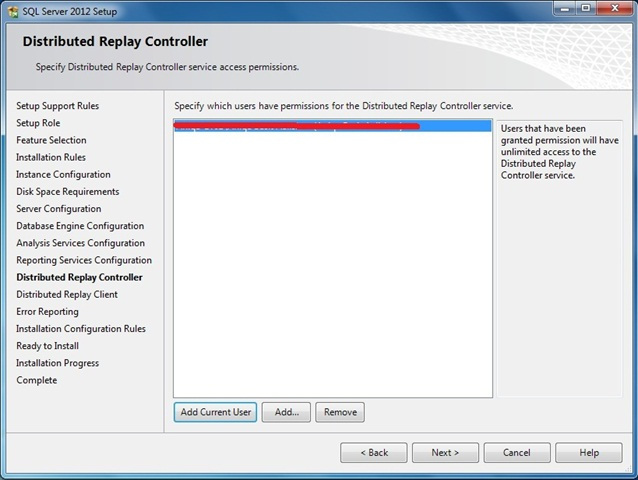
Distributed Replay Client Configuration page appears, here specify setting as shown in next figure:
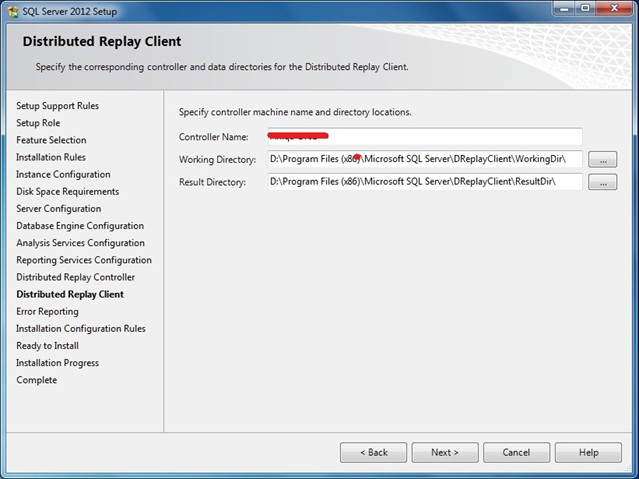
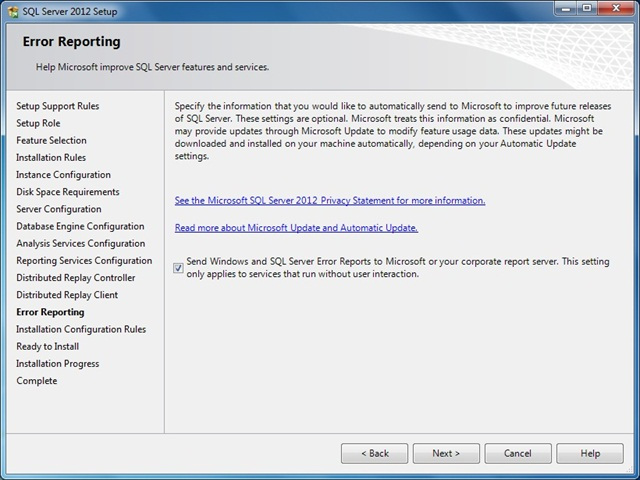
Click Next to advanced to Error Reporting page, tick the check box if you want to send Windows and SQL Server error reports to Microsoft:
Click Next, Now System Configuration Checker will run some more rules that will validate your computer configuration with the SQL Server features you have specified:
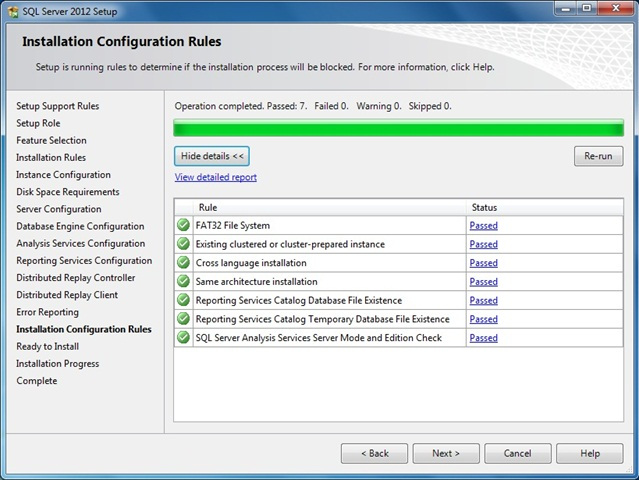
Correct any errors reported in the Installation Rules screen and click on Next to advanced to Ready to Install page. This page shows a tree view of installation options that were specified during Setup. On this page, Setup indicates whether the Product Update feature is enabled or disabled and the final update version:
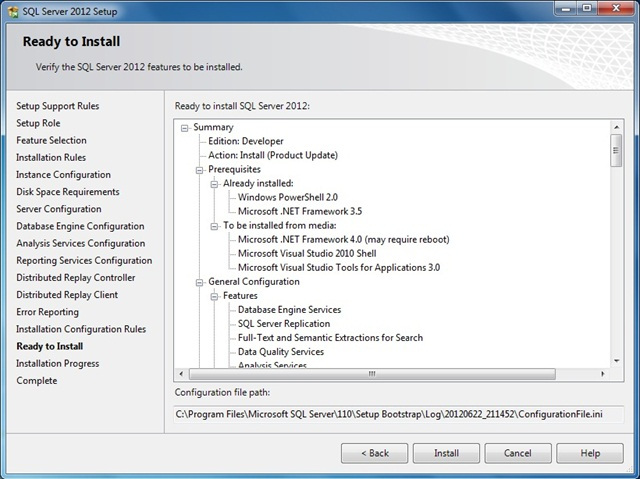
Click Install button to start SQL Server 2012 installation. The Setup will first install the required prerequisites for the selected features followed by the feature installation. The Installation Progress page provides status so that you can monitor installation progress as Setup continues:
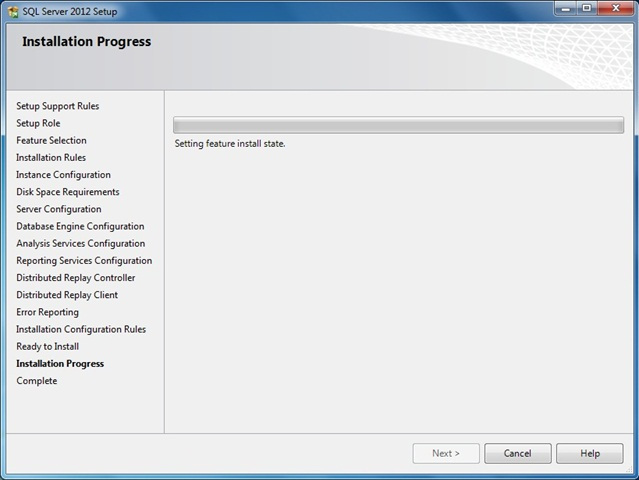
When the installation is complete, click on Next to Complete page:

Click on the link to review the installation log if appropriate, then click on Close.
Установка SQL Server 2012
Мастер установки SQL Server предоставляет единое дерево компонентов для установки всех компонентов SQL Server:
Службы Analysis Services
Службы Reporting Services
Службы Integration Services
Master Data Services
Службы Data Quality Services
Каждый компонент можно установить отдельно или выбрать сочетания перечисленных выше компонентов. Чтобы выбрать наиболее подходящий выпуск и компоненты, доступные в составе служб SQL Server, см. раздел Выпуски и компоненты SQL Server 2012. Доступны 32- и 64-разрядные выпуски Microsoft SQL Server 2012 RC 0.
Независимо от способа установки служб SQL Server (с помощью мастера установки или командной строки) программа установки SQL Server выполнят следующие три шага:
Планирование установки SQL Server
Описывает подготовку компьютера к установке SQL Server.
Требования к оборудованию и программному обеспечению.
Требования средства проверки конфигурации и критические препятствия.
Описывает параметры установки для SQL Server.
Описывает параметры обновления для SQL Server.
Uninstall SQL Server 2012
Описывает процедуры установки SQL Server и Master Data Services.
В этом разделе документации по программе установки SQL Server объясняется процедура установки и настройки отказоустойчивого кластера SQL Server.
Частью платформы Microsoft BI являются такие компоненты SQL Server, как службы Analysis Services, Integration Services, Reporting Services, а также несколько клиентских приложений, используемых для создания аналитических данных и работы с ними. В этом разделе документации по программе установки SQL Server объясняется процедура установки служб Analysis Services и Reporting Services.
В этом разделе приведены ссылки на методические разделы по установке Microsoft SQL Server 2012 RC 0 с помощью мастера установки, из командной строки, с помощью файлов конфигурации и с помощью программы SysPrep.
В этом разделе описывается установка компонентов SQL Server в среде SharePoint. В нем указано, какие компоненты SQL Server можно установить при использовании той или иной версии и выпуска SharePoint. В нем также описаны процедуры установки PowerPivot для SharePoint и служб Reporting Services в режиме SharePoint.
В этом разделе приведены инструкции по установке служб Analysis Services, Integration Services, Master Data Services и Reporting Services, причем службы Analysis Services и Reporting Services устанавливаются без SharePoint. Иногда этот режим называется собственным, это наиболее часто используемый сценарий установки как служб Reporting Services, так и служб Analysis Services. В этом разделе рассказывается о параметрах установки, которые непосредственно определяют операционный контекст сервера. При установке служб Reporting Services это может быть предварительно настроенный сервер или же сервер, для подготовки к использованию которого потребуется выполнить несколько шагов по настройке. При установке служб Analysis Services выбранные параметры установки определяют тип проекта, который можно будет разворачивать на сервере.
Описывает установку и настройку образцов SQL Server, а также образцов баз данных.
How to install SQL Server 2012 express edition

In this article, I am going to explain how we can install SQL Server 2012 express edition using the SQL Server installation center. Additionally, I will also explain how we can use the SQL Server installation configuration file to perform an unattended (silent) installation. First, download the SQL Server express edition from this location. Once the installation file is downloaded, let us begin the installation process.
Install SQL Server using SQL Server installer
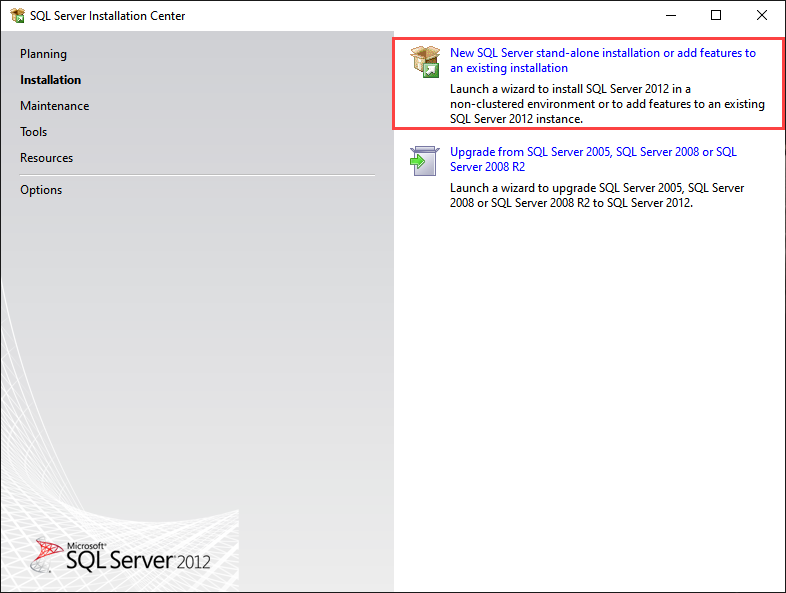
To start the installation, execute the setup file by double-clicking on it. The installation process will be started. On the first screen choose “New SQL Server stand-alone installation or add features to the existing installation” option. See the following image:
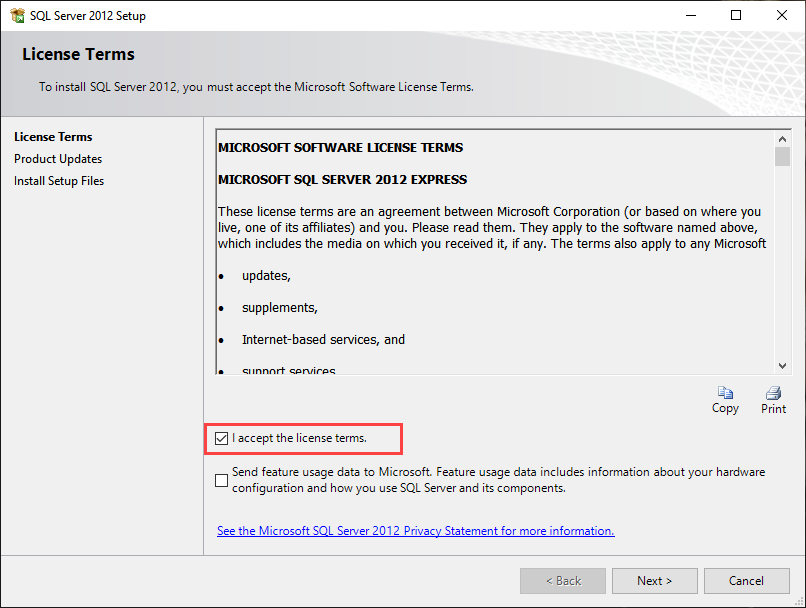
On the License terms screen, select “I accept the license terms” See the following image:
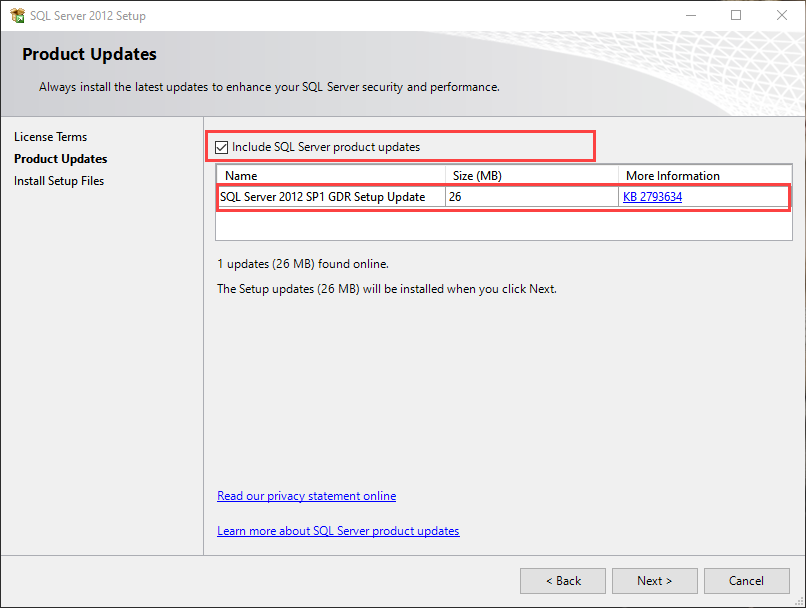
If you want to install the SQL Server product update, select “Include SQL Server product updates” on the “Product Updates” screen. It is always recommended to keep the SQL Server up to date, but before applying the update on the production server, you must test it on the test server. I am installing the SQL Server on my workstation; hence I will install the update. See the following image:
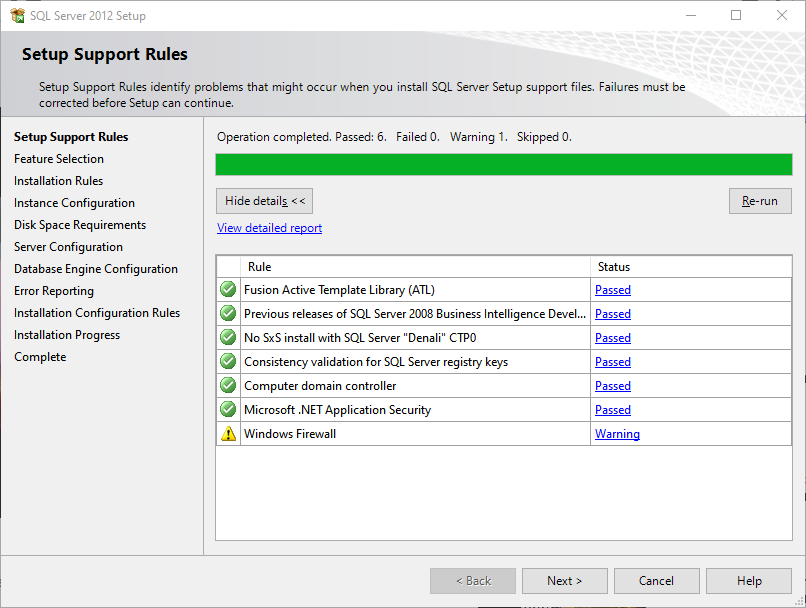
On the Setup Support Rules screen, the installer checks all the mandatory rules which are required to be passed. If you receive any error, then fix it and click on next.
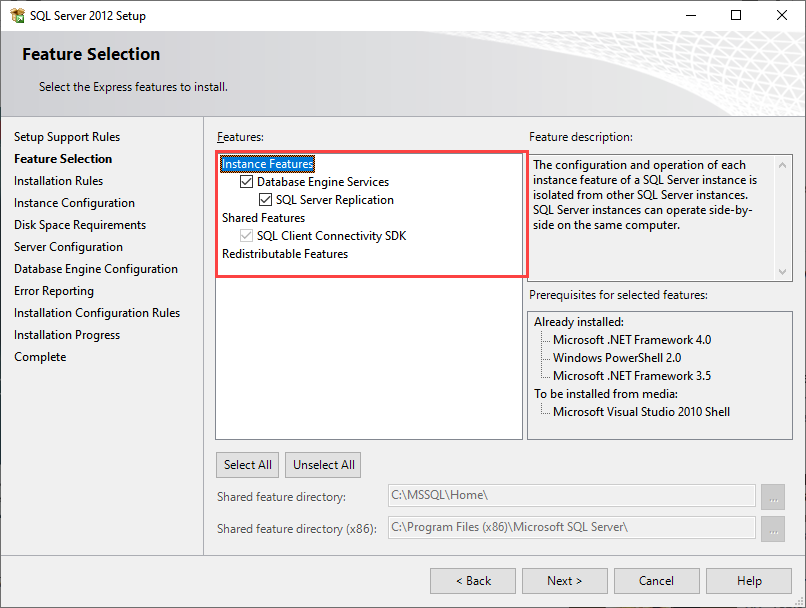
On the feature selection screen, select the features that you want to install on the computer and click on Next.
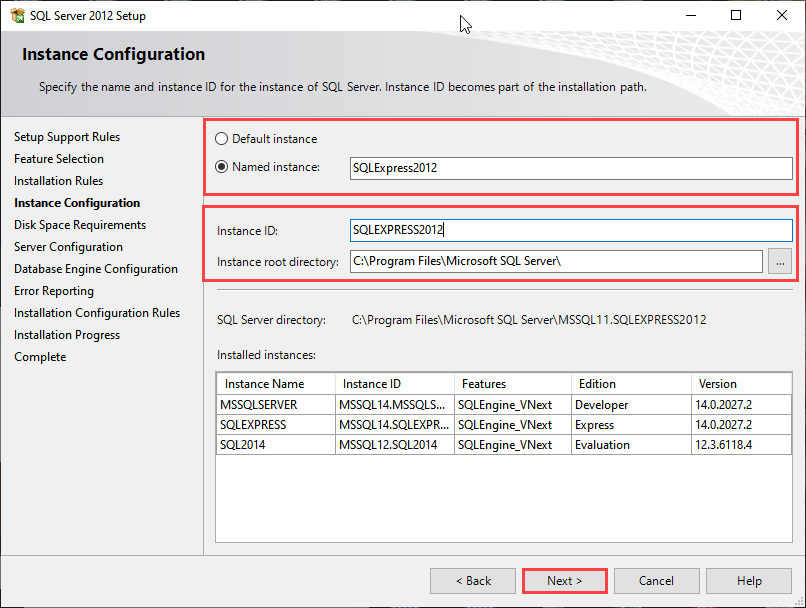
On the Instance configuration screen, you can choose to install a default instance or named instance. You can also change the instance root directory. Select desired options and click on “Next.”
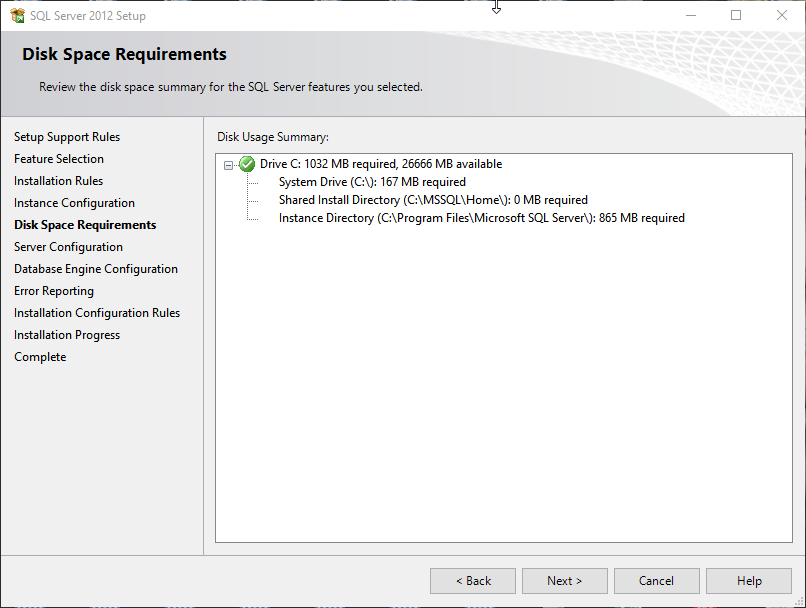
On the Disk space requirement screen, the installer checks the available space on the instance root directory. If sufficient space is available, then it skips the screen.
On the server configuration screen, you must specify the credentials of the SQL Server service account. You can also change the SQL Server service startup type.
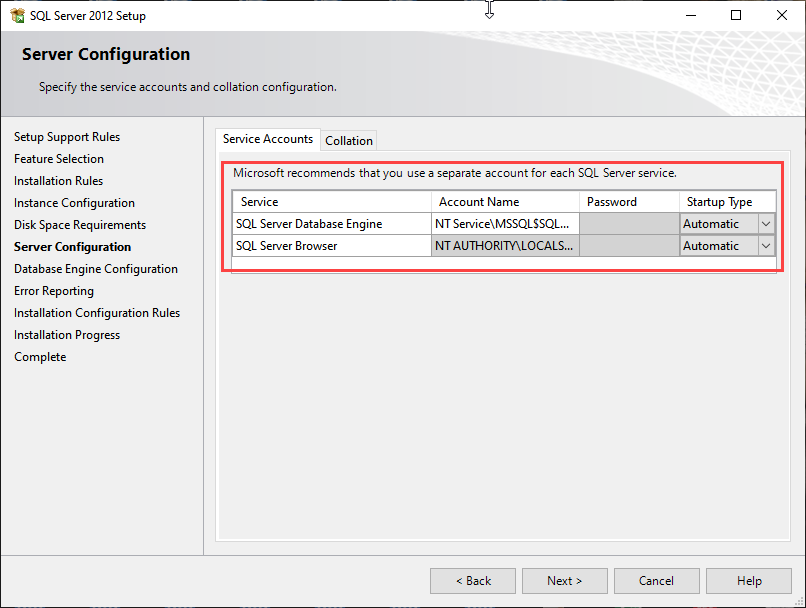
Under the collation tab, you can customize the database collation.
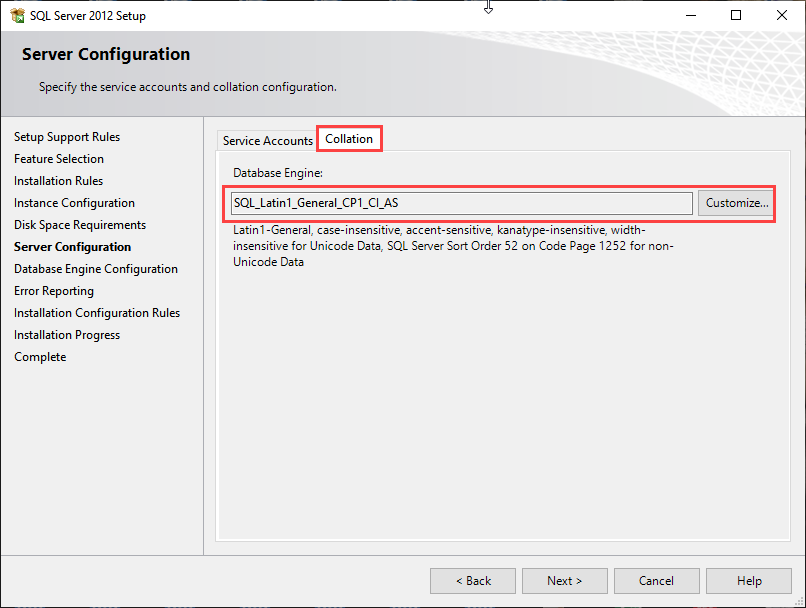
On the database engine configuration screen, you can perform the following configurations
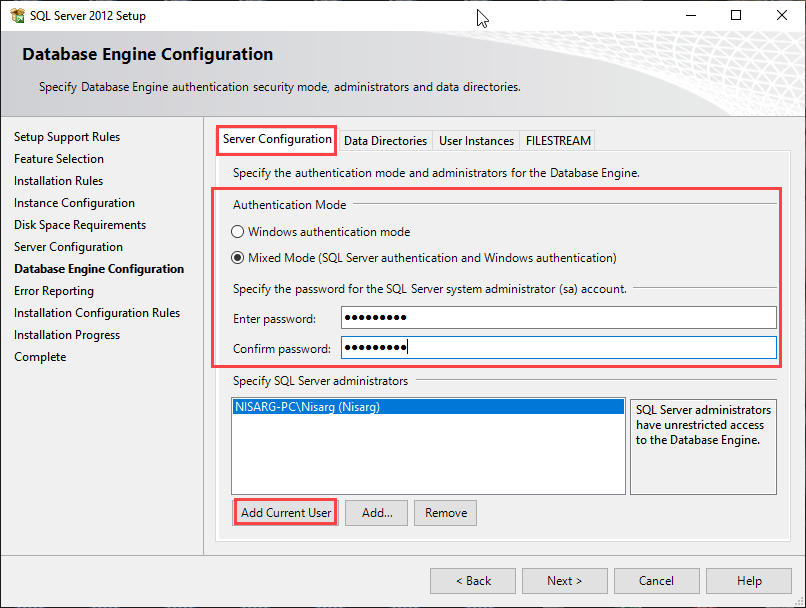
You can configure the authentication mode and specify the default SQL Server administrator from the Server configuration tab. You can choose Windows Authentication or mixed authentication (Windows authentication + SQL Server authentication). If you enable the Mixed mode, then you must provide the password of the “sa” user. Also, you must specify at least one SQL Server administrator. If you want to add yourself as a SQL Admin, then click on “Add Current Users.” See the following image:
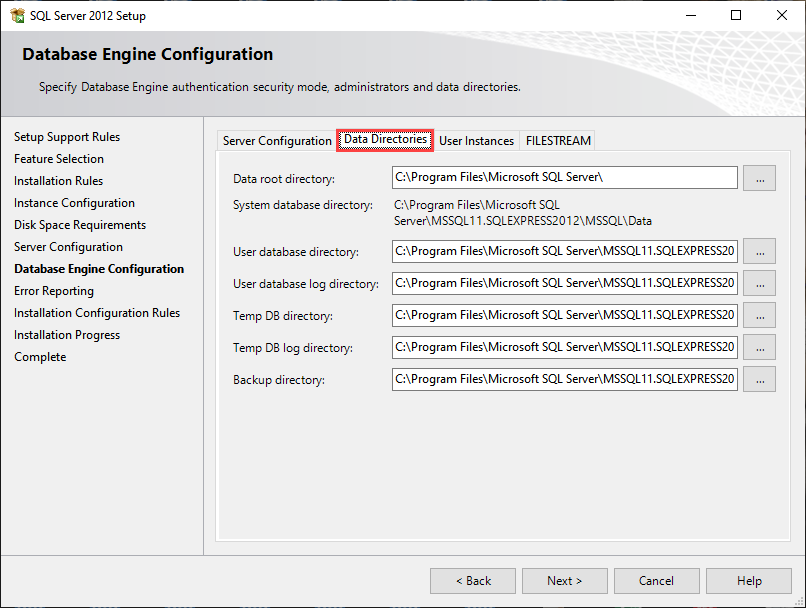
Change the default location of User database files and log files, tempdb data files, and log files and default backup directory. See the following image:
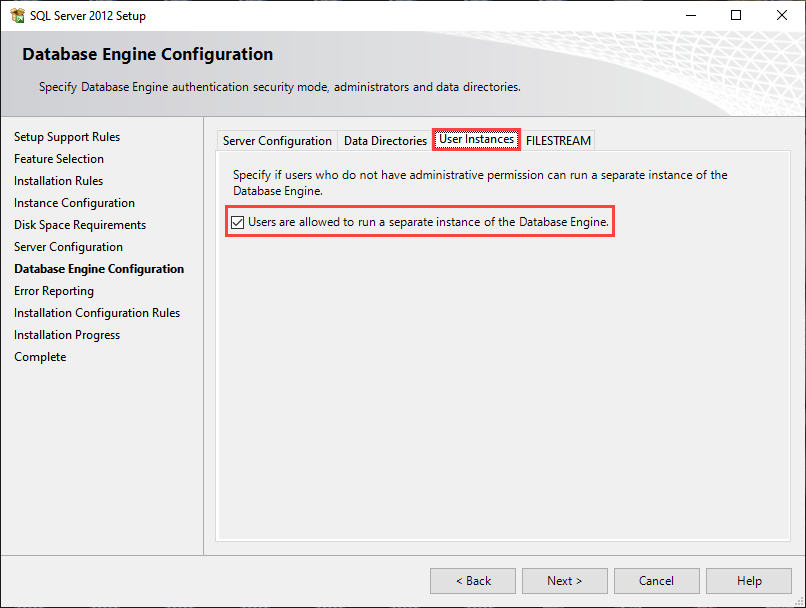
Enable User instance feature of SQL Server express edition. You can read more about it in this article. See the following image:
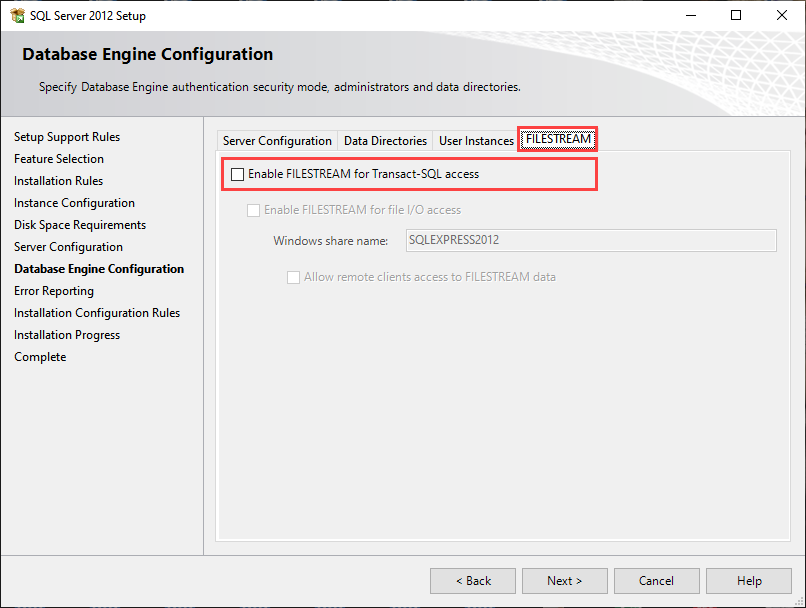
Enable FILESTREAM. See the following image:
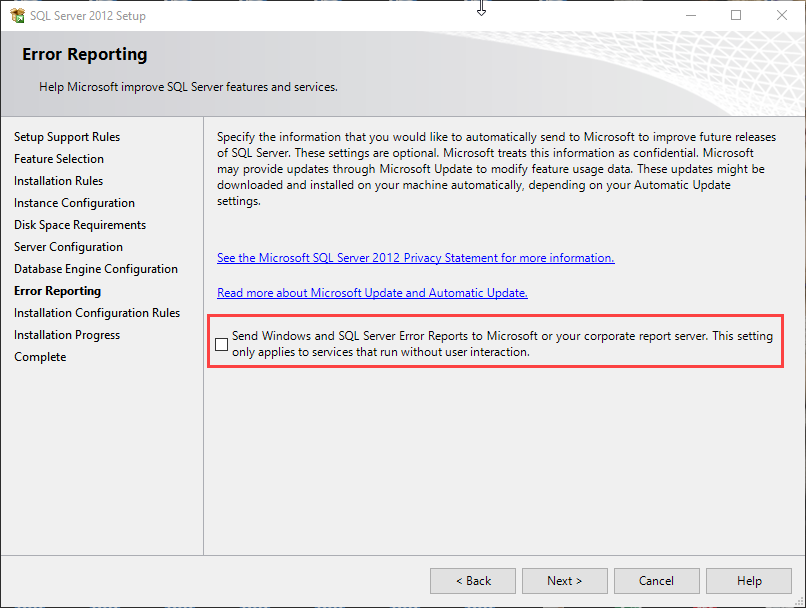
On the Error reporting screen, you can choose to send error reports to Microsoft to improve future releases.
The installer will check the installation configuration rules. All rules must be passed without error.
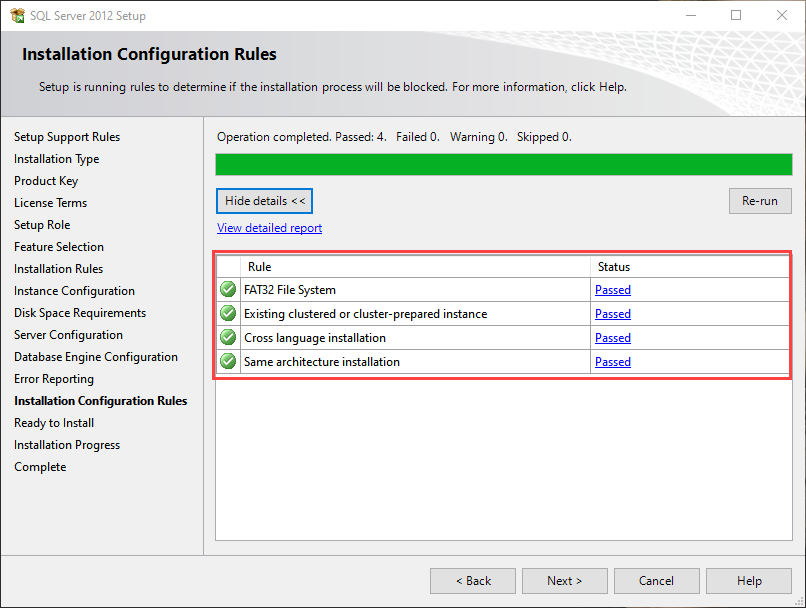
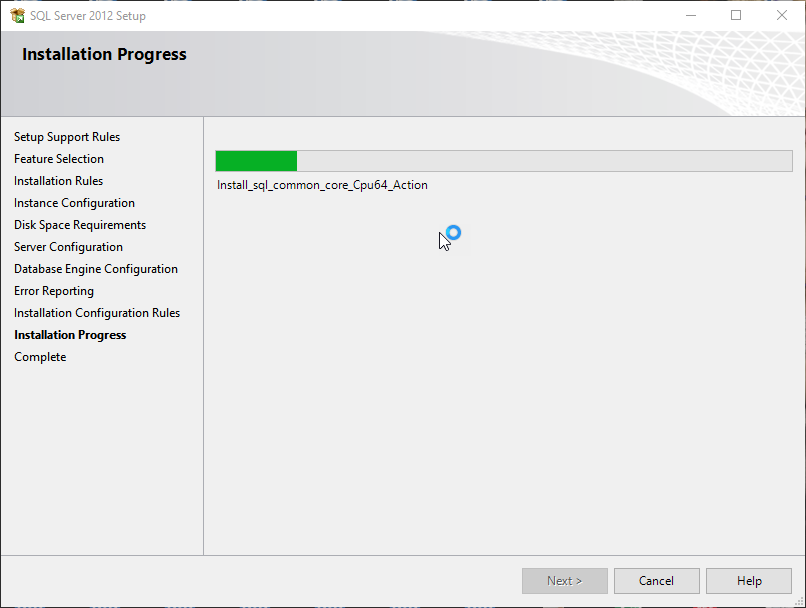
Once all the configuration rules passed successfully, the installation process will begin.
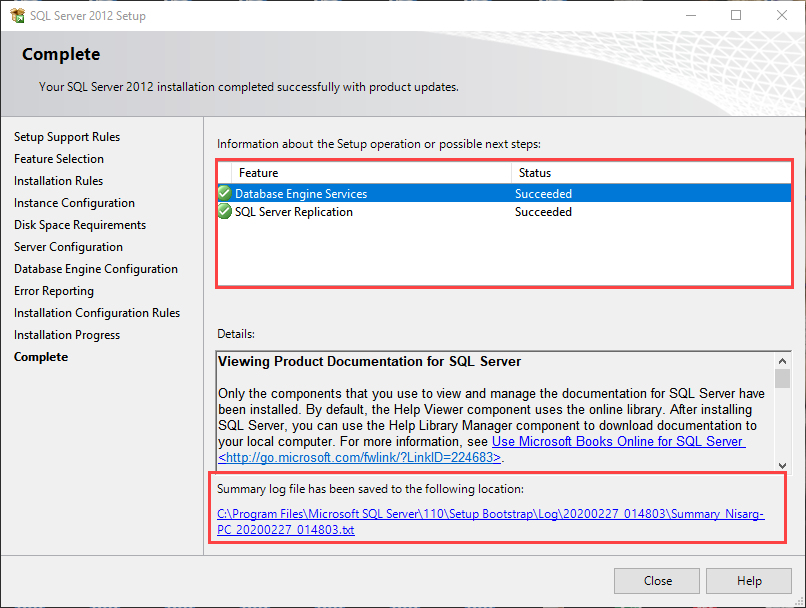
Once installation completes successfully, you should review the list of installed features and components. If you face any error during the installation process, you can review the installation logs. See the following image.
Silent installation of the SQL Server 2012 express edition
SQL Server Express edition does not create a configuration file automatically; hence we have to run the SQL Server installer by executing the following command in PowerShell or DOS.
The above command runs the SQL server installer. On the “Ready to install” screen, you can see the path of the configuration file.
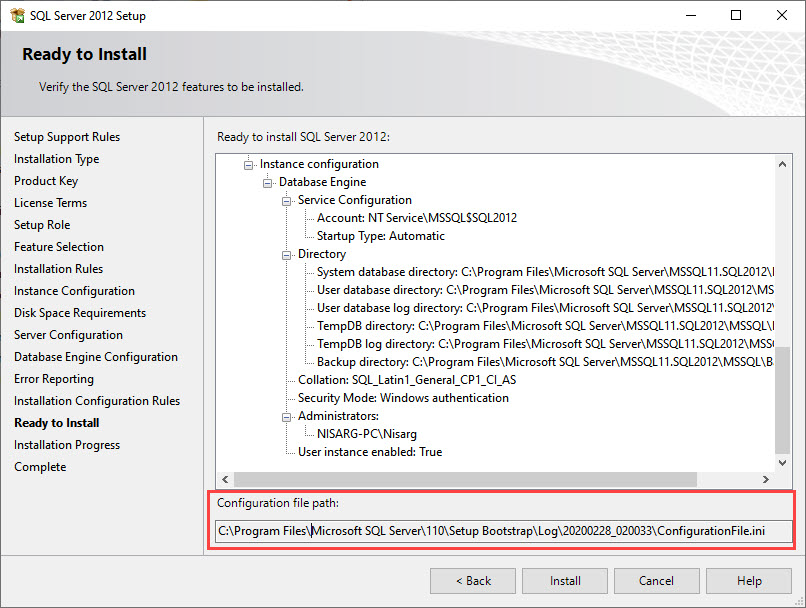
The file location:

Open the configurationfile.ini in notepad or other text editor file. The configuration file looks like the following:
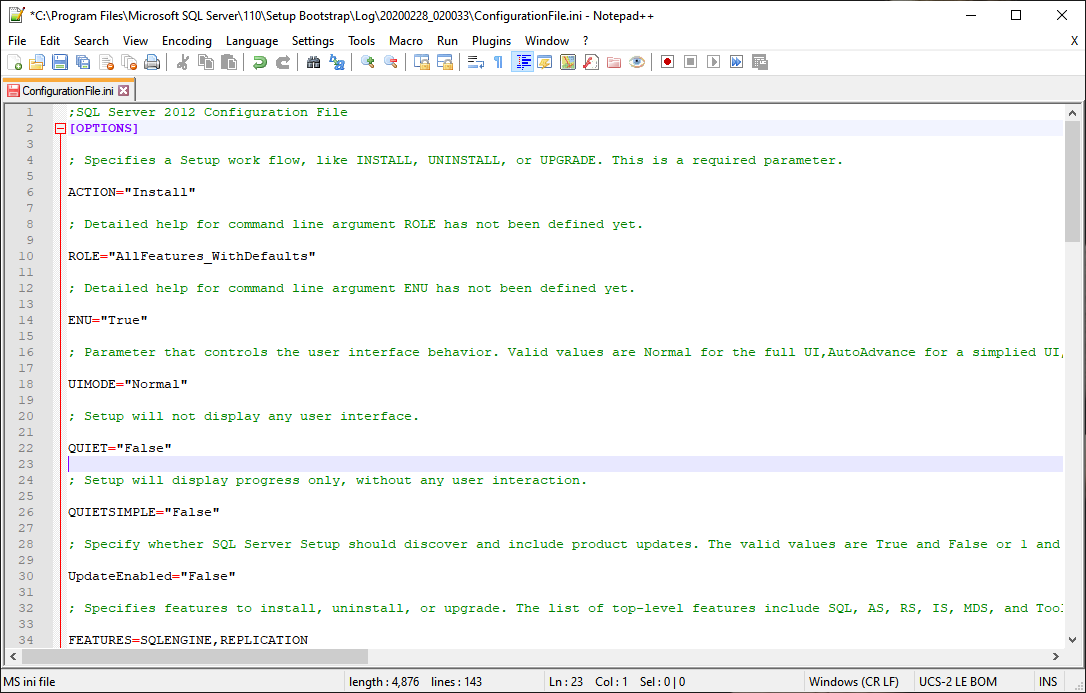
You can configure the parameters according to the requirement. The following is a description of all parameters.
This option specifies the task that needs to be performed. It could be any of the following
- Install
- Un-install
- Upgrade
This option specifies whether to install using a setup role or feature selection page. Valid values are following
- SQL Server feature installation
- PowerPivot for SharePoint
- All Features with default
This option controls the UI behavior. The valid options are following
- Normal (FULL UI)
- AutoAdvanced (Simplified UI)
- EnableUIOnServerCore (Bypass the server core setup GUI block)
The setup will not display any user interface.
Setup will display progress only without user interaction.
This option specifies whether to install SQL Server product updates. Valid values are
- True
- False
It specifies the list of features that will be installed. The top-level features are following
- SQL (SQL Server database engine)
- RS (Reporting Services)
- AS (Analysis services)
- MDS (Master Data Services)
- Tools ( SSMS, Books online, data tools and shared components)
Specify the location where the SQL Server setup will obtain the product updates. Valid options are following
- MU (Microsoft Update)
- UNC Share or valid folder path
This option specifies that the setup should be installed into WOW64.
Root installation directory of the shared components
installation directory for the WOW64 components
Specify the name of the instance.
Specify the instance ID
Specifies that the feature usage data can be collected and sent to Microsoft.
This option specifies whether errors can be reported to Microsoft.Valid values are the following:
- True
- False
Specify installation directory
Service account for SQL Agent
The startup type of agent service after installation.
The startup type of SQL Server service after installation.
Enable RANU (SQL Server user instance) for SQL Server express.
This option specifies the collation of SQL Server.
Its an account used as a SQL Server service account.
It’s an account provision as SQL Server administrator
Add current user as a SQL Server system admins (sysadmin) account.
Enable TCP IP protocol. Valid values are zero (disabled) or one (enabled).
Enable Named Pipe protocol. Valid values are zero (disabled) or one (enabled).
Startup type for SQL Server browser service. Valid values are the following:
- Automatic
- Manual
To identify the instance correctly, I have changed the value of the InstanceID and InstanceName parameters.
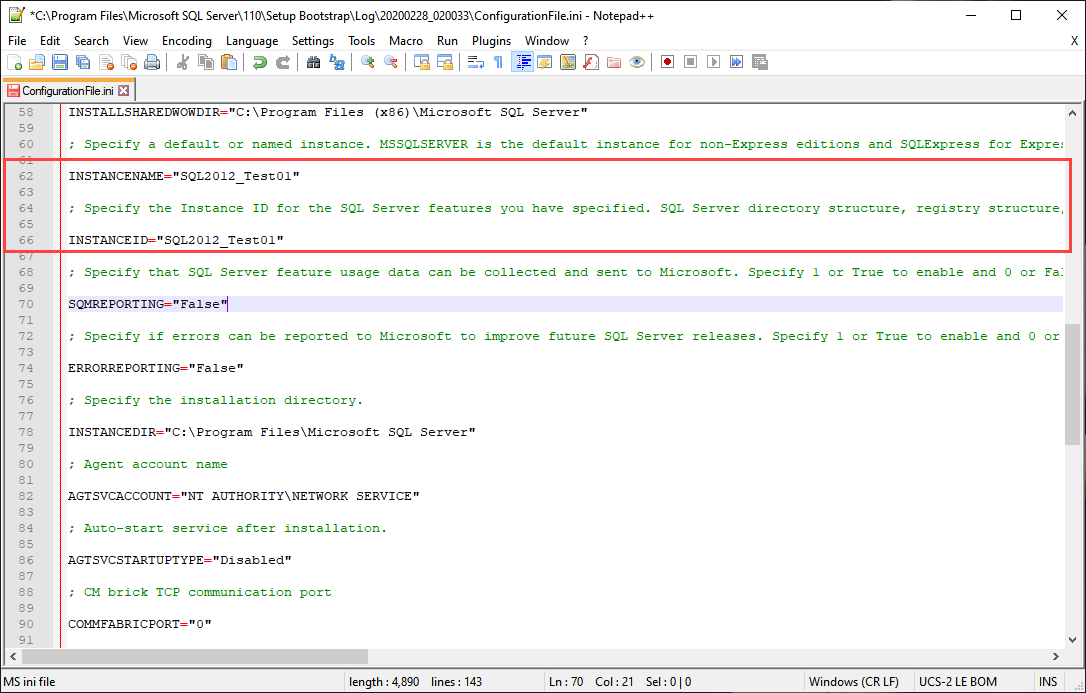
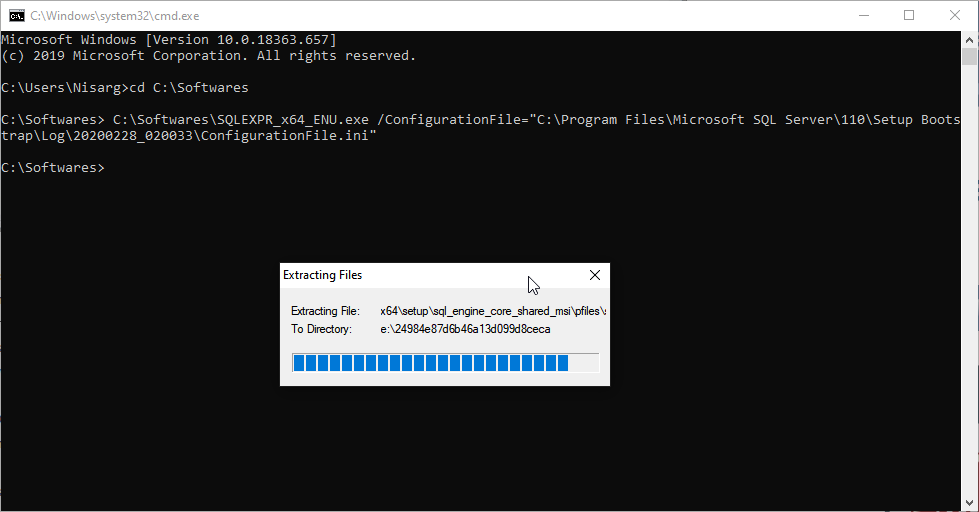
Once the values of all the parameters are set, save the file and run the following command in DOS or PowerShell to install SQL Server.
Once you run this command, the installation process starts. See the following screenshot.
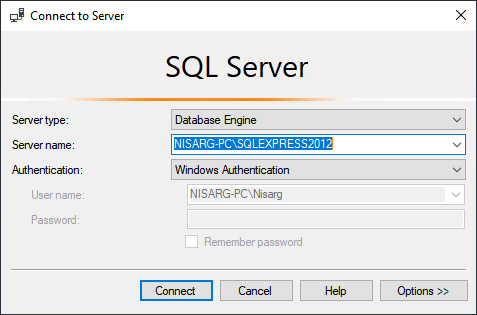
Connect to SQL Server
Once the installation completes successfully, Open SQL Server management studio and on “Connect to Server” dialog box, choose the appropriate Server name, Authentication method, and click on the Connect button. See the following image:
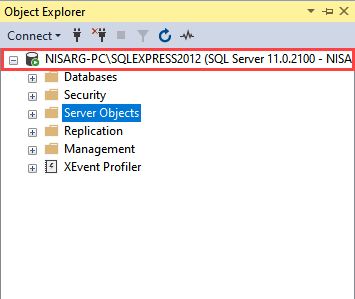
As you can see that we are able to connect to the SQLExpress2012 instance which shows that the installation was successful.
Summary
In this article, I have explained the installation process of the SQL Server 2012 express edition using the SQL Server installer and command prompt (Unattended installation).
Nisarg Upadhyay is a SQL Server Database Administrator and Microsoft certified professional who has more than 8 years of experience with SQL Server administration and 2 years with Oracle 10g database administration.