Exporting or Printing Your LayOut Document
After you work hard to create and polish a LayOut document, you want your document to go out into the world and make its mark. You can present your work on-screen, but that isn’t always enough. Here are other ways you can share your document:
- Upload a document online or attach it to an email. You can export your document pages as JPEG or PNG image files that you can display on web pages. Or you can make a PDF that your audience can download from the web or as an email attachment.
- Open a document in a CAD program. You can also export your LayOut document to a DWG or DXF file, either of which is compatible with popular CAD programs.
- Print your document. Whether you need a high-quality print or just printouts of your pages for your audience to take notes, LayOut includes printing options to help you create just the printout you need.
Table of Contents
Exporting a document as image files
When you export a document as a series of images, LayOut exports each document page as a separate image file, in either .jpg or .png format. The following steps, which reflect the selected operating system, walk you through the image-export process:
- From the menu bar, select File > Export > Images. The Export Images dialog box appears, as shown in the following figure.
- From the menu bar, select File > Export. An export dialog box appears, as shown in the following figure.
- In the Save As box, type a name that will begin each image file you export. If you export multiple images, LayOut exports a number to each image in the series, such as Green Vale Homes_1.png , Green Vale Homes_2.png , and so on.
- Navigate to the location where you want to save your images.
- From the Format drop-down list, select PNG or JPG.
- Click the Options button. The Image Export Options dialog box appears.
- (Optional) In the Pages area, select whether you want to export all the document pages (the default) or just a page range. To print a page range, select the From/To radio button and enter the page range that you want to export.
- (Optional) To change the size and resolution of your exported images, enter a new width or height value or type your desired resolution. These three settings are constrained so, for example, changing the width automatically adjusts the height to maintain the image’s aspect ratio.
- (Optional) By default, your exported images open in your default image viewer. Deselect the Show Export in Image Viewer checkbox if you don’t want to open the images in this program.
- Click the OK button.
- Back in the export dialog box, click the Save button. The images are exported to the location you selected in Step 3.
Creating a PDF of your document
When you export a PDF of a document, LayOut creates a single PDF file that contains your document pages. To export your document as a PDF, follow these steps, which reflect the selected operating system:
- From the menu bar, select File > Export > PDF. The Export PDF dialog box appears, and the PDF format is already selected in the Save As Type drop-down list.
- Navigate to the location where you want to save the PDF.
- In the File Name box, type a name for the file.
- Click the Save button. The PDF Export Options dialog box appears, as shown in the following figure.
- (Optional) The location and filename in the Export File field reflect the location you chose in Step 2. If you change your mind, click the Choose button and select a new location.
- (Optional) By default, LayOut includes all the pages in your document in the PDF. To specify a page range instead, select the From/To radio button and type the page numbers for your desired page range.
- (Optional) To change the quality for rendering models and images in your exported PDF, select an option from the Output QualityOutput Resolution drop-down list.
- (Optional) A great way to reduce the file size of the resulting PDF is to compress images in your LayOut document. Select the Use JPEG Compression for Images option and move the slider to Smaller File to reduce the quality of the images and reduce the file size as well. For a higher quality image, however, move the quality slider to Better Quality.
- (Optional) By default, LayOut creates a PDF layer that corresponds to each layer in your document. If you don’t want LayOut to create these layers, deselect the Create PDF Layers from LayOut Layers checkbox.
- (Optional) By default, LayOut displays the exported PDF file in your system’s PDF viewer, such as Adobe Reader. If you don’t want LayOut to open the file for you, deselect the Show Export in PDF Viewer checkbox.
- Click Export, and LayOut creates the PDF in the location you specified in Step 2.
- From the menu bar, select File > Export. An export dialog box appears.
- In the Save As box, type a name for the PDF file.
- Navigate to the location where you want to save your images.
- From the Format drop-down list, select PDF.
- Click the Options button. The PDF Export Options dialog box appears, as shown in the following figure.
- (Optional) In the Pages area, select whether you want to export all the document pages (the default) or just a page range. To print a page range, select the From/To radio button and enter the page range that you want to export.
- (Optional) To change the quality for rendering models and images in your exported PDF, select an option from the Output QualityOutput Resolution drop-down list.
- (Optional) A great way to reduce the file size of the resulting PDF is to compress images in your LayOut document. Select the Use JPEG Compression for Images option and move the slider to Smaller File to reduce the quality of the images and reduce the file size as well. For a higher quality image, however, move the quality slider to Better Quality.
- (Optional) By default, your exported images open in your default image viewer. Deselect the Show Export in PDF Viewer checkbox if you don’t want to open the images in this program.
- Click the OK button.
- Back in the export dialog box, click the Save button. The images are exported to the location you selected in Step 3.
Exporting a document to DWG or DXF format
DWG and DXF are file formats that open in popular CAD programs. To export a document to one of these formats, follow these steps, which reflect your selected operating system:
- From the menu bar, select File > Export > DWG/DXF. The Export DWG/DXF dialog box appears.
- Navigate to the location where you want to save the file.
- In the File Name box, type a name for the file.
- In the Save As Type drop-down list, select DWG or DXF.
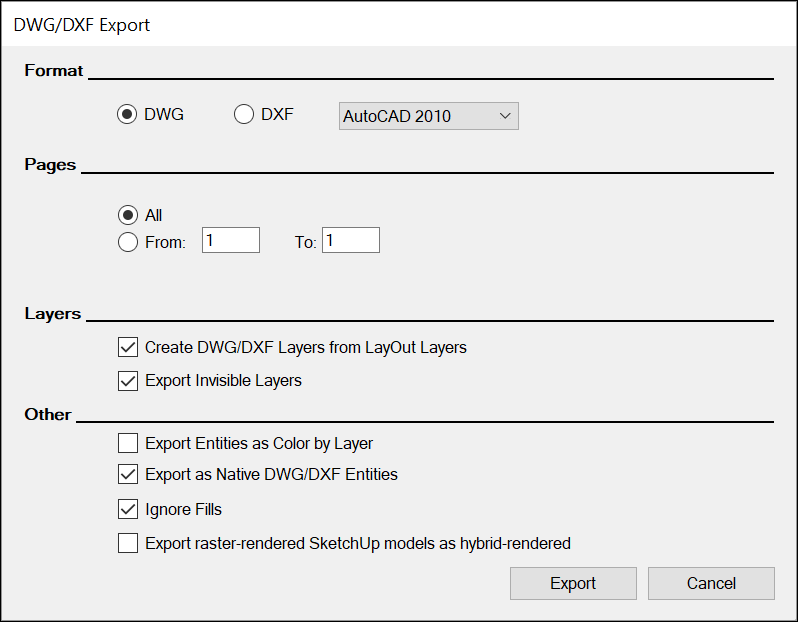
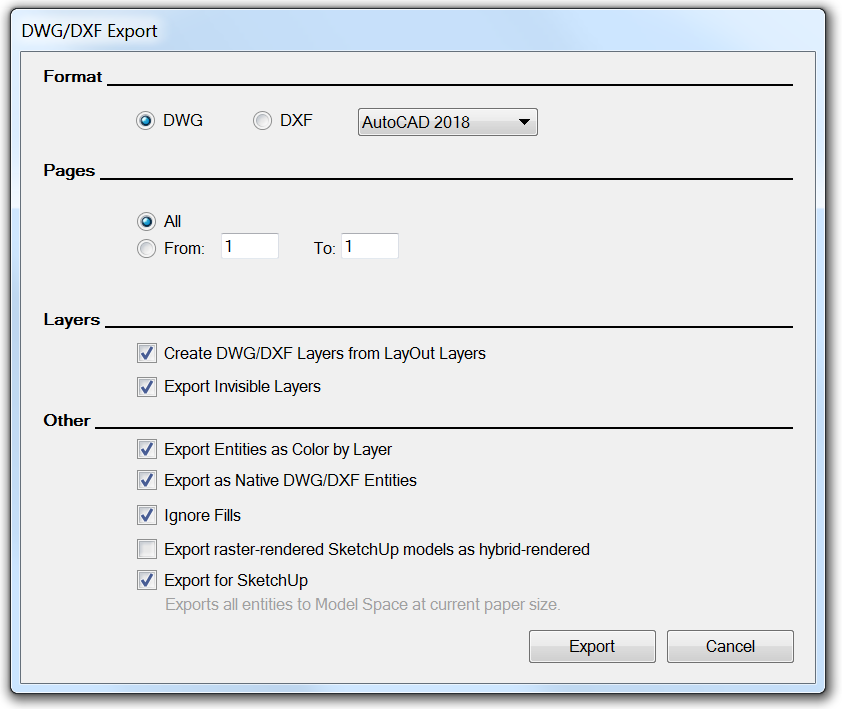
- Click the Save button. The DWG/DXF Export dialog box appears, as shown in the following figure.
- (Optional) The location and filename in the Export File field reflect the location you chose in Step 2. If you change your mind, click the Choose button and select a new location.
- (Optional) In the Format area, from the drop-down list, select the version of AutoCAD in which the file will be opened. The file format (DWG or DXF) reflects the option you selected in Step 4, and you can change that here if you like.
- (Optional) By default, LayOut includes all the pages in your document in the exported file. To specify a page range instead, select the From/To radio button and type the page numbers for your desired page range.
- (Optional) In the Output Space area, Paper Space is selected by default, which exports the file for 2D paper space. Select the Model Space radio button if you intend to use the exported file in 3D model space. When Model Space is selected, you can set a scale from the Scale drop-down list. See Editing a SketchUp Model’s View and Style Settings in LayOut for details about your scale options.
- (Optional) By default, LayOut creates a DWG/DXF layer that corresponds to each layer in your document. If you don’t want LayOut to create these layers, deselect the Create DWG/DXF Layers from LayOut Layers checkbox.
- (Optional) By default, LayOut exports hidden layers (also known as invisible layers) to your DWG or DXF file. If you don’t want LayOut to export these layers, deselect the Export Invisible Layers checkbox.
- (Optional) LayOut does not include any fills that your document contains in the exported file. Deselect the Ignore Fills checkbox if you want those fills in your exported file.
- Click Export, and LayOut creates the DWG or DXF file in the location you specified in Step 2.
- From the menu bar, select File > Export > DWG/DXF. The Export DWG/DXF dialog box appears.
- Navigate to the location where you want to save the file.
- In the File Name box, type a name for the file.
- In the Save As Type drop-down list, select DWG or DXF.
- Click the Save button. The DWG/DXF Export dialog box appears, as shown in the following figure.
- (Optional) In the Format area, from the drop-down list, select the version of AutoCAD in which the file will be opened. The file format (DWG or DXF) reflects the option you selected in Step 4, and you can change that here if you like.
- (Optional) By default, LayOut includes all the pages in your document in the exported file. To specify a page range instead, select the From/To radio button and type the page numbers for your desired page range.
- (Optional) By default, LayOut creates a DWG/DXF layer that corresponds to each layer in your document. If you don’t want LayOut to create these layers, clear the Create DWG/DXF Layers from LayOut Layers checkbox.
- (Optional) By default, LayOut exports hidden layers (also known as invisible layers) to your DWG or DXF file. If you don’t want LayOut to export these layers, clear the Export Invisible Layers checkbox.
- From the menu bar, select File > Export. An export dialog box appears.
- In the Save As box, type a name for the DWG or DXF file.
- Navigate to the location where you want to save your images.
- From the Format drop-down list, select DWG/DXF.
- Click the Options button. The DWG/DXF Export Options dialog box appears, as shown in the following figure.
- (Optional) By default, LayOut includes all the pages in your document in the exported file. To specify a page range instead, select the From/To radio button and type the page numbers for your desired page range.
- (Optional) In the Format area, select the DWG or DXF radio button to indicate which file type you wish to export. From the drop-down list, select the version of AutoCAD in which the file will be opened.
- (Optional) In the Output Space area, Paper Space is selected by default, which exports the file for 2D paper space. Select the Model Space radio button if you intend to use the exported file in 3D model space. When Model Space is selected, you can set a scale from the Scale drop-down list. If you select Custom from the drop-down list, you can define a scale in the Custom Scale box. See Editing a SketchUp Model’s View and Style Settings in LayOut for more details about your scale options.
- (Optional) By default, LayOut exports invisible layers to your DWG or DXF file. If you don’t want LayOut to export these layers, deselect the Export Invisible Layers checkbox.
- (Optional) By default, LayOut creates a DWG/DXF layer that corresponds to each layer in your document. If you don’t want LayOut to create these layers, deselect the Create DWG/DXF Layers from LayOut Layers checkbox.
- (Optional) LayOut does not include any fills that your document contains in the exported file. Deselect the Ignore Fills checkbox if you want those fills in your exported file.
- Click OK when you’re done selecting your options.
- Click Save, and LayOut creates the exported file in the location you selected in Step 3.


Printing your document
The great German philosopher, Friedrich Nietzsche, once said, “Print is dead.” Or something like that. (Beware the accuracy of quotes you find on the Internet.) Regardless, people stopped heralding the advent of the paperless office years ago. Printouts still have a place and a purpose in this world. If you have such a purpose for your LayOut document, this section guides you through the printing process.
Whether you use LayOut for Microsoft Windows or Mac OS X, the basic printing process is the same:
- Select File > Page Setup to check your page setup options.
- Preview your printout.
- Select File > Print to select your final print options and send your presentation to the printer.
However, the specific steps vary between Microsoft Windows and Mac OS X. In the following steps, you walk through the whole detailed printing process for the selected operating system:
- From the menu bar, select File > Page Setup. The Page Setup dialog box appears.
- From the Size drop-down menu, select a paper size.
- From the Source drop-down menu, select the printer tray that contains the paper you want to use.
- Click OK in the Page Setup dialog box.
- Select File > Print Preview to open the Print Preview dialog box, shown in the following figure.
- From the menu bar, select File > Page Setup. A page setup dialog box appears, displaying your page attributes options, as shown in the following figure.
Как связать LayOut в SketchUp?
Бесплатная версия не будет экспортировать ни один из перечисленных вами типов файлов.. SketchUp действительно очень мощный и способен на многое. Бесплатная веб-версия значительно упрощена по сравнению с настольными версиями, особенно Pro. Бесплатная версия не будет экспортировать ни один из перечисленных вами типов файлов.
Как экспортировать макет в DWG?
Как экспортировать макет в DWG?
- В строке меню выберите «Файл» > «Экспорт» > «DWG/DXF». …
- Перейдите к месту, где вы хотите сохранить файл.
- В поле Имя файла введите имя файла.
- В раскрывающемся списке «Тип файла» выберите DWG или DXF.
Как вставить модель в LayOut?
Просто нажмите на тег с надписью «Макет 1» рядом с тегом «Модель» в документе Autocad (см. справа). Вы покинете свое рабочее пространство «Модель» и перейдете в пространство «Макет» (см. ниже). Вы заметите рамку на листе бумаги, которая может отображать часть вашей работы или сетку, если сетка все еще включена.
Как добавить несколько видов в SketchUp LayOut?
Создание нескольких представлений в LayOut
- Нажмите на вид SketchUp, который вы вставили на титульную страницу.
- Затем перейдите в Редактировать | Копировать (или щелкнуть правой кнопкой мыши вид и выбрать Копировать в контекстном меню).
- Выберите внутреннюю страницу в палитре страниц, затем щелкните правой кнопкой мыши внутреннюю страницу и выберите «Дублировать».
Как добавить окно просмотра в LayOut?
Создание нового видового экрана листа
- Нажмите «Вид» > «Видовые экраны» > «Новые видовые экраны…».
- В диалоговом окне «Видовые экраны» введите новое имя видового экрана.
- Выберите видовые экраны из списка стандартных видовых экранов.
- Нажмите OK, чтобы создать новый видовой экран.
Как перемещать область просмотра в SketchUp LayOut?
Правильно, то, что я искал, было дважды щелкните объект и удерживайте Shift, чтобы переместить модель вместо того, чтобы вращать ее. Вы можете перетаскивать края области просмотра, чтобы отрегулировать положение краев относительно модели, но не делайте двойной щелчок по области просмотра, чтобы панорамировать модель в пределах области просмотра.
Есть ли в бесплатной версии SketchUp макет?
SketchUp Make — это бесплатная версия SketchUp, не предназначенная для коммерческого использования. среди прочего, он не включает LayOut и никогда не. Если все, что вам нужно, это делать 2D-чертежи, существует множество различных приложений для 2D-рисования.
Что такое макет Trimble?
Trimble FieldLink Office — это простой инструмент цифровой разметки полей Это помогает командам повысить точность и эффективность подготовки и анализа данных в полевых условиях.
Как из layout перенести в sketchup
After you work hard to create and polish a LayOut document, you want your document to go out into the world and make its mark. You can present your work on-screen, but that isn’t always enough. Here are other ways you can share your document:
- Upload a document online or attach it to an email. You can export your document pages as JPEG or PNG image files that you can display on web pages. Or you can make a PDF that your audience can download from the web or as an email attachment.
- Open a document in a CAD program. You can also export your LayOut document to a DWG or DXF file, either of which is compatible with popular CAD programs.
- Print your document. Whether you need a high-quality print or just printouts of your pages for your audience to take notes, LayOut includes printing options to help you create just the printout you need.
Table of Contents
Exporting a document as image files
When you export a document as a series of images, LayOut exports each document page as a separate image file, in either .jpg or .png format. The following steps, which reflect the selected operating system, walk you through the image-export process:
- From the menu bar, select File > Export > Images. The Export Images dialog box appears, as shown in the following figure.
- From the menu bar, select File > Export. An export dialog box appears, as shown in the following figure.
- In the Save As box, type a name that will begin each image file you export. If you export multiple images, LayOut exports a number to each image in the series, such as Green Vale Homes_1.png , Green Vale Homes_2.png , and so on.
- Navigate to the location where you want to save your images.
- From the Format drop-down list, select PNG or JPG.
- Click the Options button. The Image Export Options dialog box appears.
- (Optional) In the Pages area, select whether you want to export all the document pages (the default) or just a page range. To print a page range, select the From/To radio button and enter the page range that you want to export.
- (Optional) To change the size and resolution of your exported images, enter a new width or height value or type your desired resolution. These three settings are constrained so, for example, changing the width automatically adjusts the height to maintain the image’s aspect ratio.
- (Optional) By default, your exported images open in your default image viewer. Deselect the Show Export in Image Viewer checkbox if you don’t want to open the images in this program.
- Click the OK button.
- Back in the export dialog box, click the Save button. The images are exported to the location you selected in Step 3.
Creating a PDF of your document
When you export a PDF of a document, LayOut creates a single PDF file that contains your document pages. To export your document as a PDF, follow these steps, which reflect the selected operating system:
- From the menu bar, select File > Export > PDF. The Export PDF dialog box appears, and the PDF format is already selected in the Save As Type drop-down list.
- Navigate to the location where you want to save the PDF.
- In the File Name box, type a name for the file.
- Click the Save button. The PDF Export Options dialog box appears, as shown in the following figure.
- (Optional) The location and filename in the Export File field reflect the location you chose in Step 2. If you change your mind, click the Choose button and select a new location.
- (Optional) By default, LayOut includes all the pages in your document in the PDF. To specify a page range instead, select the From/To radio button and type the page numbers for your desired page range.
- (Optional) To change the quality for rendering models and images in your exported PDF, select an option from the Output QualityOutput Resolution drop-down list.
- (Optional) A great way to reduce the file size of the resulting PDF is to compress images in your LayOut document. Select the Use JPEG Compression for Images option and move the slider to Smaller File to reduce the quality of the images and reduce the file size as well. For a higher quality image, however, move the quality slider to Better Quality.
- (Optional) By default, LayOut creates a PDF layer that corresponds to each layer in your document. If you don’t want LayOut to create these layers, deselect the Create PDF Layers from LayOut Layers checkbox.
- (Optional) By default, LayOut displays the exported PDF file in your system’s PDF viewer, such as Adobe Reader. If you don’t want LayOut to open the file for you, deselect the Show Export in PDF Viewer checkbox.
- Click Export, and LayOut creates the PDF in the location you specified in Step 2.
- From the menu bar, select File > Export. An export dialog box appears.
- In the Save As box, type a name for the PDF file.
- Navigate to the location where you want to save your images.
- From the Format drop-down list, select PDF.
- Click the Options button. The PDF Export Options dialog box appears, as shown in the following figure.
- (Optional) In the Pages area, select whether you want to export all the document pages (the default) or just a page range. To print a page range, select the From/To radio button and enter the page range that you want to export.
- (Optional) To change the quality for rendering models and images in your exported PDF, select an option from the Output QualityOutput Resolution drop-down list.
- (Optional) A great way to reduce the file size of the resulting PDF is to compress images in your LayOut document. Select the Use JPEG Compression for Images option and move the slider to Smaller File to reduce the quality of the images and reduce the file size as well. For a higher quality image, however, move the quality slider to Better Quality.
- (Optional) By default, your exported images open in your default image viewer. Deselect the Show Export in PDF Viewer checkbox if you don’t want to open the images in this program.
- Click the OK button.
- Back in the export dialog box, click the Save button. The images are exported to the location you selected in Step 3.
Exporting a document to DWG or DXF format
DWG and DXF are file formats that open in popular CAD programs. To export a document to one of these formats, follow these steps, which reflect your selected operating system:
- From the menu bar, select File > Export > DWG/DXF. The Export DWG/DXF dialog box appears.
- Navigate to the location where you want to save the file.
- In the File Name box, type a name for the file.
- In the Save As Type drop-down list, select DWG or DXF.
- Click the Save button. The DWG/DXF Export dialog box appears, as shown in the following figure.
- (Optional) The location and filename in the Export File field reflect the location you chose in Step 2. If you change your mind, click the Choose button and select a new location.
- (Optional) In the Format area, from the drop-down list, select the version of AutoCAD in which the file will be opened. The file format (DWG or DXF) reflects the option you selected in Step 4, and you can change that here if you like.
- (Optional) By default, LayOut includes all the pages in your document in the exported file. To specify a page range instead, select the From/To radio button and type the page numbers for your desired page range.
- (Optional) In the Output Space area, Paper Space is selected by default, which exports the file for 2D paper space. Select the Model Space radio button if you intend to use the exported file in 3D model space. When Model Space is selected, you can set a scale from the Scale drop-down list. See Editing a SketchUp Model’s View and Style Settings in LayOut for details about your scale options.
- (Optional) By default, LayOut creates a DWG/DXF layer that corresponds to each layer in your document. If you don’t want LayOut to create these layers, deselect the Create DWG/DXF Layers from LayOut Layers checkbox.
- (Optional) By default, LayOut exports hidden layers (also known as invisible layers) to your DWG or DXF file. If you don’t want LayOut to export these layers, deselect the Export Invisible Layers checkbox.
- (Optional) LayOut does not include any fills that your document contains in the exported file. Deselect the Ignore Fills checkbox if you want those fills in your exported file.
- Click Export, and LayOut creates the DWG or DXF file in the location you specified in Step 2.
- From the menu bar, select File > Export > DWG/DXF. The Export DWG/DXF dialog box appears.
- Navigate to the location where you want to save the file.
- In the File Name box, type a name for the file.
- In the Save As Type drop-down list, select DWG or DXF.
- Click the Save button. The DWG/DXF Export dialog box appears, as shown in the following figure.
- (Optional) In the Format area, from the drop-down list, select the version of AutoCAD in which the file will be opened. The file format (DWG or DXF) reflects the option you selected in Step 4, and you can change that here if you like.
- (Optional) By default, LayOut includes all the pages in your document in the exported file. To specify a page range instead, select the From/To radio button and type the page numbers for your desired page range.
- (Optional) By default, LayOut creates a DWG/DXF layer that corresponds to each layer in your document. If you don’t want LayOut to create these layers, clear the Create DWG/DXF Layers from LayOut Layers checkbox.
- (Optional) By default, LayOut exports hidden layers (also known as invisible layers) to your DWG or DXF file. If you don’t want LayOut to export these layers, clear the Export Invisible Layers checkbox.
- From the menu bar, select File > Export. An export dialog box appears.
- In the Save As box, type a name for the DWG or DXF file.
- Navigate to the location where you want to save your images.
- From the Format drop-down list, select DWG/DXF.
- Click the Options button. The DWG/DXF Export Options dialog box appears, as shown in the following figure.
- (Optional) By default, LayOut includes all the pages in your document in the exported file. To specify a page range instead, select the From/To radio button and type the page numbers for your desired page range.
- (Optional) In the Format area, select the DWG or DXF radio button to indicate which file type you wish to export. From the drop-down list, select the version of AutoCAD in which the file will be opened.
- (Optional) In the Output Space area, Paper Space is selected by default, which exports the file for 2D paper space. Select the Model Space radio button if you intend to use the exported file in 3D model space. When Model Space is selected, you can set a scale from the Scale drop-down list. If you select Custom from the drop-down list, you can define a scale in the Custom Scale box. See Editing a SketchUp Model’s View and Style Settings in LayOut for more details about your scale options.
- (Optional) By default, LayOut exports invisible layers to your DWG or DXF file. If you don’t want LayOut to export these layers, deselect the Export Invisible Layers checkbox.
- (Optional) By default, LayOut creates a DWG/DXF layer that corresponds to each layer in your document. If you don’t want LayOut to create these layers, deselect the Create DWG/DXF Layers from LayOut Layers checkbox.
- (Optional) LayOut does not include any fills that your document contains in the exported file. Deselect the Ignore Fills checkbox if you want those fills in your exported file.
- Click OK when you’re done selecting your options.
- Click Save, and LayOut creates the exported file in the location you selected in Step 3.
Printing your document
The great German philosopher, Friedrich Nietzsche, once said, “Print is dead.” Or something like that. (Beware the accuracy of quotes you find on the Internet.) Regardless, people stopped heralding the advent of the paperless office years ago. Printouts still have a place and a purpose in this world. If you have such a purpose for your LayOut document, this section guides you through the printing process.
Whether you use LayOut for Microsoft Windows or Mac OS X, the basic printing process is the same:
- Select File > Page Setup to check your page setup options.
- Preview your printout.
- Select File > Print to select your final print options and send your presentation to the printer.
However, the specific steps vary between Microsoft Windows and Mac OS X. In the following steps, you walk through the whole detailed printing process for the selected operating system: