Как в канву загрузить пдф файл
Canva, неактивна кнопка “Скачать”. РЕШЕНО
19.09.22 обнаружил, что Canva не дает скачать даже эскиз презентации в РФ.
Зайти в Canva через VPN
Далее кликнуть на кнопку “Поделиться”
После нажать на “Скачать”
На этом шаге мы видим, что кнопка “Скачать” не кликабельна.
Открывает в Google Chrome кликаем правой кнопкой по неактивной кнопке скачать и выбираем “Показать код”
После кликаем по значку инспектора и наведя на кнопку “Скачать” делаем клик
В инспекторе кода раскрываем элемент DIV, которые у нас выбрался после предыдущего шага.
Дважды кликаем по disabled и выбрав “disabled” удаляем его.
Нажимаем Enter
Теперь кнопка хоть и не подсвечивается, но она стала кликабельной.
Кликаем и появляется возможность скачать, как эскиз, так и платную версию без водяных знаков.
How to Upload a PDF to Canva
These days, we deal with a lot of different types of media files. JPEG, PNG, TIFF, MOV, SVG, and yes, PDF. If you know and love Canva the way that I do, you’ll be happy to know that you can upload PDFs to the platform and use them for your designs.
To upload a PDF to Canva, drag and drop it onto your Canva homepage. This will import your PDF file as a new design in Canva. All of the elements and text within your PDF will be editable independently from each other within Canva .
If you’ve used Canva for a while, you’re probably thrilled that it now allows for PDF uploads. For a long time, this wasn’t the case. In order to upload PDFs to Canva, you had to convert them to image files first. Not anymore!
You can now upload PDFs to the homepage of your Canva account. We’ll talk about how to do this, as well as why PDF files can only be uploaded to your homepage.
Here’s how to upload PDFs to Canva, step-by-step:
1. Navigate to your Canva homepage.
You need to be on your account’s homepage, NOT within a design. This is important because Canva doesn’t currently support uploading a PDF into an already created design. We’ll talk about that later in this article.
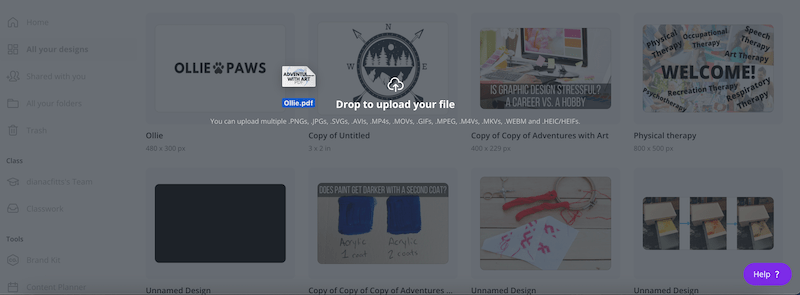
2. Drag and drop your PDF into your Canva homepage OR create a new design and choose to import your PDF file.
Your first option is to drag and drop your PDF file onto the homepage of your Canva account. Plop it anywhere you please.

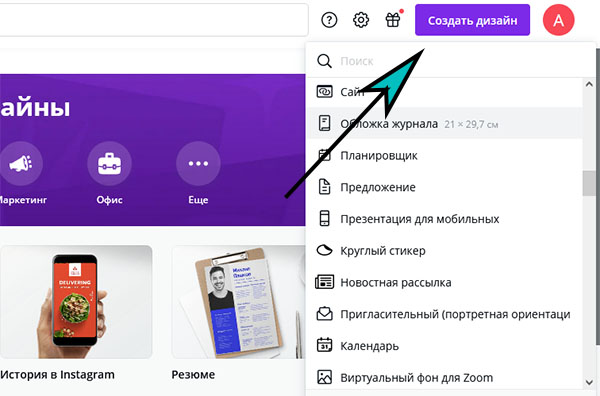
Alternatively, Click the big purple button to create a design and choose the option to upload a file. Find your PDF file and upload it.

3. Use your PDF as a new design.
When you upload a PDF, it will create a new design. If everything has gone correctly, your images, elements, and text should all be editable and independent from one another.
This is neat because, instead of a static image, your PDF will import in a way that lets you manipulate it and create a new design from it.
This is fantastic if you plan to create a new design from the PDF you upload to Canva.
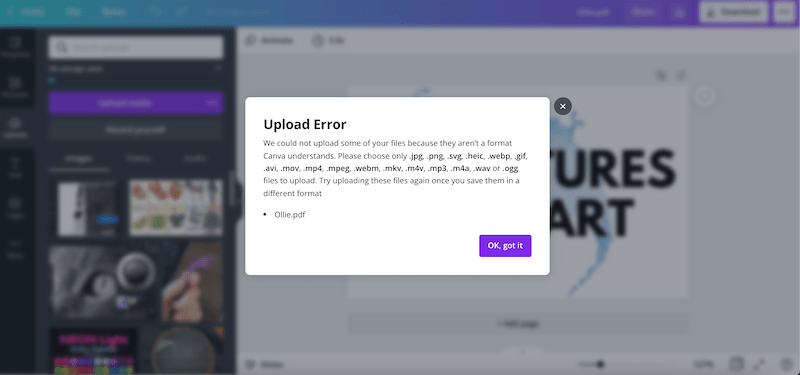
This is NOT so fantastic if you need to add a PDF to an existing Canva design. If you try to drag and drop your PDF into your media library within an existing design, you will get an error message.

Ideally, you’ll want to create a new Canva design based on the PDF file you import from your homepage. This is the easiest way to go about things, even if you have to copy and paste some elements from one Canva design to another.
This is because PDFs you upload to Canva are editable. All of the elements, text, and images are separated from each other and can be manipulated separately from each other.
With the the workaround we’ll talk about now, this isn’t the case. But, if you really need to upload a PDF to an existing design, and/or you don’t need to edit the PDF a lot, here’s what you can do.
If you need to upload a PDF to an existing Canva design, you’ll need to convert it to a file type that Canva supports within their designs.
- JPEG, PNG, HEIC, and WebP images under 25MB each and under 100 million pixels total
- SVG images under 3MB each, between 150 to 200 pixels wide, and saved as “SVG 1.1”
- MOV, GIF, MP4, MPEG, MKV, or WEBM files under 1GB
- M4A, MP3, OGG, WAV, or WEBM files under 250 MB
- fonts in formats .otf, .ttf, and .woff
There are additional specifications and requirements for files aside from JPEGs and PNGs, so be sure to review Canva’s guidelines here. Familiarizing yourself with Canva’s file guidelines can save you a lot of time and headache wondering what’s going wrong when you try to upload an obscure file.
Check out more from Adventures with Art!
If you need to upload a PDF to a current Canva design, you’ll want to convert your it to a compatible file type. The ones that make the most sense in this case are JPEG and PNG files.
Before we dive into the conversion process, let’s talk about whether you should choose a JPEG or a PNG based on the quality you’re looking for.
Which is better quality JPEG or PNG?
JPEGs use lossy compression and PNGs use lossless compression.
Lossy compression removes parts from the image that are supposed to be undetectable to the human eye. That said, the more that the image is compressed, the more you can see the flaws. It can also lead to reconstruction errors when imported into a new program.
Lossless compression doesn’t remove anything from the image as it compresse it, which means that the quality is usually higher than those that use lossy compression. It also reduces the risks of errors (source).
Given that PNGs use lossless compression, they’re a higher quality and more reliable choice.
Note: due to the compression methods, PNGs tend to be larger than JPEGs. The lossless compression used with PNGs doesn’t remove as much information as the lossy compression method used with JPEGs. If file size is a concern, you want to keep this in mind.
I will almost always choose PNGs or JPEGs for the reasons above. That said, JPEGs wouldn’t have become such a popular image choice if they were absolute trash. No, JPEGs are great. Most of the time, you won’t even notice the differences between a PNG and a JPEG.
But, because we’re talking about design, it’s good to go with the highest quality choice, which is PNG.
Ok, now that we’ve geeked out about image compression, let’s get back to uploading our PDF into Canva.
Check out more from Adventures with Art!
How to Convert a PDF into a PNG
1. Use a file converter
The first step to this process of uploading your PDF to Canva is converting your PDF into a PNG. For this process, simply Google “PDF to PNG converter” and you’ll have an entire list of great options to choose from. Zamzar is one that will appear near the top that I normally use.
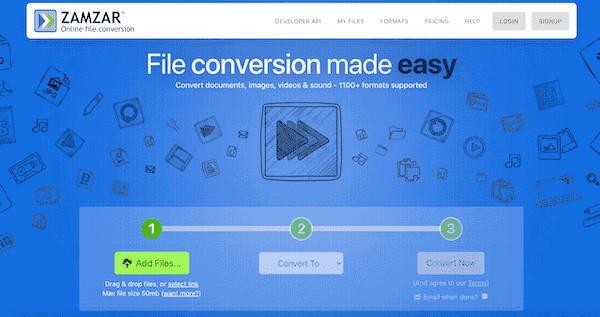
Here’s Zamzar’s dashboard. Nice and easy to use!
As you’ll notice, most of these programs give you the option to convert your PDF into any number of formats, so this is where you can decide where you fall on the JPEG vs. PNG debate.
Simply pick one of the PDF to PNG converters listed in Google, upload your PDF into it, wait for the conversion to take place, and download the PNG it spits out.
2. Drag your new PNG into Canva
Now that your PDF has been converted into a PNG, it’s compatible with Canva’s in-design media library and ready to use.
Drag and drop your PNG into your design and create your design as you normally would.
3. Download your design as needed
When you’re done with your design, it’s time to download it in whatever file type you’ll need to use. If you want to turn your design back into a PDF, I suggest using the print ready setting. This will give you the highest quality PDF version of your design.
If you need an image file, you’ve guessed it, download it as a PNG.
Important note: when you upload a PDF into Canva via your homepage as a new design, it is editable. All of the elements and text are independent of each other and can be edited as any other design would.
When you convert a PDF into an image, it is a static image, which means the elements and text are not independent from each other and can’t be edited.
There you have it. Even though Canva doesn’t allow you to upload PDF files directly into your existing designs, the workaround is pretty quick and easy. Before we close out, here are a few things to keep in mind.

Check out more from Adventures with Art!
Will converting a PDF to a PNG mess anything up?
Whenever you convert a file from one format to another, you’re at risk of something going wrong. Basically, the more moving pieces you have, the more chances there are that something will get jammed. When you do your conversion, there’s a chance of some quality loss or a bigger glitch.
Just make sure to check your files every step of the way and you’ll be totally fine.
Can I upload a Word document or other text document to Canva?
If you have Word documents or other types of text documents, save them as PDFs and then upload it to your Canva homepage.
Sometimes, we get word documents that are full of pictures. That’ll work. But, if your word documents are actually full of words. You’ll be much better off copying and pasting them into Canva’s text feature instead of turning them into an image. Turning a long string of words into an image is a recipe for squashed, distorted, and weirdly positioned text.
What if the PDF has multiple pages?
Canva can accept PDF files up to 100 pages.
Can I edit my PDF in Canva?
If you upload a PDF into Canva as a new design, all of the text and elements will be separated from each other and can all be edited separately.
That said, this is NOT true for scanned documents. If your PDF is a scanned document, it will appear as a static image.
You also may struggle to edit colors. This is dependent on the PDF you upload.
Lastly, fonts may appear differently when you upload a PDF into Canva. Canva does it’s best to match fonts, but if your PDF uses fonts that Canva doesn’t have, it can’t always match them 100%.
Do I need Canva Pro to work with PDFs in Canva?
You can upload PDFs with the free version of Canva. There’s no reason to upgrade to Canva Pro for that feature.
That said, I’m a HUGE fan of Canva Pro and wouldn’t use Canva without it. Canva Pro has a lot of amazing capabilities including:
- Resizing documents
- Removing the backgrounds of images + other great effects
- Access to a customizable brand library
- 60,000+ free templates to use for your designs
- 60+ million stock images, graphics, and videos
- Ability to upload your own fonts
Canva Pro is a huge step up from the free version. If you want to learn more, check out my reasons for why Canva Pro is worth the money. Or, click HERE or the banner to get a free trial of Canva Pro and check it out for yourself, risk free.
Canva is a great design software, that can now work with PDFs! Simply drag and drop them into your homepage and start designing. If you need your PDFs to be added to an existing design, with a simple conversion, we can turn PDFs into images that work seamlessly with Canva. Simple as that. Happy designing!

Diana has been an artist for over 25 years and has training in drawing, painting, digital drawing and graphic design. Diana’s latest obsession is digitally drawing with Procreate and creating t-shirt designs with Canva. Diana has experience selling her art across a number of platforms and loves helping other artists learn how to make money from their art as well.
Как сохранить Canva в формате PDF на Android

Canva — это мощный инструмент для создания таких работ, как плакаты, публикации в Instagram и т. Д. Мы лично используем его для создания интересных изображений, которые вы видите в наших сообщениях в блоге. У Canva есть собственное приложение для таких пользователей Android, как вы, которое поддерживает большинство функций Canva, которые есть на ПК.
В этой статье мы расскажем, как сохранить Canva в формате PDF на Android. Итак, следуйте инструкциям, описанным в руководстве, и загрузите или сохраните Canva в формате PDF на свои устройства Android.
Как сохранить Canva в формате PDF на Android
Чтобы сохранить Canva в формате PDF на Android, вам необходимо выполнить следующие действия:
Шаг 1. Установите и откройте приложение Canva на Android.
Прежде всего, установите и откройте приложение Canva на своем устройстве Android. Вы можете установить приложение из Play Store.

Шаг 2. Создайте или откройте существующий проект Canva
Вам необходимо создать или открыть существующий проект Canva в приложении Canva для Android.

Шаг 3: Нажмите на опцию экспорта
На странице проекта Canva вы получите возможность экспортировать проект в правом верхнем углу. Это поможет вам экспортировать ваш проект, щелкните по нему.

Шаг 4. Выберите «Сохранить как PDF».
В разделе экспорта вам нужно нажать «Сохранить как», а затем выбрать PDF в разделе «Тип файла».


Шаг 5. Выберите страницы и сохраните Canva как PDF.
Теперь в разделе «Сохранить как PDF» вам нужно выбрать страницы, которые вы хотите включить в файл PDF, по умолчанию Canva включает все страницы. Выбрав страницы, нажмите «Загрузить», чтобы сохранить Canva в формате PDF.

После нажатия кнопки «Загрузить» Canva сохранится в формате PDF на устройстве Android. Вы можете получить доступ к файлу PDF в папке Canva во внутреннем хранилище.
Мы надеемся, что это руководство помогло вам, поделитесь им в социальных сетях. Задайте свои вопросы в разделе комментариев ниже, мы вам ответим.
Как в канву загрузить пдф файл
Completing the CAPTCHA proves you are a human and gives you temporary access to the web property.
What can I do to prevent this in the future?
If you are on a personal connection, like at home, you can run an anti-virus scan on your device to make sure it is not infected with malware.
If you are at an office or shared network, you can ask the network administrator to run a scan across the network looking for misconfigured or infected devices.
Another way to prevent getting this page in the future is to use Privacy Pass. You may need to download version 2.0 now from the Chrome Web Store.
Cloudflare Ray ID: 71ad808cfd656934 • Your IP : 82.102.23.104 • Performance & security by Cloudflare
Инструкция по работе с Canva
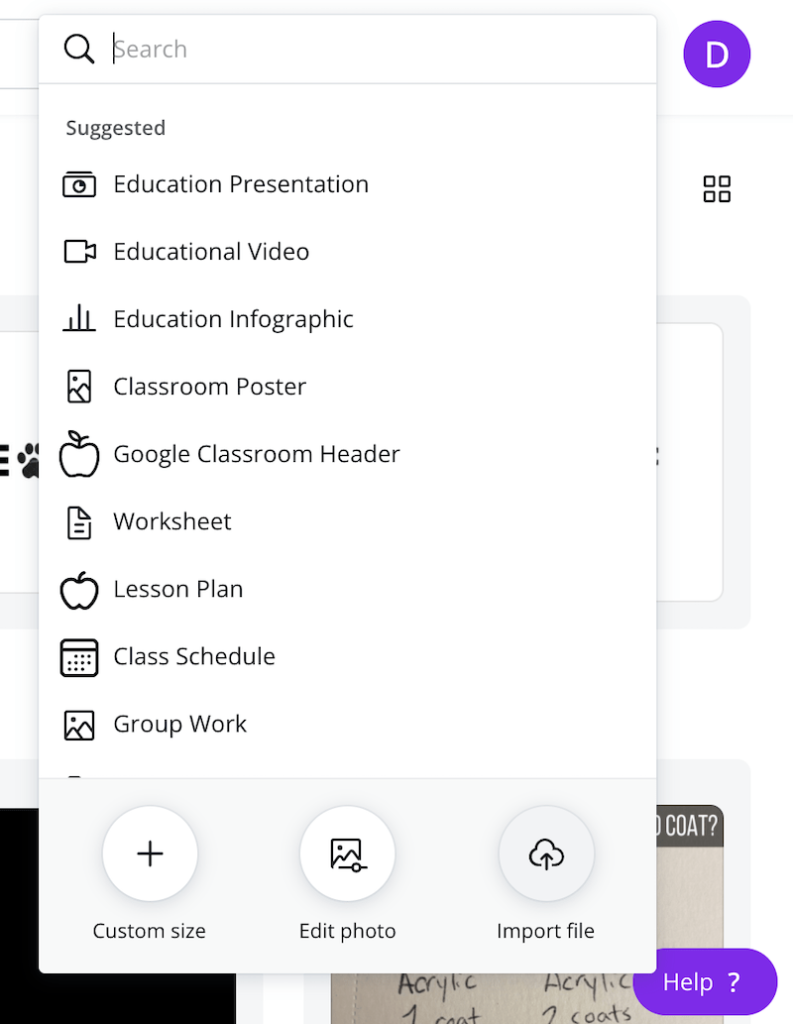
- Выберите в меню пункт Загрузки.
- Нажмите на кнопку Загрузить медиа.
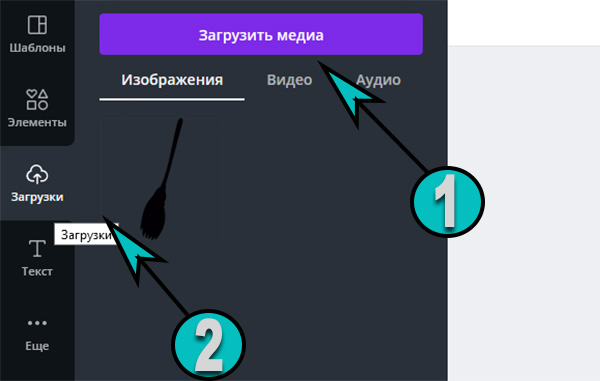
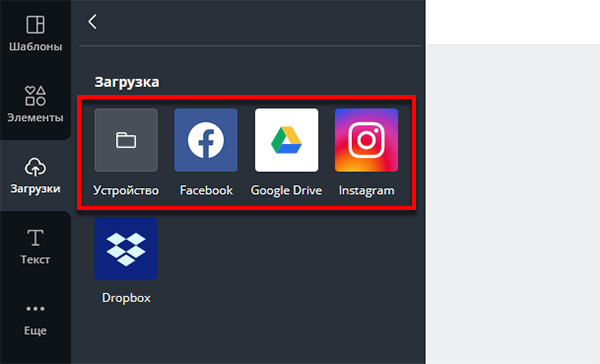
- Выберите источник картинки. Это может быть Гугл диск, Dropbox, соцсести или память вашего телефона или компьютера.
Изменить размер графики в Canva
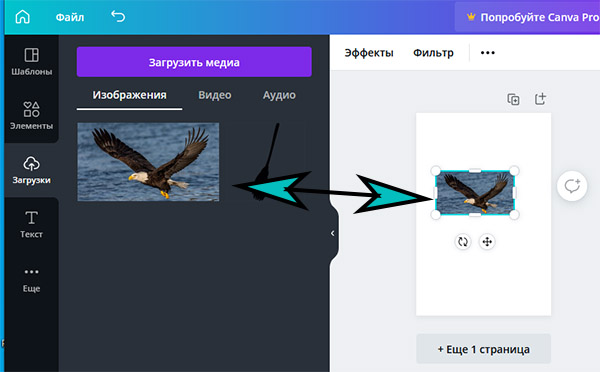
В редакторе можно добавлять свои фото и те, что предлагает онлайн-сервис. За счёт того, что каждый добавленный элемент ведёт себя как слой, мы можем в любое время изменить его размер. При наведении курсора на картинку её области подсвечиваются. 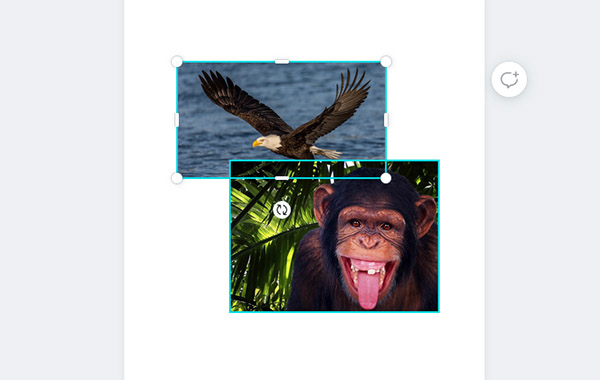 И мы можем с ней работать. Выберите один из углов картинки и потяните в нужном направлении.
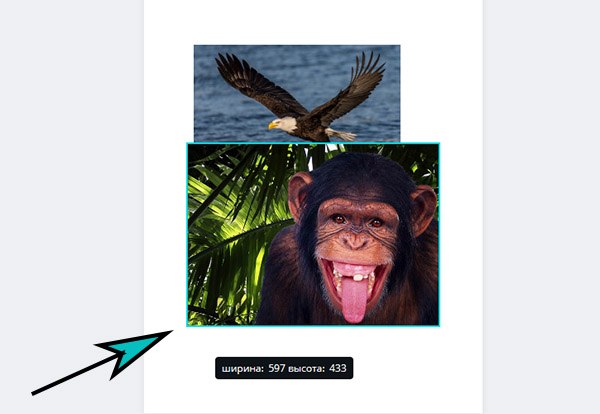
Размер самой рабочей области изменяется только после покупки подписки. Об этом говорит кнопка в верхней части панели. 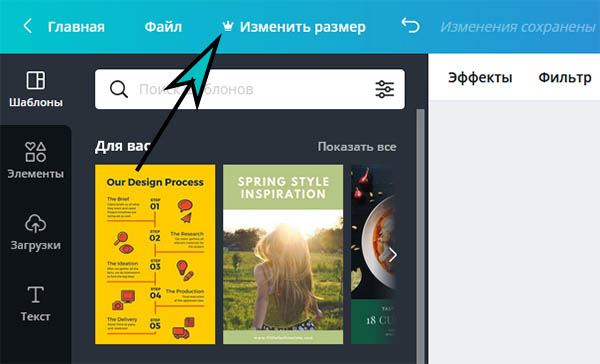 Если не подходит формат холста, выберите другой, например, портфолио, обложка, буклет. Посмотреть размер выбранного шаблона можно вверху с названием графики.
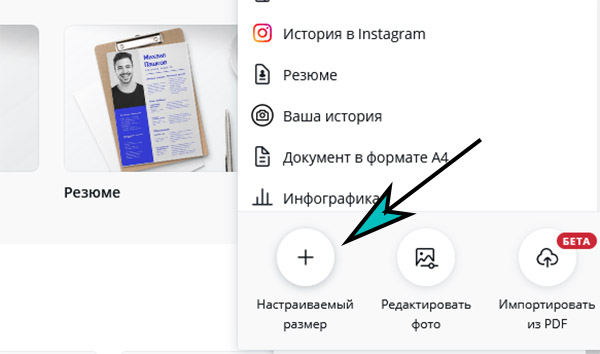
- На главном экране выберите кнопку Создать дизайн.
- В списке выберите календарь.

- В меню слева выберите подходящий шаблон, где таблица будет представлена в лучшем виде.
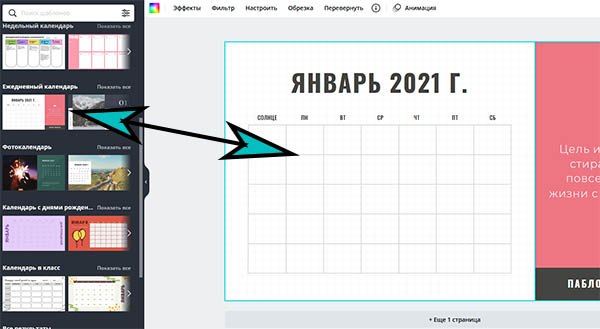
- Каждая из них является набором изменяющихся блоков. Уберите всё, что вам не нужно. К примеру, описание и подсказки, числа и прочее. Наведите курсорм мыши на лишний блок, нажмите ПКМ и выберите Удалить. При помощи инструмента Текст добавьте свои данные в ячейки. При необходимости увеличьте всю таблицу.
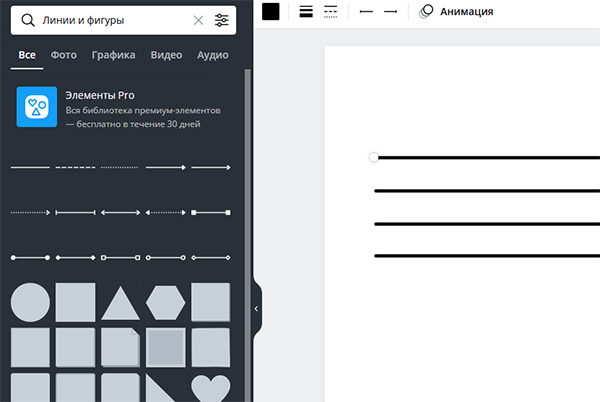
Функция удаления фона в Canva предоставляется по подписке и расположена в Эффектах. 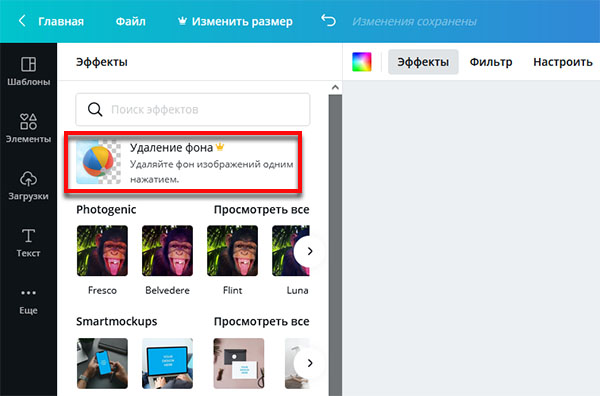 Вместо неё бесплатно можно применять инструмент Прозрачность.
 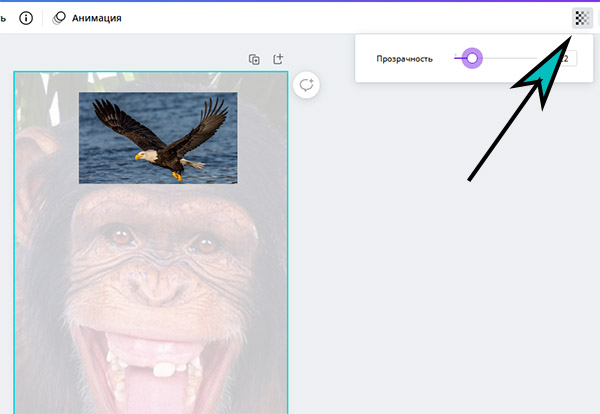 Найдите его в верхней части редактора выше холста. Он появится, если выбрать один из добавленных слоёв. Добавьте картинке прозрачности или уберите её и сохраните в формате PNG.
How to Upload a PDF to Canva
These days, we deal with a lot of different types of media files. JPEG, PNG, TIFF, MOV, SVG, and yes, PDF. If you know and love Canva the way that I do, you’ll be happy to know that you can upload PDFs to the platform and use them for your designs.
To upload a PDF to Canva, drag and drop it onto your Canva homepage. This will import your PDF file as a new design in Canva. All of the elements and text within your PDF will be editable independently from each other within Canva .
If you’ve used Canva for a while, you’re probably thrilled that it now allows for PDF uploads. For a long time, this wasn’t the case. In order to upload PDFs to Canva, you had to convert them to image files first. Not anymore!
You can now upload PDFs to the homepage of your Canva account. We’ll talk about how to do this, as well as why PDF files can only be uploaded to your homepage.
Here’s how to upload PDFs to Canva, step-by-step:
1. Navigate to your Canva homepage.
You need to be on your account’s homepage, NOT within a design. This is important because Canva doesn’t currently support uploading a PDF into an already created design. We’ll talk about that later in this article.
2. Drag and drop your PDF into your Canva homepage OR create a new design and choose to import your PDF file.
Your first option is to drag and drop your PDF file onto the homepage of your Canva account. Plop it anywhere you please.
Alternatively, Click the big purple button to create a design and choose the option to upload a file. Find your PDF file and upload it.
3. Use your PDF as a new design.
When you upload a PDF, it will create a new design. If everything has gone correctly, your images, elements, and text should all be editable and independent from one another.
This is neat because, instead of a static image, your PDF will import in a way that lets you manipulate it and create a new design from it.
This is fantastic if you plan to create a new design from the PDF you upload to Canva.
This is NOT so fantastic if you need to add a PDF to an existing Canva design. If you try to drag and drop your PDF into your media library within an existing design, you will get an error message.
Ideally, you’ll want to create a new Canva design based on the PDF file you import from your homepage. This is the easiest way to go about things, even if you have to copy and paste some elements from one Canva design to another.
This is because PDFs you upload to Canva are editable. All of the elements, text, and images are separated from each other and can be manipulated separately from each other.
With the the workaround we’ll talk about now, this isn’t the case. But, if you really need to upload a PDF to an existing design, and/or you don’t need to edit the PDF a lot, here’s what you can do.
If you need to upload a PDF to an existing Canva design, you’ll need to convert it to a file type that Canva supports within their designs.
- JPEG, PNG, HEIC, and WebP images under 25MB each and under 100 million pixels total
- SVG images under 3MB each, between 150 to 200 pixels wide, and saved as “SVG 1.1”
- MOV, GIF, MP4, MPEG, MKV, or WEBM files under 1GB
- M4A, MP3, OGG, WAV, or WEBM files under 250 MB
- fonts in formats .otf, .ttf, and .woff
There are additional specifications and requirements for files aside from JPEGs and PNGs, so be sure to review Canva’s guidelines here. Familiarizing yourself with Canva’s file guidelines can save you a lot of time and headache wondering what’s going wrong when you try to upload an obscure file.
Check out more from Adventures with Art!
If you need to upload a PDF to a current Canva design, you’ll want to convert your it to a compatible file type. The ones that make the most sense in this case are JPEG and PNG files.
Before we dive into the conversion process, let’s talk about whether you should choose a JPEG or a PNG based on the quality you’re looking for.
Which is better quality JPEG or PNG?
JPEGs use lossy compression and PNGs use lossless compression.
Lossy compression removes parts from the image that are supposed to be undetectable to the human eye. That said, the more that the image is compressed, the more you can see the flaws. It can also lead to reconstruction errors when imported into a new program.
Lossless compression doesn’t remove anything from the image as it compresse it, which means that the quality is usually higher than those that use lossy compression. It also reduces the risks of errors (source).
Given that PNGs use lossless compression, they’re a higher quality and more reliable choice.
Note: due to the compression methods, PNGs tend to be larger than JPEGs. The lossless compression used with PNGs doesn’t remove as much information as the lossy compression method used with JPEGs. If file size is a concern, you want to keep this in mind.
I will almost always choose PNGs or JPEGs for the reasons above. That said, JPEGs wouldn’t have become such a popular image choice if they were absolute trash. No, JPEGs are great. Most of the time, you won’t even notice the differences between a PNG and a JPEG.
But, because we’re talking about design, it’s good to go with the highest quality choice, which is PNG.
Ok, now that we’ve geeked out about image compression, let’s get back to uploading our PDF into Canva.
Check out more from Adventures with Art!
How to Convert a PDF into a PNG
1. Use a file converter
The first step to this process of uploading your PDF to Canva is converting your PDF into a PNG. For this process, simply Google “PDF to PNG converter” and you’ll have an entire list of great options to choose from. Zamzar is one that will appear near the top that I normally use.
Here’s Zamzar’s dashboard. Nice and easy to use!
As you’ll notice, most of these programs give you the option to convert your PDF into any number of formats, so this is where you can decide where you fall on the JPEG vs. PNG debate.
Simply pick one of the PDF to PNG converters listed in Google, upload your PDF into it, wait for the conversion to take place, and download the PNG it spits out.
2. Drag your new PNG into Canva
Now that your PDF has been converted into a PNG, it’s compatible with Canva’s in-design media library and ready to use.
Drag and drop your PNG into your design and create your design as you normally would.
3. Download your design as needed
When you’re done with your design, it’s time to download it in whatever file type you’ll need to use. If you want to turn your design back into a PDF, I suggest using the print ready setting. This will give you the highest quality PDF version of your design.
If you need an image file, you’ve guessed it, download it as a PNG.
Important note: when you upload a PDF into Canva via your homepage as a new design, it is editable. All of the elements and text are independent of each other and can be edited as any other design would.
When you convert a PDF into an image, it is a static image, which means the elements and text are not independent from each other and can’t be edited.
There you have it. Even though Canva doesn’t allow you to upload PDF files directly into your existing designs, the workaround is pretty quick and easy. Before we close out, here are a few things to keep in mind.
Check out more from Adventures with Art!
Will converting a PDF to a PNG mess anything up?
Whenever you convert a file from one format to another, you’re at risk of something going wrong. Basically, the more moving pieces you have, the more chances there are that something will get jammed. When you do your conversion, there’s a chance of some quality loss or a bigger glitch.
Just make sure to check your files every step of the way and you’ll be totally fine.
Can I upload a Word document or other text document to Canva?
If you have Word documents or other types of text documents, save them as PDFs and then upload it to your Canva homepage.
Sometimes, we get word documents that are full of pictures. That’ll work. But, if your word documents are actually full of words. You’ll be much better off copying and pasting them into Canva’s text feature instead of turning them into an image. Turning a long string of words into an image is a recipe for squashed, distorted, and weirdly positioned text.
What if the PDF has multiple pages?
Canva can accept PDF files up to 100 pages.
Can I edit my PDF in Canva?
If you upload a PDF into Canva as a new design, all of the text and elements will be separated from each other and can all be edited separately.
That said, this is NOT true for scanned documents. If your PDF is a scanned document, it will appear as a static image.
You also may struggle to edit colors. This is dependent on the PDF you upload.
Lastly, fonts may appear differently when you upload a PDF into Canva. Canva does it’s best to match fonts, but if your PDF uses fonts that Canva doesn’t have, it can’t always match them 100%.
Do I need Canva Pro to work with PDFs in Canva?
You can upload PDFs with the free version of Canva. There’s no reason to upgrade to Canva Pro for that feature.
That said, I’m a HUGE fan of Canva Pro and wouldn’t use Canva without it. Canva Pro has a lot of amazing capabilities including:
- Resizing documents
- Removing the backgrounds of images + other great effects
- Access to a customizable brand library
- 60,000+ free templates to use for your designs
- 60+ million stock images, graphics, and videos
- Ability to upload your own fonts
Canva Pro is a huge step up from the free version. If you want to learn more, check out my reasons for why Canva Pro is worth the money. Or, click HERE or the banner to get a free trial of Canva Pro and check it out for yourself, risk free.
Canva is a great design software, that can now work with PDFs! Simply drag and drop them into your homepage and start designing. If you need your PDFs to be added to an existing design, with a simple conversion, we can turn PDFs into images that work seamlessly with Canva. Simple as that. Happy designing!
Diana has been an artist for over 26 years and has training in drawing, painting, digital drawing and graphic design. Diana’s latest obsession is digitally drawing with Procreate and creating t-shirt designs with Canva. Diana has experience selling her art across a number of platforms and loves helping other artists learn how to make money from their art as well.
Как отредактировать резюме Canva PDF?

Как сохранить свое резюме в Canva? Чтобы создать резюме с помощью Canva, просто зайдите на веб-сайт, затем перейдите в раздел «Шаблоны», расположенный рядом с «Главной» в левом верхнем углу страницы вашего браузера. Отображаются шесть категорий: «Социальные сети», «Для вас». «, «Бизнес», «Маркетинг», «Образование» и «Новое».
Как отредактировать резюме в формате PDF? Откройте файл в Acrobat Щелкните инструмент «Редактировать PDF-файл» на правой панели. Используйте инструменты редактирования Acrobat: добавьте или отредактируйте текст или обновите шрифты, используя параметры в списке «Формат».
На самом деле, как зарегистрировать свое резюме на Canva?
Как импортировать PDF в Word?
КОММЕНТАРИЙ вставить PDF в Word — с Майкрософт Word :
- Открыть документ Word в который вы хотите вставить свой PDF
- Щелкните Вставить> Объект…> Это устройство…
- Выберите файл PDF в появившемся маленьком окне и нажмите «Вставить»
- Та-да! Ваш PDF теперь внутри вашего документа Word
Как импортировать документы?
Импорт и конвертировать существующие файлы
- Перейти на Диск
- Нажмите на New
- Выберите нужный файл импортер с вашего компьютера на Диск
- В окне» Импорт завершено», нажмите «Показать местоположение файла».
- Щелкните файл правой кнопкой мыши и выберите «Открыть с помощью».
Как преобразовать файл PDF в файл Word?
Конвертировать файлы PDF в документах Word
- Откройте Acrobat Выберите PDF файл , затем щелкните инструмент экспорта PDF файл в правой панели
- Преобразовать это Fichier
- Нажмите на Экспорт
- Зарегистрируйте свой новый Файл Word
Как сохранить презентацию в Canva?
После того, как вы закончите разработку презентации, возьмите тезисы и нажмите «Представить и сохранить» в правом верхнем углу редактора. Вы также можете найти эту опцию в трехточечном меню на этой стороне экрана.
Как сохранить в Canva бесплатно?
Перейдите на вкладку «Загрузки» в меню и нажмите «Записать себя» в браузере или «Сделать фото или видео» в приложении Canva.
Почему Canva не сохраняет?
Если изменения, которые вы внесли в свой дизайн, не сохраняются, это может быть связано с использованием устаревшего браузера или приложения, прерывистым подключением к Интернету или повторяющимися проблемами на сайте.
Как создать PDF из фотографии?
Откройте папку, содержащую ваши изображения, и выберите снимки (если они не являются смежными, удерживайте клавишу Ctrl и щелкните по каждому из них). Затем вытащите меню «Создать», «Создать многостраничный файл». В списке, расположенном под кнопкой «Удалить», выберите «Размер». PDF и нажмите Создать
Как преобразовать изображение в PDF?
Распечатайте или сохранитеизображение в PDF в меню печати Вы также можете «распечатать»изображение В формате PDF если установлен Acrobat Pro, выберите Microsoft Print to Virtual Printer PDF в меню печати Windows иизображение затем будет выводиться в формате PDF
Как преобразовать изображение PNG в PDF?
Как конвертировать картинка PNG в PDF в линию :
- Откройте инструмент «Изображение» PDF (или JPEG в PDF )
- Загрузите свою фотографию PNG
- Настройте макет по своему усмотрению, прежде чем нажать «Создать». PDF Теперь «
- Вы можете продолжить изменять свой PDF если хочешь
Как конвертировать фото в PDF на мобильном телефоне?
Вам просто нужно использовать приложение Google Диск и устройство Фото Ваше устройство Ваш отсканированный документ хранится в формате PDF в квитанциях Drive Scan, клиентских файлах и других важных документах на ходу
Как отсканировать документ в формате PDF?
Ce документ объяснил комментарий оцифровать документ бумагу прямо на Формат PDF с Adobe Acrobat Pro
- Поместите документ для сканирования на стекле сканера
- Нажмите кнопку Windows ► Adobe Acrobat Pro
- Щелкните Файл ►Создать ►Файл PDF из сканер
Как сохранить качество изображения в PDF?
ФАЙЛ > Сохранить как > выбрать формат
Никакой предварительной регулировки перед вставкой изображений
- ФАЙЛ > Экспортировать как PDF .
- Во вкладке «Общие», в пункте « Фотографии «, установите флажок «Сжатие без потерь»
- Сравните вес PDF , и увеличьте свой изображение … исходное разрешение сохраняется
Как преобразовать файл PNG?
Как преобразовать изображение de PNG в формате JPG
- Выберите Выбрать из своей библиотеки фотографий изображение PNG чей размер меньше 2 Гб
- Конвертировать Загрузите свое изображение, чтобы автоматически преобразовать его в формат JPG в одно мгновение.
- Загрузка Новое изображение будет загружено как Fichier JPG
Как изменить документ в бесплатном PDF?
Самый простой и удобный способ легко и быстро изменить PDF-файл — воспользоваться одним из множества доступных онлайн-сервисов.Мы рекомендуем IlovePDF, так как он абсолютно бесплатный.
Как преобразовать файл JPG в PDF в Windows 7?
Щелкните правой кнопкой мыши один из выбранных файлов и выберите «Печать». Откроется встроенный в Windows мастер печати изображений, выберите Microsoft «Печать в PDF» (если его нет в списке, установите Adobe Reader DC)
jsPDF + canvas: экспорт в PDF многостраничной таблицы на русском языке
Генерация PDF… Эта тема не нова, однако порой можно столкнуться с некоторыми тонкостями, в итоге став на тернистый путь велосипедостроения. Сегодня я расскажу, как разрабатывал один такой велосипед.
Мне понадобилось сделать генерацию отчетов в PDF. По ряду причин я решил сделать это на стороне клиента. Беглый поиск предоставил мне выбор между jsPDF и pdfmake. Остановился на первом. А теперь подробнее…
Для начала хочу сказать, что хотя jsPDF и великолепная штука, документация этого проекта местами невменяемая,
что у человека психически неподготовленного вызывает желание ругаться нецензурным матом. Вспоминается документация Symfony: ее читаешь, а потом идешь гуглить с вопросом «а как?» (либо идешь в исходники).
Первый подводный камень, брошенный в мою сторону этой библиотекой, было отсутствие поддержки русского языка (и UTF-8 в целом, насколько мне удалось выяснить).
(pdfmake напротив — умеет работать с UTF-8, однако от использования этой библиотеки я вскоре отказался.)
После поиска и экспериментов решил использовать canvas для отрисовки. Однако здесь обнаружился второй подводный камень: canvas захватывает только текущий экран и моя огромная таблица сохранилась, как набор пустых листов ( а че, экономно).
Пришлось разбивать таблицу скриптом, заносить во временный контейнер, делать из него canvas и по новой. Вот, что получилось в итоге:
Отдельно хочу упомянуть формат PNG. Штука хорошая (насколько я знаю, он поддерживается старыми браузерами, в отличие от image/jpeg), но PDF утяжеляет в разы. Вдобавок на больших отчетах браузер гарантированно ляжет, конкретно у меня хром выбрасывал окно ошибки, а ФФ вообще укладывал себя и систему, поэтому спасала только кувалда.
Когда стал генерировать в JPEG, у меня получался афро черный фон. Оказалось, что прозрачность JPEG делает афро черным.
также, html2canvas, не умеет генерировать canvas из кода, поэтому нужно создавать какой-нибудь временный элемент. Плюс он не отрисовывает невидимые элементы. Где-то на stackoverflow советовали iframe, лично я добавил div с position:absolute и left:-9999, чтобы не мешал (правда, на планкере не получилось загнать за экран)
Также возникает сложность при нарезке таблицы: колонки разные. Я это вылечил, добавил следующий стиль:
Заключение: писать велосипеды — не всегда плохо. Нередко это помогает узнать что-то новое. Однако это не должно становиться привычкой, поэтому всегда нужно читать доки, хотя бы для того, чтобы слегка попсиховать.
Надеюсь, что эта статья кому-то поможет, а также надеюсь услышать ваши советы и идеи.