How to Install Java on Windows
The Java Development Kit (JDK) is software used for Java programming, along with the Java Virtual Machine (JVM) and the Java Runtime Environment (JRE). The JDK includes the compiler and class libraries, allowing developers to create Java programs executable by the JVM and JRE.
In this tutorial, you will learn to install the Java Development Kit on Windows.
- A system running Windows 10.
- A network connection.
- Administrator privileges.
Note: Develop your core app services on PNAP’s Bare Metal Cloud servers to ensure superior performance. It’s cloud native and the perfect environment for the entire SDLC.
Check if Java Is Installed
Before installing the Java Development Kit, check if a Java version is already installed on Windows. Follow the steps below:
- Open a command prompt by typing cmd in the search bar and press Enter.
- Run the following command:

The command outputs the Java version on your system. If Java isn’t installed, the output is a message stating that Java isn’t recognized as an internal or external command.
Note: If you need to set up Java on a different system, check out our tutorials for installing Java on Ubuntu, Fedora, Raspberry Pi, CentOS 8, and CentOS 7.
Download Java for Windows 10
Download the latest Java Development Kit installation file for Windows 10 to have the latest features and bug fixes.
- Using your preferred web browser, navigate to the Oracle Java Downloads page.
- On the Downloads page, click the x64 Installer download link under the Windows category. At the time of writing this article, Java version 17 is the latest long-term support Java version.
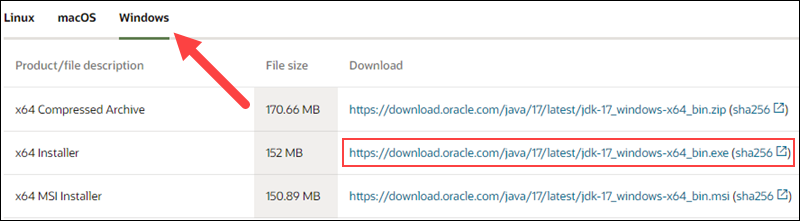
Wait for the download to complete.
Install Java on Windows 10
After downloading the installation file, proceed with installing Java on your Windows system.
Follow the steps below:
Step 1: Run the Downloaded File
Double-click the downloaded file to start the installation.
Step 2: Configure the Installation Wizard
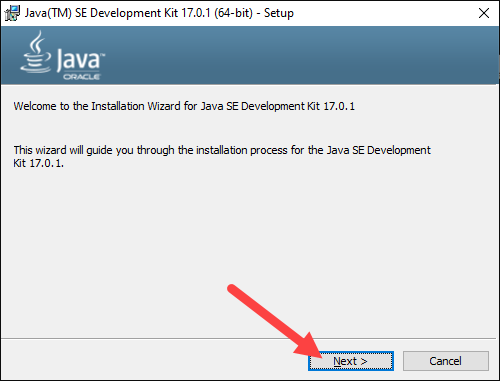
After running the installation file, the installation wizard welcome screen appears.
1. Click Next to proceed to the next step.
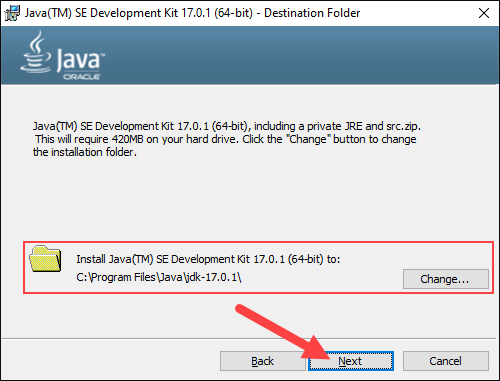
2. Choose the destination folder for the Java installation files or stick to the default path. Click Next to proceed.
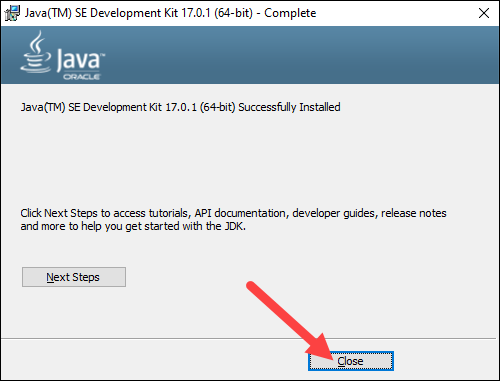
3. Wait for the wizard to finish the installation process until the Successfully Installed message appears. Click Close to exit the wizard.
Set Environmental Variables in Java
Set Java environment variables to enable program compiling from any directory. To do so, follow the steps below:
Step 1: Add Java to System Variables
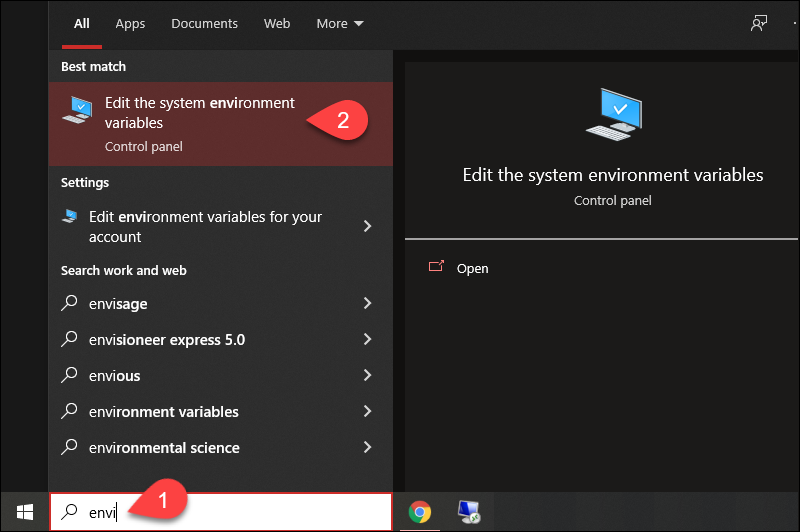
1. Open the Start menu and search for environment variables.
2. Select the Edit the system environment variables result.
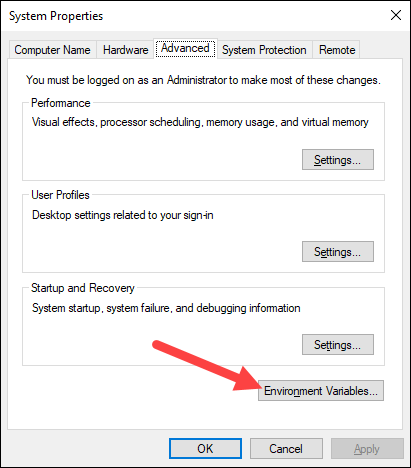
3. In the System Properties window, under the Advanced tab, click Environment Variables…
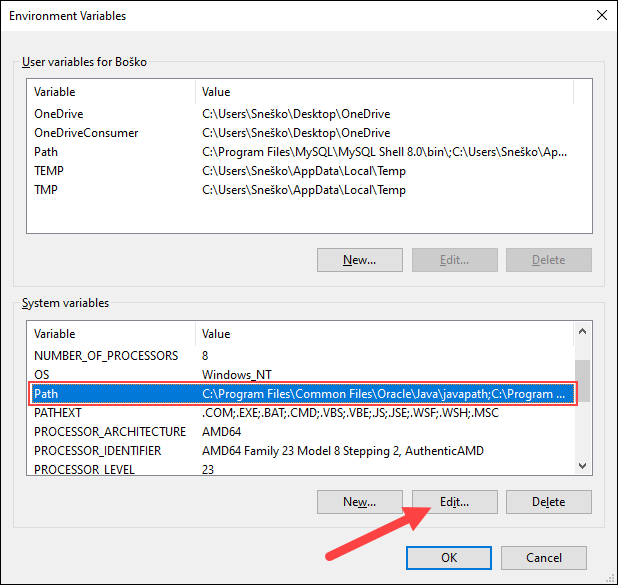
4. Under the System variables category, select the Path variable and click Edit:
5. Click the New button and enter the path to the Java bin directory:
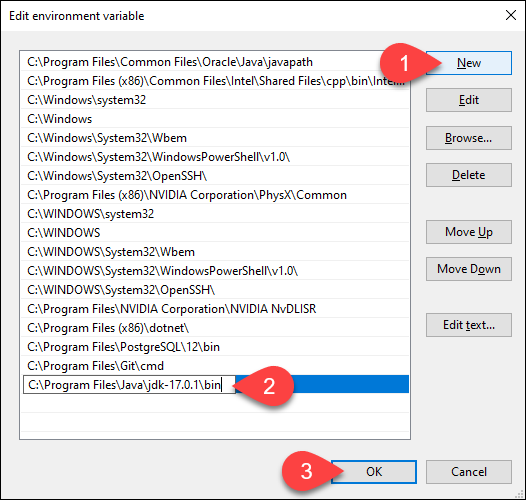
Note: The default path is usually C:\Program Files\Java\jdk-17.0.1\bin.
6. Click OK to save the changes and exit the variable editing window.
Step 2: Add JAVA_HOME Variable
Some applications require the JAVA_HOME variable. Follow the steps below to create the variable:
1. In the Environment Variables window, under the System variables category, click the New… button to create a new variable.
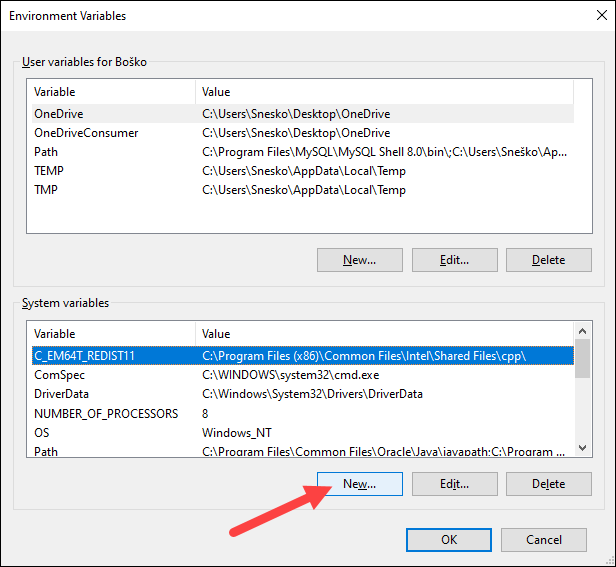
2. Name the variable as JAVA_HOME.
3. In the variable value field, paste the path to your Java jdk directory and click OK.
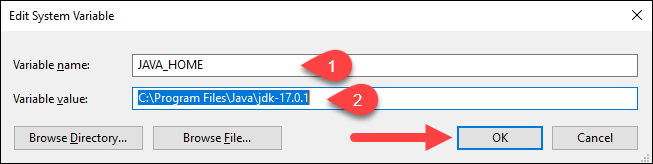
4. Confirm the changes by clicking OK in the Environment Variables and System properties windows.
Test the Java Installation
Run the java -version command in the command prompt to make sure Java installed correctly:

If installed correctly, the command outputs the Java version. Make sure everything works by writing a simple program and compiling it. Follow the steps below:
Step 1: Write a Test Java Script
1. Open a text editor such as Notepad++ and create a new file.
2. Enter the following lines of code and click Save:
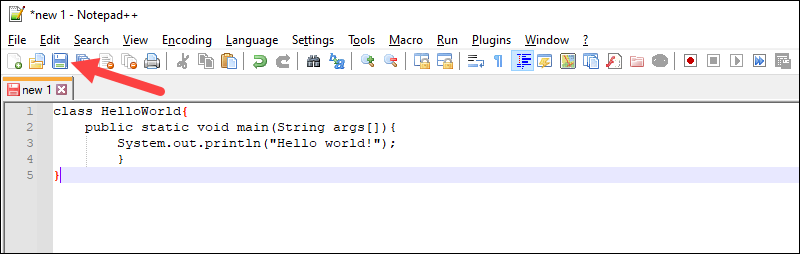
3. Name the file and save it as a Java source file (*.java).
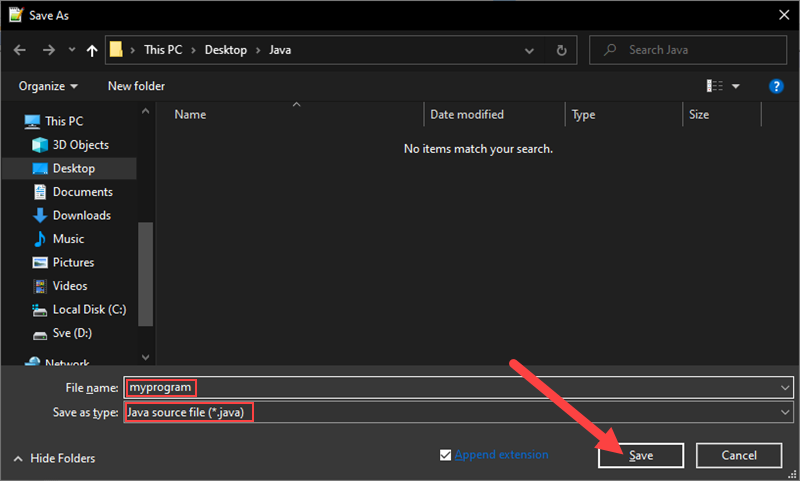
Note: When using Notepad, select All files for the Save as type option and add the .java extension to the file name.
Step 2: Compile the Test Java Script
1. In the command prompt, change the directory to the file’s location and use the following syntax to compile the program:

After a successful compilation, the program generates a .class file in the file directory.
2. Run the program with the following syntax:

The output shows that the program runs correctly, displaying the Hello world! message.
Note: Our Knowledge Base also has a guide on how to install Java on MacOS.
This tutorial showed how to install the Java Development Kit on a Windows system. If you are interested in learning more about Java, read our list of 13 best Java IDEs for writing, debugging, and testing Java code.
Download and Install Oracle JDK 17
In this post, I’d like to share with you about how to download and install Oracle JDK 17 from official source, on Windows operating system. Oracle JDK 17 is a distribution of JDK 17 under Oracle’s license.
1. Download Windows Installer for Oracle JDK 17
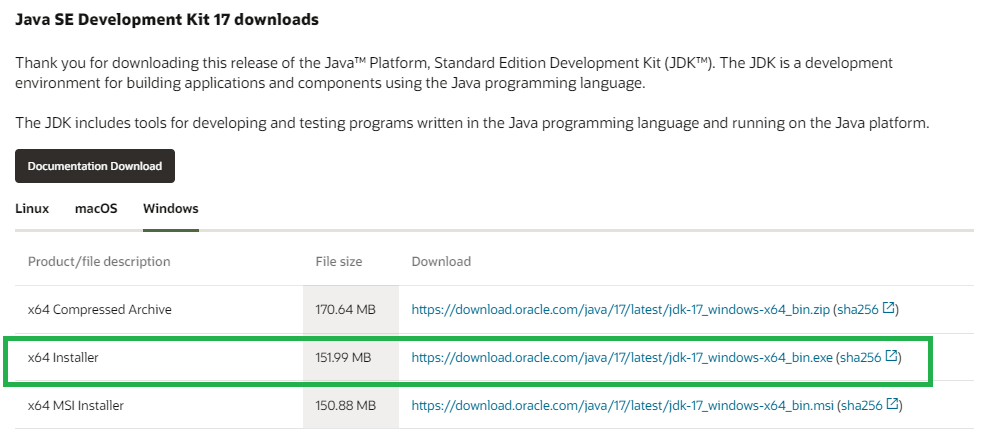
You should get the file jdk-17_windows-x64_bin.exe downloaded. Note that Oracle also provides SHA256 checksum for the file, for use in case you want to verify integrity of the file:
certutil -hashfile jdk-17_windows-x64_bin.exe SHA256
Compare the output of this command against the value posted by Oracle in the corresponding sha256 link.
2. Install Oracle JDK 17 on Windows
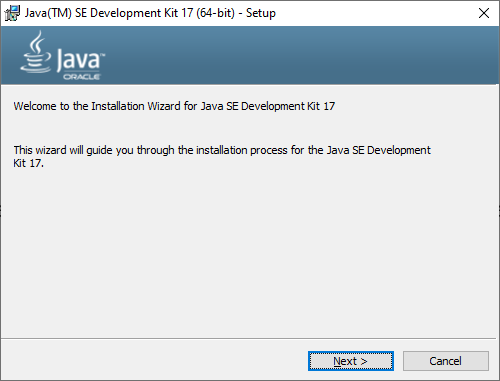
Just click Next to start installing JDK 17 for your Windows computer. It should be very quick. The installer will update Java Path in C:\Program Files\Common Files\Oracle\Java\javapath directory. Now you can open a new command prompt and type java –version to verify:

That means you have successfully installed Oracle JDK 17 on your Windows operating system. If it doesn’t work, follow this guide to update system environment variables for Java manually.
To watch the steps in action, I recommend you watch the following video:
Learn more:
About the Author:
 Nam Ha Minh is certified Java programmer (SCJP and SCWCD). He started programming with Java in the time of Java 1.4 and has been falling in love with Java since then. Make friend with him on Facebook and watch his Java videos you YouTube.
How To Install Java on Windows 10 Step by Step
In this short tutorial, we’re going to take a close look at how to install Java on Windows 10.
We’ll first start with a little insight into how to download Java. Then, we’ll explain how to install it on Windows 10. Then, we’re going to see how to properly set JAVA_HOME environment variable.
Lastly, we’ll highlight different ways to check Java and JDK versions on Windows 10.
So, let’s get started
Download Java for Windows 10
In this section, we’re going to cover in-depth all the steps required to download Java for Windows 10.
As a matter of fact, downloading Java is a piece of cake. It’s just a matter of a few clicks and simple one-time steps.
First, we need to visit the official oracle download page and choose the right release for the Java SE Platform. At this point in time, the latest version is Java 18.
Secondarily, we need to click on the Windows tab.
Bear in mind that Oracle has dropped the support for 32 bit systems. As a result, we can use Java SE only in 64 bit machines.
Oracle offers three options to install Java on Windows. We can use a compressed archive file, a x64 Installer or a x64 MSI Installer.
For instance, let’s choose the x64 Installer option:
Before Java 17, we had to accept the Oracle Technology Network License Agreement to proceed to the next step, which is not the case for Java 18
Lastly, a simple click on the download link will do the job. Easy, right?
Install Java on Windows 10
Now that we downloaded Java for Windows 10, let’s see how to install it.
Basically, the process of installing Java on Windows 10 is pretty easy and simple.
In general, we don’t need to change anything during the installation, we can go with the default settings and follow the suggested instructions.
Firstly, we need to double click on the downloaded installer file to start the installation process:
Secondarily, we click Next to continue:
Note that, “C:\Program Files\Java\” is the default Java installation folder! However, we can always change it if we want that.
Then, we keep hitting Next until the installation is complete:
Finally, we close the installer wizard to complete the installation.
Set Java Path in Windows 10
Now that we have installed Java with success, it’s time to proceed to the next step.
In this short chapter, we’re going to dive deep into how to set JAVA_HOME environment variable on Windows 10.
Add JAVA_HOME
The basic idea behind setting the Java Path is to make all the Java commands like java and javac accessible from everywhere. That way, we can run Java programs from anywhere.
Please note that, JAVA_HOME should point to the JDK not the JRE.
First, let’s open the Advanced System Settings. To do that, we just need to press Windows key + Pause Key.
Alternatively, we can type View advanced system settings in the search box.
Once the System Properties window is opened, we click on Environment Variables:
Secondarily, we click on the New button to create a new environment variable with JAVA_HOME as name and the path to the JDK directory as value:
As we can see, the JAVA_HOME environment variable points to the JDK folder which C:\Program Files\Java\jdk-18.0.1.1 is in our case.
Append JAVA_HOME to PATH
Next, we need to update the PATH variable by adding a new entry for %JAVA_HOME\bin%:
Finally, we can click OK to save and apply the changes.
That’s all we can say about downloading and installing java on windows 10. Now, we’re ready to write our first Java program.
Check Java Version on Windows 10
There are multiple ways that we can use to check Java version on Windows 10. The most obvious and basic way is to use the terminal.
Firstly, press Win+R and type cmd to open the Command Prompt. After that, type java -version and press Enter:
The output means that Java is properly installed on our operating system.
Alternatively, we can type “Java” in the search box and click on “About Java”:
Please bear in mind that multiple versions of JDK can be installed on the same on Windows 10 machine. So, it’s important to make sure the JAVA_HOME environment variable points to the right JDK release.
Let’s open a new command prompt and type:
As show above, the environment variable JAVA_HOME points to the directory of the lastest JDK version.
We can also use javac -version to verify the version of the installed JDK:
Another important thing to note here is that the JDK version can be different from the JRE version on the same machine.
Please keep in mind that we need always to check for new Java updates and install them to keep our machines up-to-date with the latest releases.
In case you want to check how to enable Java on Chrome and other browsers, feel free to take a look at this article: https://devwithus.com/enable-java-chrome/
Write First Java Program
Now that we installed Java, let’s see how to create our first Java program.
To do so, let’s open an IDE or a text editor of your choice, for example, Notepad++, and create a new file (ctrl+n).
Next, we need to append the following code in our newely created file:
Now, let’s save our file anywhere we want under the name: HelloTest.java
In order to execute our Java program, we need to compile it first. So, let’s open a terminal and type:
As we can see, javac creates a new file with the name HelloTest.class. This means that the compilation phase is done with success.
Lastly, let’s run our Java program using the java command:
Please bear in mind that we don’t need to specify the extension when executing a Java file.
Conclusion
In this article, we’ve explained how to tackle the challenge of downloading and installing Java on Windows 10. Then, we’ve seen how to add JAVA_HOME and append %JAVA_HOME\bin% to the Path.
Lastly, we have showcased how to verify and check the installed Java version.
Java для Майнкрафт / TLauncher [Windows/MacOS/Linux] [32/64x]
Для запуска нашего лаунчера и самой игры Minecraft, у вас обязательно должен быть установлена Джава. На данной странице, вы узнаете все основные подробности установки. На всё это у вас уйдёт не много времени, а в результате получите доступ к одной из самых популярных игр в истории. Дополнительно, узнайте какие версии Java используют новые и старые версии игры.
Важная информация
Для TLauncher нужна именно Java 8! В некоторых Linux системах работает и с Java 11.
Рекомендованная версия Джава для Minecraft (1.16.5 и ниже) на Windows: Java 8 Update 51 (приоритет) или Java 8 Update 45.
Рекомендованная версия Java для Майнкрафт (1.16.5 и ниже) на MacOS/Linux: Java 8 Update Последний.
Рекомендованная версия Джава для Minecraft (1.17 и 1.17.1) на Windows: Java 16 (используемая разработчиками игры).
Рекомендованная версия Java для Майнкрафт (1.17 и 1.17.1) на MacOS/Linux: Java 16 (используемая разработчиками игры).
Рекомендованная версия Джава для Minecraft (1.18 и выше) на Windows: Java 17 (используемая разработчиками игры).
Рекомендованная версия Java для Майнкрафт (1.18 и выше) на MacOS/Linux: Java 17 (используемая разработчиками игры).
ВНИМАНИЕ : TLauncher автоматически* использует нужную версию Java рекомендованную разработчиками игры: для версии игры 1.18 — Java 17, для игры 1.17 — Java 1.16, для игры 1.16.5 и ниже — Java 8 Update 51. Поэтому, не нужно вручную устанавливать Java 16 или 17! Если происходит ошибка запуска связанная с Java, то проверьте в настройках лаунчера (Иконка «Шестеренки» -> «Настройки»), что стоит «Выбор Java» на «По умолчанию«. Если стоит другая версия, лаунчер будет пытаться запустить каждую версию от нее и может быть ошибка! Меняйте это, если понимаете для чего.

* Нужно использовать актуальную версию TLauncher 2.84 и выше.
Где скачать Java 8
MacOS*: Java MacOS x64 (MacOS 10.7.3 и ВЫШЕ версии!);
Где скачать Java 16
Где скачать Java 17
* Все версии взяты с официального сайта Java, не было внесено никаких изменений, подписаны цифровой подпись Oracle!
Установка Java в Windows (XP, 7, 8, 10, 11)
1) Определяем разрядность вашей системы — x32 или x64, если знаете, переходите к следующим пунктам. Если нет, то открываем «Мой компьютер» -> в верхнем меню (Компьютер) ищем «Свойства системы» и кликаем на эту кнопку.
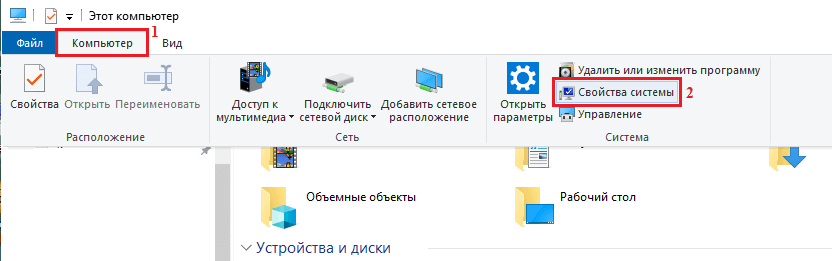
2) Ищем пункт «Тип системы«, и возле него будет указана разрядность вашей системы.
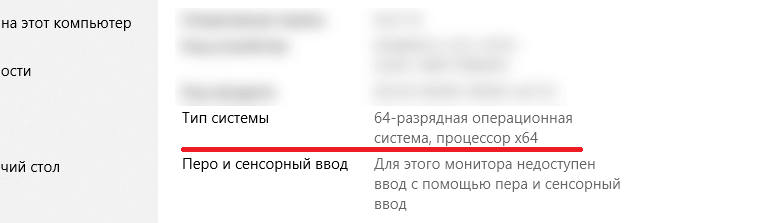
2.1) Если указано «32-разрядная операционная система, процессор x64«, то рекомендуется переустановить Windows используя разрядность x64, так как процессор ваш поддерживает. В противном случаи, x32 обладает ограничениями на выделения оперативной памяти!
3) Определив вашу разрядность, скачиваем версию Java для x32 или x64 по ссылкам выше.
4) Запускаем скаченный установщик и нажимаем на кнопку «Install«. Произойдёт установка и теперь ваш компьютер готов к работе с Minecraft/TLauncher.
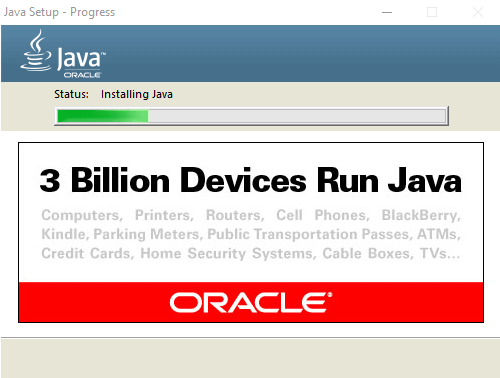
Установка Java в MacOS
1) Скачиваем версию Java под MacOS x64 по ссылке выше.
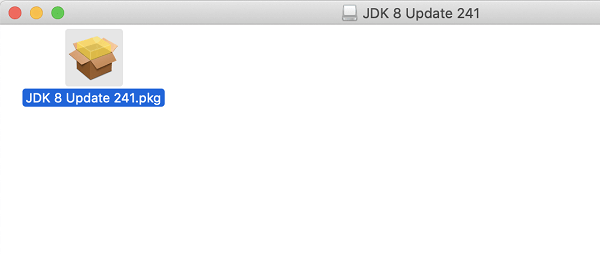
2) Запускаем скаченный образ DMG и запускаем в нём пакет установки PKG:
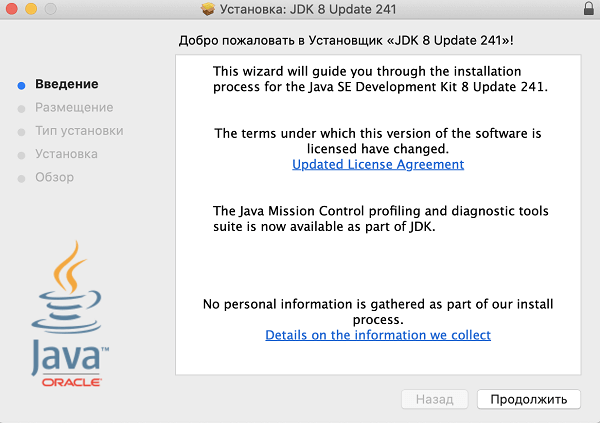
3) В первых двух окнах просто нажимаем «Продолжить«:
4) Как всегда, при установке в Мак ОС, вводим пароль:
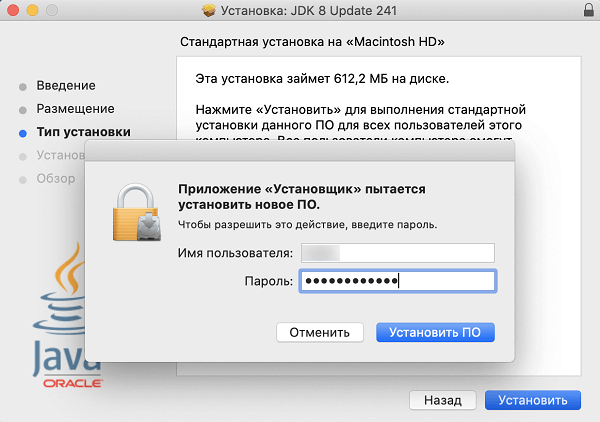
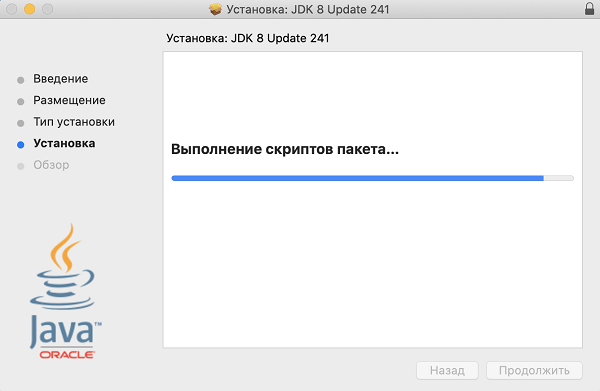
5) Готово! Теперь у вас установлена Java на OS X.
Установка Java в Linux
Установка Java в Ubuntu для TLauncher/Minecraft
1) Открываем Терминал и выполняем стандартные sudo apt-get update , а после sudo apt-get upgrade .
2) Устанавливаем Java: sudo apt install openjdk-8-jdk и соглашаемся Y на установку.
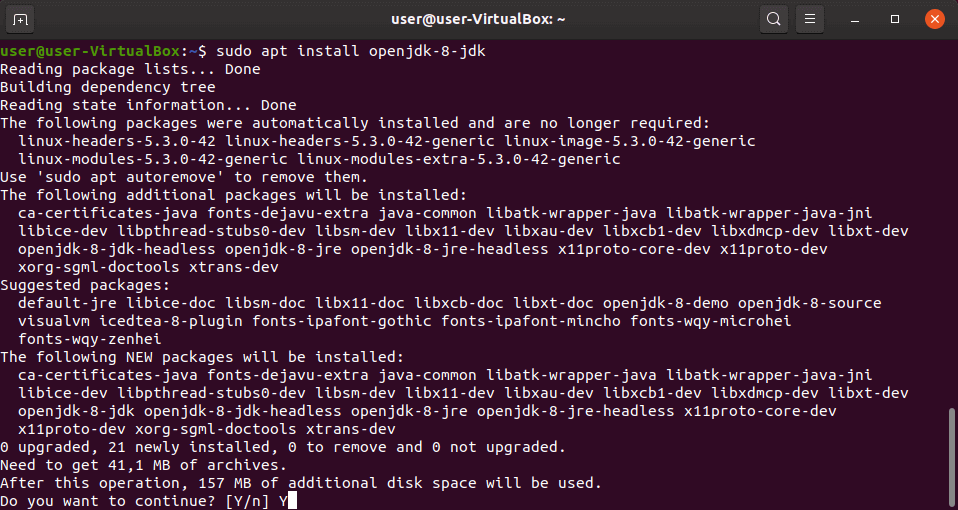
3) Скачиваем Linux версию лаунчера и распаковываем архив с .jar файл в любое место (Архив .zip распаковываем, но не сам .jar!)
4) Запускаем лаунчер командой sudo java -jar /home/user/Downloads/TLauncher-2.83.jar . У вас будет другой путь, смотря куда положили файл! Будут скачены нужные файлы и запущен лаунчер:
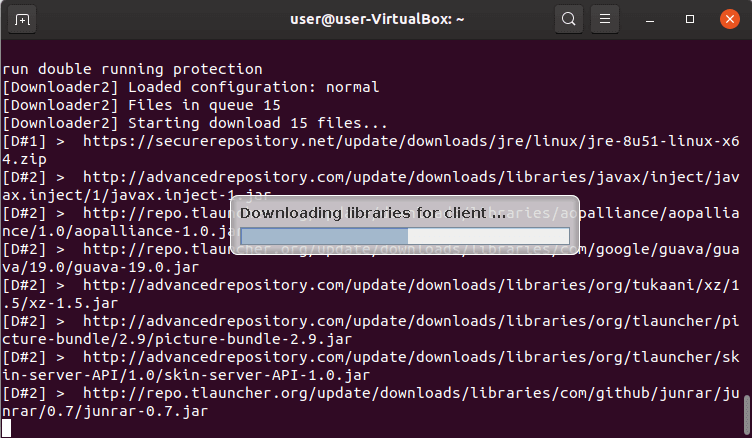
Установка Java в Debian/Mint для TLauncher/Minecraft
1) Открываем Терминал и выполняем стандартные sudo apt-get update , а после sudo apt-get upgrade .
2) Устанавливаем саму Java: sudo apt install default-jdk и соглашаемся Y на установку.
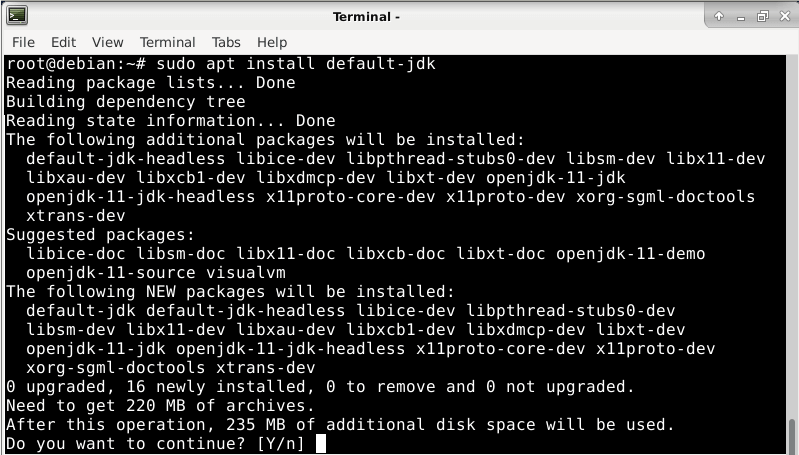
3) Скачиваем Linux версию лаунчера и распаковываем архив с .jar файл в любое место (Архив .zip распаковываем, но не сам .jar!)
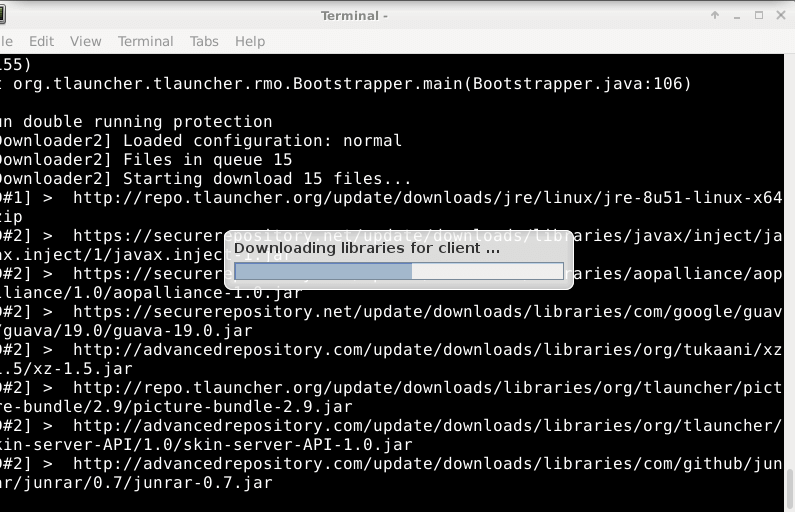
4) Запускаем лаунчер командой sudo java -jar /root/Downloads/TLauncher-2.83.jar . У вас будет другой путь, смотря куда положили файл! Будут скачены нужные файлы и запущен лаунчер:
Установка Java в Fedora/CentOS для TLauncher/Minecraft
1) Открываем Терминал и выполняем стандартные sudo yum update и обновляем.
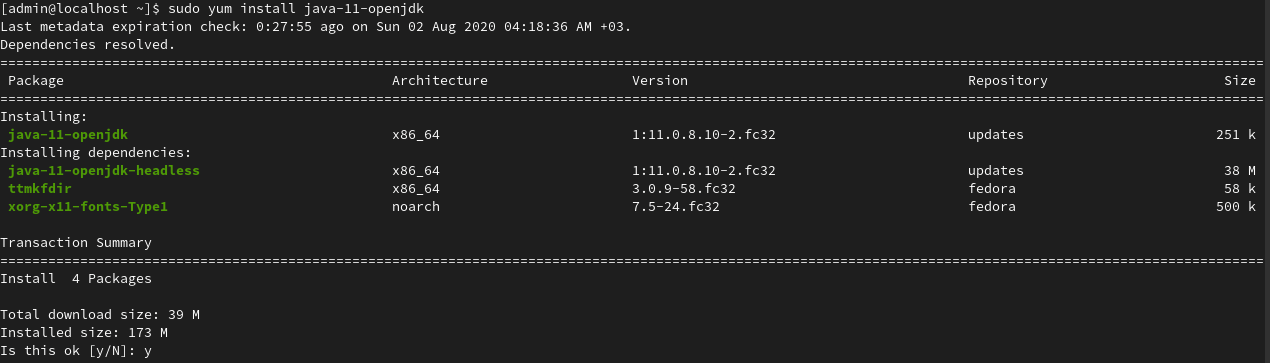
2) Устанавливаем Java: sudo yum install java-11-openjdk и соглашаемся Y на установку.
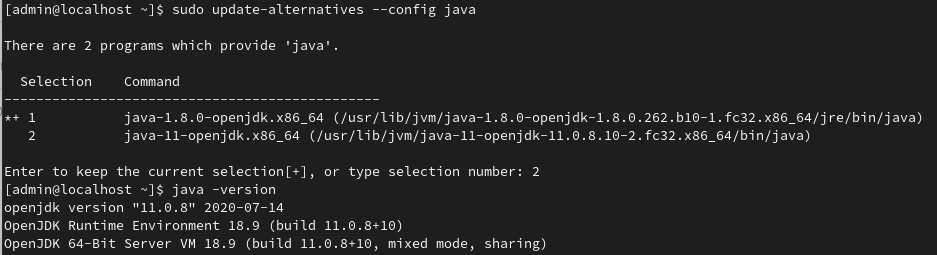
3) Выполняем команду sudo update-alternatives —config java и указываем в поле число соответствующей версии Java 11, чтобы установить её по умолчанию. Проверяем с помощью java -version , что выводит Java 11:
4) Скачиваем Linux версию лаунчера и распаковываем архив с .jar файл в любое место (Архив .zip распаковываем, но не сам .jar!)
5) Запускаем лаунчер командой sudo java -jar /home/user/Downloads/TLauncher-2.84.jar . У вас будет другой путь, смотря куда положили файл! Будут скачены нужные файлы и запущен лаунчер.
Решение проблем при установке Java
1) Не запускается установщик Java, без ошибок и окон.
1.1) Пробуем полностью перезагрузить компьютер и запустить снова установщик.
1.2) Если перезагрузка не помогает, нужно переустановить вашу ОС (Windows и т.д.), так как она сломалась.