Getting Started with Hive OS — Overclocking Profiles Basics
The previous article covered the basics of creating Fight Sheets for your workers, in this article we’ll dive deeper into fine-tuning your worker with Overclocking Profiles.
Disclaimer: Any settings that deviate from factory values may cause your system to become unstable. Use at your own risk.
What Is An Overclocking Profile
In general terms, overclocking is pushing your hardware beyond it’s factory specs thus possibly improving its performance. An Overclocking Profile can also be used for other purposes, like downvolting — reducing your hardware’s power consumption. There are many applications for overclocking and we’ll try to cover some of them in this article.
Overclocking is a process of trial and error and requires patience to achieve the desired results. You should always let your hardware run with each set of new Overclocking Profiles for some time to see if those specific parameters will stay stable. Hardware can behave differently sometime yielding unpredictable results. One way to see if your overclocking changes were successful is whether or not you start getting rejected shares.
Rejected shares — shares that your miner worked but they were either not submitted in time to be included in the block or they had an error. The most common reason for a large amount of rejected shares is due to overclocking the GPU too much to the point where it produces faulty shares. The smaller the rate of rejected shares to accept, the higher the efficiency of your GPU’s Overclocking Profile.
This said, most users leave their hardware at default settings as overclocking results may vary for each user. It also greatly depends on the actual components a manufacturer uses as some components are capable of being overclocked beyond spec and some simply don’t perform so great.
Creating An Overclocking Profile
All Overclocking Profiles are created individually for each farm and can’t be shared across farms. You can either create a farm-wide profile or a worker specific profile. The worker specific settings will always override any farm-wide settings. For example, this way you can set the optimal desired settings for the whole farm and then fine-tune each rig individually.
To add a new profile, go to your farm’s Overclocking Profiles tab and click the Add OC Profile button. In the Save Overclocking as Template window give your profile a name and click Save.
You’ve created a template that will later be used by specific workers or across your entire farm. This template can then be copied and modified for different miners or algorithm combinations.
The template we created will be used by all your GPUs, but the settings are different for Nvidia and AMD. You can have separate sets of settings for both GPU types within the same profile in case your rig is running both Nvidia and AMD GPUs and they will apply to each GPU type individually.
To edit your overclocking profile click the plus icon next to your the profile’s name and follow the instructions below depending on your GPU type.
Overclocking Nvidia GPUs
Before changing any settings you can run the nvidia-smi command to find out your current GPU settings. To do this remotely from your dashboard, go to your worker and click the Run Command button in the toolbar at the top of the screen.
You can specify one value for all cards or list of values for each card separated by a space. For example:
150 — one value for all GPUs.
0 100 0 0 0 140 — means GPU0 = none, GPU1 = 100, etc.
The Algo field is used to specify overclock settings for a specific algorithm. You can create a separate set of overclock setting for each algorithm individually or choose the Default Config that will apply to all algorithms, but can be overwritten by the algorithm settings themselves.
- +Core Clock (Mhz) — increases the GPU’s core clock speed in Mhz. The minimum and maximum values for your GPU can be found in the Nvidia X Server Settings tool by going to the PowerMizer tab on your rig. 0 will always be the GPU’s default (factory) value.
- Memory (Mhz) — increases the GPU’s memory speed in Mhz. Usually this value is double from what you see in AfterBurner. For example, if in Windows it’s +800Mhz, then the value here should be 1600. The minimum and maximum values for your GPU can be found in the Nvidia X Server Settings tool by going to the PowerMizer tab.
- Fan (%) — controls the speed of your GPU fan/fans. 0 will always be the GPU’s default (factory) value. Your GPU’s BIOS will determine the default speed of the fan, not the miner.
- Power Limit (W) — controls the power consumption. These values must be absolute, unlike in AfterBurner, where the values are percentile. You can check your power limit values in your GPU list of the rig. For example, Power Limit 60.00 W, 120.00 W, 140.00 W means that the first value, 60.00 W — the minimum, 120.00 W — the default, and 140.00 W — the maximum. The setting won’t apply if your values are less or greater than the min/max values of your specific GPU.
- Turn Off LEDs — this turns off the LED lights on your GPU, if there are any. This option may not work on some GPUs.
- OhGodAnETHlargementPill — works only with Nvidia GTX 1080 series. Provided by OhGodACompany. Check their GitHub page for details.
- Click Save and you’re done.
Example: Nvidia GTX 1060 Overclocking
Here’s an example of an Overclocking Profile for an Nvidia GTX 1060 GPU.
Note, these values are for example purposes. Use at your own risk.
- Algo — we set it to the Default Config as we want it to apply to all algorithms
- +Core Clock (Mhz) — 130
- Memory (Mhz) — 2000
- Fan (%) — left empty for default values
- Power Limit (W) — 120
- Turn Off LEDs — our GPU doesn’t have LEDs, so we skipped this setting
- OhGodAnETHlargementPill — this is available only for the 1080 series GPUs, so we skipped this setting
- Click Save and you’re done.
Overclocking AMD GPUs
Before changing any settings you can run the amd-info command to find out your current GPU settings. To do this remotely from your dashboard, go to your worker and click the Run Command button in the toolbar at the top of the screen.
You can specify one value for all cards or list of values for each card separated by a space. For example:
150 — one value for all GPUs.
0 100 0 0 0 140 — means GPU0 = none, GPU1 = 100, etc.
The Algo field is used to specify overclock settings for a specific algorithm. You can create a separate set of overclock setting for each algorithm individually or choose the Default Config that will apply to all algorithms, but can be overwritten by the algorithm settings themselves.
- Core Clock (Mhz) — sets the core clock. A good value would be around 1100. If Core State is unset, then the default 5 state will be used to set the clock. All values must be absolute.
- Core State (Index) — required if you try to undervolt you card. You should use this parameter in conjunction with Core Clock and Core Voltage settings. This is called a DPM (Dynamic Power Management) or “Power Level” of a GPU core. For RX GPUs it’s a value from 1 to 7. The default is 5. Decrease the value to downvolt. If you decide to set one of the default states then you don’t need to set any values in Core Clock and Core Voltage.
- Core Voltage (mV) — required if you try to undervolt your GPU. And you must set Core State or default 5 state will be used to set the voltage. You can set values like 900 meaning mV or values like 65284 from VBIOS table.
- Memory Clock (Mhz) — sets the memory clock speed All values are absolute.
- Mem State(Index) — a very advanced parameter. Change this if there are issues with undervolting. If everything works within spec — don’t change this value. RX cards are known to have 1 or 2 memory states (3 including 0 — idle state). By default the highest state will be selected. But some rare cards are known to fail to undervolt on the highest state and are required to select a lower one. For example, the highest is 2 and for undervolting you would want to set the state to 1. You should use this parameter with Memory Clock setting.
- Fan (%) — for setting the fan speed. Keep in mind, miners like claymore will still control the fan speed. You must disable fan control in miner configuration for this to work. We advise leaving this field empty if you have AutoFan turned on. We will write more on AutoFan in our future articles.
- Aggressive undervolting — chooses a set overclocked parameter for each DPM state.
- Click Save and you’re done.
Example: AMD RX 580 Overclocking
Here’s an example of an Overclocking Profile for an AMD RX 580 GPU.
Note, these values are for example purposes. Use at your own risk.
- Algo — we set it to the Default Config as we want it to apply to all algorithms
- Core Clock (Mhz) — 1150
- Core State (Index) — 3
- Core Voltage (mV) — 875
- Memory Clock (Mhz) — 2200
- Mem State(Index) — left empty, as our GPU didn’t have an issue undervolting
- Fan (%) — left empty for default values
- Aggressive undervolting — set to active
- Click Save and you’re done.
Applying An Overclocking Profile
You can now apply the Overclocking Profile you’ve created by going to the Workers tab, then clicking the checkboxes on the left side of the workers to which you want to apply the Overclocking Profile. You should see a speedometer icon appear in the menu bar in the top right corner.
Click it, and you should see a window with the number of workers you chose and a list of all your Flight Sheets.
Choose the Overclocking Profile you want to apply and click the Apply button. You should see a message telling you that the Overclocking command was sent to the worker. In a few seconds your workers should apply the changes.
GPU FAQ
The farm is constantly rebooting. If I turn logs-on via Hive Shell, what should I pay attention to?
Pay attention to the log lines that appear right before the rig goes offline. Apart from this, you can launch this command via Hive Shell: tail -f /var/log/syslog (you can interrupt the command by pressing the keys Ctrl-C).
When the rig goes offline, Hive Shell will disconnect, and you will see the required lines on the screen.
How to reduce the GPU power consumption?
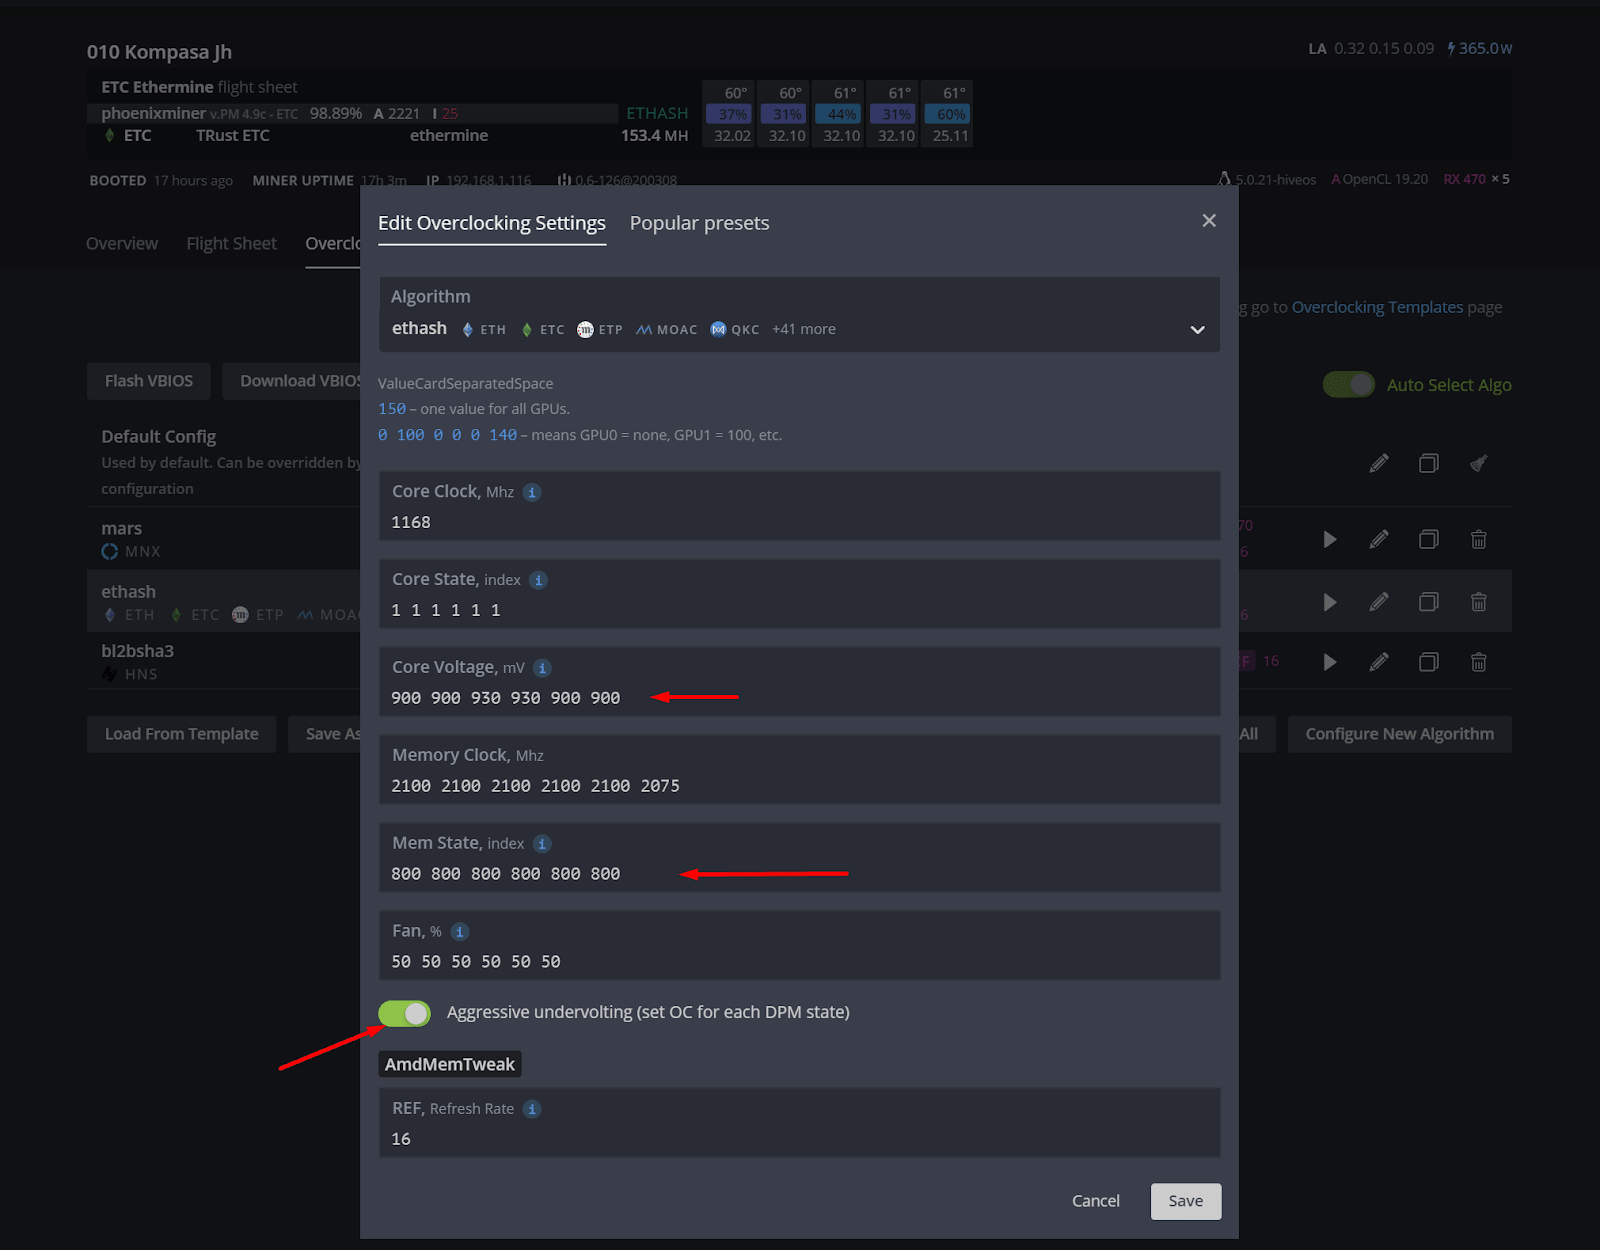
To reduce the consumption of your GPUs (when using Hiveon OS), you can specify the parameters of the core voltage and memory individually for each card.
To do this, go to the Overclocking section on your worker and specify the necessary values in the overclocking profile. Please note that in the Memory Status column you can indicate both the status index 0, 1, or 2, and the voltage in mW.
Also, to reduce power consumption, you can use the aggressive undervolting mode:
How to check internet on GPU rig?
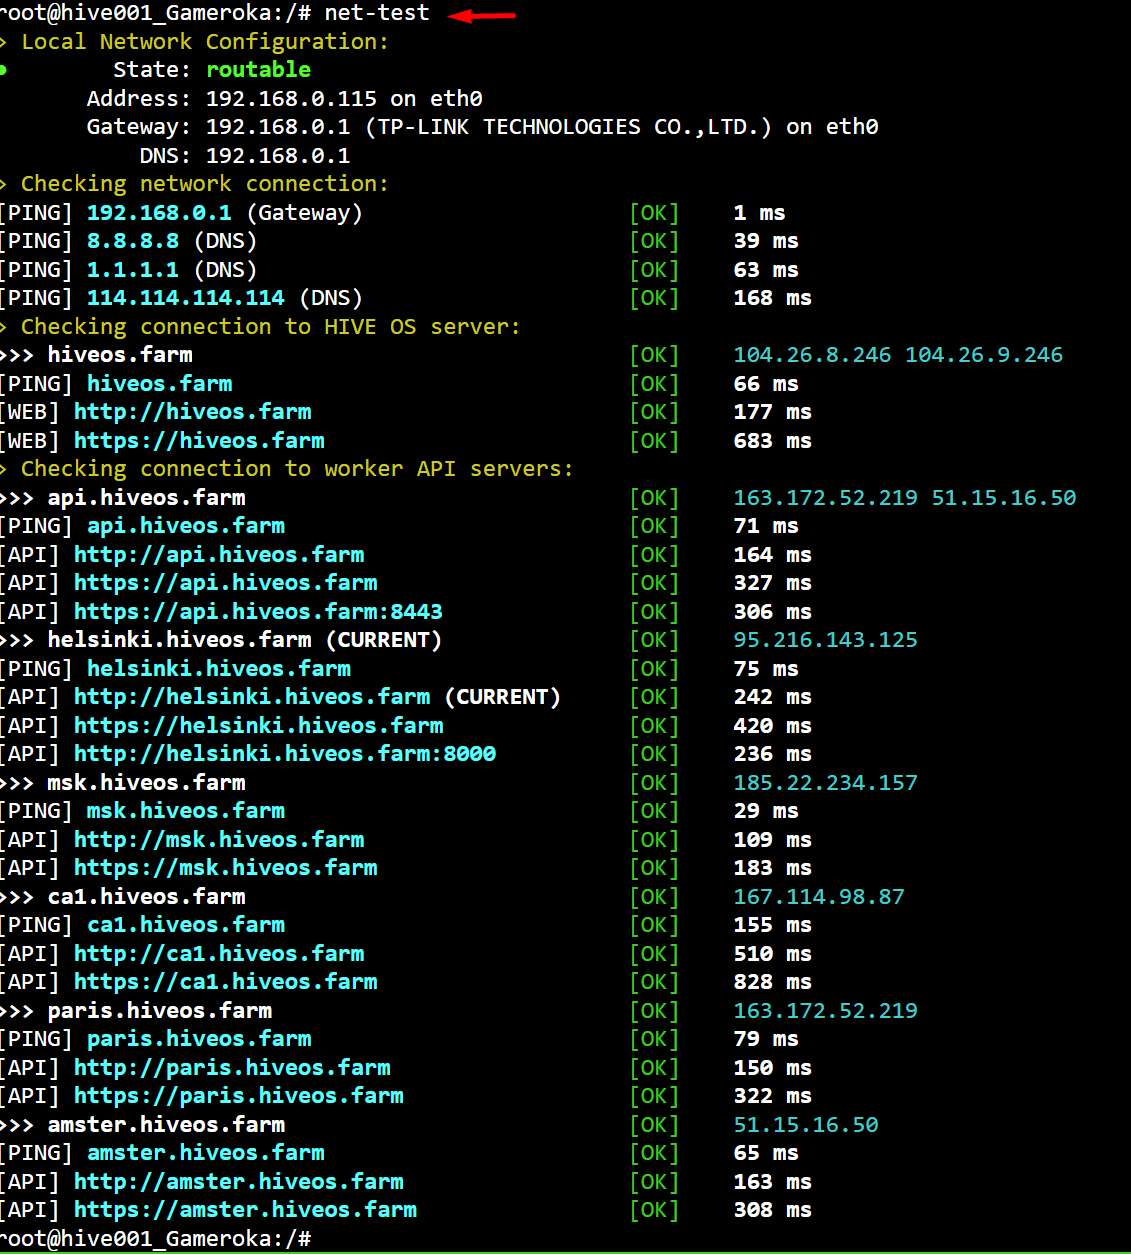
In order to check the availability of the Internet on your rig, you need a screen and a keyboard for a physical connection to the rig. After the Hiveon OS loading is complete, enter the command net-test . After you apply it, you will see the availability status of Hiveon OS servers.
What is error 511?
In most cases, this error occurs due to the malfunctioning of the video card’s riser. Please check the power connector on the riser for a burnt wire, and replace the riser.
What is DPM on AMD video cards?
DPM is a table of core frequencies and the corresponding voltages of these frequencies. This information can be checked with the amd-info command. The video card changes the core frequencies in steps according to this table.
The manufacturer with a large margin sets the voltages for each stage of the core frequency. Our task is to select the lowest voltage value for the selected core frequency specified in DPM, but at the same time to ensure that the card continues to mine steadily. In this way we get reduced consumption without losing performance. This is downvolt. Here are the examples:
- DPM 3 825
- DPM 4 875
- DPM 5 925
By default, Hiveon OS uses the value DPM 5. The factory value on Windows is DPM 7 Windows. Specifying core frequency works, but not on all the cards. But using the DPM value definitely works on all video cards.
How can rigs be merged /moved to another farm?
Go to the rig’s Settings:

Scroll down and click the Advanced settings button:

Select the desired farm from the drop-down list and click the Transfer button.:

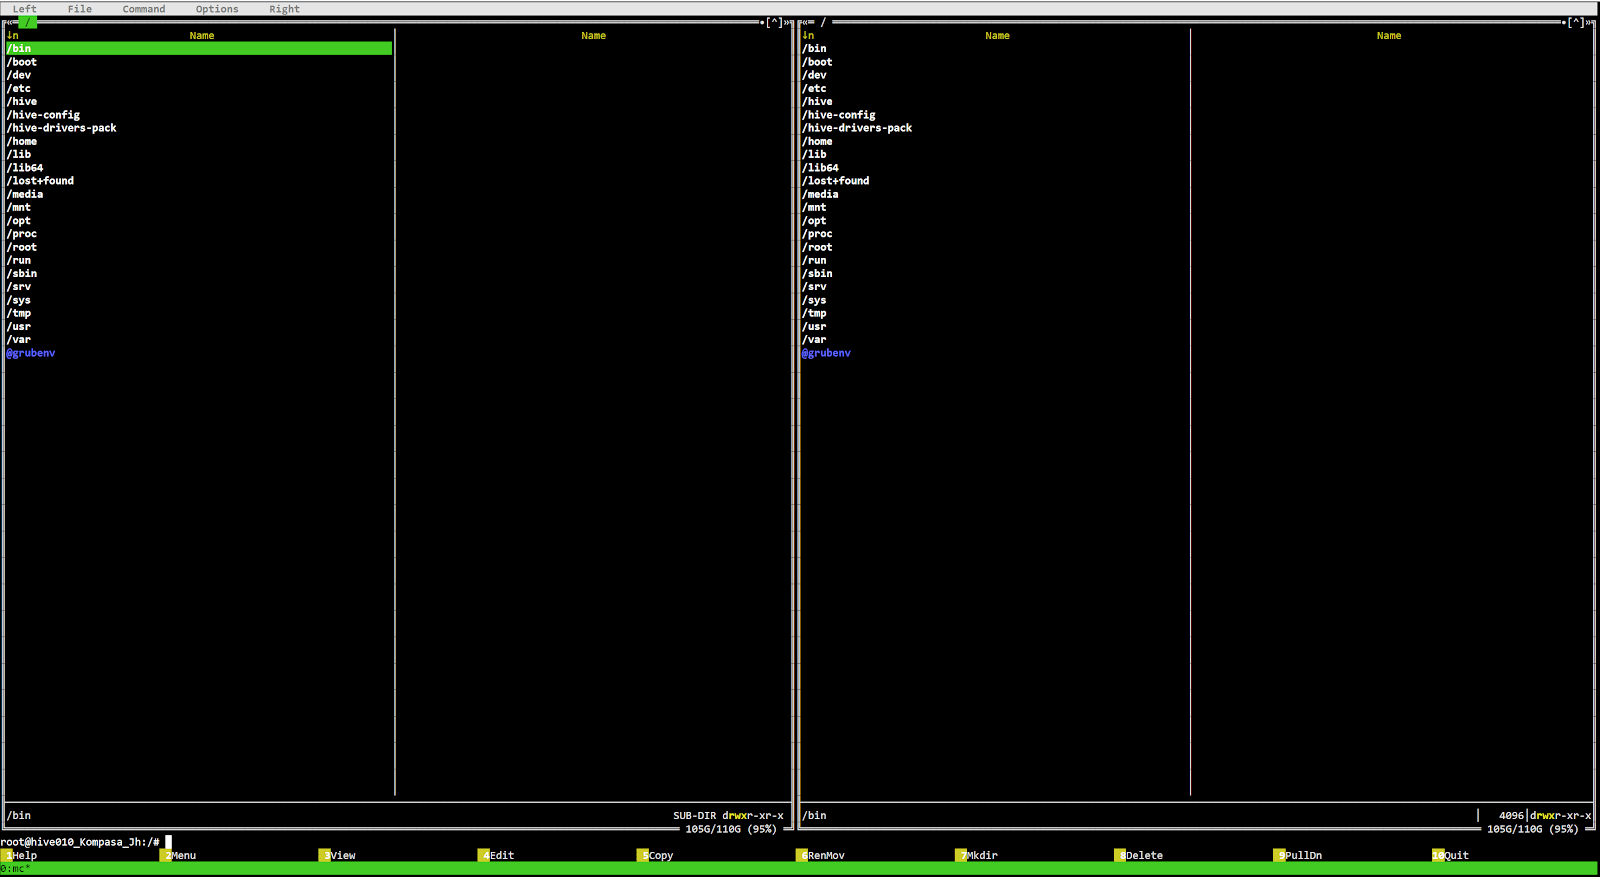
How to launch mc on the rig
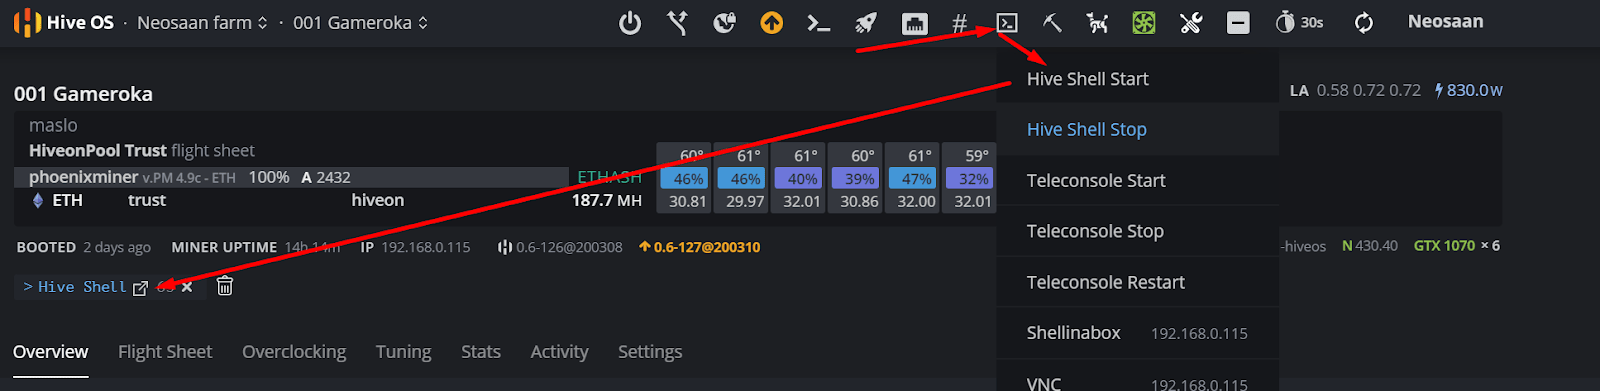
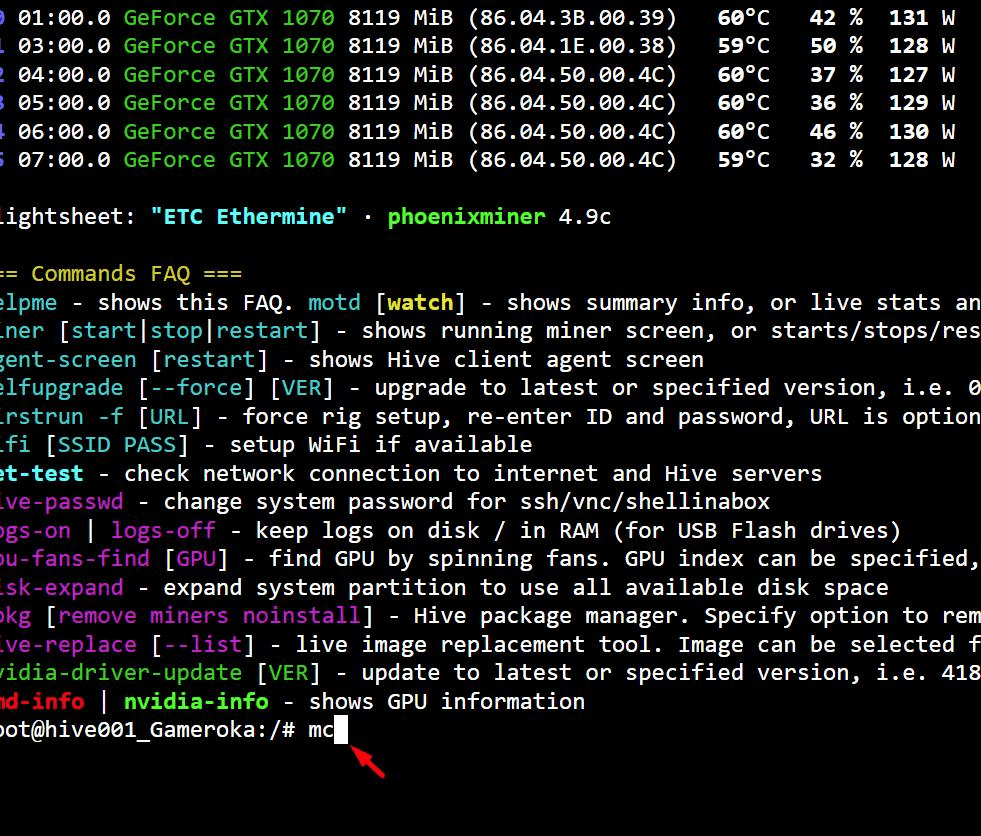
To start the mc editor, launch Hive Shell on your worker. Then enter the mc command.
How can I check if the rig is really frozen using Hive-Shell?
Using Hive Shell, enter the working rig located in the same local network as the frozen one.
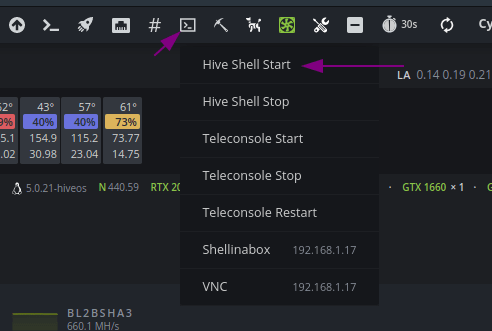
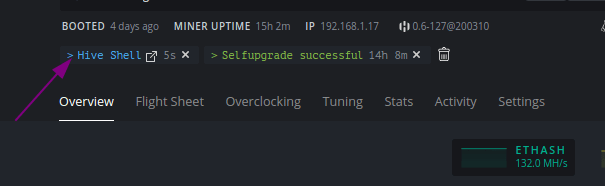
Enter this command: ssh [email protected]”Ip_address_of_the_frozen_rig” :
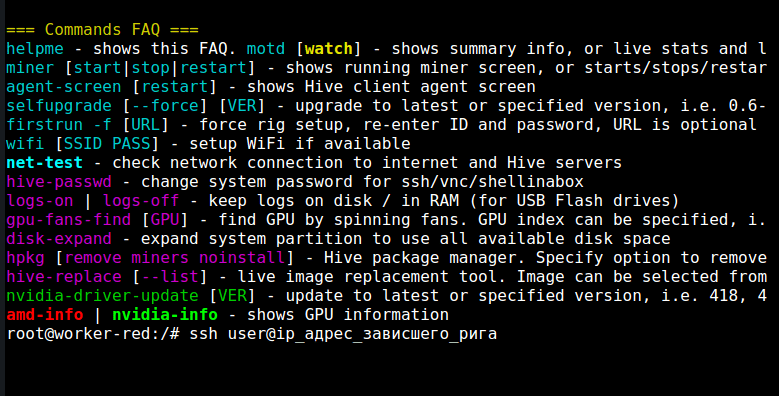
Then enter your password for this rig. The latest IP address of the rig can be checked in the Hiveon OS dashboard . Now you can check if the rig has really frozen or turned off, or if it is a glitch of the web-server.
The exit command will every time bring you back in the chain.
What is LA (Load Average)?
Load Average is the average number of executable processes over a given time. For example, if the hourly load average is 10, this means (for a uniprocessor system) that at any given time during that hour, 1 process is running, and 9 are ready to run (not blocked for input/output) and are waiting for the processor to become «free».
If you have Celeron G3930 with two cores, then LA 2 indicates 100% system load. For Ethash, this is very abnormal, but for modern algorithms — it is okay.
The maximum value of LA can be anything. This is the length of the queue to the processor, expressed in the number of cores of this processor. LA has always been counted as the number of computing devices required to complete the entire current task queue.
When mining Beam and Cuckoo on weak processors, LA can reach up to 3-4. If you don’t like the red color of the indicator, you can always set the threshold value here:
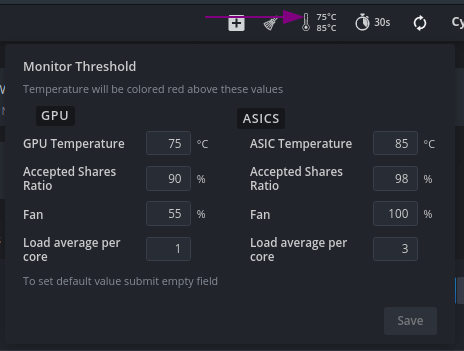
Three values: LA now / average LA per 5 minutes / average LA per 15 minutes .
Hive OS 2.0 — Настройка разгона видеокарт
В предыдущей статье были рассмотрены основы создания полетных листов для ваших воркеров, в этой статье мы углубимся в настройку вашего воркера с помощью профилей разгона.
Отказ от ответственности: любые настройки, которые отклоняются от заводских значений, могут привести к неустойчивой работе вашей системы. Вы используете это на свой страх и риск.
Что такое профиль разгона
В общем, разгон повышает характеристики вашего оборудования за пределы его заводских спецификаций, что, возможно, улучшает его производительность. Профиль разгона также может использоваться для других целей, таких как downvolting — снижение энергопотребления вашего оборудования. Существует множество приложений для разгона, и мы попытаемся охватить некоторые из них в этой статье.
Разгон — это процесс проб и ошибок и требует терпения для достижения желаемых результатов. Вы всегда должны дать видеокартам поработать с каждым набором новых профилей разгона в течение некоторого времени, чтобы убедиться, что эти конкретные параметры останутся стабильными. Аппаратное обеспечение может вести себя по-разному и может дать непредсказуемые результаты. Один из способов проверить, были ли ваши изменения в разгоне успешными, — не начать получать отклоненные акции во время майнинга.

Отклоненные акции (шары)
Отклоненные акции — акции, которые делал ваш майнер, но они либо не были представлены вовремя для включения в блок, либо у них была ошибка. Самая распространенная причина для большого количества отклоненных акций связана с чрезмерным разгоном GPU до того момента, когда он производит неисправные акции. Чем меньше ставка отклоненных акций, тем выше эффективность вашего разгонного профиля GPU.
При этом большинство пользователей оставляют свое оборудование по умолчанию, так как результаты разгона могут отличаться для каждого пользователя. Это также сильно зависит от фактических компонентов, которые использует производитель, поскольку некоторые компоненты способны разгоняться за пределы спецификации, а некоторые просто не работают так хорошо (например память видеокарт от Samsung имеет хорошие показатели для разгона по сравнению с hynix).
Создание профиля разгона
Все профили разгона создаются индивидуально для каждой фермы и не могут использоваться совместно с другими фермами. Вы можете создать профиль всей фермы или профиль конкретного воркера. Рабочие настройки всегда будут переопределять любые настройки всей фермы. Например, таким образом вы можете установить оптимальные желаемые настройки для всей фермы, а затем точно настроить каждую установку отдельно.
Чтобы добавить новый профиль, перейдите на вкладку Профили разгона вашей фермы и нажмите кнопку Добавить профиль разгона. В окне «Сохранить разгон в виде шаблона» укажите имя профиля и нажмите «Сохранить».
Создание нового профиля разгона
Вы создали шаблон, который позже будет использоваться конкретными воркерами или всей вашей фермой. Этот шаблон затем может быть скопирован и изменен для разных комбинаций майнеров или алгоритмов.
Шаблон, который мы создали, будет использоваться всеми вашими графическими процессорами, но настройки для Nvidia и AMD отличаются. У вас могут быть отдельные наборы настроек для обоих типов графических процессоров в одном профиле, если ваша установка работает как с графическими процессорами Nvidia, так и с AMD, и они будут применяться к каждому типу GPU индивидуально.
Чтобы изменить профиль разгона, щелкните значок «плюс» рядом с именем вашего профиля и следуйте приведенным ниже инструкциям в зависимости от типа вашего GPU.

Редактирование шаблона OC
Разгон графических процессоров Nvidia GPU
Прежде чем изменять какие-либо настройки, вы можете запустить команду nvidia-smi , чтобы узнать текущие настройки графического процессора. Чтобы сделать это удаленно со своей панели, перейдите к своему работнику и нажмите кнопку «Запустить команду» на панели инструментов в верхней части экрана.

Вы можете указать одно значение для всех карт или список значений для каждой карты, разделенной пробелом. Например:
150 — одно значение для всех графических процессоров.
0 100 0 0 0 140 — означает GPU0 = нет, GPU1 = 100 и т.д.

Окно Nvidia OC
Поле Algo используется для указания настроек разгона для определенного алгоритма. Вы можете создать отдельный набор параметров разгона для каждого алгоритма отдельно или выбрать настройку по умолчанию, которая будет применяться ко всем алгоритмам, но может быть перезаписана самими настройками алгоритма.
- + Core Clock (Mhz) — увеличивает тактовую частоту GPU в Mhz. Минимальные и максимальные значения для вашего графического процессора можно найти в средстве настройки сервера Nvidia X, перейдя на вкладку PowerMizer на вашем оборудовании. = 0 всегда будет значением по умолчанию равно (заводским) GPU.
- Память (Mhz) — увеличивает скорость памяти GPU в Mhz. Обычно это значение вдвое больше того, что вы видите в AfterBurner. Например, если в Windows это + 800 МГц, значение здесь должно быть 1600. Минимальное и максимальное значения для вашего графического процессора можно найти в средстве настройки сервера Nvidia X, перейдя на вкладку PowerMizer.
- Вентилятор (%) — управляет скоростью вашего вентилятора / вентилятора GPU. 0 всегда будет значением по умолчанию (заводским) GPU. BIOS вашего GPU определит скорость вращения вентилятора, а не майнер.
- Предел мощности (W) — регулирует потребление энергии. Эти значения должны быть абсолютными, в отличие от AfterBurner, где значения являются процентильными. Вы можете проверить свои предельные значения мощности в списке графических процессоров. Например, ограничение мощности 60.00 Вт, 120.00 Вт, 140.00 Вт означает, что первое значение, 60.00 Вт — минимальное, 120.00 Вт — значение по умолчанию и 140.00 Вт — максимальное. Этот параметр не будет применяться, если ваши значения меньше или превышают значения min / max вашего конкретного графического процессора.
- Turn Off LEDs — это отключает светодиодные индикаторы на вашем графическом процессоре, если таковые имеются. Этот параметр может не работать на некоторых графических процессорах.
- OhGodAnETHlargementPill — работает только с Nvidia GTX 1080. Предоставлено OhGodACompany. Проверьте их страницу GitHub.
Нажмите «Сохранить», и все готово.
Пример: разгон Nvidia GTX 1060
Вот пример профиля разгона для графического процессора Nvidia GTX 1060.
Обратите внимание, что эти значения являются примерными. Используйте на свой риск.
- Algo — мы устанавливаем его в конфигурацию по умолчанию, как мы хотим, чтобы он был применим ко всем алгоритмам
- + Core Clock (Mhz) — 130
- Память (Mhz) — 2000
- Вентилятор (%) — пустой для значений по умолчанию
- Предел мощности (Вт) — 120
- Leds— наш графический процессор не имеет светодиодов, поэтому мы пропустили эту настройку
- OhGodAnETHlargementPill — это доступно только для графических процессоров серии 1080, поэтому мы пропустили эту настройку
Нажмите «Сохранить», и все готово.
Разгон AMD GPU
Прежде чем изменять какие-либо настройки, вы можете запустить команду amd-info , чтобы узнать текущие настройки графического процессора. Чтобы сделать это удаленно со своей панели, перейдите к своему работнику и нажмите кнопку «Запустить команду» на панели инструментов в верхней части экрана.
Вы можете указать одно значение для всех карт или список значений для каждой карты, разделенный пробелом. Например:
150 — одно значение для всех графических процессоров.
0 100 0 0 0 140 — означает GPU0 = нет, GPU1 = 100 и т.д.

Окно AMD OC
Поле Algo используется для указания настроек разгона для определенного алгоритма. Вы можете создать отдельный набор параметров разгона для каждого алгоритма отдельно или выбрать настройку по умолчанию, которая будет применяться ко всем алгоритмам, но может быть перезаписана самими настройками алгоритма.
- Core Clock (Mhz) — устанавливает частоту ядра. Хорошее значение будет около 1100. Если состояние ядра отключено, то для установки частоты будет использоваться состояние по умолчанию 5. Все значения должны быть абсолютными.
- Core State (Index) — это необходимо, если вы попытаетесь понизить питание видеокарты. Вы должны использовать этот параметр совместно с настройками Core Clock и Core Voltage. Это называется DPM (Dynamic Power Management) или «Уровень мощности» ядра GPU. Для RX-графических процессоров это значение от 1 до 7. Значение по умолчанию — 5. Уменьшите значение до нисходящего потока. Если вы решите установить одно из состояний по умолчанию, вам не нужно устанавливать какие-либо значения в Core Clock и Core Voltage.
- Напряжение ядра (мВ) — необходимо, если вы попытаетесь понизить напряжение ядра видеокарты. И вы должны установить Состояние ядра или по-умолчанию 5 состояние будет использоваться для установки напряжения. Вы можете установить значения, такие как 900, значение mV или значения, такие как 65284 из таблицы VBIOS.
- Memory Clock (Mhz) — устанавливает тактовую частоту памяти. Все значения являются абсолютными.
- Mem State (Index) — очень продвинутый параметр. Измените это, если есть проблемы с undervolting. Если все работает в пределах спецификации — не меняйте это значение. Известно, что RX-карты имеют 1 или 2 состояния памяти (3 в том числе 0 — незанятое состояние). По умолчанию будет выбрано самое высокое состояние. Но некоторые редкие карты, как известно, не поддаются восстановлению в самом высоком состоянии и должны выбрать нижний. Например, самое высокое значение равно 2, и для undervolting вам нужно установить состояние в 1. Вы должны использовать этот параметр с настройкой Memory Clock.
- Вентилятор (%) — для установки скорости вращения вентилятора. Имейте в виду, что майнеры, подобные claymore, все еще будут контролировать скорость вращения вентилятора. Вы должны отключить управление вентилятором в конфигурации майнера, чтобы это работало. Советуем оставить это поле пустым, если вы включили AutoFan. Мы напишем больше о AutoFan в наших будущих статьях.
- Aggressive undervolting — выбирает заданный разогнанный параметр для каждого состояния DPM.
Нажмите «Сохранить», и все готово.
Пример: разгон AMD RX 580
Вот пример профиля разгона для AMD RX 580 GPU.
Обратите внимание, что эти значения являются примерными. Используйте на свой риск.
Примеры настроек AMD OC
Algo — мы устанавливаем его в конфигурацию по умолчанию, как мы хотим, чтобы он был применим ко всем алгоритмам
- Core Clock (Mhz) — 1150
- Core State (Index) — 3
- Core Voltage (mV) — 875
- Частота памяти (Mhz) — 2200
- Mem State (Index) — оставлено пустым, так как наш графический процессор не имел проблемы с undervolting
- Вентилятор (%) — пустой для значений по умолчанию
- Aggressive undervolting — установлено на активное
Нажмите «Сохранить», и все готово.
Применение профиля разгона
Теперь вы можете применить профиль оверклокинга, который вы создали, перейдя на вкладку «Воркеры», а затем щелкнув флажки на левой стороне ригов, к которым вы хотите применить профиль разгона. Вы должны увидеть значок спидометра в строке меню в правом верхнем углу.

Применение профиля OC
Нажмите на нее, и вы увидите окно с количеством выбранных вами работников и список всех ваших полетных листов.

Список профилей OC для применения к воркерам
Выберите профиль разгона, который вы хотите применить, и нажмите кнопку «Применить». Вы должны увидеть сообщение о том, что команда разгона была отправлена работнику. Через несколько секунд ваши работники должны применить изменения.