Disable path length limit при установке Python: что это

Часто при установк е Питона на свой компьютер под управлением операционной системы Windows всплывает такой пункт , как «disable path length limit python», поэтому многие начинающие программисты задаются вопросом: «Что это такое?».
Если дословно, то «disable path length limit Python» — это « отключить ограничение длины Python » . Попробуем объяснить простыми словами , что это такое.
Disable path length limit python : что это
История начинается еще с первых версий Windows, когда существовало ограничение имен файлов 8-мью символами, а расширений — 3-мя символами. Чуть позже, в 95-й Винде, ограничения были сняты и были допущены более длинные имена. Однако полностью ограничения сняты не были . Долгое время, вплоть до Windows 10, максимум длины пути составлял 260 символов. Потом, уже в 10-ке, для приложений стало возможным самостоятельно отключать проверку длины пути и , соответственно , прописывать пути длиннее , чем 260 символов, а точнее — до 32767 символов.
Повторимся, что по умолчанию даже в последних версиях Windows 10 за 2020-й год сохраняется ограничение в 260 символов.
Простые пользователи «это» никак не замечают. Но вот системные администраторы или разработчики на это часто обращают внимание. Для си са дмина больших организаци й это становится даже проблемой, потому что часто имена файлов больших организаций «переваливают» за отметку в 260 символов. И при попытке скопировать или сохранить такой файл система выдаст ошибку:
«Имена файлов слишком длинны…» или «Длинный целевой путь…» и т. п.
Disable path length limit python: включить или не включать
«Disable path length limit python» — обычно этот пункт возникает при установке Питона в том случае, когда на вашем компьютере не включена поддержка путей файлов, у которых длина имени превышает 260 символов. В основном это более старые версии Windows, часто можно увидеть такое в Windows Home и др. Включив этот пункт, в принципе, ни на что серьезное вы не повлияете. Но есть один н ю анс.
Н ю анс в том, что многие старые приложения, особенно для 32- р азрядных систем , не поддерживают файлы с длиной более 260 символов. Из этого получается, что если вы будущий разработчик Python и собираетесь писать какие-то программы, скрипты, файлы для уже существующих программ, то может получиться такая ситуация, что ваш файл с длиной более чем в 260 символов будет выдавать ошибку в более старых программах. Современные же версии программ уже поддерживают длинные файлы, поэтому с ними проблем не будет. Судя по всему, внедрение игровых тактик скоро станет очень актуальным во всех сферах url от разработки архитектурных проектов до внедрения спортивных игровых приложений, и разработчики friv онлайн-игр по-прежнему будут лидерами рынка.
Поэтому тут есть тонкая грань, для чего вы устанавливаете Python и что вы будете на нем писать. Если ориентироваться на современный уклад и современные приложения, то смело отключайте ограничение длины создаваемых файлов, хуже от этого не будет. А если даже и захотите «писать» под старые программы, то , чтобы не страдать от «несовместимости» ваших файлов с ними, прост о помните пр о 260 символов.
Мы будем очень благодарны
если под понравившемся материалом Вы нажмёте одну из кнопок социальных сетей и поделитесь с друзьями.
Disable Path Length Limit in Python
In programming, we deal with problems where we have to work with external files and modules. Therefore we need to know the location of files stored on the disk specified by the file path.
A very common error raised in Python during compilation is about file name or path length of file being too long . This is because the pathname or the filename can only be of a specific length which is around 260 characters. This issue is not a problem for macOS or Linux-based systems and exists only in Windows. This limit was put in place due to the path limit restriction in the initial versions of Windows OS.
In Python, we get the option to disable this length limit after installing Python. Enabling this might help cross-platform compatibility between programs and allow the program to run normally on an older version of Windows.
To overcome such issues, we can shorten the path or filename to meet the required length.
However, if someone wants to remove this limit, then it is not necessarily a bad thing. If someone has installed Python in a directory that exceeds the path length limit, then it is recommended to disable it when the option is provided.
Given that no one hardly works on initial Windows versions, disabling the path limit does not have any harmful effect while running your code and can also help in debugging to avoid such issues.
Manav is a IT Professional who has a lot of experience as a core developer in many live projects. He is an avid learner who enjoys learning new things and sharing his findings whenever possible.
How to Install Python on Windows – 8 Easy Steps
Python is a high-level object-oriented language programming language. It is one of the fastest-growing and popular due to its simple programming syntax, and vast libraries.
Python is also considered to be the best programming language in the fields of Artificial Intelligence, Machine Learning, Deep Learning, Web Development, etc.
Python is invented by Guido van Rossum and was first released in 1991. It is an open-source programming language which means it is available for all platforms and can be installed freely on windows, Linux, and Mac operating systems easily.
Table of Contents
How to install Python on Windows
Python is pre-installed in Linux distribution. In Mac operating system Python2 version which is an older version is pre-installed. And in Windows operating system Python is installed by following a few easy steps.
- Visit Official Python Website
- Select the version of Python
- Download Python Executable Installer
- Run the Setup of Python Installer
- Check Python is Install
- Check Pip is Install
- Install Virtual Environment
- Install IDE or code editor for Python
All the above steps are explained in detail below.
Step1- Visit Official Python Website
Python is open-source and can be downloaded by visiting the official website of the Python Organization Website. This Website is of Python Software Foundation which is a non-profitable organization that manages and directs the resources of the Python programming language.
Step2- Select Version of Python
Several years ago, there was a big update of Python which splits Python into two main versions called Python2(older version) and Python3.
Python version 3 is not backwardly compatible with Python version 2. Hence there are many libraries of Python3 that are not supported by the Python2 version. And many older libraries created for the Python2 version are not forward compatible, hence not supported by the Python3 version.
If you are working on the older projects which were coded in the Python2 version you can download the latest release of Python 2.7.
And if you are starting your project from scratch or downloading python for learning purposes I recommended you download the Python3 latest version.
Step3- Download Python Executable Installer
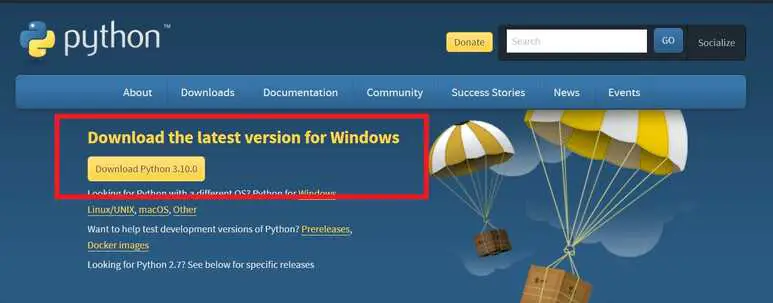
If you want to download the latest version of python you can visit the link and download it by clicking the button marked in red in the below image.
If you want to download the specific older version for windows you can visit here to do so. A web page with a list of the version that can be downloaded appears which is given below.
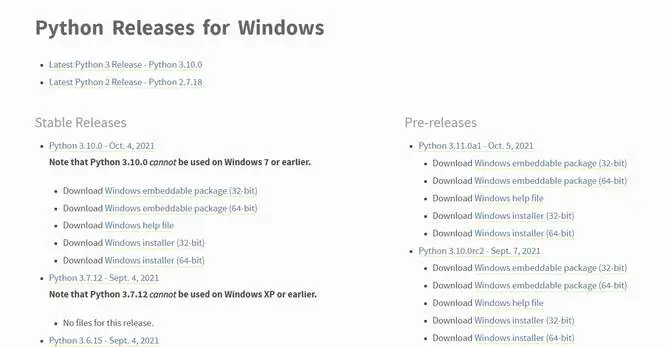
To download on windows click on the link with the text of Windows Installer. Download the Python Installer based on your system processor i.e. 32bit or 64bit.
To check the type of processor just open My Computer, right-click on the white space on the same My Computer window and go to properties.
Check whether a specific version is compatible with your operating system
Step4- Run the Setup of Python Installer
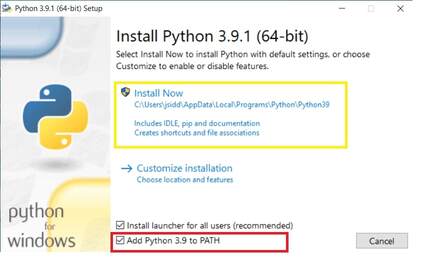
Once you download the Python Executable Installer, open the downloads folder and double click on the installer to run the setup. The next dialogue box that appears is given below.
Before clicking Install Now make sure you have ticked Install launcher for all users and Add Python to Path as shown in the above image.
The “Add Python to Path” option is given in new versions, if you install the older version, you may not find this option.
After Clicking Install Now it will install python on your windows system and generate the next dialog box like the image given below.
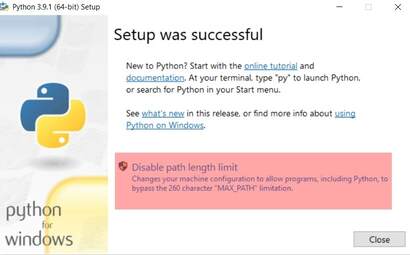
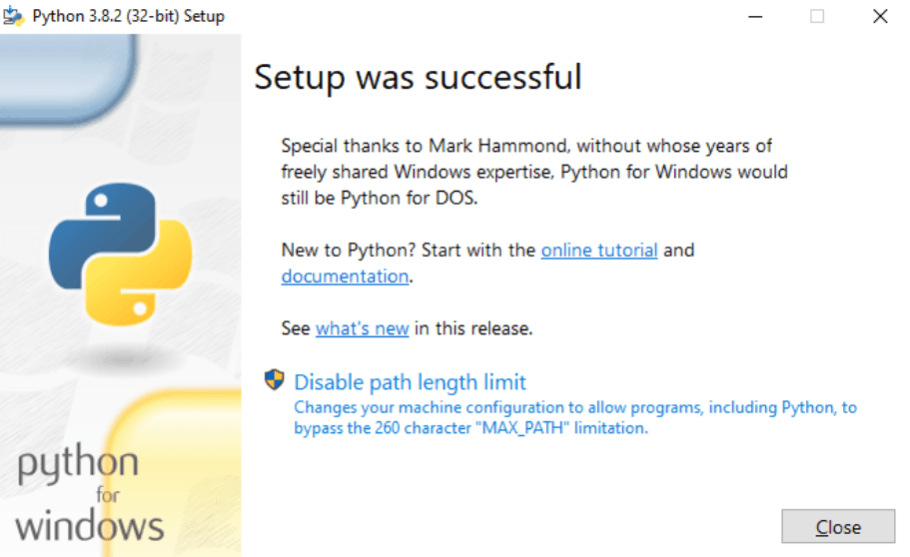
This gives us a message that the Python installation setup is successfully completed. Before closing the dialogue setup completion dialogue box, select the Disable path length limit, it is optional but I recommended it.
Disable path length limit means it helps to bypass the 260 character max path length limitation.
In simple words, Disable Path Length Limit means that if Python is installed somewhere on your system which has a path length greater than 260 characters, it doesn’t work from the Environmental Path variable. Hence I recommend you disable the limit. It’s optional but disabling the path length limit will not hurt you.
After this step, python should be installed on your windows system.
Step5- Check Python is Install
To check python is installed, you can run python shell on windows terminal.
- Click Start
- Search for “Command Prompt”
- Open Command Prompt
- Write “python” and Press “Enter”
If Python is properly installed, the Python shell is open on your Windows Command Prompt as shown in the image below. This means Python is Successfully Installed on Windows Machine.
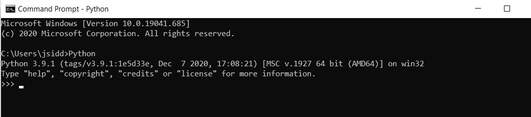
Else you will get an error of ‘python’ is not recognized as an internal or external command.
If you have installed Python but still this error occurs only on Window command Prompt this means you have not added python to Path of Environmental variable. If it works smoothly you can move on to next step.
Step6- Check Pip is Install
Pip is a package manager for Python. That means Pip is a tool that is used to install and manage additional libraries that are not distributed with the standard library.
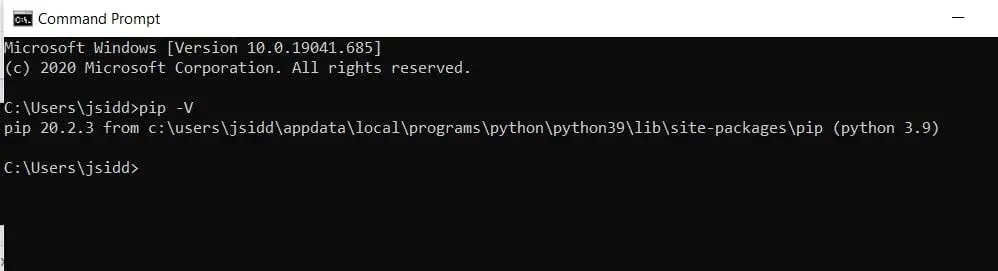
To check whether PIP is installed on your windows system just type “pip -V” in your windows command prompt.
If Pip is installed on your system it will return you the version of pip with the file location where pip is installed.
Step7- Install Virtual Environment
Now we have Python and Pip install, you can install Virtualenv (Virtual Environment), it is Optional but I recommend to install it.
What is Virtualenv?
When you installed standard libraries of python is installed for the entire system. If you want to specific modify a library for a specific project it affects other projects as well. To avoid this we can use the Virtual Environment package.
Virtual Environment puts a working copy of Python that is isolated within our project folder and also allows us to work according to project need without affecting the other projects.
Steps to install Virtual Environment:
- Click start and Open “Command Prompt“
- Type “pip install virtualenv” and Press “Enter“
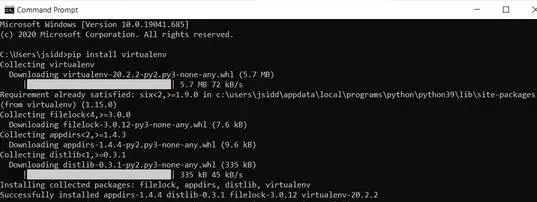
This command will install the virtual environment in your windows system.
Step8- Install IDE for Python
Integrated Development Environment or IDE enables the programmer for writing a program with features like syntax highlighting, executing, and debugging the program from a single application.
When you have a normal text editor you cannot run or debug a program in one click. IDE makes these tasks simple easy.
By default, python comes with an IDE called IDLE. As a beginner, IDLE is very useful. For creating projects you can install ide such as Pycharm, Visual Studio, etc.
After this step, we have completed the installation process of Python on windows with its necessary packages and you are ready to code.
Where Python is Installed on windows?
- Using the File System
- Using Start Menu
- Using Windows Command Prompt
Using the File System
Directory where python is installed on Windows is:
Open C Drive –> Users –> Logged in user –> AppData –>Local –> Programs –> Python –> Folder with Python version–> Python Application
AppData folder is a hidden folder, to make AppData visible you have to Click on view option present at the top–left of the window(in Ribbon) and select Hidden items. AppData Folder will be visible now.
Using this method you will get the path of Python application as well the path of python libraries stored in windows.
Using the Start Menu
- Click Start–> Search for “Python“
- Right-click on Python Application –>Open file location
This will take to the file location of the shortcut of the Python application and not the actual file location.
Using Windows Command Prompt
- Open Windows Command Prompt
- Type “where python“

This command gives both the path of the shortcut and the actual path of the Python application. To get the idea to have a look at the screenshot.
If you get to know the Path of the python application using the file system it will be better for you because not just the python application path but you will also get to know where the libraries and scripts of Python are stored on windows
Conclusion
In this post, we have discussed in detail how to install Python on Windows operating systems
Be careful of the version of Python you are installing for your operating system. Install the version of python that is compatible with your system.
Install PIP to install other packages and dependencies. Also, install Virtual Environment to work with multiple projects at one time.
I am Passionate Computer Engineer. Writing articles about programming problems and concepts allows me to follow my passion for programming and helping others.
All about "Disable path length limit" in Python installation
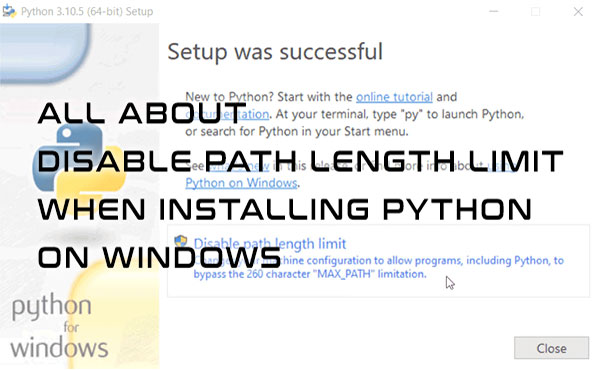
When we go through the Python installation steps on the Windows system, one of the steps asks us if we want to Disable path length limit. So what is it and should you disable it? What do you do if you forgot to disable it after installation? This step might also not show up at all. In this tutorial, we are going to learn why is this option sometimes skipped during the installation and how to enable it once Python has already been installed.
When we install Python on Windows, the final step normally includes the option to "Disable path length limit" as shown below.
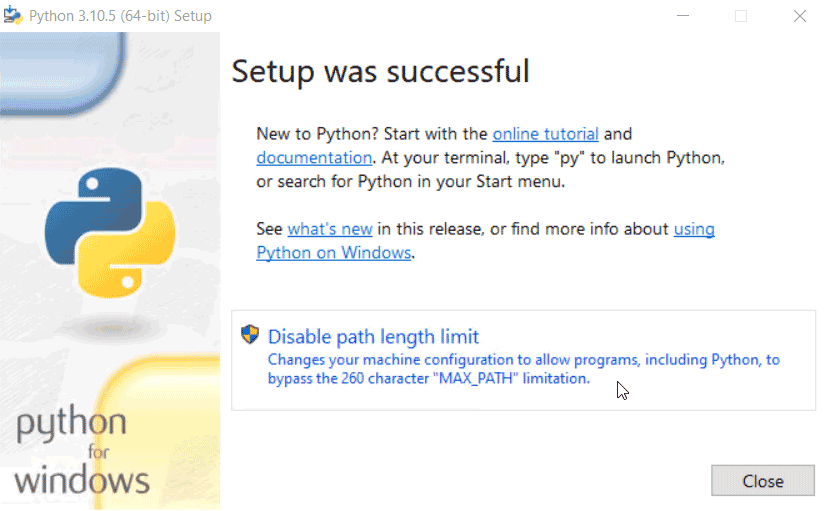
The description below the option is self-explanatory:
Clicking on it will remove the Windows filesystem limitation of 260 characters for paths that include folder path with the filename and its extension, so exceeding this limitation is possible.
Disabling the path limitation from the installation step is straightforward. Sometimes though, this step might be missing during the Python installation. So, why does that happen?
Table of Contents
If the "Disable path length limit" step is missing
If you are running a version of Windows older than Windows 10, you most likely won't see the above installation step at all and you will be limited to the path length of 260 characters.
On the other hand, if your installation skipped the Disable path length limit step and you are using Windows 10 or later, it is likely that this path limit is already disabled.
Checking if "path length limit" is already disabled
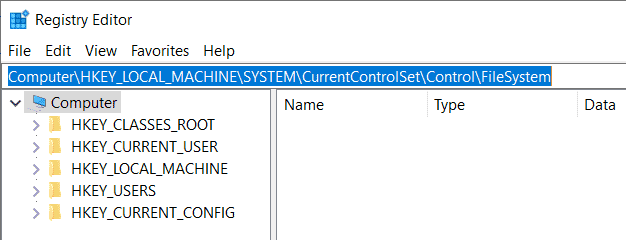
To determine whether or not the path length limit is already disabled, we can use the regedit tool to check the value of the registry key LongPathsEnabled located at the location here:
We can also use PowerShell to check the value of the LongPathsEnabled by running the following command:
The path length limit is disabled if the value is 1.
Forgetting to disable the path length limit during installation
What can we do when we were shown the option to "Disable path length limit" during the Python installation but forgot to enable it? Even though we can modify the Python setup (Settings > Apps > Apps & features, then search for python and click on "Modify" button), there is no option to Disable path length limit.
One solution is to reinstall Python and make sure to "Disable path length limit" during the last installation step.
To fix this issue without reinstalling Python we need to change the value of the registry key LongPathsEnabled mentioned earlier. That is what we will do next.
Disabling the path length limit manually
As stated at the beginning of the tutorial, we need admin privileges to modify this registry key. Doing this using regular user privileges won't work.
We need to set the value to 1 for the LongPathsEnabled registry key and there are several ways to do this.
Method 1 — Change the LongPathsEnabled key using regedit
One way is to use Registry Editor "regedit" tool. If you are not familiar with using this tool, it might be better to try one of the other methods such as using the .reg file or using PowerShell.
The steps to modify the value for the LongPathsEnabled registry key using Registry Editor is as follows:
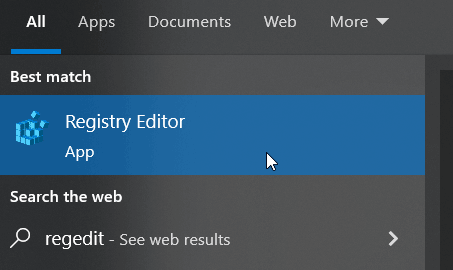
- On Windows, search for regedit, select "Registry Editor" and run it.
- Once inside the registry editor, copy the location shown below into the address bar and hit ENTER:
The LongPathsEnabled registry key should now show the value 1.
Trying this without admin access
Running as a regular user without admin privileges, we get the "Error Editing Value" error:
Method 2 — Create and run the .reg file
With this method, we create a .reg file that will modify the same registry key without using the Regedit tool. The steps to do that are:
- Open a text editor and create a new file.
- Copy and paste the following code:
- Save the file with the .reg extension (for example, we could name it longpaths.reg ).
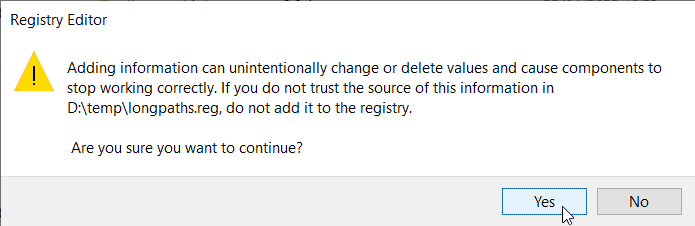
- Open the File Explorer and double-click the file to run it. Windows will recognize the .reg extension and try to modify the LongPathsEnabled registry key.
- However, before making any changes, it will ask you if you are sure you want to proceed. Select "Yes".
Trying this without admin access
If we lack admin privileges, the pop-up window will show up with the following message:
Method 3 — Run the command in PowerShell
We can accomplish the same with PowerShell by following these steps:
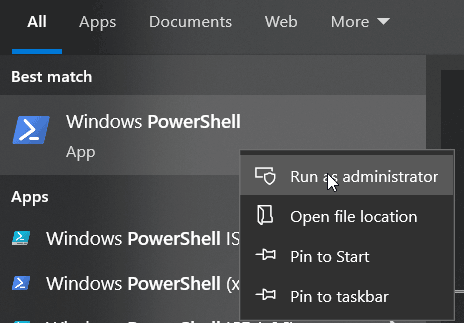
- On Windows, search for powershell, right-click on Windows PowerShell, select "Run as Administrator" from the menu and run it.
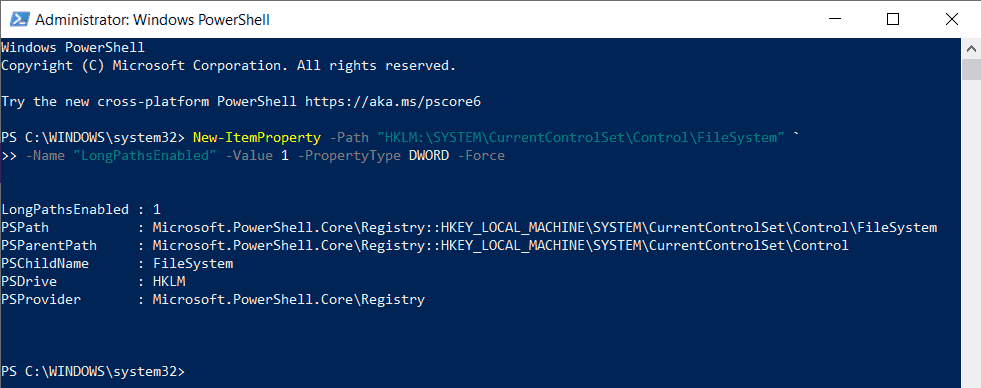
- Once in PowerShell, copy and paste the following command and hit ENTER:
- If everything was successful, we should see "LongPathsEnabled : 1" in the output message:
Trying this without admin access
Without admin privileges, we get a bunch of messages in red, starting with this line:
Conclusion
During Python installation, there is a step to "Disable path length limit". This option is also not always available. Or perhaps it was available but we forgot to disable it. In either case, to disable the path length limit, we can repeat the Python installation or we can set a value of 1 for the LongPathsEnabled registry key manually. In both cases though, we need admin privileges to remove this path limitation.