Как включить доступ к консоли KVM virsh для Ubuntu Linux виртульной машины
 Я выполнил все ваши инструкции и установил KVM с Ubuntu Linux в качестве новой гостевой виртуальной машины. Однако я не могу использовать команду: «virsh console vm». Как настроить и включить доступ к консоли, чтобы получить доступ к оболочке на недавно созданной виртуальной машине Ubuntu Linux 16.04 LTS?
Активация последовательной консоли в гостевом Ubuntu Linux 16.04 LTS — отличный способ войти в систему и решить проблемы.
Пример нашего установленного экземпляра
- KVM IP хоста: 192.168.2.15
- KVM гостевая операционная система: Ubuntu Linux 16.04 LTS
- KVM гостевой IP: 192.168.2.45
- KVM гостевое имя: ubuntu-box1
- KVM гостевое имя пользователя: vivek
- KVM гостевой пароль: hidden-secrete
Как настроить доступ к консоли Ubuntu 16.04 KVM Guest
Во-первых, вам нужно войти с помощью ssh или VNC клиента в гостевой Ubuntu.
Осуществляем вход с помощью ssh
В этом примере, я осуществляю вход, используя ssh клиент, из моей рабочей станции (или введите команду на самом хосте KVM) в Ubuntu Linux VM guest:
После входа получите доступ к корневой оболочке:
Осуществляем вход с помощью
Введите следующую команду на вашем KVM хосте:
Пожалуйста. обратите внимание на значение порта (т. е. 5901). Вам нужно использовать SSH-клиент для настройки туннеля и клиента VNC для доступа к удаленному серверу vnc. Введите следующую команду переадресации портов SSH из вашей клиентской или настольной системы Linux/Unix/MacOS:
После того, как вы установили туннель ssh, вы можете указать в VNC свой IP 127.0.0.1 (localhost) адрес и порт 5901. В VNC клиенте это можно сделать следующим образом:
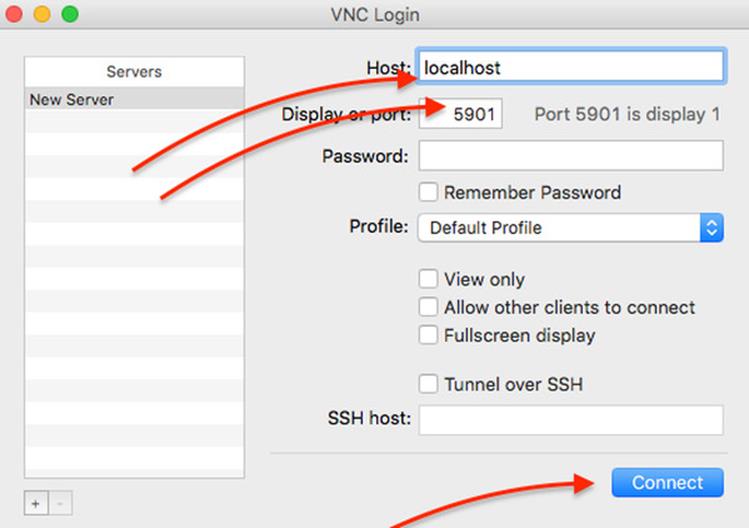
Рисунок 01: Графический клиент VNC для подключения к консоли сервера Ubuntu Linux 16.04 LTS
Войдите в свою виртуальную машину:
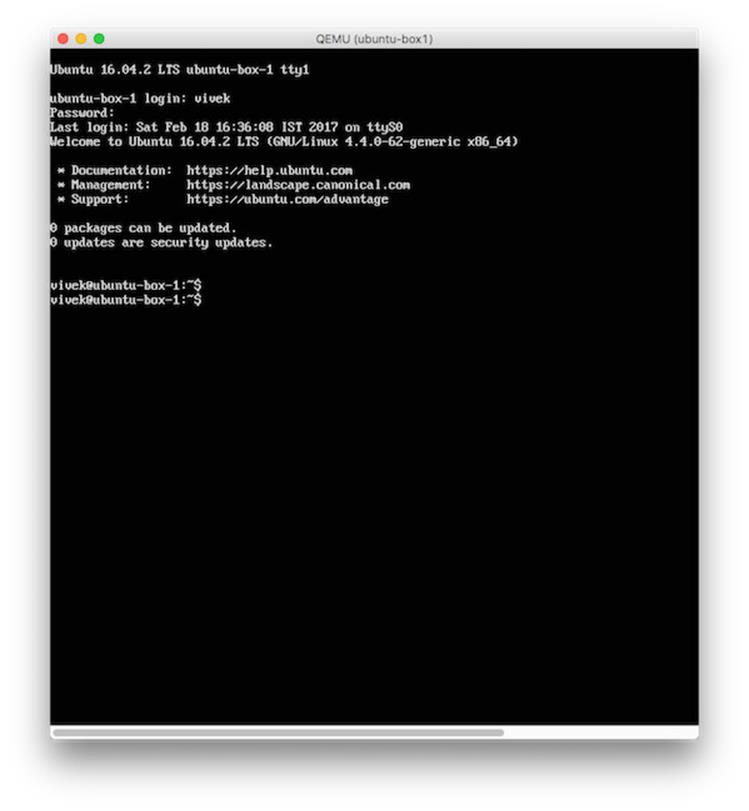
Рисунок 02: Вход в мою гостевую виртуальную машину Ubuntu
Настройте последовательную консоль в гостевой Ubuntu
Наконец, введите следующие две команды, чтобы включить последовательную консоль в гостевой системе для доступа к соединению с помощью команды «virsh console»:
Примеры возможных выводов данных:
Как получить доступ к консоли Ubuntu 16.04 KVM Guest с узла KVM
Для того чтобы увидеть список запущенных виртуальных машин введите:
Примеры возможных выводов данных:
Введите следующую команду с хоста KVM для входа в гостевой файл с именем ubuntu-box1
Используйте комбинацию клавиш Ctrl + ] для того, чтобы выйти из консоли.
Как зайти в консоль виртуальной машины?
1. В личном кабинете перейдите на страницу «Виртуальные машины».

2. Выберите нужную виртуальную машину и кликните на панели управления. 
3. Консоль управления откроется в новой вкладке браузера. Введите логин и пароль (Где посмотреть пароль от виртуальной машины?).

4. Для входа в консоль Windows воспользуйтесь виртуальной клавиатурой. Кликните на значок Специальные возможности в левом нижнем углу.

5. Выберите опцию «Ввод текста без клавиатуры (экранная клавиатура)».
How to Use VirtualBox Command-Line?
When you have a VirtualBox hypervisor installed, there is no doubt that the easiest way to navigate through the VirtualBox is via GUI. It is very user-friendly; even an average user can create and manage a virtual machine using VirtualBox GUI without having prior knowledge on how to manage VM’s. But the fastest way to use the VirtualBox is via its command line. Many people think that working with the VirtualBox VM via the command line is a complex task, and only an advanced user should be performed. However, that’s not the case. Once you start using the VirtualBox CLI, you may not go back to the GUI again because it’s a faster way to get things done.
Instead of going through multiple steps, you can pretty much do everything with one single command, and you don’t have to move around the menus and sub-menus using the mouse pointer.
Moreover, the VirtualBox CLI supports more features that are not available in the GUI.
In this blog, we will look at how you can manage VirtualBox using the command line, we are not going through all the commands, but we will go through the essential ones.
After following this, you can manage the virtual machine in VirtualBox using the command line.
I am using VirtualBox on a Windows 10 machine, and the commands that I use here are pretty much the same for VirtualBox running on other operating systems.
Table of Contents
Can I start VirtualBox GUI from command line?
You can start VirtualBox GUI from the command line. However, you have to be at the installation location and start the CMD from there, which we will discuss next.
After you opened the cmd, all you have to do is type VirtualBox and hit enter. The GUI would open.
The character doesn’t have to be case-sensitive.
As you can see, I have typed the command with the mix of upper and lower cases, and all of them worked just fine. And that should open the Virtualbox GUI.
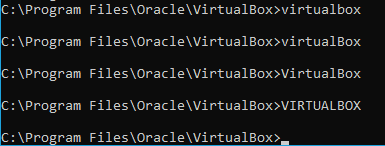
How to run VirtualBox Command line?
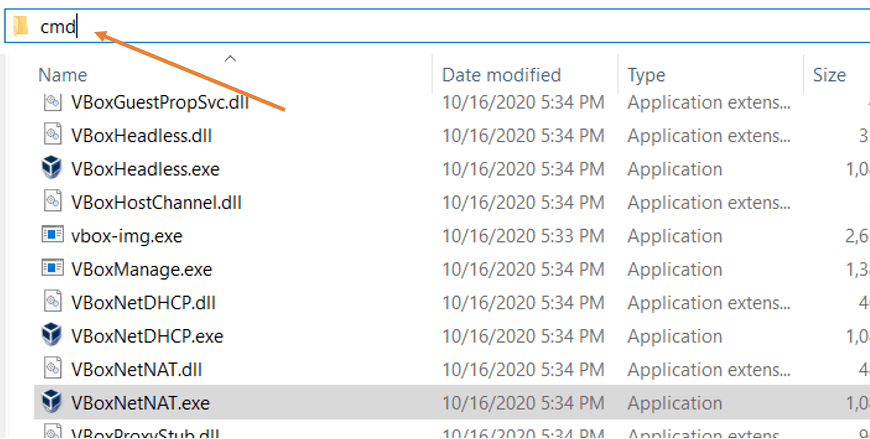
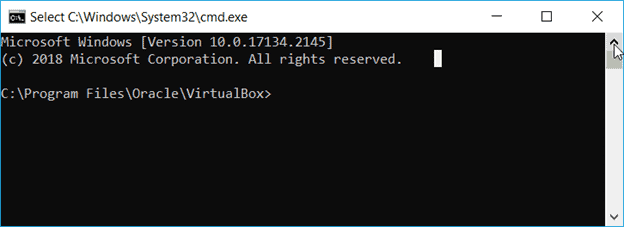
Vboxmanage is the command-line interface utility for the VirtualBox. To start the command line for VirtualBox, you will have to go to the installation location of the VirtualBox. By default, the installation location for the VirtualBox in windows is under C:\Program Files\Oracle\VirtualBox
While you are at the location, you can type cmd on the address bar. It should open up the command line on the exact location, and you can start to use vboxmanage and the rest of the VirtualBox commands from here now.
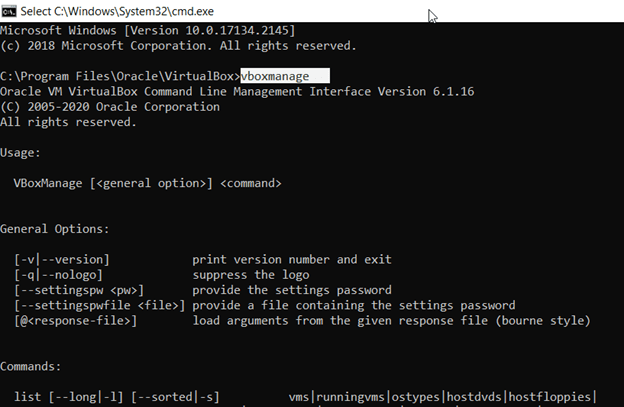
To get help or the command reference that you want to follow, you can enter the command vboxmanage and hit enter. It will show you a whole list of commands and the subcommands you could run with the vboxmanage.
List the VirtualBox VM’s.
To see the VM’s list currently running on your VirtualBox machine, you can type the command vboxmanage list vms and hit enter.
It will show you all the VM’s that are currently installed in the VirtualBox environment with their name and UUID. We will see how we can use both the names and the UUIDs to manage the VM’s in VirtualBox CLI.
How do I see the running VM’s in vboxmanage?
While the list VM’s will show you the list of VM’s that you have in the VirtualBox, You can type the command vboxmanage list runningvms to see the list of VM’s that are currently running on the VirtualBox.
As you can see, I cannot see any VM’s that are currently running because I have not started any VM’s yet.
Let’s take a look at how you can start a VM via CLI in VirtualBox.
How to start a VirtualBox VM from command line?
To start a VM, you can use the command startvm following vboxmanage and the VM name or UUID.
The command will be as follows.

You can also type the VMname without quotes. However, if the VM name has space, you cannot run the commands without the quotes.
As you can see, I tried to start a VM with a space in its name, but it didn’t start. Instead threw an error, and when I tried the same command with quotes, it started.

If your machine doesn’t have GUI access, you can also start the VM in a headless mode. This will not open the GUI, and from other devices or a local network, you can log in via ssh protocol and manage the VM, provided you should have the Virtualbox Networking properly set up.
To start the VM in a headless mode, right after the VM name add –type command and type as headless.
When you enter the headless commands, you won’t see the VM opens up in a GUI. However, it will be running in the background. And you can use the runningvm command to see the running VM’s.
Start the Virtualbox VM with UUID.
Remember, I mentioned managing the VM’s with name and UUID ?.
We have already taken a look at how you can manage the VM’s using the VM’s name. Let’s do the same thing with the UUID.
To get the UUID, you can type the list VM’s command again, and after the name, you should be able to see the UUID.
I have an Opnsense firewall VM with the UUID start with e1c and ends with 9c8.
Let’s start the VM using the UUID, and you should see the VM has started. Since we have not used the headless mode, the VM should open up in a VirtualBox GUI if you have GUI access.
I entered the command list running VMS, and I can see the Opnsense firewall VM has been started and running now.
How do I see the properties of the Virtualbox VM?
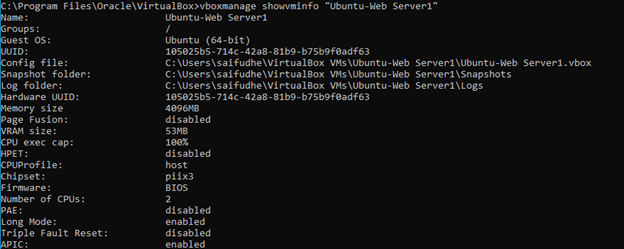
When you wanted to see the properties or the information about a specific VM, you should use vboxmanage showvminfo <vmname> command.
It will help you alter the VM settings later on when you wanted to make some changes, which we will cover in the modifyvm settings.
When you enter the showvminfo command, it will show you detailed information about VM resources, including OS type, CPU, Memory, Storage, and so on.
How to check host machine resources in vboxmanage CLI?
When you deploy a VM to VirtualBox, or any other hypervisor for that matter, the resources such as memory, CPU, and so on are allocated by the host machine. And you must know how much resources are left on your host machine before you spin up more VM’s.
We have checked the VM information by entering showvminfo right. Is it possible to check the host machine properties as well?
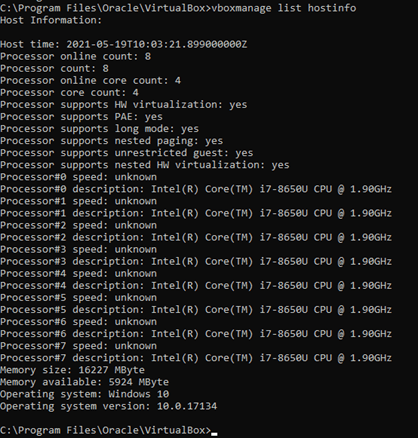
You can check the host machine information on the vboxmanage command line, by typing the command below.
vboxmanage list hostinfo.
As you can see, it will show you the number of processors your host machine has. The Memory size and available memory on the and operating system information as well.
Vboxmanage controlvm.
With vboxmanage controlvm you can change the state of the virtu albox virtual machine, you could pause, resume, power off, restart and everything can be done from here.
Let’s take a look at how it works in action.
The Virtualbox CLI is mainly used so everything can be done remotely over the ssh. To make things clear, I will also show you how each command works with the GUI as well.
How to stop VirtualBox VM from command line?
We have some VM’s that we have started to test the vboxmanage command line. How do we go about and shutdown those VM’s via CLI?
The shutdown option in VirtualBox is under the subcommand controlvm, similar to how you power down a physical machine by pressing the power button. You can do the same using acpipowerbutton option.
I will power down one of the Ubuntu web server that I am running in the VirtualBox.
First, let’s check the VM’s in CLI.
For your information, the GUI list also shown.
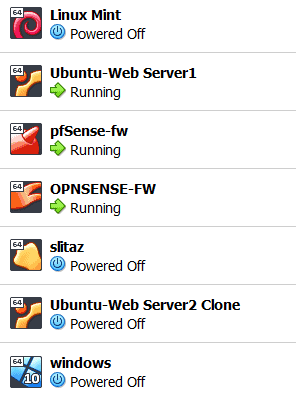
Shutdown the VM.
I used the command vboxmanage controlvm “Ubuntu-Web Server1” acpipowerbutton and as you can see the VM got shutdown and I no longer see the VM’s under the running state.
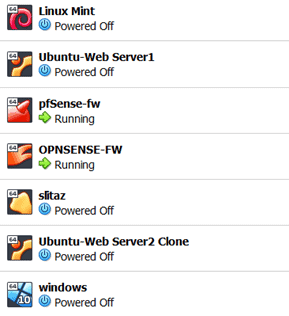
Virtualbox VM force shutdown.
When you try to shut down the VM’s using the acpipowerbutton command, it may not work for some of the VM’s because of no ACPI support on the operating system. You can use an alternate command which is poweroff, The poweroff option is like unplugging the cable from a physical machine, and you know that it is not a good practice.
And same applies to this poweroff command as well. You should be extra careful when you use this command as it can corrupt the virtual machine.
From the current running machines, I will shut down both remaining VM’s that I have.
After few seconds, the VM’s will be powered down, and you should see there are no runningvms currently on the VirtualBox CLI as well in the GUI.
Reboot a VM in VirtualBox using vboxmanage.
We have taken a look at how you can stop the VM’s using vboxmanage. You can also reboot the VM’s in VirtualBox using the vboxmanage command.
It is recommended to use the restart option within the VM’s, but you have this option available for you to use.
The command for restarting the VM is vboxmanage controlvm <vmname/uuid> reset.
It is similar to the reset button on the physical box.
I have just powered on one of the windows 10 machine that I have, and I will use the command against the same virtual machine.
As soon as I entered the command, the VM got rebooted.
Pause a VM using vboxmanage.
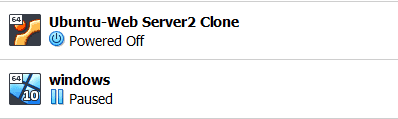
As the name suggests, the pause command will put the VM state into a pause state, and you won’t be able to make any changes on the VM. Neither can you log in. And the VM screen will look in grey.
To pause the VM, you can type the command vboxmanage controlvm “windows” pause.
As you can see from the below screenshot, the one on the left running state and the right is when the VM is paused, and you cannot do anything in the VM until you resume the state of the VM.
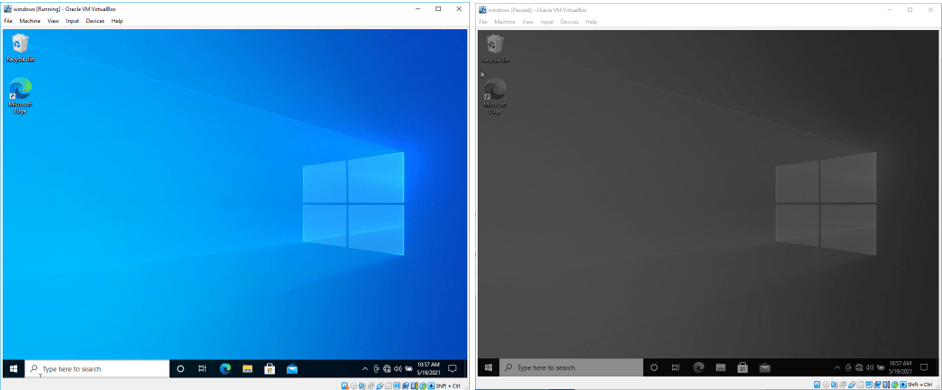
You can see the VM is paused in the list of VM’s in the GUI as well.
Resume the VM state from pause.
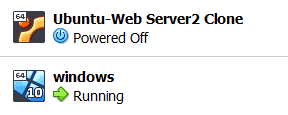
To come out of the pause state, you can replace pause with resume. It will bring up the VM to be running state again.
You should see the state changed from the pause to resume in VirtualBox.
Save the virtual machine state.
When you try to close the VM’s in GUI, you must have seen an option that says Save the machine state. What it will do is, it will save the current machine state to the disk and close the VM.
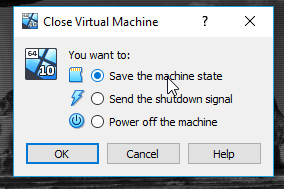
The same option is available under the controlvm command as savestate.
I have the same windows 10 VM running, and let’s run the command vboxmanage controlvm “windows” savestate.
Before we run the command, let’s open some applications in the Windows VM and apply the command, and when we start the VM again, it should restore from where it was left off.
This option is handy when you are in the middle of something, and you want to take a long break and come back and resume from where you left off.
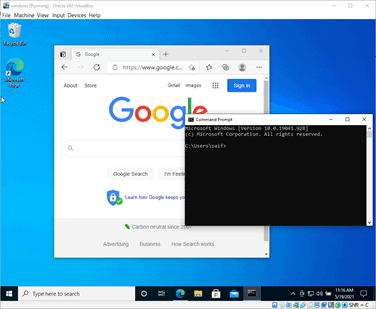
I have a web browser and a command prompt window which I have currently opened. And I am going to issue the command now.
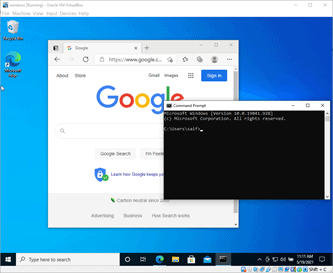
I ran the command, and after few seconds, the VM has saved its state and shut down the VM.
You wont be able to see the VM is running in the virtualbox.
And in the GUI, you can see the VM status as Saved.
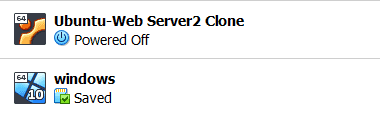
Let’s start the VM using the startvm command again, and it should start from where we left off.
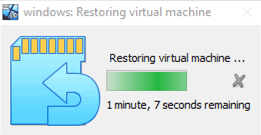
As soon as I powered on the VM, it started to restore the virtual machine. Though the remaining restoration time says 1minutes and 7 seconds, I could get in within few seconds.
And you could see I could get back to the previous state I was in right before I shut down the machine.
Vboxmanage modifyvm
We have taken a look at how you can manage the VM using the vboxmanage controlvm. Let’s take a look at how you can modify the VM properties using the modifyvm subcommand in vboxmanage. When you run the command, make sure you shut down the Virtual machines first.
Change the VM name VirtualBox CLI.
If you want to change the name of the VM in virtualbox CLI, you can run the command vboxmanage modifyvm <» vmname»> —name <newname>
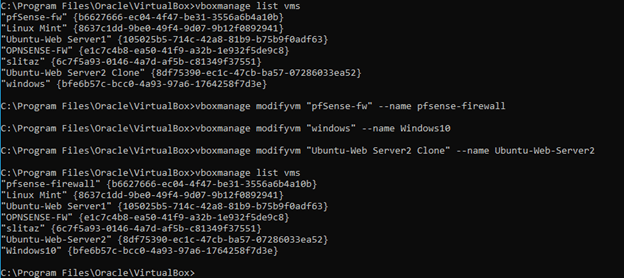
I will rename some of the VM’s names using the –name option in the CLI.
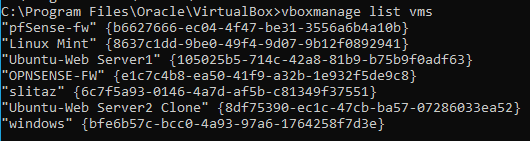
To rename the pfSense-fw we can type the command as follows.
Similarly I have renamed the two other VM’s as well. Windows to Windows 10 and Ubuntu-web server2 clone to ubuntu_web_server2.
Modify the memory.
When I deployed the Ubuntu machine in VirtualBox, I have added 4Gigs of ram. Since my machine has enough RAM, it should be okay. However, when I want to run more VM’s at the same time, it will be a challenge.
So let’s see how can modify the memory in VirtualBox using CLI.
First, let’s check the current memory allocation.

I can check the memory allocation by typing the vboxmanage showvminfo “vmname” command.
I have provided 4096MB of RAM.
Let’s go ahead and reduce to 1028MB instead.
Before I make the changes, I need to see if I am running the VM or not.
As you can see, the Ubuntu VM is currently running, and I cannot modify the memory allocations to it.
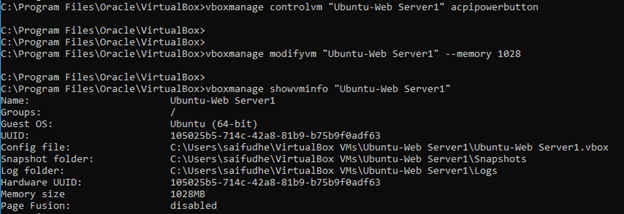
Poweroff the machine. And modify the RAM size to 1028 with the below command.
After that, when I checked the vminfo, I could see the memory size reduced to 1gig.
Increasing the memory also the same way. Let’s say you want to increase the memory from 1028 to 2048 replace the 1028 in the previous command to 2048.
Modify the CPU.
When we checked the Ubuntu VM CPU, we could see that we have assigned 2 CPUs to it.
What if you are machine is running slow, and you wanted to run the VM’s, but allocate only single-core? You can do that by using the modify CPU option.
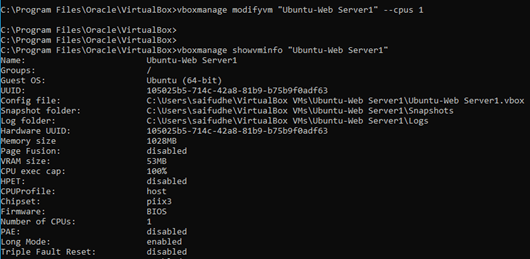
So you can type the command vboxmanage modifyvm «Ubuntu-Web Server1» —cpus 1
After that, you can notice the in showvminfo, the CPU is changed to 1 core.
Change the OS Types.
After you deploy an operating system, and later you realize that you choose the different operating system type instead of a correct one, you can go back to the vboxmanage CLI and change the ostype and which is very easy.
You can get the list of supported ostypes in virtualbox by typing the following command.
Vboxmanage list ostypes
Let’s assume that I have installed, windows 10 on my VirtualBox, unfortunately, I have chosen windows 7 as the OS type during the installation.
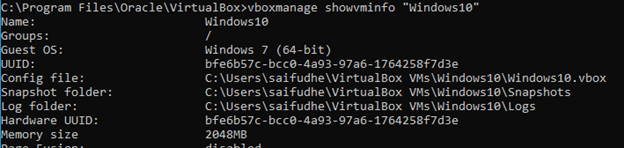
You can verify the same from the GUI as well.

To change the OS type, first, check the OStype from the list of supported ostypes mentioned above, my operating system type is listed below, which is windows 10 and I have two options to choose from one is 32 bit another is 64 bit.
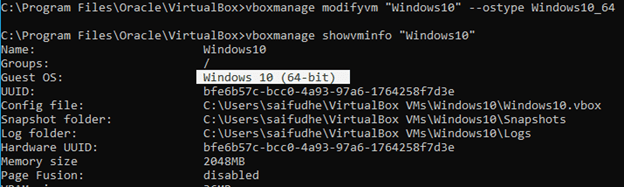
To change from windows 7 to windows 10 enter the command as below.
vboxmanage modifyvm «Windows10» —ostype Windows10_64
After you made the changes, you should be able to see the vminformation changed on the virtualbox CLI and the GUI.

How to delete a VM from VirtualBox using CLI?
You can either remove the Virtual machine from the VirtualBox or delete it from the disk.
To remove the VM from the VirtualBox, you can use the command unregistervm, and it would remove the VM instance from the VirtualBox.
However, the VM files will still be there under the VirtualBox VM folder.
To altogether remove the VM, you can type the command –delete at the end. It should delete the VM.
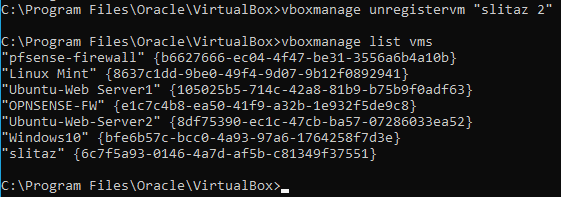
I have below VM’s in the list, and I will remove slitaz 2 from the list.
To do that enter the command as below.
vboxmanage unregistervm “slitaz 2” And you no longer see that VM in the list.
But you can see the VM files in the VirtualBox folder.
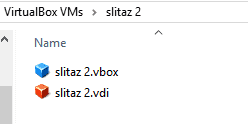

To register the VM which was removed, you can enter vboxmanage registervm
“C:\Users\saifudhe\VirtualBox VMs\slitaz 2\slitaz 2.vbox”
Note: You need to call the file from the Virtualbox VM locations.
Now the VM is registered back.

Delete the VM completely.
To delete the VM, you can use –delete at the end.

After the deletion, you will still see the folder, but the virtual machine files are deleted.
Подключение к консоли виртуальной машины в VirtualBox
Классическая ситуация: есть сервер с *nix и на нём поднят VirtualBox. В один момент доступ к одной из виртуальных машин пропал. Нужно подключится к консоли, но как? Нигде нету GUI, что бы как на десктопе, взять и подключиться.
Выход есть: запустить заново виртуальную машину в режиме headless. Держать запущенным всё время виртуальную машину в этом режиме опасно, так как открывается консоль на порту на всех интерфейсах, тем более, если ваш сервер смотрит в мир.
Узнаем список виртуальных машин
# VBoxManage list vms
«deb0»
Выключаем виртуальную машину любым способом и запускаем в headless режиме:
# VBoxHeadless -s deb0 -v on -p 3390
В новой версии используем параметр -e:
Warning: ‘-p’ or ‘-vrdpport’ are deprecated. Use ‘-e «TCP/Ports=3390″‘
# VBoxHeadless -s deb0 -v on -e «TCP/Ports=3390»
При этом, порт консоли будет 3390.
Проверяем, что машина запустилась
# VBoxManage list runningvms
«deb0»
И теперь подключаемся к ней:
$ rdesktop -g 1024×768 -a 16 -5 XX.XX.XX.XX:3390
где XX.XX.XX.XX адрес сервера, где запущен VirtualBox
После завершения работ, запустите виртуальную машину в нормальном режиме.
Изменение количества памяти.
Понадобилось изменить память с 1Гб до 2Гб. Останавливаем машину и меняем:
# VBoxManage modifyvm «deb0» —memory 2048
VBoxManage: error: The machine is not mutable (state is Saved)
VBoxManage: error: Details: code VBOX_E_INVALID_VM_STATE (0x80bb0002), component SessionMachine, interface IMachine, callee nsISupports
VBoxManage: error: Context: «COMSETTER(MemorySize)(ValueUnion.u32)» at line 470 of file VBoxManageModifyVM.cpp
Лечится это так:
# VBoxManage list vms
«deb0»
# VBoxManage discardstate «
# VBoxManage modifyvm «deb0» —memory 2048
После этого запускаем машину