Простым языком об HTTP
Вашему вниманию предлагается описание основных аспектов протокола HTTP — сетевого протокола, с начала 90-х и по сей день позволяющего вашему браузеру загружать веб-страницы. Данная статья написана для тех, кто только начинает работать с компьютерными сетями и заниматься разработкой сетевых приложений, и кому пока что сложно самостоятельно читать официальные спецификации.
HTTP — широко распространённый протокол передачи данных, изначально предназначенный для передачи гипертекстовых документов (то есть документов, которые могут содержать ссылки, позволяющие организовать переход к другим документам).
Аббревиатура HTTP расшифровывается как HyperText Transfer Protocol, «протокол передачи гипертекста». В соответствии со спецификацией OSI, HTTP является протоколом прикладного (верхнего, 7-го) уровня. Актуальная на данный момент версия протокола, HTTP 1.1, описана в спецификации RFC 2616.
Протокол HTTP предполагает использование клиент-серверной структуры передачи данных. Клиентское приложение формирует запрос и отправляет его на сервер, после чего серверное программное обеспечение обрабатывает данный запрос, формирует ответ и передаёт его обратно клиенту. После этого клиентское приложение может продолжить отправлять другие запросы, которые будут обработаны аналогичным образом.
Задача, которая традиционно решается с помощью протокола HTTP — обмен данными между пользовательским приложением, осуществляющим доступ к веб-ресурсам (обычно это веб-браузер) и веб-сервером. На данный момент именно благодаря протоколу HTTP обеспечивается работа Всемирной паутины.
Также HTTP часто используется как протокол передачи информации для других протоколов прикладного уровня, таких как SOAP, XML-RPC и WebDAV. В таком случае говорят, что протокол HTTP используется как «транспорт».
API многих программных продуктов также подразумевает использование HTTP для передачи данных — сами данные при этом могут иметь любой формат, например, XML или JSON.
Как правило, передача данных по протоколу HTTP осуществляется через TCP/IP-соединения. Серверное программное обеспечение при этом обычно использует TCP-порт 80 (и, если порт не указан явно, то обычно клиентское программное обеспечение по умолчанию использует именно 80-й порт для открываемых HTTP-соединений), хотя может использовать и любой другой.
Как отправить HTTP-запрос?
Самый простой способ разобраться с протоколом HTTP — это попробовать обратиться к какому-нибудь веб-ресурсу вручную. Представьте, что вы браузер, и у вас есть пользователь, который очень хочет прочитать статьи Анатолия Ализара.
Предположим, что он ввёл в адресной строке следующее:
Соответственно вам, как веб-браузеру, теперь необходимо подключиться к веб-серверу по адресу alizar.habrahabr.ru.
Для этого вы можете воспользоваться любой подходящей утилитой командной строки. Например, telnet:
telnet alizar.habrahabr.ru 80
Сразу уточню, что если вы вдруг передумаете, то нажмите Ctrl + «]», и затем ввод — это позволит вам закрыть HTTP-соединение. Помимо telnet можете попробовать nc (или ncat) — по вкусу.
После того, как вы подключитесь к серверу, нужно отправить HTTP-запрос. Это, кстати, очень легко — HTTP-запросы могут состоять всего из двух строчек.
Для того, чтобы сформировать HTTP-запрос, необходимо составить стартовую строку, а также задать по крайней мере один заголовок — это заголовок Host, который является обязательным, и должен присутствовать в каждом запросе. Дело в том, что преобразование доменного имени в IP-адрес осуществляется на стороне клиента, и, соответственно, когда вы открываете TCP-соединение, то удалённый сервер не обладает никакой информацией о том, какой именно адрес использовался для соединения: это мог быть, например, адрес alizar.habrahabr.ru, habrahabr.ru или m.habrahabr.ru — и во всех этих случаях ответ может отличаться. Однако фактически сетевое соединение во всех случаях открывается с узлом 212.24.43.44, и даже если первоначально при открытии соединения был задан не этот IP-адрес, а какое-либо доменное имя, то сервер об этом никак не информируется — и именно поэтому этот адрес необходимо передать в заголовке Host.
Стартовая (начальная) строка запроса для HTTP 1.1 составляется по следующей схеме:
Например (такая стартовая строка может указывать на то, что запрашивается главная страница сайта):
Метод (в англоязычной тематической литературе используется слово method, а также иногда слово verb — «глагол») представляет собой последовательность из любых символов, кроме управляющих и разделителей, и определяет операцию, которую нужно осуществить с указанным ресурсом. Спецификация HTTP 1.1 не ограничивает количество разных методов, которые могут быть использованы, однако в целях соответствия общим стандартам и сохранения совместимости с максимально широким спектром программного обеспечения как правило используются лишь некоторые, наиболее стандартные методы, смысл которых однозначно раскрыт в спецификации протокола.
URI (Uniform Resource Identifier, унифицированный идентификатор ресурса) — путь до конкретного ресурса (например, документа), над которым необходимо осуществить операцию (например, в случае использования метода GET подразумевается получение ресурса). Некоторые запросы могут не относиться к какому-либо ресурсу, в этом случае вместо URI в стартовую строку может быть добавлена звёздочка (астериск, символ «*»). Например, это может быть запрос, который относится к самому веб-серверу, а не какому-либо конкретному ресурсу. В этом случае стартовая строка может выглядеть так:
Версия определяет, в соответствии с какой версией стандарта HTTP составлен запрос. Указывается как два числа, разделённых точкой (например 1.1).
Для того, чтобы обратиться к веб-странице по определённому адресу (в данном случае путь к ресурсу — это «/»), нам следует отправить следующий запрос:
GET / HTTP/1.1
Host: alizar.habrahabr.ru
При этом учитывайте, что для переноса строки следует использовать символ возврата каретки (Carriage Return), за которым следует символ перевода строки (Line Feed). После объявления последнего заголовка последовательность символов для переноса строки добавляется дважды.
Впрочем, в спецификации HTTP рекомендуется программировать HTTP-сервер таким образом, чтобы при обработке запросов в качестве межстрочного разделителя воспринимался символ LF, а предшествующий символ CR, при наличии такового, игнорировался. Соответственно, на практике бо́льшая часть серверов корректно обработает и такой запрос, где заголовки отделены символом LF, и он же дважды добавлен после объявления последнего заголовка.
Если вы хотите отправить запрос в точном соответствии со спецификацией, можете воспользоваться управляющими последовательностями \r и \n:
echo -en «GET / HTTP/1.1\r\nHost: alizar.habrahabr.ru\r\n\r\n» | ncat alizar.habrahabr.ru 80
Как прочитать ответ?
Стартовая строка ответа имеет следующую структуру:
Версия протокола здесь задаётся так же, как в запросе.
Код состояния (Status Code) — три цифры (первая из которых указывает на класс состояния), которые определяют результат совершения запроса. Например, в случае, если был использован метод GET, и сервер предоставляет ресурс с указанным идентификатором, то такое состояние задаётся с помощью кода 200. Если сервер сообщает о том, что такого ресурса не существует — 404. Если сервер сообщает о том, что не может предоставить доступ к данному ресурсу по причине отсутствия необходимых привилегий у клиента, то используется код 403. Спецификация HTTP 1.1 определяет 40 различных кодов HTTP, а также допускается расширение протокола и использование дополнительных кодов состояний.
Пояснение к коду состояния (Reason Phrase) — текстовое (но не включающее символы CR и LF) пояснение к коду ответа, предназначено для упрощения чтения ответа человеком. Пояснение может не учитываться клиентским программным обеспечением, а также может отличаться от стандартного в некоторых реализациях серверного ПО.
После стартовой строки следуют заголовки, а также тело ответа. Например:
Тело ответа следует через два переноса строки после последнего заголовка. Для определения окончания тела ответа используется значение заголовка Content-Length (в данном случае ответ содержит 7 восьмеричных байтов: слово «Wisdom» и символ переноса строки).
Но вот по тому запросу, который мы составили ранее, веб-сервер вернёт ответ не с кодом 200, а с кодом 302. Таким образом он сообщает клиенту о том, что обращаться к данному ресурсу на данный момент нужно по другому адресу.
В заголовке Location передан новый адрес. Теперь URI (идентификатор ресурса) изменился на /users/alizar/, а обращаться нужно на этот раз к серверу по адресу habrahabr.ru (впрочем, в данном случае это тот же самый сервер), и его же указывать в заголовке Host.
GET /users/alizar/ HTTP/1.1
Host: habrahabr.ru
В ответ на этот запрос веб-сервер Хабрахабра уже выдаст ответ с кодом 200 и достаточно большой документ в формате HTML.
Если вы уже успели вжиться в роль, то можете теперь прочитать полученный от сервера HTML-код, взять карандаш и блокнот, и нарисовать профайл Ализара — в принципе, именно этим бы на вашем месте браузер сейчас и занялся.
А что с безопасностью?
Сам по себе протокол HTTP не предполагает использование шифрования для передачи информации. Тем не менее, для HTTP есть распространённое расширение, которое реализует упаковку передаваемых данных в криптографический протокол SSL или TLS.
Название этого расширения — HTTPS (HyperText Transfer Protocol Secure). Для HTTPS-соединений обычно используется TCP-порт 443. HTTPS широко используется для защиты информации от перехвата, а также, как правило, обеспечивает защиту от атак вида man-in-the-middle — в том случае, если сертификат проверяется на клиенте, и при этом приватный ключ сертификата не был скомпрометирован, пользователь не подтверждал использование неподписанного сертификата, и на компьютере пользователя не были внедрены сертификаты центра сертификации злоумышленника.
На данный момент HTTPS поддерживается всеми популярными веб-браузерами.
А есть дополнительные возможности?
Протокол HTTP предполагает достаточно большое количество возможностей для расширения. В частности, спецификация HTTP 1.1 предполагает возможность использования заголовка Upgrade для переключения на обмен данными по другому протоколу. Запрос с таким заголовком отправляется клиентом. Если серверу требуется произвести переход на обмен данными по другому протоколу, то он может вернуть клиенту ответ со статусом «426 Upgrade Required», и в этом случае клиент может отправить новый запрос, уже с заголовком Upgrade.
Такая возможность используется, в частности, для организации обмена данными по протоколу WebSocket (протокол, описанный в спецификации RFC 6455, позволяющий обеим сторонам передавать данные в нужный момент, без отправки дополнительных HTTP-запросов): стандартное «рукопожатие» (handshake) сводится к отправке HTTP-запроса с заголовком Upgrade, имеющим значение «websocket», на который сервер возвращает ответ с состоянием «101 Switching Protocols», и далее любая сторона может начать передавать данные уже по протоколу WebSocket.
Что-то ещё, кстати, используют?
На данный момент существуют и другие протоколы, предназначенные для передачи веб-содержимого. В частности, протокол SPDY (произносится как английское слово speedy, не является аббревиатурой) является модификацией протокола HTTP, цель которой — уменьшить задержки при загрузке веб-страниц, а также обеспечить дополнительную безопасность.
Увеличение скорости обеспечивается посредством сжатия, приоритизации и мультиплексирования дополнительных ресурсов, необходимых для веб-страницы, чтобы все данные можно было передать в рамках одного соединения.
Опубликованный в ноябре 2012 года черновик спецификации протокола HTTP 2.0 (следующая версия протокола HTTP после версии 1.1, окончательная спецификация для которой была опубликована в 1999) базируется на спецификации протокола SPDY.
Многие архитектурные решения, используемые в протоколе SPDY, а также в других предложенных реализациях, которые рабочая группа httpbis рассматривала в ходе подготовки черновика спецификации HTTP 2.0, уже ранее были получены в ходе разработки протокола HTTP-NG, однако работы над протоколом HTTP-NG были прекращены в 1998.
На данный момент поддержка протокола SPDY есть в браузерах Firefox, Chromium/Chrome, Opera, Internet Exporer и Amazon Silk.
И что, всё?
В общем-то, да. Можно было бы описать конкретные методы и заголовки, но фактически эти знания нужны скорее в том случае, если вы пишете что-то конкретное (например, веб-сервер или какое-то клиентское программное обеспечение, которое связывается с серверами через HTTP), и для базового понимания принципа работы протокола не требуются. К тому же, всё это вы можете очень легко найти через Google — эта информация есть и в спецификациях, и в Википедии, и много где ещё.
Впрочем, если вы знаете английский и хотите углубиться в изучение не только самого HTTP, но и используемых для передачи пакетов TCP/IP, то рекомендую прочитать вот эту статью.
Ну и, конечно, не забывайте, что любая технология становится намного проще и понятнее тогда, когда вы фактически начинаете ей пользоваться.
Support
Find answers, guides, and tutorials to supercharge your content delivery.
HTTP Port

In this guide, we’ll aim to explain everything you need to know about the HTTP port as you go forward in your networking journey!
IP addresses
When we discuss networking, IP address are often brought up. This is a sequence of numbers separated by dots that identify your computer to the world. Your computer has a public IP address that’s visible to the Internet. Additionally, it has a private IP address that is only visible to other machines on your Local Area Network (LAN).
Consider how many Internet-connected applications you use. For example, you probably are reading this right now in your web browser, you may have a mail client running, and countless other networked applications. This is where ports become important in networking.
Why use the HTTP port?
You can probably see the issue without using ports: we’d have all sorts of traffic flying around without a definitive destination. You can think of ports as virtual windows and your IP address as a building. Each port is designed to receive data of a specific format for a particular protocol.
This is how you’re able to run several applications connected to the Internet at the same time. Most popular protocols have reserved ports for themselves. For example, the HTTP port is always port 80 . These are always reserved for common protocols. If a developer makes an application utilize these ports for other purposes in their own applications, they run the risk of network communications failure.
UDP vs TCP ports
Before we dive into the list of reserved ports, there’s one more difference you’ll need to understand; this is the difference between UDP and TCP ports. User Datagram Protocol, also known as UDP, is used when there’s a huge amount of data to send, but it isn’t a big deal if a small amount of that data is missed by the recipient. Online streaming services often stream over UDP because much more data can be sent, but the recipient never verifies it got the data.
On the other hand, Transmission Control Protocol focuses on ensuring that the recipient gets every piece of data, also called packets. This protocol is used when every bit of data matters; for example, email uses this to ensure that the contents of messages is always verifiable. The client always acknowledges receipt of every single packet, and transmission of failed packets is always retried until it succeeds. While this is a slower way to transmit data, it’s guaranteed that the sender will know whether or not data was sent.
This is why you’ll see (TCP), (UDP), or (TCP/UDP) after each reserved port listing. This means that it can be used over either TCP or UDP. Note that the most modern version of HTTP, HTTP/3, is built on top of solely UDP in order to increase its speed, so our HTTP Port on modern devices will be UDP, but technically the port could operate on either TCP or UDP.
Our list only contains commonly utilized ports. Many low-numbered ports are still technically reserved but are not in common usage anymore. For example, port 8 used to be reserved for the quote of the day before Internet connections were common. However, now even most networking students would likely not be familiar with that port off-hand, and that’s completely fine!
Common ports, registered ports, and more
Generally speaking, ports numbered anywhere from 0 to 1023 are commonly known, reserved ports. That means that they’ve been used for the same program, protocol, or service for quite awhile. For example, as HTTP has been around for awhile, it’s simply port 80 . Likewise, the secure version, HTTPS, is on port 443 .
Ports numbered between 1024 and 49151 are called registered ports. This means that there is an official usage for most ports in this range. However, it’s less likely that these ports would be in usage on the average user’s machine than commonly known ports. They’re usually for specialized purposes and more likely to be used on corporate machines. Still, if you’re developing an application, you should not use these ports for anything other than their «registered» purposes.
Finally, we have unreserved ports. These run from 49152 through 65535 . These aren’t registered nor are they commonly used. Some textbooks and sites refer to these as ephemeral ports because they’re often temporarily utilized by applications to transfer data.
Why do port numbers end with 65535 ? They are technically 16-bit numbers. Since a bit is binary and can have a 0 or 1 value, there are two possible values for each bit in a sequence. To calculate the number of available ports, we would just count 2 to the sixteenth power (multiply the number 2 by itself 16 times). However, because ports are zero-indexed (they start with the number 0 rather than 1 ), we subtract 1. This works out to be 65535 .
The most important ports to know
The HTTP port isn’t the only common, reserved port! It’s crucial to know these common ports that are always reserved, especially if you’ll be working in the networking arena. Remember, (almost) all of these will be somewhere between 0 and 1023 !
Remember to also not use registered ports for customized purposes. IANA is the agency that determines when a port is considered common or registered. Its documentation is a bit dense, but it’s the most complete and authoritative publication on the subject of the HTTP port and others.
- SSH Port 22 (TCP) — This is an old but still used mechanism to securely transfer files from one machine to another. To guarantee integrity, this must use TCP.
- SMTP Port 25 (TCP) — This is how mail servers receive and send mail among each other.
- DNS Port 53 (TCP/UDP) — The Domain Name System (DNS) is what resolves domain names to IP addresses. Though you remember network addresses as names such as «google.com», it’s DNS servers that work to determine the exact IP address to which top-level domains correspond.
- HTTP Port 80 (TCP) — This is the server port your computer accesses when you go to a website without HTTPS protections.
- HTTPS Port 443 (TCP) — This is the port that you access on a server when you go to a web address that starts with https:// rather than just http:// . It uses Transport Layer Security (TLS) technology to ensure that information transmitted while connected is kept secure.
Keep in mind that this is by no means an exhaustive list. Now, let’s take a look at how a connection to a server’s HTTP port actually occurs!
Navigating an HTTP port connection
First, your computer needs to have a private port of its own. This is the port used to connect to port 80 on a remote server. This is typically a randomized ephemeral port. It’s not visible to anyone but you.
Once your device comes up with an internal port to utilize, it sends what’s called a SYN Packet to the HTTP server over port 80 . If all is well with the connection, the HTTP port sends back what’s called an ACK packet. This is to acknowledge that the initial packet was received and let you know that the server is ready to proceed.
Next, your computer sends over a SYN ACK packet from your internal port to the HTTP port on the remote server. This finalizes the initial handshake performed. Both servers are on the same page in terms of your client connectivity, and you’re ready to browse the site!
HTTP vs HTTPS: The Difference Between HTTP and HTTPS
Do you pay attention to whether the URL of the website you are visiting starts with HTTP or HTTPS in your browser’s address bar? If not, you should definitely do so in the future, especially when you enter your personal information or make online…
How Does a CDN Work?
We’ve previously discussed the specifics behind what is a CDN in another article, however, in this CDN tutorial we’ll dive a little deeper into how does a CDN work. Why speed matters It’s important to provide a fast web browsing experience to site…
Port 80 (HTTP) vs. Port 443 (HTTPS): Everything You Need to Know
Port 80 vs Port 443: Port 80 provides unencrypted connection, whereas Port 443 supports encrypted connection.
Port 80 vs. Port 443: Many of you have chaos about these different ports. When you read or hear about Port 80 vs. Port 443 what is the first thing that comes to your mind? Yes, you might have heard about HTTP vs. HTTPS. In this article, we will know about these two useful ports and how to enable them on different operating systems. Before that lets start from beginning.
What is a Port?
Generally, Port is used to make the computer understand what type of data is received from or sent to a computer over the similar network connection. Each Port is assigned with different functionality and a port number like Port 80, 443, 21, 25, etc. Port is a virtual numbered address used as an endpoint for communication to the various Transport Layer Protocols.
Transport Layer protocols include Transfer Control Protocol (TCP) and User Datagram Protocol (UDP) and are used in data transmission over the Internet.
UDP is mostly used for large volumes of data transfer where security is not of much significance, while TCP is used where data security is of prime importance. When data transfer occurs, each data pack comes with a port number attached to it, and the protocol directs each data pack to the appropriate Port with accuracy. According to the SMB vulnerability report, 65% of attacks target the main three ports: SSH- 22/TCP, HTTPS-443/TCP and HTTP-80/TCP.
Port 80
HTTP Port-80 is used for HTTP (Hyper Text Transfer Protocol) connection by default. It is a popular and widely used port across the globe. Port 80 was introduced by Tim Berners-Lee in 1991 in the HTTP 0.9 document. The document states that if there is no port assigned for HTTP connection, Port 80 is used by default. It connects you to the worldwide web (WWW). A user, with the help of this port, can connect to webpages available on the internet. It means unencoded data exchange takes place between the user’s browser and the server using this port. This port relates to TCP (Transfer Control Protocol- a protocol used in data transmission).
Port 443
HTTPS (Hypertext Transfer Protocol Secure) is a secured HTTP version where all traffic is bind with strong encryption that passes through 443. This port is also connected with TCP protocol and creates a secure connection between the webpages and browser. HTTPS Port 443 was officially published in RFC 1700 and solicited by “Kipp E.B. Hickman”. The main difference between Port 80 and Port 443 is strong security. Port-443 allows data transmission over a secured network, while Port 80 enables data transmission in plain text. Users will get an insecure warning if he tries to access a non-HTTPS web page. Port 443 encrypts network data packets before data transmission takes place. The security over port 443 is used by the SSL protocol (secure socket layer).
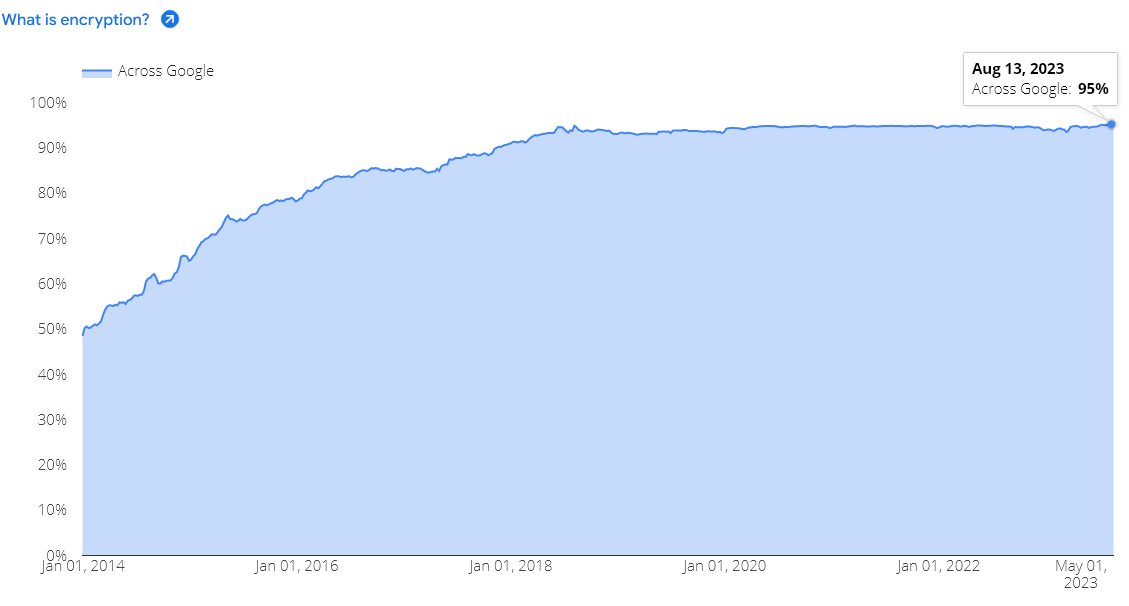
Due to the much-needed awareness spread among internet users regarding the safety of their data shared with the websites, over 95% of accessed websites are done using a secure HTTPS connection over Port 443, according to Google’s research.
Enable Port 80 and 443 on Windows
A firewall restricts traffic and protects you from the threats coming from the internet and local applications. If you wish to allow restricted traffic on the firewall, you need to open a specific port. Below we have explained the process to enable Port 80 and 443 on Windows.
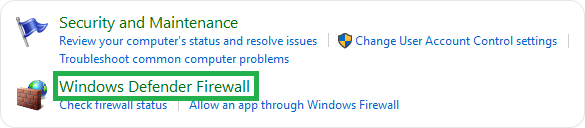
First, you need to browse the Control Panel and search for System and Security showing on the box’s left side. There you need to click on the Windows Firewall.
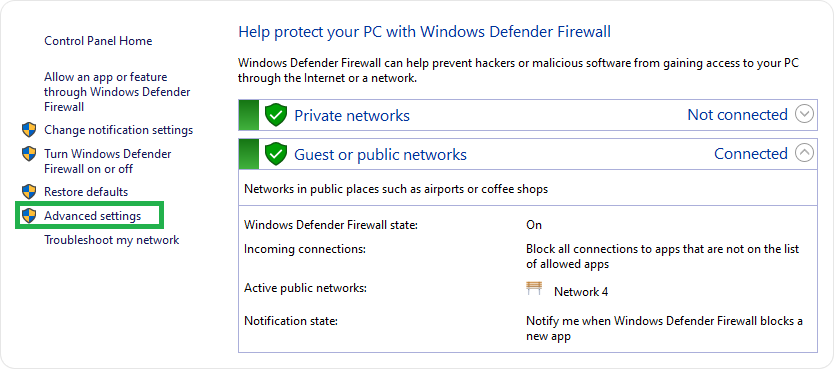
Now, go to the Advanced Settings option showing on the left side and click on it.
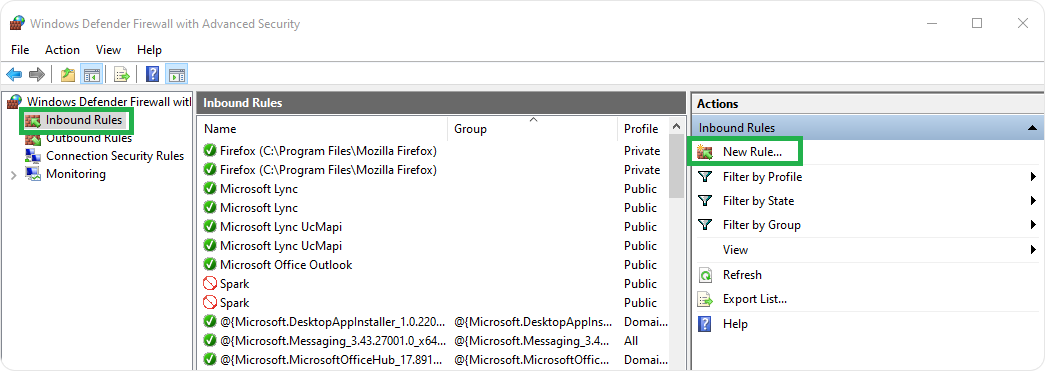
You will have a new window, “Windows Defender Firewall with Advanced Security”, where you need to the right click on ‘Inbound Rules’ and choose ‘New Rule’.
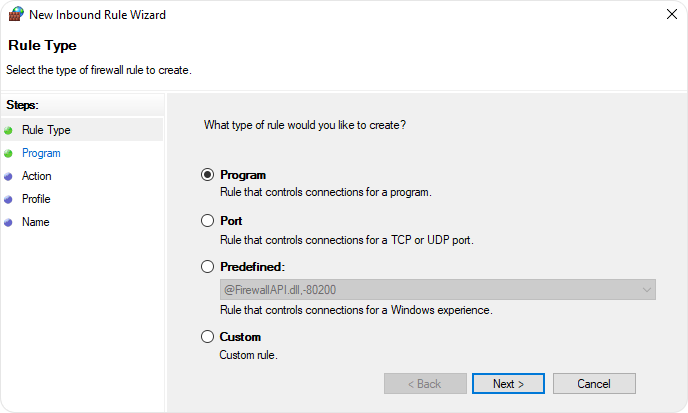
You will have a New Inbound Rule Wizard box where you need to checkmark against on ‘Port’ and click on the ‘Next’ button.
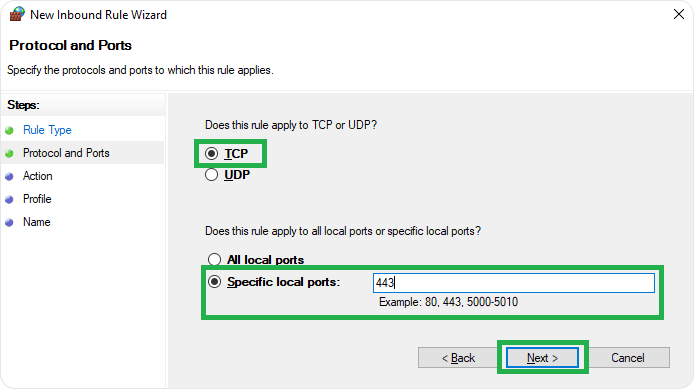
Choose UDP or TCP protocol and check mark against ‘Specific Local Port’ option. Here, you need to enter port and click on the ‘Next’ button.
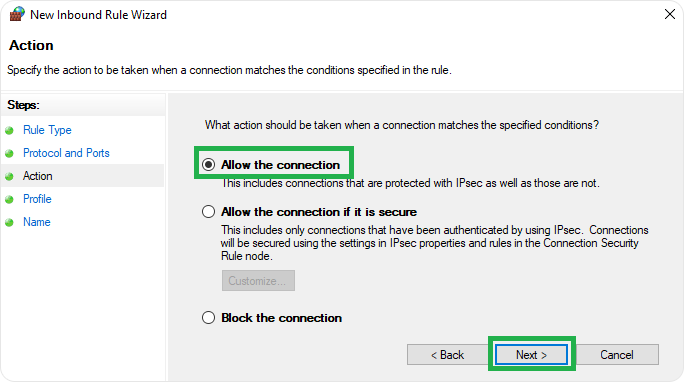
Now, choose ‘Allow the connection’ and click on the ‘Next’ button.
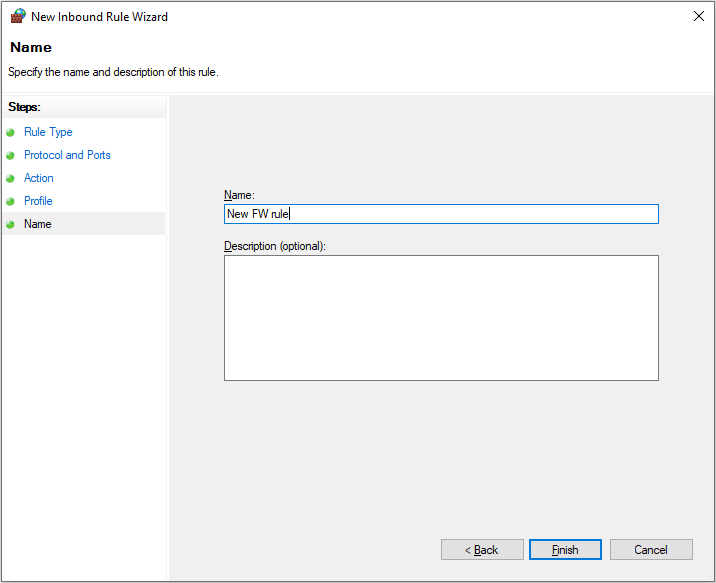
Here, you should keep the name of a rule and click on the Finish button.
Enable Port 80 and 443 on Mac
It is essential to know that Mac OS X opens ports as per requests by individual applications or services instead of managing ports individually. Most users using the default OS X firewall should use the following steps to Allow incoming connections for Applications.
- Open System Preferences > Security & Privacy > Firewall > Firewall Options.
- Click Add.
- Choose an application from the Applications folder and click Add.
- Ensure that the option next to the application is set to Allow incoming connections.
- Click OK.
To open a specific port on OS X, you need to go with Terminal. You need to use the pfctl command for OS X 10.10. In the earlier version, the ipfw command was used to open a specific port.
- Open Terminal app.
- Enter Sudo pfctl -d command to stop the active packet filter.
- Use a nano text editor to open configuration file for packet filter:
- You can create customize rule for any port, for example 80, and enter the command below default configurations. It means you are allowing TCP incoming traffic from any machine to your machine without any inspection.
pass in inet proto tcp from any to any port 80 no state
- Press Ctrl-x and exit from nano text editor then, press Y and It means you have saved the file with the same name.
- Now, reload the firewall’s configuration from the earlier edited file.
- Finally, restart the firewall with the below command:
For opening the port at system startup, use sudo nano /etc/pf.conf and add the sudo pfctl -vnf /etc/pf.conf to this pf.conf file.
Enable Port 80 and 443 on Linux
To open a port on Linux, you first need to check open ports using netstat or ss command as showing below:
After testing opened ports, use the below commands to allow TCP connections. Here, we have taken port-80, for example.
Enable Port 80 and 443 on Ubuntu
If you have an Ubuntu firewall named ufw, you should use the below command:
Enable Port 80 and 443 on CentOS
For CentOS users, they should use the below command:
Note: The user can enable any port (80,443) with above commands.
Conclusion
However, Port 80 provides an HTTP connection under TCP protocol. This port provides an unencrypted connection between the web browser and the web servers, which leaves the sensitive user data exposed to cybercriminals and may lead to severe data misuse.
HTTPS Port 443 offers encrypted communication between the web browser and web server, making the data unreadable for any data breach. Hence, connecting through HTTPS Port 443 for web browsing certainly wins hands down over establishing an unsafe HTTP Port 80 connection for web surfing.