Особенности работы с виртуальными дискaми VirtualBox
 Статья рассматривает особенности использования виртуальных дисков в VirtualBox, применение разных режимов чтения-записи, принцип и организацию работы snapshot-ов, кэширование ввода/вывода данных, а также некоторые аспекты использования виртуальных дисков с точки зрения информационной безопасности. Для тех, кому интересен пример с безопасностью, можете сразу переходить по якорю к разделу об особых режимах записи.
Начнем с некоторых общих понятий. У VirtualBox существуют 3 основных метода предоставления гостевой операционной системе (ОС) доступа к данным. Сей текст концентрируется на использовании виртуальных дисков.
Виртуальные диски подключаются к виртуальной — гостевой ОС, методом эмуляции подключения через соответствующий контроллер, IDE, SATA (AHCI), SCSI, SAS.
Поведение контроллеров запрограммировано таким образом, чтобы имитировать физические прототипы, следовательно IDE контроллер будет работать медленнее SATA и потреблять больше ресурсов процессора, ОС без соответствующих драйверов и аппаратной поддержки не будут взаимодействовать с виртуальными дисками и т.д. Например, в семействе Windows до Windows Vista нет поддержки Advanced Host Controller Interface (AHCI), к которому относится SATA, поэтому в частности, виртуальная машина с ОС Windows XP с SATA работать не будет.
Файлы виртуальных дисков
VirtualBox позволяет работать с разными форматами файлов виртуальных дисков. Помимо собственного VDI, поддерживаются VMDK (VMware), VHD (Microsoft), Parallels version 2 HDD format (Parallels).
Каждому виртуальному диску присваивается уникальный идентификатор UUID, это помогает VirtualBox удостовериться, что каждый диск используется только один раз и не позволяет импортировать в гостевую ОС обычные копии дисков (для этого существует отдельная процедура клонирования).
Виртуальные диски могут быть, как фиксированного размера, так и динамически выделяемого, причем VirtualBox позволяет увеличить размер дискового пространства, независимо от объёма и формата диска и даже в том случае, если диск содержит данные. Ниже пример, как это сделать с помощью утилиты vboxmanage.
При выборе динамически выделяемого образа, файл контейнера будет «разрастаться» постепенно, по мере заполнения секторов данными, до тех пор, пока размер контейнера не достигнет указанного при создании виртуальной машины лимита.
Учитывая то, что в процессе регулярного увеличения размера контейнера задействуются дополнительные вычислительные ресурсы, скорость записи при использовании опции с фиксированным размером, как правило выше, в с равнении с динамическим диском. Тем не менее, если размер динамического диска в долгосрочной перспективе значительно не увеличивается, то разница в скорости записи практически нивелируется.
Управление виртуальными медиа (Virtual Media Manager)
VirtualBox ведет реестр всех виртуальных медиа носителей, которые используются всеми гостевыми ОС. Это так называемые ”known media”, доступ к списку (реестру) которых можно получить используя утилиту Virtual Media Manager (доступно из меню File). Эта утилита показывает детальную информацию о каждом виртуальном диске, включая полный путь к файлу, а также к какой именно виртуальной машине файл прикреплен. Информацию из реестра можно удалить используя встроенную функцию удаления “Remove”
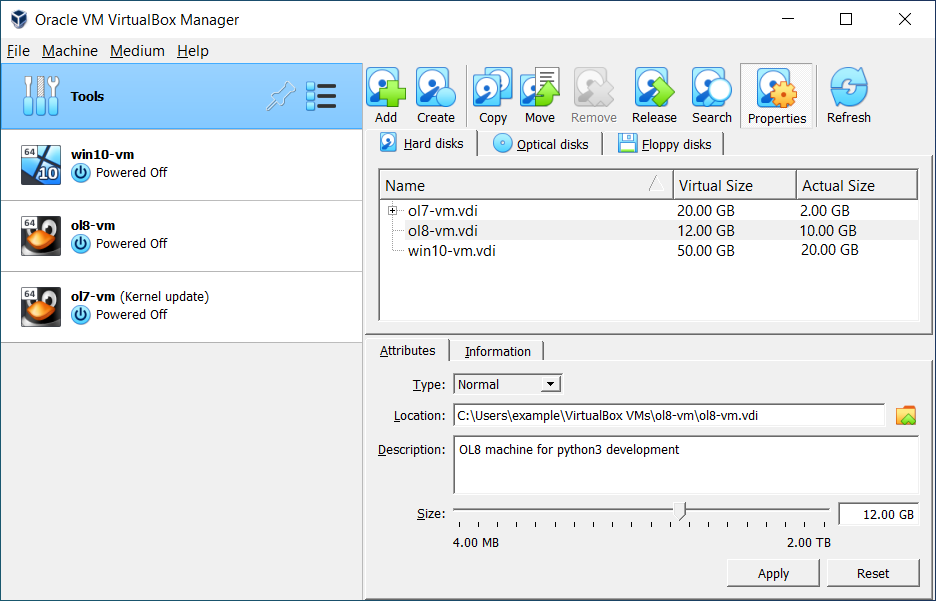
Каждый отдельно взятый образ можно «открепить» от виртуальной машины за которой он закреплен, используя функцию ”Release”
Открепив образ, прикрепить его обратно нажатием одной кнопки не удастся, для этого необходимо будет добавить образ, как жесткий диск. Аналогичным способом «прикрепляются» и снэпшоты (снимки диска).
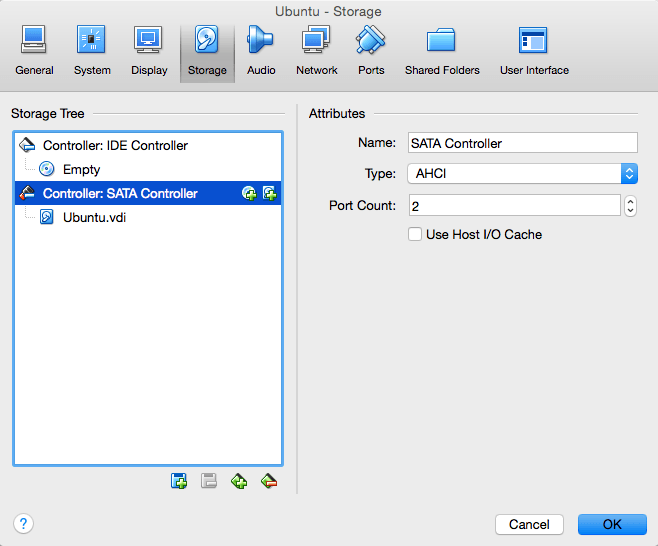
В очередной раз отмечу, что из-за наличия UUID, о которых говорилось выше, нельзя просто скопировать и прикрепить образ диска.
Snapshots (Снэпшоты)
Как известно snapshot в переводе с английского означает снимок. Принцип работы механизма прост. При создании снэпшота, VirtualBox переводит текущий образ (образы, если их несколько), прикрепленный к ВМ в режим только для чтения и создает отдельный виртуальный диск (диски) и все последующие процедуры записи производятся уже в новом виртуальном хранилище. Причем фиксируются только изменения в определенных секторах, проще говоря при создании снэпшота диска размером 10GB, новый снэпшот будет гораздо меньше, и будет увеличиваться в размере постепенно, как будут заполнятся сектора.
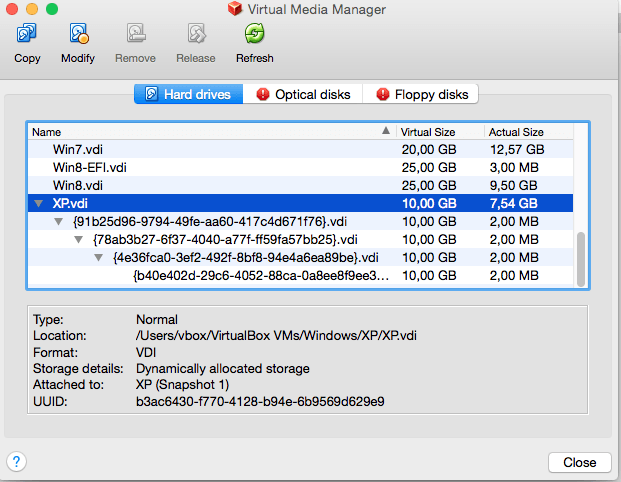
Логично предположить, что чем больше используется снэпшотов одной виртуальной машины, тем больше используется вычислительных ресурсов для выполнения операций чтения с диска. Действительно, если есть 2 снэпшота, то вначале VirtualBox смотрит есть ли нужный сектор в образе снэпшота2, если нет, то система обращается к снэпшоту1, если и там ничего не обнаружено, то тогда идет обращение к основному диску. Нагрузка все-же будет незначительной и мало заметной для конечного пользователя, т, к. вся таблица секторов постоянно присутствует в памяти.
Стоить помнить, что при удалении снэпшота, все изменения произведенные после его создания «сливаются» с ранее «замороженным» образом.
Кэширование ввода/вывода
Затронув тему производительности уместно будет упомянуть и о кэшировании. Изначально VirtualBox работает с файлами образов, как с обычными файлами, которые само-собой кэшируются хостовой ОС. Это сделано, как нистранно с целью увеличение скорости. Когда гостевая ОС производит операцию записи, то операция кэшируется хостовой ОС и сообщение об успешном завершении операции отправляется в гостевую ОС сразу-же, в то время как сама операция обрабатывается гостевой ОС асинхронно. Такой подход не всегда себя оправдывает, т.к. файлы образов диска имеют тенденцию увеличиваться в объеме и вся процедура начинает давать обратный эффект — происходит двойное кэширование на стороне гостевой и хостовой операционных систем и снижается скорость производимых операций.
Помимо расходa ресурсов еще одним недостатком кэширования является недостаточная надежность. Например, если внезапно случился перебой с электропитанием в момент, когда хоставая ОС уже сообщила гостевой об успешном выполнении записи, а сам процесс асинхронной записи еще не завершился. Такой сценарий безусловно приводит к потере данных.
Отключение кэширования выполняется следующим образом:
Bandwidth
VirtualBox позволяет ограничивать ширину пропускного канала для одного или нескольких виртуальных дисков.
Создаем группу “Limit” и устанавливаем лимит в 20 Mb/s
Добавляем нужные диски в группу.
Суммарный для обоих дисков bandwidth не будет превышать 20 MB/s. Этот лимит можно изменить в любой момент, не выключая виртуальной машины.
Особые режимы записи образов
Для каждого образа виртуального диска, поддерживаемого VirtualBox, не зависимо от формата, можно определить режим поведения при записи данных, будь это следствие операций внутри виртуальной машины или снимка дика (snapshot). Такие режимы называются «нестандартными», в то время, как по умолчанию все образы дисков функционируют в «нормальном» режиме. Для того, что бы перевести режим из «нормального» в «нестандартный» можно воспользоваться вышеупомянутым Virtual Media Manager или консольной утилитой vboxmanage
В «нормальном» режиме записи, гостевая ОС может осуществлять чтение и запись с физического диска без всяких ограничений a при создании снимков диска (snapshot), VirtualBox создает oтдельный файл в котором фиксируются все изменения.
В режиме «write through» функция снэпшотов работать не бует.
Режим работы «shareable» своего рода разновидность предыдущего. Тут тоже нет возможности работы со «снэпшотами», зато есть возможность использования несколькими одновременно работающими виртуальными машинами одного образа диска, сценарий кластеризации.
Схожий по названию, но отличающийся по принципам работы режим «multiattach», также позволяет использовать один образ диска для нескольких виртуальных машин, но в этом режиме каждая отдельная виртуальная машина использует свой независимый «снэпшот» и изменения произведенные в одной ВМ не доступны для других.
Режим «read only» используется в основном для работы с образами CD/DVD, т.к. предполагает только чтение.
Режим на который стоит обратить внимание называется «Immutable». Как следует из названия immutable образы не меняются с течением времени. Любые изменения в immutable диске актуальны ровно до тех пор, пока виртуальная машина работает. После отключения виртуальной машины все изменения пропадают. Прежде чем перевести диск в режим immutable стоит сначало создатъ «нормальный» диск, установить и настроить систему в оптимальное состояние, желательно не подключаясь к интеренету, и только после того, как гостевая система готова — «откреплять» диск и переводить его в режим immutable.
Одним из сценариев работы может быть схема при которой используются два диска – один в режиме immutable, на котором находится сама система, второй в нормальном или write-through режиме. На первый взгляд вполне безопасный и понятный сценарий работы — каждый раз загружается «свежая» система. Но не все так прозрачно и есть некоторые нюансы.
Во первых, для immutable дисков есть одно важное исключение. Они не “обнуляются” в случае, когда прикреплены к виртуальной машине, снимок диска которой был сделан пока та была запущенна — так называемый online-snapshot. Это означает, что если например, пользователь создал immutable disk, а потом в процессе работы, создал «снэпшот», не завершив работу виртуальной машины, то начиная с упомянутого «снэпшота» все последующие операции и действия внутри системы будут носить необратимый эффект, т.к. все действия будут де-факто происходить в «снэпшоте».
В случае если основной целью является «свежая система» при каждом запуске, то от использования снэпшотов, лучше воздержаться.
Во-вторых, вышеописанное «обнуление» отдельного образа происходит только в случае, когда команда включения/отключения виртуальной машины посылается самой средой VirtualBox, а не происходит внутри гостевой ОС. Проще говоря, если например перезагрузить гостевую ОС Windows стандартным методом (Меню пуск, перезагрзить систему), то обнуление immutable диска не произойдет.
Наконец последнее и самое важное — все изменения происходившие внутри виртуальной машины сохраняются на физическом диске и остаются там до тех пор, пока виртуальная машина не будет запущена заново.
После того, как текущий контейнер установлен в режим immutable, VirtualBox перестает использовать этот контейнер и фактически диск переходит в режим «read only». Все операции записи перенаправляются в отдельный образ и каждый раз, когда виртуальная машина начинает работу этот новый «отдельный» образ «обнуляется». В реальности на жестком диске создается временный «снэпшот», который находится в папке Snapshots, соответствующей виртуальной машины, внутри которого и происходит вся работа. После завершения работы виртуальной машины вышеупомянутый временный скриншот остается нетронутым.
Рассмотрим простой пример
Боб создал виртуальную машину, настроил ОС и перевел диск в режим immutable. Боб регулярно использует свою виртуальную машину для тайного общения с Алисой. При каждом запуске, загружается «свежая» система, не содержащая никаких логов предыдущего общения, текстов, видео или фото. В очередной раз закончив переписку, Боб спокойно выключает виртуальную машину и идет спать.
Предположим также, что перед каждым запуском ОС Боб проверяет, что режим диска установлен как “immutable”.
Ева имеет доступ к компьютеру на котором установлена виртуальная машина. Ей достаточно зайти в папку Snapshots внутри директории соответствующей виртуальной машины и там будет требуемый «снэпшот».
Все что остается сделать Еве, что бы увидеть всю переписку, равно как и результат всех действий производимых Бобом внутри ОС, это перевести диск в «нормальный» режим и перед тем, как запустить виртуальную машину прикрепить к ней снэпшот. Более того, Ева может каждый день делать резервные копии таких «снэпшотов», главное, что бы это было сделано до того, как Боб снова запустит виртуальную машину.
Решением для Боба в данной ситуации будет после завершения работы, вручную удалять все содержимое папки Snapshots. Не говоря уже о том, что надо постоянно проверять в каком режиме работает диск и желательно, либо вообще заблокировать некоторые элементы GUI, что достаточно просто реализуется
Справедливости ради стоит сказать, что у тех-же Parallels, с самых ранних версий для того, что бы перевести диски из одного режима в другой необходим пароль суперпользователя, а временные «снэпшоты» удаляются моментально, после завершения работы.
Virtualbox snapshot как работать
Oracle® VM VirtualBox
User Manual for Release 6.0
- Preface
- First Steps
- Why is Virtualization Useful?
- Some Terminology
- Features Overview
- Supported Host Operating Systems
- Host CPU Requirements
- Starting a New VM for the First Time
- Capturing and Releasing Keyboard and Mouse
- Typing Special Characters
- Changing Removable Media
- Resizing the Machine’s Window
- Saving the State of the Machine
- Taking, Restoring, and Deleting Snapshots
- Snapshot Contents
- About the OVF Format
- Importing an Appliance in OVF Format
- Exporting an Appliance in OVF Format
- Exporting an Appliance to Oracle Cloud Infrastructure
- Importing an Instance from Oracle Cloud Infrastructure
- The Cloud Profile Manager
- Using the Soft Keyboard
- Creating a Custom Keyboard Layout
- Installing on Windows Hosts
- Prerequisites
- Performing the Installation
- Uninstallation
- Unattended Installation
- Public Properties
- Performing the Installation
- Uninstallation
- Unattended Installation
- Prerequisites
- The Oracle VM VirtualBox Kernel Modules
- Kernel Modules and UEFI Secure Boot
- Installing Oracle VM VirtualBox from a Debian or Ubuntu Package
- Using the Alternative Generic Installer (VirtualBox.run)
- Performing a Manual Installation
- Updating and Uninstalling Oracle VM VirtualBox
- Automatic Installation of Debian Packages
- Automatic Installation of RPM Packages
- Automatic Installation Options
- Performing the Installation
- The vboxuser Group
- Starting Oracle VM VirtualBox on Oracle Solaris
- Uninstallation
- Unattended Installation
- Configuring a Zone for Running Oracle VM VirtualBox
- Supported Guest Operating Systems
- Mac OS X Guests
- 64-bit Guests
- An Example of Unattended Guest Installation
- Basic Tab
- Advanced Tab
- Description Tab
- Disk Encryption Tab
- Motherboard Tab
- Processor Tab
- Acceleration Tab
- Screen Tab
- Remote Display Tab
- Recording Tab
- USB Settings
- Implementation Notes for Windows and Linux Hosts
- Video Modes in EFI
- Specifying Boot Arguments
- Introduction to Guest Additions
- Installing and Maintaining Guest Additions
- Guest Additions for Windows
- Installing the Windows Guest Additions
- Updating the Windows Guest Additions
- Unattended Installation
- Manual File Extraction
- Installing the Linux Guest Additions
- Graphics and Mouse Integration
- Updating the Linux Guest Additions
- Uninstalling the Linux Guest Additions
- Installing the Oracle Solaris Guest Additions
- Uninstalling the Oracle Solaris Guest Additions
- Updating the Oracle Solaris Guest Additions
- Manual Mounting
- Automatic Mounting
- Supported Formats
- Known Limitations
- Hardware 3D Acceleration (OpenGL and Direct3D 8/9)
- Hardware 2D Video Acceleration for Windows Guests
- Using Guest Properties to Wait on VM Events
- Using the Guest Control File Manager
- Memory Ballooning
- Page Fusion
- Hard Disk Controllers
- Disk Image Files (VDI, VMDK, VHD, HDD)
- The Virtual Media Manager
- Special Image Write Modes
- Differencing Images
- Cloning Disk Images
- Host Input/Output Caching
- Limiting Bandwidth for Disk Images
- CD/DVD Support
- iSCSI Servers
- vboximg-mount: A Utility for FUSE Mounting a Virtual Disk Image
- Viewing Detailed Information About a Virtual Disk Image
- Mounting a Virtual Disk Image
- Virtual Networking Hardware
- Introduction to Networking Modes
- Network Address Translation (NAT)
- Configuring Port Forwarding with NAT
- PXE Booting with NAT
- NAT Limitations
- Introduction
- Commands Overview
- General Options
- VBoxManage list
- VBoxManage showvminfo
- VBoxManage registervm/unregistervm
- VBoxManage createvm
- VBoxManage modifyvm
- General Settings
- Networking Settings
- NAT Networking Settings
- Import from OVF
- Import from Oracle Cloud Infrastructure
- Export to OVF
- Export to Oracle Cloud Infrastructure
- Synopsis
- Description
- unattended detect
- unattended install
- Synopsis
- Description
- General Command Operand
- Take a Snapshot of a Virtual Machine
- Delete a Snapshot
- Restore a Snapshot
- Restore the Current Snapshot
- Change the Name or Description of an Existing Snapshot
- List the Snapshots
- Show Information About a Snapshot’s Settings
- Synopsis
- Description
- Command Operand and Options
- Examples
- See Also
- Synopsis
- Description
- extpack install
- extpack uninstall
- extpack cleanup
- Synopsis
- Description
- Common options
- dhcpserver add
- dhcpserver modify
- dhcpserver remove
- dhcpserver restart
- dhcpserver findlease
- Common DHCP Options:
- Synopsis
- Description
- Common options
- debugvm dumpvmcore
- debugvm info
- debugvm injectnmi
- debugvm log
- debugvm logdest
- debugvm logflags
- debugvm osdetect
- debugvm osinfo
- debugvm osdmesg
- debugvm getregisters
- debugvm setregisters
- debugvm show
- debugvm stack
- debugvm statistics
- Synopsis
- Description
- Common options
- cloudprofile add
- cloudprofile show
- cloudprofile update
- cloudprofile delete
- Synopsis
- Description
- Common options
- cloud list instances
- cloud list images
- Synopsis
- Description
- Common options
- cloud instance create
- cloud instance info
- cloud instance termination
- cloud instance start
- cloud instance pause
- Synopsis
- Description
- Common options
- cloud image create
- cloud image info
- cloud image delete
- cloud image import
- cloud image export
1.10. Snapshots
With snapshots, you can save a particular state of a virtual machine for later use. At any later time, you can revert to that state, even though you may have changed the VM considerably since then. A snapshot of a virtual machine is thus similar to a machine in Saved state, but there can be many of them, and these saved states are preserved.
To see the snapshots of a virtual machine, click on the machine name in VirtualBox Manager. Then click the List icon next to the machine name, and select Snapshots . Until you take a snapshot of the machine, the list of snapshots will be empty except for the Current State item, which represents the «now» point in the lifetime of the virtual machine.
1.10.1. Taking, Restoring, and Deleting Snapshots
There are three operations related to snapshots, as follows:
Take a snapshot . This makes a copy of the machine’s current state, to which you can go back at any given time later.
If your VM is running, select Take Snapshot from the Machine pull-down menu of the VM window.
If your VM is in either the Saved or the Powered Off state, as displayed next to the VM name in the Oracle VM VirtualBox main window, click the List icon next to the machine name and select Snapshots . The snapshots window is shown. Do one of the following:
Click the Take icon.
Right-click on the Current State item in the list and select Take .
In either case, a window is displayed prompting you for a snapshot name. This name is purely for reference purposes to help you remember the state of the snapshot. For example, a useful name would be «Fresh installation from scratch, no Guest Additions», or «Service Pack 3 just installed». You can also add a longer text in the Description field.
Your new snapshot will then appear in the snapshots list. Underneath your new snapshot, you will see an item called Current State , signifying that the current state of your VM is a variation based on the snapshot you took earlier. If you later take another snapshot, you will see that they are displayed in sequence, and that each subsequent snapshot is derived from an earlier one.
Figure 1.10 Snapshots List For a Virtual Machine
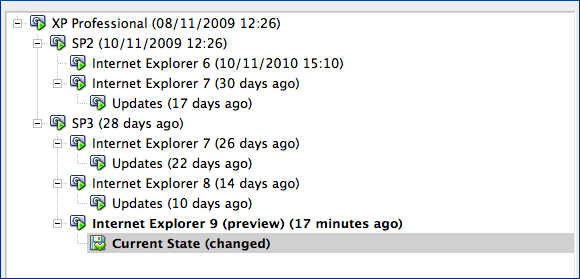
Oracle VM VirtualBox imposes no limits on the number of snapshots you can take. The only practical limitation is disk space on your host. Each snapshot stores the state of the virtual machine and thus occupies some disk space. See Section 1.10.2, “Snapshot Contents” for details on what is stored in a snapshot.
Restore a snapshot . In the list of snapshots, right-click on any snapshot you have taken and select Restore . By restoring a snapshot, you go back or forward in time. The current state of the machine is lost, and the machine is restored to the exact state it was in when the snapshot was taken.
Restoring a snapshot will affect the virtual hard drives that are connected to your VM, as the entire state of the virtual hard drive will be reverted as well. This means also that all files that have been created since the snapshot and all other file changes will be lost. In order to prevent such data loss while still making use of the snapshot feature, it is possible to add a second hard drive in write-through mode using the VBoxManage interface and use it to store your data. As write-through hard drives are not included in snapshots, they remain unaltered when a machine is reverted. See Section 5.4, “Special Image Write Modes”.
To avoid losing the current state when restoring a snapshot, you can create a new snapshot before the restore operation.
By restoring an earlier snapshot and taking more snapshots from there, it is even possible to create a kind of alternate reality and to switch between these different histories of the virtual machine. This can result in a whole tree of virtual machine snapshots, as shown in the screenshot above.
Delete a snapshot . This does not affect the state of the virtual machine, but only releases the files on disk that Oracle VM VirtualBox used to store the snapshot data, thus freeing disk space. To delete a snapshot, right-click on the snapshot name in the snapshots tree and select Delete . Snapshots can be deleted even while a machine is running.
Whereas taking and restoring snapshots are fairly quick operations, deleting a snapshot can take a considerable amount of time since large amounts of data may need to be copied between several disk image files. Temporary disk files may also need large amounts of disk space while the operation is in progress.
There are some situations which cannot be handled while a VM is running, and you will get an appropriate message that you need to perform this snapshot deletion when the VM is shut down.
1.10.2. Snapshot Contents
Think of a snapshot as a point in time that you have preserved. More formally, a snapshot consists of the following:
The snapshot contains a complete copy of the VM settings, including the hardware configuration, so that when you restore a snapshot, the VM settings are restored as well. For example, if you changed the hard disk configuration or the VM’s system settings, that change is undone when you restore the snapshot.
The copy of the settings is stored in the machine configuration, an XML text file, and thus occupies very little space.
The complete state of all the virtual disks attached to the machine is preserved. Going back to a snapshot means that all changes that had been made to the machine’s disks, file by file and bit by bit, will be undone as well. Files that were since created will disappear, files that were deleted will be restored, changes to files will be reverted.
Strictly speaking, this is only true for virtual hard disks in «normal» mode. You can configure disks to behave differently with snapshots, see Section 5.4, “Special Image Write Modes”. In technical terms, it is not the virtual disk itself that is restored when a snapshot is restored. Instead, when a snapshot is taken, Oracle VM VirtualBox creates differencing images which contain only the changes since the snapshot were taken. When the snapshot is restored, Oracle VM VirtualBox throws away that differencing image, thus going back to the previous state. This is both faster and uses less disk space. For the details, which can be complex, see Section 5.5, “Differencing Images”.
Creating the differencing image as such does not occupy much space on the host disk initially, since the differencing image will initially be empty and grow dynamically later with each write operation to the disk. The longer you use the machine after having created the snapshot, however, the more the differencing image will grow in size.
If you took a snapshot while the machine was running, the memory state of the machine is also saved in the snapshot. This is in the same way that memory can be saved when you close a VM window. When you restore such a snapshot, execution resumes at exactly the point when the snapshot was taken.
The memory state file can be as large as the memory size of the VM and will therefore occupy considerable disk space.
Copyright © 2004, 2020 Oracle and/or its affiliates. All rights reserved. Legal Notices
Снэпшоты и клонирование виртуальных машин
В этой главе мы продолжим обсуждение использования виртуальных машин, разберем клонирование и создание снэпшотов. Этот функционал крайне необходим при работе с виртуальными машинами.
Представьте себе ситуацию: вы скачали подозрительное приложение и устанавливаете его в виртуальной машине. Приложение ведет себя странно, и вы от греха подальше удаляете его. Что делать с виртуальной машиной? Возможно, она уже скомпрометирована и дальнейшее ее использование небезопасно.
Самым верным решением будет уничтожить ее, но в таком случае вам придется создавать новую виртуальную машину. Возможно, на этой виртуальной машине у вас уже был установлен необходимый для работы софт, а каждый раз создавать новую машину и настраивать систему – это и долго, и трудозатратно.
Чтобы не создавать новую виртуальную машину, есть два пути. Первый – создать образцовую систему и в дальнейшем просто клонировать ее. Вы создаете виртуальную машину, устанавливаете систему и все программы, необходимые вам, после этого выбираете созданную виртуальную машину и жмете “Клонировать”.
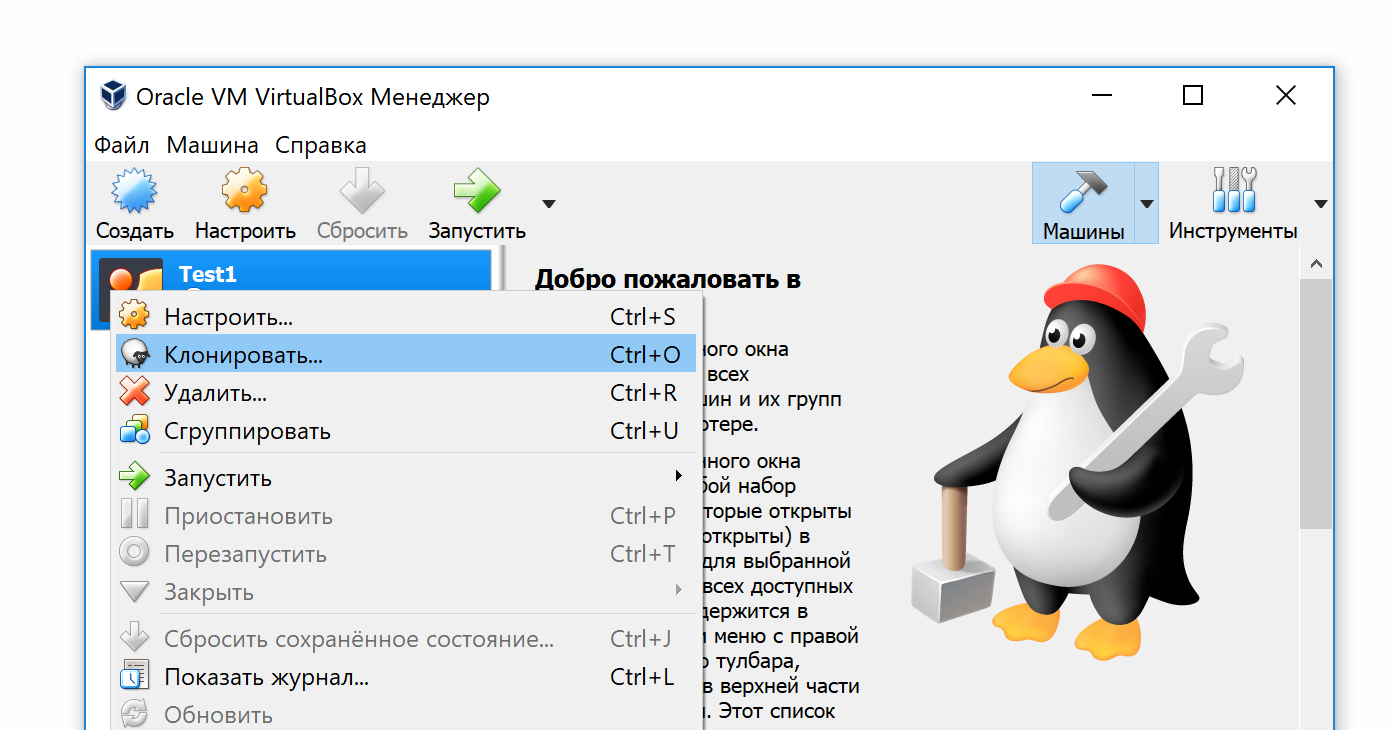
Выбираете название клона, на следующем шаге обязательно выбираете полное клонирование, после дожидаетесь окончания процедуры – и система готова к запуску.
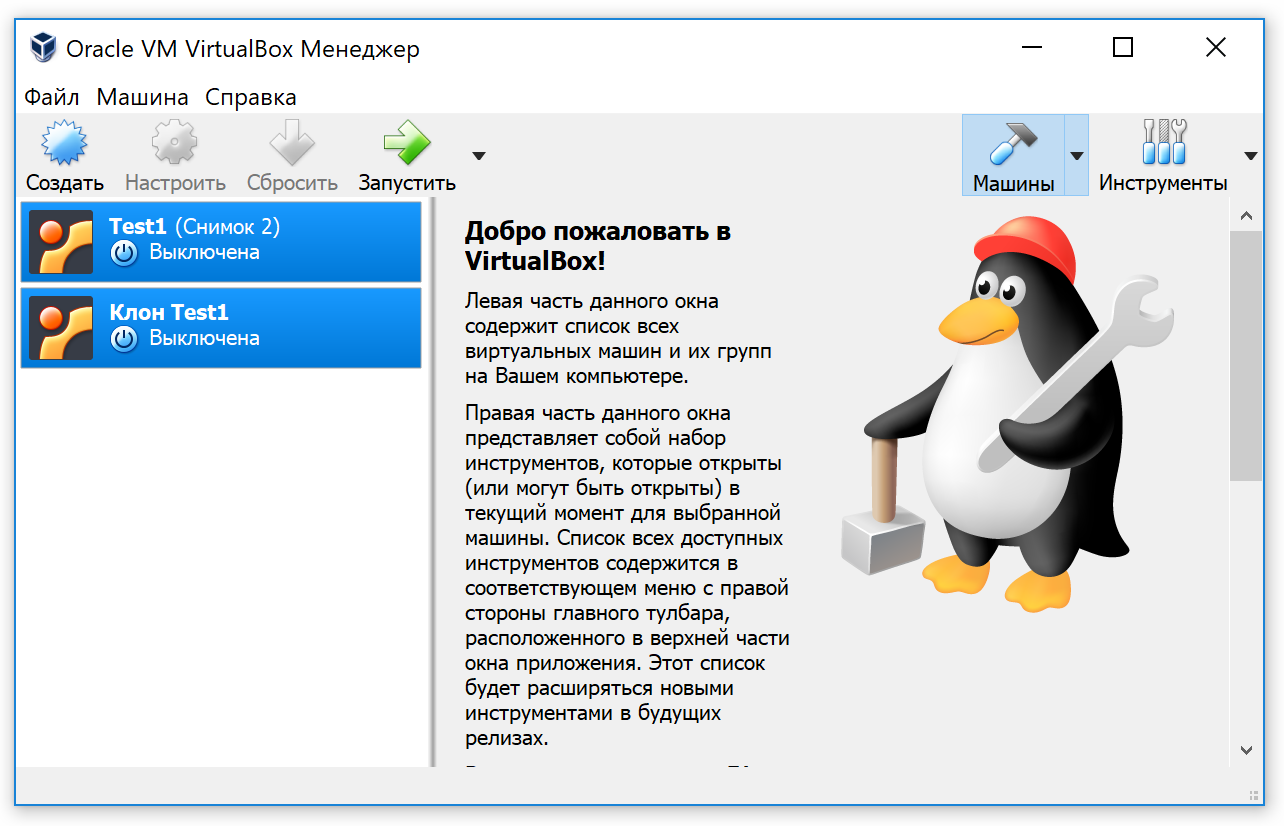
Для решения каких-либо задач вы запускаете клон, после использования удаляете его и создаете новый клон, не трогая при этом основную систему. И волки сыты, и овцы целы.
Совет
Второй путь сохранения настроенной виртуальной системы – создание снэпшота. Снэпшот – копирование состояния системы, к которому всегда можно откатиться. Лучшая параллель здесь – сохранение в компьютерной игре, перед каким-либо сложным боссом или этапом вы сохраняете игру и в случае неудачи загружаетесь с этого места. В процессе работы вы можете сделать несколько снэпшотов (снимков, если использовать термин переводчиков VirtualBox) и в любой момент откатиться к любому из них.
Для создания снэпшота в меню VirtualBox выберите Машины > Снимки и затем “Создать”. Каждому снэпшоту можно присвоить имя и описание. Когда вам необходимо будет восстановить какую-либо версию системы, вы выбираете снэпшот и затем “Восстановить”.
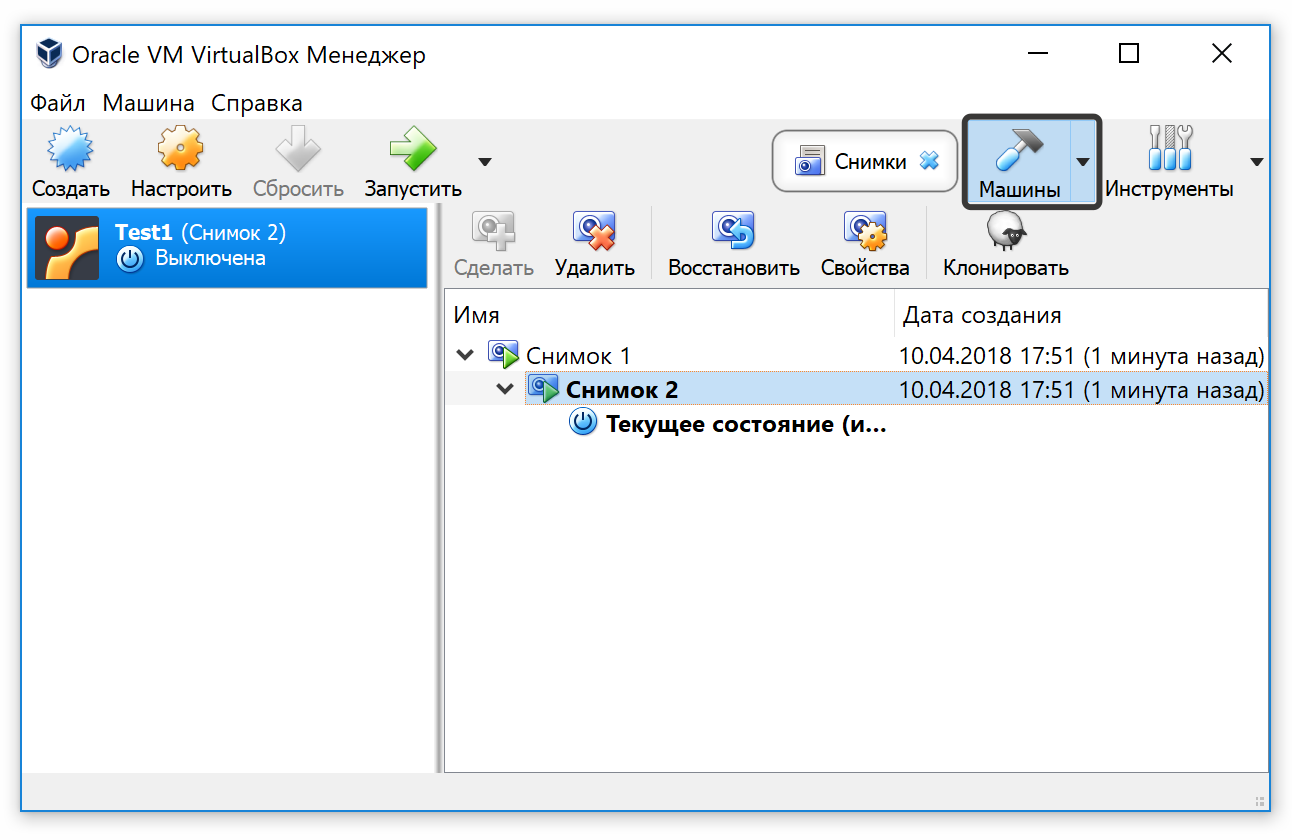
В завершение главы хочу сказать пару слов о live-системе. Live-система не устанавливается на диск вашего компьютера, все данные она хранит в оперативной памяти, получая их из образа операционной системы. Live-система имеет неоспоримые плюсы: скорость запуска системы, отсутствие необходимости производить установку на жесткий диск. Минусы: амнезия – система забывает все при выключении машины. Если вы хотите сохранить данные на диск, вам следует произвести установку.
В предыдущей главе мы показали, как создавать виртуальную машину с операционной системой Linux Mint. Может быть, вы уже запустили систему. Первоначально она запускается как live-система, и, вероятно, вам не хватает сохранения данных. Немного забегу вперед: запустив систему, выберите “Install Linux Mint” и следуйте инструкциям.
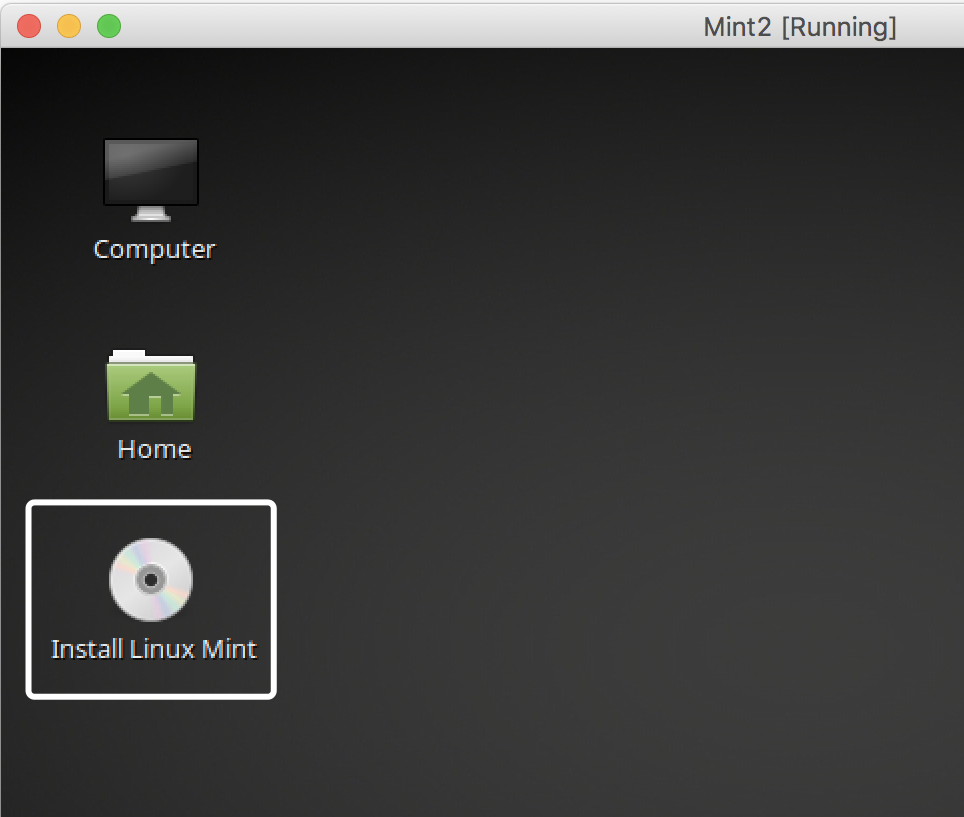
Обязательно создайте образцовую систему и клонируйте ее. В дальнейшем мы будем работать уже с клонами вашей основной системы.
1.10. Snapshots
With snapshots, you can save a particular state of a virtual machine for later use. At any later time, you can revert to that state, even though you may have changed the VM considerably since then. A snapshot of a virtual machine is thus similar to a machine in «saved» state, as described above, but there can be many of them, and these saved states are preserved.
You can see the snapshots of a virtual machine by first selecting a machine in the VirtualBox Manager and then clicking on the «Snapshots» button at the top right. Until you take a snapshot of the machine, the list of snapshots will be empty except for the «Current state» item, which represents the «Now» point in the lifetime of the virtual machine.
1.10.1. Taking, restoring and deleting snapshots
There are three operations related to snapshots:
You can take a snapshot . This makes a copy of the machine’s current state, to which you can go back at any given time later.
If your VM is currently running, select «Take snapshot» from the «Machine» pull-down menu of the VM window.
If your VM is currently in either the «saved» or the «powered off» state (as displayed next to the VM in the VirtualBox main window), click on the «Snapshots» tab on the top right of the main window, and then
either on the small camera icon (for «Take snapshot») or
right-click on the «Current State» item in the list and select «Take snapshot» from the menu.
In any case, a window will pop up and ask you for a snapshot name. This name is purely for reference purposes to help you remember the state of the snapshot. For example, a useful name would be «Fresh installation from scratch, no Guest Additions», or «Service Pack 3 just installed». You can also add a longer text in the «Description» field if you want.
Your new snapshot will then appear in the snapshots list. Underneath your new snapshot, you will see an item called «Current state», signifying that the current state of your VM is a variation based on the snapshot you took earlier. If you later take another snapshot, you will see that they will be displayed in sequence, and each subsequent snapshot is derived from an earlier one:
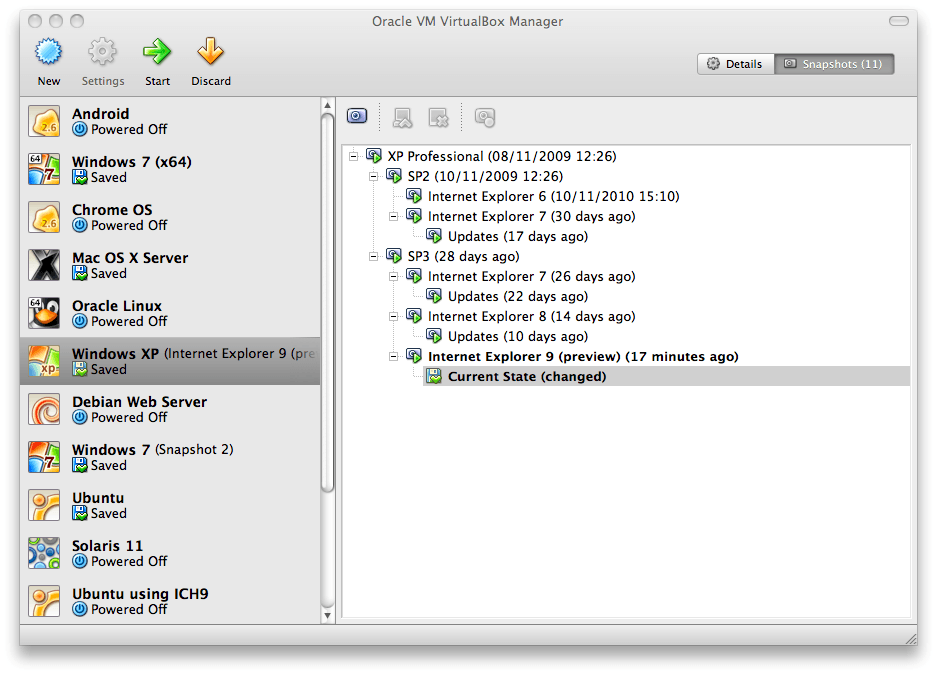
VirtualBox imposes no limits on the number of snapshots you can take. The only practical limitation is disk space on your host: each snapshot stores the state of the virtual machine and thus occupies some disk space. (See the next section for details on what exactly is stored in a snapshot.)
You can restore a snapshot by right-clicking on any snapshot you have taken in the list of snapshots. By restoring a snapshot, you go back (or forward) in time: the current state of the machine is lost, and the machine is restored to the exact state it was in when the snapshot was taken. [4]
Restoring a snapshot will affect the virtual hard drives that are connected to your VM, as the entire state of the virtual hard drive will be reverted as well. This means also that all files that have been created since the snapshot and all other file changes will be lost. In order to prevent such data loss while still making use of the snapshot feature, it is possible to add a second hard drive in «write-through» mode using the VBoxManage interface and use it to store your data. As write-through hard drives are not included in snapshots, they remain unaltered when a machine is reverted. See Section 5.4, “Special image write modes” for details.
To avoid losing the current state when restoring a snapshot, you can create a new snapshot before the restore.
By restoring an earlier snapshot and taking more snapshots from there, it is even possible to create a kind of alternate reality and to switch between these different histories of the virtual machine. This can result in a whole tree of virtual machine snapshots, as shown in the screenshot above.
You can also delete a snapshot , which will not affect the state of the virtual machine, but only release the files on disk that VirtualBox used to store the snapshot data, thus freeing disk space. To delete a snapshot, right-click on it in the snapshots tree and select «Delete». As of VirtualBox 3.2, snapshots can be deleted even while a machine is running.
Whereas taking and restoring snapshots are fairly quick operations, deleting a snapshot can take a considerable amount of time since large amounts of data may need to be copied between several disk image files. Temporary disk files may also need large amounts of disk space while the operation is in progress.
There are some situations which cannot be handled while a VM is running, and you will get an appropriate message that you need to perform this snapshot deletion when the VM is shut down.
1.10.2. Snapshot contents
Think of a snapshot as a point in time that you have preserved. More formally, a snapshot consists of three things:
It contains a complete copy of the VM settings, including the hardware configuration, so that when you restore a snapshot, the VM settings are restored as well. (For example, if you changed the hard disk configuration or the VM’s system settings, that change is undone when you restore the snapshot.)
The copy of the settings is stored in the machine configuration, an XML text file, and thus occupies very little space.
The complete state of all the virtual disks attached to the machine is preserved. Going back to a snapshot means that all changes that had been made to the machine’s disks — file by file, bit by bit — will be undone as well. Files that were since created will disappear, files that were deleted will be restored, changes to files will be reverted.
(Strictly speaking, this is only true for virtual hard disks in «normal» mode. As mentioned above, you can configure disks to behave differently with snapshots; see Section 5.4, “Special image write modes”. Even more formally and technically correct, it is not the virtual disk itself that is restored when a snapshot is restored. Instead, when a snapshot is taken, VirtualBox creates differencing images which contain only the changes since the snapshot were taken, and when the snapshot is restored, VirtualBox throws away that differencing image, thus going back to the previous state. This is both faster and uses less disk space. For the details, which can be complex, please see Section 5.5, “Differencing images”.)
Creating the differencing image as such does not occupy much space on the host disk initially, since the differencing image will initially be empty (and grow dynamically later with each write operation to the disk). The longer you use the machine after having created the snapshot, however, the more the differencing image will grow in size.
Finally, if you took a snapshot while the machine was running, the memory state of the machine is also saved in the snapshot (the same way the memory can be saved when you close the VM window). When you restore such a snapshot, execution resumes at exactly the point when the snapshot was taken.
The memory state file can be as large as the memory size of the virtual machine and will therefore occupy quite some disk space as well.
[4] Both the terminology and the functionality of restoring snapshots has changed with VirtualBox 3.1. Before that version, it was only possible to go back to the very last snapshot taken — not earlier ones, and the operation was called «Discard current state» instead of «Restore last snapshot». The limitation has been lifted with version 3.1. It is now possible to restore any snapshot, going backward and forward in time.
- Guest Additions for Windows