Как установить и настроить программу Krita
За последние несколько лет было разработано несколько десятков графических редакторов. Среди универсальных вариантов, которые можно использовать для создания и редактирования растровой графики, можно выделить программу для рисования Krita. Ее широкий функционал позволяет рисовать изображения с нуля.
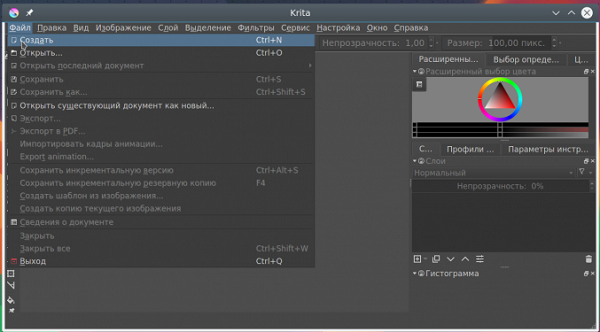
Установка Krita
Установочные файлы графического редактора размещены на официальном сайте, в Магазине Windows, Steam, а также здесь. Версия, которая доступна для скачивания с официального сайта, отличается от других только отсутствием функции автоматического обновления.
Для загрузки доступно две версии архитектуры, которую можно выбрать в ручном режиме. По умолчанию загружается файл с разрешением EXE, но можно отдать предпочтение переносной версии, представленной ZIP-архивом.
При использовании установочного файла программа отобразится на панели задач. Установка через EXE-файл:
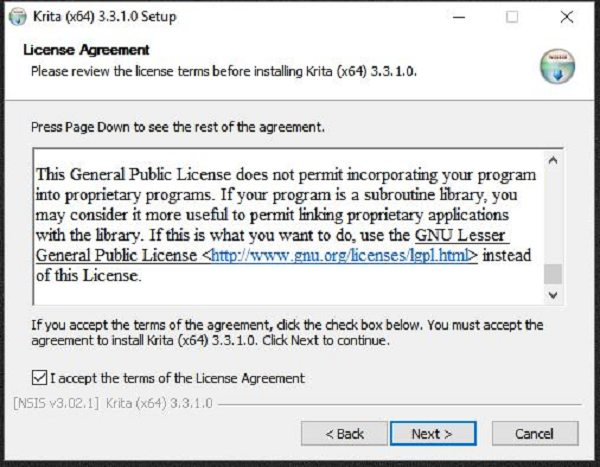
- Скачанный файл открывается с правами администратора. Затем нужно согласиться с правилами лицензионного соглашения.

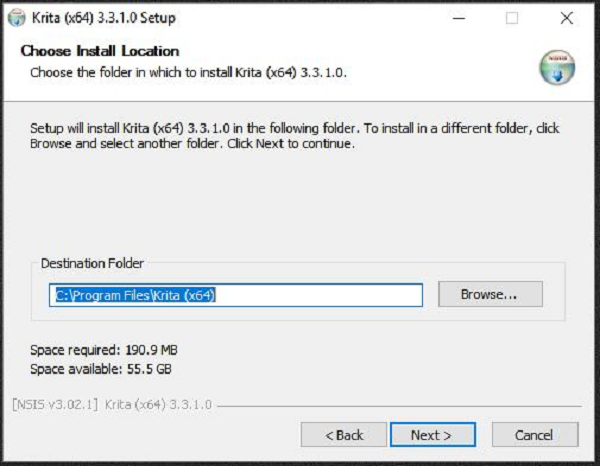
- Выбирается папка для установки.
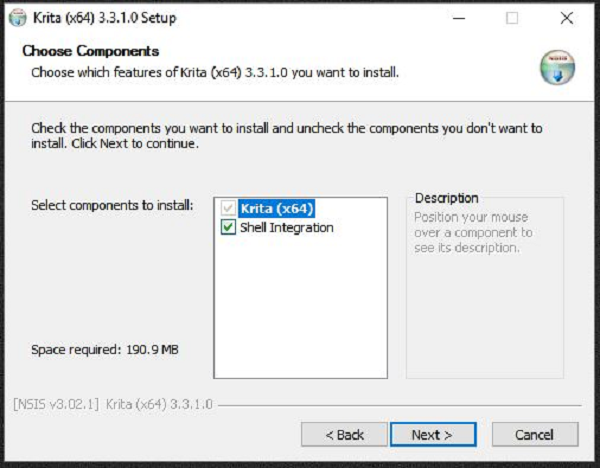
- Выбирается дополнительные компоненты для корректной работы утилиты, а также место их хранения.
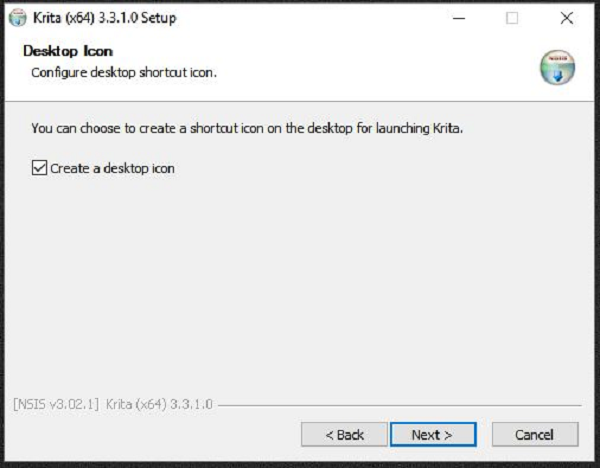
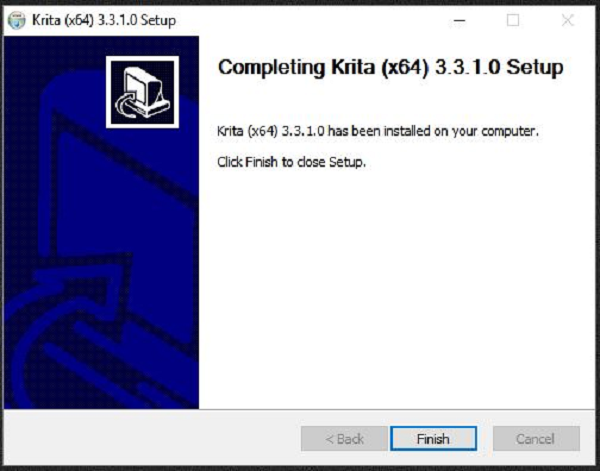
- Процесс завершен, что подтверждается нажатием соответствующей клавиши.
Настройка
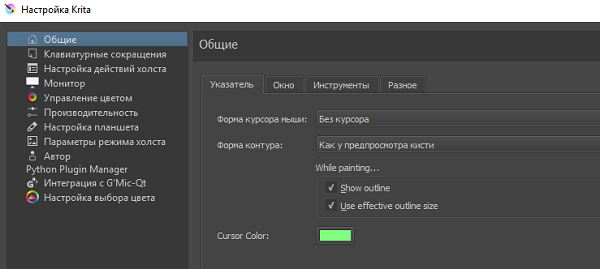
Перед началом работы в программе ее следует настроить. Меню настроек разделили на несколько вкладок:
- общие;
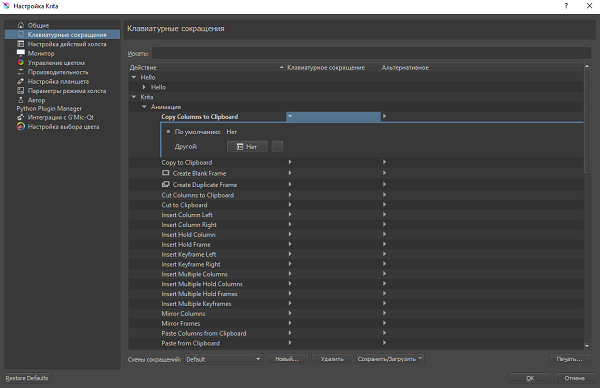
- клавиатурные сокращения;
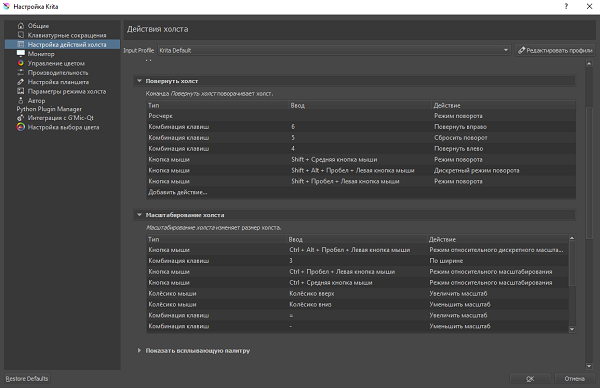
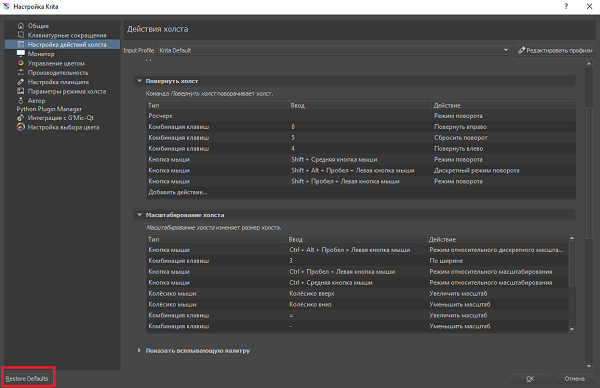
- настройка действий холста;
- монитор;
- управление цветом;
- производительность;
- настройка планшета;
- параметры режима холста;
- интеграция с GMic-Qt;
- настройка выбора цвета.
Работа с графическим редактором при отсутствии пера и сенсорной зоны осуществляется при помощи клавиатуры и стандартной мыши. Для существенного ускорения процесса можно назначить горячие клавиши в разделе «Клавиатурные сокращения»:
- откройте раздел;
- выберите нужную команду;
- после клика по строке на клавиатуре наберите комбинацию клавиш.
Функционал этой вкладки настроек позволяет искать требуемые действия в соответствующем поле, создавать, сохранять и удалять наборы клавиатурных сокращений. Для каждого действия можно назначить две комбинации.
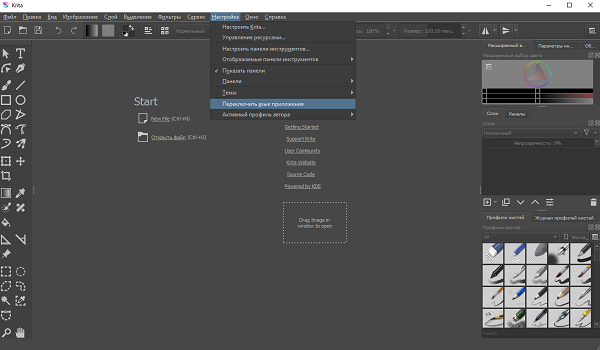
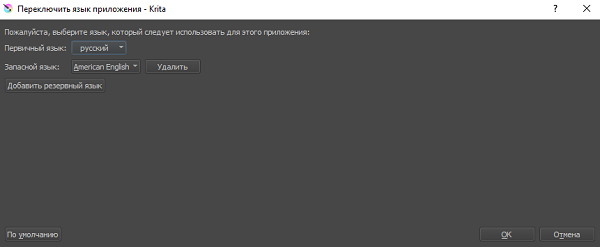
Программа переведена на несколько языков. Смена осуществляется в несколько этапов:
- выберите вкладку «Настройка»;
- нажмите на раздел «Переключить язык приложения»;
- выберите основной и резервный язык.
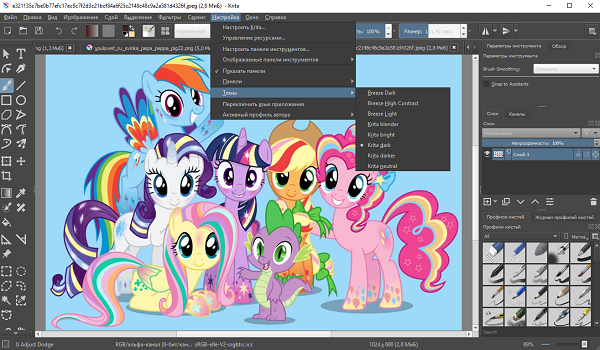
Все панели могут отображаться в несколько цветовых вариантах. Это сделано для того, чтобы каждый мог создать удобные условия для работы с учетом своих предпочтений. Переключение темы осуществляется путем выбора настроек и раздела «Темы». После этого появляется вкладка с доступными цветовыми решениями оформления.
Как пользоваться Krita
Как ранее было отмечено, графический редактор в большей степени подходит для рисования с нуля растровой графики. Другими словами, для работы с вектором или редактирования фотографий лучше подобрать иной вариант. Функционал Krita достаточно большой, но большинство начинающих пользователей используют программу только для одной задачи – создание рисунков. Инструкция следующая:
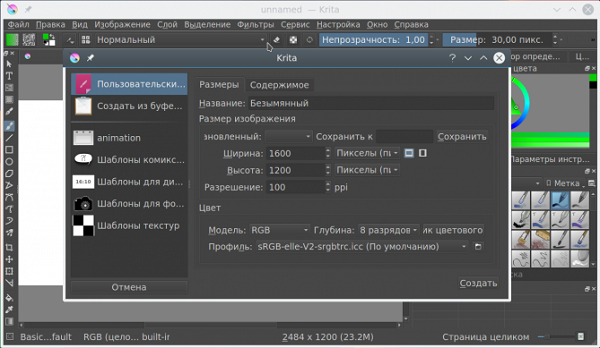
- Создание холста. Каждая работа начинается с создания нового проекта. На этом этапе задаются важные параметры, которые в дальнейшем можно будет изменить. Для создания холста откройте меню «Файл» и выберете пункт «Создать». В появившемся диалоговом окне следует указать ширину и высоту холста, данные вводятся в нескольких значениях, которые меняются в зависимости от поставленной задачи. Есть возможность выбрать место сохранения, разрешение проекта и цвет холста. Для создания WEB-материала есть прозрачный холст.
- После появления подходящей рабочей области можно приступать к рисованию. Изображение получается за счет использования разных кистей, которые могут отличаться формой, размером, степенью нажима, прозрачностью и некоторыми другими параметрами. Все доступные кисти расположены в правом окне, где есть еще и цветовая палитра. Для выбора наиболее часто используемых кистей, достаточно нажать на колесик мышки. Основные настройки расположены в верхнем окне.
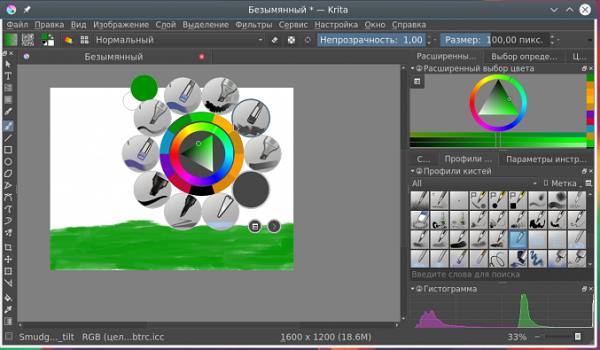
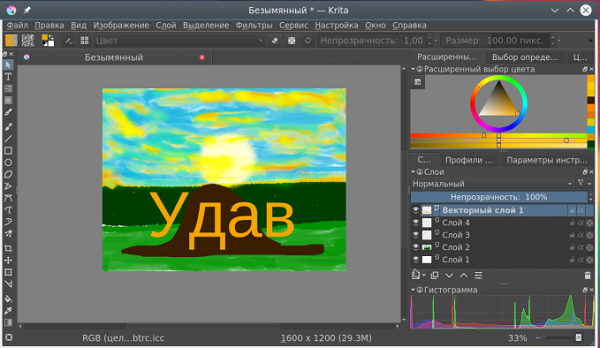
- Со слоями многие знакомы по Фотошопу, здесь они также присутствуют, но имеют чуть измененный функционал. За счет группировки можно работать отдельно с несколькими объектами. Для создания нового слоя можно воспользоваться назначенной комбинацией клавиш, или перейти в раздел «Слои» и выбрать функцию «Создать». Дополнительные инструменты расположены под самим диалоговым окном.
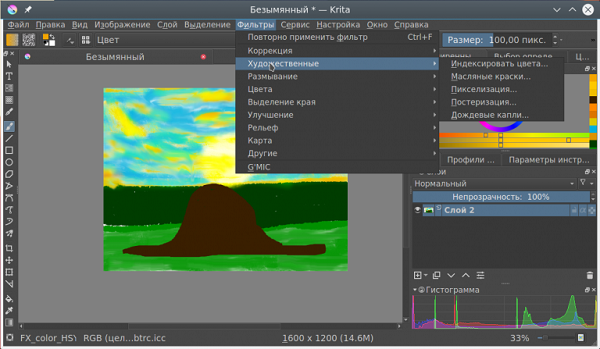
- Фильтры предназначены для получения необычного эффекта. Они накладываются на каждый слой или поверх всего проекта, могут быть обрамлены маской. Все доступные варианты находятся во вкладке «Фильтры». После выбор подходящего появляется соответствующая вкладка с тонкими настройками.
- Слева есть все доступные инструменты, большая часть которых отвечает за создание фигур и линий. После выбора нужного варианта в верхней части экрана появятся собственные тонкие настройки.
В настройках программы есть функция автоматического сохранения, которая включается в разделе «Общие». После завершения работы нужно сохранить проект или результат в нужном формате. Для этого:
- выберете раздел «Файл» и «Сохранить»;
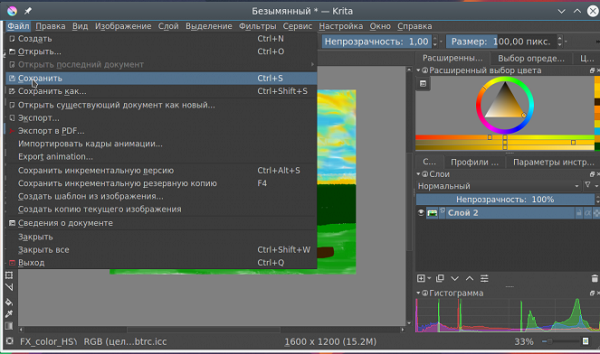
- укажите папку;
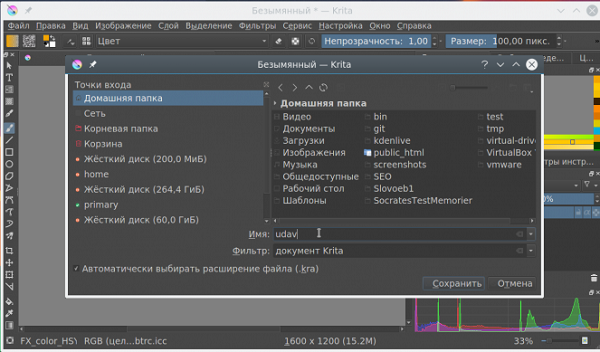
- на выбор предоставлено несколько форматов, для дальнейшего редактирования проекта в программе.
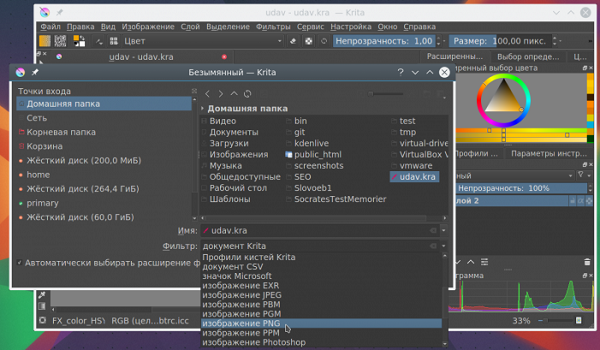
При выборе некоторых форматов изображения можно сохранить и альфа-канал, который отвечает за прозрачность.
Рассмотрим особенности использования графического редактора на примере создания изображения девушки. Весь процесс можно разделить на несколько этапов:
- создается холст со стандартным значением разрешения и размером 1920 на 1920 пикселей;
- полученная зона изображения блокируется на панели слоев;
- создается новый пустой слоя, без заливки для нанесения контура;
- стандартная горячая клавиша для кисти «В»;
- нажмите на кисть Bridttle_hairy, в цветовом круге выберете темный нейтральный оттенок;
- при зажатой клавише «Shift» мышкой выбирается подходящий размер кисти;
- на верхней панели нажимается клавиша, отвечающая за выбор режима рисования отрезками;
- наносятся общие очертания головы, рта, носа, ушей и волос;
- для переключения режима ластика можно нажать клавишу «Е»;
- если результат даже отдаленно не напоминает то, что задумывалось, можно удалить весь слой, для чего он выбирается и нажимается клавиша «DELETE»;
- для создания привлекательного эффекта проводится нанесение теней;
- под тени создается новый слой, который будет лежать ниже линий;
- есть несколько техник рисования теней, каждая предусматривает предварительное определение зоны расположения источника света;
- для объединения созданных слоев, кроме фона, достаточно выбрать их и нажать комбинацию «Ctrl+E».
Стоит учитывать тот момент, что процесс рисования напоминает обычный, с использованием листа бумаги и карандашей. Другими словами, для получения красивого результата нужно уметь рисовать. Проще всего добиться результата можно на графическом планшете.
Удаление программы
Для того чтобы удалить программу, которая установлена по стандартной схеме Windows, достаточно выполнить несколько действий. Они следующие:
- зайдите в папку, куда был установлен графический редактор;
- выберите файл с названием «uninstall» и разрешением EXE;
- после его открытия с правами администратор, нужно согласиться со всем, о чем предупреждает программа.
Итоги
Программу Krita можно назвать полноценной заменой многих графических редакторов. Она поставляется с открытым исходным кодом, через официальный сайт скачивается абсолютно бесплатно с полным набором функций. Как и многие другие аналоги, предназначена для работы с растровой графикой, но отсутствуют некоторые распространенные инструменты для ретуши и точного выделения объектов. На сайте разработчиков есть подробная документация по использованию всех инструментов. Многочисленные отзывы указывают на отсутствие проблем с использованием Krita, при этом есть версия, которую можно установить путем распаковывания файлов. Для скачивания доступны несколько версий, предназначенные для самых различных операционных систем и рабочих оболочек.
Как убрать пиксели в крите


Selections
Selections allow you to pick a specific area of your artwork to change. This is useful when you want to move a section of the painting, transform it, or paint on it without affecting the other sections. There are many selection tools available that select in different ways. Once an area is selected, most tools will stay inside that area. On that area you can draw or use gradients to quickly get colored and/or shaded shapes with hard edges. The selections in Krita are not limited to the canvas boundary, so you can also select portions of the painting that are beyond the canvas boundary.
Creating Selections
The most common selection tools all exist at the bottom of the toolbox. Each tool selects things slightly differently. The links for each tool go into a more detailed description of how to use it.
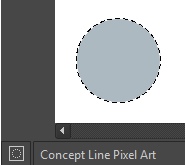
Select the shape of a square.
Select the shape of a circle.
Click where you want each point of the Polygon to be. Double click to end your polygon and finalize your selection area. Use the Shift + Z shortcut to undo last point.
freehand/Lasso tool is used for a rough selection by drawing the selection outline freehand on the canvas.
Similar Color Selection Tool.
Contiguous or “Magic Wand” selects a field of color. Adjust the Fuzziness to allow more changes in the field of color, by default limited to the current layer.
Path select an area based on a vector path, click to get sharp corners or drag to get flowing lines and close the path with the Enter key or connecting back to the first point.
Magnetic selection makes a free hand selection where the selection snaps to sharp contrasts in the image.
You can also use the transform tools on your selection, a great way to try different proportions on parts of your image.
Editing Selections
The tool options for each selection tool gives you the ability to modify your selection.
Replace the current selection.
Get the overlapping section of both selections.
Add the new selection to the current selection.
Subtract the selection from the current selection.
Make a selection where both the new and current do not overlap.
You can change this in Tools Settings .
If you hover over a selection with a selection tool and no selection is activated, you can move it. To quickly go into transform mode,  and select Edit Selection .
Removing Selections
If you want to delete the entire selection, the easiest way is to deselect everything. Select ‣ Deselect . Shortcut Ctrl + Shift + A . When you have one of the selection tool active, and the mode of selection is in intersect, replace or symmetric difference then you can also deselect by just  anywhere on the canvas.
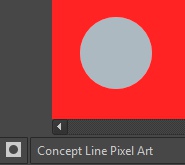
Display Modes
In the bottom left-hand corner of the status bar there is a button to toggle how the selection is displayed. The two display modes are the following: (Marching) Ants and Mask. The red color with Mask can be changed in the preferences. You can edit the color under Settings ‣ Configure Krita… ‣ Display ‣ Selection Overlay . If there is no selection, this button will not do anything.
Ants display mode (default) is best if you want to see the areas that are not selected.
Mask display mode is good if you are interested in seeing the various transparency levels for your selection. For example, when you have a selection with very soft edges due using feathering.
Changed in version 4.2: Mask mode is activated as well when a selection mask is the active layer so you can see the different selection levels.
Global Selection Mask (Painting a Selection)
The global Selection Mask is your selection that appears on the layers docker. By default, this is hidden, so you will need to make it visible via Select ‣ Show Global Selection Mask .
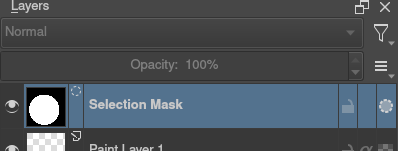
Once the global Selection Mask is shown, you will need to create a selection. The benefit of using this is that you can paint your selection using any of the normal painting tools, including the transform and move. The information is saved as grayscale.
You can enter the global selection mask mode quickly from the selection tools by doing and select Edit Selection .
Selection from layer transparency
You can create a selection based on a layer’s transparency by right-clicking on the layer in the layer docker and selecting Select Opaque from the context menu.
New in version 4.2: You can also do this for adding, subtracting and intersecting by going to Select ‣ Select Opaque , where you can find specific actions for each.
If you want to quickly select parts of layers, you can hold the Ctrl + shortcut on the layer thumbnail. To add a selection do Ctrl + Shift + , to remove Ctrl + Alt + and to intersect Ctrl + Shift + Alt + . This works with any mask that has pixel or vector data (so everything but transform masks).
Pixel and Vector Selection Types
Vector selections allow you to modify your selection with vector anchor tools. Pixel selections allow you to modify selections with pixel information. They both have their benefits and disadvantages. You can convert one type of selection to another.
![]()
When creating a selection, you can select what type of selection you want from the Mode in the selection tool options: Pixel or Vector. By default this will be Vector.
Vector selections can be modified as any other vector shape with the Shape Selection Tool , if you try to paint on a vector selection mask it will be converted into a pixel selection. You can also convert vector shapes to selection. In turn, vector selections can be made from vector shapes, and vector shapes can be converted to vector selections using the options in the Selection menu. Krita will add a new vector layer for this shape.
One of the most common reasons to use vector selections is that they give you the ability to move and transform a selection without the kind of resize artifacts you get with a pixel selection. You can also use the Shape Edit Tool to change the anchor points in the selection, allowing you to precisely adjust bezier curves or add corners to rectangular selections.
If you started with a pixel selection, you can still convert it to a vector selection to get these benefits. Go to Select ‣ Convert to Vector Selection .
If you have multiple levels of transparency when you convert a selection to vector, you will lose the semi-transparent values.
Common Shortcuts while Using Selections
Copy – Ctrl + C or Ctrl + Ins
Paste – Ctrl + V or Shift + Ins
Cut – Ctrl + X , Shift + Del
Copy From All Layers – Ctrl + Shift + C
Copy Selection to New Layer – Ctrl + Alt + J
Cut Selection to New Layer – Ctrl + Shift + J
Display or hide selection with Ctrl + H
Select Opaque – Ctrl + on layer thumbnail.
Select Opaque (Add) – Ctrl + Shift + on layer thumbnail.
Select Opaque (Subtract) – Ctrl + Alt + on layer thumbnail.
Select Opaque (Intersect) – Ctrl + Shift + Alt + on layer thumbnail.
© Copyright licensed under the GNU Free Documentation License 1.3+ unless stated otherwise. Build 1665.
Krita Pixel Art
![]()
Krita Pixel Art can be understood as designing any artwork on 1 x 1 or 2 x 2 pixels using 1 or 2-pixel brushes of brushes preset. We generally create art work, character, object and gaming components in pixel art that incorporate 2D game designing and other pixel design work. For creating pixel art in this software, we have to adjust different types of grids systems, and then we can easily create pixel art by using some of the tools of the tool panel, including the freehand brush tool.
![]()
![]()
![]()
![]()
![]()
![]()
![]()
![]()
How to Create Pixel Art in Krita?
Creating pixel art in Krita is not a big deal; you just have to make some adjustment and learn how to use pixel brush and other tools for this purpose.
3D animation, modelling, simulation, game development & others
Let’s see each step one by one.
Let us have a new document first, and for that, click on the New File option of the Start label of this working screen, or you can press the Ctrl + N button as the shortcut key.
![]()
Once you click on it, a ‘Create New Document dialog box will be open. Here take the size of your document as 64 x 64 or 32 x 32 pixels because for creating pixel art, we have to work on 1 x 1 pixel and click on Create button.
![]()
Now go to the Menu bar and click on the Settings menu. A scroll down of this menu will be open. Now click on the ‘Configure Krita’ option of the drop-down list.
![]()
Here go to the Display option of the opened dialog box and then click on the grid settings tab of this option.
![]()
Decrease value of ‘Start Showing at’ option as 400%.
![]()
Now click the color box of the Pixel Grid option to change the color into any dark color code if your document color is light. I will choose this color from color wheel.
![]()
Now you will have a grid-like this on your canvas or document.
![]()
When you draw something with any brush preset, you will not have a perfect art pixel for your drawing.
![]()
For creating pixel arts, Krita offers pixel art brushes that have a brush tip size of 1 pixel, and for pixel art brush, search for Pixel Art in a panel of Brush presets. You can find this panel on the right side of the working screen.
![]()
You can also have these brushes from the Edit Brush Settings dialog box at the properties bar (at the top of the working screen).
![]()
Here Krita offers three-pixel art brushes in its brush preset. If you want, you can download more from Krita official website. We will choose this brush.
![]()
Now when you draw something with it, it will draw one by one pixel like this.
![]()
You can also take any Shape tool for drawing pixel shape instead of pixel brush.
For example, we will take the rectangle tool from the tool panel and draw these two rectangle shapes.
![]()
If you want to remove any pixel from your shape, then take Eraser brush from Brush presets or take any brush preset.
If you have taken an Eraser brush, you need not do the next step, which I will tell you or if you have taken any brush, then enable Eraser mode by click on this icon.
![]()
Now click on that pixel of shape you want to remove, and that will erase like this.
![]()
Now, if you decrease the value of opacity of the taken brush.
![]()
And use it in Eraser mode will not remove the pixel completely but down its opacity as your chosen opacity value.
![]()
You can also fill color inside any shape if it is closed shape and for that take Fill tool from tool panel or press F button of the keyboard.
![]()
Now make click inside where you want to fill color, and it will fill that area with your chosen color.
![]()
But if you click a square shape inside a rectangle, then the color will spread on the whole canvas because this is an open shape due to erasing of pixels.
![]()
If you want to select any drawn object separately, you have to select that object by using a selection tool. We will take the Rectangle Selection tool for this purpose.
![]()
We will make a selection around a top object like this. You can take any other selection tool, but that tool should select pixel by pixel.
![]()
And press Ctrl + T for transform box of it, and you can do transform operation with it as you can move it, rotate it and so on.
![]()
You can also do transform from the Layer menu of the menu bar. Just select your desired object with your desired election tool.
![]()
Now go to the Layer menu, click on it, and then go to the Transforms option of the drop-down list. Next, choose the Shear Layer option from the new drop-down list.
![]()
Here enter shear angle as per your requirement for shearing this object.
![]()
And it will shear like this.
![]()
If you want to change any object like this, you can make a selection around it by using the Contiguous Selection Tool of the tool panel.
![]()
Just make click on the shape for selecting that color you want to change.
![]()
And after selection, take the Fill tool from the tool panel or press the F button on the keyboard and click on the selected area. Now your chosen color will fill on it. You can see that it will fill only continuous pixels.
![]()
These are some parameters and characteristics which you can handle for creating pixel art in this software. Once you have set these parameters, you can create your imagination of pixel art on this software.
Conclusion
Pixel art is no more an unknown word for you, and you can easily manage all related parameters of it for getting the best result in your work. Just start practicing on it to explore new ideas and analyse different data of tools that involve creating pixel art.
Recommended Articles
This is a guide to Krita Pixel Art. Here we discuss the introduction and how to create pixel art in Krita? for better understanding. You may also have a look at the following articles to learn more –
Display Settings

Here various settings for the rendering of Krita can be edited.
OpenGL
For Krita 3.3 or later: Reworded as “*Canvas Graphics Acceleration*”
OpenGL is a bit of code especially for graphics cards. Graphics cards a dedicate piece of hardware for helping your computer out with graphics calculations, which Krita uses a lot. All modern computer have graphics cards.
For Krita 3.3 or later: On Windows, Krita also supports using Direct3D instead with the help of the ANGLE library. ANGLE works by converting the OpenGL functions that Krita makes use of to the equivalent in Direct3D. It may (or may not) be slower than native OpenGL, but it has better compatibility with typical Windows graphics drivers.
Enable OpenGL (For Krita 3.3 or later: Reworded as *Canvas Graphics Acceleration*)
Selecting this checkbox will enable the OpenGL / ANGLE canvas drawing mode. With a decent graphics card this should give faster feedback on brushes and tools. Also the canvas operations like Rotate, Zoom and Pan should be considerably faster.
For Krita 3.3 or later: Renderer
On Windows: You can switch between native OpenGL or ANGLE Direct3D 11 rendering. The usual recommendation is to leave it as “Auto”, which Krita will decide the best to use based on some internal compatibility checking. Changes to this option require a restart of Krita to take effect.
Use Texture Buffer
This setting utilizes the graphics card’s buffering capabilities to speed things up a bit. Although for now, this feature may be broken on some AMD/Radeon cards and may work fine on some Intel graphics cards.
The user can choose which scaling mode to use while zooming the canvas. The choice here only affects the way the image is displayed during canvas operations and has no effect on how Krita scales an image when a transformation is applied.
This is the fastest and crudest filtering method. While fast, this results in a large number of artifacts — ‘blockiness’ during magnification, and aliasing and shimmering during minification.
This is the next step up. This removes the ‘blockiness’ seen during magnification and gives a smooth looking result. For most purposes this should be a good trade-off between speed and quality.
This should give a little better result than Bilinear Filtering.
High Quality Filtering
Only available when your graphics card supports OpenGL 3.0. As the name suggests, this setting provides the best looking image during canvas operations.
New in version 4.2: These settings are only available when using Windows.
Since 4.2 Krita can not just edit floating point images, but also render them on screen in a way that an HDR capable setup can show them as HDR images.
The HDR settings will show you the display format that Krita can handle, and the current output format. You will want to set the preferred output format to the one closest to what your display can handle to make full use of it.
The format your display is in by default. If this isn’t higher than 8bit, there’s a good chance your monitor is not an HDR monitor as far as Krita can tell. This can be a hardware issue, but also a graphics driver issue. Check if other HDR applications, or the system HDR settings are configured correctly.
Current Output format
What Krita is rendering the canvas to currently.
Preferred Output Format
Which surface type you prefer. This should be ideally the closest to the display format, but perhaps due to driver issues you might want to try other formats. This requires a restart.
Transparency Checkerboard
Krita supports layer transparency. Of course, the nasty thing is that transparency can’t be seen. So to indicate transparency at the lowest layer, we use a checker pattern. This part allows you to configure it.
This sets the size of the checkers which show up in transparent parts of an image.
The user can set the colors for the checkers over here.
Canvas Border
The user can select the color for the canvas i.e. the space beyond a document’s boundaries.
Selecting this will hide the scrollbars in all view modes.
Selection Overlay
Set the color of the alternate Selection display mode. This mode is typically used when making complex selections.
Color of the overlay.
How opaque the overlay is.
Pixel Grid
New in version 4.0.
This allows configuring an automatic pixel-by-pixel grid, which is very useful for doing pixel art.
The color of the grid.
Start Showing at
This determines the zoom level at which the pixel grid starts showing, as showing it when the image is zoomed out a lot will make the grid overwhelm the image, and is thus counter productive.
Miscellaneous
Hides the scrollbars on the canvas.
Enable Curve Anti-Aliasing
This allows anti-aliasing on previewing curves, like the ones for the circle tool, or the path tool.
Hide Layer thumbnail popup
This disables the thumbnail that you get when hovering over a layer.
Color Channels in Color
This configures whether the image display should be colored when only a single channel is selected in the channels docker.
Enable Selection Outline Anti-Aliasing
This allows automatic anti-aliasing on selection. It makes the selection feel less jaggy and more precise.
Move Checkers When Scrolling
When selected the checkers will move along with opaque elements of an image during canvas Panning, Zooming, etc. Otherwise the checkers remain stationary and only the opaque parts of an image will move.
© Copyright licensed under the GNU Free Documentation License 1.3+ unless stated otherwise. Build 2122.