[Step By Step Guide] How to set up visual studio code for C and C++ programming 2021.
Visual Studio Code is a free source-code editor made by Microsoft for Windows, Linux and macOS. Features include support for debugging, syntax highlighting, intelligent code completion, snippets, code refactoring, and embedded Git.
It currently supports hundreds of programming languages and file formats. Several common languages come supported by default (JavaScript, HTML, CSS, etc), and others gain support by adding integrated extensions. If you find a language that isn’t supported by an existing extension, the open nature of the extensions system means you can build one.
In this blog post you will learn how to set up visual studio code on your local environment for C and C++, this can get tricky but if you follow step by step you can set it up easily.
Step 1: Download Visual studio code.
Type vscode on your browser and click on the first link of the page, or just click here.
Now download the installer according to your operating system.
Step 2: Install vscode
This step is easy, accept the agreement and click next.
Check the following options as shown in above image and click next and install.
Step 3: Download extensions for visual studio code.
Once you have installed visual studio code, now its time to install some extensions. Click on the button where red arrow is pointing in above image.
Now click on C/C++ extension from Microsoft as shown in the below image. If you don’t see the extension search C/C++ and you will find it.
Install the extension.
Now we have to install another extension called Code Runner.
Now we have successfully installed code editor but we need a compiler to compile and output our code, for that we will be installing MinGW.
Step 4: Download MinGW
Type mingw on google and choose following first link as shown in the image below or Click Here.
Now click download.
Step 5: Install MinGW
Open the installer, you should see something like the below image. Click on install and choose your directory where the software should be installed and click continue.
After installing, click on continue and right click on every checkbox and choose mark for installation.
After checking all checkboxes you should see something like image below.
Now click Installation on top left corner and then choose Apply Changes. You should see something like shown in the image below.
And then click on Apply.
Once you complete the installation, you should see something like the image below.
Click close and close the installer.
Step 6: Copy Bin Path
Now open ‘This PC’ and open ‘local Disk C’ you should see mingw file and click on bin folder.
Now you have to copy the folder destination which is above the page as shown below.
Now right click and copy or just press ‘Ctrl + C’ on your keyboard.
Step 7: Environment Variables
Open ‘Control Panel’ from your start menu and click on System. If you don’t find system on your control panel just type ‘system’ on the search bar which you can find in top right corner of the control panel.
Click on Advanced system setting on right side you should see system properties as shown in the image below.
Now click on Environment Variables you should see something as shown in the image below.
Now click on the path in system variable and click on edit as shown in the image below.
Now click on new and paste the bin path that we have copied in the previous step and then click Ok.
Now click ok till there are no pop ups left.
Step 8: Let’s check if MinGW has been successfully installed or not.
Click on search button near the bottom left of windows and search for command prompt.
Exit fullscreen mode
And if you see something like the image above, voila! we did it.
�� �� If you get some error don’t worry just reinstall mingw as shown in the step 4 and step 5 and it should solve the problem.����
Step 8: Let’s write our first program in C++
Hurray! we have successfully set up vscode for C and C++ now lets test it by writing our first program in vscode.
Click on ‘File’ in upper left section and choose ‘Open Folder’.
Lets make a new folder in dekstop and select the folder.
Now click on the document symbol in the side bar. If you dont see a sidebar just press Ctrl + B on keyboard.
Now make a file with a extension of .cpp as shown in the image below
Now lets type our first code. You can copy and paste the code that I have provided below.
How to Run C# in VSCode (and Compile, Debug, and Create a Project)
As stated above, I make it a point to use VSCode for as many things as I can get away with.
I feel comfortable in VSCode, know the shortcuts, and just don’t like jumping editors.
I started out with C# in Visual Studio because I was told to. It’s easy, has many, many features, and is what the tutorials told me to use.
Later, I made it a point to become efficient in it with VSCode. I was using it for everything else. Why not with C#? Visual Studio, to me, is just too bulky and has too much going on.
So in this post, I want to help you do the same.
Whether you are just starting out in C# or have decided to switch from Visual Studio to VSCode, I’m going to share with you how to run, debug, execute, and compile your C# code in VSCode.
Watch the Video?
Before we get started, if you prefer video format, check out the tutorial on YouTube.
Otherwise, continue reading.
How to Run C# in VSCode
1. Install .NET 5.0
First, install .NET 5.0. You can do that here:
Then confirm that dotnet is installed by checking the version in a terminal window:
Also go ahead and install this C# VSCode extension.
2. Create a new C# project in VSCode
Next, create a new project and open it in VSCode:
Now you should see a simple Hello World app with the main code in Program.cs
3. Run Your C# Code in VSCode
To execute your code, simply run:
…and you should see Hello World displayed in the console.
4. Debug Your C# Code in VSCode
First, be sure you installed the official C# extension mentioned above. If not, it can be found here.
Next, in VSCode open the Command Palette by going to View > Command Palette (or use the shortcut if you know what it is), and search for .NET: Generate Assets for Build and Debug
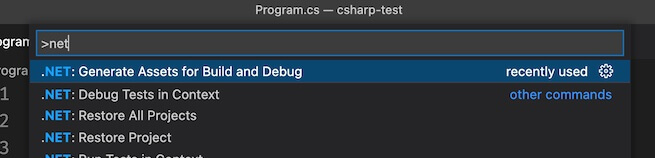
Choosing this will generate a .vscode folder with a prepopulated build configuration in it.
Now go to the “Run and Debug” tab in VSCode, set your breakpoint(s), and click the Play button to debug.

5. Compile Your Code
To compile your code, run:
After that is done you will have an executable (exe or dll) in your /bin folder. Depending on your build configuration it may be in a Debug folder or a Release folder.
Conclusion
And that’s how you run C# code in VSCode.
Now build our your code, debug it as needed, run dotnet run to execute your code, and dotnet build to compile it.
Setup VSCode to run and debug C / C++ code

By the end of this short guide, you’d be able to run, debug, and get IntelliSense for C/C++ files in VSCode. Though, this guide is focused on the Windows platform but can be extended to Mac and Linux with some minor changes.
I extensively used C & C++ in my competitive programming years and wanted better support for debugging & IntelliSense. The only options available were Dev-C++ (outdated) and the original "Mammoth" Visual Studio. Lately, I found VSCode and fell in love with it (first love was Atom). I tweaked it around and set it up as a complete IDE For small C, C++ projects especially geared towards competitive programming.
Create a sample C/C++ project
Open/Create an empty folder in VSCode.
Create a new.cpp file inside it like below:
Install recommended C/C++ extension in VSCode and reload.

Install C/C++ Compiler
C/C++ extension does not include a C++ compiler. So, you will need to install one or use which is already installed on your computer.
Windows: Download MinGW64.zip (latest release) and extract it to the C Drive.
Mac: xcode
Linux: gcc
Also, Make sure to add C++ compiler PATH to environment variable of your platform. For Windows MinGW64 add: C:\MinGW64\bin
Run and Debug C/C++ Code
You’ll notice that there is also a .vscode folder in your sample project. To configure debug configuration , 2 files are required launch.json and tasks.json inside .vscode folder.
VSCode can create and auto-configure these files if we try to debug for the first time. To do that, open C++ file in VSCode and either hit F5 or go to Debug -> Start Debugging and select C++ (GDB/LLDB) then select g++.exe build and debug active file .


This should create 2 files launch.json and tasks.json in .vscode folder which should look like below (update the MinGW64 path if not correct)
Notice that I’ve added one more optional configuration g++ build & run active file in launch.json and g++ build & run in tasks.json file for purpose of also Running C/C++ code without debugging. Now you may choose which configuration to pick when you start debugging. You may remove the configuration whichever you won’t need.

externalConsole in launch.json can be set to true to see code output in cmd instead.
Restart VSCode to take effects of newly added compiler paths.
Open any C/C++ file, set some breakpoints (or not), and hit the Big Green Play Button.

Tip: To hide *.exe files in the side explorer of VSCode, open settings and paste the below config:
Как настроить Visual Studio Code на работу с С++?
как настроить Visual Studio Code на работу с С++ после установки нужных плагинов? Visual Studio не подходит, ест много ресурсов, да и функционал немного другой.
примерно год назад я точно так же не мог с первого раза настроить VS Code.
Как справедливо указали в комментариях — есть прекрасная официальная документация по настройке. Тем не менее, я оставлю свой ответ, так как он более детальный в некоторых моментах. А в других моментах — менее детальный 🙂
Чтобы настроить VSC, хорошо бы научиться компилировать и запускать Вашу программу из командной строки. А потом настройки, котрые для этого понадобились, добавить в правильные места в файлах конфигурации VS code.
Труднность этого процесса именно в "зоопарке" разных возможностей. На этого не стоит пугаться.
Кроме того, настройка немного отличатся для разных систем (Linux, windows, macos), а Вы не указали, какая система у вас.
Я приведу пример настройки для компилятора gcc под Win64. Можно повторить мои шаги, а когда получится — сделать самостотельную настройку, например, на другой компилятор.
Устанавливаем msys2. Я установил его в C:\Programs\msys64 . При этом сам msys2 позаботился о том, чтобы путь к его директории C:\Programs\msys64\mingw64\bin оказался в path. Проверить это можно, выполнив в консоли команду path
Устанавливаем компилятор и дебаггер. Я делаю это с помощью пакета msys2, выполнив в окне, котрое открывает msys2, следующие команды:
Эта команда обновляет msys2. Она может закрыть консоль — это нормально, нужно перезапустить ее и ввести ту же команду, чтобы завершить обновление. Хорошей идеей будет время от времени обновляться, чтобы всегда иметь последнюю версию компилятора.
Теперь в Вашей системе есть компилятор и дебаггер. Проверить это просто: открываем новое окно консоли, пишем g++ —version
Если ответом не является версия — надо поискать, что пошло не так. Проверить path, возможно, отредактировать его вручную.
Такую же проверку хорошо бы сделат для дебаггера: gdb —version
Пишем hello world. Это позволит нам окончательно убедиться, что компилятор работает. в любой директории созадем файл hello.cpp с текстом
потом в этой папке в командной строке компилируем командой g++ hello.cpp -o hello.exe Если появился файл hello.exe, и он запускается и вывоит строчку — ок, этот шаг завершен.
А вот теперь можно поставить VSC. Обратите внимание, что редакций есть несколько, во первых для 32 и 64 битных систем, а во вторых — то, что назывется "User Installer" и "System Installer". Выбираем 64 битный System Installer на странице загрузки
В VSC ставим расширение для работы с C++, оно называется C/C++ for Visual Studio Code и написано Microsoft
Теперь запустим VSC в папке Вашего проекта. Пусть это будет папка C:\Projects\ . Делается это так: запускам консоль. Переходим в консоли в папку ( cd C:\Projects\ ). Запускаем VSC командой code . .
Важно то, что при этом создаётся папка настроек VSC, котрые находятся по пути C:\Projects\.vscode . В этой папке нужно создать 4 файла, я приведу их в минимальном варианте. Пути — для моей системы, где msys2 установлен в C:\Programs\msys64\ .
Файл tasks.json — отвечает за то, чтобы работала комбинация клавиш Ctrl+shift+B для сборки программы:
Файл launch.json — отвечает за работу дебаггера:
Файл settings.json — как то отвечает за файловые ассоциации, возможно даже, что он не особо нужен. Но лишним не будет:
Файл c_cpp_properties.json — отвечает за расположение include — файлов:
Если Вы создадите эти файлы, а потом заново запустите в этой директории VSC — то всё уже должно работать. То есть, программы на C++ будут компилироваться, запускаться в отладке (по F5) и показывать значения переменных в окне отладчика.
Теперь — самое важное. Как только заработает — Вам нужно эту папку .vscode копировать к корень каждой папки с проектом на C++. Это позволит VSC запускаться с Вашими настройками.
Даже если мой способ Вам не подходит напрямую — у Вас теперь есть все необходимые ключевые слова, чтобы использовать их для гуглежа.
PS. Время от времени попадаются полезные дополнительные возможности для настройки.