Установка пакетов из внешних репозиториев в Ubuntu [объяснено]
У вас есть идеи по установке пакетов в Ubuntu с помощью команды apt. Эти пакеты взяты из репозиториев Ubuntu.
Как насчет стороннего или внешнего репозитория? Нет, я не говорю здесь о PPA.
Рано или поздно вы встретите инструкцию по установке, состоящую как минимум из четырех строк. Вы устанавливаете что-то под названием «apt-transport-https», а затем делаете что-то с gpg и списком источников. После этого вы устанавливаете пакет.
Не могу вспомнить полностью. Позвольте мне привести пример для установка последней версии Yarn на Ubuntu:
Вы часто будете сталкиваться с таким методом установки при установке инструментов программирования непосредственно от разработчиков.
Многие люди просто следуют инструкциям, не задумываясь дважды о том, что здесь происходит. В этом нет ничего плохого, но знание процесса на самом деле улучшает ваши знания по этому вопросу, а также может помочь в устранении неполадок.
Позвольте мне объяснить логику этих строк.
Понимание процедуры установки из внешних репозиториев
Прежде чем продолжить, я настоятельно рекомендую прочитать эти две статьи, чтобы вам было немного понятнее:
Чтобы быстро вспомнить, вот визуальное представление репозиториев и менеджер пакетов в Linux.
 Иллюстрация репозитория и менеджера пакетов
Вся идея здесь в том, что вы добавляете в свою систему новый внешний репозиторий. Таким образом, вы сможете загружать и устанавливать пакеты, доступные из этого нового репозитория. Если репозиторий предоставляет обновление версии пакета, вы можете обновить установленный пакет вместе с обновлениями системы (apt update && apt upgrade).
Так, как это работает? Пройдем по строкам одну за другой.
Часть 1. Получение поддержки HTTPS для apt
Первая строка такая:
Curl — это инструмент для загрузки файлов в Linux-терминал. Основная часть здесь — установка АПТ-транспорт-https и, честно говоря, больше не нужен.
Смущенный? Этот пакет apt-transport-https позволяет вашей системе получать доступ к репозиториям по безопасному протоколу HTTPS. По умолчанию репозитории Ubuntu используют http, а не https.
Взгляните на скриншот ниже. Https — это внешние репозитории, которые я добавил в свою систему. Репозитории Ubuntu и PPA используют http.

В более старой версии диспетчера пакетов apt поддержка https не была включена. Пакет apt-transport-https добавляет поддержку https в apt. Чтобы добавить репозиторий, использующий https, сначала устанавливается этот пакет.
Разве я не говорил, что это больше не нужно? Да, потому что более новые версии apt (выше 1.5) поддерживают https, и поэтому вам больше не нужно устанавливать apt-transport-https.
И все же вы видите этот пакет, упомянутый в инструкции. Это больше по причинам устаревания или для действительно старых версий дистрибутива, которые могут использовать более старую версию apt.
Теперь вы можете задаться вопросом, почему репозитории Ubuntu используют http, а не https, когда https является безопасным протоколом. Разве это не угроза безопасности? Следующий сегмент ответит на этот вопрос.
Часть 2: Добавление ключа GPG удаленного репозитория
Репозитории Linux имеют встроенный механизм безопасности на основе ключа GPG. Каждый репозиторий добавил свой открытый ключ GPG к доверенным ключам вашей системы. Пакеты из репозиториев «подписываются» этим ключом GPG, и благодаря сохраненному общедоступному ключу ваша система проверяет, что пакет поступает из репозитория.
Если есть несоответствие между ключами, ваша система выдаст ошибку вместо установки или обновления пакетов из указанного репозитория.
Все идет нормально. Следующим шагом является добавление открытого ключа GPG внешнего репозитория в вашу систему Linux, чтобы он доверял пакету из этого репозитория.
В приведенной выше команде вы загружаете ключ GPG с заданного URL-адреса с помощью curl. Опция sS гарантирует, что вы не увидите переполненный вывод (беззвучный режим), но покажет ошибку (если есть). Последний — сообщает apt-key использовать стандартный ввод вместо файла (в данном случае это результат выполнения команды curl).
Ключ загрузки добавляется в систему с помощью apt-key add команда.
Вы можете увидеть ключи GPG, добавленные различными репозиториями в вашей системе, используя apt-key list команда.

Список ключей GPG
Это один из способов добавления ключа GPG в систему. Вы увидите некоторые другие команды, которые могут выглядеть немного иначе, но выполняют ту же работу по добавлению открытого ключа репозитория в вашу систему.
Вы заметите предупреждение о том, что apt-key устарел. Вы все еще можете использовать команду apt-key до Ubuntu 22.04, но в конечном итоге она будет удалена. Давайте пока не будем об этом беспокоиться.
Часть 3: Добавление внешнего репозитория в список источников
Следующая команда добавляет новую запись в список источников вашей системы. Таким образом, ваша система будет знать, что она должна проверять этот репозиторий на наличие пакетов и обновлений.
Существует файл /etc/apt/sources.list, содержащий подробную информацию о репозиториях Ubuntu. Этот файл трогать нельзя. Все дополнительные репозитории должны быть размещены в их собственном соответствующем файле (заканчивающемся соглашением .list) в каталоге /etc/apt/sources.list.d.

Внешний репозиторий должен иметь собственный файл списка источников в каталоге /etc/apt/sources.list.d
Это упрощает управление пакетами. Если вы удаляете репозиторий из системы, вам просто нужно удалить соответствующий файл источников. Не нужно связываться с основным файлом sources.list.
Рассмотрим команду более подробно.
С sh вы просите запустить команду в новой оболочке вместо подоболочка. -c option указывает команде sh читать команды из операнда вместо стандартного ввода. Затем он запускает команду echo, которая в основном добавляет строку deb https://dl.yarnpkg.com/debian/ стабильный основной в файл /etc/apt/sources.list.d/yarn.list (файл будет создан)
Теперь существует множество способов создать файл .list в указанном каталоге и добавить в него строку с деталями репозитория. Вы также можете использовать это так:
Вы уловили суть, верно?
Часть 4: Установка приложения из недавно добавленного репозитория
Итак, вы добавили в систему ключ GPG репозитория и URL-адрес репозитория.
Но ваша система все еще не знает о пакете, доступном в этом новом репозитории. Вот почему вам нужно сначала обновить локальный кеш метаданных пакета с помощью этой команды:
В вашей системе будет информация о пакетах, доступных из недавно добавленного репозитория, и вы можете установить пакет сейчас:
Компания && гарантирует, что вторая команда будет запущена только тогда, когда предыдущая команда завершится без ошибок.
На этом процесс завершается.
Это прояснило или запутало вас еще больше?
Я объяснил логику шагов по использованию внешних репозиториев в Ubuntu. Я надеюсь, что теперь вы лучше понимаете эту тему, но также возможно, что слишком большое количество деталей может сбивать с толку.
Если что-то по-прежнему неясно или у вас есть дополнительные вопросы, дайте мне знать. Если вы заметили технические неточности, сообщите мне об этом в разделе комментариев.
Installing Packages From External Repositories in Ubuntu [Explained]
You have some ideas about installing packages in Ubuntu with apt command. Those packages come from Ubuntu’s repositories.
How about third-party or external repository? No, I am not talking about PPA here.
Sooner or later, you’ll come across installation instructions that goes in at least four lines. You install something called ‘apt-transport-https’ and then do something with gpg and sources list. After that, you install the package.
Can’t recall completely. Let me share an example for installing the latest version Yarn on Ubuntu:
You’ll often come across such installation method while installing programming tools directly from the developers.
Many people just follow the instructions without thinking twice about what’s going on here. Nothing wrong with that but knowing the process actually improves your knowledge on the matter and could also help in troubleshooting.
Let me explain the logic behind those lines.
Understanding the procedure of installation from external repositories
Before you proceed, I highly recommend reading these two articles so that things are a bit more clear to you:
To recall quickly, here’s a visual representation of repositories and package manager in Linux.

Illustration of repository and package manager
The entire idea here is that you add a new, external repository to your system. This way, you’ll be able to download and install packages available from this new repository. If the repository provides an update on the package version, you get to update the installed package along with the system updates (apt update && apt upgrade).
So, how does this work? Let’s go through the lines one by one.
Part 1: Getting HTTPS support for apt
The first line is this:
Curl is a tool for downloading files in Linux terminal. The main part here is the installation of apt-transport-https and frankly speaking not needed anymore.
Confused? This apt-transport-https package allows your system to access repositories over the secure HTTPS protocol. By design, Ubuntu repositories use http, not https.
Take a look at the screenshot below. The https ones are the external repositories I have added into my system. Ubuntu repositories and PPA use http.

In the older version of apt package manager, https support was not included. apt-transport-https package adds https support to apt. To add a repository that uses https, this package is installed first.
Did I not say it is not needed anymore? Yes because the newer versions of apt (higher than 1.5) support https and thus you do not need to install apt-transport-https anymore.
And yet you see this package mentioned in the instructions. This is more for legacy reasons or for really old distribution versions that might be using an older version of apt.
Now, you may wonder why Ubuntu repositories use http, not https when https is the secure protocol. Is it not a security risk? The next segment will answer that question.
Part 2: Adding GPG key of the remote repository
Linux repositories have this built-in GPG-key based security mechanism. Every repository added its public GPG key to your system’s trusted keys. The packages from the repositories are ‘signed’ by this GPG key and thanks to the stored public key, your system verifies that the package is coming from the repository.
If there is a mismatch between the keys, your system will throw an error instead of installing or updating packages from the said repository.
So far, so good. The next step is to add the public GPG key of the external repository to your Linux system so that it trusts the package from this repository.
In the above command, you download the GPG key from the given URL using curl. The option sS ensures that you don’t see the flooded output (silent mode) but shows the error (if any). The last — tells apt-key to take stdin instead of a file (which is the output of the curl command in this case).
The download key is added to the system with apt-key add command.
You can see the GPG keys added by various repositories in your system using the apt-key list command.
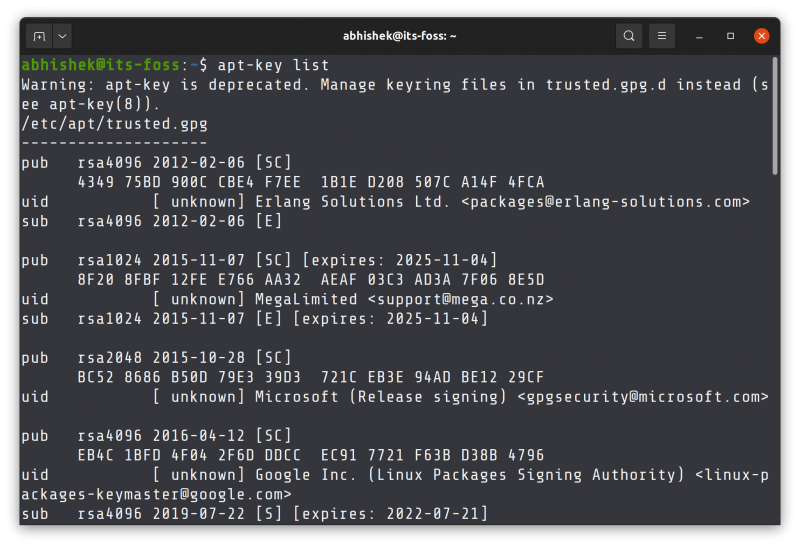
List GPG keys
That’s one way of adding the GPG key to the system. You’ll see some other commands that may look slightly different but do the same job of adding the public key of the repository to your system.
You’ll notice a warning that apt-key is deprecated. You could still use apt-key command till Ubuntu 22.04 but it will eventually be removed. Let’s not worry about it at the moment.
Part 3: Adding the external repository to your sources list
The next command adds a new entry into the sources list of your system. This way, your system will know that it has to check this repository for packages and updates.
There is a file /etc/apt/sources.list that contains the details of the Ubuntu repositories. This file should not be touched. All the additional repositories should be placed in their own respective file (ending with .list convention) in the /etc/apt/sources.list.d directory.
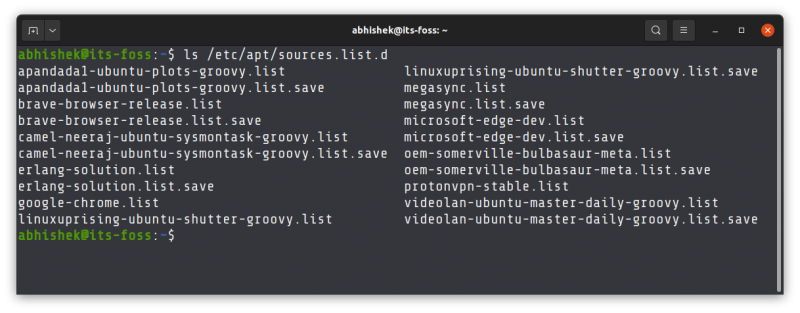
External repository should have their own sources list file in the /etc/apt/sources.list.d directory
This makes package management easier. If you are removing a repository from the system, you just need to delete the corresponding sources file. No need to mess with the main sources.list file.
Let’s look at the command in a bit more detail.
With sh, you are asking to run the command in a new shell, instead of the subshell. -c option tells the sh command to read the commands from the operand instead of standard input. Then it runs the echo command which basically adds line deb https://dl.yarnpkg.com/debian/ stable main to /etc/apt/sources.list.d/yarn.list file (file will be created)
Now, there could be numerous ways you can create a .list file in the specified directory and add the line with repository details in it. You could use it like this as well:
You get the gist, right?
Part 4: Installing the application from newly added repository
So far, you have added the GPG key of the repository and the URL of the repository to the system.
But your system still does not know about the package available from this new repository. This is why you need to update the local cache of package metadata first with this command:
Your system will have the information about the packages available from the newly added repository and you can install the package now:
The && ensures that the second command only runs when the previous command completed without any error.
And thus the process completes.
Did it make things clear or confused you even more?
I explained the logic behind the steps for using external repositories in Ubuntu. I hope you have a better understanding of the topic now, but it is also possible that too much detail could be confusing.
If things are still not clear or if you have additional questions, please let me know. If you notice technical inaccuracies, please let me know in the comment section.
A Tale of Two (APT) Transports
Securing access to your APT repositories is critical. At Cloudflare, like in most organizations, we used a legacy VPN to lock down who could reach our internal software repositories. However, a network perimeter model lacks a number of features that we consider critical to a team’s security.
As a company, we’ve been moving our internal infrastructure to our own zero-trust platform, Cloudflare Access. Access added SaaS-like convenience to the on-premise tools we managed. We started with web applications and then moved resources we need to reach over SSH behind the Access gateway, for example Git or user-SSH access. However, we still needed to handle how services communicate with our internal APT repository.
We recently open sourced a new APT transport which allows customers to protect their private APT repositories using Cloudflare Access. In this post, we’ll outline the history of APT tooling, APT transports and introduce our new APT transport for Cloudflare Access.
A brief history of APT
Advanced Package Tool, or APT, simplifies the installation and removal of software on Debian and related Linux distributions. Originally released in 1998, APT was to Debian what the App Store was to modern smartphones — a decade ahead of its time!
APT sits atop the lower-level dpkg tool, which is used to install, query, and remove .deb packages — the primary software packaging format in Debian and related Linux distributions such as Ubuntu. With dpkg, packaging and managing software installed on your system became easier — but it didn’t solve for problems around distribution of packages, such as via the Internet or local media; at the time of inception, it was commonplace to install packages from a CD-ROM.
APT introduced the concept of repositories — a mechanism for storing and indexing a collection of .deb packages. APT supports connecting to multiple repositories for finding packages and automatically resolving package dependencies. The way APT connects to said repositories is via a “transport” — a mechanism for communicating between the APT client and its repository source (more on this later).
APT over the Internet
Prior to version 1.5, APT did not include support for HTTPS — if you wanted to install a package over the Internet, your connection was not encrypted. This reduces privacy — an attacker snooping traffic could determine specific package version your system is installing. It also exposes you to on-path attacker attacks where an attacker could, for example, exploit a remote code execution vulnerability. Just 6 months ago, we saw an example of the latter with CVE-2019-3462.
Enter the APT HTTPS transport — an optional transport you can install to add support for connecting to repositories over HTTPS. Once installed, users need to configure their APT sources.list with repositories using HTTPS.
The challenge here, of course, is that the most common way to install this transport is via APT and HTTP — a classic bootstrapping problem! An alternative here is to download the .deb package via curl and install it via dpkg. You’ll find the links to apt-transport-https binaries for Stretch here — once you have the URL path for your system architecture, you can download it from the deb.debian.org mirror-redirector over HTTPS, e.g. for amd64 (a.k.a. x86_64):
To confirm which APT transports are installed on your system, you can list each “method binary” that is installed:
With apt-transport-https installed you should now see ‘https’ in that list.
The state of APT & HTTPS on Debian
You may be wondering how relevant this APT HTTPS transport is today. Given the prevalence of HTTPS on the web today, I was surprised when I found out exactly how relevant it is.
Up until a couple of weeks ago, Debian Stretch (9.x) was the current stable release; 9.0 was first released in June 2017 — and the latest version (9.9) includes apt 1.4.9 by default — meaning that securing your APT communication for Debian Stretch requires installing the optional apt-transport-https package.
Thankfully, on July 6 of this year, Debian released the latest version — Buster — which currently includes apt 1.8.2 with HTTPS support built-in by default, negating the need for installing the apt-transport-https package — and removing the bootstrapping challenge of installing HTTPS support via HTTPS!
BYO HTTPS APT Repository
A powerful feature of APT is the ability to run your own repository. You can mirror a public repository to improve performance or protect against an outage. And if you’re producing your own software packages, you can run your own repository to simplify distribution and installation of your software for your users.
If you have your own APT repository and you’re looking to secure it with HTTPS we’ve offered free Universal SSL since 2014 and last year introduced a way to require it site-wide automatically with one click. You’ll get the benefits of DDoS attack protection, a Global CDN with Caching, and Analytics.
But what if you’re looking for more than just HTTPS for your APT repository? For companies operating private APT repositories, authentication of your APT repository may be a challenge. This is where our new, custom APT transport comes in.
Building custom transports
The system design of APT is powerful in that it supports extensibility via Transport executables, but how does this mechanism work?
When APT attempts to connect to a repository, it finds the executable which matches the “scheme” from the repository URL (e.g. “https://” prefix on a repository results in the “https” executable being called).
APT then uses the common Linux standard streams: stdin, stdout, and stderr. It communicates via stdin/stdout using a set of plain-text Messages, which follow IETF RFC #822 (the same format that .deb “Package” files use).
Examples of input message include “600 URI Acquire”, and examples of output messages include “200 URI Start” and “201 URI Done”:
![]()
If you’re interested in building your own transport, check out the APT method interface spec for more implementation details.
APT meets Access
Cloudflare prioritizes dogfooding our own products early and often. The Access product has given our internal DevTools team a chance to work closely with the product team as we build features that help solve use cases across our organization. We’ve deployed new features internally, gathered feedback, improved them, and then released them to our customers. For example, we’ve been able to iterate on tools for Access like the Atlassian SSO plugin and the SSH feature, as collaborative efforts between DevTools and the Access team.
Our DevTools team wanted to take the same dogfooding approach to protect our internal APT repository with Access. We knew this would require a custom APT transport to support generating the required tokens and passing the correct headers in HTTPS requests to our internal APT repository server. We decided to build and test our own transport that both generated the necessary tokens and passed the correct headers to allow us to place our repository behind Access.
After months of internal use, we’re excited to announce that we have recently open-sourced our custom APT transport, so our customers can also secure their APT repositories by enabling authentication via Cloudflare Access.
By protecting your APT repository with Cloudflare Access, you can support authenticating users via Single-Sign On (SSO) providers, defining comprehensive access-control policies, and monitoring access and change logs.
Our APT transport leverages another Open Source tool we provide, cloudflared, which enables users to connect to your Cloudflare-protected domain securely.
Securing your APT Repository
To use our APT transport, you’ll need an APT repository that’s protected by Cloudflare Access. Our instructions (below) for using our transport will use apt.example.com as a hostname.
To use our APT transport with your own web-based APT repository, refer to our Setting Up Access guide.
APT Transport Installation
To install from source, both tools require Go — once you install Go, you can install `cloudflared` and our APT transport with four commands:
The above commands should place the cloudflared executable in /usr/local/bin (which should be on your PATH), and the APT transport binary in the required /usr/lib/apt/methods directory.
To confirm cloudflared is on your path, run:
The above command should return /usr/local/bin/cloudflared
Now that the custom transport is installed, to start using it simply configure an APT source with the cfd:// rather than https:// e.g:
Next time you do `apt-get update` and `apt-get install`, a browser window will open asking you to log-in over Cloudflare Access, and your package will be retrieved using the token returned by `cloudflared`.
Fetching a GPG Key over Access
Usually, private APT repositories will use SecureApt and have their own GPG public key that users must install to verify the integrity of data retrieved from that repository.
Users can also leverage cloudflared for securely downloading and installing those keys, e.g:
The first command will open your web browser allowing you to authenticate for your domain. The second command wraps curl to download the GPG key, and hands it off to `apt-key add`.
Cloudflare Access on «headless» servers
If you’re looking to deploy APT repositories protected by Cloudflare Access to non-user-facing machines (a.k.a. “headless” servers), opening a browser does not work. The good news is since February, Cloudflare Access supports service tokens — and we’ve built support for them into our APT transport from day one.
If you’d like to use service tokens with our APT transport, it’s as simple as placing the token in a file in the correct path; because the machine already has a token, there is also no dependency on `cloudflared` for authentication. You can find details on how to set-up a service token in the APT transport README.
What’s next?
As demonstrated, you can get started using our APT transport today — we’d love to hear your feedback on this!
This work came out of an internal dogfooding effort, and we’re currently experimenting with additional packaging formats and tooling. If you’re interested in seeing support for another format or tool, please reach out.
Visit 1.1.1.1 from any device to get started with our free app that makes your Internet faster and safer.
To learn more about our mission to help build a better Internet, start here. If you’re looking for a new career direction, check out our open positions.
How to use https with apt-get?
Does apt-get use https or any kind of encryption? Is there a way to configure it to use it?
![]()
5 Answers 5
apt-get (and other package manipulation commands, which are a front-end to the same APT libraries) can use HTTP, HTTPS and FTP (and mounted filesystems). If you specify https:// URLs in /etc/apt/sources.list and /etc/apt/sources.list.d/* , then APT will use HTTPS.
APT verifies the signature of packages. So you do not need to have a form of transportation that provides data authentication. If an attacker modifies the files you’re downloading, this will be noticed. Using a signature verification is better than using an HTTPS connection, because it’ll detect an attack on the server you’re downloading from, not just an attack in transit.
More precisely, the (simplified) data flow for a package is the following:
- The package is produced on a build machine.
- The package is signed on the build machine.
- The signed package is copied to a download mirror.
- You download the package.
HTTPS ensures that step 4 happens correctly. The package signatures ensure that steps 2 to 4 happen correctly.
In fact, there is one small benefit to HTTPS for step 4: the package signatures only ensure that the package is authentic. An attacker in step 4 could impersonate a legitimate server and serve stale versions of the package. For example, the attacker could prevent you from downloading any security updates, in the hope of exploiting a vulnerability on your machine that you would have patched if it wasn’t for the attack. This isn’t a very realistic scenario, because it requires an active attacker (so that would have to be someone in control of your Internet connection), but it could happen in principle.
The other benefit to HTTPS would be if you’re trying to hide the fact that you’re downloading Ubuntu packages from someone snooping on your network connection. Even then, the eavesdropper could see what host you’re connecting to; if you connect to an Ubuntu mirror and download hundreds of megabytes, it’s clear that you’re downloading Ubuntu packages. The eavesdropper could also mostly figure out which packages you’re downloading from the size of the files. So HTTPS would only be useful if you’re downloading from a server that also offers other files of similar size — I don’t see any point except for third-party packages, and only in very unusual circumstances.
To reiterate: the usual benefit of HTTPS, which is that you know you’re connected to the real server, is useless when you’re downloading Ubuntu packages. The signature verification on packages gives a stronger guarantee than what HTTPS can provide.